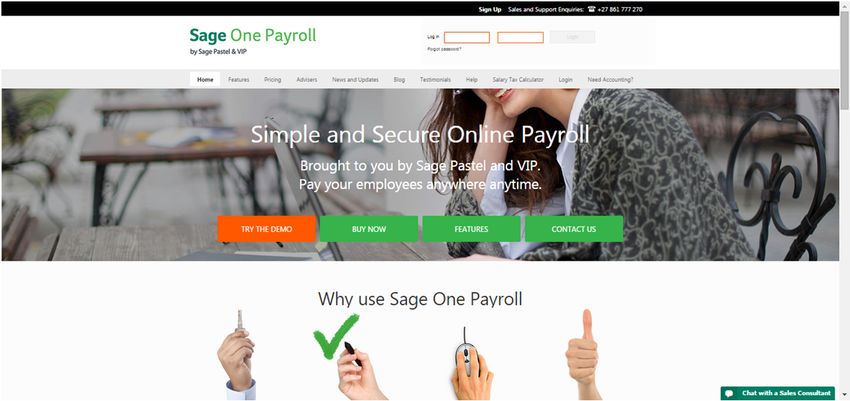
Sage One Payroll
   Getting Started Guide
←
→
Page content transcription
If your browser does not render page correctly, please read the page content below

Sage One Payroll Getting Started Guide
Sage One Getting Started Guide
Getting Started
Guide
Sage One Payroll
October 2015

    Follow us on Twitter: twitter.com/sageoneza

    Join us on Facebook: facebook.com/sagegroupza

    View us on YouTube: youtube.com/user/sageoneza

    Read our Blog: sageone.co.za/blog/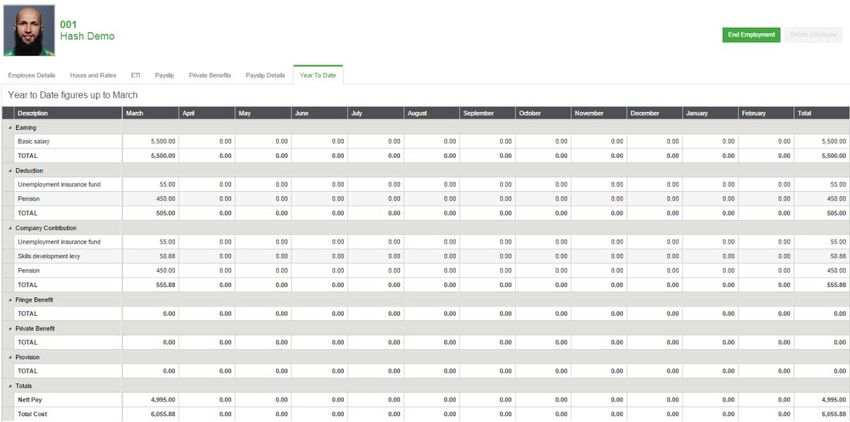
Copyright Notice
© Copyright 2015 by Sage South Africa under the Copyright Law of the Republic of South Africa.
No part of this publication may be reproduced, transmitted, transcribed, stored in a retrieval system, or translated into a human or computer
language, in any form or by any means, electronic, mechanical, magnetic, optical, chemical, manual or otherwise without the express
permission in writing of Sage.

Disclaimer
Sage South Africa makes no representation or warranties with respect to the contents hereof. Further, Sage South Africa reserves the right to
revise this publication and to make changes in the content hereof, from time to time, without obligation to notify any person or organisation of
such revision or change.
The sole purpose of this help file is to provide the registered users of the software with adequate information on how to operate this system.
The use of this information for any other use is prohibited.

Published by:
Sage South Africa
PO Box 38017
Garsfontein East
Pretoria
0060

Trademarks Notice and Copyrights
© Sage South Africa (Pty) Ltd 2015.
We hereby acknowledge the copyrights and trademarks of all terms we use in this manual and its accompanying electronic documentation.
This includes, but is not restricted to, the following names and terms.
The following are the property of the Microsoft Corporation and / or its subsidiaries:
Microsoft SQL Server
MSDE
Windows 95, Windows 98
Windows NT
Windows 2000
Windows XP
Windows Vista
Windows 7
Windows 8
Windows 10

The following are the property of Adobe Corporation:
Adobe Acrobat
PDF

Acknowledgements
Content Developer and Editor: Lorna Bam
Layout, Design and Graphics: Lorna Bam and Gerhard van der Berg
Proof Reader and Quality Controller: Maryna du Toit

© Sage South Africa (Pty) Ltd 2002 - 2015                                                                         Page 2 of 76
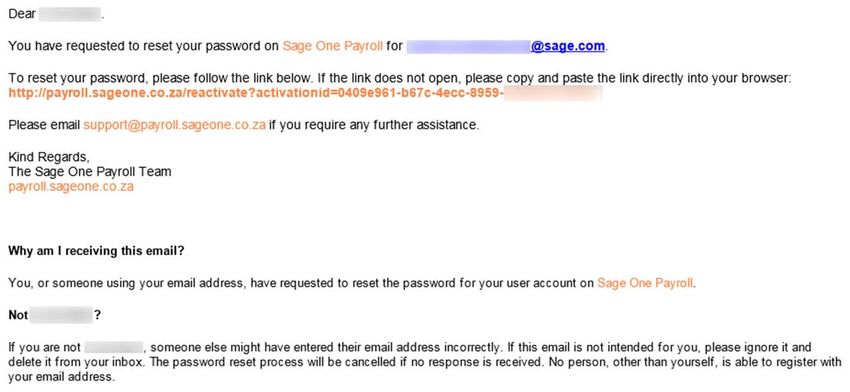
Table of Contents
Introduction .............................................................................................................................................................................. 5

Terminology ............................................................................................................................................................................. 6

The Hosting Site ...................................................................................................................................................................... 7

Getting Started......................................................................................................................................................................... 8
Steps to sign up as a user on Sage One Payroll ..................................................................................................................................... 8

Admin Tasks .......................................................................................................................................................................... 16
My Profile ................................................................................................................................................................................................................ 16
Change Password ............................................................................................................................................................................................... 17
Reset Your Password ........................................................................................................................................................................................ 17
Unlock your account ........................................................................................................................................................................................... 19

Add a Company ..................................................................................................................................................................... 20
How to Switch between Companies or Reach the “My Dashboard” View.................................................................................. 22

Add an Employee .................................................................................................................................................................. 23
Deleting an employee ....................................................................................................................................................................................... 24
Ending employment ........................................................................................................................................................................................... 24

Client Information ................................................................................................................................................................. 25
Account details..................................................................................................................................................................................................... 26
Invoice details ....................................................................................................................................................................................................... 26
Support .................................................................................................................................................................................................................... 27

Company ................................................................................................................................................................................. 29
Company Details ................................................................................................................................................................................................. 29
Manage pay periods .......................................................................................................................................................................................... 32
Cycle Details ......................................................................................................................................................................................................... 32
Dates & Periods................................................................................................................................................................................................... 33
Setup benefit funds ............................................................................................................................................................................................ 34

© Sage South Africa (Pty) Ltd 2002 - 2015                                                                                                                                     Page 3 of 76
Payroll ...................................................................................................................................................................................................................... 38
Hours and rates ................................................................................................................................................................................................... 38
Employment Tax Incentive ............................................................................................................................................................................. 40
Payslip ...................................................................................................................................................................................................................... 41
Private Benefits.................................................................................................................................................................................................... 43
Payslip Details...................................................................................................................................................................................................... 45
Month To Date ..................................................................................................................................................................................................... 45
Year To Date ........................................................................................................................................................................................................ 46
ACB .......................................................................................................................................................................................................................... 46
Roll Over and Roll Back ................................................................................................................................................................................... 49

Reports and Exports .............................................................................................................................................................51

UIF Declaration ...................................................................................................................................................................... 58
UIF Submission ................................................................................................................................................................................................... 58

Manage Additional Users .................................................................................................................................................... 60

Processing the Payroll from A - Z..................................................................................................................................... 60
Introduction ............................................................................................................................................................................................................ 60
Input Documents .................................................................................................................................................................................................. 61
Adding New Employees ................................................................................................................................................................................... 62
Explain Company Policy .................................................................................................................................................................................. 63
Changes to Employees Particulars ............................................................................................................................................................. 63
Changes that affect the Tax Calculation ................................................................................................................................................... 63
Changes to transactions which could affect employees .................................................................................................................... 65
Terminations ......................................................................................................................................................................................................... 66
Reconciling income and deductions ........................................................................................................................................................... 68
Balancing earnings and deductions to input documents.................................................................................................................... 68
Reconciling this period’s earnings and deductions to those of the previous period ............................................................... 69
Producing Payslips.............................................................................................................................................................................................. 71
Producing Reports............................................................................................................................................................................................... 71

How to Videos ........................................................................................................................................................................ 76

© Sage South Africa (Pty) Ltd 2002 - 2015                                                                                                                                       Page 4 of 76
Introduction Sage One Payroll is an online payroll solution. Sage One Payroll is a SAAS product. SAAS is the abbreviation for Software as a Service and is sometimes referred to as "on-demand software". It is a software delivery model in which the software and the user’s data are hosted online, and the user uses a web browser to access the software and their data over the Internet. Sage One Payroll aims to provide a cost effective and easy-to-use payroll for the SME market. There is no cap on the number of companies or employees that can be loaded. The payroll functionality that the user requires determines whether Sage One Payroll is the payroll solution for them. Sage One Payroll currently caters for: Monthly, weekly and biweekly payrolls multiple companies and unlimited employees. To ensure that the system remains user friendly, easy to use and easy to support the customizability has been limited. Earnings and deductions and basic calculations (such as overtime) have been pre-defined. © Sage South Africa (Pty) Ltd 2002 - 2015 Page 5 of 76
Terminology

  Terms                        Information

  Hosting Site                 The website from where the user accesses Sage One Payroll is called the
                               hosting site.

  Client                       The person who opens an account with Sage One and is liable for paying the
                               account.

  User                         The person who logs in and processes on Sage One Payroll.

  User Interface (UI)          The UI is everything that is designed into an information device with which a
                               user can interact. This will include the display screen and the software’s
                               appearance on the user’s desktop as well as how a Web site invites interaction
                               and how the user responds to it.

  Company                      This is the PAYE entity or employer.

  Pay Cycle                    The pay frequency cycle.

  Pay Period                   Pay periods fall within a pay cycle. There are thus 12 pay periods (months) in a
                               monthly pay cycle, 26/27 pay periods in a fortnightly pay cycle and 52/53 pay
                               periods in a weekly pay cycle.

  Definition                   These are all your earnings, deductions, company contributions and fringe
                               benefits. Definitions are pre-defined in Sage One Payroll and editing has been
                               limited (e.g. descriptions and multipliers). Templates are used to select which
                               definitions are used in each company.

  Transaction                  We refer to the input that is done on all definitions as transactions. Sage One
                               Payroll allows for multiple transactions on each definition.

  Views                        The different screens in Sage One Payroll is referred to as “views”. We thus refer
                               to, for example, the Company Detail view, the Payslip view, etc.

  Minimised view               The blue blocks displaying to the right of the screen while another view is
                               maximised.

  Tiles                        Each employee is displayed in a tile on the employee list.

  Expander                     Views are divided into different sections, indicated by blue headers and
                               triangles to the left. These sections can be expanded and collapsed but the
                               user.

  Switch                       The action to move between companies or tax years.

© Sage South Africa (Pty) Ltd 2002 - 2015                                                         Page 6 of 76
The Hosting Site
Information can be found on the following pages on the hosting site:
Product Info
o Contains general information about Sage One Payroll and Sage One’s other products and services.
FAQ
o This page contains basic questions about Sage One Payroll, as well as information regarding Tax,
SDL and UIF. This page also has links to registration forms and websites with more information on
each topic.
Contact Us and Support
o These pages contain all the phone numbers and contact details for Sage One
Login
o This is the page where all existing users log into Sage One Payroll. Users can bookmark this page.
o This page also contains details of what was released in each software update.
© Sage South Africa (Pty) Ltd 2002 - 2015 Page 7 of 76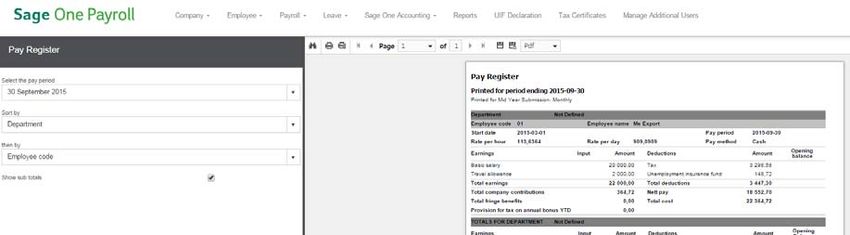
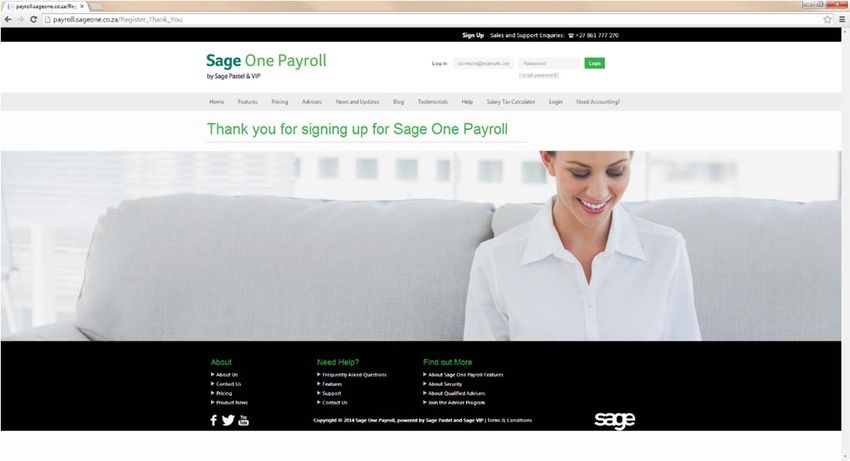
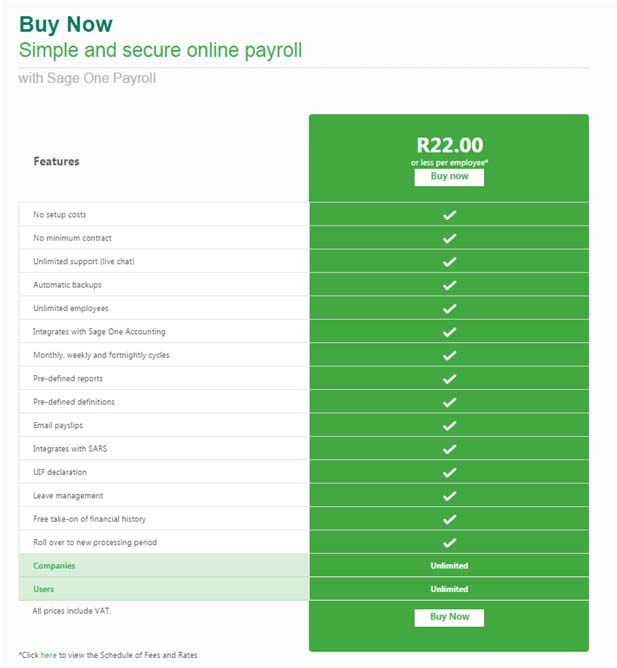
Getting Started Steps to sign up as a user on Sage One Payroll Go to the Sage One Payroll website: http://payroll.sageone.co.za/ The following screen is displayed: Select BUY NOW. © Sage South Africa (Pty) Ltd 2002 - 2015 Page 8 of 76

The following screen is displayed: Select Buy Now. The following screen is displayed: © Sage South Africa (Pty) Ltd 2002 - 2015 Page 9 of 76
Complete the details on the Sign Up page. This is the information that will be used as the user’s login
details.
o Your name and surname – This is the client name and surname.
o Email address – This is the email address the user will use to log into Sage One Payroll. This email
Address is also used for all correspondence from Sage One Payroll such as activation and reset
password emails. It is thus important that an active email address is used.
o Password – The password must be at least 8 characters long and contain at least one capital letter,
one small letter and one number.
o Confirm password – The user must retype the password to ensure that the correct password was
entered.
o How did you hear about us? – You can indicate where you heard about Sage One Payroll.
The options to select from are:
Got an email about Sage One
Got my info from the Sage One website
I saw an ad/billboard of Sage One
I used another Sage product before
I was referred by my auditor/accountant
I was referred by someone
o Voucher number – You can enter your voucher number if you have one.
o Terms and Conditions – You can click on Terms and Conditions to read it before flagging the
checkbox to be able to continue.
After the details have been entered select Next.
© Sage South Africa (Pty) Ltd 2002 - 2015 Page 10 of 76 The following screen is displayed:
Complete the details on the Sign Up page. This is the information that will be used to generate the
usage invoice from Sage One Payroll at the end of each month.
After the details have been entered select Next.
© Sage South Africa (Pty) Ltd 2002 - 2015 Page 11 of 76 The following screen is displayed:
o The invoice will be issued to a – One of the following options must be selected:
Company/CC,
Partnership,
Person
© Sage South Africa (Pty) Ltd 2002 - 2015 Page 12 of 76 If the Company/CC is selected, then the following information must be supplied:
o Registered name of company
o Registration number
© Sage South Africa (Pty) Ltd 2002 - 2015 Page 13 of 76 If the Partnership or Person is selected, then the person’s name and ID number must be
completed:
o I am Registered or Not Registered for VAT
Select the applicable option from the combo box. If you are registered for VAT then
you must supply your VAT number.
o An order number can be supplied, if you make use of order numbers.
Important Information
Please note that the contact details can default from the original detail already completed or
alternatively you can add another person for invoice queries.
If you have an existing demo account and loaded your own companies on the demo
software, you will be able to select to make the companies live.
Select the checkbox next to the companies that you want to keep. Select Finish to
complete the sign up process.
© Sage South Africa (Pty) Ltd 2002 - 2015 Page 14 of 76 The following screen is displayed:
Important Information
Please note that an activation email will be sent to you with a link on it. When you click on this link,
you will be prompted to enter your email address and password.
The registration process is only complete once you have selected the activation link. You will
not be able to access Sage One Payroll before activating your account.
© Sage South Africa (Pty) Ltd 2002 - 2015 Page 15 of 76Admin Tasks Sage One Payroll allows you to perform certain tasks to manage your profile and accounts. My Profile From the top black navigation bar click on the dropdown arrow next to your email address and select My Profile. You will be able to edit your details from this view. Display Name – The name that will be displayed for this user. Email Address – The email address linked to this account. Clients I am linked to – The user’s information will be displayed here including the site code and the date that the account was registered on. © Sage South Africa (Pty) Ltd 2002 - 2015 Page 16 of 76
Change Password Click on the Change Password button. A screen will be displayed allowing you to type a new password. Make sure that your password is at least 8 characters long and contains at least 1 upper case letter, 1 lower case letter and a number. You cannot make your password your email address or any portion thereof. Reset Your Password If you forgot your password, you can reset it. Go to the Sage One Payroll website: www.payroll.sageone.co.za Click on Login. Click on Forgot password? to reset the password. Enter the email address for which the password must be reset. © Sage South Africa (Pty) Ltd 2002 - 2015 Page 17 of 76
The following confirmation screen displays:

In order to setup the new password, the user must click on the link in the email sent by Sage One
Payroll.

© Sage South Africa (Pty) Ltd 2002 - 2015                                               Page 18 of 76
You will now be prompted to enter the new password. Click on Submit.

You may now log in with your new password.

Unlock your account

You have 5 attempts to log into Sage One Payroll. After 5 unsuccessful login attempts, you will be
locked out of Sage One Payroll. A red error message will indicate how many attempts you have
remaining.

Once locked out, the following message will be displayed to the user.

The user can request their account to be unlocked. If you click on Click here to request your account
be unlocked an email will open where you can request support to unlock their account. The account is
automatically unlocked after 24 hours.

© Sage South Africa (Pty) Ltd 2002 - 2015                                               Page 19 of 76
Add a Company
After successfully signing up and activating an account, you will be prompted to add a company when
you first log into Sage One Payroll.
On the main navigation bar select Company and then click on Add new company or you
can select the Add Company button. The following screen is displayed:
or
After selecting the option the following screen is displayed:
Enter the registered Company Name and also enter a Company Number
(0001 – 9999).
Important Information
Please note that if you do not select a unique company number, the next available number will be
displayed for you.
© Sage South Africa (Pty) Ltd 2002 - 2015 Page 20 of 76 Select Next. The following screen is displayed:
Add a cycle name (for example, Monthly Salaries), choose a cycle frequency and add the date
that the financial year will begin on.
Important Information
Please note that the company tax year start date is automatically set according to the date selected
here. If the wrong date was selected and the process was finalised, the date cannot be changed. A
new company should be added and the company with the wrong date should be changed to
“HISTORY”. To change to history, change the company name on the Company details view.
Select Finish once all the information has been entered. The following screen is displayed:
Enter the company’s details as requested on the screen.
Once all the information has been entered, select Save.
© Sage South Africa (Pty) Ltd 2002 - 2015 Page 21 of 76How to Switch between Companies or Reach the “My Dashboard” View
Follow these steps:
From the Company Details view, click on the green Change Company or Cycle button inside the
black bar at the top:
The following screen is displayed:
Click on the company and the cycle you wish to switch to.
© Sage South Africa (Pty) Ltd 2002 - 2015 Page 22 of 76Add an Employee
Click on Employee in the main navigation bar and select Add new employee.
In order to add an employee, Sage One Payroll initially only requires 4 fields:
Surname,
Date of Birth,
Date Engaged and
Tax Status.
Additional Information
Please note that in order to generate tax certificates, Sage One Payroll will require all mandatory
fields as required by SARS. The following are mandatory fields required before you will be able to
generate a tax certificate:
© Sage South Africa (Pty) Ltd 2002 - 2015 Page 23 of 76Deleting an employee An employee can only be deleted in the first period that you load the employee, by going to the employee’s details and clicking on Delete Employee. Ending employment Ending employment can be done by clicking on the End Employment button. This button is available when you click on Employee in the main navigation bar and select Employee details or by accessing the Hours and rates, Employment tax incentive, Payslip, Private benefits, Payslip details or Year to date values from the Payroll selection in the main navigation bar. You will also be able to access it from the Leave option on the main navigation bar by selecting Employee leave details or Employee leave transactions. © Sage South Africa (Pty) Ltd 2002 - 2015 Page 24 of 76
Client Information
From the main navigation bar click on the dropdown arrow next to your user name and select
Manage Accounts.
The following screen will is displayed:
Client Information has 3 tabs:
Account details
Invoice details
Support
© Sage South Africa (Pty) Ltd 2002 - 2015 Page 25 of 76Account details Account details contain the details of the person/entity that will be invoiced, the address and contact details. Most of the account details are completed by you during the sign up process. This information can be changed at any time. Invoice details Invoice Details holds all the invoices and the bank details. The unpaid invoices are grouped together, so that you can see which invoices are outstanding. Invoices are always generated on the last day of the month. You are then billed for all usage during the month. © Sage South Africa (Pty) Ltd 2002 - 2015 Page 26 of 76
Support

You now have the option to give support consultants support access to assist with a query or to do an
off-site consultation. This means, the consultant can log into your account without having to ask for
your login details.

By clicking on Grant access the following screen is displayed:

Once you click on the Grant access button, the Support desk will have access to your information for
24 hours or until you decide to stop the access. Once you click on Grant Access you will see the date
and time when the 24h session starts. You will also get a reference number for this support session.

            Important Information

Please note that you must always log out of the system while the consultant is investigating. If both
you and the consultant try to make changes the system will give errors. ALL changes made to the
system will be discussed with you and confirmed that it is correct.

© Sage South Africa (Pty) Ltd 2002 - 2015                                              Page 27 of 76
To cancel the support session, you can click on Cancel Access as indicated below: By cancelling the session it will not automatically log out the consultant. The consultant should still click on Log out, but will then not be able to get back into the system as the access has been cancelled. n © Sage South Africa (Pty) Ltd 2002 - 2015 Page 28 of 76
Company
Company Details
From the main navigation bar select Company and then Company details.
There are 5 sections on the Company details view.
The Company section contains the following information:
Company Number
This is the company number entered when the company was added, and can be changed here. It
is any number between 1 and 9999.
Company Name
Enter the company’s registered name. This can be followed by the company’s trading name.
Company Registration Number
If this is a registered company or cc, enter the registration number here.
Tax Registration Number
If the employer is registered for PAYE, then enter the PAYE number, otherwise enter the
employer’s Income Tax Number.
© Sage South Africa (Pty) Ltd 2002 - 2015 Page 29 of 76 Trade Classification
Select the applicable trade classification for the employer.
SDL Payment Reference Number (SARS)
This is the SARS payment reference number for SDL and must only be completed if the employer
is paying over SDL to SARS.
UIF Payment Reference Number (SARS)
This is the SARS payment reference number for UIF and must only be completed if the employer
is paying over UIF to SARS.
UIF Registration Number (Debt of Labour)
This is the UIF registration number as issued by the Department of Labour.
Not eligible for Employment Tax Incentive
This dropdown menu allows you to select an option for not being eligible for ETI.
Standard Industry Classification
Enter the SIC code. This code can easily be found by searching for it on the internet.
Special Economic Zone
A Special Economic Zone is an economic development tool to promote national economic
growth and export by using support measures in order to attract targeted foreign and domestic
investments and technology.
The Physical Address section contains the following information:
Enter the employer’s physical address.
© Sage South Africa (Pty) Ltd 2002 - 2015 Page 30 of 76The Postal Address section contains the following information: Enter the employer’s postal address. If the postal address is the same as the physical address, flag the Default from physical address checkbox. The SARS Contact Person Detail section contains the following information: Contact person Email Address Contact Telephone Number The UIF Contact Person Detail section contains the following information: Contact person Email Address Contact Telephone Number If the UIF contact person details are the same as the SARS contact person details, flag the Default from physical address checkbox. © Sage South Africa (Pty) Ltd 2002 - 2015 Page 31 of 76
Manage pay periods From the main navigation bar select Company and then Manage pay periods. Manage pay periods has 2 tabs: Cycle Details Dates & Periods Cycle Details This view contains the current company’s information and cycle information. You can add new cycles here by clicking on the Add New Cycle button. © Sage South Africa (Pty) Ltd 2002 - 2015 Page 32 of 76
Close cycle
You can flag cycles that are no longer in use as closed. This will typically be used when a business or
business unit closes.
The closed status is mainly used to include the cycle when generating tax certificates - we don't
expect the cycle to have rolled a full tax year.
You are able to flag a cycle as closed if:
All the employees in the cycle has been terminated and
The user rolled out of the period in which the termination is effective.
If these conditions are not met, a report with the relevant information will display.
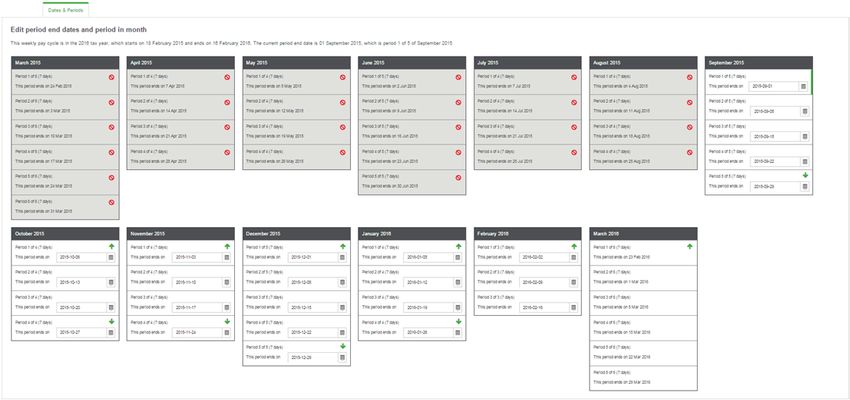
Dates & Periods
This view allows you to edit period end dates of weekly and biweekly companies and move periods to
other payroll months.
Roll Over and Roll Back
Each period that you roll forward is recorded here and marked when completed.
Rollover
You can select to roll over to the following period by clicking on this button. A backup is
automatically made as part of the roll over process.
© Sage South Africa (Pty) Ltd 2002 - 2015 Page 33 of 76 Roll back
You can select to do a roll back if you have to go back to a previous period. A roll back is
different to restoring a backup. When you restore a backup of a previous month all data is
restored to what it was at the time of the backup. When you roll back only your financial history
(or anything affecting financials, such as tax status, age, etc.) is restored to what it was in the
previous period. You are only allowed a maximum of two roll backs per company and you cannot
roll back over tax years or to periods that you did not roll over from.
Setup benefit funds
From the main navigation page click on Company and select Setup benefit funds.
From the Manage Benefit Funds view you will be able to add a pension, provident of medical aid fund.
© Sage South Africa (Pty) Ltd 2002 - 2015 Page 34 of 76Pension and Provident Funds
Adding a pension or provident fund requires that you click on the Add pension fund or Add provident
fund button.
Adding these funds will require the following information:
Fund Name
Give the fund you wish to add a name.
Clearance Number
If a clearance number is provided this can be added but this field is not mandatory.
Description
To describe this fund.
% Calculation or Fixed Amount
You must select whether the calculation setup is based on a % that must be calculated or will it
be a fixed amount.
Calculation based on
This field requires that you select the type of calculation from a dropdown menu.
© Sage South Africa (Pty) Ltd 2002 - 2015 Page 35 of 76o Fixed Pensionable Earnings Amount
This selection changes the Calculation will be based on field to an amount field, allowing
you to type in the amount that the calculation will be based on.
o Percentage Of Specific Earnings
This selection changes the Calculation will be based on field to % field, allowing you to
type in the value % that the calculation will be based on and adding a selection dropdown,
containing all the income transactions, to select which incomes the % will be based on.
o Specific Earnings
This selection is the default selection and changes the Calculation will be based on field
to a selection dropdown, containing all the income transactions, to select which incomes
the % will be based on.
© Sage South Africa (Pty) Ltd 2002 - 2015 Page 36 of 76o Employee Contribution
This field allows you to enter a value for the % the employee will contribute of the above
calculated/given amount.
o Employer Contribution
This field allows you to enter a value for the % the employer will contribute of the above
calculated/given amount.
Save once you have entered all the information needed.
Medical Aid Fund
Adding a medical aid fund requires that you click on the Add medical aid button.
Fund Name
Give the fund you wish to add a name.
Scheme Name
Provide the Scheme Name.
Important Information
Please note that adding a medical aid to the payslip of the employee will be done by adding the
transactions on the payslip itself.
© Sage South Africa (Pty) Ltd 2002 - 2015 Page 37 of 76Payroll The Payroll dropdown view is separated into 2 sections: The first section contains all the payslip details and information. The second section allows you to do a roll over and roll back as well as print or email payslips. Hours and rates When adding an employee you can add the employee’s monthly salary, rate per hour or rate per day on the payslip view when entering the basic salary or you can access the Hours and Rates view and complete the fields there. © Sage South Africa (Pty) Ltd 2002 - 2015 Page 38 of 76
Adding rates from the Hours and Rates view:

From the main navigation bar select Payroll and then Hours and rates.

If you want to enter the number of days or hours worked every period, and do not want Sage One
Payroll to default the employee’s salary after every roll over, flag the This employee must not be paid
unless hours or days worked are advised checkbox.

Adding rates from the Payslip’s View

From the main navigation bar select Payroll and then Payslip. (Click on the Payslip tab.)

© Sage South Africa (Pty) Ltd 2002 - 2015                                                 Page 39 of 76
The basic salary line will always default on the payslip screen of monthly cycles. If you click on it the
below screen will display. You can enter the employee’s rates here, or advise any once off amounts to
be paid.

If the basic is not to be paid this month, you can flag the I do not want to pay this Basic salary this
month checkbox.

Employment Tax Incentive

The Employment Tax Incentive legislation will encourage employers to hire young people by reducing
the amount of PAYE you have to pay to SARS, thereby, reducing the cost of employment to the
employer while leaving the employee’s earnings unaffected. The effective date of the legislation is 1
January 2014.

For more information regarding ETI, you can contact a support consultant:

© Sage South Africa (Pty) Ltd 2002 - 2015                                                   Page 40 of 76
Payslip

From the main navigation bar select Payroll and then Payslip.

The payslip has sections for earnings, deductions, company contributions and fringe benefits.

In order to add a new transaction to the payslip, click on   in the applicable header. Select the
transaction you want to add and capture the information required on the side menu.

                                                       1.   Click on      .
                                                       2.   Select transaction.
                                                       3.   Enter values.
                                                       4.   Click on Ok then click on Back
                                                            to Payslip.
                                                       5.   Transaction added.

© Sage South Africa (Pty) Ltd 2002 - 2015                                              Page 41 of 76
Intelligent calculations on the payslip
Annual bonus – In Sage One Payroll we designed the annual bonus calculation to be an
intelligent calculation making adding, editing and deleting the annual bonus with or without
provision and for a current or future month, as easy and simple as possible. It all starts with the
way the annual bonus transaction popup works.
Select from the earnings heading
Then select Annual Bonus.
Once you have selected the annual bonus definition you can either choose a manual bonus value or a
13th cheque.
Once selecting the system must calculate a 13th cheque you will then be able to select any date after
the current processing month that you are in on Sage One Payroll in which you want to pay out your
13th cheque.
© Sage South Africa (Pty) Ltd 2002 - 2015 Page 42 of 76You also have the option to select the bonus provision period. You can either provide for the annual
bonus until the bonus is paid or you can select to provide until the end of the tax year.
You can however change this option from month to month up until the month the bonus is paid and
Sage One Payroll will recalculate the provision according to the options you make.
It is imperative that you take note of the bottom message. If the company is not flagged to pro rata a
13th cheque when paid to an employee, the employee will receive the full value. Alternatively you can
select a manual bonus value.
Private Benefits
From the main navigation bar select Payroll and then Private Benefits.
Private Benefits has two expandable views:
Private Retirement Annuity
A Private Retirement Annuity can be added by clicking on the add option next to it.
© Sage South Africa (Pty) Ltd 2002 - 2015 Page 43 of 76This will expand the view once more.
Enter the amount that the employee is contributing and the date from which the contributions
will start. You can also add a clearance number if you have one.
Private Medical Aid
A Private Medical Aid can be added by clicking on the add option next to it.
This will expand the view once more.
Enter the amount that the employee is contributing and the date from which the contributions
will start. You can also add a clearance number if you have one.
© Sage South Africa (Pty) Ltd 2002 - 2015 Page 44 of 76Payslip Details From the main navigation bar select Payroll and then Payslip Detail. The Payslip Details view will display all the transactions on the employee’s payslip in a summative format as well as the amounts that the system will use to do statutory calculations. This view can come in very useful when doing manual calculations. Month To Date From the main navigation bar select Payroll and then Month To Date values. The Month To Date view provides you with a table containing all the figures loaded for the employee for the month, up to the current date. © Sage South Africa (Pty) Ltd 2002 - 2015 Page 45 of 76
Year To Date

From the main navigation bar select Payroll and then Year To Date values.

The Year To Date view provides you with a table containing all the figures loaded for the employee for
the year, up to the current date.

ACB

From the main navigation bar select Payroll, ACB and then ACB Setup.

When setting up the ACB layout you can select from the following option:

© Sage South Africa (Pty) Ltd 2002 - 2015                                               Page 46 of 76
Each selection has its own criteria:

ABSA Business Integrator

FNB Online Enterprise

Netbank

Standard Bank Business Online

© Sage South Africa (Pty) Ltd 2002 - 2015   Page 47 of 76
After entering the details you can save and export the information. By clicking on the Export button
you will be prompted to give more information specific to the type of bank selected previously.

Once the information has been entered click on Process.

The Export to PDF button will display the file in PDF format. The Download button will download the
file to your Downloads folder and can be accessed there to import into the banking website.

© Sage South Africa (Pty) Ltd 2002 - 2015                                              Page 48 of 76
Roll Over and Roll Back

The roll over or roll back functions can be performed from two different options. From the main
navigation bar, click on Payroll and then select either Roll over to new processing period or Roll back
to previous processing period. From the black top navigation bar select the Current Period: option for
a dropdown menu and select either Roll Over or Roll Back.

Roll Over

© Sage South Africa (Pty) Ltd 2002 - 2015                                               Page 49 of 76
Roll Back

© Sage South Africa (Pty) Ltd 2002 - 2015   Page 50 of 76
Reports and Exports

From the main navigation bar select Reports.

The report to choose from are available on the left.

Select a section and then a report to the left, then click on Preview.

The report will be displayed on the right. Now you can print the report to printer.

© Sage South Africa (Pty) Ltd 2002 - 2015                                             Page 51 of 76
© Sage South Africa (Pty) Ltd 2002 - 2015 Page 52 of 76
Or you can export the report to any of the following formats:

The Reports that are currently available are:

© Sage South Africa (Pty) Ltd 2002 - 2015                       Page 53 of 76
© Sage South Africa (Pty) Ltd 2002 - 2015 Page 54 of 76
© Sage South Africa (Pty) Ltd 2002 - 2015 Page 55 of 76
Email payslips

You can email current and previous plain paper payslips to your employees.

            Important Information

Please note that payslips are emailed to the email addresses entered on the employees' Employee
details views. Please ensure that the correct email address is entered.

Follow these steps to email a payslip:

1.      From the main navigation bar select Reports or select Payroll and then Print or email payslips.

2.      From the reports selection bar select the dropdown arrow next to Payslip.

3.      Select the Current/Previous payslip – Plain Paper Payslip option.

4.      Select the pay period.

5.      Select the specific employees you want to include in the report.

6.      Select whether to exclude employees with zero or negative nett pay.

7.      Select whether you want to sort this report by

        o       Department, or
        o       Pay Point.
                The default selection is "None".
8.   Select whether you want to sort the employees by

        o       Surname (default sort option), or
        o       Employee code.
9.   Select the pay date.

10. Select the type of rate, which balance to use, company contributions, fringe benefits, private
     benefits and which leave balances to print.

11. Select Preview.

12. Click on         .

© Sage South Africa (Pty) Ltd 2002 - 2015                                                Page 56 of 76
13. A popup with the following information will display: The employee’s date of birth is used as the password, and the format is yyyymmdd. Click on Send Payslips to email the payslips to the listed employees. The employees will receive an email with a PDF payslip attachment. © Sage South Africa (Pty) Ltd 2002 - 2015 Page 57 of 76
UIF Declaration
From the main navigation bar click on UIF Declaration.
UIF Submission
The contact details on UIF Submission view defaults from UIF contact person details entered on the
Company => Company Details view. If no information is saved on the Company Details view, the user
will have to manually enter the details every time a submission is done.
When all the required information is entered, click on the Submit UIF button.
The file is now checked for validation errors. A popup will appear if there are errors – the user
can select to submit the file with the errors, or to stop the submission and view the error report.
After validation, Sage One Payroll will email the submission directly to the UIF email address and
also CC’s the user.
© Sage South Africa (Pty) Ltd 2002 - 2015 Page 58 of 76The UIF Submission Report and UIF Error Report are then generated and can be previewed on screen. © Sage South Africa (Pty) Ltd 2002 - 2015 Page 59 of 76
Manage Additional Users
From the main navigation bar click on Manage Additional Users.

Sage One Payroll has made it possible for more than one user to be accredited to one company. By
accessing the Manage Additional Users view you will be able to add additional users. Simply click on
the Add New User button and enter the new users email address. You will be able to limit the new
user’s access by only giving them access to certain areas of the company created.

Processing the Payroll from A - Z

Introduction

Depending on the payroll administrator’s job description, the tasks that he/she will be responsible for
will differ. There are however certain duties that every payroll administrator will encounter at some
point in their career.

This section attempts to provide the payroll administrator with a list of such tasks and a checklist to
be used as a guideline for the processing cycle.

© Sage South Africa (Pty) Ltd 2002 - 2015                                                 Page 60 of 76
Input Documents
It is advisable that standard input documents are used in order to streamline the record keeping of
payroll information and to minimise human error. It is important that all input documents are
authorised by the relevant person responsible, who will eventually assist in the yearly audit of the
payroll by the company’s auditors. This will ensure that changes are only made with due authorisation.
The payroll administrator should ensure that all the required input documents relating to the pay
period is acquired for processing.
Documents required will include:
Clock cards or other input documents relating to normal hours worked, overtime hours worked,
unpaid leave days, etc.
Letters of appointment or service contracts for new employees.
Transfer letters of employee’s to other branches, changes in department or pay points.
Changes to medical aid tables received from medical aid.
Medical aid adjustments, if these are processed through the payroll.
Changes to pension fund or provident fund calculations received from the relevant fund.
Changes in the personal particulars of employees such as the number of medical aid
dependants, change in marital status, etc.
Increases across the board or for specific employees.
Bonuses to be paid in this period.
New loans or changes to loan repayments for the period, and interest on loans.
Changes to savings for the period.
Changes to third party payments such as bonds, insurances and garnishee orders.
Changes to fringe benefits.
If the payroll administrator is responsible for updating leave, they must have leave input forms
available for the different types of leave i.e. annual leave and sick leave.
Letters of resignation and documents relating to terminations.
It is important that the responsible person approves all documents, e.g. overtime signed by the
relevant supervisor, increases and bonuses authorised by the head(s) of the relevant department(s).
© Sage South Africa (Pty) Ltd 2002 - 2015 Page 61 of 76Adding New Employees The administrator must ensure that they have all the information required to process new employee payroll information. Legal requirements A contract of service is required when a new employee joins the company. This must include at least the name of the company, the name of the employee, the engagement date and the starting salary of the employee and basic conditions of employment. As this is a legal document it must be signed by both the employer's authorised representative and the employee in the presence of two witnesses, and each page must also be initialled. For Income Tax purposes The employee must furnish the employer with his/her personal details and an income tax reference number. The payroll administrator or the relevant responsible person must obtain this reference number. If the employee is not already registered as a taxpayer he/she must apply for a tax reference number from the Receiver of Revenue and this can be done using e-Filing as well as with e@syFile. Bank Details If employees are paid via bank transfer, or by any other electronic means, it is necessary that the payroll administrator acquires their correct banking details, i.e. the branch number of the bank, the type of account (current, savings or transmission) and the bank account number. It is advisable to check these particulars with the bank concerned, to ensure that his/her salary will be paid into the correct account. Importance of Identity Number for UIF purposes Employers are required to submit details of all employees, whether they are UIF contributors or not, to the Unemployment Insurance Fund each month. Provisions have been made for these details to be submitted electronically via e-mail. The Unemployment Insurance Fund will only pay benefits to employees who have contributed to UIF, and benefits will be based on the “UIF Remuneration” on which the contributions for the employee were calculated. © Sage South Africa (Pty) Ltd 2002 - 2015 Page 62 of 76
Occupational Injuries and Diseases (OID) The OID Act states that when an employee is involved in an accident, which results in his/her disablement or death, such an employee or his/her dependant will be entitled to the benefits provided for and prescribed in this Act. The Act also provides for compensation if it is proved that an employee contracted an occupational disease or that an employee has contracted a disease other than an occupational disease, which has arisen out of and in the course of his/her employment. It is not necessary to register individual employees with the Commissioner for occupational injuries and diseases. Explain Company Policy It is advisable to provide the employees with a copy of the company policies and procedures, and it is important that they sign an agreement that they have seen and understand the rules and regulations as set out by these policies and procedures. All the necessary industrial council and union requirements should also be included. Some aspects to consider: The employee might be required to join a specific union. The employer may have to induct and train the employee according to specific requirements. Union deductions may be required from the employee. Changes to Employees Particulars It is of utmost importance that all employee records are kept up to date at all times. The employee is expected to inform the payroll administrator of any changes to his/her personal particulars, e.g. change in address. This must be entered correctly since the employee's correct address must be printed on the tax certificate at year end. In practice, employees frequently have to be reminded of this. Changes that affect the Tax Calculation Age An employee’s age can affect the tax calculation. Employees that are older than 65 but not older than 75 receive an additional tax rebate of R 7 407.00. Employees that are older than 75 receive a further additional tax rebate of R 2 466.00. © Sage South Africa (Pty) Ltd 2002 - 2015 Page 63 of 76
Important Information
Additional tax rebates are effective as of the start of the tax year in which the employee turns 65 or
75 respectively.
Medical Aid
If the company has a medical aid scheme for employees, the payroll administrator must ensure that
the employee completes the necessary application forms and submit these forms to the medical aid
scheme.
If the employee has added or removed medical aid dependants, his/her contributions to the medical
aid scheme will probably change, and he/she will have to complete the necessary forms which must be
submitted to the medical aid scheme. This will also affect tax since different tax credits are applicable
based on the number of dependants on the medical aid scheme.
Pension, provident funds & retirement annuities
If the company has a pension, provident fund or retirement annuities for employees, the payroll
administrator must ensure that the employee completes the applicable forms. Beneficiaries must also
be named in certain cases. As these are legal documents they must be witnessed and any alterations
must be signed. The required documents must then be submitted to the relevant fund or insurance
company.
Pension, provident fund or retirement annuity contributions are unlikely to change except for annual
contribution increases, but if, for example, an employee has married, he/she may well wish to alter the
beneficiaries named. If this is the case, the necessary change of beneficiary forms will have to be
completed and submitted to the relevant fund or insurance company.
Other changes that affects the tax calculation
Other kinds of changes that should be updated include:
Moving from one department to another.
If the company has different departments, branches or categories that could affect the costing,
it is important that this information is entered correctly and kept up to date.
© Sage South Africa (Pty) Ltd 2002 - 2015 Page 64 of 76Changes to transactions which could affect employees
Changes which could potentially affect all or certain groups of employees, include:
Changes in taxation.
Changes in medical aid structures.
Changes in pension or provident fund percentages or formulas.
Changes to the UIF percentages or limit.
Changes in interest percentages on loans or savings deductions.
New earnings or deductions that have not been used before, e.g. a garnishee order.
Information to be entered for individual employees, include:
Normal hours worked, usually for weekly or fortnightly paid employees.
Short hours worked, where applicable.
Overtime hours worked.
Advances, loans, or savings deductions.
Leave pay and leave deductions for weekly employees going on leave, e.g. during the
Christmas/annual shut-down.
Increases for individual employees.
Bonuses for individual employees.
Any adjustments to information which was incorrectly entered in a previous period.
Updating Employee Leave Records
If the payroll administrator is responsible for keeping employees' leave records up to date, all annual
leave, sick leave or other leave days taken must be entered onto the software. Leave is subject to
company policy and legislation, and it is therefore important that the payroll administrator is always
up to date with company policy. For example, the payroll administrator needs to know whether the
employee must produce a doctor's certificate if he/she is absent from work due to illness for more
than two days within an 8 week period (Basic Conditions of Employment Act).
Annual leave records must always be kept up to date, since the company is required to make provision
for the paying out of any leave days due to employees, if their employment is terminated.
© Sage South Africa (Pty) Ltd 2002 - 2015 Page 65 of 76You can also read