WEBSITE DEVELOPMENT USING THE CUSTOMIZED WORDPRESS THEME - Yuping Feng - Core
←
→
Page content transcription
If your browser does not render page correctly, please read the page content below
Yuping Feng

WEBSITE DEVELOPMENT USING THE CUSTOMIZED WORDPRESS THEME
WEBSITE DEVELOPMENT USING THE CUSTOMIZED WORDPRESS THEME

                                  Yuping Feng
                                  Bachelor’s thesis
                                  Spring 2018
                                  Information Technology
                                  Oulu University of Applied Sciences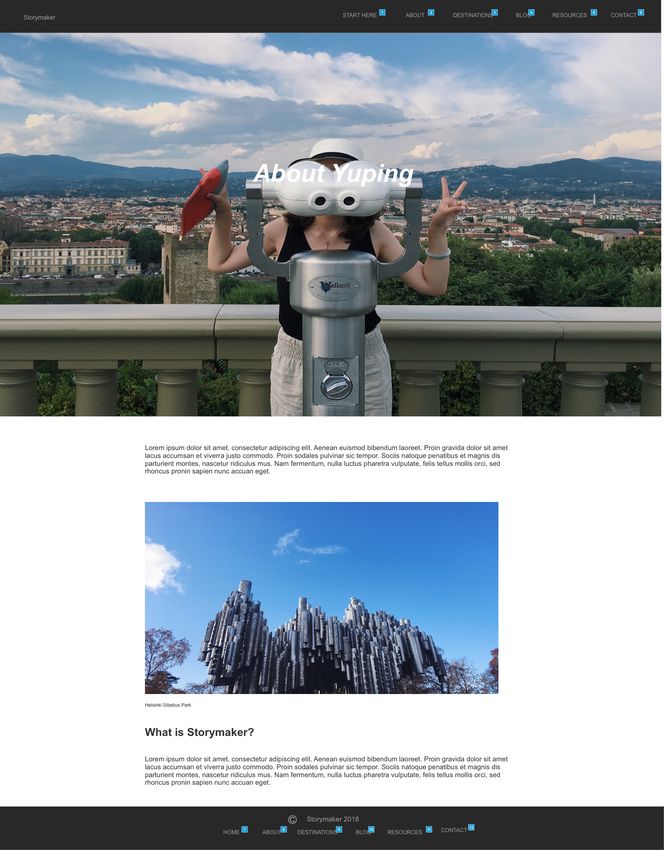
ABSTRACT

Oulu University of Applied Sciences
Degree Programme, Information Technology

Author: Yuping Feng
Title of Bachelor´s thesis: Website Development using the Customized WordPress Theme
Supervisor: Kari Laitinen
Term and year of completion: Spring 2018                      Number of pages: 51

The objective of this bachelor's thesis was to develop a responsive travel blog website which uses
a customized WordPress theme. The website can be used for introducing and sharing stories,
images and experiences of travelling all over the world.

For user interface design, a tool named Axure RP was used to draw a prototype. During the process
of building a static website, web technologies Bootstrap and Font Awesome were applied. PHP
was utilized for building the customized theme of WordPress, and PHP code editing was controlled
in the Control Panel of server. Features of the website were implemented in the WordPress admin
system.

As a result of the work, a responsive blog website, which can adjust to different sizes of screen,
was implemented. Moreover, a customized theme of WordPress was built as well. In the future, the
author plans to polish the theme and upload to WordPress.org.

Keywords: Bootstrap, WordPress, Website, Theme, CMS, PHP

                                                3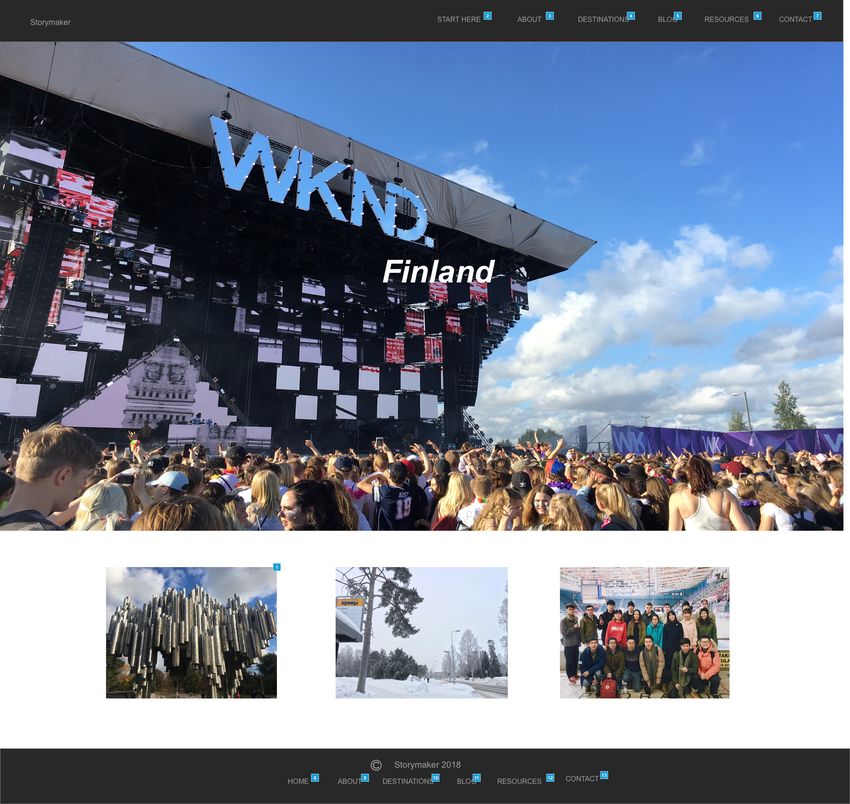
TABLE OF CONTENTS

ABSTRACT ..........................................................................................................................................3
TABLE OF CONTENTS .......................................................................................................................4
ABBREVIATIONS ................................................................................................................................6
PREFACE .............................................................................................................................................7
1       INTRODUCTION .........................................................................................................................8
2       BACKGROUND ...........................................................................................................................9
        2.1        WordPress .......................................................................................................................9
        2.2        Bootstrap ..........................................................................................................................9
        2.3        Web hosting .................................................................................................................. 10
        2.4        Domain name................................................................................................................ 11
3       DESIGN .................................................................................................................................... 12
        3.1        Requirements specification .......................................................................................... 12
                  3.1.1          Functional requirements design .................................................................... 13
                  3.1.2          Non-functional requirements design ............................................................. 13
        3.2        User interface design.................................................................................................... 13
                  3.2.1          Axure RP ........................................................................................................ 14
                  3.2.2          Sitemap .......................................................................................................... 14
                  3.2.3          Prototype ........................................................................................................ 15
4       IMPLEMENTATION.................................................................................................................. 30
        4.1        Setting up a server........................................................................................................ 30
        4.2        Building a static website ............................................................................................... 30
                  4.2.1          Importing Bootstrap ....................................................................................... 30
                  4.2.2          Using CSS and Components of Bootstrap ................................................... 31
                  4.2.3          Importing CSS Font Awesome ...................................................................... 32

                                                                           4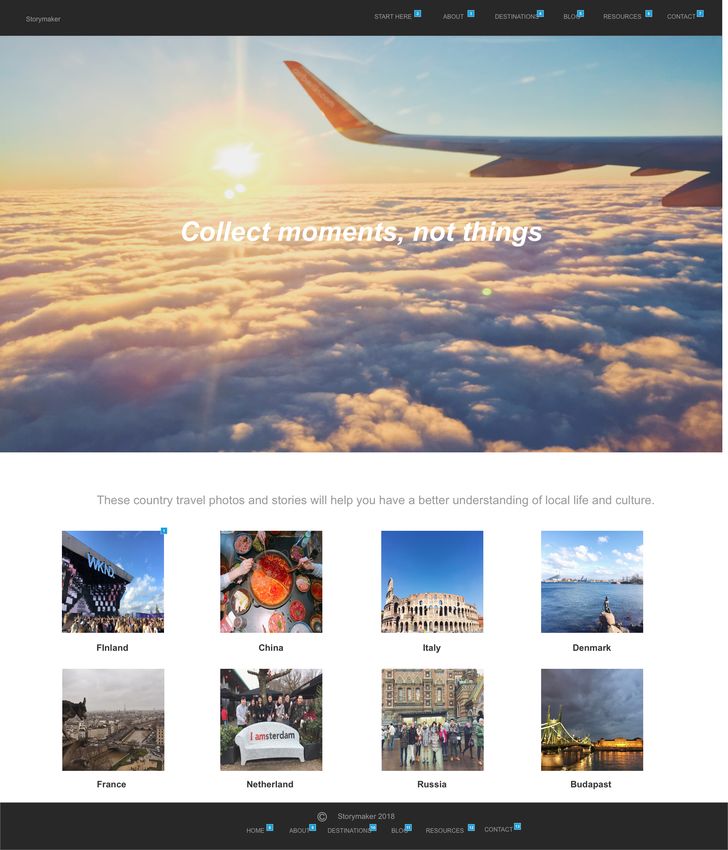
4.3        Installing WordPress ..................................................................................................... 33
       4.4        Converting to a dynamic website ................................................................................. 35
                  4.4.1         Customized theme ......................................................................................... 35
                  4.4.2         Transforming the Start Here page into a dynamic page .............................. 38
       4.5        Features ........................................................................................................................ 43
                  4.5.1         Advanced Custom Fields .............................................................................. 43
                  4.5.2         Contact Form 7 .............................................................................................. 44
       4.6        Testing........................................................................................................................... 45
5      CONCLUSION .......................................................................................................................... 47
REFERENCES .................................................................................................................................. 49

                                                                          5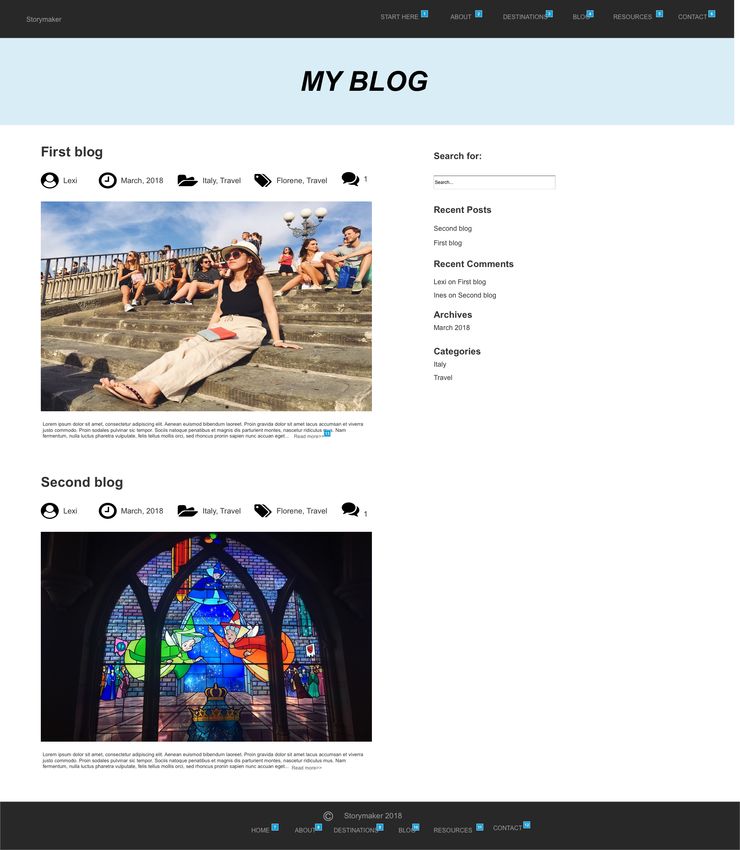
ABBREVIATIONS

CMS     Content Management System

MySQL   My Structured Query Language

PHP     Hypertext Preprocessor

HTTPS   Hypertext Transfer Protocol Secure

AMP     Apache, MySQL, PHP/Perl/Python

HTML    Hyper Text Markup Language

CSS     Cascading Style Sheets

DNS     Domain Name System

RP      Rapid Prototyping

CDN     Content Delivery Network

URL     Uniform Resource Locator

                                        6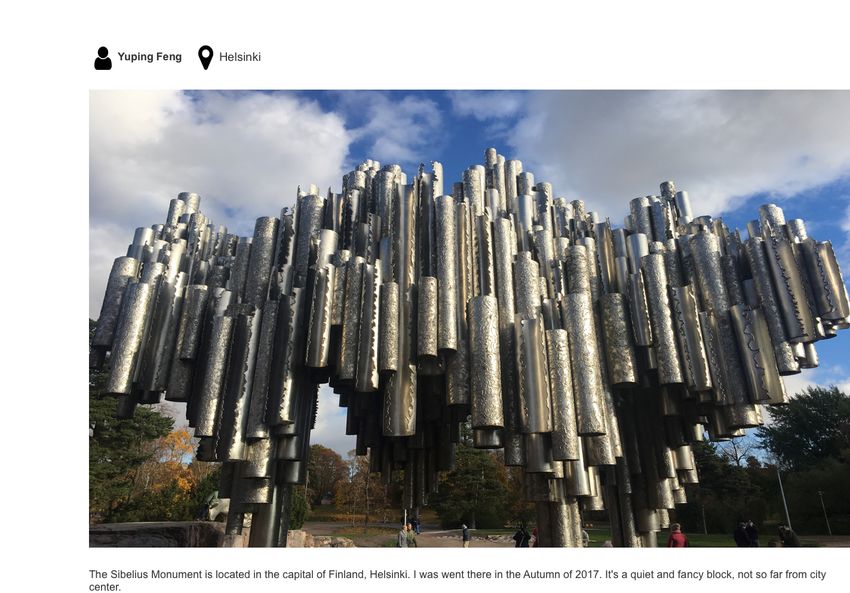
PREFACE

This thesis was made at Oulu University of Applied Sciences, Finland. During working on the thesis,
I learnt a lot of skills of programming and scientific writing. Fortunately, many people provided
assistance to me, and I am very appreciative of their support and selfless help.

First of all, I would like to sincerely express my gratitude to my supervisor Kari Laitinen. I am
thankful for his patience and guidance. He always gave me some useful suggestions when I felt
confused about some problems during the writing of thesis. My thesis was improved by his advices.

Secondly, I am very grateful to Kaija Posio for language checking. She is a conscientious teacher.
Moreover, I would like to extend my gratitude to all teachers at Oulu University of Applied Sciences.
Through their courses, I was inspired to learn new technologies efficiently. Thus, these courses
laid a solid foundation for the completion of my thesis.

Then, I would also like to thank my dear friends for their company and support. We encourage each
other and inspire each other. I wish them a good future.

Finally, I would like to deeply appreciate my most beloved family. They have always given me
unconditional love and support in my study and life.

All in all, thanks to everyone who helped me during my thesis work.

Oulu, 7.5.2018
Yuping Feng

                                                  7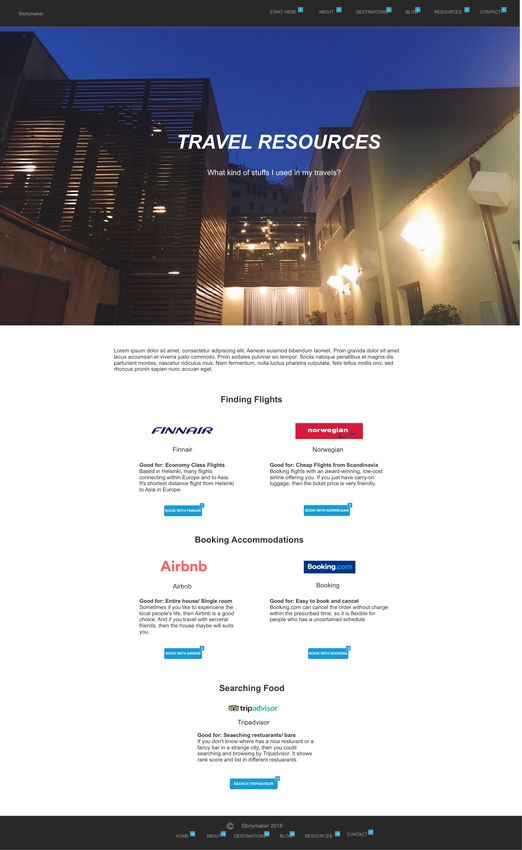
1    INTRODUCTION

The purpose of the thesis work was to design and develop a travel blog website according to the
actual situation and the characteristics of blog interactivity, aiming at providing a platform for
website visitors to communicate with each other and for sharing travel information between visitors.
On the basis of the characteristics of the blog sharing, the travel blog website can promote
information and knowledge exchange among users.

In Finland, websites are widely used. Basically, governments, schools, enterprises and even
supermarkets all have their own websites. People can find desired information on these websites
conveniently. In addition, there are a lot of people having their own blog sites, which makes the
information spread more rapidly and forms a unique blog culture. Blogs cover a wide range of
topics, from cooking to travelling, from fashion to photography.

In 1994, the first blog was created. The progress of blog until the current microblogging platform is
extremely important on the Internet development. Nowadays, there are many different ways to build
a blog on the Internet, such as WordPress, Tumblr, Squarespace. Even so, WordPress hosted 74.6
million websites approximately in February 2014. It is a popular platform for building blogs.
Moreover, WordPress sites occupied 18.9% of all self-hosted websites at that time. As a matter of
fact, 75 million websites were operated by WordPress until the end of 2016 [1]. Hence, in this thesis
study, WordPress was chosen as the platform for the travel blog website.

The objective of this travel blog includes providing a platform for learning and communicating
information between website visitors, sharing photos and stories of travel around the world. A user
can not only read the travel story on the travel blog, but users can also contribute their own stories
to administrator on blog. This kind of behavior promotes the spread of information. Even if users
do not go out, they can still view different landscapes and experience different cultures through the
travel blog. The user requires only a mobile device or a desktop computer.

                                                  8
2     BACKGROUND

The aim of this chapter is to give a description of what kinds of software, technology, tools and
programming languages were used in this thesis project.

2.1   WordPress

WordPress is a user-friendly content management system(CMS) that can be used to create
websites, applications and blogs. It is a free open source software based on MySQL and PHP [2].
It should be installed at a web hosting or a software platform which can support PHP, MySQL and
HTTPS. For instance, MAMP for Mac operating system, XAMPP for Windows operating system,
and LAMP for Linux operating system.

Nowadays many websites are developed by WordPress because of the multiple themes and user-
friendly management system. Developers can create a customized theme and use various plugins
according to customers’ requirement. Website administrators can use the WordPress CMS to add
and delete contents of website easily. There are some successful and popular cases, such as
Angry Birds, BBC America, Vogue India and Mercedes-Benz [3].

With these advantages, WordPress is daily used by millions of websites and seen by tens of millions
of users because it is the largest and the most popular tool for self-hosted blogging service all over
the world [4]. Thus, WordPress is supporting and powering 26.4% of the Web on the basis of stats
since March 2016, and it keeps increasing [5].

2.2   Bootstrap

Bootstrap is an open source front-end component library for website and web application
development, including the HTML, CSS and JavaScript frameworks [6]. Bootstrap also provides
fonts, forms, buttons, navigations, and other useful components, then it makes the development of
a responsive website and web application easier and faster.

                                                  9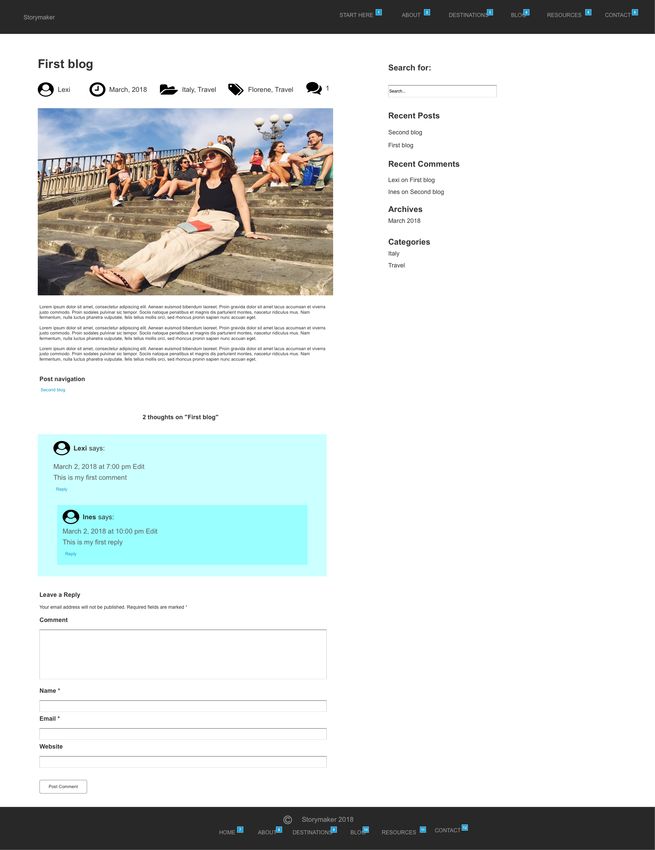
Due to the feature of mobile first, Bootstrap defines the basic style of a series of HTML components,
and designs a unique, modern style for a text, form and grid system [7]. The other function of
Bootstrap is the reusable components. In addition to the basic HTML elements, Bootstrap also
includes other commonly used interface elements, such as a button with advanced features, labels,
thumbnails and progress bars. These components are using the CSS class to implement. It needs
to correspond to the specific HTML element [8]. According to jQuery, Bootstrap adds some
JavaScript components and enhances some functionalities of user interface elements. Plugins can
be used together, or one by one easily [9].

Contemporarily, Bootstrap is the most popular front-end framework in the world. Spotify’s website
was published in September 9 2015, is an example of using Bootstrap [10].

2.3   Web hosting

The web hosting service uses the data center’s computer clusters and storage devices to provide
free or paid service for a client. It allows individuals and organizations to publish a website to the
Internet. Normally, the hosting company will provide a control panel for the client to upload the web
content remotely. Then others can access the website by entering the website address or domain
name into the browser [11].

There are several advantages of web hosting. Firstly, compared with the purchase of independent
servers, the cost of website construction has been greatly reduced, which has greatly facilitated
the popularity of small and medium-sized websites. Secondly, using the technology of web hosting,
a real host can be divided into a number of virtual hosting. Each web hosting has an independent
domain name and IP address, and it has full Internet server functionality as well. In addition, the
high-efficiency is a significant benefit. The efficiency of website building has improved when using
the web hosting, but it takes a longer time if a user purchases the server and installs the operating
system and software application by themselves [12].

On the other hand, the web hosting has also some disadvantages. First, some functions are limited
by the server providers, such as forum programs and traffic statistics functions. Then, the website
design needs to consider the functional support provided by the service provider, such as the
database type or operating system. Furthermore, some websites using the web hosting are slow

                                                 10
to access. This may be because the hosting provider is leasing a host to a large number of websites
or because of the aspect of server configuration. This situation cannot be solved by the website
itself, and it may have adverse effects on the normal access of the website [12].
2.4 Domain name
A domain name is the name of computer or a group of computers that consists of a string of dot-
separated names. It is used to identify the electronic direction of the computer during data
transmission. In short, Internet users can access the website through the address of domain name.
It is hard for people to remember a string of numbers, such as computer’s IP addresses. Hence,
the development of domain name is beneficial for user identification instead of IP addresses.
For example, www.google.com is a domain name, and the 8.8.8.8 is the corresponding IP address.
DNS is like an automatic telephone directory. A user can call Google’s name instead of the
telephone number—IP address. After the user has called the website’s name directly, DNS will
convert the user-friendly name, such as www.google.com into an IP address, e.g. 8.8.8.8, which is
convenient for machine identification [13].
The domain name can be a random combination of letters and numbers, and the various domain
name extensions can be combined into the domain name, such as .com, .org, .net. The domain
name becomes valid after being registered, and it is unique so that there will not be the situation
that the same domain name shows up at the same time [14].
113 DESIGN
The design part is the beginning phase of a project or product, and it is very important for the
product usability. Usability is a user-centered design concept. The design of usability focuses on
how to make the product design meet a user’s habit and need. The design of an Internet site, for
example, aims that users can have a smooth browsing process [15].
The judge criterion of the usability can be divided into three aspects: effectiveness, efficiency and
satisfaction. There are three primary results of the usable interface. Firstly, during the first contact
with the website, users should be familiar with and be able to use the user interface. For instance,
if a blog website is user-friendly and well designed, then users should be able to find the interesting
content very fast. Secondly, users can achieve their goal easily by using the website. An excellent
design will guide users to leave messages for the blogger if needed. Finally, users should feel
effortless to remember the user interface and how to use it in the future. Thus, it means that users
should get to know how to find the useful information next time through an impressed design of the
blog website [16].
A user interface designer tries to improve the design’s usability during the entire development
process, from a functional map to a wireframe and from a mockup to a prototype and to the final
design. Because the usability decides whether the existing property of the design succeeds or fails
[16].
3.1 Requirements specification
Before coding in a project, the requirements specification of the website needs to be prepared. It is
used for describing the user interactions that the website must provide. It includes functional
requirements and non-functional requirements. The requirements specification of this blog website
was implemented individually instead of cooperating with a client.
123.1.1 Functional requirements design
The functional requirements assign what the website should do [17]. In the thesis’s blog website,
the designed functional requirements are:
— With the website, users should be able to follow and browse the latest images, stories and blogs.
— With the website, users should be able to contact the blogger and upload the images and stories
that they wish to share.
— With the website, users should be able to comment the blog.
— The administrator should be able to manage images, stories and blogs in the admin system.
— The administrator should be able to get the message from the user and choose the interesting
images and stories to post on the blog.
3.1.2 Non-functional requirements design
The non-functional requirements describe how a website operates. There are some representative
non-functional requirements: capacity, reliability, maintainability, performance, modifiability [17]. In
the thesis’s blog website, the designed non-functional requirements are:
— The admin system should provide content modifiability.
— The website should be responsive, dynamic and user-friendly.
3.2 User interface design
User interface design is primarily used for software or machine’s user interface, such as computers,
mobile devices, applications, websites and electronic devices. It follows the guidance of user
experience and interaction and focuses on the ease of use and comfort level for users. Creating
the user’s interaction using an easy and high-efficiency way is the aim of user interface design. In
addition, there are three principles of user interface design. Firstly, the interface should be under
the control of users. Secondly, the user interface design should lighten the user’s burden of
memory. Thirdly, the user interface design should maintain the consistency of the interface [18].
Basically, there is an 8-step process to develop the user interface design. It contains understanding
the project’s concept, brainstorming and sketching, user flow diagram, structure and flow validation,
13choosing the style of the interface, style validation, choosing and creating the preview form, such
as wireframe, mockup and clickable prototype, and the final step is design validation [19].
3.2.1 Axure RP
In this work, the Axure RP (Rapid Prototyping) 8 is the tool that was used for creating the user
interface design. Axure is a powerful prototyping tool which does not need to write any code. There
are some particularly useful features of Axure RP, including dynamic content, conditional flow,
animations, data driven, adaptive views and math functions. Besides, the design project builds by
Axure is easy to share. The user needs to click a button, then the Axure Share will generate a link
and publish the diagrams and prototypes on cloud. Then other users would be able to check the
project by the link [20].
The Axure Share App is also available for iOS and Android except for using a browser to open the
link. The Axure RP is supporting a team collaboration as well. It allows working on the same file by
many people in the meantime. Thus, it is easier for a team work, and the team project history allows
showing the notes of changes from team members [20].
3.2.2 Sitemap
Sitemap is the hierarchical chart demonstrating the website or application’s structure. The user
experience designer used the sitemap to define the category through grouping the related content.
The sitemap is a very important part of user-centered design because the designer needs to ensure
that the content is located in the user’s desired position.
In regard to the purpose of sitemap, it displays how to structure the navigation. And the sitemap is
beneficial to identify the place of content and produce the content. In addition, relationships
between different pages are shown by sitemap [21]. Hence, building a sitemap makes the
functionality of a website or an application more clear. Axure RP was the tool used to draw the
sitemap in this thesis (Figure 1).
14FIGURE 1. Sitemap
3.2.3 Prototype
The clickable prototype is the detailed demonstration of the final product that simulates the
interaction between the user and the interface. The UI designer is responsible for maintaining the
integrity of the user interface prototype and using the prototype to build a usable user interface.
Comparing with wireframe and mockup, building a prototype is more time-consuming [19].
In this work, there are two versions of the prototype. The first version of user interface design was
published on the Axure share platform: https://se1wg3.axshare.com . The final version was
published as a link: https://ni6fq0.axshare.com.
The obvious differences of user interface design are header and footer on every page. In the
beginning, the header was included in an image. Also, the header and the footer were of different
styles because of the different background color (Figure 2). Considering the consistency of user
interface design, the final version of design (Figure 3) was changed to use the same color and style
in the header and footer. And the dark color style of the header made the navigation menu more
clear on the top of image than the first version design of the header.
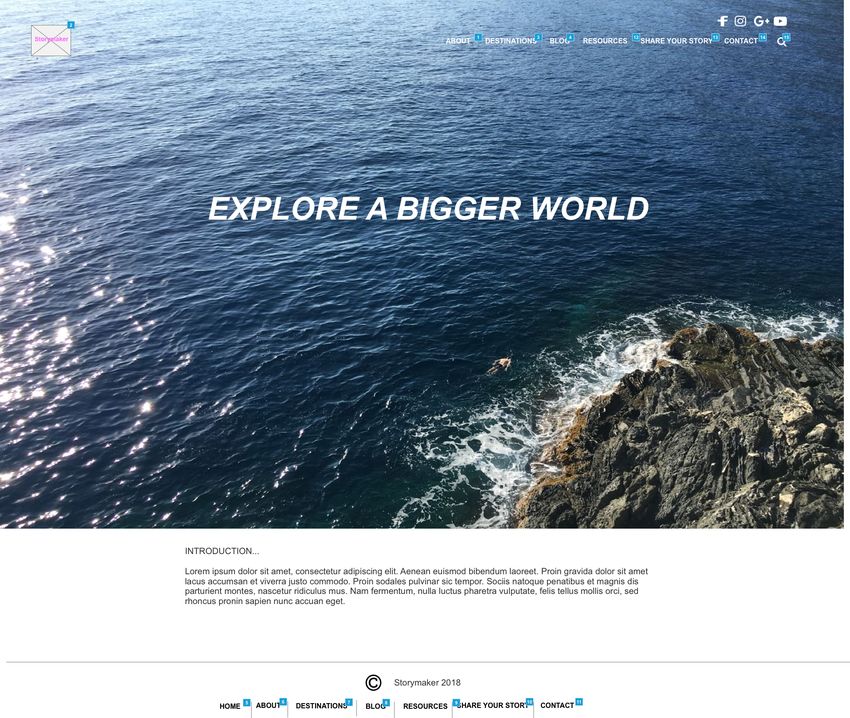
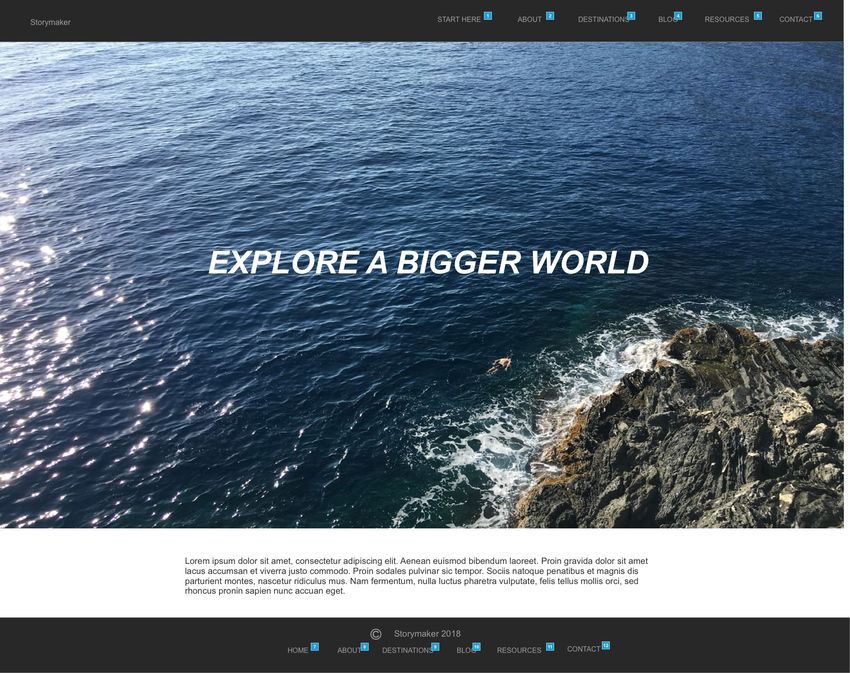
Figure 3 shows the blog website’s home page, and this is the landing page.
15FIGURE 2. Home page design in the first version
16FIGURE 3. Start Here page design
17In user interface design, the about page was used for the blogger’s self-introduction and a detailed
description about this travel blog (Figure 4). The image below the navigation bar is the same style
as other pages. Users will have a better understanding of this blog website through the About page.
FIGURE 4. About page design
18About the design of the destination page (see Figure 5), besides the same style of navigation bar
and main image, the other part is the latest countries thumbnail photos that show images and
stories from different countries all over the world. If the user clicks a certain country, then the current
page will redirect to another certain country page.
According to the certain country page design (see Figure 6), the user can view the latest thumbnail
images of travel. And if the user clicks a certain image, there will pop up a window which
demonstrates a bigger image, the photographer, location and story description.
The pop-up window’s design was displayed in Figure 7. Each image has a pop-up window to show
the image and a story in different countries. The user can view a high definition travel picture and
a detailed story through the window.
19FIGURE 5. Destinations page design
20FIGURE 6. The certain country page design (Finland)
21FIGURE 7. The certain story pop up window design
22In user interface design, the blog page includes two vertical parts: a blog list part and a sidebar part
(Figure 8). The blog list part contains the blog header, author’s name, publish date, category, tag,
comment, blog post thumbnail and a brief of the blog. And the sidebar part consists of a search
area and some widgets about the blog. The user can retrieve useful information efficiently through
these widgets.
The certain blog page was redirected from the blog page. If the user clicks the “Read more” link,
then the certain blog page will appear (see Figure 9). The certain blog page was designed for the
detailed description of blog. It includes the blog’s full text, the comment area and the sidebar. The
user can leave a comment about the blog, and other users also can leave a reply to a comment.
23FIGURE 8. Blog page design
24FIGURE 9. Certain blog page design
25In the design of resources page (Figure 10), it inherits the previous page’s navigation bar and main
image. Then, a paragraph used to introduce the resources page’s purpose is below the image. The
user can get some useful information and tips about airline companies, accommodation reservation
tools and the local restaurant. Hence, this page was designed for sharing travel resources to users.
FIGURE 10. Resources page design
26At the beginning of the user interface design, the share-your-story part and the contact part were
on different pages separately (Figure 11 and Figure 12). The share-your-story part was utilized to
encourage users to upload their own travel images and stories. And the contact page was just used
for the user to leave a message.
However, in the final version of user interface design, the share-your-story part and the contact part
were combined together as the contact page (Figure 13). Therefore, users can submit information
on the contact page. Personal information and messages are necessary, but uploading the image
and story are optional. The combination avoided the problem of content repetition on different
pages. Thus, the user can use the functions efficiently.
FIGURE 11. Share your story page design in the first version of user interface design
27FIGURE 12. Contact page design in the first version of user interface design
28FIGURE 13. Contact page design in the final version of user interface design
294 IMPLEMENTATION
In this chapter, the implementation phase of the website will be introduced.
4.1 Setting up a server
The implementation phase was started by choosing the web hosting and domain name. HostGator
was chosen as the web hosting service provider in the beginning. It also includes the service that
registers the domain name. HostGator, as one of the top ten host companies in the United States,
currently hosts more than 9 million domains and has over 400,000 customers. It is very friendly for
a personal user due to the decent price [22]. A Hatchling plan was picked from hosting plan options,
because it included a domain. yuping.co was chosen for the domain name used for the thesis
project. With regard to .co, it is the Internet country code top-level of a domain assigned to
Columbia. Meanwhile, in Japan, South Korea and some Commonwealth countries, the company
domain name .com is replaced by .co frequently [23].
After the web hosting and domain name is paid, the HostGator system will provide an account
about the Control Panel to the user. In the Control Panel which plays a role as a server
management side, the user can manage files and install plugins.
4.2 Building a static website
In the beginning of the blog development, the static website of blog was built. These HTML files
and assets were uploaded to the server after the website had been finished, and the home page
file was uploaded as the index.html. Therefore, the static website’s accessible URL is
www.yuping.co.
4.2.1 Importing Bootstrap
The Bootstrap version 3.3.7 was used during the implementation. There are a few ways to import
Bootstrap into website development, and Bootstrap CDN was chosen as a method to import in this
study. The following lines of code display the CSS part of Bootstrap CDN.
30According to the CDN code provided by the Bootstrap website:
https://getbootstrap.com/docs/3.3/getting-started/, the Bootstrap front-end framework was applied
to the blog website. jQuery and JavaScript parts of Bootstrap CDN codes were shown below. Apart
from the CSS, jQuery and JavaScript of the Bootstrap package, the customized CSS file was
utilized for the blog website as well.
4.2.2 Using CSS and Components of Bootstrap
When building the static website, the global CSS settings and reusable components of Bootstrap
were used. Building the navigation bar was the first step to make the static website. Based on the
final version of user interface design, the Bootstrap component inverted navbar including a class
name navbar-inverse was used for the menu on every page of the blog website. Similarly, the tag
footer was utilized for the footer on every page of the website. Overall CSS settings also included
CSS classes text-center and container. About the background image on different pages, the
Bootstrap component jumbotron including a class name jumbotron was used and it includes the
following definition.
EXPLORE A BIGGER WORLD
31The grid system was applied to adjust the size of the viewport or device when images were listed
in the destinations page and the certain country page, and the component thumbnails including the
class name thumbnail was applied to all image sections. In the next part, when the user clicked the
post image on the certain country page, the CSS class modal was triggered to show the pop-up
window. on the blog page, the grid system of CSS settings was also directed at dividing the blog
content list part and the sidebar part. With respect to the search form of the sidebar part, the CSS
classes form-group was employed in it. Moreover, the CSS classes form-horizontal, form-group,
form-control and btn were utilized by the comment form part of the independent blog page. And
Bootstrap tags form, label, input, textarea and button were also used for the comment part. Within
the resources page, the grid system and component thumbnails including class name thumbnail
were applied to build the sections of information and tips. The booking button used the Bootstrap
tag button and CSS classes btn and btn-info. From the last contact page, the grid system and the
CSS class form-group were used for the contact form. The Bootstrap tags form, label, input and
textarea were also utilized for the contact form.
The main part’s style of user interface was comprised CSS classes and components of Bootstrap
version 3.3.
4.2.3 Importing CSS Font Awesome
Except for Bootstrap, the Font Awesome icon set library was used as well. Font Awesome provides
scalable icons and social logos on the website. The size, color, shadow and other features of icon
can be controlled by using CSS [24].
During the development of the blog website, the Font Awesome library was downloaded and placed
in the assets folder on the server. Then in the blog and post of HTML files, the Font Awesome
library was imported. There is a minor difference between the way of using the Bootstrap CDN and
the way of importing the Font Awesome, and the only thing we need to do is to add one line of code
below after downloading Font Awesome from the official website.
32Then, in the blog page and post page of website, the icon part utilized the Font Awesome library.
It is very simple to insert the icon code into the HTML code as following lines of codes show.
Different class names of icons can be found on the Font Awesome official website.
Yuping Feng
Feb 22, 2018
Italy,Travel
Florence,Italy
0
4.3 Installing WordPress
The user can install the WordPress on the Control Panel easily because of the Marketplace of
Control Panel includes WordPress. Figure 14 shows the user interface when the user is installing
the WordPress on the Control Panel. Then in this thesis, “yuping.co” was chosen as the domain,
and “wp” was chosen as the directory in the form.
FIGURE 14. WordPress installation part1
In the next step, the user needs to fill the setting information. In this work, the travel blog’s
information was filled as shown in Figure 15.
33FIGURE 15. WordPress installation part2
Finally, the installation was completed, and the system showed the website path, username and
password (see Figure 16).
FIGURE 16. Installation complete
The developer can use the username and password to login to the WordPress admin system (see
Figure 17). Generally speaking, the URL of WordPress admin system’s login page consists of the
website path and “wp-admin”. For instance, in this study, the WordPress admin system’s URL is
www.yuping.co/wp/wp-admin.
34FIGURE 17. WordPress admin system login page
4.4 Converting to a dynamic website
The dynamic website refers to a website regulated by the application server that uses server
technologies such as PHP, JavaScript or ASP, to process. There are some advantages about the
dynamic website, firstly, it is easy to update. The content of website can be updated and modified
through the customer’s requirements quite easily at any time. Secondly, the dynamic website is
more flexible and smoother to load a website. Then user can jump from one page to another without
the cache problem of website. Lastly, the dynamic website can be responsive to any size of screen
faster than a static website [25].
According to installation settings of WordPress, the dynamic blog website will be built on the URL
www.yuping.co/wp.
4.4.1 Customized theme
After the WordPress has been installed in the directory named “wp” of the server, then there will
appear a folder “wp” under the public_html folder on the File Manager of the Control Panel. All files
35about the dynamic blog website will be saved in the folder “wp”. Moreover, all WordPress themes
of the dynamic blog website will be generated in the folder path “public_html/wp/wp-
content/themes”. In the corresponding WordPress admin page part, the themes are listed in the
appearance of sidebar. The administrator can choose different user interface design styles of the
website through change themes in the WordPress admin system.
Before this study, the author was unfamiliar with WordPress. Therefore, the author learnt from the
tutorial by Ken Cen in the Udemy platform. In this tutorial, Ken Cen provided a URL ken-
cens.com/ken_cens_wordpress_theme.zip to share a documentation about WordPress theme’s
template. After the template was downloaded, the author uploaded it to the folder path
“public_html/wp/wp-content/themes” in the File Manager of the Control Panel. The user interface
of the original template looks like the one shown in Figure 18.
FIGURE 18. The user interface of original template
36This is the beginning of creating a customized theme. Next, the theme name was renamed as
YupingTheme. Besides, operations about the blog dynamic website will influence the structure of
the files in the folder YupingTheme (see Figure 19).
FIGURE 19. Customized theme in the File Manager of Control Panel
Figure 19 shows where the customized theme was placed in Control Panel. Furthermore, the
WordPress admin page will display the added theme automatically after the theme has been
uploaded to the server. YupingTheme was chosen to be the active theme in the WordPress admin
system. Figure 20 indicates how to activate themes in the WordPress admin system.
FIGURE 20. Customized theme in the WordPress admin system
374.4.2 Transforming the Start Here page into a dynamic page Navigation bar part The Start Here page is the landing page of the blog website, and the first step of transformation is the converting navigation bar. On the basis of the theme template, header.php is the file that controls the navigation bar. Then, in order to enable the WordPress system allowed to find the Font Awesome library, a block of improved code importing Font Awesome library was also used in the file header.php. The following code includes a PHP function bloginfo.
FIGURE 22. Function register_nav_menus in the function.php file

Finally, structure and settings of navigation bar can be controlled through the menu section in
WordPress admin system. That is the process how to make the navigation bar be dynamic.
Moreover, the documentation header.php can use in different PHP files by function get_header.

Footer part

The next stage after converting navigation bar to be dynamic was converting page footer to be
dynamic. The method was similar between converting these two parts to be dynamic. In theme’s
template, file footer.php was the file which controls footer. The first step was to port footer part’s
HTML code from static website. The second step was to modify function register_nav_menus in
file function.php (see Figure 22) and function wp_nav_menu in file footer.php (Figure 23). The last
step was to set and edit footer menu in WordPress admin system. Function get_footer can be
included in various pages’ code as well.

FIGURE 23. PHP function in the footer.php file

                                                 39
Content part
With respect to the transformation of content on the Start Here page, initially, a PHP file page-
starthere.php was created under the folder YupingTheme in the Control Panel. Then, in the
WordPress admin system, the corresponding operation was to add a page named Start Here. The
PHP part’s functions get_header and get_footer were added to the file page-starthere.php to build
the structure of the Start Here page. Except the get_header function, the PHP tag in the first part
of file page-starthere.php also included template name definition and some variables definitions
(Figure 24). The template name definition was used to select a template of page attributes in the
WordPress admin system.
FIGURE 24. PHP tag of file page-starthere.php in the Control Panel
Title of content part
Besides, the variable main_slogan and function get_post_meta were utilized for the dynamic title.
The administrator used a section Custom Fields to define an attribute name and a corresponding
value on the Start Here page of the WordPress admin system (Figure 25). The function
get_post_meta included three parameters (see Figure 24), 8 means what the post number equaled
on the Start Here page of the WordPress admin system. On the Start Here page of the WordPress
admin system, main_slogan was defined for a parameter name in the Custom Fields section
(Figure 25). In regard to the parameter true, if the return value is a single value, then the parameter
should be true, otherwise the parameter should be false. As the return value shows in Figure 25,
the third parameter of the variable main_slogan was true.
40FIGURE 25. Section Custom Fields on the Start Here page of the WordPress admin system
After variables had been defined, they could be called in where needed. For instance, the function
echo can output the variable main_slogan in the PHP tag which was involved in the HTML code
(Figure 26). On the whole, the process of converting a title to be dynamic will be completed. The
administrator is able to update the title of the Start Here page in the WordPress admin system
easily.
FIGURE 26. Background image part code in the file starthere.php
Background image of the content part
On the page Start Here of the WordPress admin system, there is a section used to set a featured
image. Then, the system will check whether the image exists through the PHP function, so that the
background image will update on the website if the image exists. According to Figure 26, the if
statement in the PHP code was used for inquiring whether post thumbnail exists. If yes, the
background image’s URL will update, if no, it keeps as before. A CSS inline style was added in
where the image setting is located (see Figure 26), and a PHP function echo was added into the
CSS inline style to output a variable thumbnail_url.
41At the same time, the variable thumbnail_url needs to be defined in the PHP tag of the beginning
part of the file starthere.php (see Figure 24). A specific WordPress function wp_get_attachment_url
utilizing for obtaining the image path was applied to the variable thumbnail_url. The other PHP
function get_post_thumbnail_id was used for acquiring a dynamic attachment ID number as well.
In the function get_post_thumbnail_id, the parameter post->ID indicates what is the image ID that
was published in the page setting of the WordPress admin system. After that, if the administrator
sets or changes the featured image on the Start Here page setting of the WordPress admin system,
the background image will be updated on the Start Here page of the blog website.
Paragraph of the content part
With regard to the complex content, such as images and paragraphs, the custom fields of the native
function were not enough. Thus, the plugin Advanced Custom Fields was installed and activated
in the WordPress admin system. Firstly, a new field group named start_here_section was built on
the section Custom Fields through the sidebar menu in the WordPress admin system. In the
location section of editing field group setting, the field group start_here_section will be shown if the
page is equal to Start here. Moreover, a new field was added in the field group start_here_section
and the filed label and field name were named as start_introduction. The field type was set as text.
Secondly, a variable start_introduction was defined in the PHP tag of the beginning part of file
starthere.php (see Figure 24). The PHP function get_field was used for obtaining information
through the corresponding field name which was defined in Tool Advance Custom Fields. Finally,
the administrator is able to edit or update the paragraph on the Start Here page through the
WordPress admin system efficiently (Figure 27).
The process of converting rest of the pages to be dynamic is similar to the process transforming of
the Start Here page to be dynamic. It is worth mentioning that the Start Here page was set as a
Homepage, and the Blog page was set as a Posts page in the WordPress admin system. These
were used for setting the priority of website reading.
FIGURE 27. Controlling paragraph section on the Start Here page of the WordPress admin system
424.5 Features
WordPress is powerful because of its good extensions, numerous themes, and plugin support.
Apart from the original features of WordPress, some external plugins were used during the process
of developing the blog website in this study.
4.5.1 Advanced Custom Fields
Advanced Custom Fields is a powerful plugin to customize a field. It allows adding multiple forms
of custom field types, for example, image, text, checkbox, or text area. Furthermore, this plugin
requires basic PHP code editing capabilities. The file in theme panel needs to be modified to display
fields. The process of a detailed operation was demonstrated in the previous section of this chapter.
In addition, there is an example in Figure 28.
Figure 28 illustrates the structure of a field group about_section which was used for converting the
About page to a dynamic one. Field group settings included some field labels definitions, location
where the field group was used and other options.
43FIGURE 28. User interface of the plugin Advanced Custom Fields
4.5.2 Contact Form 7
Contact Form 7 is a very popular custom contact form plugin of WordPress. After website visitors
have entered the contact page, input the form content and submitted it, Plugin Contact Form 7 will
send the filled form information to the administrator’s default mailbox automatically.
Contact Form 7 is very easy to use. The administrator only needs to use the simple built-in tags to
customize the form and email the content flexibly. Supported tags include text field form, date, drop-
down menus, check boxes and upload files. In this study, text tag, email tag, text area tag, file tag
and submit tag were used for the Contact page’s form of the blog website (Figure 29).
44FIGURE 29. User interface of the plugin Contact Form 7
4.6 Testing
In short, the concept of website testing is checking if the website contains latent errors before they
will be published. At this stage, website security, operation of website, visiting by disabled people
and normal user, and capacity of processing flow will be checked [26].
In this thesis, the website security and capacity of processing flow are in charge of WordPress
conveniently. Moreover, website features and usability were tested by the administrator. After the
website’s implementation part has been done, the blog website is responsive for different screen
sizes of mobile devices. Thus, the website becomes more user-friendly at present.
The main feature of the blog website is that a visitor can upload images and stories to the website,
then the administrator can receive messages from visitors. After testing, this feature works
correctly, the administrator’s mailbox can receive what the visitor has uploaded (Figure 30).
45FIGURE 30. Contact information submit function test
The testing about disabled people reading was made as well. As Figure 31 shows, when a mouse
is moved on the text field that inputs name, the computer system will remind the visitor what should
be input through voiceover.
FIGURE 31. Disabled people reading test
465 CONCLUSION
In this thesis, I studied developing a blog website using a customized WordPress theme by web
technologies. The first step was designing a user interface, the second step was implementing a
static website, the last step was building a customized theme. Before this thesis, I had minor
knowledge about WordPress. The only thing I knew was that WordPress is a popular tool. However,
a developer needs to have an understanding of comprehensive latest technologies and tools. Thus,
I chose WordPress as my studying topic.
During the design of the user interface, I reviewed the process of user interface design. Then I
investigated other successful blogs to learn how to make the user experience of website more user-
friendly. After that, I created a unique user interface design for the travel blog website through a
decent tool, Axure RP. For the static website, I implemented a whole website including nine pages.
However, this static website without features due to the theme was customized and features were
achieved through WordPress. Web technologies Bootstrap and Font Awesome library were used
for building the user interface. The key part was creating a customized theme and I explored the
structure of a WordPress theme. Then, the static website was converted to a dynamic website
through the customized theme. PHP knowledges were applied to build the customized theme.
Some user-friendly WordPress plugins were detected as well.
During this thesis work, I learnt that WordPress has a powerful Content Management System
including many themes and plugins. WordPress can achieve many types and purposes of website
because of these different kinds of plugins and theme library. This blog website, the purpose
focuses on sharing travel stories, images and information with others all over the world.
Although I had done a lot of projects during previous studies, I rarely did a project by myself.
However, in this thesis study, I took a responsibility for the front-end development and back-end
development. Hence, I learnt a lot during the website development, such as how to solve a problem
and how to overcome a difficult part.
In the future, there remain many functions and plugins of WordPress that are worth to learn.
Besides, the travel blog website www.yuping.co/wp will be updated in the future. Due to a lack of
47time, some parts of the website did not convert to be a dynamic content. If I have time to complete
it in the future, I will try to upload YupingTheme to WordPress.org.
48REFERENCES
1. Mediakix Team 2017. How many blogs are there in the world? Date of retrieval 23.1.2018
http://mediakix.com/2017/09/how-many-blogs-are-there-in-the-world/#gs.X307Glk
2. WordPress.org 2018. Meet WordPress. Date of retrieval 12.3.2018
https://wordpress.org/
3. WordPress.org 2018. Showcases. Date of retrieval 12.3.2018
https://wordpress.org/showcase/
4. Liu A X, Kovacs J M, Gouda M G. 2012. A secure cookie scheme[J]. Computer Networks 56(6),
1723-1730.
5. Nevena Tomovic 2016. More Surprising Statistics About WordPress Usage. Date of retrieval
13.3.2018
https://managewp.com/blog/statistics-about-wordpress-usage
6. Mark Otto & fat 2018. Bootstrap. Date of retrieval 14.3.2018
https://getbootstrap.com/
7. Mark Otto & fat 2016. CSS. Date of retrieval 14.3.2018
https://getbootstrap.com/docs/3.3/css/
8. Mark Otto & fat 2016. Components. Date of retrieval 14.3.2018
https://getbootstrap.com/docs/3.3/components/
9. Mark Otto & fat 2016. JavaScript. Date of retrieval 15.3.2018
https://getbootstrap.com/docs/3.3/javascript/
10. Mark Otto 2015. Bootstrap Expo. Date of retrieval 15.3.2018
http://expo.getbootstrap.com/
4911. Website.com Solutions Inc. 2018. What is Web Hosting? Date of retrieval 15.3.2018
https://www.website.com/beginnerguide/webhosting/6/1/what-is-web-hosting?.ws
12. Sanjay Kumar Negi 2014. Top Advantages and Disadvantages Of Shared Hosting. Date of
retrieval 16.3.2018
https://www.businesscomputingworld.co.uk/top-advantages-and-disadvantages-of-shared-
hosting/
13. Google 2018. Google Public DNS. Date of retrieval 17.3.2018
https://developers.google.com/speed/public-dns/
14. Website.com Solutions Inc. 2018. Domain Name Server. Date of retrieval 18.3.2018
https://www.website.com/beginnerguide/webhosting/6/4/domain-name-server-(dns).ws
15. Merriam-Webster, Incorporated 2018. Definition of USABILITY. Date of retrieval 18.3.2018
https://www.merriam-webster.com/dictionary/usability
16. Interaction design foundation 2018. Usability. Date of retrieval 19.3.2018
https://www.interaction-design.org/literature/topics/usability
17. UIf Eriksson 2012. Functional VS Non-Functional requirements. Date of retrieval 20.3.2018
https://reqtest.com/requirements-blog/functional-vs-non-functional-requirements/
18. Interaction design foundation 2018. User Interface (UI) Design. Date of retrieval 21.3.2018
https://www.interaction-design.org/literature/topics/ui-design
19. Roman Gaponov 2017. User interface Development Flow. 8-step Process. Date of retrieval
21.3.2018
https://medium.com/swlh/user-interface-development-flow-537f82f00247
20. Axure Software Solutions, Inc. 2018. Design the right solution. Date of retrieval 22.3.2018
https://www.axure.com/
21. Chris Mears 2013. Sitemaps – The Beginner’s Guide. Date of retrieval 23.3.2018
50https://theuxreview.co.uk/sitemaps-the-beginners-guide/
22. Top10WebHostingSites.org 2016. HostGator Review: A Top Unlimited Web Hosting Provider.
Date of retrieval 30.3.2018
https://top10webhostingsites.org/review/hostgator
23. Wikipedia 2018. .co. Date of retrieval 30.3.2018
https://en.wikipedia.org/wiki/.co
24. Fonticons 2018. Icons. Easy. Done. Date of retrieval 3.4.2018
https://fontawesome.com/
25. Palak Jain 2017. Static Vs Dynamic Website: Advantages And Disadvantages. Date of retrieval
6.4.2018
https://www.weblinkindia.net/blog/static-vs-dynamic-website-advantages-disadvantages
26. Guru 99 2018. Web Application Testing: 8 Step Guide to Web Testing. Date of retrieval
15.4.2018
https://www.guru99.com/web-application-testing.html
51You can also read