User's Guide hp iPAQ Navigation System - September 2003 Part Number 348773-001
←
→
Page content transcription
If your browser does not render page correctly, please read the page content below
®

User’s Guide
hp iPAQ Navigation System

September 2003
Part Number 348773-001
© 2003 Hewlett-Packard Company
Microsoft, MS-DOS, Windows, Windows NT, ActiveSync, and Outlook are trademarks of
Microsoft Corporation in the U.S. and other countries.
Intel, Pentium, Intel Inside, and Celeron are trademarks of Intel Corporation in the U.S. and other
countries.
Adobe, Acrobat, and Acrobat Reader are trademarks or registered trademarks of
Adobe Systems Incorporated.

SD is a trademark of Secure Digital.
All other product names mentioned herein may be trademarks of their respective
companies.
Hewlett-Packard Company shall not be liable for technical or editorial errors or
omissions contained herein or for incidental or consequential damages in con-
nection with the furnishing, performance, or use of this material. The information
in this document is provided “as is” without warranty of any kind, including, but
not limited to, the implied warranties of merchantability and fitness for a particular
purpose, and is subject to change without notice. The warranties for HP products
are set forth in the express limited warranty statements accompanying such
products. Nothing herein should be construed as constituting an additional
warranty.
This document contains proprietary information that is protected by copyright. No
part of this document may be photocopied, reproduced, or translated to another
language without the prior written consent of Hewlett-Packard Company.

                                              WARNING: Text set off in this manner
                                              indicates that failure to follow directions
                                              could result in bodily harm or loss of life.

                                                Caution: Text set off in this manner
                                                indicates that failure to follow directions
                                                could damage to equipment or loss of
                                                information.

User’s Guide
hp iPAQ Navigation System
First Edition September 2003
Part Number 348773-001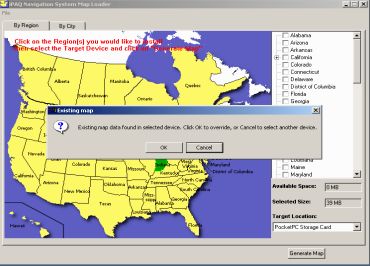
Table of Contents

Getting Started
What Is In the Box? ............................................................................................................... 1-2
System Requirements............................................................................................................. 1-3
Loading the Navigation System Software ............................................................................. 1-4
   Selecting and Downloading a Map by Region ............................................................... 1-5
   Selecting and Downloading a Map By City .................................................................... 1-6
   Downloading Additional Maps........................................................................................ 1-7
Closing the Navigation System.............................................................................................. 1-8

Using the HP iPAQ GPS Bluetooth Receiver
Learning About Bluetooth GPS Features .............................................................................. 2-1
Setting Up the Bluetooth GPS Receiver ................................................................................ 2-2
    Manually Partnering for Windows Mobile 2002 Operating System ............................... 2-3
    Establishing a Connection................................................................................................ 2-3
    Manually Partnering for Windows Mobile 2003 Operating System ............................... 2-5
    Establishing a Connection................................................................................................ 2-5
    Checking the GPS Connection Status.............................................................................. 2-8
    Receiving Satellite Signals .............................................................................................. 2-9

Getting Acquainted with Navigation System
Moving Around the Map ....................................................................................................... 3-3
   Panning the Map .............................................................................................................. 3-3
   Zooming the Map............................................................................................................. 3-3
Using Menus .......................................................................................................................... 3-4
   Main Menu....................................................................................................................... 3-5
   File Menu ......................................................................................................................... 3-6
   Tools Menu ...................................................................................................................... 3-7
   View Menu....................................................................................................................... 3-8
   Pop Up Menu ................................................................................................................... 3-9

User’s Guide                                                                                                                             i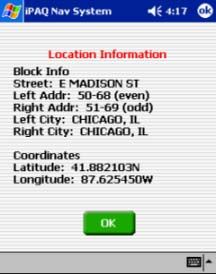
Setting Options..................................................................................................................... 3-10
    Selecting the Map Display View ................................................................................... 3-10
        Map View................................................................................................................. 3-10
        Map View Modes..................................................................................................... 3-11
        Guidance View......................................................................................................... 3-13
    Setting Voice Guidance ................................................................................................. 3-14
    Setting Route Options .................................................................................................... 3-15
    Setting Safety Options ................................................................................................... 3-16
    Recording a Route.......................................................................................................... 3-18
        Replaying Route Instructions................................................................................... 3-19

Using The Navigation System
Entering a Start Location ....................................................................................................... 4-1
Entering a Destination............................................................................................................ 4-2
   Setting a Destination by Address ..................................................................................... 4-3
    Setting a Destination by Intersection .............................................................................. 4-6
   Setting a Destination by Point of Interest ........................................................................ 4-9
       Selecting a POI Alphabetically ................................................................................ 4-11
       Selecting a POI By Distance.................................................................................... 4-12
       Selecting a POI By City ........................................................................................... 4-13
   Setting a Destination From the Contacts List ................................................................ 4-15
   Setting a Destination From the Favorites Location List ................................................ 4-17
   Setting a Destination from the Recent Destinations List ............................................... 4-18
Managing the Destination and Route................................................................................... 4-19
   Entering a Detour ........................................................................................................... 4-20
   Entering Stopovers......................................................................................................... 4-22
   Clearing a Selected Destination ..................................................................................... 4-22
Navigating the Vehicle......................................................................................................... 4-23
   Using Day vs. Night Display ......................................................................................... 4-23
   Viewing the Route List .................................................................................................. 4-25

User’s Guide                                                                                                                           ii
Software Technical Support General Definition.................................................................................................................. 5-1 Obtaining Support .................................................................................................................. 5-1 Performing a Soft Reset ......................................................................................................... 5-1 Troubleshooting................................................................................................. 6-1 Appendix ................................................................................................................... A-1 User’s Guide iii
Getting Started
           HP iPAQ Navigation System is a full featured software using the latest in satellite technology and
           detailed street maps from Navigation Technologies. This software guides you through the most
           complex streets with ease.

               The HP iPAQ Navigation System is referred to as Navigation System in this
               User’s Guide.

           The Navigation System is designed for the HP iPAQ PocketPC. Since the map of the United States
           and Canada is very large, it does not fit on the HP iPAQ PocketPC. You can transfer map data by
           city or state, but not both at the same time. To transfer the portion of the map you want to your
           iPAQ PocketPC, use the companion map loading software on your desktop (or laptop). The time
           needed to download a map varies based on system capabilities.
           When you travel to a different area of the country, the map loader lets you easily change the maps
           on your iPAQ PocketPC, as needed.

                           CAUTION! You should limit the size of the map data downloaded to your iPAQ
                           PocketPC to
What is in the Box?
What is in the Box?
3
4
The Navigation System box includes the following items:
1 iPAQ Bluetooth™ GPS Receiver.
2 12 V DC Adapter for charging in the car.
3 CD ROM 1 including:
Navigation application (Desktop and Pocket PC application).
Western U.S. and Canada map data.
User’s Guide.
4 CD ROM 2 including Eastern U.S. and Canada map data.
If you are missing any items, contact your dealer.
User’s Guide 1-2System Requirements
System Requirements
The Navigation System is designed to run on any HP iPAQ Bluetooth enabled pocket PC, includ-
ing:
HP iPAQ 1940/45
HP iPAQ 2210/15
HP iPAQ 5450/55
HP iPAQ 5450/55
HP iPAQ 3870/75
HP iPAQ 3970/75
h4100
h4300
Desktop or Laptop PC system requirements include:
Microsoft
® Windows 98, ME, 2000 Professional, or XP operating system.
®
266 MHZ Intel Pentium II microprocessor with MMX™ or equivalent.
64 MB RAM.
80 MB available hard drive space.
CD ROM drive.
Handheld PC system requirements include:
® Windows Pocket PC 2002 or Microsoft Windows Mobile 2003 Operating Sys-
Microsoft
tem.
64 MB RAM.
64 MB storage space on SD card, CF card, or main memory.
User’s Guide 1-3Loading the Navigation System Software
Loading the Navigation System Software
To install the Navigation System Software on your Desktop:
1. Synchronize the iPAQ PocketPC with your computer using ActiveSync.
For information on synchronizing your PC, refer to the iPAQ User’s Guide.
2. Connect the iPAQ PocketPC to your computer using the iPAQ cradle or synchronization cable.
3. Close all other applications running on the Desktop and Pocket PC.
4. Obtain the two Navigation System installation discs.
5. Insert Disk 1 in the CD drive.
The Installer should start immediately. If the setup program does not auto-
matically start, click on the Start tab and select the Run option. Type the fol-
lowing in the dialog box: D:\setup.exe and click on the OK button. Follow
the directions in the dialog boxes.
6. Click on the Next button on the Welcome to Install Shield Wizard window.
Read through the End User License Agreement.
7. Click on the Yes button if you accept the License Agreement terms.
Setup installs the Navigation System files onto your computer.
8. Click on the Finish button.
User’s Guide 1-4Loading the Navigation System Software
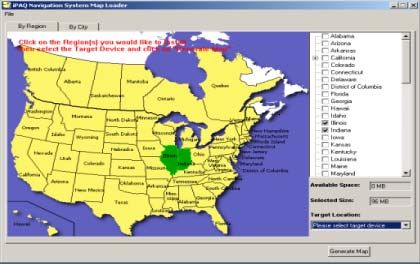
Selecting and Downloading a Map by Region
Selecting and Downloading a Map by Region
The Navigation System allows you to install maps by region/state, or by city.
You can not store multiple cities, or cities and states in the same location.
On the Map Loader window,
1. Click on each state to download to your iPAQ PocketPC, or click on the check box next to
each state name.
A region consists of one or more states. Each selected state is highlighted on
the map. A check mark is entered next to each state name on the right side of
the window. You deselect a state by tapping on it on the map, or by tapping
on the box to remove the checkmark. The size of the selected region appears
in the Selected Size box.
2. Select Pocket PC Main Memory from the Target Location pop up box.
The default target location for maps is the Pocket PC main memory. If there
is an SD or CF card installed in your Pocket PC, you can select this as the tar-
get location for maps.
3. Click on the Generate Map button.
4. Insert the appropriate disk in the CD drive, when prompted.
5. Click on the OK button after the map is downloaded onto your iPAQ PocketPC.
6. Remove the disk from the CD drive.
User’s Guide 1-5Loading the Navigation System Software
Selecting and Downloading a Map By City
Selecting and Downloading a Map By City
Selecting a map by radius around a city is preferred since it lets you create a
customized map using a small amount of memory. This is helpful if you do
not have additional removable storage cards.
On the Map Loader window,
1. Click on the By City tab for the options to create a map around a city.
2. Enter a state in the Region box. Click on the down arrow next to the box to display a list of
states.
3. Enter a city in the City box. Click on the down arrow next to the box to display a list of cities.
4. Click on the bar in the Map Radius box to enter a radius for the selected city.
You can increase the radius from 25 miles to 125 miles by moving the indica-
tor to the right. A message displays if the selected map size exceeds the iPAQ
available memory.
5. Select Pocket PC Main Memory from the Target Location pop up box.
6. Click on the Generate Map button.
7. Insert the appropriate disk when prompted.
8. Click on the OK button after the map is downloaded onto your iPAQ PocketPC.
9. Remove the disk from the CD drive.
User’s Guide 1-6Loading the Navigation System Software
Downloading Additional Maps
Downloading Additional Maps
The Navigation System easily lets you change map information stored on your iPAQ PocketPC or
removable storage cards.
CAUTION: If you install additional maps, Navigation System warns that any existing
map information is erased from the storage location. This is to prevent the maps
from occupying a considerable amount of storage space.
If you need to store a number of maps, you can use different removable SD or CF
cards.
To access the map installer after Navigation System is installed on your Desktop and iPAQ Pock-
etPC, do the following:
1. Connect the iPAQ PocketPC to your Desktop.
CAUTION: Verify the Navigation System is closed before installing additional maps.
For more information refer to the Closing the Navigation System section.
2. Double click the Navigation system icon on your Desktop screen.
The Map Loader screen is displayed.
3. Select a download method, as follows:
By State - Click on each state to download, or click the check box next to each state name
For more information, refer to the Downloading a Map by Region section.
By City - Enter the State, City, and radius around the selected city. For more information,
refer to the Downloading a Map by City section.
The selected state or city size displays in the Selected Size box on the Map Loader screen.
4. Select the storage location (i.e., iPAQ Pocket PC Main Memory or SD Card) from the Target
Location pop up box on the Map loader screen.
5. Click on the Generate Map button.
If you accept the removal of existing maps, the new selected map(s) are
downloaded to your iPAQ PocketPC.
User’s Guide 1-7Closing the Navigation System
Downloading Additional Maps
Closing the Navigation System
When you open Navigation System, it runs in the background of your iPAQ PocketPC. To stop it
from running in the background, you should manually close it.
If you do not manually close Navigation System, your iPAQ PocketPC may
freeze when it is switched off. You must perform a soft reset before you can
switch the iPAQ PocketPC on, again. This procedure does not harm any data
or settings.
To manually close Navigation System:
1. Tap the blue x in the upper right corner of the map.
2. Tap Start >Settings.
3. Tap the System tab at the bottom of the screen.
4. Tap the Memory icon on the System screen.
The Memory screen displays.
5. Tap the Running Programs tab at the bottom of the Memory screen.
The Running Programs list displays.
6. Tap iPAQ Navigation System in the list.
7. Tap the Stop button.
8. Close your iPAQ PocketPC.
User’s Guide 1-8Learning About Bluetooth GPS Features
Using the HP iPAQ GPS Bluetooth Receiver
The HP iPAQ Navigation System Bluetooth GPS receiver gets GPS signals from satellites orbiting
the earth. It identifies your position to an accuracy of less than 10 meters.
The HP iPAQ Navigation System Bluetooth GPS receiver is referred to as
the Bluetooth GPS receiver in this User’s Guide.
Learning About Bluetooth GPS Features
An illustration of the Bluetooth GPS receiver with features follows.
External Antenna
Power Jack
Feature Description
Power Switch Power is On or Off.
Power Jack The Power Jack connects a DC car power charger (included) or
AC power charger to recharge the internal battery.
Bluetooth Status Blinking Slowly - There is not a Bluetooth connection.
LED (Blue) Blinking Quickly - There is a connection to another Bluetooth
receiver.
GPS Status LED Blinking - The GPS position is fixed.
(Green) Steady Light - The GPS position is not fixed.
Battery Status LED Red - Battery power is extremely low. Charge immediately.
(Red/Yellow) Yellow - Battery is currently charging.
LED Off - Battery is partially or fully charged.
External Antenna Connects an external antenna. This is usually not required since
the GPS has an internal antenna.
User’s Guide 2-1Setting Up the Bluetooth GPS Receiver
Setting Up the Bluetooth GPS Receiver
The Navigation System requires set up with the Bluetooth GPS receiver in order to operate. For the
initial set up, do the following:
1. Charge the Bluetooth GPS receiver using the DC adapter (included) or the AC adapter for the
HP iPAQ PocketPC.
The first time you charge the Bluetooth GPS receiver, it can take up to three
hours.
2. Turn on the Bluetooth GPS receiver using the Power switch on the left side of the receiver.
The blue LED flashes when the receiver is turned on.
3. Partner the Bluetooth GPS receiver with the iPAQ PocketPC, as follows:
n Tap Start at the top of the Today screen of the iPAQ PocketPC.
n Tap Programs on the Start menu.
4. Tap the iPAQ Navigation System icon on the Programs screen.
This is a one time procedure. After this, you just tap the Navigation Sys-
tem icon at the top of the Start menu.
The following warning displays:
5. Tap on the I Accept button.
User’s Guide 2-2Setting Up the Bluetooth GPS Receiver
Manually Partnering for Windows® Mobile 2002 Operating System
Partnering between the Bluetooth GPS receiver and the iPAQ PocketPC automatically occurs.
Some devices require you manually partner the Bluetooth GPS receiver and
the iPAQ PocketPC. This includes devices using Microsoft® Windows
Pocket PC 2002 operating system. For more information, refer to the Manu-
ally Partnering the Bluetooth GPS Receiver and the iPAQ PocketPC section.
Manually Partnering for Windows® Mobile 2002 Operating System
To partner the Bluetooth GPS receiver with the iPAQ PocketPC requires:
Navigation System software installed on your iPAQ PocketPC.
Bluetooth GPS receiver is charged.
iPAQ PocketPC is turned on.
Bluetooth GPS receiver is turned on.
Bluetooth GPS receiver and iPAQ PocketPC are between 5-10 meters apart.
Establishing a Connection
1. Tap Start at the top of the Today screen on the iPAQ PocketPC.
2. Tap Bluetooth Manager from the pop up menu.
The Bluetooth Manager screen displays.
3. Tap the Yes tab to search for devices.
iPAQ searches for and displays a list of Bluetooth devices.
User’s Guide 2-3Setting Up the Bluetooth GPS Receiver
Establishing a Connection
4. Tap the check box to the left of the BT-GPS-xxxxxx device in the list.
5. Tap the OK button on the upper right side of the screen.
A Bluetooth GPS icon displays on the Bluetooth Manager screen.
6. Tap and hold the pointer on the BT-GPSxxxxxx icon.
7. Tap on Connect to Serial xxxxxx to establish a connection with the Bluetooth GPS receiver.
User’s Guide 2-4Setting Up the Bluetooth GPS Receiver
Manually Partnering for Windows® Mobile 2003 Operating System
Two blue arrows display on the GPS Bluetooth receiver icon to indicate a
connection.
Partnering between the Bluetooth GPS receiver and the iPAQ PocketPC immediately occurs.
Manually Partnering for Windows® Mobile 2003 Operating System
To partner the Bluetooth receiver with the iPAQ PocketPC requires:
Navigation System Software installed on your iPAQ PocketPC.
Bluetooth GPS Receiver is charged.
iPAQ PocketPC is turned on.
Bluetooth GPS Receiver is turned on.
Bluetooth GPS receiver and iPAQ PocketPC are between 5-10 meters of each other.
Establishing a Connection
1. Tap Start at the top of the Today screen on the iPAQ PocketPC.
2. Tap the Settings option on the pop up menu.
3. Tap the System tab at the bottom of the Settings menu.
4. Tap the Bluetooth icon on the System menu.
The Bluetooth General screen displays.
User’s Guide 2-5Setting Up the Bluetooth GPS Receiver
Establishing a Connection
5. Tap the Turn On tab below the Bluetooth status.
The message “Bluetooth is On” displays.
6. Tap Bluetooth Manager to set the connections.
The Bluetooth screen displays.
User’s Guide 2-6Setting Up the Bluetooth GPS Receiver
Establishing a Connection
7. Tap the New tab at the bottom of the Bluetooth screen.
8. Tap Connect! to display the Connection Wizard.
9. Tap Explore a Bluetooth Device from the Connection Wizard options.
10. Tap the Next tab at the bottom of the Connection Wizard screen
11. Tap inside the Device box to display a list of available Bluetooth Devices.
The Bluetooth GPS receiver displays a list of available devices. This creates a
shortcut for the GPS receiver
12. Tap the icon labeled BT-GPS-XXXXXX.
13. Tap Serial XXXXXX on the Service Selection screen to highlight it.
14. Tap the Next tab at the bottom of the Service Selection screen.
15. Tap the Finish tab at the bottom of the Connection Wizard screen.
A box with the connections displays.
16. Tap the BT-GPS-XXXXXX icon, twice, to establish a connection between the iPAQ Pock-
etPC and the Bluetooth GPS receiver.
Green arrows on the icon indicate an active connection.
User’s Guide 2-7Setting Up the Bluetooth GPS Receiver
Checking the GPS Connection Status
Checking the GPS Connection Status
1. To check the status for the Bluetooth GPS receiver and the iPAQ PocketPC, tap the Bluetooth
icon on the Today screen.
The Bluetooth icon is located on the lower right side of the screen.
2. Tap Bluetooth Manager.
The Bluetooth Manager screen displays.
3. Tap the Active Connections tab at the bottom of the screen.
If a connection is established, an icon with the label “BT-GPS-XXXXXX” displays. The green line
next to the icon indicates an active connection.
User’s Guide 2-8Setting Up the Bluetooth GPS Receiver
Receiving Satellite Signals
If the connection is not active, manually partner the Bluetooth GPS receiver with the iPAQ Pock-
etPC. For more information, refer to Manually Partnering the Bluetooth GPS Receiver with the
iPaQ PocketPC section.
Receiving Satellite Signals
The Bluetooth GPS Receiver gets satellite signals only when there is a clear view of the sky. Trees
and tall buildings can block the view. Generally, you do not receive signals inside a building.
The Bluetooth GPS Receiver should be placed on the front or back dashboard
of the vehicle.
A wireless connection between the Bluetooth GPS Receiver and iPAQ Pock-
etPC is established through the receiver radio. The Bluetooth GPS receiver
and the iPAQ PocketPC should be no further than 5-10 meters apart.
Once a connection is established between the Bluetooth GPS Receiver and iPAQ PocketPC, satel-
lite signals are received. When you first use the Bluetooth GPS Receiver, it can take from five to
fifteen minutes to receive a satellite signal. Thereafter, it should take approximately 90 seconds to
receive signals.
Some days, you receive a GPS signal quicker than on other days. Although
GPS signals orbit the earth in set patterns, they are not always over the same
position on earth. There is more extensive coverage over lower latitudes and
less near the poles.
Based on satellite position, geographic location, and heading, you can experience the following:
User’s Guide 2-9Setting Up the Bluetooth GPS Receiver
Receiving Satellite Signals
Satellite signals are received quicker at specific times of the day. For example, at 10 A.M., you
can receive signals under a minute since there are more satellites visible in the sky. At 3 P.M.,
you may not receive signals because only two satellites are visible in the sky.
Buildings can block satellite signals. Setting up the GPS receiver in a vertical window blocks at
least 50% of the sky. Trees also can block satellite signals.
A window with a Southern view, rather than Northern view, should be used to receive signals.
The Bluetooth GPS Receiver needs at least three satellite connections. Using Navigation Sys-
tem, check the GPS Receiver status as follows:
Tap the View tab > GPS Info.
Tap the Menu button > GPS icon.
The GPS Info screen displays.
The Bluetooth GPS receiver performs at its best when the battery is fully
charged. If you are at a location receiving weak signals, verify the Bluetooth
GPS receiver is connected to the DC power charger.
The strongest GPS connection has 4 or more satellites available and the vehicle position dis-
plays in green on the map. If there are 3 satellites available, the vehicle displays in yellow on
the map. If less than three satellites, the vehicle displays in red on the map.
If the iPAQ PocketPC loses connection with a GPS device, tap Tools > GPS Options > Auto
Detect > OK for Navigation System to search for GPS Devices.
User’s Guide 2-10Getting Acquainted with Navigation System
When you start Navigation System, the downloaded map displays in Map View. This provides an
expanded view of the map area around the vehicle location.
Map View is the default selection. You can also select Guidance View to
center in on the map location. For more information, refer to Selecting the
Map Display View.
If you have a GPS signal, the map defaults to the current location.
If you do not have a GPS signal, the map defaults to the last location.
The vehicle icon displays as a green, yellow, or red arrow on the map. The color indicates the num-
ber of available satellites. At the bottom of the map is the vehicle location.
User’s Guide 3-1To see detailed information, for the vehicle location, do one of the following:
Tap on the location description at the bottom of the map.
Tap on the map location and select Info from the Pop Up menu.
User’s Guide 3-2Moving Around the Map
Panning the Map
Moving Around the Map
You can easily move around the map by:
Panning the map in the direction you want it to move.
Zooming in and out of the map display.
Panning the Map
You can tap the pointer on the map and drag it in the direction you want it to move: up down, right
or left. When you remove the pointer from the map, it centers in on the selected location. This lets
you have considerable control over your viewing area
The Map View changes to Map Panning mode. To return to the default map view,
tap the red x on the bottom right side of the Map Panning screen.
Zooming the Map
Navigation System lets you zoom in and out of the map within a 100 feet- 25 mile range. To zoom
the map, do one of the following:
Tap the + (zoom in) or - (zoom out) buttons at the bottom of the screen.
Tap View> Zoom+ or Zoom - to move in or out of the map display.
The map zooms in or out by one unit.
User’s Guide 3-3Using Menus
Zooming the Map
Using Menus
Navigation System is based on a menu structure, including:
Main Menu
File Menu
Tools Menu
View Menu
Pop UP Menu
The File, Tools, View and Pop Up menus provide short cuts to features on the
Main Menu.
User’s Guide 3-4Using Menus
Main Menu
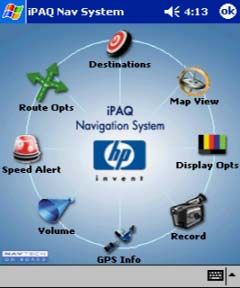
Main Menu
The Main Menu contains all of the options necessary to create and monitor your destination and
route. To access this menu, tap the Menu button on the lower left side of the screen.
.
Options Description
Destinations Sets the destination by address, intersection, points of
interest, contacts, favorite locations, or recent locations.
Map View Displays an expanded view of the map area around the
vehicle location.
Display Opts Sets the map orientation, screen color on the iPAQ Pock-
etPC, automatic or manual guidance, and the display of
POI icons.
Record Records GPS information and street maneuvers.
GPS Info Displays GPS status information.
Volume Sets the guidance volume on or off and sets the volume
level.
Speed Alert Sets an automatic or fixed speed alert.
Route Options Manages your route calculation preferences.
User’s Guide 3-5Using Menus
File Menu
File Menu
The File menu helps you to manage your destination and route. To access the File menu, tap on the
File tab at the bottom of the screen.
Option Description
Enter Destination Displays the Set Destination screen to select a destina-
tion option.
Save Current Location Enters the current location on the Favorites List.
Cancel Route Deletes a route.
Record Track/Stop Recording Records and stops recording GPS and street maneuvers
for your destination. This is a toggle feature.
Play Track/ Stop Playback/ Replays and stops the playback of guidance information
for the recorded route.This is a toggle feature.
About iPAQ Navigation System Displays release version and copyright information for the
software.
Help Displays help for Navigation System features.
Exit Exits Navigation System.
User’s Guide 3-6Using Menus
Tools Menu
Tools Menu
The Tools menu helps you to set destination options. To access the Tools menu, tap on the Tools
tab at the bottom of the screen.
If an option has an arrow to the right of it, there are additional options.
Option Description
Safety Features Warns if vehicle is exceeding the speed limit, and pro-
vides safety warnings during foggy weather conditions.
Distance Units Displays distances in:
• Miles and Feet (English)
• Miles and Yards (English)
• Kilometers (Metric)
Route Options Manages the route calculation preferences.
Display Options Sets the map orientation, screen color on the iPAQ Pock-
etPC, automatic or manual guidance, and the display of
POI icons.
Input Options Sets the Pocket PC Keyboard or the iPAQ Navigation
System Keyboard as the input method.
GPS Options Automatically or manually sets the COM Port and Baud
Rate.
Guidance Volume Sets the guidance volume on or off and sets the volume
level.
User’s Guide 3-7Using Menus
View Menu
View Menu
The View menu lets you display specific information about your destination route. To access the
View menu, tap on the View tab at the bottom of the screen.
Option Description
Map Displays an expanded view of the map area around the
vehicle position.
Guidance Centers in on the vehicle position and displays a smaller
view of the map area.
Route List Displays the maneuvers in a route, beginning with the
start location and ending with the destination.
GPS Info Displays GPS status information and local time.
Almanac Displays sunrise and sunset times, and phases of the
moon for the vehicle location.
Zoom + Zooms the map in.
Zoom - Zooms the map out.
You can only zoom in or out in Map View. Zoom varies from 100 feet to a 25
mile radius around the vehicle.
User’s Guide 3-8Using Menus
Pop Up Menu
Pop Up Menu
The Pop Up Menu provides easy access to options for a specific location. To display the pop up
menu, tap on the screen.
Option Description
Location Displays the street, address, intersection, or location
type.
Set Start Location Sets this location as the vehicle start position.
Set Stopover Sets this location as a stopover on the route.
Set Destination Sets this location as the destination.
Save This Location Adds this location to your list of favorite locations.
Info Displays detailed information for this location.
Cancel Closes the Pop up menu.
User’s Guide 3-9Setting Options
Selecting the Map Display View
Setting Options
Through Navigation System, you can set the following preferences:
Map Display View.
Voice Guidance
Routing Options.
Safety Options
Selecting the Map Display View
Navigation System provides two views for map display: Map View and Guidance View. Map
View is designed to give a broader view around the current location of the vehicle. Guidance View
displays a smaller distance around the vehicle and also displays the distance to the next maneuver.
You can select the view you want for your route, or switch between the two views.
Map View
1. To display the map in Map View, do one of the following:
Tap the Menu button > Map View icon.
Tap the View menu > Map option.
The Map View screen displays.
.
Map View displays an expanded view of the map area around the vehicle position.
You can easily select an address by tapping on the screen with the pointer.
2. Do one of the following:
Tap the Menu button > Display Options icon.
Tap the Tools menu > Display Options.
User’s Guide 3-10Setting Options
Selecting the Map Display View
3. From the Display Options screen select a map orientation, as follows:
Heading Up to automatically orient the map in the direction of vehicle travel.
North Up to maintain the map in a North/South position.
The red arrow in the upper right corner of the menu indicates a North direc-
tion.
Map View Modes
Map View has three view modes as follows:
Connected to a GPS Receiver - Routing
Next Intersection for
Maneuver
Next Maneuver Distance to Next
Instruction Maneuver
Destination
Current Vehicle Position
Toggle for:
Distance to Destination
Remaining Time (Estimated)
Current Location Estimated Time of Arrival
Speed
User’s Guide 3-11Setting Options
Selecting the Map Display View
No Destination Selected
Current Vehicle Position
Currrent Location
Panning Mode -Manually Scrolling the Map
Exit Panning Mode
User’s Guide 3-12Setting Options
Selecting the Map Display View
Guidance View
To display the map in Guidance View, tap the View menu > Guidance option.
The Guidance screen displays.
..
Intersection for Next
Maneuver
Next Maneuver
Distance to Maneuver Box
(Changes as Turn Approaches)
Current Location
Guidance View centers in on the vehicle location, displaying a narrower
view of the map.You can not pan or zoom the map in Guidance View.
4. Do one of the following:
Tap the Menu button > Display Options icon.
Tap the Tools menu > Display Options.
5. From the Display Options screen, select a Guidance Screen option, as follows:
Auto for the map to automatically switch between Map and Guidance View when
approaching a turn maneuver.
Manual to switch from map to guidance view only when selected.
User’s Guide 3-13Setting Options
Setting Voice Guidance
Setting Voice Guidance
Voice Guidance provides verbal instructions for each maneuver in your route. A Speaker icon
appears on the menu bar at the bottom of the map to indicate voice guidance is turned on.
WARNING: For safety purposes, Voice Guidance should be on when oper-
ating the vehicle.
1. To Set the Voice Guidance Level, do one of the following:
Tap on the Menu button > Volume icon.
Tap the Tools menu > Guidance Volume.
The Guidance Volume screen displays.
.
A volume level bar displays in the middle of the screen.
2. Do one of the following:
Tap the + button on the volume bar to increase the volume level.
Tap the - button on the volume bar to decrease the volume level.
3. Tap the Test button to listen to the volume level.
4. Tap on the OK button.
You can turn off Voice Guidance by tapping on the Speaker icon at the bot-
tom of the map. A red x appears on the Speaker icon. Or, you can tap the
Mute button on the Guidance Volume screen. To turn Voice Guidance back
on, tap the Speaker icon or Mute button, again.
User’s Guide 3-14Setting Options
Setting Route Options
Setting Route Options
Routing options let you set up preferences for route calculation.
1. To set up route preferences, do one of the following:
Tap the Menu Button> Route Opts icon.
Tap the Tools menu > Route Options.
The Route Options screen displays.
2. Tap on one of the following route methods:
Quickest Route to calculate a route with minimum travel time.
Shortest Route to calculate a route with minimum travel distance.
3. For the type of roads to include in the route, tap on one of the following:
Major to include major roads, such as highways.
Local for local streets.
4. For reduced turns, tap on one of the following:
Enable to calculate routes that reduce the number of required turns.
Disable to turn off this feature.
5. For toll roads, tap on one of the following:
Include to include toll roads in the route.
Exclude to omit toll roads from the route.
6. For carpool lanes, tap on one of the following:
Include to include carpool lanes in the route.
Exclude to omit carpool lanes from the route.
7. Click on the OK button.
User’s Guide 3-15Setting Options
Setting Safety Options
Setting Safety Options
Safety Options notify you of:
Approaching dangerous intersections (useful with foggy weather conditions).
Exceeding Speed Limits.
For foggy weather conditions,
Tap File menu > Safety Features > Fog Driving.
This alerts you to traffic signals and incoming traffic, which is helpful at intersections.
When you select the Fog Driving option, a check mark displays to the left of
it. You can cancel this option, by tapping on it, again.
For exceeding speed limits,
1. Do one of the following:
Tap Menu button > Speed Alert icon.
Tap File menu > Safety Features > Speed Alert.
The Speed Alert screen displays.
CAUTION: The Map database includes the speed limits posted on all roads.
At times, speed limits can change. HP and its licensors do not guarantee that
the speed alert function always provides accurate warning.
You should obey local driving laws and use good judgment for safe driving at
all times.
User’s Guide 3-16Setting Options
Setting Safety Options
2. Do one of the following:
Tap the Enable Auto Speed Alert box for a warning when you exceed the road speed
limit.
Tap the Enable Fixed Speed Alert box for a warning when you exceed the fixed speed
limit entered in the mph box.
You enter the Fixed Speed Limit using the key pad on the Speed Alert
screen.
3. Tap the OK button.
User’s Guide 3-17Setting Options
Recording a Route
Recording a Route
You can record voice guidance instructions for any route.
1. Before you begin your destination, do one of the following:
Tap the Menu button > Record icon.
Tap File menu > Record Track.
The Save As screen displays.
2. Enter the following information:
Field Name Description
Name The route name.
Folder The name of the folder for storing the route instructions.
Type The type of file to save (GPS Log Files).
Location The folder location.
A down arrow appears to the left of some fields. Tap on the down arrow to
display a list of selections.
3. Click on the OK button.
REC displays in the upper right corner of the map to indicate the recording of
information. You can stop recording information by tapping File menu> Stop
Recording or tapping the Menu button > Record icon.
User’s Guide 3-18Setting Options
Recording a Route
Replaying Route Instructions
To replay route instructions to a destination,
1. Tap File > Play Track.
2. The Open screen displays.
3. Enter the name of the folder storing the destination instructions in the Folder field.
4. Enter GPS Log Files in the Type field.
A down arrow appears to the left of each field. Tap on the down arrow to dis-
play a list of selections.
A list of the files in the selected folder displays.
5. Tap on a file.
Tap on the Up and Down arrows at the top of the column to move through the
list.
Navigation System replays the details for the selected route.
You can stop the playback of route instructions by tapping on File >Stop
Playback option.
User’s Guide 3-19Using The Navigation System
The Navigation System is designed to guide you to your destination in the most efficient manner.
Easy-to-use- features let you:
Enter a Destination by address, intersection, point of interest, favorite location, or a recent location.
Set up Stopovers along the route.
Indicate areas to avoid along the route.
The calculated route for a destination displays in blue on the map. If you miss a turn in the
route, Navigation System recalculates the route and briefly displays “Recalculating Route”
on the map display.
Before Using the System:
Clock and time settings are accurate by tapping Start >Settings >System>Clock.
Bluetooth GPS Device is on by tapping the Bluetooth icon at the bottom of the Start
screen.
Entering a Start Location
The Navigation System defaults to the current location as the starting point for route calculation, as
specified by the GPS signal. You can enter a start location if you are not connected to a GPS
receiver, do not have a GPS signal, or want another point of origin.
To enter a start location, do one of the following:
Tap and hold the pointer on the map location. A pop up menu with the selected address displays.
Tap the Set Start Location option on the pop up menu.
You can pan the map to the location by moving the map with the pointer.
Tap the Menu button > Destinations icon. Enter the destination information. For more informa-
tion, refer to the Entering a Destination section.
User’s Guide 4-1Entering a Destination
Entering a Destination
To enter a destination, do one of the following:
Tap the Menu button > Destinations icon.
Tap and hold the pointer on the map location. When a dialog box with the location address dis-
plays, tap the Set Destination option.
The Set Destination screen with options displays.
User’s Guide 4-2Entering a Destination
Setting a Destination by Address
Setting a Destination by Address
1. Tap Address on the Set Destination screen.
The Select Input Method screen displays.
In the left top corner of the screen is the map region or area. If this is not correct, click on the
Change button to select the correct one.
2. Select an Input Method as follows:
Tap Street First to enter a street address, including the house number.
Tap City First to enter the city name and street address, including the house number.
A search by City First is faster than a search by Street First.
When you enter a street or city, dialog boxes similar to the following display:
User’s Guide 4-3Entering a Destination
Setting a Destination by Address
.
At the top of the screen is a list of valid entries (cities, streets, or house numbers). When you
enter an address, do not enter the street type, such as Ave or St.
3. Select an entry, as follows:
Scroll through the list by using the scroll keys at the right of the list.
Tap in characters using the keypad at the bottom of the screen.
4. Tap on the OK button after each entry.
As you tap in characters, the system updates and displays the Select Address List.
User’s Guide 4-4Entering a Destination
Setting a Destination by Address
5. To select an entry, tap on it in the Select Address List.
You can use the Up and Down arrows at the bottom of the screen to move through the list of
addresses.
6. Tap on one of the following buttons at the bottom of the screen:
Nav to calculate the route and center in on the map location.
Fav to add this location to your list of favorite locations.
Map to set this location as the starting route point for your destination.
User’s Guide 4-5Setting a Destination by Intersection
1. Tap Intersection on the Set Destination screen.
The Select Input Method screen displays.
2. Select an Input Method as follows:
Tap Street First to enter the names of two intersecting streets.
Tap City First to enter the city name and two intersecting streets.
When entering an address, do not enter the street type, such as ave or st.
User’s Guide 4-6Entering a Destination
Setting a Destination by Intersection
When you enter a street or city, dialog boxes similar to the following display:
For an intersection, there are two address dialog boxes for the two intersecting streets.
3. To select an entry, do one of the following:
Scroll through the list using the scroll keys at the right of the list.
Tap in the characters using the keypad at the bottom of the screen.
4. Tap on the OK button after each entry .
As you tap in characters, the system updates and displays the Select Address List.
User’s Guide 4-7Entering a Destination
Setting a Destination by Intersection
5. To select an entry, tap on it in the Select Address List.
6. Tap on one of the following buttons at the bottom of the screen:
Nav to calculate the route and center in on the map location.
Fav to add this location to your list of favorite locations.
Map to set this location as the starting route point for your destination.
User’s Guide 4-8Entering a Destination
Setting a Destination by Point of Interest
Setting a Destination by Point of Interest
The map database contains over one million points of interest (POIs) within the U.S. and Canada.
POIS are divided into categories and represented by icons on the map.
To select a POI:
1. Tap Points of Interest on the Set Destination screen.
The Select Input Method screen displays.
You can turn on or off the display of POI icons on the map through the Display options on
the Tools menu. You can navigate to a POI even if it is not displayed on the map.
2. Tap on a Points of Interest category.
3. Tap on the OK button.
User’s Guide 4-9Entering a Destination
Setting a Destination by Point of Interest
The Points of Interest Options is displayed.
At the bottom of the screen is the map region or area. If this is not correct, click on the
Change button to select the correct one.
4. Do one of the following:
Select a POI alphabetically, within a 25 mile radius. For more information, refer to the
Selecting a POI Alphabetically section.
Select a POI by distance, within a 25 mile radius. For more information refer to the Select-
ing a POI By Distance section.
Select a POI By City.For more information, refer to the Selecting a POI By City section.
User’s Guide 4-10Entering a Destination
Setting a Destination by Point of Interest
Selecting a POI Alphabetically
1. Tap Alphabetically on the Points of Interest Options screen.
The Enter POI Name screen displays.
2. Select an entry, as follows:
Scroll through the list by using the scroll keys at the right of the list.
Tap in characters using the keypad on the screen.
3. Tap on the OK button.
The POI Select screen displays.
4. Tap on one of the following buttons at the bottom of the screen:
Nav to calculate the route and center in on the map location.
Fav to add this location to your list of favorite locations.
Map to set this location as the starting route point for your destination.
User’s Guide 4-11Entering a Destination
Setting a Destination by Point of Interest
Selecting a POI By Distance
1. Tap By Distance on the Points of Interest Options screen.
A POI List with the points of interest within a 25 mile radius displays.
.
Select an entry by scrolling through the list and tapping on it.
2. Tap on one of the following buttons at the bottom of the screen:
Nav to calculate the route and center in on the map location.
Fav to add this location to your list of favorite locations.
Map to set this location as the starting route point for your destination.
User’s Guide 4-12Entering a Destination
Setting a Destination by Point of Interest
Selecting a POI By City
1. Tap By City on the Points of Interest Options screen.
The Enter City Name screen displays.
2. Select a city, as follows:
Scroll through the list using the scroll keys at the right of the list.
Tap in characters using the keypad at the bottom of the screen.
3. Tap on the OK button.
The Enter POI Name screen displays.
User’s Guide 4-13Entering a Destination
Setting a Destination by Point of Interest
4. Select a POI as follows:
Scroll through the list by using the scroll keys at the right of the list.
Tap in characters using the keypad at the bottom of the screen.
5. Tap on the OK button.
The POI Select screen displays.
6. Tap on one of the following buttons at the bottom of the screen:
Nav to calculate the route and center in on the map location.
Fav to add this location to your list of favorite locations.
Map to set this location as the starting route point for your destination.
User’s Guide 4-14Entering a Destination
Setting a Destination From the Contacts List
Setting a Destination From the Contacts List
1. Tap Contacts on the Set Destination screen.
The Enter Contact Name screen displays.
The name must appear in the Contact List on your iPAQ PocketPC. The contact information
must be accurate and in the correct format for Navigation System to make a match.
2. Select a contact name, as follows:
Scroll through the list using the scroll keys at the right of the list.
Tap in the characters using the keypad at the bottom of the screen.
Since Navigation System enters the contact names alphabetically by last name, you should
enter the last name, or first character of the last name when searching for a contact.
3. Tap on the OK button.
User’s Guide 4-15Entering a Destination
Setting a Destination From the Contacts List
The Select Address screen displays.
This screen contains the contact’s home address, business address and/or any additional
address entered.
4. Tap the address.
Navigation System sets the selected contact location as the destination and calculates the
route.
User’s Guide 4-16Entering a Destination
Setting a Destination From the Favorites Location List
Setting a Destination From the Favorites Location List
1. Tap Favorites on the Set Destination screen.
The Favorite Destination screen displays.
This screen lists all locations that you saved as favorites. You can use the up and down arrows
at the bottom of the screen to move through the list.
You can also tap on the map location and tap Save This Location from the pop up menu.
2. Tap on one of the following buttons at the bottom of the screen:
Nav to calculate the route and center in on the map location.
Map to set this location as the starting route point for your destination.
To change information for a favorite location, tap the Edit button. Or, tap the Del button to
remove a location from your Favorite Destinations list.
User’s Guide 4-17Entering a Destination
Setting a Destination from the Recent Destinations List
Setting a Destination from the Recent Destinations List
1. Tap Recent on the Set destinations screen.
The Recent Destinations screen displays.
This screen lists all of your recent destinations. You can use the up and down arrows at the
bottom of the screen to move through the list.
2. Tap on one of the following buttons at the bottom of the screen:
Nav to calculate the route and center in on the map location.
Map to set this location as the starting route point for your destination.
To change information for a recent location, tap the Edit button. Or, tap the Del button to
remove a location from your Recent Destinations list.
User’s Guide 4-18Managing the Destination and Route
Setting a Destination from the Recent Destinations List
Managing the Destination and Route
After you enter a destination, Navigation System calculates the route. To manage your destination
and route, do one of the following:
Tap on the Menu button > Destinations icon.
Tap File > Destinations.
The Destination Options screen displays.
.
Tap on one of the following buttons:
Detour to enter roads to avoid along the route. For more information, refer to the Entering
Detours section.
Stopover to enter places to stop along the route. For more information, refer to the Entering
Stopovers section.
Clear Dest to clear the current destination and enter a new destination. For more information,
refer to the Clearing a Destination section.
New to clear the current destination and enter a new destination. For more information, refer to
the Entering a Destination section.
Back to display the map view.
User’s Guide 4-19Managing the Destination and Route
Entering a Detour
Entering a Detour
After your route is calculated, you can enter a section to avoid on the route. Navigation System
recalculates the route to exclude the detour area.
A warning displays if there is no detour for the current route.
1. Tap the Detour button at the bottom of the screen.
The Avoid Roads list displays.
2. Tap the road to avoid.
3. Tap on the Avd button.
User’s Guide 4-20Managing the Destination and Route
Entering a Detour
A red x displays in the column to the left of the selected road.
4. Repeat steps 1-3 for each road to avoid.
5. Tap on the Nav button to recalculate the route.
To cancel a selection, tap on it and tap the Clr button.To cancel all selections, tap the Rst
button.
User’s Guide 4-21Managing the Destination and Route
Entering Stopovers
Entering Stopovers
A stopover is an intermediate location on your route. This feature guides you to the intermediate
location and then continues to the destination.
To enter a stopover:
1. Tap the Stopover Button on the Destination Options screen.
The Set Stopover screen displays.
You can also tap on the map location and tap Set Stopover from the pop up menu.
2. Tap on a Stopover Category.
3. Enter the Stopover information.
Refer to the Entering a Destination section for the steps to enter information for a specific
category.
Clearing a Selected Destination
To cancel a selected destination, do one of the following:
1. Tap on the Menu button > Destinations option.
2. Tap on the Clear Dest button on the Destination Options screen.
The screen displays in Map View mode.
User’s Guide 4-22Navigating the Vehicle
Using Day vs. Night Display
Navigating the Vehicle
After you have entered a destination and selected the Nav option, Navigation System quickly calcu-
lates a route based on your preferences and guides you to your destination. The guidance includes:
A map that automatically scrolls as the vehicle moves.
Voice instructions for each maneuver.
A list of route instructions.
Map View is the default for guidance. Depending on the preferences you select, the view automat-
ically changes to Guidance View as you approach a maneuver.
Using Day vs. Night Display
The Navigation System can display the map or guidance view in one of the following modes:
Day Mode to set the screen color for daylight driving conditions.
User’s Guide 4-23You can also read