2.14 Security - Copyright 2021 Agiloft Inc. All Rights Reserved.
←
→
Page content transcription
If your browser does not render page correctly, please read the page content below
2.14 — Security

 © Copyright 2021 Agiloft Inc. All Rights Reserved.   HELP-31Mar2021
CONTENTS
1. Security Recommendations . . . . . . . . . . . . . . . . . . . . . . . . . . . . . . . . . . . . . . . . . . . . . .                     3
    1.1 General Security Guidelines . . . . . . . . . . . . . . . . . . . . . . . . . . . . . . . . . . . . . . . . . .                     3
    1.2 Password Management . . . . . . . . . . . . . . . . . . . . . . . . . . . . . . . . . . . . . . . . . . . . .                       5
    1.3 Hotlinks . . . . . . . . . . . . . . . . . . . . . . . . . . . . . . . . . . . . . . . . . . . . . . . . . . . . . . . . . . .      7
2. Single Sign-on . . . . . . . . . . . . . . . . . . . . . . . . . . . . . . . . . . . . . . . . . . . . . . . . . . . . . . . . . .       9
    2.1 Google OAuth 2.0 SSO . . . . . . . . . . . . . . . . . . . . . . . . . . . . . . . . . . . . . . . . . . . . . . .                  9
    2.2 SAML 2.0 SSO . . . . . . . . . . . . . . . . . . . . . . . . . . . . . . . . . . . . . . . . . . . . . . . . . . . . . .            16
3. Two-Factor Authentication . . . . . . . . . . . . . . . . . . . . . . . . . . . . . . . . . . . . . . . . . . . . . . .                  23
4. Security . . . . . . . . . . . . . . . . . . . . . . . . . . . . . . . . . . . . . . . . . . . . . . . . . . . . . . . . . . . . . . .   27
5. Activity Logs Setup . . . . . . . . . . . . . . . . . . . . . . . . . . . . . . . . . . . . . . . . . . . . . . . . . . . . . .          35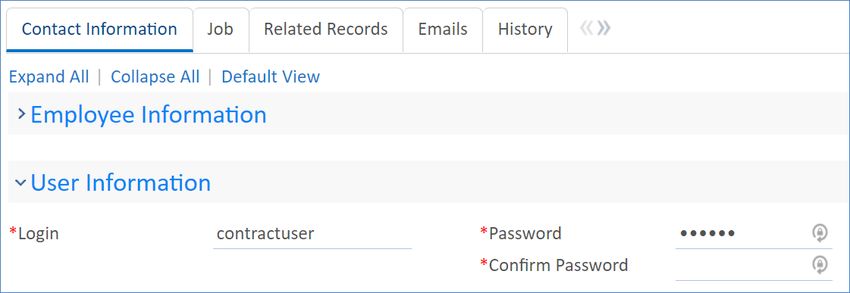
Security Recommendations
  The following articles provide guidelines and general recommendations to help ensure the security of Agiloft.
  When configuring your system, make sure you read and follow the recommendations in these articles to
  guard against potential security vulnerabilities.

  General Security Guidelines
  The following methods are best practices for ensuring the security of Agiloft and the server it runs on. We
  highly recommend that you use each method below to protect your data and reduce the likelihood of security
  vulnerabilities in your system.

  Follow the Principle of Least Privilege
  Do not allow users to have privileges they do not need or do not have the skills to use safely. For example, a
  user with the ability to delete all records in a table in one operation can do considerable unintentional
  damage if they are not familiar enough with Agiloft's architecture. Only trusted and trained users should be
  placed in the Admin group because members of this group can make drastic changes to the structure and
  data of your system.

  Use Secure Sockets Layer (SSL)
  Use SSL via HTTPS to secure web browser connections to the Agiloft server. Using standard HTTP to connect
  to the Agiloft server exposes passwords and potentially sensitive information to anyone able to monitor
  network traffic. The ability to intercept network traffic also opens up additional methods of attack.

  To connect to your web server using SSL, you need to configure it manually because SSL is not configured by
  default. This involves purchasing or generating a server certificate that authenticates your server to the
  clients. This configuration differs depending on the host operating system and the web server software you
  use. The following resources may help:

        Securing Your Apache 2 Server with SSL
        Van's Apache SSL/TLS mini-HOWTO
        How to implement SSL in IIS

  Even if you must allow access to some accounts through standard HTTP, ensure that HTTPS is used to access
  more sensitive accounts, such as those in the Admin group or with login access to the admin console.

  Restrict Login Access to the Agiloft Server
  Make sure that only trusted and experienced users have access to the Agiloft server. A root user on Unix
  /Linux or a user in the Administrators group in Windows can use their special privileges to circumvent Agiloft
  internal security. Even unprivileged users can circumvent security by using local web access, so make sure you
  appropriately restrict all methods of accessing the server.

© 2021 Agiloft Inc.                                                                                         3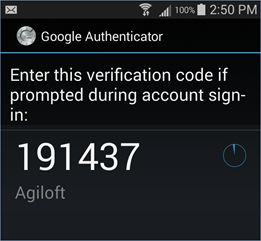
Restrict Services Accessible on the Agiloft
  Server
  Treat the Agiloft server as you would any other sensitive server. Only allow connections essential for Agiloft
  operation, such as HTTP and HTTPS, and connections required for administration, such as SSH for Unix/Linux
  or Terminal Services for Windows. Additional services or applications that run on the same server machine,
  including other web applications, may potentially contain security holes that could lead to the compromise of
  Agiloft data.

  The default services installed with most recent Linux distributions are generally minimal. To aid security, use
  the nmap tool to verify which ports are exposed on your server, which may return a result like the following:

   linux# nmap -sS wizard.example.com
   Starting Nmap 4.00 ( http://www.insecure.org/nmap/ ) at 2006-12-14 18:12 PST
   Interesting ports on wizard.example.com (10.0.0.1):
   (The 1667 ports scanned but not shown below are in state: filtered)
   PORT      STATE SERVICE
   22/tcp    open   ssh
   80/tcp    open   http
   113/tcp   closed auth
   443/tcp   open   https
   8080/tcp open    http-proxy
   MAC Address: 00:E0:81:00:00:12 (Tyan Computer)
   Nmap finished: 1 IP address (1 host up) scanned in 64.320 seconds
   linux#

  For reference, these are the TCP ports normally used by Agiloft:

   Port         Description
   number

   80          The standard HTTP port that connects to the Apache or IIS web server. The /gui2/ URL is
               forwarded to the Tomcat server and is the normal unsecured access port to the Agiloft
                application.

   8080        The native connection port to the Tomcat server that is part of the Java framework behind
               Agiloft.

   443         The standard HTTPS port for web service over SSL. This is either forwarded to the Tomcat
               server by the native web server or forwarded directly to port 8443 by Linux kernel using the
               internal firewall module.

   8443        The native HTTPS port that Tomcat may be configured to listen to. It is often better to use the
               SSL engine in Tomcat with requests forwarded from port 443 than to configure the native Web
               server for SSL and request forwarding.
   3306        The standard server port for MySQL, the default Linux back-end database, This port is not
               exposed externally; in other words, it is bound only to localhost.

© 2021 Agiloft Inc.                                                                                          4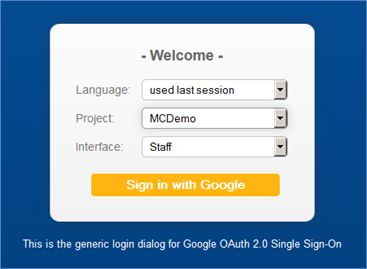
Password Management
  Password options in Agiloft satisfy military-grade security requirements and can be made as strict or lenient
  as you require. Users are often granted access to change their own passwords, but the default settings only
  allow admin users to change other users’ passwords.

  Creating secure passwords is very important. For passwords to be resistant to attack and malicious users,
  they should adhere to several guidelines:

        Be at least 8 characters in length
        Contain a mixture of upper and lowercase characters
        Contain one or more numbers or other non-alphabetic characters
        Not be derived in any obvious way from the username

  All power user accounts should be secured with such passwords, especially those in the Admin group. If you
  wish to give end user accounts simple passwords for their convenience, then these users should be severely
  restricted in their permissions. For example, you might only allow them access to a single record form to
  complete. If you allow end users to modify existing records or view sensitive data, they should be given
  secure, attack-resistant passwords.

        For the most secure passwords, we recommend requiring a minimum password length of 12–14
        characters with at least one uppercase, one lowercase, one numeric, and one symbolic character.

  Password Field Wizard
  The Password Field wizard is used for creating new Password fields and editing existing Password fields. To
  access the wizard, navigate to the Fields tab of a Table wizard and select New > Password, or edit an existing
  Password field.

  The wizard is very similar to other Field wizards, with General, Options, Permissions, and Display tabs. Only
  the Options tab contains unique settings, which determine the password requirements mentioned above, as
  well as additional options that improve password security:

        Preventing the login and password from being the same value and a password from containing the
        login string
        Requiring users to change their password if it is reset
        Invalidating passwords or locking an account after a number of failed login attempts
        Controlling password reuse
        Controlling password expiration time
        Adding password encryption
        Requiring confirmation of new passwords
        Excluding dictionary words from passwords

© 2021 Agiloft Inc.                                                                                        5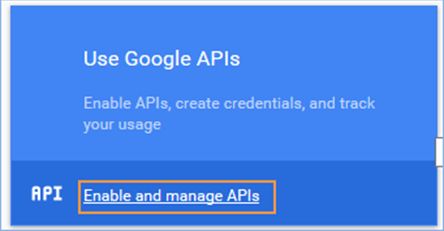
Password Fields and Subtables
  Password fields, like other data types, allow for different settings on different subtables. For instance, the out-
  of-the-box KB has Employees and External Users subtables on the People table. If only employees log in to the
  system, it's reasonable to make the Password field required on the Employees subtable but not the External
  Users subtable.

  In other cases, you may want to require longer and stricter passwords for employees and let end users create
  passwords with fewer characters and requirements. Although this option provides useful flexibility, every
  unique password configuration requires additional future maintenance.

  Changing Passwords
  By default, only admin users are able to change other users' passwords. Admin users are also able to change
  the password of the admin console for on-premise installations.

  Non-admin users are able to manage their own passwords once they have logged in to the system. For more
  information on this process, see Change Passwords.

  Changing Other Users' Passwords
  In some cases, admins may want or need to change the passwords for other users in the system. Use the
  following steps to change another user's password:

     1. In the left pane, select the People table.
     2. Edit a user's record.
     3. On the Contact Information tab, enter the new password in the fields and click Finish.

  Changing the Admin Console Password
© 2021 Agiloft Inc.                                                                                           6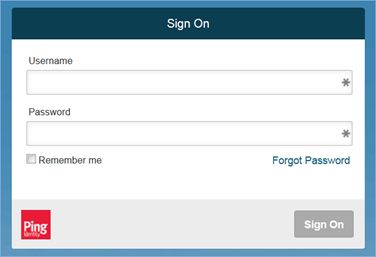
Changing the Admin Console Password
  All on-premise installations are given the same default admin console password, so it's critical to change the
  password during the initial installation:

     1. Log in to the admin console.
     2. On the left pane, click People.
     3. Edit the admin user record and click Change Password.
     4. Enter the existing and new password, and then click Save.
     5. Save the admin user record.

  Sample User Passwords
  Each out-of-the-box knowledgebase is automatically populated with a number of sample users. Sample users
  are given easy-to-remember and therefore insecure passwords by default. These passwords should be
  changed if you plan to keep these user records. You can also simply delete the sample users, with some
  exceptions.

  Three users are essential for certain functionalities and should never be deleted: anonymous, register, and
  guest. The system also contains four admin-level users that should be given highly secure passwords:
  admin, busadmin, ewsystem, and system.

  Hotlinks
  Hotlinks are a form of hyperlink within Agiloft that allow external users to access the system or a specific
  record by clicking a link. Hotlinks can execute complex functions, such as logging in to a specific table, running
  a saved search, and more. You can embed hotlinks in emails from within Agiloft and have them generated at
  runtime, or you can generate them manually and use the links outside of Agiloft. To ensure hotlinks are
  secure, use encryption and user authentication, which are important security features. This page focuses on
  these security features, but for information on how you can create hotlinks, see Hyperlinks.

  User Authentication
  System-generated hotlinks are automatically encrypted, so it is not possible to use them to obtain user login
  details, but it can still be important to require user authentication. If a malicious user has access to the
  encrypted link, they could still access the system and edit or view a record. There are two recommended levels
  of protection against this possibility, which involve variations of user authentication.

  To configure either of these two levels of protection, click the Setup gear in the top-right corner and go to
  Access > Configure Hotlinks:

  Hotlinks
© 2021 Agiloft Inc.                                                                                           7
The recommended option is to require the user to enter their login and password the first time that
they use a hotlink from a particular device. This prevents anyone else from using the hotlink, unless
they also have access to that workstation or the login information. If you choose this option, you have
additional options to provide an exception for certain users and an expiration date, after which users
need to re-enter their login and password when using a hotlink.
The second option is to require the user to enter their login and password every time they use a hotlink.
This is an even more secure option, but it requires additional effort that some users may find
cumbersome.
Manually Encrypted Hotlinks
You can create hotlinks manually for use in action buttons or outside the system, but they are not
automatically encrypted. Instead, manually created hotlinks must also be manually encrypted. We
highly recommend encrypting any hotlinks you create; otherwise, the username and password that the
hotlink uses will be visible within the link itself.
Follow these steps to manually encrypt a hotlink:
1. Go to Setup > Access > Automatic Login Hotlinks.
2. Select any groups to exclude from using the hotlink.
3. Enter the hotlink in the Encrypt Hotlink box.
4. Select an expiration time for the hotlink, after which the hotlink will no longer work.
5. Click Encrypt. The newly encrypted hotlink then appears in the Encrypted Hotlink box. You can copy and
paste the link as needed.
Example
Imagine you enter the following hotlink:
http://localhost:8080/gui2/login.jsp?
keyID=0&KB=TESTKB&user=admin&passwd=testpassword&state=Main
In this example, you can clearly derive the username and password from the link. After clicking
Encrypt, the system encrypts the sensitive portions of the link and generates an output like the
following:
http://localhost:8080/gui2/login.jsp?p=a&genhotlink=Aj3ze1x9W5xwlXRB
/MPL8VHo+m72uHf350nT13m+vhPCU41hVmkMfVVj/YGTEbLYYfHpv6Y
© 2021 Agiloft Inc. 8Single Sign-on
Single Sign-On (SSO) is a secure access method that allows users to use one login for many applications. With
so many applications in use, remembering and storing passwords can be burdensome for users and
compromise security. Single sign-on methods share a common goal of simplifying user access by
authenticating against a single identity source, which in turn communicates with other applications to grant
access.
Agiloft integrates with several SSO methods, listed here:
Google OAuth 2.0 SSO
SAML 2.0 SSO
Windows SSO
Single Sign-on with CAS
SPNEGO Kerberos Authentication
Google OAuth 2.0 SSO
Use this guide to configure an Agiloft knowledgebase to use Google Single Sign-On (SSO).
Initial Administrator Setup
In order to complete the configuration steps, you need a Google account, typically a Gmail address, to log in to
the Google Developer Console. You may use any Google account to set up your Agiloft/OAuth project; it does
not have to be associated with an Agiloft user. The address should be the one that you intend to use within
Agiloft to sign on and access Google Docs. Google SSO can be configured with an SSO role or an APPS role.
Step 0: Finding the KB Redirect Address
Before you can start setup in the Google Developer Console, you need to find the redirect address for the KB
you want to set up. As the admin user, log in to the Agiloft KB where you want to set up OAuth/Google SSO.
1. Navigate to Setup > Access > Configure OAuth 2.0 Profiles and click New to create a new SSO profile.
2. Copy the address in the Redirect URI field and paste it into another program for reference later, such as
Notepad.
For an SSO role, this value should be: https://:443/gui2/oauth20sso
For an APPS role, this value should be: https://:443/ui/oauth20callback
3. Click Cancel.
Step 1: Configuring the Google Developer
Console
The following configuration steps are derived from the steps provided at https://developers.google.com
/accounts/docs/OAuth2Login#appsetup. They are designed to help you integrate Google OAuth 2.0 SSO with
Agiloft.
1. Log in to the Google Developers Console using the Google account which was created for this purpose.
2. Create a new project
© 2021 Agiloft Inc. 9a. Click the drop-down at the top right and select Create a project.
b. In the next dialog box, enter a project name and click Create, then wait for project creation to
finish. You will see the Project Dashboard when it is done.
3. In the Use Google APIs section, click Enable and manage APIs.
a. In the left pane of the API Manager window, click Credentials.
If you wish to enable Google Docs integration with Agiloft, you can use the Drive API option in this
window. This will be covered in more detail below.
b. In the Credentials dialog, select the OAuth consent screen tab.
i. Enter your Google Email address.
ii. Enter the Product name that will appear in the consent screen.
© 2021 Agiloft Inc. 10b.
iii. Optionally, enter the URL for the logo of your Agiloft instance, which will appear in the
consent screen.
iv. Click Save.
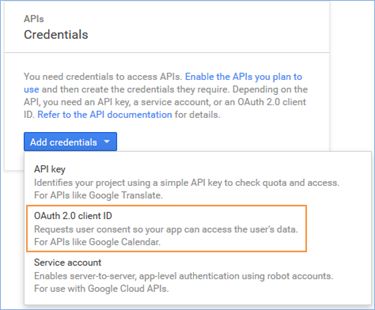
c. Select the Credentials tab, and select Add credentials > OAuth 2.0 client ID.
d. Select the Web application radio button.
i. Optionally, enter a name for the web client.
ii. Leave the Authorized JavaScript origins field blank.
iii. In the Authorized redirect URIs field, enter the URL you copied from the KB.
For an SSO role, this value should be: https://:443/gui2/oauth20sso
For an APPS role, this value should be: https://:443/ui
/oauth20callback
iv. Save this URL, which will be used to create your OAuth profile in Agiloft.
v. Click Create.
© 2021 Agiloft Inc. 11e. In the OAuth client dialog, save the client ID and client secret values. You will need to input the
same values in the OAuth 2.0 Configuration wizard in each Agiloft KB where you will use Google
OAuth 2.0 based SSO.
Step 2: Enabling the Google Apps API
Complete this step if you plan to use Google Drive integration so that you can upload Google Docs to any file
fields in Agiloft. The file field must also have Google Docs enabled.
To enable Google Docs for a file field, edit the field in question, and then in the Options tab of the field wizard,
select Yes under Allow Google Documents.
1. Navigate to the Overview window of the API Manager and click Drive API.
2. Click Enable API.
© 2021 Agiloft Inc. 123. Optionally, navigate to the Drive UI Integration tab and configure the options for Google Drive
integration with Agiloft.
4. Exit the Google Developers Console.
Step 3: Configuring SSO in the Agiloft KB
As the admin user, log in to the Agiloft KB where you want to set up OAuth/Google SSO.
1. Navigate to Setup > Access > Configure OAuth 2.0 Profiles and click New to create a new SSO profile.
Note: Multiple profiles can be set up to manage the Google OAuth roles. This is important when
enabling Google Drive integration.
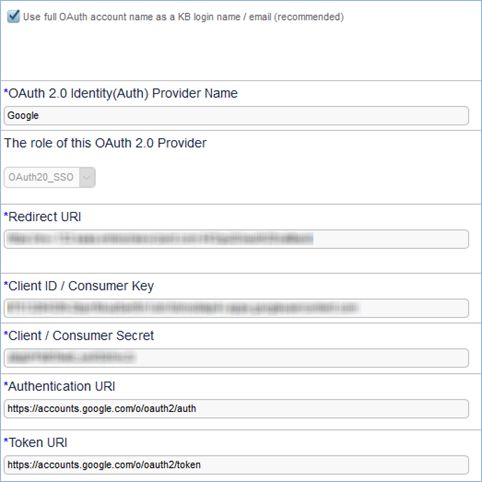
2. Leave the Use full OAuth account name checkbox selected.
3. Enter a name for the OAuth 2.0 provider, such as Google.
4. For The role of the OAuth 2.0 Provider, select OAuth20_SSO.
5. Enter the following information in the remaining fields:
a. Redirect URI: Leave the default value here.
b. Client ID/Consumer Key: The client ID value provided above.
c. Client/Consumer Secret: The client secret value provided above.
d. Authentication URI: For Google OAuth 2.0 based SSO, enter https://accounts.google.com/o
/oauth2/auth.
e. Token URI: For Google OAuth 2.0 based SSO, enter https://accounts.google.com/o/oauth2/token
f. Click Finish to save the OAuth 2.0 configuration.
6. To allow users to sign into Agiloft using Google OAuth 2.0 based SSO, ensure that at least one of the
following conditions is satisfied:
a. The Login name of the Agiloft user is the same as the user’s Gmail account.
or
b.
© 2021 Agiloft Inc. 13b. The Email Address of the Agiloft user is the same as the user’s Gmail account.
7. To enable OAuth2.0 for your users when they click a hyperlink sent within an email, change the Hotlink
Type global variable value to OAUTH20. You can do this on either the Admin Console or Power User
interface.
8. Log out as the admin user.
Once the above steps are completed, Agiloft users will be able to log in using their Google account.
Configuring Google Drive in the Agiloft KB
The steps to configure Google Drive integration in Agiloft are very similar to the above procedure. The only
differences are:
1. In the OAuth 2.0 Identity Provider Name field, enter GOOGLE APPS.
2. For The role of this OAuth 2.0 Provider, select Google_APPS.
3. This will create a Google Apps profile that will enable you to use Google Docs files within the Agiloft KB.
Logging into Agiloft using your Google
account
Before completing the following steps:
The Agiloft KB must already be configured to support Google OAuth SSO.
Each user to be authenticated must have an email address or username in the OAuth Identity Provide
such as Google, which matches either the Login or Email Address of the user’s record in Agiloft.
Signing in with Google
1. In your browser, enter the address of the OAuth 2.0 SSO Landing Page as follows: https:///gui2/googleoauth.jsp, where is the FQDN/IP Address of the Agiloft instance.
2. Select appropriate values for Language, Project (KB), and Interface, then click Sign in with Google.
Note: The Project/KB must have OAuth 2.0 configured.
© 2021 Agiloft Inc. 143. If you are not already signed in or authenticated, you will be prompted for the Google user name and
password.
4. Enter your Google ID which matches an Agiloft user and valid password.
a. If you are logging in with Google OAuth 2.0 for the first time, you may be prompted with a
consent screen as follows:
b. Click on Accept to continue with the login. You will be redirected to your Agiloft knowledgebase.
c. The PRODUCT NAME chosen during SSO setup will be shown to users on the login screen above.
SAML 2.0 SSO
© 2021 Agiloft Inc. 15SAML 2.0 SSO
Agiloft integrates with a variety of SAML authentication providers, or Identity Providers (IdPs). SAML-based
SSO is a leading method for providing federated access to multiple applications for your users or end users.
This short guide assists you in configuring SAML authentication with your Agiloft knowledgebase.
SAML 2.0 Terminology
Identity Provider (IdP) – Software that provides Authentication Service and uses SAML 2.0 protocol to
assert valid users.
Service Provider (SP) – Software that trusts an Identity Provider and consumes the services provided
by the Identity Provider.
SAML Metadata XML – An XML document containing SAML2.0 configuration data.
SAML Assertion XML – An XML document that provides information about a user authenticated by an
IdP.
Set up SAML 2.0 SSO
The following highlights the steps needed to integrate any SAML 2.0 IdP with an Agiloft knowledgebase. Please
refer to your IdP for instructions on how to configure access to a service provider, where Agiloft acts as the SP.
Prerequisites
Administrator-level login credentials for Agiloft and your SAML provider.
Obtain the configuration details from your IdP. These are typically provided in an XML file, commonly
known as IdP SAML Metadata XML. Download the XML file from your IdP. If your IdP does not provide
the configuration via XML file, you must obtain the following details from the Identity Provider:
IdP Entity
IdP Login
IdP Logout URL
IdP X.509 certificate
Note down the SAML Attribute names containing user groups and teams if you will create users in
Agiloft during login events.
© 2021 Agiloft Inc. 16When you configure SAML SSO in Agiloft, you will have the option to create users in Agiloft when they first log
in. If you choose this option, you'll also need to select which default groups and teams the user is assigned to,
or map them from SAML attributes. You'll need the exact names of the SAML attributes containing the user's
groups, teams, and Primary Team.
Configure Agiloft
Follow these steps in Agiloft to configure the SAML connection.
1. Log in to your Agiloft knowledgebase as an admin user.
2. Click the Setup gear in the top-right corner and click Access.
3. Click Configure SAML 2.0 Single Sign-on to open the SAML Configuration wizard.
4. On the General tab:
a. Select the Enable SAML SSO checkbox.
b. Optionally, select the "Create SAML IdP Authenticated user in Agiloft" checkbox. This creates
users in Agiloft from those in the SAML system when the connection is first established. If this or
the next option is selected, the User Field(s) Mapping tab will appear when you click Next.
c. Optionally, select "Update User fields on subsequent logins by an existing user." This will update
the mapped user fields from SAML whenever the user logs in. If this option is selected, the User
Field(s) Mapping tab will appear.
d. If the "Create SAML IdP Authenticated user" or "Update User fields on subsequent logins by an
existing user" options were selected, choose a Persons table or subtable to map user fields from
SAML to Agiloft.
5. User Group Mapping tab: Select any default Groups for the new SAML user, or map the user's group
from an attribute in their SAML profile, at creation and on subsequent logins. You can set up user
mapping after the initial configuration, too.
6. User Team Mapping tab: Select any default Team for the user, or use IdP or SAML attributes to define
the team, at creation and on subsequent logins.
7. User Field(s) Mapping tab: If this tab is open, create the mappings between the SAML attributes and the
field names of the Persons table in Agiloft. By default, this tab shows all of the field names of a user's
record which can be mapped to SAML attributes. If you only want a specific set of field names to appear
for mapping, you can restrict which fields appear using the List of fields from 'contact' table/subtable to
be used in SAML configuration global variable.
8. The Service Provider Details tab contains information to connect to Agiloft as the Service Provider.
Hosted customers must contact support to enter the provider details on this tab. Enter the following
information:
© 2021 Agiloft Inc. 17a. Agiloft (SP) Entity Id: Enter a unique identifier string for the Agiloft KB. Use the same identifier
when configuring the Identify Provider. The system will automatically populate this field with a
value of {server}/{KBName}, e.g. agiloft.example.com/mykb.
b. SAML V2 Assertion Consumer Service (ACS) Endpoint: The value in this field should be in the form:
http(s)://{server}/gui2/spsamlsso?project={KBName}
Write down these two values—they will be used to configure your Identity Provider (IdP).
c. Java Key Store (JKS) details. The Private Keys for HTTPS communication with Agiloft are stored in
the Java Key Store (JKS) file on the Agiloft Server. The same Key pair will be used to digitally sign
the SAML XML exchanged between the Agiloft server and IdP. For more assistance, see: Generate
a Keystore File. Enter the following values:
i. Java Keystore (.jks) file path on the Agiloft Server. Configurations vary by server. The
default path for Agiloft servers is /opt/server/Agiloft/etc/certs/agiloft.
keystore
ii. Java KeyStore Password.
iii. Alias used to add certificate to Java KeyStore.
d. Name identifier in SAML Assertion sent by IdP: In SAML 2.0 protocol, the NameID XML tag is used
to send the details of the authenticated user in the SAML Assertion XML sent by an IdP to the
service provider. From the drop-down, specify which format your IdP uses: User Name, Email, or
Federation ID.
Then, select the field name in the People table that will be matched against the NameID value. If
the NameID value in the XML assertion matches the value of the chosen field, then the user will
be allowed to log in to Agiloft.
Below is an example of a NameID TAG in SAML Assertion XML, which provides the email address
of the authenticated user:
salesuser1@mydomain.com
If your IdP sends a Federation Id for authenticated users, be sure to create a corresponding field
in the People table and populate it with the correct value for the users accessing Agiloft via SAML.
e. Name Identifier location in SAML Assertion: Choose the XML tag - NameID or Attribute - used
by the IdP to send user information. NameID is the most commonly used XML tag.
If your IdP sends user details in the Attribute TAG, enter the value of the Name or FriendlyName
attribute. In the example below, USERID_ATTRIB_NAME is the value of the Name attribute:
© 2021 Agiloft Inc. 18e.
salesuser1@mydomain.com
f. SAML Authentication Profile:
This option determines how Agiloft will interact with the IdP when a user tries to access
Agiloft.
Select Passive Web Single Sign On with IdP to allow users who are already authenticated by
the IdP to access Agiloft directly. If the user is not already authenticated, Agiloft will display
an error message.
Select Forced Authentication to require a user name and password every time, even if the
user has a valid login session with the IdP.
The Default behavior lets users who are already authenticated by the IdP to access Agiloft.
If the user is not authenticated, the IdP will prompt a login screen for the user.
g. Click Next.
9. On the Identity Provider Details tab:
a. If you have a SAML Metadata XML file, paste the contents in the box under SAML Metadata XML
contents obtained from your IdP. Leave remaining fields blank and click Next.
When the SAML configuration is saved, Agiloft will automatically populate the remaining fields
based on the XML contents.
b. Alternately, populate each field with the information previously obtained from the IdP. If you
provide SAML Metadata XML in the first field and enter values in one or more of the remaining
fields, the values entered in the individual fields will override those obtained from the XML file.
i. IdP Entity ID / Issuer: Enter the name or URL identifying the IdP.
ii. IdP Login URL: Enter the URL where Agiloft will forward login requests.
iii. IdP Logout URL: Enter the URL where Agiloft will forward logout assertions.
iv. IdP Provided X.509 Certificate Contents: If your IdP provides the X.509 certificate in a
file, open the file with a text editor and paste the contents of the certificate file in the input
box.
10. Click Finish to save and close the SAML configuration wizard.
© 2021 Agiloft Inc. 1911. On the Setup > Access screen, click Download X.509 Certificate. Save this file to use when configuring
the IdP.
12. On the Setup > Access screen, click Download SAML 2.0 Service Provider Metadata. Save this file to use
when configuring the IdP. Note that this file also contains the X.509 Certificate, and most IdPs will allow
you to import this file to populate the fields in Configure the Identity Provider.
13. To enable SAML 2.0 for your users when they click a hyperlink sent within an email, change the Hotlink
Type global variable to SAML20. You can do this on either the Admin Console or Power-User interface.
Note that SAML SSO Messages sent to Agiloft are encrypted using public key cryptography. Agiloft supports
the following standard cipher transformations to prepare a message for encryption:
RSA/ECB/PKCS1Padding
RSA/ECB/OAEPWithSHA-1AndMGF1Padding
RSA/ECB/OAEPWithSHA-256AndMGF1Padding
RSA/ECB/OAEPWithSHA-512AndMGF1Padding
While these cipher transformations should suffice for most commonly used IdPs, if you find that your IdP uses
a special cipher transform, you can configure Agiloft to use it with the Custom Cipher transform for
decrypting SAML Keys global variable.
Generate a Keystore File
In cases where the Java Keystore file and corresponding private key are required for the SAML installation,
which is typically needed when Agiloft is installed on a server which is not hosted by Agiloft, the following
steps will enable you to generate the Keystore file from the CA certificate and corresponding private key for
your organization.
To configure Agiloft's SAML SSO Keystore file for servers hosted by Agiloft, please contact support.
Note that the OpenSSL tool is not present on Windows systems by default. You can download it here on the
Agiloft server and use the same commands in Windows, after logging into the Windows server as an
Administrator user.
1. Copy the CA certificate and private key files onto the Linux server where Agiloft is installed.
2. Login to the server via SSH.
3. Create a PKCS 12 file using your private key and CA signed certificate. The following OpenSSL command
will work for this:
openssl pkcs12 -export -in [path to CA certificate] -inkey [path to private
key] -certfile [path to CA certificate ] -out mykeystore.p12
4. Create a JKS file using the Keytool command. Note that you may append the output file as either .jks or .
keystore.
© 2021 Agiloft Inc. 204.
/jre/bin/keytool -importkeystore -srckeystore mykeystore.
p12 -srcstoretype pkcs12 -destkeystore mycompany.keystore -deststoretype JKS
a. You will be prompted to provide a new password for the destination keystore file: mycompany.
keystore. Provide, and note down, that password.
b. You may be prompted to provide an alias for the keystore. The default alias is 1.
5. Provide the complete path for mycompany.keystore, its password and the alias in the Service Provider
Details tab of the Agiloft SAML configuration wizard.
Configure the Identity Provider
The next step is to provide the Agiloft Service Provider details to the IdP. Configuration steps for SAML 2.0 vary
depending on the Identity Provider. It is likely that you will be able to import the SAML 2.0 Service Provider
Metadata file to the IdP to populate these details, but below are the typical configuration items you will
required to supply for the IdP:
1. Agiloft (SP) Entity Id, found in step 7.a. The default value is in the form:
{server}/{KBName}
2. Agiloft Login Assertion Consumer Service URL, found in step 7.b. The default value is in the form:
http(s)://{server}/gui2/spsamlsso?project={KBName}
3. Agiloft Logout URL: This value is in the form:
http(s)://{server}/gui2/samlv2Logout.jsp
4. Agiloft Logout Service End Point URL: This value is in the form:
http(s)://{server}/gui2/spsamlssologout?project={KBName}
5. X.509 Certificate, downloaded previously.
Log In with SAML 2.0
Once the SAML 2.0 integration has been properly configured, users can log in to Agiloft by authenticating with
the IdP.
1. Point your browser to: http(s)://{server}/gui2/samlssologin.jsp?project={kbName},
© 2021 Agiloft Inc. 211. Point your browser to: http(s)://{server}/gui2/samlssologin.jsp?project={kbName},
where {server} is the IP Address or FQDN of the server hosting the Agiloft instance and kbName is
replaced by the name of your Agiloft knowledgebase. Most customers either save this URL as a
bookmark (or favorite), or add an HTML login block to an existing web page.
2. This URL forwards the login assertion to the IdP. You will be directed to the login page for your IdP:
If you are already logged in and authenticated, you will be forwarded directly to the Agiloft interface.
Note: Agiloft supports SAMLv2 with Active Directory Federation Services (ADFS) version 2.0 and 3.0 in releases
after 2015_02.
Two-Factor Authentication
© 2021 Agiloft Inc. 22Two-Factor Authentication
Two-Factor Authentication (2FA) requires users to verify their identity using both a password and a code sent
to their mobile device in addition to their password. It provides an added layer of security, particularly for
users with extensive permissions such as knowledgebase administrators.
Prerequisites
For users who will sign in with two-factor authentication, the Cell Phone field in their user record must contain
a validly formatted number. Non-US phone numbers must be preceded by "+" and the country code. For US
numbers, the country code (+1) is optional.
The system ignores spaces, hyphens, and parentheses in the phone number. The following formats are all
accepted:
US Numbers:
555-111-2222
5551112222
1 (555) 111 2222
+15551112222
International Numbers:
+382 5555555555
+91 5555-5555
+7 012 345 6789
Enabling Two-Factor Authentication
You can enable two-factor authentication from a Knowledgebase or the admin console. Admin console access
is only available for on-premise customers who maintain their own Agiloft server.
1. To enable 2FA:
In a specific Knowledgebase, log in as an admin, click the Setup gear in the top-right corner, and
go to Access > Two Factor Authentication.
For all KBs on the server, log in to the admin console and go to General > Settings and click Two
Factor Authentication.
If you don't see Two Factor Authentication, you likely need to upgrade to a later Agiloft
release.
2. Select the Require two factor authentication checkbox.
3. You can optionally Exclude groups or Exclude users from two-factor authentication. For instance, you
© 2021 Agiloft Inc. 233. You can optionally Exclude groups or Exclude users from two-factor authentication. For instance, you
might allow users with low permission levels to log in with only a password, while admin-level users
must provide two forms of authentication. When excluding specific users from 2FA, enter the user’s
Login. Use a comma to separate multiple logins.
4. Choose whether two-factor authentication is required For every login, or only For the first login from a
particular device.
5. Optionally, choose an expiration period after which users must reauthenticate.
6. Choose an authentication method, either standard SMS or the Google Authenticator app. If Google
Authenticator is chosen, users must download the app to their smart device and create an account
before receiving verification codes.
7. If you select the Text message authentication method, select an SMS account from the drop-down list.
Two-factor authentication uses cookies, which are both browser and device-specific. Logging in from a
different device, a different browser on the same device, or after clearing cookies from the browser
cache will prompt the user for reauthentication.
Google Authenticator is compatible with Android, BlackBerry, and iOS devices.
Signing in with Two-Factor Authentication
When 2FA is set up in your system, you'll use it when you log in.
Text Message (SMS)
1. Navigate to the login page for your Agiloft knowledgebase.
2. Enter your username and password and click Log In.
3. A verification code is sent to your cell phone number on record. Enter the code when prompted.
4. Click Submit. You will be logged in to your Agiloft knowledgebase.
© 2021 Agiloft Inc. 24Google Authenticator
You can use the Google authenticator app instead of SMS. For an example of setting up and using Google
Authenticator, see 2-Step Verification with Google Authenticator.
First time setup
1. Navigate to the login page for your Agiloft knowledgebase. Enter your credentials and click Log In.
2. When the pop-up dialog appears, click Send Secret Key to send the 16-digit key to your cell phone.
3. On your mobile phone, go to the Play Store or App Store and search for Google Authenticator to find,
download, and install the app.
4. Open the Google Authenticator app.
5. From the menu, select Set up account, then select Enter provided key.
6. Enter an account name for this knowledgebase. Enter the secret key sent to your mobile device via text
message in step 2. Click Add.
© 2021 Agiloft Inc. 257. The verification codes now appear when you open the account in the app. The code changes every 60
seconds.
Logging in
1. Navigate to the login page for your Agiloft knowledgebase.
2. Enter your username and password and click Log In. A pop-up dialog appears.
3. Open the Google Authenticator app on your smart device to retrieve the current 6-digit verification
code.
4. Return to the browser. Enter the code in the pop-up dialog and click Submit. You will be logged in to
your Agiloft knowledgebase.
Resend the secret key
If you lose your secret key, such as when reinstalling the app or changing your device, use the authentication
pop-up dialog option to Resend secret key. The key is sent to your email address or to your cellphone by SMS,
depending on the method defined by the administrator. The option to resend the key only appears once you
have entered your login and password.
© 2021 Agiloft Inc. 26Security There are several parameters that can be configured to optimize security in Setup > System > Security. Configure each setting as needed to provide optimal security for your system. General Tab The General tab has most of the security options necessary to secure your system. You might use some or all of these features in various combinations to suit your needs. Restrict Standard Login / Password based access to Agiloft users authenticated by SSO This option determines whether to restrict standard login/password-based access to only those users who have been authenticated by SSO. With this set to Yes, users who log in with a valid login and password must still be authenticated by SSO in order to access the system. SSO Endpoint SSO Endpoint allows an encrypted email hotlink to connect to a custom web SSO application. If you enter an endpoint value here, hotlinks included in emails do not include the login and password for authentication. Instead, hotlinks redirect to the specified endpoint and allow the user to be authenticated and logged in. Security: Trusted Zones Use the Trusted Zones option to limit external net resources to a specified list of source addresses. For example, if you add trusted zones here, users are only able to add hyperlinks and embedded images that point to locations inside these trusted zones. You can use this to help protect user data from malicious attacks, such as XSS or XSRF attacks. To use trusted zones, enter a comma- or CR character-separated list of addresses. HTML references outside these addresses aren't allowed. If URLs outside the trusted zones are added in the system, they are displayed in gray to indicate they aren't clickable. For optimal security, this global variable should generally be set to /, *.YOUR_COMPANY.COM. Example Values: © 2021 Agiloft Inc. 27
Value             Behavior

   *.agiloft.com    Users can refer to agiloft.com domain, its subdomains and the server host, without
   ,/               defining its name.

   *, /             Users can refer to any domain in the net and the server host.

   /                References to net resources are disabled.

   NULL             Only references to the current host are enabled (e.g. /home.jsp).

          This option restricts what URLs can be displayed within Agiloft. As such, the domain name or specific
          URLs that may be referenced as embedded URLs within the Home page should be added to the list.

  Security: Allowed Referrers
  This option restricts the host names that are allowed as referrers to your server. Enter a comma separated list
  of host names to use this feature. A value of “*” allows any host name to act as referrers to this server.

  Security: Hotlink Master Password
  This defines the master password used for checking cookies for those users who selected to save login
  credentials for generated hotlinks.

  JavaScript Injections in UI
  This determines whether JavaScript is allowed in the Look and Feel wizard options and in field labels. This can
  prevent malicious injections in interface objects. If you use JavaScript as part of your system design, set this to
  Yes.

  Security: Permit Javascript in print templates
  This determines whether JavaScript scripts are allowed in print templates. Select Yes to allow scripts.

© 2021 Agiloft Inc.                                                                                            28
Security: Allow scripts in dashboard widgets
This determines whether the system allows scripting in widgets on the dashboard. Select No to disable
scripting and help protect users from malicious attacks (XSS, XSRF, etc). This ensures that only safe HTML is
allowed.
Security: Allowed External Hosts
Use this option to restrict the host URLs the system is allowed to redirect to. This helps guard against XLS
attacks. Specify as many hosts as necessary, delimited by spaces, commas, or semi-colons. To allow any host,
enter *. This global variable should generally be set to a value such as *.YOUR_COMPANY_NAME.COM, *.
SERVER_URL.COM. For example, *.widget.com, *.widget.enterprisewizard.com *.widget.agiloft.com.
This global variable restricts which values work as ExitURLs. If you use hotlinks that specify ExitURLs,
add them to the list of values entered here.
Security: Check Session Match
This determines whether the system requires that the session ID matches the cookie associated with it. If you
select Yes and the session ID does not match the cookie associated to that session when the user first logged
in, the connection is rejected. This guards against a hacker who can see the user's browser from manually
entering the URL.
For optimal security, this global variable should be set to All_Users. Note that some browser settings
or firewalls may prevent cookies from being used. In that case, you can either set this global variable
to No and enable the Security: Check client IP global variable or, if your Admin or Power Users are not
affect by the issue, you can enter a value such as Admin_Users or Staff_Users for more security.
Security: Check client IP
Determines whether the system checks that all requests are made from the same IP address as the IP address
used when the session first started. This helps prevent a hacker who can see the URL or session ID on your
computer from initiating a session on another machine.
Note that this feature causes the user to be logged out if they access the system from an ISP or through a
gateway that assigns a dynamically changing IP address.
© 2021 Agiloft Inc. 29Additionally, this method is not as secure as using Security: Check Session Match because if both PC's are
accessing the server through the same NAT or Proxy servers, their IP addresses will seem to be the same.
This variable should generally be set to No because stronger security is available using the Security:
Check Session Match global variable. This option provides for those rare installations that block the
use of cookies and, therefore, the use of the Security:Check Session Match global variable.
Security: Informative Password Messages
This determines whether diagnostic messages in password-related functions can contain the account name. If
you set this to Yes, you can use the Security: Custom message for “Reset Password” error global variable to
define a custom error message.
For optimal security, this variable should generally be set to No.
Security: Custom message for "Reset Password"
error
If you set Informative Password Messages to Yes, use this field to define the custom message that appears
when an error occurs during password reset. It's best to leave this variable unset or use a message that does
not provide any security information, such as "Invalid login/password combination, please contact your
administrator."
Security: Show Stack Trace on SoD
This determines whether the stack trace button appears on the SoD screen. Select No to prevent users from
seeing the stack trace information. This feature is generally only used when testing a knowledgebase to
troubleshoot errors.
Security: Web Services Anti SQL Injection
This determines whether anti SQL injection features are enabled. Select No to disable these features.
© 2021 Agiloft Inc. 30Security: Web Services Verbose Errors
This determines whether SOAP and REST calls produce more detailed error messages for debugging
purposes. This feature is usually only set to Yes in testing environments, and should be set to No in
production environments.
Security: Days to continue support of old key
This defines the number of days to continue the support of old keys. The default value is 31.
Security: JS Exceptions
This controls the level of protection against cross-site scripting (XSS) attacks. The default value is Standard,
which allows some common sense exceptions while still providing XSS security.
Web Services Tab
This tab contains settings related specifically to web services.
SOAP Groups
Select the groups whose users are allowed to use SOAP.
Security: SOAP IP Blacklist
Any IP address defined in this global variable is unable to access the system via the SOAP interface. If a
blacklist is defined, IP addresses on the blacklist are not accepted, and IP addresses outside the blacklist are
subject to any other relevant security checks. You may enter IPv4, IPv6, and IP address ranges in a comma-
delimited list, such as 10.168.6.102, 10.169.7.132-10.169.7.150. Server-wide settings take precedence over
specific KB settings.
If you use the SOAP IP Whitelist, it is generally not necessary to set values in the Blacklist as well.
© 2021 Agiloft Inc. 31If you use the SOAP IP Whitelist, it is generally not necessary to set values in the Blacklist as well.
However, the Blacklist is useful if you allow API access from a constantly changing set of IP addresses
that do not live within well-defined ranges, but you also want to block access from certain ranges, such
as those of foreign countries.
Security: SOAP IP Whitelist
The system allows any IP addresses defined in this global variable to access the system via the SOAP interface.
If a whitelist is defined, all other IP addresses are automatically blocked. You may enter IPv4, IPv6, and IP
address ranges in a comma-delimited list, such as 10.168.6.102, 10.169.7.132-10.169.7.150. KB-specific
settings take precedence over server-wide settings.
For optimal security, set this global variable to the value of the machines from which your SOAP scripts are
running. You may also enter 127.0.0.1 to block external access entirely.
REST Groups
Select the groups whose users are allowed to use REST.
Security: REST IP Blacklist
Any IP address defined in this global variable is unable to access the system via the REST interface. If a
blacklist is defined, IP addresses on the blacklist are not accepted, and IP addresses outside the blacklist are
subject to any other relevant security checks. You may enter IPv4, IPv6, and IP address ranges in a comma-
delimited list, such as 10.168.6.102, 10.169.7.132-10.169.7.150. Server-wide settings take precedence over
specific KB settings.
If you use the REST IP Whitelist, it is generally not necessary to set values in the Blacklist as well.
However, the Blacklist is useful if you allow API access from a constantly changing set of IP addresses
that do not live within well-defined ranges, but you also want to block access from certain ranges, such
as those of foreign countries.
© 2021 Agiloft Inc. 32Security: REST IP Whitelist
The system allows any IP address defined in this global variable to access the system via the REST interface. If
a whitelist is defined, all other IP's are automatically blocked. You may enter IPv4, IPv6, and IP address ranges
in a comma-delimited list, such as 10.168.6.102, 10.169.7.132-10.169.7.150. KB-specific settings take
precedence over server-wide settings.
For optimal security, set this global variable to the value of the machines from which your REST scripts are
running. You may also enter 127.0.0.1 to block external access entirely. Be careful when configuring this
variable. You can potentially lock yourself entirely out of a knowledgebase if it's configured improperly.
WDC Editor Groups
Users who are part of a group selected in this field have permission to set a saved search to be available in
Tableau. This generates a WDC URL that can be used as a Web Data Connector in Tableau.
IP Restrictions Tab
This tab allows general IP restrictions for system access. These settings work together to determine whether a
user can successfully access the system, so choose your configuration carefully. These settings are useful if
some groups should only have access to the system when they are at a specific location or using a specific
workstation or network.
1. In the Groups to be Restricted field, select the groups whose access you want to limit based on IP.
2. In the Whitelisted IP Ranges field, enter the IP ranges you expect from these users when accessing the
system. Users in the groups you selected above will only be granted system access if they log in from a
whitelisted IP address. You can enter IPv4, IPv6, and IP address ranges in a comma-delimited list.
3. In the Whitelisted Users field, you can select individual users who might be part of a restricted group,
but who should always have access to the system, regardless of IP address.
Additional Security Global Variables
In addition to the settings in the Security wizard, there are a few security-related global variables you might
want to set. For details on how to access and set global variables, see Global Variables.
© 2021 Agiloft Inc. 33Security: Check iframe origin Name: check_iframe_origin Description: Determines whether the system requires that KB usage occurs only in an iframe, or an embedded web page, that has the same origin as the KB. If this global variable is set to No, any origin is allowed. If you are using a third-party or external API that displays information in the End User Interface, this variable should be set to Yes. Default Value: No Recommended Values: Location: Admin Console Security: Collect System Data on Error Name: collect_system_information_on_sod Description: Determines whether to collect and include system information, such as the OS version and IP address, in the data that appears on the automatic bug report screen (SoD). Select Yes to collect and include this information. Default Value: No Recommended Values: For optimum security, the recommended value is No. Location: Admin Console Security: Show KB Names Name: show_kb_names Description: Determines whether the generic login page shows a drop-down list of KB names. If set to No, the KB list on the /gui2 login page is hidden, and users need to manually enter the desired KB name. Default Value: No Recommended Values: For optimal security, this variable should generally be set to No. Location: Admin Console Activity Logs Setup © 2021 Agiloft Inc. 34
Activity Logs Setup
  Activity logs maintain a record of any specified statistics of system usage, which can assist with auditing your
  system. You can view current activity logs in the Activity Logs table.

  It's often useful to create rules based on the events you track. For instance, you could create a rule to notify
  you when someone changes a workflow, rule, or user record. You can also set up reports for activities that
  pose a security concern. For instance, you could create a report for failed logins that alerts you regarding
  potential attempts to breach the login screen.

        To access the Activity Logs table, go to Setup > Tables, select Activity Log, and click Unhide. From
        there, you can use the nav bar menu icon to search for it, or add it to your navigation menu (User
        Menu > Preferences > Navigation Menu Setup).

  Configuring Activity Logs
  You can configure your activity logs by creating different audit rules. Audit rules define which system activity is
  tracked and how long activity logs are maintained. To view existing audit rules, go to Setup > System >
  Configure Activity Log. You can create new audit rules by clicking New to open the Audit Rules wizard.

  The Audit Rules wizard is a single screen that allows you to choose to track various system events and create
  saved searches that determine which users' actions are logged. Many different kinds of events can be tracked:
  login failures, action bar edits, record views, and others. The system creates records in the Activity Log table
  when the events you select meet the saved search criteria.

  To create an audit rule:

     1. Click the Setup gear in the top-right corner and go to System > Configure Activity Log.
     2. Click New to open the Audit Rules wizard.
     3. Name the audit rule and select a language for the audit report.
     4. Create or select a saved search that determines which users actions are logged.

© 2021 Agiloft Inc.                                                                                            35
5. Select which events are logged for the users meeting the saved search criteria. An event is only logged if
it selected from this list and is executed by a user who meets the saved search criteria. For example,
you might want to only log specific actions from admin users, such as when they edit a team or group.
6. Define for how long the system retains entries created by the audit rule. If an audit rule is deleted, any
records created by the rule are also deleted.
7. Click Finish.
Log files generated from activity logs and other system activity are deleted with the Logeraser utility.
By default, log files are deleted after 30 days. To change Logeraser's default settings, you must have
access to the file directory on the server.
© 2021 Agiloft Inc. 36You can also read