Amazon AppFlow User Guide - AWS Documentation
←
→
Page content transcription
If your browser does not render page correctly, please read the page content below
Amazon AppFlow User Guide
Amazon AppFlow User Guide

Amazon AppFlow: User Guide
Copyright © 2021 Amazon Web Services, Inc. and/or its affiliates. All rights reserved.

Amazon's trademarks and trade dress may not be used in connection with any product or service that is not
Amazon's, in any manner that is likely to cause confusion among customers, or in any manner that disparages or
discredits Amazon. All other trademarks not owned by Amazon are the property of their respective owners, who may
or may not be affiliated with, connected to, or sponsored by Amazon.
Amazon AppFlow User Guide

Table of Contents
  What is Amazon AppFlow? .................................................................................................................. 1
        Related AWS services .................................................................................................................. 1
  Setting up ......................................................................................................................................... 3
        Prerequisites .............................................................................................................................. 3
        General information ................................................................................................................... 3
  Getting started .................................................................................................................................. 5
        Prerequisites .............................................................................................................................. 5
        Step 1: Create a flow .................................................................................................................. 5
        Step 2: Configure the flow .......................................................................................................... 6
        Step 3: Map data fields ............................................................................................................... 6
        Step 4 (Optional): Add filters ....................................................................................................... 7
        Step 5: Review and create ........................................................................................................... 8
  Supported applications ....................................................................................................................... 9
        SaaS applications supported by Amazon AppFlow .......................................................................... 9
        Amazon S3 ................................................................................................................................ 9
              Requirements ................................................................................................................... 10
              Connection instructions ..................................................................................................... 10
              Notes .............................................................................................................................. 10
              Related resources ............................................................................................................. 11
        Amazon Redshift ...................................................................................................................... 11
              Requirements ................................................................................................................... 12
              Connection instructions ..................................................................................................... 12
              Notes .............................................................................................................................. 14
              Related resources ............................................................................................................. 14
        Amazon EventBridge ................................................................................................................. 15
              Requirements ................................................................................................................... 15
              Connection instructions ..................................................................................................... 15
              Notes .............................................................................................................................. 16
              Related resources ............................................................................................................. 16
        Amazon Honeycode .................................................................................................................. 16
              Setup instructions ............................................................................................................ 17
              Notes .............................................................................................................................. 17
              Related resources ............................................................................................................. 17
        Amazon Lookout for Metrics ...................................................................................................... 17
              Requirements ................................................................................................................... 18
              Setup instructions ............................................................................................................ 18
              Notes .............................................................................................................................. 19
              Related resources ............................................................................................................. 19
        Amplitude ............................................................................................................................... 19
              Requirements ................................................................................................................... 20
              Connection ...................................................................................................................... 20
              Notes .............................................................................................................................. 21
              Related resources ............................................................................................................. 21
        Datadog .................................................................................................................................. 22
              Requirements ................................................................................................................... 22
              Connection instructions ..................................................................................................... 22
              Notes .............................................................................................................................. 23
              Related resources ............................................................................................................. 23
        Dynatrace ................................................................................................................................ 24
              Requirements ................................................................................................................... 24
              Connection instructions ..................................................................................................... 24
              Notes .............................................................................................................................. 25
              Related resources ............................................................................................................. 25
        Google Analytics ...................................................................................................................... 26

                                                                         iii
Amazon AppFlow User Guide

      Requirements ...................................................................................................................          26
      Connection instructions .....................................................................................................             26
      Notes ..............................................................................................................................      27
      Related resources .............................................................................................................           30
Infor Nexus ..............................................................................................................................      30
      Requirements ...................................................................................................................          30
      Connection instructions .....................................................................................................             30
      Notes ..............................................................................................................................      31
Marketo ..................................................................................................................................      32
      Requirements ...................................................................................................................          32
      Connection instructions .....................................................................................................             32
      Notes ..............................................................................................................................      33
      Related resources .............................................................................................................           33
Salesforce ................................................................................................................................     34
      Requirements ...................................................................................................................          34
      Connection instructions .....................................................................................................             34
      Notes ..............................................................................................................................      38
      Related resources .............................................................................................................           39
Salesforce Pardot .....................................................................................................................         39
      Requirements ...................................................................................................................          39
      Setup instructions ............................................................................................................           40
      Notes ..............................................................................................................................      40
      Related resources .............................................................................................................           41
ServiceNow ..............................................................................................................................       41
      Requirements ...................................................................................................................          41
      Connection instructions .....................................................................................................             41
      Notes ..............................................................................................................................      42
      Related resources .............................................................................................................           43
Singular ..................................................................................................................................     43
      Requirements ...................................................................................................................          43
      Connection instructions .....................................................................................................             43
      Notes ..............................................................................................................................      44
      Related resources .............................................................................................................           44
Slack .......................................................................................................................................   44
      Requirements ...................................................................................................................          45
      Connection instructions .....................................................................................................             45
      Notes ..............................................................................................................................      46
      Related resources .............................................................................................................           46
Snowflake ...............................................................................................................................        47
      Requirements ...................................................................................................................          47
      Connection instructions .....................................................................................................             47
      Related resources .............................................................................................................           49
Trend Micro .............................................................................................................................       49
      Requirements ...................................................................................................................          49
      Connection instructions .....................................................................................................             49
      Notes ..............................................................................................................................      50
      Related resources .............................................................................................................           50
Upsolver ..................................................................................................................................     50
      Requirements ...................................................................................................................          51
      Setup instructions ............................................................................................................           51
      Notes ..............................................................................................................................      51
      Related resources .............................................................................................................           52
Veeva ......................................................................................................................................    52
      Requirements ...................................................................................................................          52
      Connection instructions .....................................................................................................             52
      Notes ..............................................................................................................................      53
      Related resources .............................................................................................................           53

                                                                iv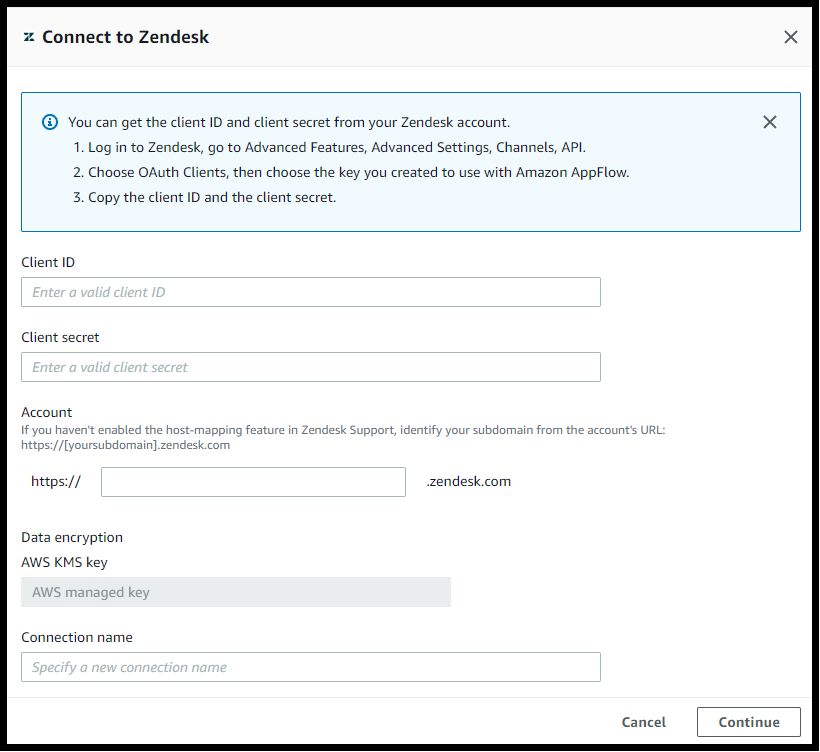
Amazon AppFlow User Guide

     Zendesk ..................................................................................................................................        54
             Requirements ...................................................................................................................          54
             Connection instructions .....................................................................................................             54
             Notes ..............................................................................................................................      55
             Related resources .............................................................................................................           55
Managing flows ................................................................................................................................         56
     Activate a flow .........................................................................................................................          56
     Edit a flow ..............................................................................................................................         57
     Delete a flow ...........................................................................................................................          57
     Flow triggers ...........................................................................................................................         57
             On demand .....................................................................................................................           58
             Event-triggered ................................................................................................................          58
             Schedule-triggered ...........................................................................................................            58
     Private flows ............................................................................................................................         59
     Flow notifications .....................................................................................................................           60
             Common fields .................................................................................................................            61
             Flow event detail fields .....................................................................................................             61
Security ...........................................................................................................................................   64
     Data protection ........................................................................................................................          64
             Encryption at Rest ............................................................................................................           65
             Encryption in Transit .........................................................................................................           65
             Key Management .............................................................................................................              65
             Connection credentials ......................................................................................................             65
     Identity and access management ...............................................................................................                    66
             Predefined AWS managed policies ......................................................................................                     67
             Adding a new user ...........................................................................................................             67
             Granting access ................................................................................................................          68
             Changing access ...............................................................................................................           68
             Creating custom access policies ..........................................................................................                69
             API actions for Amazon AppFlow .......................................................................................                    69
             Policy examples ...............................................................................................................           70
             Other required permissions ................................................................................................               73
     Compliance validation ...............................................................................................................             73
     Resilience ................................................................................................................................       74
     Infrastructure security ...............................................................................................................           74
Quotas ............................................................................................................................................    75
CloudTrail logs .................................................................................................................................      77
     Amazon AppFlow information in CloudTrail .................................................................................                        77
     Understanding Amazon AppFlow log file entries ..........................................................................                           78
Document history .............................................................................................................................         79

                                                                        v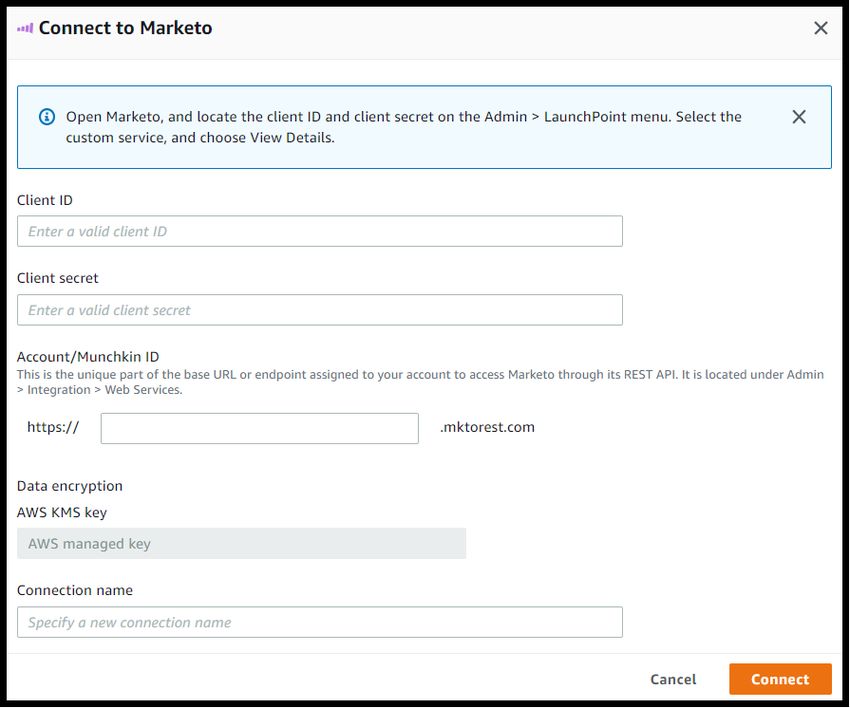
Amazon AppFlow User Guide
                                       Related AWS services

What is Amazon AppFlow?
    Amazon AppFlow is a fully-managed integration service that enables you to securely exchange data
    between software as a service (SaaS) applications, such as Salesforce, and AWS services, such as Amazon
    Simple Storage Service (Amazon S3) and Amazon Redshift. For example, you can ingest contact records
    from Salesforce to Amazon Redshift or pull support tickets from Zendesk to an Amazon S3 bucket.

    In addition to this User Guide, you can also refer to the Amazon AppFlow API Reference.

    Amazon AppFlow enables you to do the following:

    • Get started quickly — Create data flows to transfer data between a source and destination in minutes,
      without writing any code.
    • Keep your data in sync — Run flows on demand or on a schedule to keep data in sync across your
      SaaS applications and AWS services.
    • Bring your data together — Aggregate data from multiple sources so that you can train your analytics
      tools more effectively and save money.
    • Keep track of your data — Use Amazon AppFlow flow management tools to monitor what data has
      moved where and when.
    • Keep your data secure — Security is a top priority. We encrypt your data at rest and in transit.
    • Transfer data privately — Amazon AppFlow integrates with AWS PrivateLink to provide private data
      transfer over AWS infrastructure instead of public data transfer over the internet.

    For a list of Amazon AppFlow Regions, see Amazon AppFlow Regions and Endpoints in the AWS General
    Reference.

Related AWS services
    You can use the following services with Amazon AppFlow.

    AWS CloudTrail

    Amazon AppFlow is integrated with AWS CloudTrail, a service that provides a record of actions taken by a
    user, role, or an AWS service in Amazon AppFlow. CloudTrail captures all API calls for Amazon AppFlow as
    events. The calls captured include calls from the Amazon AppFlow console and code calls to the Amazon
    AppFlow API operations. If you create a trail, you can enable continuous delivery of CloudTrail events to
    an Amazon S3 bucket, including events for Amazon AppFlow. If you don't configure a trail, you can still
    view the most recent events in the CloudTrail console in Event history. Using the information collected
    by CloudTrail, you can determine the request that was made to Amazon AppFlow, the IP address from
    which the request was made, who made the request, when it was made, and additional details. For more
    information, see Logging Amazon AppFlow API calls with AWS CloudTrail in the Amazon AppFlow User
    Guide.

    AWS CloudFormation

    AWS CloudFormation provides a common language for you to model and provision AWS and third party
    application resources in your cloud environment. AWS CloudFormation allows you to use programming
    languages or a simple text file to model and provision, in an automated and secure manner, all the
    resources needed for your applications across all regions and accounts. This gives you a single source of
    truth for your AWS and third party resources. Amazon AppFlow now supports AWS CloudFormation for
    creating and configuring Amazon AppFlow resources along with the rest of your AWS infrastructure—in

                                                  1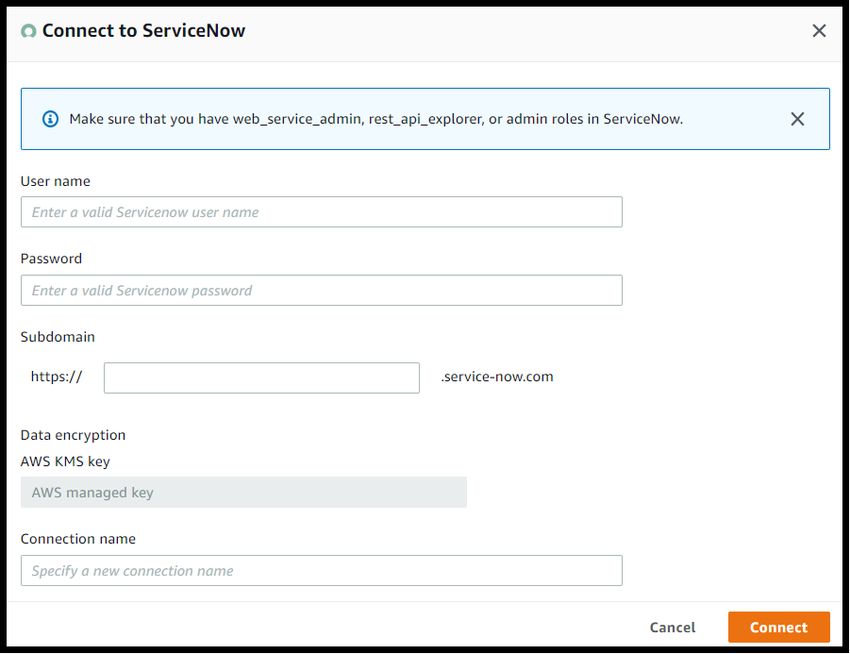
Amazon AppFlow User Guide
                                  Related AWS services

a secure, efficient, and repeatable way. For more information, see AWS::AppFlow::ConnectorProfile and
AWS::AppFlow::Flow in the AWS CloudFormation User Guide.

Amazon EventBridge

Amazon AppFlow integrates with Amazon EventBridge to receive events from Amazon AppFlow sources
such as Salesforce. This enables you to publish events ingested by Amazon AppFlow to a partner event
bus in Amazon EventBridge. Amazon AppFlow supports the ingestion of Salesforce Platform events and
Change Data Capture events. You can configure rules in Amazon EventBridge to match patterns from
events such as those from Salesforce, and then route them to AWS services such as AWS Lambda, AWS
Step Functions, Amazon Simple Queue Service, and others. You can also use Amazon AppFlow’s private
data transfer option to ensure that events don't get exposed to the public internet during transfers
between AWS and Salesforce, improving security and minimizing risks of Internet-based attack vectors.
For more information, see the Amazon EventBridge documentation page in the Amazon AppFlow User
Guide.

AWS Identity and Access Management (IAM)

IAM is an AWS service that helps an administrator securely control access to AWS resources. Amazon
AppFlow integrates with the IAM service so that you can control who in your organization has access
to Amazon AppFlow. As an AWS root user or an IAM user with administrator access, you can add one or
more users to your AWS account. You can also grant different levels of access to new and existing users.
You can grant access using predefined identity-based policies, or you can create your own custom policy.
For more information, see AWS Identity and Access Management for Amazon AppFlow in the Amazon
AppFlow User Guide.

                                             2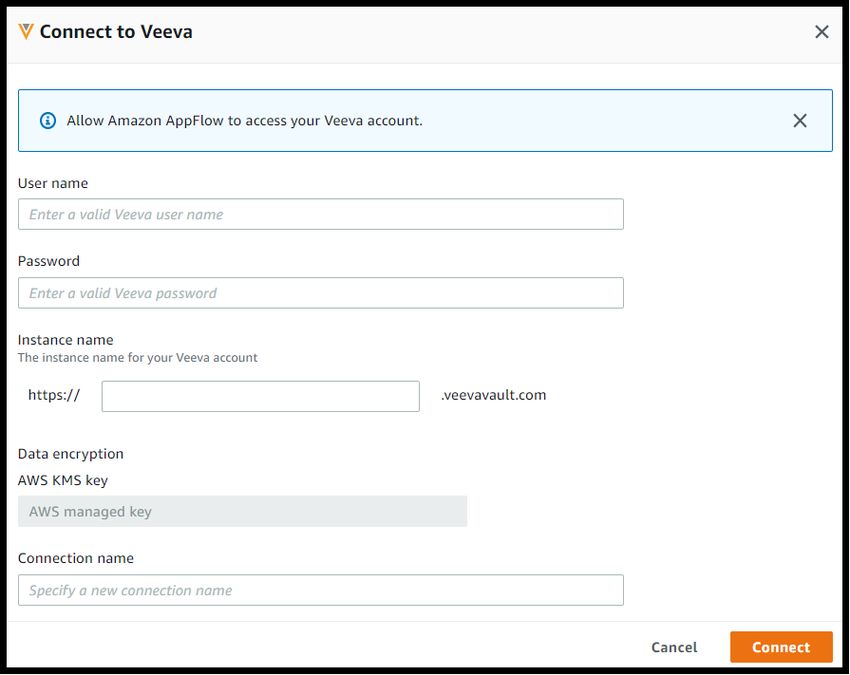
Amazon AppFlow User Guide
                                            Prerequisites

Setting up Amazon AppFlow
Prerequisites
     This section provides a list of the prerequisites for getting started with Amazon AppFlow.

     • AWS account setup — If you don't have an AWS account, you must create one. For more information,
       see How to create and activate a new AWS account.
     • SaaS application setup — You must verify that you have the required information about the source
       and destination applications, and that they meet the relevant configuration requirements. For
       application-specific requirements and setup instructions, see Supported applications (p. 9).
     • AWS CloudFormation OAuth — If you want to use AWS CloudFormation to create a connector profile
       for connectors that implement OAuth (such as Salesforce, Slack, Zendesk, and Google Analytics), you
       must fetch the access and refresh tokens. You can do this by implementing your own UI for OAuth, or
       by retrieving them from elsewhere. Alternatively, you can use the Amazon AppFlow console to create
       the connector profile, and then use that connector profile in the flow creation AWS CloudFormation
       template.
     • Data encryption — Amazon AppFlow encrypts your data and connection details during transit and at
       rest. For more information, see Data protection in Amazon AppFlow (p. 64). When you configure
       a flow, you specify an AWS Key Management Service CMK to use for encryption. You can choose
       the AWS managed customer master key (CMK) that Amazon AppFlow creates by default, named
       AWSDefaultEncryptionKey, or you can choose a customer managed CMK that you create. To create a
       CMK, see Creating symmetric CMKs in the AWS Key Management Service Developer Guide. For examples
       of how to set IAM permissions for KMS access, see Amazon AppFlow policy examples.
     • Identity and access management — If you access AWS as an IAM user, your administrator must grant
       you the permissions required to create and run flows. For more information, see Identity and access
       management for Amazon AppFlow (p. 66).

General information for all applications
     This section provides a list of general information that applies to all supported source and destination
     applications.

     Source and destination API limits

     The API calls that Amazon AppFlow makes to data sources and destinations count against any API
     limits for that application. For example, if you set up an hourly flow that pulls 5 pages of data from
     Salesforce, Amazon AppFlow will make a total of 120 daily API calls (24x5=120). This will count against
     your 24-hour Salesforce API limit. Exact API limits can vary depending on your licensing with the SaaS
     application.

     IP address ranges

     Amazon AppFlow operates from the AWS IP address ranges shown in the Amazon Web Services General
     Reference Guide. Configuring a flow connection with an incorrect URL, URI, or IP address range can
     return a 'bad gateway' error. If you encounter this error, we recommend deleting your connection and
     creating a new one with the correct URL, URI, or IP address range. For instructions on how to create a
     new connection for your SaaS application, see Supported applications (p. 9).

                                                    3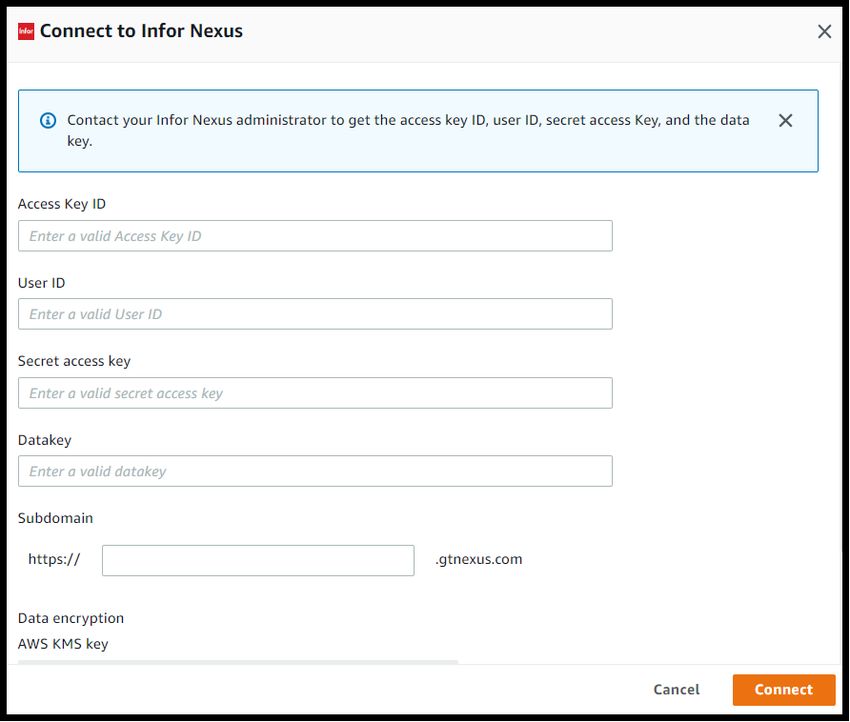
Amazon AppFlow User Guide
                                    General information

    Note
    You can't use IP allow listing in your Amazon S3 bucket policy to deny access to any other IP
    addresses besides Amazon AppFlow IP addresses. This is because Amazon AppFlow uses a VPC
    endpoint when placing data in your Amazon S3 buckets. For more information about Amazon
    AppFlow Regions and endpoints, see Amazon AppFlow Regions and Endpoints in the AWS
    General Reference.

Schema changes

Amazon AppFlow only supports the automatic import of newly created Salesforce fields into Amazon
S3 without requiring the user to update their flow configurations. For other source applications, Amazon
AppFlow does not currently support schema changes, but you can edit your flow to reload the fields
and update your mapping. For more information on how to edit a flow, see Edit an Amazon AppFlow
flow (p. 57).
    Note
    If the source or destination fields in a flow's configuration are deleted from the source or
    destination application (including Salesforce), then the flow run will fail. To prevent failed flows,
    we recommend that you edit your flows to remove deleted fields from the mapping.

                                               4
Amazon AppFlow User Guide
                                              Prerequisites

Getting started with Amazon
AppFlow
     This tutorial provides a hands-on introduction to Amazon AppFlow. You create and configure a flow to
     move data between a data source and a data destination.

     Tasks
      • Prerequisites (p. 5)
      • Step 1: Create a flow (p. 5)
      • Step 2: Configure the flow (p. 6)
      • Step 3: Map data fields (p. 6)
      • Step 4 (Optional): Add filters (p. 7)
      • Step 5: Review and create (p. 8)

Prerequisites
     Ensure you have reviewed the Prerequisites (p. 3) for getting started with Amazon AppFlow.

Step 1: Create a flow
     Provide basic information for your flow.

     To create a flow

     1.   Open the Amazon AppFlow console at https://console.aws.amazon.com/appflow/.
     2.   Choose Create flow.
     3.   For Flow details, enter a name and description for the flow. A valid flow name is a combination of
          alphanumeric characters and the following special characters: !@#.-_.
     4.   (Optional) To use a customer managed CMK instead of the default AWS managed CMK, choose Data
          encryption, Customize encryption settings and then select an existing CMK or create a new one.
     5.   (Optional) To add a tag, choose Tags, Add tag and then enter the key name and value. The following
          basic restrictions apply to tags:

          • Maximum number of tags per resource – 50
          • For each resource, each tag key must be unique, and each tag key can have only one value.
          • Maximum key length – 128
          • Unicode characters in UTF-8
          • Use letters, numbers, and spaces representable in UTF-8, and the following characters: + - = . _ : /
            @.
          • Tag keys and values are case-sensitive.
          • The aws: prefix is reserved for AWS use. If a tag has a tag key with this prefix, then you can't
            edit or delete the tag's key or value. Tags with the aws: prefix do not count against your tags per
            resource limit.

                                                      5
Amazon AppFlow User Guide
Step 2: Configure the flow
6. Choose Next.
Step 2: Configure the flow
Provide information about the source and destination for your flow.
To configure the flow
1. For Source details, select the source and provide the requested information. For example, provide
connection information and select objects or events. For more information, look up your source
application on the Supported applications (p. 9) page where you can find application-specific
connection instructions.
2. For Destination details, select the destination and provide the requested information about
the location. For more information, look up your destination application on the Supported
applications (p. 9) page where you can find application-specific connection instructions.
3. For Flow trigger, choose how to trigger the flow. The following are the flow trigger options:
• Run on demand - Run the flow manually.
• Run on event - Run the flow based on the specified change event.
• This option is available only for SaaS applications that provide change events. You must choose
the event when you choose the source.
• Run on schedule - Run the flow on the specified schedule and transfer the specified data.
• You can choose either full or incremental transfer for schedule-triggered flows.
• When you select full transfer, Amazon AppFlow transfers a snapshot of all records at the time of
the flow run from the source to the destination.
• When you select incremental transfer, Amazon AppFlow transfers only the records that have
been added or changed since the last successful flow run. You can also select a timestamp field
to specify how Amazon AppFlow identifies new or changed records. For example, if you have a
Created Date timestamp field, choose this to instruct Amazon AppFlow to transfer only newly-
created records (and not changed records) since the last successful flow run. The first flow in a
schedule-triggered flow will pull 30 days of past records at the time of the first flow run.
• The scheduling frequency depends on the frequency supported by the source application.
4. Choose Next.
Tip
Attempting a connection with an expired user login can return a 'status code 400' error. If
you encounter this error, we recommend creating a new connection and deleting the old one,
or using an existing connection with valid credentials. For more information on setting up a
connection, look up your source application on the Supported applications (p. 9) page.
Step 3: Map data fields
Map the fields in the source objects to fields in the destination. This determines how data is transferred
from the source to the destination.
To map data fields
1. For Mapping method, choose how to map the fields and complete the field mapping. The following
are the field mapping options:
6Amazon AppFlow User Guide
Step 4 (Optional): Add filters
• Manually map fields - Use the Amazon AppFlow user interface to specify the field mapping. To
map all fields, choose Source field name, Bulk actions, Map all fields directly. Otherwise, select
one or more fields from Source field name, Source fields, and then choose Map fields directly.
• Upload a .csv file with mapped fields - Use a comma-separated values (CSV) file to specify the
field mappings. Each line in the CSV file contains the source field name, followed by a comma,
which is followed by the destination field name. For more information on how to create the CSV
file for upload, see the note that follows this procedure.
2. (Optional) To add a formula that concatenates fields, select two fields from Mapped fields and then
choose Add formula.
3. (Optional) To mask or truncate field values, select one or more fields from Mapped fields and then
choose Modify values.
4. (Optional) For Validations, add validations to check whether a field has bad data. For each field,
choose the condition that indicates bad data and what action Amazon AppFlow should take when a
field in a record is bad.
5. Choose Next.
Tip
When manually mapping between a source and destination, you must select compatible fields
and be sure not to exceed the number of records supported by the destination. For more
information on supported record quotas, see Quotas for Amazon AppFlow in the Amazon
AppFlow User Guide.
Note
When creating a CSV file to upload to Amazon AppFlow, you must specify each source field and
destination field pair in a single line separated by a comma. For example, if you want to map
source fields SF1, SF2, and SF3 to destination fields DFa, DFb, and DFc respectively, the CSV file
should contain three lines as follows:
SF1, DFa
SF2, DFb
SF3, DFc
Save your file with a .csv extension and then upload this file to import the mapping into
Amazon AppFlow.
Step 4 (Optional): Add filters
Specify a filter to determine which records to transfer. Amazon AppFlow enables you to filter data fields
by adding multiple filters and by adding criteria to a filter.
Note
When you select field names with string values, OR logic allows you to combine two or more
criteria into a broader condition. When you add multiple filters, AND logic allows you to
combine your filters into a narrower condition.
To add filters
1. To add a filter, choose Add filter, select the field name, select a condition, and then specify the
criteria.
2. (Optional) To add further criteria to your filter, choose Add criteria. Depending on the field and the
condition, you can add up to 10 criteria per filter.
3. (Optional) To add another filter, choose Add filter again. You can create up to 10 filters to specify
which data fields you want to use in your flow. Amazon AppFlow will implement each filter in the
order in which you specify them, and transfer only the records that meet all filter criteria.
4. To remove a filter, choose Remove next to the filter.
7Amazon AppFlow User Guide
Step 5: Review and create
5. When you are finished adding filters, choose Next.
Step 5: Review and create
Review the information for your flow. To change the information for a step, choose Edit. When you are
finished, choose Create flow.
Tip
If the flow creation fails, review the error message and confirm that all required fields have been
entered.
8Amazon AppFlow User Guide
SaaS applications supported by Amazon AppFlow
Supported applications
SaaS applications supported by Amazon AppFlow
Select an application from the following list to learn more about its setup requirements.
• Amazon S3 (p. 9)
• Amazon Redshift (p. 11)
• Amazon EventBridge (p. 15)
• Amazon Honeycode (p. 16)
• Amazon Lookout for Metrics (p. 17)
• Amplitude (p. 19)
• Datadog (p. 22)
• Dynatrace (p. 24)
• Google Analytics (p. 26)
• Infor Nexus (p. 30)
• Marketo (p. 32)
• Salesforce (p. 34)
• Salesforce Pardot (p. 39)
• ServiceNow (p. 41)
• Singular (p. 43)
• Slack (p. 44)
• Snowflake (p. 47)
• Trend Micro (p. 49)
• Upsolver (p. 50)
• Veeva (p. 52)
• Zendesk (p. 54)
Amazon S3
The following are the requirements and connection instructions for using Amazon Simple Storage
Service (Amazon S3) with Amazon AppFlow.
Note
You can use Amazon S3 as a source or a destination.
Topics
• Requirements (p. 10)
• Connection instructions (p. 10)
• Notes (p. 10)
• Related resources (p. 11)
9Amazon AppFlow User Guide
Requirements
Requirements
• Your Amazon S3 buckets must be in the same AWS Region as your console and flow.
• If you use Amazon S3 as a source, all source files in the chosen Amazon S3 bucket must be in CSV
format, with a header row that includes the field names in each file. Before you set up the flow, ensure
that the source location has at least one file in CSV format, with a list of field names separated by
commas in the first line. You must place the CSV file inside a folder in the Amazon S3 bucket.
• Each source file should not exceed 25 MB in size. However, you can upload multiple CSV files in
the source location, and Amazon AppFlow will read from all of them to transfer data over a single
flow run. You can check for any applicable destination data transfer limits in Quotas for Amazon
AppFlow (p. 75).
• Amazon AppFlow does not support cross-account access to Amazon S3 buckets in order to prevent
unauthorized access and potential security concerns.
Connection instructions
To use Amazon S3 as a source or destination while creating a flow
1. Open the Amazon AppFlow console at https://console.aws.amazon.com/appflow/.
2. Choose Create flow.
3. For Flow details, enter a name and description for the flow.
4. (Optional) To use a customer managed CMK instead of the default AWS managed CMK, choose Data
encryption, Customize encryption settings and then choose an existing CMK or create a new one.
5. (Optional) To add a tag, choose Tags, Add tag and then enter the key name and value.
6. Choose Next.
7. Choose Amazon S3 from the Source name or Destination name dropdown list.
8. Under Bucket details, select the Amazon S3 bucket that you're retrieving from or adding to. You can
specify a prefix, which is equivalent to specifying a folder within the Amazon S3 bucket where your
source files are located or records are to be written to the destination.
Now that you are connected to your Amazon S3 bucket, you can continue with the flow creation steps as
described in Getting started with Amazon AppFlow (p. 5).
Tip
If you aren’t connected successfully, ensure that you have followed the instructions in the
Requirements (p. 10) section above.
Notes
• When you use Amazon S3 as a source, you can run schedule-triggered flows at a maximum frequency
of one flow run per minute.
10Amazon AppFlow User Guide
Related resources
• When you use Amazon S3 as a destination, the following additional settings are available.
Setting name Description
Data format preference • You can specify your preferred file format for the transferred records.
• The following options are currently available: JSON (default), CSV, or
Parquet.
Note
If you choose Parquet as the format for your destination file in
Amazon S3, the option to aggregate all records into one file per
flow run will not be available. When choosing Parquet, Amazon
AppFlow will write the output as string, and not declare the
data types as defined by the source.
Data transfer preference • You can choose between aggregation, and no aggregation of records.
• By default, Amazon AppFlow transfers data into multiple files per flow
run.
• Alternatively, you can choose to aggregate all transferred data into
one file per run flow.
Filename preference • You can choose to add a timestamp to the filename.
• Your filename will end with the file creation timestamp in YYYY-MM-
DDThh:mm:sss format.
• The creation date is in UTC time.
Folder structure • You can choose to place the file in a timestamped folder.
preference • You can choose your preferred level of granularity (year, month, week,
day, or minute).
• The granularity that you choose determines the naming format of the
folder.
• The timestamp is in UTC time.
Related resources
• Amazon Simple Storage Service Console User Guide
• Amazon AppFlow now supports new data formats for ingesting files into Amazon S3 in the AWS
What’s new blog
• Video: How to insert new Salesforce records with data in Amazon S3 using Amazon AppFlow
• Video: How to transfer data from Slack to Amazon S3 using Amazon AppFlow
• Video: How to transfer data from Google Analytics to Amazon S3 using Amazon AppFlow
• Video: How to transfer data from Zendesk Support to Amazon S3 using Amazon AppFlow
Amazon Redshift
The following are the requirements and connection instructions for using Amazon Redshift with Amazon
AppFlow.
Note
You can use Amazon Redshift as a destination only.
11Amazon AppFlow User Guide
Requirements
Topics
• Requirements (p. 12)
• Connection instructions (p. 12)
• Notes (p. 14)
• Related resources (p. 14)
Requirements
You must provide Amazon AppFlow with the following:
• The name and prefix of the S3 bucket that Amazon AppFlow will use when moving data into Amazon
Redshift.
• The user name and password of your Amazon Redshift user account.
• The JDBC URL of your Amazon Redshift cluster. For more information, see Finding your cluster
connection string in the Amazon Redshift Cluster Management Guide.
You must also do the following:
• Ensure that you enter a correct JDBC connector and password when configuring your Redshift
connections. An incorrect JDBC connector or password can return an '[Amazon](500310)' error.
• Create an AWS Identity and Access Management (IAM) role that grants AmazonS3ReadOnlyAccess
and access to the kms:Decrypt action (see the following example). This allows Amazon Redshift
to access the encrypted data that Amazon AppFlow stored in the S3 bucket. Attach the role to your
cluster.
For more information, see Create an IAM role in the Amazon Redshift Getting Started Guide.
{
"Effect": "Allow",
"Action": "kms:Decrypt",
"Resource": "*"
}
• Ensure that your cluster is publicly accessible. For more information, see How to make a private
Redshift cluster publicly accessible in the AWS Knowledge Center.
• Ensure that your Amazon Redshift cluster is accessible from Amazon AppFlow IP address ranges in
your Region.
Connection instructions
To ensure that your Amazon Redshift cluster is accessible from Amazon AppFlow IP address
ranges in your Region
1. Sign in to the AWS Management Console and open the Amazon Redshift console at https://
console.aws.amazon.com/redshift/.
2. Choose the cluster to modify.
3. Choose the link next to VPC security groups to open the Amazon Elastic Compute Cloud (Amazon
EC2) console.
4. On the Inbound Rules tab, be sure that all Amazon AppFlow IP CIDR blocks for your region and the
port of your Amazon Redshift cluster are allowed.
12Amazon AppFlow User Guide
Connection instructions
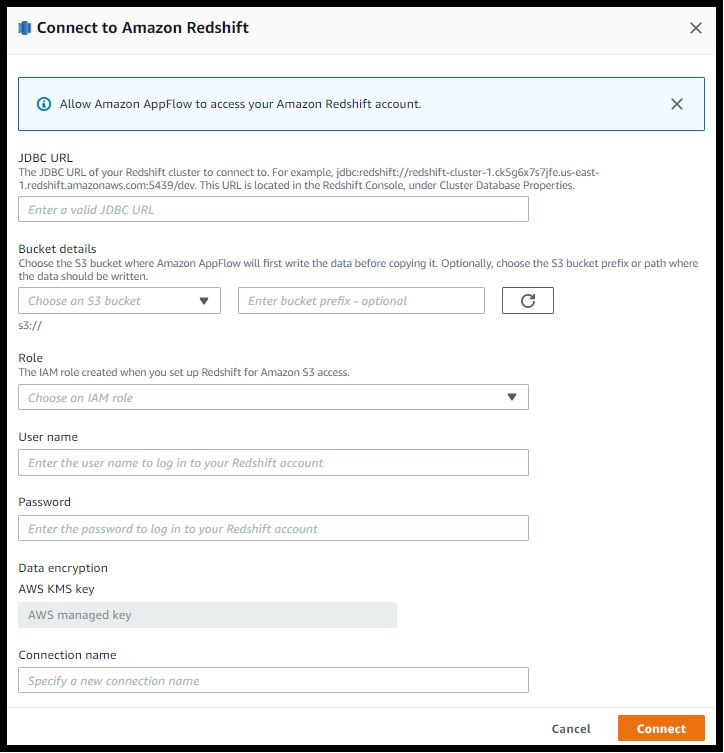
To connect to Amazon Redshift while creating a flow
1. Open the Amazon AppFlow console at https://console.aws.amazon.com/appflow/.
2. Choose Create flow.
3. For Flow details, enter a name and description for the flow.
4. (Optional) To use a customer managed CMK instead of the default AWS managed CMK, choose Data
encryption, Customize encryption settings and then choose an existing CMK or create a new one.
5. (Optional) To add a tag, choose Tags, Add tag and then enter the key name and value.
6. Choose Next.
7. Choose Amazon Redshift from the Destination name list.
8. Choose Connect to open the Connect to Amazon Redshift dialog box.
a. Under JDBC URL, enter your access key ID.
b. Under Bucket details, select the Amazon S3 bucket where Amazon AppFlow will write data
before copying it.
c. Under Role, select the IAM role that you created when you set up Amazon Redshift for Amazon
S3 access.
d. Under User name, enter the user name that you use to log into Amazon Redshift.
e. Under Password, enter the password that you use to log into Amazon Redshift.
f. Under Data encryption, enter your AWS KMS key.
g. Under Connection name, specify a name for your connection.
9. Choose Connect.
13Amazon AppFlow User Guide
Notes
Now that you are connected to Amazon Redshift, you can continue with the flow creation steps as
described in Getting started with Amazon AppFlow (p. 5).
Tip
If you aren’t connected successfully, ensure that you have followed the instructions in the
Requirements (p. 12) section.
Notes
• The default port for Amazon Redshift is 5439, but your port might be different. To find the Amazon
AppFlow IP CIDR block for your region, see AWS IP address ranges in the Amazon Web Services General
Reference.
• Amazon AppFlow currently supports the insert action when transferring data into Amazon Redshift,
but not the update or upsert action.
Related resources
• Finding your cluster connection string in the Amazon Redshift Cluster Management Guide
• How to make a private Redshift cluster publicly accessible in the AWS Knowledge Center
• Create an IAM role in the Amazon Redshift Getting Started Guide
14Amazon AppFlow User Guide
Amazon EventBridge
• Workaround to extract Salesforce data using Amazon AppFlow and upsert it to Amazon Redshift tables
hosted on private subnet using data APIs in the Amazon AppFlow GitHub Page
Amazon EventBridge
The following are the requirements and connection instructions for using Amazon EventBridge with
Amazon AppFlow.
Note
You can use Amazon EventBridge as a destination only.
Topics
• Requirements (p. 15)
• Connection instructions (p. 15)
• Notes (p. 16)
• Related resources (p. 16)
Requirements
Amazon AppFlow integrates with Amazon EventBridge to receive events from Salesforce. When
you configure a flow that responds to Salesforce events, you can choose Amazon EventBridge as a
destination. This enables Salesforce events received by Amazon AppFlow to be routed directly to a
partner event bus.
• To configure Amazon EventBridge integration in Amazon AppFlow, you must first create a flow with
Amazon EventBridge as the destination and then specify the partner event source.
• Before you can activate the flow, you must go to Amazon EventBridge to associate the partner event
source with the event bus. After you complete this association and activate the flow, Salesforce events
start flowing to the Amazon EventBridge event bus.
Connection instructions
To create a flow with Amazon EventBridge as the destination
1. Open the Amazon AppFlow console at https://console.aws.amazon.com/appflow/.
2. Choose Create flow and enter a name for your flow.
3. For Source details, choose Salesforce as the source and select Salesforce Events with the specific
event name.
4. For Destination details, choose Amazon EventBridge as the destination and one of the following
partner event sources:
• Existing partner event source - Amazon AppFlow displays a list of existing partner event sources
that are available to you.
• New partner event source - Amazon AppFlow creates a new partner event source on your behalf.
If you choose this option, the partner event source name generated by Amazon AppFlow appears
in a dialog box. (Optional) You can modify this name if needed.
Note
The actual call to Amazon EventBridge API operations for creating this partner event source
happens only when you choose Create flow in step 11 of this procedure.
15Amazon AppFlow User Guide
Notes
5. For Large event handling, specify the Amazon S3 bucket where you want Amazon AppFlow to send
large event information.
6. Ensure that Run flow on event is selected in the Flow trigger section. This setting ensures that the
flow is executed when a new Salesforce event occurs.
7. For field mapping, choose Map all fields directly. Alternatively, you can choose the fields that you're
interested in using from the Source field name list.
8. Choose Next.
9. (Optional) Configure filters for data fields in Amazon AppFlow.
10. Choose Next.
11. Review the settings and then choose Create flow.
To associate the partner event source with the event bus in Amazon EventBridge
1. Open the Partner event sources view in the Amazon EventBridge console at https://
console.aws.amazon.com/events/home?#/partners/.
2. Choose the partner event source that you created.
3. Choose Associate with event bus.
4. Validate the name of the partner event bus.
5. Choose Associate.
6. Return to Amazon AppFlow and choose Activate flow to activate the flow.
Notes
• Events are limited to 256 KB. For events larger than 256 KB, Amazon AppFlow doesn't send the full
event to Amazon EventBridge. Instead, the event payload contains a pointer to an Amazon S3 bucket,
where you can get the full event.
• Events should be enabled in Salesforce and also in Amazon AppFlow for the destination to receive
them. The destination service receives all such events configured for your account. If you need to filter
the kinds of events that you want to process, or send different events to different targets, you can use
content-based filtering with event patterns.
Related resources
• Receiving events from a SaaS partner in the Amazon EventBridge documentation
• Amazon AppFlow now supports Amazon EventBridge as a destination in the AWS What's new blog
• Building Salesforce integrations with EventBridge and Amazon AppFlow in the AWS Compute blog
Amazon Honeycode
The following are the requirements and connection instructions for using Amazon Honeycode with
Amazon AppFlow.
Note
You can use Amazon Honeycode as a destination only.
Topics
• Connection instructions (p. 17)
• Notes (p. 17)
• Related resources (p. 17)
16Amazon AppFlow User Guide
Setup instructions
Connection instructions
To create a flow with Amazon Honeycode as the destination
1. Open the Amazon AppFlow console at https://console.aws.amazon.com/appflow/.
2. Choose Create flow and enter a name for your flow.
3. (Optional) To add a tag, choose Tags, Add tag and then enter the key name and value.
4. Choose Next.
5. For Source details, choose one of the supported sources such as Salesforce, and provide the
requested information.
6. For Destination details, choose Amazon Honeycode as the destination. If you are connecting to
Amazon Honeycode for the first time, follow the instructions to complete the OAuth workflow and
create a connection profile.
7. Select the workbook and table that are enabled in your account. You can select only one workbook
and one table at a time.
8. Specify an error handling option to determine what action Amazon AppFlow takes if it can’t write
a record to the destination. If data can't be transferred to Amazon Honeycode, Amazon AppFlow
writes that data to the Amazon S3 location of your choice. You can also choose to Stop the current
flow run or Ignore and continue the flow run.
9. Choose a trigger for your flow. When using Amazon Honeycode as a destination, the Run on
demand and Run flow on schedule options are available.
10. Choose Next.
11. For field mapping, choose Map all fields directly. Alternatively, you can manually select the fields
that you want to use from the Source field name list.
12. (Optional) Under Validations - optional, add validations to check whether a field has bad data. For
each field, choose the condition that indicates bad data and what action Amazon AppFlow should
take when a field in a record is bad.
13. Choose Next.
14. (Optional) Specify a filter to determine which records to transfer. To add a filter, choose Add filter,
select the field name, select a condition, and then specify the criteria.
15. Choose Next.
16. Review the settings and then choose Create flow.
Notes
• This integration with Amazon Honeycode currently supports the append functionality only. You can
add new records to existing workbooks and tables, but you cannot update existing records at this time.
Related resources
• Amazon Honeycode User Guide
Amazon Lookout for Metrics
The following are the requirements and connection instructions for using Amazon Lookout for Metrics
with Amazon AppFlow.
Note
You can use Amazon Lookout for Metrics as a destination only.
17You can also read