J.P. Morgan Receivables Online - January 2021 - JP Morgan
←
→
Page content transcription
If your browser does not render page correctly, please read the page content below

J.P. Morgan
Receivables Online
January 2021
Last Modified: June 15, 2021

This guide is confidential and proprietary to J.P. Morgan and is provided for your general information only. It is
subject to change without notice and is not intended to be legally binding. All services described in this guide are
subject to applicable laws and regulations and service terms. Not all products and services are available in all
locations. Eligibility for particular products and services will be determined by JPMorgan Chase Bank, N.A. or its
affiliates. J.P. Morgan makes no representation as to the legal, regulatory or tax implications of the matters referred
to in this guide.

J.P. Morgan is a marketing name for the Wholesale Payments businesses of JPMorgan Chase Bank, N.A. and its
affiliates worldwide.

JPMorgan Chase Bank, N.A., organized under the laws of U.S.A. with limited liability.
© 2020 JPMorgan Chase & Co. All rights reserved.

                                                                                                                     2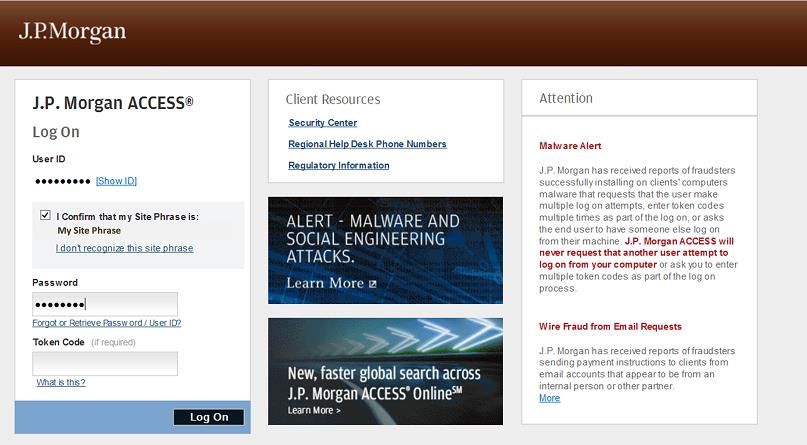
Table of Contents
 Receivables Online Log On ..................................................................................................................... 7
    Overview ............................................................................................................................................. 7
    Log On – How To................................................................................................................................. 8
    Password Requirements ................................................................................................................... 10
    Machine Registration........................................................................................................................ 12
    Express Password Reset (EPR) .......................................................................................................... 14
    Site Phrase ........................................................................................................................................ 17
    Personally Identifiable Information .................................................................................................. 18
 Navigation ............................................................................................................................................ 19
    Receivables Online Header ............................................................................................................... 19
    Menu Bar .......................................................................................................................................... 19
    Filters and Actions ............................................................................................................................ 20
    Breadcrumbs..................................................................................................................................... 22
    Wildcard Search ................................................................................................................................ 22
 Image Viewer........................................................................................................................................ 24
    Image Viewer – Overview ................................................................................................................. 24
    Image Viewer – Toolbar.................................................................................................................... 24
    View Document Images .................................................................................................................... 26
    Exporting Data and Images ............................................................................................................... 27
 Settings ................................................................................................................................................. 30
    Settings – Overview .......................................................................................................................... 30
    Display and Print Settings ................................................................................................................. 31
    Remote Capture Settings.................................................................................................................. 31
    Alert Settings .................................................................................................................................... 31
 Support ................................................................................................................................................. 32
    Message Center ................................................................................................................................ 32
 Receivables Online – Menu Bar ........................................................................................................... 33
    Receivables ....................................................................................................................................... 33

                                                                                                                                                            3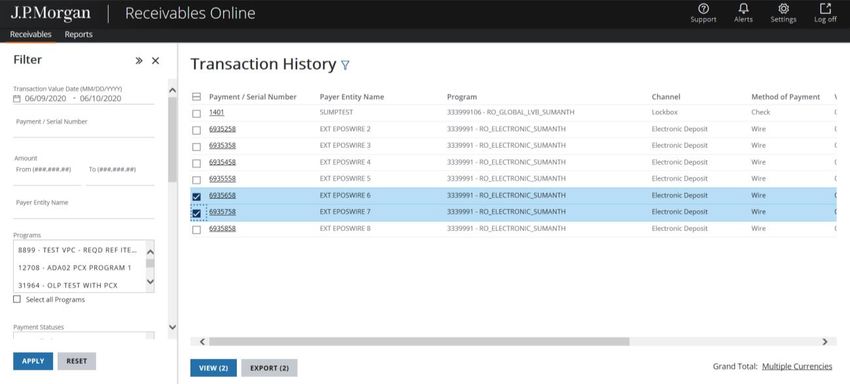
Reports.............................................................................................................................................. 35
   Administration .................................................................................................................................. 36
   Action Items ...................................................................................................................................... 36
Transaction History .............................................................................................................................. 38
   Transaction History Filter ................................................................................................................. 39
   Advanced Transaction History Filter ................................................................................................ 41
   Archived Transaction Retrieval......................................................................................................... 42
   Transaction History List .................................................................................................................... 42
   Column Headings .............................................................................................................................. 43
   Action Buttons .................................................................................................................................. 44
Transaction Details ............................................................................................................................... 45
   Transaction Details – Overview ........................................................................................................ 45
   Screen Layout ................................................................................................................................... 45
Transactions Requiring Action ............................................................................................................. 48
Returns ................................................................................................................................................. 49
   Returns – Overview .......................................................................................................................... 49
   Transaction History – Reassociated Returns Search ........................................................................ 49
   Return Item Summary Report .......................................................................................................... 51
Alerts .................................................................................................................................................... 54
   Alert Inbox–Overview ....................................................................................................................... 54
   Filter Alert Messages ........................................................................................................................ 54
   Read Alert Messages ........................................................................................................................ 55
   Alert Types ........................................................................................................................................ 56
   Alerts Inbox Display .......................................................................................................................... 56
   Manage Alerts – Overview ............................................................................................................... 58
   Edit and Delete Alerts ....................................................................................................................... 59
   Create Alerts ..................................................................................................................................... 59
   Activate and Deactivate Alerts ......................................................................................................... 59
   Manage Alerts–How To .................................................................................................................... 59

                                                                                                                                                            4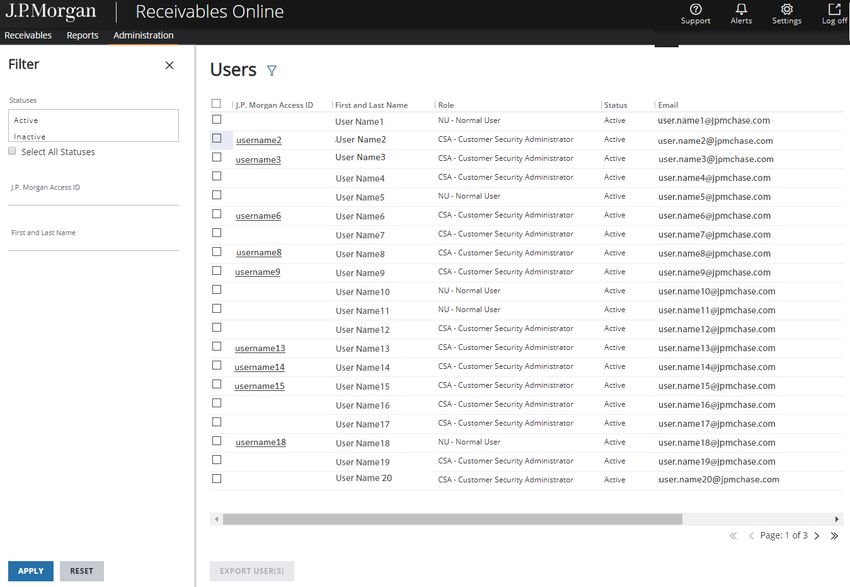
View Alerts ........................................................................................................................................ 59
   Create New Alerts ............................................................................................................................. 60
   Payment Alert Triggers ..................................................................................................................... 61
   Return Alert Triggers ........................................................................................................................ 61
   Capture Alert Triggers ...................................................................................................................... 62
   Decision Alert Triggers ...................................................................................................................... 62
   Remittance Alert Triggers ................................................................................................................. 63
   Activate/Deactivate Alerts................................................................................................................ 64
   Edit Alerts ......................................................................................................................................... 65
   Delete Alerts ..................................................................................................................................... 65
Reports ................................................................................................................................................. 66
   Reports – Overview .......................................................................................................................... 66
   Reports by Type ................................................................................................................................ 67
   Select a Report.................................................................................................................................. 67
   Available Reports .............................................................................................................................. 69
   Activity Summary .............................................................................................................................. 69
   Assigned To Summary ...................................................................................................................... 69
   Capture Summary ............................................................................................................................. 70
   CSV+ Detail........................................................................................................................................ 70
   Extended Detail ................................................................................................................................ 70
   Payment Detail ................................................................................................................................. 72
   Return Item Summary ...................................................................................................................... 72
   Transaction Summary ....................................................................................................................... 72
   Report Inbox ..................................................................................................................................... 73
   Lockbox Deposit Advice Report ........................................................................................................ 73
   Transmission Journal ........................................................................................................................ 73
   Electronic Payment Detail Report .................................................................................................... 73
   Custom Report .................................................................................................................................. 73
   Selection Parameters for the Report Inbox ...................................................................................... 74

                                                                                                                                                          5
Entities .................................................................................................................................................. 75
Administration...................................................................................................................................... 76
View User ............................................................................................................................................. 77
Edit User ............................................................................................................................................... 79
Create User........................................................................................................................................... 83
   Setup New User ................................................................................................................................ 83
   Clone User......................................................................................................................................... 87
   User Profile Settings ......................................................................................................................... 87
   Programs/Groups ............................................................................................................................. 87
   Services/Entitlements ....................................................................................................................... 88
   User Id/User Name Rules ................................................................................................................. 89
   Password Rules ................................................................................................................................. 89
Important Entitlements cannot be modified for Security Administrators (SAs). At the time of service
implementation, entitlements at the company level and the user level for SAs are entered by the
Bank. SAs are not allowed to modify their or each other’s service entitlements.Glossary .................. 89

                                                                                                                                                            6
Receivables Online Log On
Overview
Receivables Online is an internet-based receivables management application and account
reconciliation solution. It combines advanced image and data capture technology to deliver a
consolidated view of current-day and long-term remittance data.

Receivables Online, which is accessed through the J.P. Morgan AccessTM at www.jpmorganaccess.com,
provides you with more self-service capabilities and security features. For example:

Machine Registration – When you log on to Access from a computer that is not recognized, you must
provide an Activation Code to register your computer. This is done to keep your information secure.
The Activation Code will be e-mailed to you. Once the Activation Code is submitted, your computer
will be registered.

Express Password Reset – You will have the ability to reset your password without having to rely on
your Security Administrator. Simply set up Challenge Questions and Answers, so if you forget your
password, you can answer a series of questions to reset your password.

Site Phrase – You will have the ability to reset your Site Phrase that is used in the two-step logon
process.

Secure ID Token – Depending on your setup, you may be required to utilize a secure ID token when
logging on. Your Security Administrator will provide the token, if needed.

After logging on, the Access landing page is displayed, where you can select Receivables Online from
the More Services menu. If you have access to multiple Web IDs, you will be prompted to select a
Receivables Online account. Once you have selected the appropriate account, you will be taken to
Receivables Online. If you only have one Web ID, you will bypass the Select Receivables Online
Account page and proceed directly to Receivables Online.

The Log Out icon is displayed in header on every Receivables Online screen. You must log on and log
out each time you want to open and close the Receivables Online application. By default, your login
password is set to expire every 90 days.

                                                                                                       7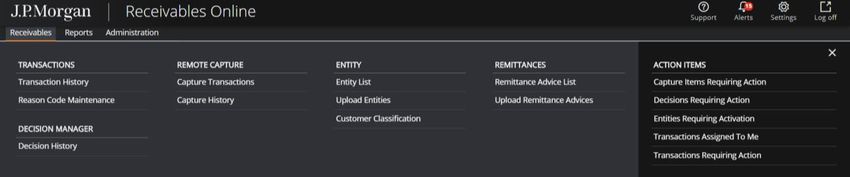
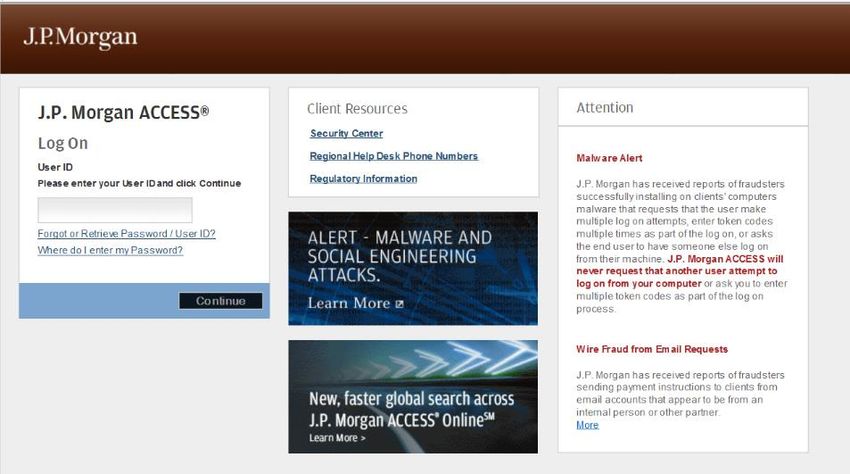
Log On – How To

To log on to the Receivables Online application, you will use your User ID, Site Phrase and Password.
You may also need to use a Secure ID Token, if one has been assigned to you.

   1. Enter your assigned User ID in the User ID field.

                                                                                                        8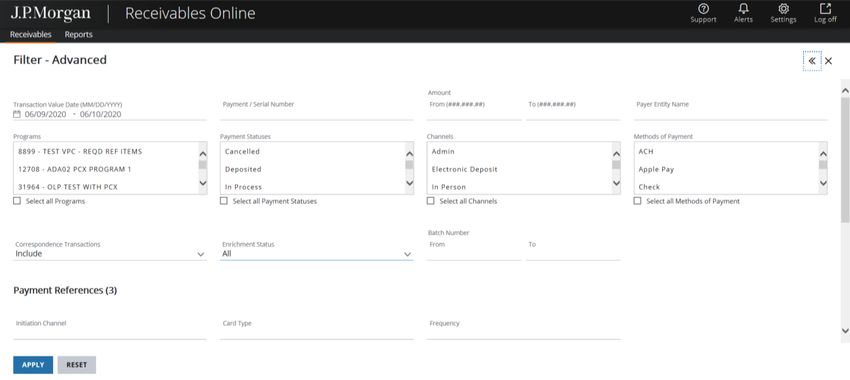
2. Select the Continue button to display the second Log On screen.

3. Confirm that the personal Site Phrase displayed is correct.

4. Enter your password in the Password field.

5. If you have been assigned a Secure ID token, enter the security code displayed on your token
   into the Token Code field.

6. Select Log On.

7. The J.P. Morgan AccessTM dashboard is displayed. Select Receivables Online from the More
   Services menu.

                                                                                                  9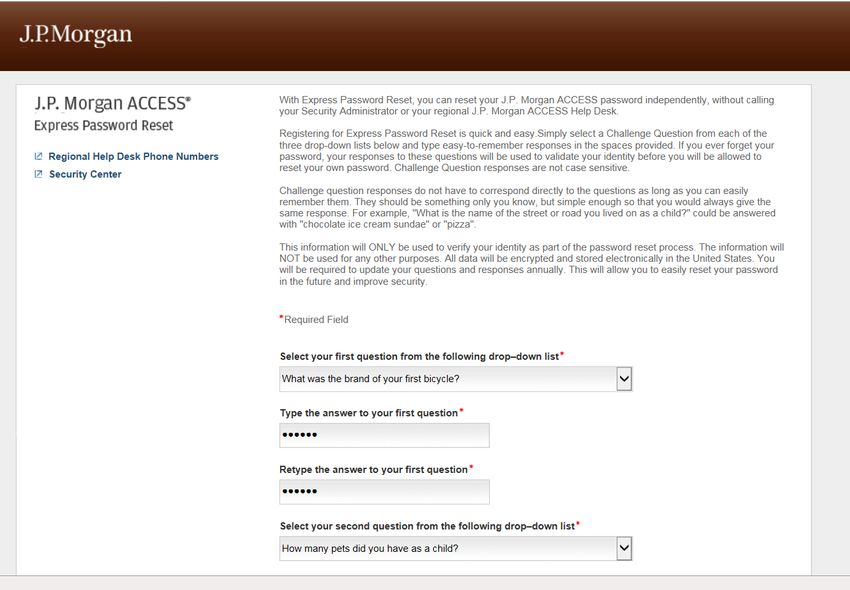
Password Requirements
Your password is case-sensitive, meaning that it must be typed in exactly as it is defined with upper
and lower case alpha characters and numbers. When you log on for the first time, the Change
Password screen opens, and you are required to change your password for security purposes. The
following Password rules apply.

   •   Password must be between eight to 20 characters long

   •   Contain at least one upper-case letter, one lower-case letter and one number

   •   Not contain spaces but can contain following special characters: @ # $ % & _ + / { } | ~ ?

   •   Not contain three or more consecutive numbers or letters (e.g. "123Smjth / ABCSmjth" would
       not be allowed)

   •   Not contain three or more repeated numbers, letters or special characters (e.g. "AAASmjth /
       111Smjth / @@@Smjth" would not be allowed)

   •   Not contain the words "morgan", "chase", “test”, “admin”, “qwerty”, “password”, “yesterday”

   •   Be different from your J.P. Morgan AccessTM User ID

   •   Your new password cannot be the same as your previous 10 passwords

There are three conditions when a password must be changed:

   1. The first time you login to Receivables Online

   2. When your password periodically expires

   3. When your password has been reset either through Express Password Reset or by your
      Security Administrator

By default, your login password is set to expire every 90 days.

To change your existing password from the Access Log On screen:

                                                                                                        10
1. Enter your User ID in the User ID field.
2. Enter your current password in the Enter Current Password field.
3. Enter a new password in the New Password field. Remember, your password is case-sensitive.
It must contain alpha and numeric characters between eight and 20 characters.
4. Enter your new password again in the Confirm New Password field exactly as you entered it in
the previous field to confirm the new entry.
5. Select Next.
6. The new password is saved successfully. J.P. Morgan AccessTM will display the following
confirmation message:
117. Select Next to return to the J.P. Morgan AccessTM landing page, where you can select
Receivables Online from the More Services menu.
The next time you log on, you must enter the new password to gain access to Receivables Online.
Machine Registration
Each time you log on to J.P. Morgan AccessTM from a computer that is not recognized, you are
required to register your computer using a new Activation Code. This is done to keep your
information safe and secure. The initial computer that is used to log on to AccessTM for the first time
will be automatically registered. Any subsequent computers used to log on will require Machine
Registration. The Activation Code will be e-mailed to you. You will then be required to enter your
Activation Code before you can successfully log on to Receivables Online. Once the Activation Code
has been submitted, your computer will be registered.
1213
Express Password Reset (EPR)
When logging on to Receivables Online through J.P. Morgan AccessTM, you will be prompted to set up
your Express Password Reset (EPR) responses if you have not done so on your initial login. EPR setup
will be required to successfully log on to Receivables Online. EPR will present a series of challenge
questions, and depending on which questions selected, you will need to provide answers to those
questions.

                                                                                                   14
Once this setup is completed, you will have the ability to reset your password if you forget it or get
locked out in the future.
From the Access Log On page, select the Forgot your password? link and do the following:
1. Enter your User ID and your email address.
2. Choose one Challenge Question from each of the three drop-down lists.
3. Enter the easy-to-remember answers, and then select Submit.
15Once you have answered them correctly, an e-mail will be sent to you with your temporary password.
You will be able to log on to Access with the temporary password and will be required to update your
password.
16Site Phrase
When logging on to Receivables Online through J.P. Morgan AccessTM, you will be prompted to set up
your personal Site Phrase if you have not done so during your initial log on. Site Phrase setup will be
required to successfully log on to Receivables Online. The personal Site Phrase selected will be
displayed during the log on process for your confirmation to ensure you are logging on through the
authorized URL.
17Personally Identifiable Information
When logging on to Receivables Online through J.P. Morgan AccessTM for the first time, you will be
prompted to enter your Personally Identifiable Information (PII). This consists of your legal name and
residential address (you may choose to substitute your business address).
Once you have completed your initial log on and profile setup process, you can make Security changes
when needed through the J.P. Morgan AccessTM Settings Menu.
18Navigation
Receivables Online has a streamlined, intuitive design that simplifies capturing, viewing, and managing
receivables transactions. All transactions are displayed in single, nearly full-sized screens with more
information making it easier to filter a list, view transactions, or take action on an item. When you log
on to Receivables Online you will be taken to the default landing page. This will generally be the
Transaction History page, unless you have Remote Capture entitlements, then you will be taken
directly to the Capture Transactions page. The Receivables Online header and menu bar are visible on
all Receivables Online pages, so you can easily navigate to any function or feature.
Receivables Online Header
You can access common functions from the header icons:
• Support will open a page where you can access support materials and user guides.
• Alerts will take you to your alerts inbox to view important system and transaction alert
messages. See the Alerts section for additional details.
• Settings will open a page where you can update your default scanner, display and print, and
alert options. See the Settings section for additional details,
• Use Log off to log off of Receivables Online.
Menu Bar
You can quickly access tasks and view information from the Receivables menu bar.
Select from the following menu options:
• Receivables – Displays options for viewing and managing receivables transactions
• Reports – Displays available reports based on your company and user level entitlements
• Administration – For entitled users, displays options for viewing and maintaining user
entitlements
19• Action Items – Quick links displayed in the menu panel that allow you to directly navigate to
filtered results screens where you can perform immediate tasks on specific transactions
Filters and Actions
On the various list screens in Receivables Online, select the Filter icon to open the Filters panel,
where you can filter your captured batches, transactions, remittances, entities or User lists by date,
program, status, etc.
20The available filter parameters will be displayed in the filter panel.
1
4
2 3 5 7
6
1. Select your desired parameters from the available filter options.
2. Select Apply to execute your search.
3. Use Reset to clear your filter selections and return to the default filter.
4. Your search results will be displayed in the viewing panel.
5. Key actions can be executed by item or in groups, by checking one or more items in the list and
selecting one of the action buttons. To select all items in a list, select the checkbox above the
header row of the results list. Key actions include:
• Export
• Submit
• Save/Save & Continue
• View
• Edit
• Activate/Deactivate.
6. Grand Totals will be displayed for the items included in your results list in the bottom right
corner of the screen.
7. You can page through your results using the Pagination buttons in the lower right corner of the
results list.
21Breadcrumbs
The concept behind breadcrumbs is to mark a trail as you navigate forward (or, “drill down” deeper)
through the application screens. The breadcrumbs are also known as “the path” that you have taken
to arrive at the current screen. The breadcrumb is the reverse route you would take back to the
previous screen. The breadcrumb is displayed on every detail screen in Receivables Online. The
example below shows the breadcrumb that is created when you select a specific transaction from the
Transaction History list. Selecting the breadcrumb will return you to the Transaction History list
screen.
Important
Do not use your browser's "Back" button to navigate backward once you have logged on. Doing so
may cause your transactions to be submitted incorrectly. Always use the breadcrumb, Menu, or
Pagination links on a page to navigate forward and backward through Receivables Online.
Wildcard Search
Many search fields in Receivables Online will accept a partial text entry that includes the asterisk (*)
meta-character in place of missing characters in the text string. Wildcard searches are useful both as a
shortcut to entering a query and as a tool to fill in the blanks when you only know part of the alpha or
numeric text entry you need to locate. The asterisk (*) can be used at the beginning, middle, or end of
a string search.
22For example, we have entered a wildcard text string at the Entity Name field in the Transaction
History Filter. We know that there is at least one Entity with a name that includes the text string,
"Test" in the full Entity name.
The text string, test*, will return all entries in the database that begin with that text string. The
wildcard text strings, *test and *test* will produce all entries in the database that contain the string,
“test” anywhere. The search returns the following transactions in the Transaction History list.
Note: The same functionality applies in all of the filter panels throughout Receivables Online.
23Image Viewer
Image Viewer – Overview
The Image Viewer is accessible from various Receivables Online transaction screens. The Image
Viewer displays payment-related images such as a check, coupon, invoice, postal envelope, or other
packaging material.
The Image Viewer presents images in a single-page format with thumbnails for easy navigation
through multiple images. It allows you to:
• Quickly view multiple check and/or document images for a transaction.
• Print an entire transaction with one request.
• Download an entire transaction, and print and/or save it to a file that can be attached to an email message.
• Activate the Image viewer from the Transaction History list screen to view and/or export several
transactions at once.
• The Image Viewer also includes a thumbnail feature.
Image Viewer – Toolbar
The Image Viewer toolbar allows you to navigate between transaction images, adjust the
magnification settings and page orientation, as well as print and save image. The following table
shows each toolbar icon and its description.
Icon Description
Rotate
Zoom In
Zoom Out
Invert
24Icon Description
Save
Print
25View Document Images
Document images may be viewed in black and white or in color, depending on how your account is
configured on the Bank's capture platform. All images may be downloaded and saved to your PC's file
system.
To view a document image from the Transaction Details screen, a transaction-related image must be
available. Images are not available with electronic payments.
Important
You may want to create a folder for your images in the desired location of your PC's file system before
you save an image.
To view images for one or more transactions, do the following:
1. Perform a search by applying your selected filters, and select a transaction link in the
Transaction History list screen. The Transaction Details screen opens.
2. In the Transaction Details screen, select a check or other payment-related image. The Image
Viewer window opens with the selected document displayed.
3. Alternately, you can select one or more transactions in the Transaction History list, and select
View. The selected transactions will open, and you can utilize the pagination buttons at the
bottom of the screen to page through images for each transaction.
26Exporting Data and Images
The ability to export filtered search results is available from the following screens in Receivables
Online:
• Transaction History
• Capture History
• Entity List
• Remittance Advice List
• Decision History
• Capture Items Requiring Action
• Transactions Requiring Action
• View User
To export your filtered search results to a spreadsheet:
1. Choose the transaction(s) you want to export, and then select EXPORT.
2. The Export window displays. If both data and images are available, you can select the type of
information to export.
3. To export data, select Data, and then select EXPORT.
274. Your file extract message will display at the bottom of the screen; you can save the file to your PC
and/or open the exported CSV file for viewing.
5. To export images, select Images, and then select EXPORT. The Image Viewer displays with the
selected document(s). If multiple images are included in a transaction, the first image is displayed.
You can page forward or use the thumbnail feature to view additional images.
286. You can SAVE or PRINT selected images from the Image Viewer. From the Save or Print window
that displays, you can select specific images or all the images to save or print. When saving
images, you can select from PDF or TIFF format.
Notes
• When you print or save in the Adobe® PDF format for a single image, the single image will
display the check and transaction information, and note(s), if applicable.
• When you print or save in the PDF format for multiple images, the check and transaction
information and note(s), if applicable, will be displayed with each image.
29Settings
Settings – Overview
In addition to your JP Morgan AccessTM Settings, there are a few settings available in Receivables
Online. The Receivables Online Settings icon is accessed from the Receivables Online header, which is
available on every Receivables Online screen. Selecting the Settings icon will display the Settings page.
Depending on your entitlements, options on the page will allow you to change some of the
characteristics of your default user profile and your Alert destination.
• Display and Print–you can update how data is displayed in Receivables Online.
• Remote Capture–you can update your Remote Capture scanner setting.
• Alerts–you can update the destination for receiving Alerts. See the Alerts section for additional
details.
The various profile settings can help you customize the way transactions are presented to best suit
the way you perform your daily work. Alerts-related information is only displayed if your company
subscribes to the Alert Service.
30Display and Print Settings
In Display and Print Settings, you can update how information is displayed on the Receivables Online
screens.
• Start Page–Set your preferred landing page when you start Receivables Online.
• Time Zone–Set your preferred Time Zone. The default is Central Standard Time (CST).
• Time Format–Set your preferred Time Format for 12 Hr. or 24 Hr.
• Date Format–Set your preferred Date Format. The default is MM/DD/YY.
• Currency Format–Set your preferred Currency Format. The default is 999,999.99.
Remote Capture Settings
If you subscribe to the Remote Capture Service, you will have the option to select a scanner. Simply,
select your scanner from the dropdown list, and then select Save. The scanner you selected will
become your default scanner.
Alert Settings
If you subscribe to the Alerts Service, you can update the destination for delivery of your Alerts.
• Alert Inbox Only–alerts will be delivered to your Alert Inbox in Receivables Online, but not to
your email.
• Alert Inbox and Email–alerts will be delivered to both your Receivables Online Alert Inbox and
your email address.
31Support
The Support icon can be found in the upper right corner of the Header in Receivables Online.
When you select the Support icon, you will be routed to the Receivables Support page where you can
access the Receivables Online User Guides and obtain additional support information.
To access one of the User Guides, select the link for the user guide you would like to review; a PDF file
will open for the selected user guide.
Message Center
When you logon to Receivables Online, any important messages about system outages or updates will
be displayed. You can also access these messages from the Message Center on the Support screen.
The Message Center is used to present a variety of important system messages to users. Messages are
presented in chronological order with the most recent message displayed first. An expiration date is
set for each displayed message. When that date is reached, the message is automatically removed
from the display and deleted from the system.
32Receivables Online – Menu Bar
When you log on to Receivables Online you will be taken to the default landing page. This will
generally be the Transaction History page, unless you have updated your start page in the Display and
Print Settings. The Menu Bar is visible on all Receivables Online pages, so you can easily navigate to
any function or feature.
Receivables
Depending on your entitlements and the services your company subscribes to, you will find one or
more of the following options under Receivables.
• Transactions
o Transaction History–View and filter transaction activity. See the Transaction History
section of this guide for additional details.
o Transactions Requiring Action–Immediately view all transactions in Enrichment
Required status. This option is available with company-level entitlement to Remittance
Association or Supplemental Data Entry service. See the Data Enrichment User Guide
for additional details on this feature.
• Remote Capture
o Capture Transaction–If your company subscribes to the Remote Capture service, this
feature allows entitled users to capture check transactions via desktop scanner for
deposit submission. See the Remote Capture User Guide for additional details.
o Capture Items Requiring Action–Immediately view all remote capture transactions that
have not yet been submitted for deposit and require additional action. This option is
available with company-level entitlement to the Remote Capture service. See the
Remote Capture User Guide for additional details on this feature.
o Capture History–If your company subscribes to the Remote Capture service, this
feature allows entitled users to view and filter all Remote Capture transaction activity.
See the Remote Capture User Guide for additional details.
33• Entity
o Entity List–If your company subscribes to Entity Management (formerly Remitter
Management), Integrated Receivables or Concourse programs, this feature allows
entitled users to view information about your company’s Entities. See the Entity
Management User Guide for additional details.
o Create Entity–If your company subscribes to Entity Management (formerly Remitter
Management), Integrated Receivables or Concourse programs, this feature allows
entitled users to create a new Entity. See the Entity Management User Guide for
additional details.
o Upload Entities-If your company subscribes to Entity Management (formerly Remitter
Management), Integrated Receivables or Concourse programs, this feature allows
entitled users to create a new Entities via an upload template. See the Entity
Management User Guide for additional details.
• Remittances
o Remittance Advice List–If your company subscribes to the Remittance Association or
Integrated Receivables services, this option allows entitled user to view available
remittance advices. See the Data Enrichment User Guide for additional details.
o Create Advice–If your company subscribes to the Remittance Association or Integrated
Receivables services, this option allows entitled user to create a new remittance advice.
See the Data Enrichment User Guide for additional details.
o Upload Advices–If your company subscribes to the Remittance Association or
Integrated Receivables services, this option allows entitled user to create new
remittance advices via an upload template. See the Data Enrichment User Guide for
additional details.
• Decision Manager
o Decision History-If your company subscribes to the Decision Manager service, this
feature allows entitled users to view and filter all suspended transaction decision
activity. See the Decision Manager User Guide for additional details.
Decisions Requiring Action–Immediately view all Decision Manager items that require
action. This option is available with company-level entitlement to the Decision
Manager service. See the Decision Manager User Guide for additional details.
34Reports
Depending on your entitlements and the services your company subscribes to, you will find one or
more of the following options under Reports.
• Reports by Type–A list of available reports based on the user’s entitlements. See the Reports
section of this guide for additional details.
o Activity Summary
o Capture Summary
o CSV+ Detail
o Custom Report
o Extended Detail
o Payment Details
o Return Item Summary
o Transaction Summary
• Reports Inbox–A list of downloadable reports based on the user’s entitlements.
o Electronic Payment Detail
o Data Files
o Data and Image Files
o Lockbox Deposit Advices
o Custom Reports
35Administration
Depending on your entitlements and the services your company subscribes to, you will find one or
more of the following options under Administration. (See the Administration section of this guide for
additional details.)
• View User–Allows Security Administrators to view user entitlements.
• Edit User–Allows Security Administrators to edit user entitlements for Receivables Online
users.
• Create User–Allows Security Administrators to create user entitlements for new Receivables
Online users.
Action Items
Action items are quick links displayed on the Receivables Menu Bar that allow you to directly navigate
to filtered results screens where you can perform immediate tasks on specific transactions. The action
item links may include:
• Capture Items Requiring Action–Allows users to immediately view all remote capture
transactions that have not yet been submitted for deposit and require additional action. This
option is available with company-level entitlement to the Remote Capture service. See the
Remote Capture User Guide for additional details on this feature.
• Transactions Requiring Action (formerly Enrichment Required)–Allows users to immediately
view all transactions that are in Enrichment Required status. This option is available with
company-level entitlement to Remittance Association or Supplemental Data Entry service. See
the Data Enrichment User Guide for additional details on this feature.
• Transactions Assigned To Me–Allows users to navigate directly to transaction payment results
if certain payments have been assigned to them. Assignment of work requires Workflow
Update entitlement at the user level, but any user can access the work that is assigned to them
using the Action Item.
36• Entities Requiring Activation–Allows users to immediately view all Payer Entities with a status
of New. This link is available with company-level entitlement to Entity Management service.
• Decisions Requiring Action–Allows users to immediately view all Decision Manager items that
require action. This option is available with company-level entitlement to the Decision
Manager service. See the Decision Manager User Guide for additional details.
37Transaction History
Transaction screens are the starting point for creating queries to access and display transactions for
your entitled Programs based on a wide variety of criteria. Depending on your company-level and
user-level entitlements, you can access one or more of the following screens:
• Transaction History
• Transactions Requiring Action
To access Receivables Online transactions, select Transaction History from the Transactions section of
the Receivables menu.
The system will automatically display all of your transactions for the current day for the Programs to
which you are entitled.
You can further refine or change your search by using the various criteria available in the Filter panel.
38Transaction History Filter
Choose your filter criteria from the Filter panel on the Transaction History screen, and then select
Apply to execute your search. Note: If the filter panel has been closed, select the filter icon to
reopen the panel. Basic filter criteria include:
• Value Date–Two fields used to define the beginning (From) and ending (To) criteria for a range
of dates from the earliest date to the latest (up to a 90-day range). All transactions with Value
Dates in the defined range are returned. To select a single Value Date for your search, select
the desired date in the From and To fields using the date picker. Only the transactions that
match that Value Date are returned. Value Date is the banking day on which the payment was
deposited to your account. In addition to selecting a single date or date range in the Value
Date fields you may limit your query by using the various preselected date options, including
Current Day, Previous Day, Previous Week, Previous Month, Last 3 Months.
• Payment/Serial Number – A numeric entry up to 20 characters is used to identify and search
for a transaction to display based on its check or payment number. A wildcard search using the
asterisk (*) in place of unknown characters may be used at this field.
• Amount – Two fields used to define the least amount (From) and greatest amount (To) criteria
for a range of payment amounts in the ##.## format. All transactions with amounts in the
defined range are returned. To enter a single payment amount for your search, enter the
desired amount in the From and To fields. Only the transactions that match that payment
amount are returned.
• Entity Name – A specific payment Entity name can be entered in this field to further narrow
your search. The entry is not case-sensitive. To perform a wild card search for one or more
Entity names that contain the same series of characters, enter an asterisk (*) followed by a few
common characters. For example, the search string, *Plumbing would return entries such as
ABC Plumbing Supply Co., Smith’s Plumbing Contractors, XYZ Plumbing Co., and so on.
• Channels – A value to identify the source of the payment. Select one or more of the following
Channels: Admin, Electronic Deposit, In Person, Lockbox, Online & Mobile, Remote Capture
Desktop, Remote Capture Mobile, or Voice. Use Select All Channels to select all payment
channels.
39• Methods of Payment–A value to identify the method of payment. Select one or more of the
following Methods of Payment: ACH, Apple Pay, Check, Credit Card, Google Pay, Pay Pal, Misc,
Pinless Debit Card, Signature Debit Card or Wire. Use Select All Methods of Payment to select
all payment methods.
• Programs–The Programs listed are those to which your Customer Security Administrator has
granted you access. Select one or more of the Programs. Use Select All Programs to select all
of your programs.
• Batch Number–Two fields used to define a range of batch numbers from the lowest (From) to
the highest (To) numeric batch results you want to display. All transactions with batch
numbers in the defined range are returned. To enter a single batch number for your search,
enter it in the From and To fields. Only the transactions that match that batch number are
returned.
• Payment Statuses–Select one of more of the following Payment Statuses: Cancelled,
Deposited, In Process, Processing Cancellation, Processing Refund, Re-presented, Refunded,
Rejected, Returned, Scheduled. Use Select All Payment Statues to select all statues.
The more filter criteria you populate, the more narrowly defined your search will be. The drop-down
and multi-select options include specific values you can select to further limit the number of results
returned.
A successful query returns results in the Transaction History list.
40Important
You must enter filter criteria in at least one field to activate the Apply filters button and complete a
successful database query.
When no results are found to match your search criteria, an unsuccessful search displays the message “No
Transactions found. Please refine your filter criteria.”
Finally, the number of search results returned cannot exceed the system limit. If the number of items exceeds
the limit, the maximum number of results are returned with a notification that you have exceeded the maximum
results limit.
Advanced Transaction History Filter
Selecting the expand arrow [>>] opens the Advanced Filter, which provides the ability to search on
your additional Payment and Invoice Reference fields, if needed.
Payment References
Payment References are optional payment level search criteria that can be configured to
accommodate unique business processes and other customer or industry-specific requirements. They
are only displayed if your company has subscribed to the specific field(s).
41Invoice (Remittance) References
Invoice (Remittance) References are optional remittance level search criteria that can be configured
to accommodate unique business processes and other customer or industry-specific requirements.
They are only displayed if your company has subscribed to the specific field(s).
Archived Transaction Retrieval
If your company subscribes to the Long-Term Archive service, you may be able to search for archived
transactions from the Transaction History screen. If your entered search criteria includes transactions
that are older than 180 days and have images, the images will be archived from immediate view. If you
select a transaction with archived images, the transaction will display a message on the Transaction Details
page indicating the Transaction has been archived.
Select Get Images to submit a request to retrieve the transaction’s images from the archive.
Then select OK in the Confirmation pop-up window that displays.
Once the image has been retrieved from the archive, you will receive an Alert in your Alert inbox.
Unarchived images are available for viewing on the Transaction Details screen for 48 hours after their
retrieval.
Transaction History List
Once you have executed a successful search from the Transaction History Filter, your search results
will be displayed in the Transaction History viewing panel, sorted with your most recent transactions
displayed first.
42Each row in the display includes a selection checkbox. You can mark one or more checkboxes to select
multiple transactions for subsequent action on that subset. You will see a transaction count increment
on the Action buttons as you select transactions. To select all transactions from your search, select the
checkbox in the header row of the transaction list.
Select View to view Transaction Details for the selected transactions.
Select Export to export transaction data or images (if available) for the selected transactions. See the
Exporting Data and Images section for additional details.
You may also select the transaction hyperlink in the Payment/Serial Number column to view the
Transaction Details for a single transaction.
Column Headings
The following columns are displayed on the Transaction History list view.
Selection Checkbox – the first column in the list section of the screen includes checkboxes at each
transaction. When marked, items can be viewed, noted as exceptions, and/or assigned to an available
user. You may select items across multiple pages. There is also a checkbox at the head of the column.
When marked, all transactions in your search results are automatically selected for one or more
actions. Note: The ability to mark items as exceptions and assign items to users requires the
appropriate entitlement, which is assigned by your Customer Security Administrator.
Payment/Serial Number–The numeric ID of a check or other form of payment. Entries in this key
column are hyperlinks to the payment details for each transaction.
Entity Name–The name of the payment originator, if captured
43Program–The Program to which remittances are directed
Channel–The originating source of the transaction
Method of Payment–The method of payment for the transaction
Value Date–The Value Date of the transaction
Status–The status of a payment (Cancelled, Deposited, In Process, Refunded, Rejected, Returned, Re-
presented, Scheduled)
Currency–The currency of a payment
Amount–The amount of the payment
Enrichment Status–If your company subscribes to the Supplemental Data Entry, Remittance
Association or Invoice Matching services, you will see the enrichment status (Enrichment Required;
Enrichment Complete) displayed.
Action Buttons
View–Allows you to view the payment details for all check-marked transactions at one time in the
Transaction Details screen.
Export–Allows you to download the transaction results for all check-marked transactions to a
spreadsheet. Optionally, you can save the spreadsheet file to your computer’s file system. You can
also download images (if available).
44Transaction Details
Transaction Details – Overview
The Transaction Details screen is immediately displayed after you select an item from the Transaction
History screen that lists multiple transaction results following a search.
Screen Layout
The Transaction Details screen displays "read-only" transaction information. The details include:
Entity Name, Value Date, Transaction Amount, Site, Program, Deposit Account, Batch Number, and
Reference Text.
Additional Payment Information is displayed in the following sections depending on the status of the
transaction and your customer-level and user-level entitlements.
Payments
• Payment Details–The following fields are displayed for each payment included in the
transaction: Payment/Serial Number, Status, Entity RT, Entity Account Number, Currency,
Amount, Channel and Method of Payment.
45• Payment References–The payment reference fields displayed in this section are defined by
each customer and are based on a company’s operational and business requirements. If your
company has optional payment reference fields defined, they are displayed in Payment
References.
• Return Details–The return details will be displayed only if a return was received and matched
to the original transaction. The following fields are displayed: Payment/Serial Number,
Currency, Amount, Disposition, Return Reason, Return Date and Return Sub-Account. If
available, the Bulk Return Reference and Return Details will also be displayed.
Remittances
• Remittance Information–The invoice reference fields displayed in this section are defined by
each customer and are based on a company’s operational and business requirements. If your
company has optional invoice reference fields defined, they are displayed here. Reference
Information provides the payment details needed for cash application, exception
management, and customer servicing. The fields include those captured from remittance
documents during check processing or those included with electronic payments. Multiple lines
of reference data may be presented for each transaction.
• Unassociated Advices–Unassociated Remittance Advices will display for customers that utilize
the Remittance Association or Invoice Matching services. Payments that are not automatically
matched can be manually matched to a remittance advice. Unassociated remittances are
displayed in this section as defined by each customer and are based on a company’s
operational and business requirements. If your company has unassociated remittances option
defined, they are displayed here.
46You can also read