JMP-APP WIND-KITE SURFING - User Manual - Jean-Michel ...
←
→
Page content transcription
If your browser does not render page correctly, please read the page content below
JMP-APP
       WIND-KITE SURFING
          User Manual

                       Conception – Design – Programmation
                                Jean-Michel Gruber

      Contact : rachma07@live.fr or contact@jeanmichelgruber.com

                          Personal website
 https://www.jeanmichelgruber.com/applications-garmin-garmin-apps/

Last revision : 09.11 2020                                   Page 1/46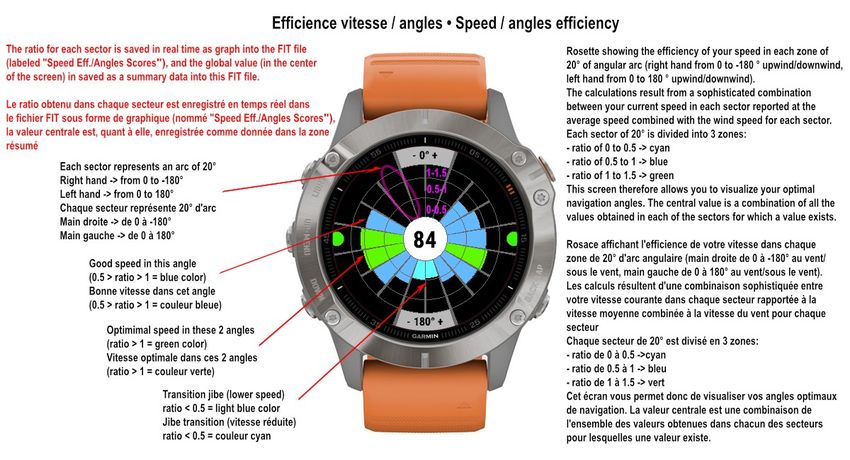
Information about the purchase and installation process of the application

Following your purchase, the response procedure is not automated so, no need to open
a PayPal ticket or send me an email to inform me that you have not received the code,
this is normal : although I usually answer within the hour following the purchase, I am
still not always connected or permanently in front of a screen so, thank you for waiting to
get the answer (at worst, in a 24H delay).

If I do not receive a additional email from you, the only address that I can answer you is
the one you entered in PayPal so, check that it is still valid, and your spam box too (it
happens sometimes my answers fall into spam...).
So, if you have not received a response from me within 24 hours, check that your PayPal
address is correct, as well as your spam box).

Thanks in advance.

For Wind-Kite Surfing, Surfing, Wakeboarding and Downhills applications, and to be able to
calculate your personal activation code, please send me an emailI with those 3 following
informations:
- the gender (man or woman) of the user
- your birth year
- your height in cm (but not your weight)

Those 3 data must match the ones saved into your Garmin profile and/or the user profile saved
into your watch
Note: I do not use those infos for any commercial usage

Following the purchase of the application, you will receive an email (non-automated procedure)
which will contain the following information:

Thanks a lot for your purchase, it's very kind of you.

PLEASE READ THIS EMAIL CAREFULLY, as well as the information concerning the use
of this application, here:
https://www.jeanmichelgruber.com/applications-garmin-garmin-apps/

So, here your personal activation code for the Wind-Kite Surfing app:
00000000

To enter the code, you can both set it (depending your watch SDK compatibility):
- within the Wind-Kite Surf app installed on your watch: launch it as usual (enter your
apps list + START key) and enter its main menu (long press on the UP key) then go to ->
Options -> Miscellaneous -> Activation Code -> Unlock Code
- by using Express or Connect and enter the code into the app settings (you’ll possibly
need to reboot or soft reboot your watch as there are a lot of issues with those 2 apps)

If the application does not unlock after entering the code correctly, it means that one or more of
your data is not
similar to the ones you gave me for calculating the code.
Please check in your Garmin profile AND into your watch settings that they are correct
and similar.
Main menu -> Settings -> User Profile
  Last revision : 09.11 2020                                                           Page 2/46
Sometimes third-party applications change these values without your knowledge.

And if, in the future, you get the "You need to purchase the app ..." message again, and
are therefore unable to start a session, it means that at least one of these 3 pieces of
information has been modified again so, repeat the same procedure as above, and
everything will work again.

In some cases of not taking into account the code, it comes from a dysfunction specific
to Garmin, which does not always take into account the modifications made in the file
settings. To fix this:
- use Express versus Connect depending on which one you used
- carry out a soft reboot of your watch (long press on the LIGHT button of your watch
until completely extinguished then, start it normally)
- uninstall the app, then reinstall it

I kindly ask you, and thank you in advance, to read all those instructions to avoid
sending me emails (which I unfortunately receive in very large numbers) which would
include questions to which the answers are already contained on the pages of this site.

  Last revision : 09.11 2020                                                     Page 3/46
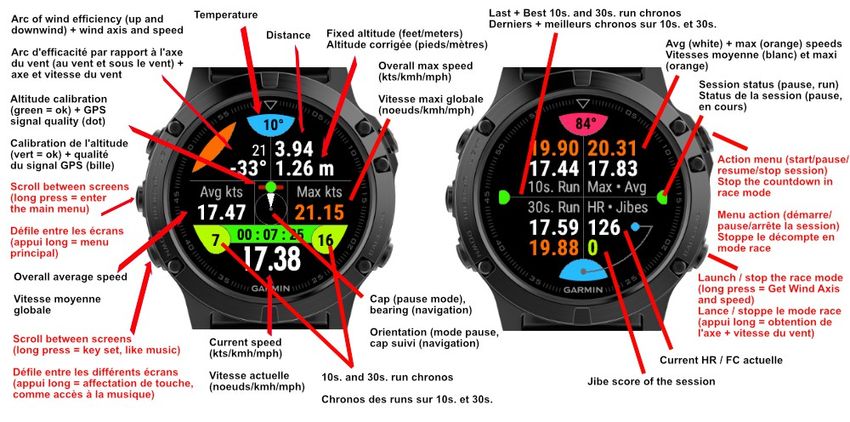
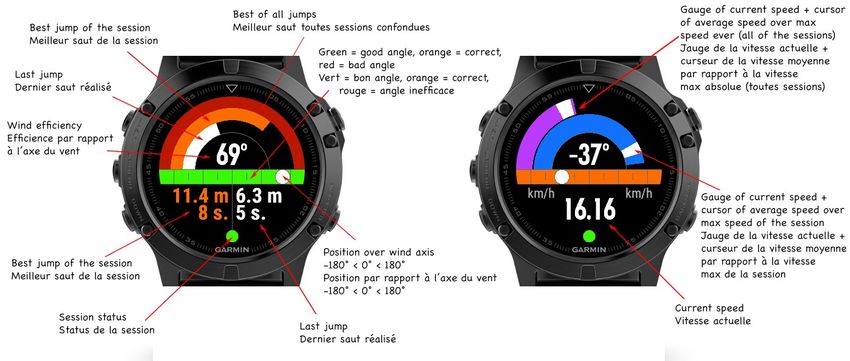
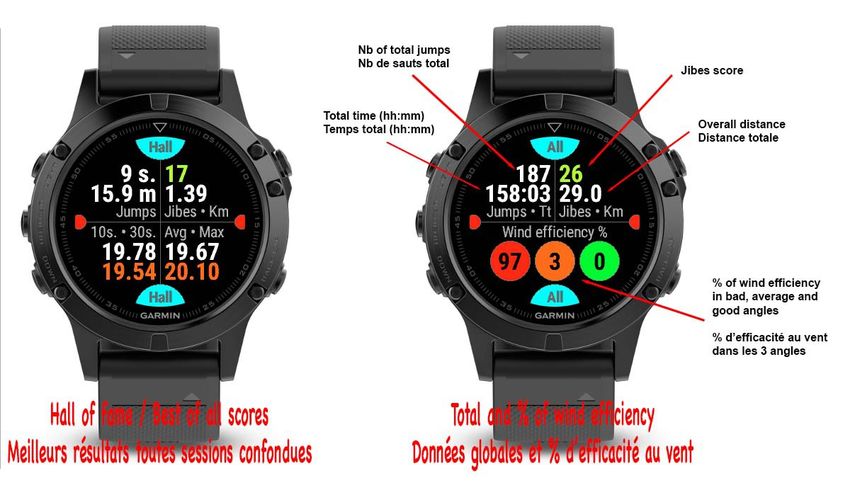
Features offered by the application
The first and most complete application of the Garmin store for windsurfing, kitesurfing,
windfoiling, kitefoiling and snowkiting

Thirteen complete screens are available:
 - screen 1: main screen (current, average, and max speeds, heading, wind axis + efficiency
angle upwind / downwind, altitude, elapsed distance, accelerometer, chronometer, as well as
the count of the calculation of the 10s. and 30s. runs
- screen 2: the accelerometer, last and best 10s. run, last and best 30s.run, average and max
speeds, the heart rate and the number of jibes realized
- screen 3: rather dedicated to kitesurfing, 3 arcs of jumps (the best ever, the best of the
session, the last realized), as well as the corresponding values for the best of the session and
the last jump made, a horizontal colored bar representing the efficiency angle upwind (0 to -90
°) or downwind (0 to 90 °), green = ideal angle, orange = average angle, red = angle too close.
- screen 4: screen for more technical navigation conditions, showing the wind efficiency, and
the current speed as well as its gauge in relation to the maximum speed of the session plus the
average speed cursor
- screen 5: compass with wind efficiency + course data (distance + time to waypoint / VMC)
- screen 6: virtual partner + average speeds over 500-meter runs
- screen 7: topo map representing your location + wind efficiency display (for models equipped
with maps feature)
- screen 8: graph representing the efficiency of your speed in each angle of navigation
compared to the wind
- statistical screen 9: the best of all scores, all sessions combined
- statistical screen 10: the total of some data + stats, all sessions combined
- statistical screen 11: your skills level
- end session screens (12 and 13): display a summary of the main data obtained during the
session

Jumps are actually triggered and calculated either by the accelerometer or the
barometric altitude (option to select in the options menu of the app).

In the FIT file, the following data are saved:
- GPS track of the session
•• graphs:
- speed, in km / h or knots, if this speed is equal or higher than the chosen planing speed
- the height of each jump of the session
- the efficiency of the upwind and downwind angle
- the efficiency score index of your speed / angles for each navigation angle
- the size of the sails / wings used during the session
- the size of the fins / foils (or boards if kitesurfing or similar activity is selected) used during the
session
•• as lap:
- the height + airtime for each jump, in meters or feet
- the jibe score for each jibe done
•• summary data:
- the height and airtime for the best jump of the session
- the best speed on a 10s. run
- the best speed on a 30s. run
- the best average speed and best chrono over 15 customizable distances (if this data exists,
and only for 1024 Kb devices)
- the best average speed on an Alpha500 challenge (if this data exists)

  Last revision : 09.11 2020                                                                Page 4/46
- the average jibe score for all the session
- the overall score for speed efficiency in relation to navigation angles (only for 1024 Kb devices)
- your own feeling of the session (score ranking)

If you have a Strava account (linked to your Garmin account), all of these FIT data will also be
automatically pushed to it.

Note: all the options set in the menu are permanently saved into the watch so, no need to
configure them each time you launch the application.

Given its complexity and time spent developing, the price of this application is set to 16 US
dollars, or 20 to 25 times cheaper than a North PIQ or WOO 3.0 sensor so, it makes sense to
have this kind of application on Garmin devices.

For further detailed explanations, you can consult the detailed images below.

Despite all the care taken in this application, it could remain some hidden bugs, or possible
malfunctions (who knows?). Therefore, thank you to contact me directly by email to inform me
rather than posting bad comments on the site, I will then do what is necessary to fix the issue as
soon as possible. Thank you in advance.

My warmest thanks to Giuseppe for all the tests he has done in the Neapolitan Sea, his valuable
advice on kitesurfing as well as his wise and relevant suggestions, as well as Stijn for the few
tests done in Spain. Thanks to them.

Currently unemployed, I develop applications for the Garmin community to stay active and "in
the wind".
The paid version can be unlocked via my Paypal account (see the link above), with the
possibility to pay with credit cards too.

Don't forget to mention the name of the application, JMG-APP Wind-Kite Surfing, your
gender (0= female, 1 = male), your birth year and your height mentioned in your Garmin
profile, in your PayPal comment.

Please, feel free to enjoy !

Importante remark:

there are 2 major versions of this application, one for low-RAM models (LOW version), and
another for models with higher memory capacity (HIGH version).

- LOW version -> Bravo + Titanium D2, ForeAthlete 735XTJ, Forerunner 230, 235, 630 and
735XT, Forerunner 920XT, Fenix 3 + Quatix + Tactix, Fenix 3HR, Vivoactive + Vivo HR. The
features of this version are described on the app's explanation page on the Garmin Connect
app website

- HIGH version -> all other watch models. This category is itself divided into 2 subgroups, one
for models with 124 KB of memory, and the other for models with 1024 KB of memory.

  Last revision : 09.11 2020                                                            Page 5/46
Version HIGH 124 Ko                                  Version HIGH 1024 Ko
             Modèles compatibles                                  Modèles compatibles
                                                                               fr945
                                                                           fr245 music
                          fr245                                            fr645 music
                          fr645                       fenix5plus – fenix5splus – fenix5x – tactix Charlie
                          fr935                                            fenix5xplus
                        fenix 5s                         fenix6spro / 6spro Solar / 6spro Dual Power
                    fenix chronos                    fenix6pro / 6pro Solar / 6pro Dual Power / quatix 6
                   fenix 5, quatix 5                                fenix6xpro / tactix delta
          fenix 6 / 6 Solar / 6 Dual Power                              all Marq models
        fenix 6s / 6s Solar / 6s Dual Power                              all D2 models
                      vivoactive 3                                        descentmk1
                     vivoactive 3d                                vivoactive 3 music / 3 mlte
                                                                 vivoactive 4s – vivoactive 4
                                                                captain marvel – first avenger
                                                                 saga rey - saga darth vader
                                                                         approach s62
                                                                               venu
                               Main differences between the 2 versions
- Simplified Race Mode:                              - Full Race / Competition mode:
     • no countdown                                       • management of the pre-race countdown
     • only one possible customizable distance (in        • several customizable distances can be
        addition to the alpha500)                            recorded and permanently saved, with
- no waypoint or course management                           performance monitoring, management, etc
- 2 jump calculation algorithms                      - waypoints management + course tracking and
- no management / monitoring of the rider's          management
performance level                                    - 4 jump calculation algorithms
- no possibility to configure and access weather     - management / monitoring of the rider's
web services                                         performance level (session + global
-no management of fins/foils/boards integrated to    - 4 possible choices to configure and access
the quiver                                           weather web services
                                                     - management of fins/foils and boards (kitesurf and
                                                     similar) integrated to the quiver

For these obvious reasons of different amount of useful memory for the use of an application, it
was therefore not possible to integrate all the functionalities of the 1024 KB version into the 124
KB version.
However, apart from the differences mentioned above, everything else is strictly identical and
common to the 2 versions (metrics calculated and saved in the FIT file - graph / summary,
session and global statistics, etc.).

Clearly, if you want to make a purchase of a Garmin watch, that you do not intend to use the
Competition mode and that the estimate of your rider level does not matter to you, a model
supporting the 124 KB version only will be enough for you.
Otherwise, or if you already have a 1024 KB compatible watch, you will de facto benefit from all
the features.

However, take into consideration, in your choice, the fact that the 124 KB version has reached
its maximum potential limit, which means that I will never be able to include new major or
important features in the future, unlike the version 1024 KB which is far from having reached its
limit!

  Last revision : 09.11 2020                                                                 Page 6/46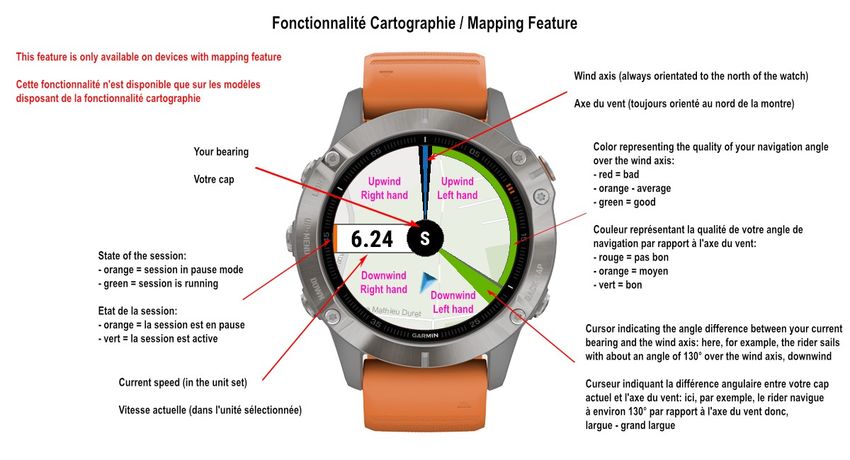
To summarize, in order to make the most of all the current and future potential of this
application, I therefore advise you, in the event of a possible purchase of a Garmin watch and,
as far as possible, to acquire a model with at least 124 KB of memory, the best would be a 1024
Kb device, obviously...

  Last revision : 09.11 2020                                                       Page 7/46
Procedure
Entering the activation code
- for users who have received an activation code, and who can not enter it directly
through the integrated menu of the application, it must be entered in the settings of the
application using Garmin Connect or Garmin Express applications (DON’T USE THE COPY-
PASTE METHOD). Then save the changes, disconnect the watch and launch the
application
- otherwise, you can enter the activation code directly from the application's menu: menu
→ Options → Miscellaneous → Activation Code → Unlock Code
Preparing and using the app
- launch the app, as any other Garmin app
- then, you have to select the type of practice (kitesurf, windsurf, etc), in the menu options
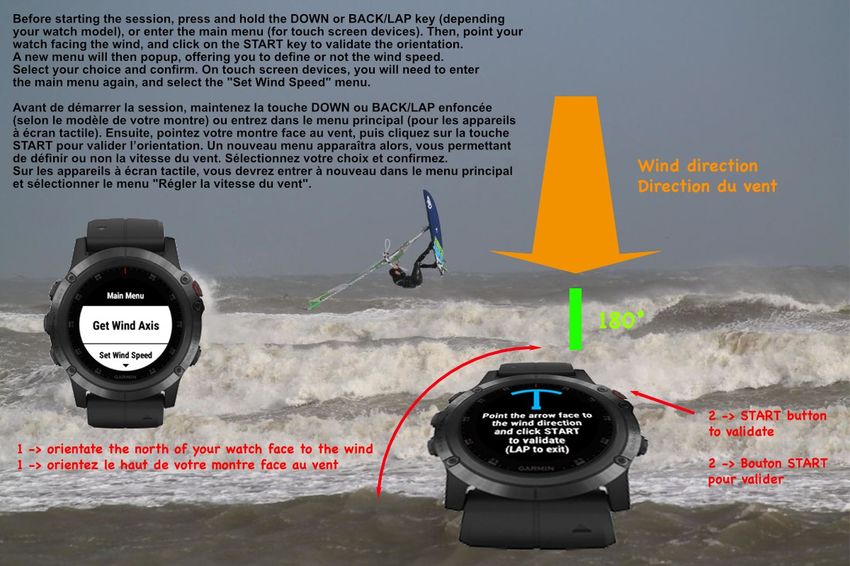
- you can get the axis of the wind otherwise you will not have access to calculate the
efficiency of your trajectory in relation to the wind; this is done by an operation depending
your watch model:
• touchscreen models → general menu then menu "Get Wind Axis"
• models that do not include the management of the advanced control buttons → long
press on the DOWN key
• models with advanced control button management → long press on the BACK / LAP
key
- then, enter the wind speed (in m/s, knots or km/h-mph, option to select in the options menu), if
you know it. This will allow you to get charts showing your speed over wind speed ratio, and the
one of only the wind speed, in your session summary in Garmin Connect; knowing that, if the
conditions were to change during the session, it is possible at any time to enter a new value
corresponding better to the actual wind speed, or the one you feel. By the way, if you did not
enter this wind speed value, the application will work fine, but you will not get these 2
corresponding graphs. Please note that when a wind speed is entered, a small graph on the
main screen will appear to simulate this speed, by the color and amplitude of the colored arcs
- then, select a sail / wing in your quiver (the selection is automatic depending on the type of
practice selected), or use the calculator that will give you a better idea of the size to choose
according to the wind, if you doubt of your choice (see below Quiver Management).
- finally, you can choose and select all other desired options (units, background color, etc.), at
any time
- once those "calibrations" have been done, you can start the timer by pressing the START key.
However, make sure that the calibration of the initial altitude is done before (small green
horizontal bar on the 1st screen) otherwise, the calculation of the height of the jumps will not be
accurate (this procedure is automatic and is updated at regular intervals throughout the session
to correct any differences due to atmospheric pressure)
- for the practice of kitesurfing (and similar activities involving the management of jumps), also
remember to define an algorithm for calculating jumps, as well as the minimum threshold from
which jumps will be recorded as new lap in the FIT file (see below the Note on jump
calculation algorithms)
- scrolling between screens is achieved by simply clicking the UP or DOWN key
- you can pause the session by pressing the START key then "Pause" menu, and resume
Last revision : 09.11 2020 Page 8/46
recording with a second press on the same key then, "Resume" menu (pause = orange dots,
active = green dots, stop = red dots)
- on touchscreen models, the pause mode is executed by pressing the START key and then
selecting Pause in the menu; to resume the session, you can slide your finger on the screen to
the right, or enter the menu again by pressing the START button and select Resume. You have
the possibility, in the options menu of the application, to choose to use an automatic pause
mode, which will take effect as soon as you take a break (or your speed is less than 1 m/s). This
automatic mode also works in automatic restart mode of the session which, when you resume
your session and your speed exceeds 1 m/s, will then automatically start, so you do not have to
press the BACK button every time you stop or resume your session
- to end the session, you press the START key, a menu appears, proposing you either to reject
or save the session. Then, 2 summary screens will be proposed to you, summarizing the main
data of the session
- to quit the application in stop mode (when no session has been started), click on the BACK /
LAP key, but not on the START one
- the current time is displayed in the following 3 modes: when the session is waiting for
launching, in pause mode, and in the minimalist screen otherwise, the timer is displayed.

How to use weather web services
First of all, I should point out that this functionality is only available on models with 1024 KB of
useful memory for applications, that is to say, applications with mapping and / or music options
(HIGH 1024 Kb version).

Weather web service offered by Garmin since the arrival of the new SDK 3.2.x
For all models compatible with this new SDK 3.2.x (remember to update your watch firmware),
you automatically benefit from the integration of direct access to the weather web service
available in the Garmin Connect application. You will see the corresponding "Garmin Weather"
menu appear just below the "Set Manual Data" menu.

Accessing the service is very simple:
   • connect your watch to your smartphone via bluetooth (synchronization is not necessary),
      the weather data is then automatically transferred to the watch
   • disconnect your watch by disabling bluetooth on the watch (if you wish)
   • launch the application on the watch and enter the "Get Wind Axis" menu, the "Garmin
      Weather menu should normally appear (if this is not the case, it means that your watch is
      not SDK 3.2.x compatible) or, if it should, that your watch's firmware is not up to date to
      its latest version
   • select this menu, you will see the popup displaying the weather information from the
      database at Garmin
In addition to the reliability of the data from this service (which remains to be verified for a
defined spot), the main advantage of using this Garmin service is to be able to benefit from
hourly forecasts for a few hours, without having to reconnect the watch to the smartphone!
Indeed, I introduced an automatic update in the background, every 30 minutes, of this weather
data saved into the watch so, the wind axis and its speed will be automatically updated during
your session, and any variations will therefore be immediately reported within the application for
all calculations where these data come into play! This will make the calculations even more
dynamic than before!

  Last revision : 09.11 2020                                                            Page 9/46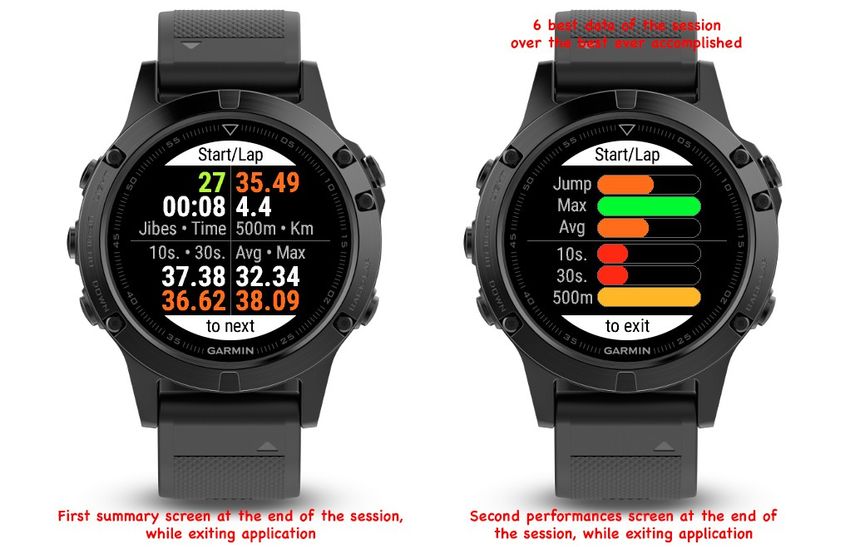
Note: of course, you still have the option of always entering your own data manually, or of using
one of the web services below, but in this case, this new choice will cancel the updating of
Garmin data in the background.
I'll see, in the future, if I can introduce this hour-by-hour refresh feature for the web services
below, without making the code too heavy.

For the other weather web services

First, go to one of your favorite sites offered by the application:
    • OpenWeatherMap
click on the API tab at the top of the page, then on the orange "Subscribe" button in the "Current
Weather Data" area. On the new page, click the "Get API key and Start" button, and follow the
instructions. At the end of the registration process, you will receive an email containing your new
API key.
    • WeatherBit
click on the "Pricing" tab at the top of the page, a new page opens, click on the green "Sign Up"
button in the "Free" area, and follow the steps in the process. At the end of the registration
process, you will receive an email containing your new API key
    • ClimaCell
the zone on the left offers you to create a free account (the characteristics of the account are
detailed in this zone). Click on the "Start now" button in this area, this opens an account creation
form. When you have entered all your information, you will receive a confirmation email and
then, when you access your freshly opened account, you will be able to consult your API key
generated automatically by the site.
    • StormGlass
the link directly brings you to the presentation page of the proposed formulas, the free version is
on the left, click on the "Sign Up" button, enter the requested information. Once your account is
created, you will be able to access the dashboard, which will then give you access to your API
key.

Remember to keep this API key, because it can also be used in the future, in case you have to
re-enter it in the application following a replacement of your watch, for example.

Your key received, you will then enter it in the application settings, in the field corresponding to
the site you have selected. To do this, connect your watch with your smartphone and open
Garmin Connect (or a computer with Garmin Express). Select the Wind-Kite Surf application
from the list of your applications, and open the settings: four fields appear at the top of the page.
Copy and paste your API key in the corresponding field and confirm your entry. There it's done,
the API key is automatically transferred to the Wind-Kite Surfing app. Note that yours keys are
automatically saved on your watch, in the permanent settings of the application, so you will not
have to re-enter them, unless you change your watch.

Note: if the API key has been saved in the field of the settings file, but you can't see the
corresponding menu in the web service menu of the application, please proceed as follow:
   • activate the bluetooth mode of the watch and connect it with your smartphone then,
      launch the Garmin Connect application
   • launch the Wind-Kite Surfing app on the watch, and stay on the main screen
   • on your smartphone, in Garmin Connect, go to the list of the applications installed on the
      watch, select the Wind-Kite Surfing application and open the settings tab
  Last revision : 09.11 2020                                                           Page 10/46
• the API key(s) should appear; otherwise, re-enter it (them) and save the modifications
• this time, the API keys must have been sent to the application on the watch
Finally, to be able to use this function, and thus recover the wind data automatically in the
application:
1. put your watch in connectivity mode (bluetooth activated)
2. launch Garmin Connect on your smartphone
3. launch the Wind-Kite Surf application from your watch
4. the phone connection notification icon (top right of the main screen) should light up in
blue
5. enter the main menu of the application, and select the menu "Get Wind Axis", as before
in fact, so far nothing has changed
6. position yourself on the menu corresponding to the site for which you have entered the
API key, and select it by pressing the START key. That's it, it's done, the wind speed +
wind direction / axis data are now integrated into the application, you should see them
displayed on the main screen, in the same way as if you had performed this function
manually (like in the past)
7. finally, if you wish, don't forget to deactivate the bluetooth mode on the watch in order to
avoid additional battery consumption
Result of the request --->
(This feature is only available in the HIGH
1024 Kb version of the app AND for watch
models compatible with SDK 3.2.x mini)
Last revision : 09.11 2020 Page 11/46Result of the request --->
Note:
• you still have the possibility of entering these two data (wind speed and axis) manually,
as before, this is the new menu renamed "Set Manual Data"
• if no API key has been entered in one of the fields in the settings file, the menu of the
corresponding service will will not be displayed on the menu, in order to avoid
overloading the menu with useless options
• you can obviously open an account on the 2 sites mentioned, and use one or the other
within the application, because perhaps one of the 2 proposed sites will be more reliable
than the other on such or such a spot, and vice versa for another spot (we know that
these weather data are relatively complicated to obtain reliably).
Reset data/scores
You have the option to reset two types of data:
• only the best scores: your records, better performances. This data is displayed on the
"Hall" screen
• all values: the best scores + all the data recorded over all your sessions ("All" screen)
Note that the reset is an irreversible function, all data will be lost after this action.
Assign values / scores
This feature allows you to manually assign a value to the data displayed on the "All" screen.
This can be useful for example in the case of a replacement / change of your watch, and you do
not want to loose all your global statistics. The data entry follows the same order as the data
displayed on the "All" screen, to simplify your input.
Last revision : 09.11 2020 Page 12/46Minimalist screen
This screen presents the essentials and minimalistic informations, with an extended font. You
can configure the 3 fields displayed as follow :
• top field : time • current speed • average speed • max speed • run distance • distance /
time to the next waypoint • VMC
• center field : time • chrono
• bottom field : time • current speed • average speed • max speed • run distance •
distance / time to the next waypoint • VMC
All around the screen, you will fond the arc of efficiency over the wind + cap followed - as on the
screen compass but in a simpler way.
It is easily readable during navigation, especially for riders with visual weakness and who can
not wear their glasses in navigation.
This screen can be activated or not in the menu of the application - Options -> Display Screens
-> Essential Wide -> Disabled/Enabled
In this menu, you also have the option to choose whether to display the chrono + countdown
during a race / competition. If selected, it will appear alternately in the bottom field.
When it is activated, it is displayed when the session is started and therefore active. When you
put the session in pause mode, the screen disappears to make room for all other screens, so
you can, for example, see your performance / detailed information when you pause the session.
When you restart your session, the minimalist screen reappears again.
Note: when you have just jumped, the height of the jump is automatically displayed on screen
for 10 seconds (the value is then circled by 2 white / black dots to better distinguish the
difference from the value of the speed ). This allows you to visualize the height of your jump just
after this one, serenely. If, during this period of 10 seconds, another jump is detected and its
height is greater than the one displayed, the new height will then be displayed for a new period
of 10 seconds otherwise, in case of a lower jump, it is always the value of the previous jump
which remains displayed, until the end of the 10 seconds.
Quiver management
Before starting a session, you should first, and preferably, have organized your quiver by adding
the sails / wings / fins / foils that you own (for the practice of kitesurfing or similar activities, the
management of the fins is replaced by the boards). Then, before starting your session, you
select the sail / wing and fin (board) / foil that you are going to use and so, this choice will be
saved in the FIT file and displayed in the activity summary as a graph named
"Boards/Fins/Foils". Note that you can of course change the sail / wing and fin (board) / foil
during the session if the sailing conditions change, which eventually happens relatively
regularly, or if you want to compare your performances over several kind of materials.
The management of the quiver integrates a recommended surface calculator: this calculator
works in both directions:
1- you enter the wind speed, it offers 3 recommended sizes (a mini, an ideal and a maxi) and, if
your quiver is already set, it offers one or two sails framing the ideal recommended size
2- or, you enter a sail size (or select one from your quiver), and the calculator tells you which
wind ranges you can navigate with this sail
Last revision : 09.11 2020 Page 13/46Management of Run Distances - Speed racing + competition mode This feature allows you to run on predefined or distances therefore, to perform speed racing or participate in competitions, such as the Wind Challenge for example. This mode offers you the possibility: - either enter a predefined distance (you can store up to 20), and run on one of these distances - or run on a distance not determined in advance (free), new distance which will then be stored in the same list (always in the limit of 20) - run on a course following a precise route plotted with up to 10 waypoints - start a countdown, going from an immediate duration (duration = 0) to 10 minutes before the start (or the line marking the beginning of the distance to run) Operation: you start the session as usual (START button) then, at the desired moment, you press the LAP button, which will initiate calculations on the distance (chrono + best average speed); if you compete on a free distance, and to end the race, you press the LAP button again, which will stop the timer; if you compete within a predetermined distance, the timer will automatically stop when you have reached the distance (so you do not need to press the LAP key) however, you still have the option to end the chrono manually by pressing the button LAP. If you have set a countdown, at the start of the countdown by pressing the LAP button, you will see a countdown corresponding to the time you entered in the menu, and whose representation differs depending on the screen on which you you are: - on the main screen -> the count appears in the 2 blue zones, at the bottom and on both sides of the screen with, the minutes on the left and the seconds on the right - on the minimalist screen -> the counting appears on the bottom zone, black text on blue sky background; When the countdown comes to an end, the normal display returns to its place on both screens. While scrolling the countdown, there may be a lag of one second or more between the full minute of the countdown and the official flag raising. In this case, you now have the possibility to resynchronize the count with this flag raising: you just have to press the BACK / LAP key when the count is close to a full minute, and this one goes automatically set back or up on the full minute. At any time, you have the possibility to view the history of all the scores made on each of the distances recorded and on which you have competed. To do this, you must go to the corresponding menu (Race - Distances - Settings -> Scores), giving you access to the list, which includes: - distance indication (in kms / miles or nautical miles) - the sail / wing and the wing that you used on that distance - best time and best average speed over the whole distance Please note that: - if you run several times on the same distance, only the best lap / fastest lap times are stored in memory. - for the quiver to be recorded simultaneously with the performance, it is still necessary that you have previously selected the sail / wing surface and the fin used otherwise, none of these 2 data will be recorded. Do not forget to do this before each race otherwise, this data will not appear. Last revision : 09.11 2020 Page 14/46
- if you run a greater distance than others in the list, the best chronos + speeds will also be
calculated and recorded for these distances, even in free distance mode (if the distance traveled
is greater than one of the other lower distances, of course). This is done on the principle of "who
can do most can least", based on the observation that if you have run a distance D, you have
also traveled all the distances recorded in the list and which are less than D.
- if you select a distance equal to D, and stop the timer manually by pressing the LAP button
before reaching this distance, no score calculation will be performed
- once you have started the countdown timer, you can stop it at any time by pressing the START
button. To restart it, press the BACK / LAP key again
- once you have started the timer integrating countdown, you have the possibility to
resynchronize it by pressing the BACK / LAP button again, giving you the opportunity to readjust
the situation according to the race conditions.
- the corrected altitude value on the main screen will then be replaced by the ratio between
your current speed and the max speed reached since the beginning of the chrono / race

Waypoints / Course menu (only available for HIGH 1024 Kb version)
This menu gives you access to the recording of GPS points / coordinates (up to 10) in order to
create a precise route on which you will be able to compete.
   • first step: record GPS points. Enter the "Manage Waypoints" menu, where you can do
       this either by manually entering the LAT-LON coordinates of each point (in degrees of
       angle), or by automatically retrieving them (if you are precisely at the GPS point you want
       to recover). A sub-menu also gives you the possibility of being able to delete one or more
       points, it suffices to select them from the list then, to validate the entry by positioning
       yourself on the "Done" menu. You can thus create as many GPS points as you want, but
       always within the limit of 10 points maximum (this limit may be likely to be readjusted
       upwards in the future)
   • second step: create a course composed of 2 points minimum, up to 10 maximum (for
       the moment). Enter the "Manage Course" menu, then create your course using the "Plot"
       menu. Choose all the points, in ascending order of your input by pressing the START
       key, and validate your route by selecting the "Done" menu. The "Edit • Empty" menu
       allows you to delete one or more points from the route or even to completely empty it if
       you select all the points. Note that you cannot run on a course if it does not include a
       minimum of 2 points. The "Info" menu allows you to consult the number of points making
       up the route, the total distance of the route according to the arrangement of the points
       and, for users of a watch with the map option, the route of the route on the map (with
       option move / zoom / etc)
   • third step: return to the lower menu "Set or Select a Race Distance" then, if you want to
       run on your newly created course, select the "Race on Course" menu; exit the menu to
       return to one of the application screens
   • the "Loop Course" menu, meanwhile, allows you to loop endlessly on the same course.
       For example, you want to train on a course consisting of 2 buoys 4 km apart, and you
       want to perform several runs over this marked distance: by activating LOOP mode, it's
       possible!
   • result / display: when you start the session by pressing the START key (or if it is already
       started and you return to one of the application screens), the fifth screen (or the wide
       screen) will direct you automatically towards the first GPS point of the course then, when
       you arrive within a radius of 15 meters around this point (or this buoy), the following point
       will be displayed, and so on until the end of the course. If LOOP mode is activated, the
       course will automatically resume at the first GPS point, and so on in a loop
  Last revision : 09.11 2020                                                          Page 15/46
The compass screen (5th screen) offers you the display of different data in this course tracking
mode:
• at the top → the distance separating you from the next GPS point, therefore, the
distance remaining to travel to this one (in the selected unit) and, just above, the point
index (first = Wp.1 , second = Wp.2, etc)
• at the bottom → VMC (Velocity Made on Course). The VMC (not to be confused with
the VMG!) Corresponds to the speed at which you navigate to the next GPS point,
according to your angle of navigation compared to this one. This data is very useful in
regatta to be able to optimize the angle of approach towards the next buoy (and more
relevant than the VMG which, it, considers only the axis of the wind, regardless of the
course to follow to reach the buoy) . The icing on the apple pie, to know if your VMC is
optimal or not, the bottom area is colored according to the value of this speed (a
calculator works constantly to know that it is the optimal VMC to reach). So if you reach
the ideal VMC, the zone becomes green, if your VMC is lower by 1m / s less than the
optimal VMC, the zone becomes orange, and if your VMC is beyond, the zone passes to
red. So, at a glance, you know immediately if you are following the best course towards
the GPS point, or not!
• purple circular gauge in the center of the screen → this gauge indicates the ratio
between your VMC and your current speed: if the gauge is in the upper zone, it means
that your VMC is negative, if it occupies the entire upper zone, your VMC is equal to
zero, the lower zone therefore means a positive VMC, and if the circle is completely filled,
it means that your VMC is equal to your current speed
• the arc of efficiency over the wind axis does not change, it always corresponds to the
efficiency of your navigation heading with respect to the wind axis
• the dark blue cursor indicates the heading / direction to follow to reach the next GPS
point (in the figure below, to the south-east heading). This means that if the white cursor
(or black on a white background), which therefore corresponds to the heading you are
currently following, is aligned with this blue cursor, you are heading straight towards the
GPS point in question
In the "Essential Wide" menu, you can now choose 3 new data to display, corresponding to the
addition of this new Route functionality: the distance to the next GPS point ("Dist. To Wpt"), the
remaining time to reach the next waypoint ("Time to Wpt"), and the VMC . Note that if at least
one of these 2 data is selected, but that no route has been created and selected, the display will
give nothing, and will be replaced by this type of display:
"• •. • • "
Last revision : 09.11 2020 Page 16/46Representation on the Essential Wide screen Representation on the Compass screen
At the top, the remaining distance
At the top, the remaining distance to Wpt. 1, here, 11.7 km.
to Wpt. 1, here, 11.7 kms Below, your VMC, equal to 2.18 knots.
The purple gauge indicates that your VMC is
Below, your VMC, equal to 1.92 knots slightly higher than half of your current speed.
Note:
- your VMC will be equal to your current speed if the angle formed between your heading and
the one to reach the next GPS point is equal to zero
- your VMC will become negative (yes, yes!) if you move away from the course to follow to
reach the GPS point, therefore, beyond -90 or + 90 ° angle. Indeed, if you follow an opposite
heading of more than 90 ° compared to the one you would have to follow, your VMC will
become negative because you move away from this point instead of getting closer to it, from
where this negative VMC. So the reference angle is -90 or 90 °, where your VMC will be equal
to ... zero!
- the more your VMC increases, the shorter the time it will take you to reach the point, and vice
versa. So, logically, it is when your VMC is optimal (green colored zone) that you will arrive most
quickly at the GPS point, and that you will therefore have the best chance of arriving first!
Last revision : 09.11 2020 Page 17/46Explanations on the submenu of the Race menu
• Set or Select Distance Distance → allows you to create new distances, select / delete
distances, or delete all distances
• Free distance → activated, you will compete on an indeterminate distance so, free;
deactivated, you will compete on a distance that you have previously selected in your list
• Countdown → allows you to set the duration of the countdown, from 0 mn (immediate) to
10 mn
• Waypoints / Course → allows you to record up to 10 GPS points then, to create a course
composed of at least 2 GPS points, up to 10
• Race on Course → this option allows you to follow the course you have drawn in the
Waypoints / Course menu. The compass screen (5th screen) is then transformed by the
display, at the top, of the distance separating you from the next GPS point to reach, at
the bottom, the VMC (Velocity Made on Course) and the purple arc , which shows you
the time remaining to reach this GPS point
• Loop Course → when this option is selected, you can run on the course in loop mode.
When you reach the last GPS point on the route, you automatically return to point 1, and
so on (Wp.1 → Wp.2 → Wp.3 → Wp.1 → Wp.2 → Wp.3 → Wp.1 → etc). This can be
very useful when you train on a course of 2 or 3 buoys several times, for example
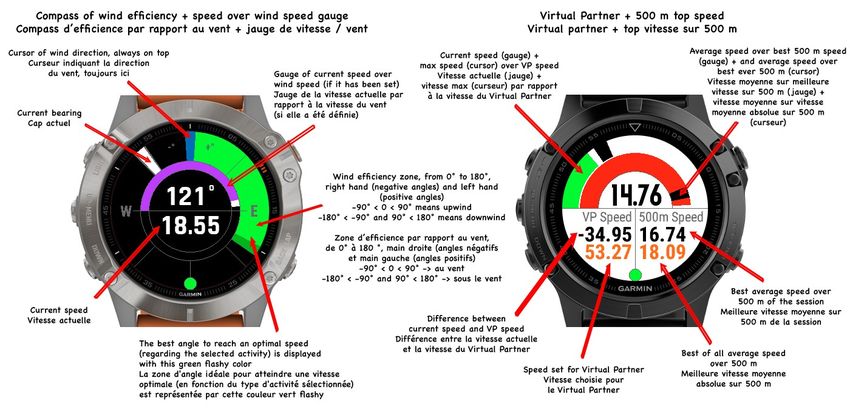
• Data to Display → on the Virtual Partner screen, and on the Hall and end of session
screens, you have the possibility to display either the chronos or the best speeds
(knowing that anyway, the 2 data are automatically saved in the FIT file so that you can
be seen afterwards in your session summary on your Garmin Connect profile)
• Alpha500 → if this option is checked, it is the calculation data of the Alpha500 that will be
displayed on the screen of the Virtual Partner, in place of the chrono (or better speed)
over a distance
• Scores → visualization of the results for each of the distances for which a scoring
calculation could be carried out
- new option for the wide screen: I have also added a new option in the menu of the
minimalist screen, allowing you to display the chrono (in large characters) alternately with one of
the 7 data offered to be displaying on this screen.
- additional notes:
1- if you have not created any custom distances, and did not selected the free race mode, the
start by pressing the LAP key will not be generated
2- If you have created distances but do not select any for the current session, this will be the
first distance from the list that will be used for the automatic calculation of the best speed.
Last revision : 09.11 2020 Page 18/46Note about jump calculation algorithms
Depending on the watch models, the application offers 2 or 4 algorithms for calculating kitesurf
(and similar practices) jumps:
124 Kb of memory models
Baro + Accel. algorithm common to all models
Accel. Only equivalent to the algo.2 of the 1024 Kb models
1024 Kb of memory models
Baro + Accel. algorithm common to all models
Accel. Algo.1 algorithm rather suitable for touch screen models
Accel. Algo.2 algorithm optimized for button models
Accel. Algo.3 maximization of algo.2 → if the results of algo.2 appear to you to be
slightly minimized, this algo.3 will aim to maximize them upwards
Anyway, and regardless of the structure of each algorithm, it is up to you to test each of these
algorithms to see which one most closely matches your model because, each watch model is
different and therefore will not behave like the others, even for 2 identical models which,
moreover, makes it even more complicated on Garmin watches when it comes to developing an
algorithm supposed to be generic!
The option allowing you to define a minimum threshold corresponds to the minimum altitude
from which each jump will be recorded as a new lap (in Garmin Connect) therefore, all jumps
below this limit will be well counted and recorded by the application in the FIT file, but will not be
materialized as a lap. This option is found in the "Options → Jumps Settings → Jump as Lap"
menu.
To avoid the display of a multitude of points as laps on the map of your session, be sure to set
this threshold high enough to retain only the most significant jumps of your session, and not all
the jumps, otherwise, the map will be oversaturated by points and illegible.
Also keep in mind the consideration of the height of the waves! If you are sailing in a swell of at
least 3 meters and your threshold is set to 3 meters, this means that all your detected jumps
(even those of 50 cm or less) will be counted as a lap! Which leads to a lot of points on the map
(several hundred), even the risk that it will have difficulty to load into Connect.
So, for example: swell of 10 feet + I only want to see jumps >= 16 feet => threshold must be
set to 26 feet.
Explanation of the wind efficiency function (principle and operation)
The wind efficiency function shows you the angle between your navigation heading and the
wind axis (if it has been set in the application), depending on the sport selected (windsurf,
kitesurf, etc.) .
This allows you to better visualize the navigation course to follow in order to optimize / maximize
your speed.
The result of this functionality is summarized in the 2 screens presented below, the first
displaying in real time the efficiency angle, your bearing and the gauge of your current speed
over the wind speed (if it has been filled in in the application), the second, always in real time,
the maximum speeds reached in each angle zone over the overall max speed of the session,
ranging from -0° to -180° (right hand) and from 0° to 180° (left hand), in 20° increments.
Last revision : 09.11 2020 Page 19/46Note that, on the first screen, the function will also tell you the same information when the
session is stopped or in pause mode. In this case, and as you are no longer in navigation
therefore, no more navigation course, it is the orientation of the watch on an axis 0° → 360°
which intervenes, and you will then see the cursor of the course and the angle between this
heading over the wind axis moving. This allows you to anticipate, before going on the water, the
best trajectories, by looking in advance at the heading(s) which give an angle located in the
green zone !
Also please note that this behavior of wind efficiency works the same way into the wide
screen Essential wide.
In this example, the wind axis is defined This screen shows you the efficiency score of
approximately to 90° (east), materialized by your speed in each angle zone (ratio between
the blue cursor, always oriented to the north of your speed in each zone compared to your
the watch regardless of the value of this axis. average speed per zone combined with the
wind speed - if this data exists). The value
Your course is indicated by the white cursor:
displayed in the center of the screen is a
when you sail north-west (course of 330°), you
global combination of all scores by angle area.
form an angle of 121° relative to the wind axis
The median score is at a value of 100, which
(left hand) therefore, the gauge becomes
means optimal overall speed efficiency.
green and therefore covers an angle of 121°,
you are good ! When your heading In this example, the most efficient angles
approaches the axis of the wind, the gauge (those where your speed is most efficient) are
changes from orange to red (facing the wind) between -80-120 ° right hand and 100-120 °
to go back to the right hand (change of tack), left hand; the angles between -140 / + - 180 / +
until you find a heading which allows you to 140 ° correspond to the passage of the jibe,
generate an angle located in the green zone, which explains a lower speed.
for example a course of 200° (SW); and so on. See also the explanatory image below for
further details on this screen (seventh screen).
Last revision : 09.11 2020 Page 20/46Explanations about the purple gauge, representing your current speed over the wind speed (if
it has been defined and saved into the application, either manually or by collecting it via a
weather web service).
The gauge works on 2 arcs, one on the top, and one on the bottom:
• on the upper arc, if the gauge oscillates between the left and the right, it means that
your speed is lower than that of the wind (you sail slower than the speed of the wind !)
→ the ratio of your speed on that wind is therefore less than 1
• on the lower arc, if the gauge swings between right and left, it means that your speed is
higher than that of the wind (you sail faster than the wind speed !) → the ratio of your
speed on that of the wind is therefore greater than 1
• if the small white cursor at the end of the gauge is located just on the right (the gauge
occupies the entire upper arc), this means that you are sailing as fast as the wind
Hypothesis: if the 2 arcs were filled by the gauge (full gauge of 360°), that would mean that you
would be sailing 2 times faster than the wind speed !
Mapping option (compatible models)
For users who own a model with the mapping feature, you have the option of displaying or not
the map of your GPS location. This option is found in the menu "Options -> Display Screens ->
Mapping". You also have another option allowing you to display or not, superimposed on the
map, the representation of your efficiency over the wind axis (efficiency angle between your
heading / bearing and the wind axis), according to your practice (windsurfing, kitesurfing, etc.).
The color codes are identical to those already used in the other screens of the application (red -
orange – green).
Last revision : 09.11 2020 Page 21/46note: when you are on the map screen, management is carried out in the same way as in other
Garmin applications:
• in preview mode, you exit the map by pressing the UP or DOWN key, then you return to
the previous - next screen, depending the order in which your screens are displayed
• in edit mode (entered by pressing the START key), you exit this mode by pressing the
BACK / LAP key, then you return to the preview mode
The representation of the wind efficiency offers:
• the wind axis, represented by the purple arc, and always oriented towards the north of
the watch
• your course, displayed in the central circle
• the difference between your heading and the wind axis is represented by the colored arc,
depending on whether you navigate left hand (the wind arrives on your left side therefore,
on the left of the screen) or right hand (the wind arrives on your right side therefore, on
the right of the screen). The closer you sail (to the meadow for example), the narrower
the angle will change from green to orange, then red, and the more you navigate in the
wind (to the drop for example), the more the angle will open to pass from red to orange,
then green. So, for example, an arc centered on the purple axis of the wind will appear
red because you are sailing face to the wind therefore, very bad angle hence zero speed
and not efficient. A green angle therefore indicates that it is an optimal angle to be able to
reach an optimal speed
• your current speed, converted into the unit chosen in the options
• a small orange (pause session) or green (session in progress) indicator next to the speed
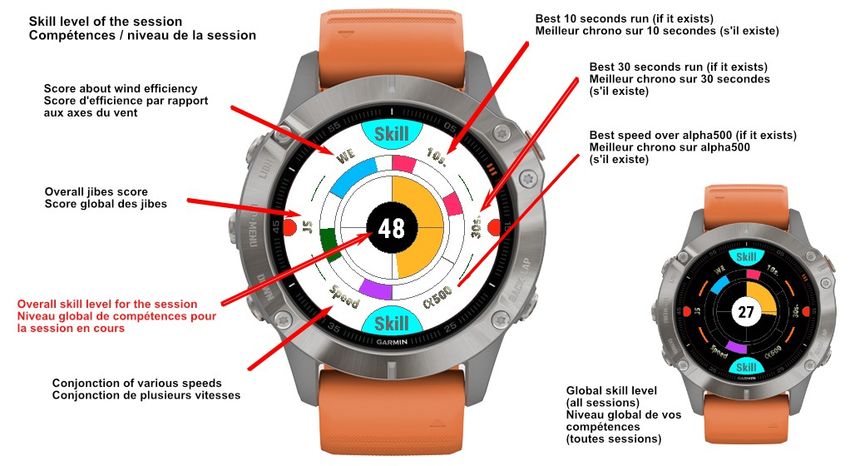
Last revision : 09.11 2020 Page 22/46Session and overall skill screen This screen shows you your skill level, taking into account a certain number of parameters known by the application, following its use (see below the detailed descriptive image). It operates cyclically, approximately every 7 seconds, displaying both your performance level for the current session (golden yellow arcs) and your overall performance level (orange arcs). Note that if there is no active session, the screen will only display your overall performance. A first outer circle composed of 6 arcs shows the skills for each of the indicated areas and, once compiled, all these data will generate an overall skill level indicated in the center of the main disk, ranging from zero to 100 (100 meaning the maximum score to be reached... Antoine Albeau ?). It operates in two stages, real and delayed time, meaning that the skills data integrate the values of the previous sessions but also the data calculated during the current session. When the application is launched, the skill level is calculated based on certain values known and saved by the application thanks to all your previous sessions. So this is your actual skill level, your current level. When you start a new session, new data will be calculated and, for some of them, will modify and overwrite the previous ones (especially the data concerning the best scores), which will consequently result in modifying your skill level, possibly upwards. But if the data of your current session are below your overall skill level (which can sometimes happen - wind less strong, less healthy, misfits, etc.), you'll see the different skill levels, as well as the overall one, to be affected more or less significantly (possibly downwards), then indicating that you have sailed below your usual level. But, and this is important, it will not significantly affect your previous overall skill level because, you have reached your current level gradually over time, and it can not fail like that because of one or two sessions somewhat below your abilities and usual skill level. So, to summarize: - your skill level can only increase over time or, at worst, stagnate or decrease slightly if you cumulate the "trash" sessions, according to the principle: a reached skill level can not be questioned, which is acquired is acquired! - the data calculated during the current session will only affect your skill level if they are better than the previous ones in a sustainable way; if they are lower, this will only have a temporary visual impact on the different levels visible on the screen, just to indicate to you that this session was at a lower level than your usual level Note: if you delete the best scores and / or all scores, you will also lose your skill level; you will need to manually reassign these values to find out your previous skill level. Last revision : 09.11 2020 Page 23/46
Descriptive Images
Obtaining the axis and speed of wind

Wide Screen

First and second screens

  Last revision : 09.11 2020           Page 24/46
Third and fourth screens

Fifth and sixth screens

  Last revision : 09.11 2020   Page 25/46
Seventh screen

Eighth screen

 Last revision : 09.11 2020   Page 26/46
Skill level screen

Statistical screens

  Last revision : 09.11 2020   Page 27/46
End of session screens

 Last revision : 09.11 2020   Page 28/46
Last revision : 09.11 2020 Page 29/46
GPS Track saved to the FIT file

  Last revision : 09.11 2020      Page 30/46
List of all the menus of the app and their explanation

  Last revision : 09.11 2020                             Page 31/46
If this option is checked, will be displayed the data concerning the
                             best speed achieved over 500 meters, instead of data concerning
                             a possible distance selected.

                             Allows you to access and view the scores made on all distances
                             over which you have competed. The distance (in units chosen in
                             the options), the quiver used (sail + fin) and the score achieved
                             (chrono + best average speed) are displayed here. Here you also
                             have the option to reset / erase all scores; attention: this action is
                             irreversible.

                             If this option is selected, the calculations made will be set to an
                             indefinite distance, which you will define yourself by pressing the
                             LAP key a second time. Then this new distance will be
                             automatically saved and integrated into the list for later use. The
                             score achieved on this distance is saved in the score list.
                             If this option is not selected, you will have to choose a predefined
                             distance from the list.

                             Allows you to run on a previously created course with at least 2
                             waypoints.
                             If no route is available (or does not have a minimum of 2
                             waypoints), this menu is disabled and cannot be operated

Last revision : 09.11 2020                                                           Page 32/46
If the “Race on Course” menu is selected, this menu becomes
available, and will allow you to run on the course in loop mode
(Wpt. 1 → Wpt.2 → Wpt.3 → Wpt.1 → Wpt.2 → Wpt. 3 → etc
Allows you to create custom distances that you can compete on.
For example, you create a distance of 40 Kms (which
corresponds to the distance of the Défi Wind), and then train on
this distance to see your performance over this distance and,
thus, try to improve it.
Quiver menu (for > 64 Ko memory devices only)
Allows you to create and manage your quiver (surfaces of your
sails or wings, fins, foils, kite boards). This menu also offers you
an advanced calculator of recommended surfaces according to
the strength of the wind.
Allows you to choose a sail / wing surface for the session. This
surface will then be saved as a graph in the FIT file, allowing you
to view your performance based on your choice of sail / wing
surface. Obviously, ou have the possibility to change this surface
during the session.
Last revision : 09.11 2020 Page 33/46An advanced calculator of recommended surfaces according to
the current wind speed on the spot. This calculator works in two
different ways:
- you know the wind speed -> the calculator will give you 3
recommended surfaces, the minimum, the ideal, and the
maximum surface. In this calculation mode, depending on the sail
/ wing surfaces already recorded in your quiver, the computer will
suggest you the surface that comes closest to the surface
recommended by the calculator. You can then choose this
proposed surface or, another, according to your convenience
- you enter a sail / wing surface or choose one from your quiver's
list, and the calculator will give you the range of wind speeds you
can navigate between (the minimum wind speed, the ideal, and
the maximum)
Allows you to choose a fin size or foil for the session; you can
change size during the session. This choice is saved into the FIT
file as a graph.
Allows you to create and manage your quiver, with the ability to
add and remove items.
Options menu
Last revision : 09.11 2020 Page 34/46This menu gives you access to all the options available within the
application.
Allows you to select one of the 7 activities proposed by the
application, and corresponding to your practice: windsurfing, wind
foiling, kitesurfing, kite foiling, wing surfing, wing foiling, or snow
kiting.
Jumps menu
Access menu to jumps settings for kitesurfing and similar
activities.
Method used for the calculation of the height of the jumps:
accelerometer or barometer + accelerometer. This choice will
depend essentially on your watch, knowing that not all models
are similar in terms of the reliability of the information sent by the
sensors. It will be up to you to test by yourself which of the 2
methods is the most relevant and reliable for your watch.
Last revision : 09.11 2020 Page 35/46You can also read