Digital TV Recorder user guide - Vodafone Power to you
←
→
Page content transcription
If your browser does not render page correctly, please read the page content below

Digital TV
 Recorder
user guide
      Vodafone
    Power to you
Welcome to your Digital TV Recorder set top box
                                  Digital TV Recorder user guide
                                  This is your guide to using the Digital TV Recorder
                                  set top box, including user settings that can be used
                                  to customise the experience.
                                  The features and channels available will depend on the subscription
                                  chosen, and therefore the options shown in this guide may be different to
                                  that actually displayed on your system.
                                  To discuss or change subscription please call customer services
                                  on 0508 888 800.

                                  Vodafone contact information
                                  To contact Vodafone for help, questions on your subscription or any
                                  other reason please use the contact details below;

                                  Sales & customer care enquiries
                                  Phone: 0508 888 800
                                  Fax:     0508 888 801
                                  Hours:   24/7

                                  Faults and technical assistance
                                  Phone: 0508 888 800
                                  Hours:   24/7

                                  On the web
                                  You can also visit us on the web: vodafone.co.nz

Page 1                                                                                  Digital TV Recorder User Guide
What is a Digital TV Recorder?
This is a personal video recorder set top box giving the latest in entertainment technology and is available to Vodafone customers.

                                 3 tuners                                                          Dolby AC3, MP2 and AAC audio compliant
                                 This allows recording on 2 channels whilst watching another       The best options to cover all the best audio formats.
                                 channel OR to watch a pre-recorded programme while
                                 recording 2 others.

                                 At least 300GB of hard drive space                                Java based middleware from Digisoft.tv
                                 To record up to 180hrs of SD (standard definition) and 50hrs of   Enabling very fast and flexible upgrades to software allowing
                                 HD TV.                                                            simple addition of new applications.

                                 Up to 1080P HD playout through HDMI 1.3                           Supports future internet video delivery.
                                 Important if playing the highest quality movies through the set
                                 top box.

                                 MPEG2 and H264 compliant
                                 This provides video capability using the industries best, open
                                 standards.

Digital TV Recorder User Guide                                                                                                                                     Page 2
Digital TV Recorder user guide
About this user guide                                                        User guide format
This user guide is to help make the most of your Digital TV                  Guide conventions
Recorder STB (set top box) experience. The Digital TV Recorder               The personal video recorder set top box will be termed
provides an easy to use on-screen menu guide to the service.                 ‘Digital TV Recorder’ throughout this user guide.
All Digital TV Recorder features are controllable using the                  The user guide is organised as follows:
remote control unit.                                                         • Welcome to Digital TV Recorder
                                                                             • About this user guide
This allows you to:
                                                                             • Contents
• Find out what’s on now/next while continuing to watch current programme.
                                                                             • Safety notice
• See what is on the listings for the next 7 days.
                                                                             • General information – About the Digital TV Recorder and the TV
• Browse and purchase content like movies, with Now’s Good.
                                                                             • Get started – Turn on the equipment, introducing the remote control
• Set recording options to record now or in the future.                        and the remote control functions.
• Play programmes already recorded.                                          • On-screen symbols – A quick guide to the symbols that may
• Prevent children from viewing unsuitable programmes.                         be seen while using the Digital TV Recorder.
• Set reminders from the planner, TV guide or channel bar.                   • Navigating the Digital TV Recorder functions
• Create and modify the favourites list; channels viewed most.               • The full TV screen – the normal TV viewing mode
• View additional information about the programme being watched.             • QuickJump menu – Quick access to the main menus of the Digital TV Recorder
• Change the Digital TV Recorder settings.                                   • TV guide screen – Shows channel information, resized TV screen and menu options
                                                                             • Using the channel bar – View channel information while continuing to watch TV
                                                                             • The planner – Scheduling and recording.
                                                                             • Playing recordings, replaying live TV
                                                                             • Now’s Good – Movie rentals.
                                                                             • Favourites – Managing favourite channels
                                                                             • Parental control – Options
                                                                             • Notifications – Messages that may be displayed while using the decoder.
                                                                             • Settings – Choosing how to use the decoder, parental control settings,
                                                                                 disk space management options.
                                                                             • Troubleshooting – Some steps or suggestions to help resolve simple issues.
                                                                             • Specifications

Page 3                                                                                                                                           Digital TV Recorder User Guide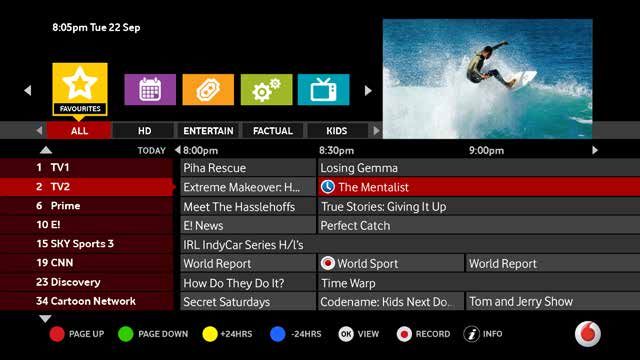
Contents
Welcome to Digital TV Recorder personal set top box                                                                                                                                        1      The full TV screen ..............................................................................................................................................................15
Digital TV Recorder user guide                                                                                                                                      1                             PIN ................................................................................................................................................................................................... 15
Vodafone contact information ...................................................................................................................................... 1                             QuickJump menu ................................................................................................................................................................. 16
On the web .................................................................................................................................................................................. 1   Interactive TV guide ............................................................................................................................................................ 17
What is Digital TV Recorder?                                                                                                                                                               2      Navigating the TV guide screen ................................................................................................................................. 18
Digital TV Recorder user guide                                                                                                                                                             4      Using the channel banner                                                                                                                                                                          19
About this user guide ........................................................................................................................................................... 4               Using the planner                                                                                                                                                                                 20
Digital TV Recorder user guide format .................................................................................................................... 4                                      Recordings ............................................................................................................................................................................... 22
Contents                                                                                                                                                                                   4      Recording conflicts ............................................................................................................................................................ 22
Safety and maintenance                                                                                                                                                                     5      Recording a series ............................................................................................................................................................... 23
Safety notice .............................................................................................................................................................................. 5    Removing a series link ..................................................................................................................................................... 23
Maintenance .............................................................................................................................................................................. 5      Removing a recording ...................................................................................................................................................... 23
General information                                                                                                                                                                        6      Playing a recording, replaying live TV                                                                                                                                                            24
Information on your Digital TV Recorder .............................................................................................................. 6                                          Playing recordings ............................................................................................................................................................... 24
Information for your TV ...................................................................................................................................................... 6                  Pause/play live TV .............................................................................................................................................................. 25
Getting started                                                                                                                                                                            7      Now’s Good (Pay per View)                                                                                                                                                                         26
Connecting the box, the rear panel ........................................................................................................................... 7                                  Purchasing Now’s Good (Pay per View) ............................................................................................................... 28
Connecting to the Digital TV Recorder ................................................................................................................... 8                                       Managing favourite channels and parental control                                                                                                                                                  29
Connecting to your TV ....................................................................................................................................................... 8                   Notifications                                                                                                                                                                                     30
Turn on the equipment ...................................................................................................................................................... 9                    Settings                                                                                                                                                                                          31
The remote control ............................................................................................................................................................. 10               My settings ................................................................................................................................................................................ 31
Remote control functions .............................................................................................................................................. 11                        HDMI options........................................................................................................................................................................... 33
On-screen symbols - a quick guide                                                                                                                                                       13        Managing the disk space ................................................................................................................................................ 34
Dialog symbols ....................................................................................................................................................................... 13         General settings ................................................................................................................................................................... 35
Ratings symbols .................................................................................................................................................................... 13           Engineering settings ......................................................................................................................................................... 35
Information symbols .......................................................................................................................................................... 14                 Troubleshooting                                                                                                                                                                                   36
Navigating the Digital TV Recorder functions                                                                                                                                            15        Specifications                                                                                                                                                                                    38
Basic rule “point and select” ......................................................................................................................................... 15

Digital TV Recorder User Guide                                                                                                                                                                                                                                                                                                                                                                        Page 4

Safety and maintenance
Safety notice                                                                                 • Do not place the Digital TV Recorder on an unstable surface, from where the
                                                                                                Digital TV Recorder may fall, risking injury and damage. Only use with mounting
The Digital TV Recorder is shipped with an external power                                       accessories recommended by the supplier.
adapter that operates at 110 – 240 V AC, 50-60 Hz and produces                                • Do not connect the unit through a VCR. Video signals fed through VCRs may
                                                                                                be affected by copyright protection systems and the picture will be distorted
a 12V DC supply to the Digital TV Recorder                                                      on the television.
• Ensure all electrical connections are properly made before connecting the Digital TV
  Recorder (including the power adapter) to the mains supply. Always disconnect the
  power adapter from the mains supply before connecting or removing cables                    Maintenance
• When connecting the power adapter, always plug the adapter into the Digital TV              To clean the Digital TV Recorder disconnect it from the power supply. To clean the Digital
  Recorder before connecting the adapter to the mains supply                                  TV Recorder use a soft dry cloth. For very dirty surfaces dip a soft cloth in a weak soap and
• Do not allow the Digital TV Recorder to come into contact with water. If the Digital TV     water solution and wring well. After cleaning wipe with a soft dry cloth. Never use alcohol,
  Recorder gets wet disconnect from the power supply immediately                              paint thinners, or a chemically treated cloth to clean this Digital TV Recorder. Use of such
• Always allow adequate air to circulate around the Digital TV Recorder to avoid internal     chemicals may damage the surface of the Digital TV Recorder.
  heat build-up. Avoid placing next to or on top of radiators, and keep the top surface       In the event of a breakdown, please contact us on 0508 888 800. An authorised service
  vents clear                                                                                 agent or service centre will repair or replace the Digital TV Recorder if required.
• Never attempt to repair, deconstruct or modify the Digital TV Recorder. There are no
  user serviceable parts inside. Removing the cover will void your warranty and may
  incur further replacement charges from Vodafone
• As there is a hard disk in the Digital TV Recorder, never move the Digital TV Recorder
  while operating. If the Digital TV Recorder is to be moved, stop any recordings currently
  running, and put the Digital TV Recorder into standby for 30 – 60 seconds. Disconnect
  from the power. The Digital TV Recorder is now ready for moving. The Digital TV
  Recorder must be handled carefully. Any damage will invalidate the warranty
• Do not expose or operate the Digital TV Recorder in places that are hot, damp, dusty or
  cold, or in direct sunlight
• Do not place objects such as candles, vases or any object containing liquids on top of
  the Digital TV Recorder
• Do not place heavy objects on top of the Digital TV Recorder
• Do not place the Digital TV Recorder on fabric furnishings, carpets or other flammable
  materials

Page 5                                                                                                                                                                 Digital TV Recorder User Guide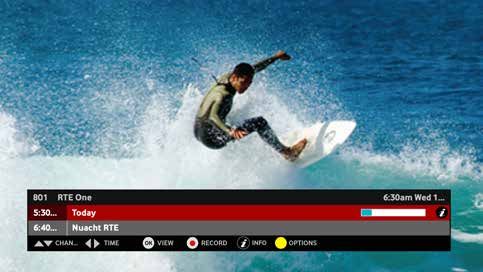
General information
Information on your Digital TV Recorder                                                           Information for your TV
Important                                                                                         Still images cannot be left displayed on the TV screen over an
Your Digital TV Recorder employs the latest 2-way communication technology in order to            extended period of time otherwise a condition termed ‘screen burn’
bring you a rich user experience. This is possible as the Digital TV Recorder has a high-         can occur. This can be seen as a permanent residual image on
speed internet connection in addition to the regular cable TV and antenna connections.            the screen.
The internet connection is made by a cable modem device.                                          To prevent screen burn, the Digital TV Recorder employs a screen saver feature, so if a still
The high-speed internet connection is used for the following purpose                              graphics image is displayed without user interaction over a pre-configured time period (5
• Delivery of electronic programme guide information                                              minutes by default) full screen video, or normal TV, is resumed.
• Decryption and entitlement information to ensure you can watch the TV channels you              However some Digital TV Recorder screens do not have a screen saver timeout in
  have subscribed to                                                                              operation and care should be taken not to ignore these screens while displayed. These are:
• On-demand movie purchasing                                                                      • Parental PIN input - displayed on attempting to access restricted channels.
• Remote diagnostics, messaging and software upgrades                                             • Access denied message – displayed after 3 unsuccessful PIN input attempts.
To ensure you are able to use the full features of the Digital TV Recorder it is important that   • All playback control screens.
the Digital TV Recorder be connected to the internet at all times.                                • Pause transport screen – displayed when pausing live TV or recorded content.
The installer should have demonstrated the basics of the Digital TV Recorder and using the        • Un-entitled channel message – displayed when the user attempts to tune to an un-
remote control. Here’s a brief overview on the Digital TV Recorder system (box and remote           entitled channel from full screen video.
control) again.                                                                                   • UI lockout dialog - displayed while listings are being updated.
The Digital TV Recorder is the personal video recorder set top box that connects our              Plasma, LCD and rear projection televisions are more prone to screen burn, especially
services. It includes an internal disk storage facility that stores programmes that have been     during the first two to four weeks of operation.
chosen for recording.
                                                                                                  Please consult your television manufacturer’s instructions for appropriate
To keep the Digital TV Recorder up to date, each night during a scheduled off peak                operating details.
time (e.g. 2 am), the Digital TV Recorder will be updated by us, with any changes to TV
schedules or software updates that may be needed from time to time.
Viewing will not be interrupted but if watching TV, use of the remote control will be limited
to changing channels (CH+/-) while the update is in progress. Once the update completes,
all normal functions are restored automatically.
During this update the loading/processing indicator will be displayed in the top corner of
the screen. The upload period will typically take 1 minute.
This product incorporates copyright protection technology that is protected by U.S.
patents and other intellectual property rights. Use of this copyright protection technology
must be authorized by Rovi Corporation, and is intended for home and other limited
viewing uses only unless otherwise authorized by Rovi Corporation.  Reverse engineering
and disassembly are prohibited.

Digital TV Recorder User Guide                                                                                                                                                             Page 6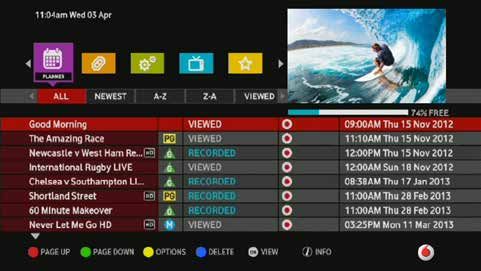
Getting started
The Digital TV Recorder is connected to our service using the
connections to the rear of the Digital TV Recorder, while it
is controlled from the front using the remote control or the
manual controls on the front panel.

Connecting the box, the rear panel
The rear of the Digital TV Recorder contains all the connections that are needed to
connect the Digital TV Recorder to the TV, to the power outlet, to the Vodafone service
and to our management for the Digital TV Recorder. It also comes with an external power
unit, 1 x composite cable, 1 x HDMI cable.

                                                                                                    LAN 1; Disabled/      USB 2.0;
              ANT IN: TV     RF OUT: Used for      Component video SPDIF             HDMI to TV     Reserved for          Reserved for      12 V DC connector
              aerial input   output to TV          out connections                   (preferred)    future use            future use

                                                 COMPONENT VIDEO OUT                                      LAN 1

                                                                                OPTICAL AUDIO OUT
            RF IN            ANT IN   RF OUT                                                                                                                                  “DOLBY” is a Trademark of Dolby
                                                                                                                                                                              Laboratories
                                                                                                                                                                              1992 - 1997 DOLBY LABORATORIES, INC
                                                                                                                                                                              Compliant with H.264, AAC

                                               VIDEO OUT   AUDIO OUT   S-VIDEO OUT      HDMI              LAN 0          USB     RESET    12VDC - 3.5A

          RF Input (RF IN;                Composite        Analogue      S-Video out;                   LAN 0; Box               Reset
          DVB-C, connects to              video            audio         optionally used with           management               Note: The reset button should only be used if
          our cable services)             output           output        composite audio out            LAN1 not used.           requested by our support services. It is equivalent to
                                                                                                                                 power off and power on.

Page 7                                                                                                                                                                                    Digital TV Recorder User Guide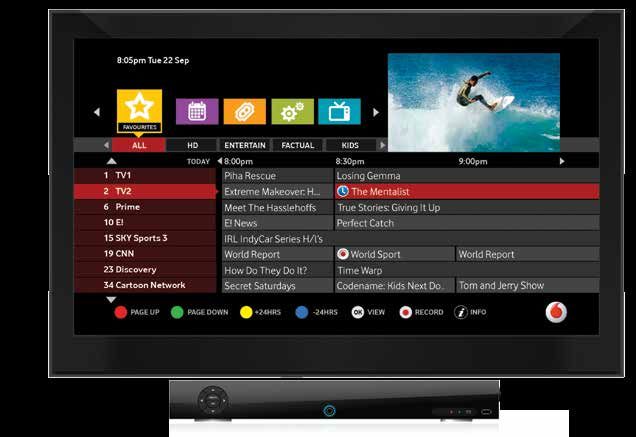
Getting started
Connecting to Digital TV Recorder                                                                               Connecting to the power supply
As standard there will be two connections required for the signal from our service, one                         The Digital TV Recorder is supplied with an external power adapter. Plug the 12v DC barrel
a circular F-type coaxial connector to be connected to ‘RF IN’ and the other an ethernet                        type connector into the box and the other end to the mains power supply.
data cable to be connected to ‘LAN 0’ using an RJ-45 type connector. Both of these
connections are to be found on the rear panel of the box.

Connecting to your TV
Depending on the TV/DVD/audio equipment to be connected, different types of
connections can be used. Most HD TV’s will use the HDMI connection, but the
composite (RCA) audio and video connectors can also be used if preferable. For future
reference please become familiar with the connectors used and note which cables
are connected e.g. if moving the equipment, or checking connectivity during any
troubleshooting exercises.

                                                             COMPONENT VIDEO OUT                                       LAN 1

                                                                                            OPTICAL AUDIO OUT
                    RF IN                ANT IN   RF OUT                                                                                                                             “DOLBY” is a Trademark of Dolby
                                                                                                                                                                                     Laboratories
                                                                                                                                                                                     1992 - 1997 DOLBY LABORATORIES, INC
                                                                                                                                                                                     Compliant with H.264, AAC

                                                           VIDEO OUT   AUDIO OUT   S-VIDEO OUT      HDMI              LAN 0         USB      RESET   12VDC - 3.5A

                                 RF IN: Signal input                    HDMI connection to/                                    Ethernet cable                       Power input from
                                 from Vodafone                          from HD TV (preferred                                  from our box                         external power adapter
                                                                        for HD TV)                                             management

Digital TV Recorder User Guide                                                                                                                                                                                             Page 8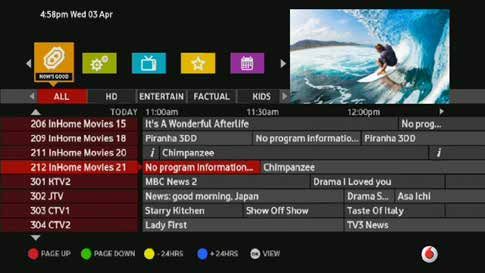
Getting started
Turn on the equipment
Before operating the Digital TV Recorder ensure all equipment is plugged in and turned on.       When the box is in standby mode the                button will have a red backlight            .
• Switch on the TV and any other connected equipment.                                            If there are no lights on the front of the box, make sure the box is correctly connected to
• Set the Digital TV Recorder to operate mode by pressing the operate/power button               the external power supply, and the power switch is set to on.
  on the remote control or the power button on the front panel of the box.
The operate mode is indicated by a blue backlight around the        button on the
front panel .
                            Up

            Menu

           Left                             Right

               Ok

                          Down
                                      Digital TV Recorder                                    Digital TV Recorder                                 Digital TV Recorder Indicators
                                      control panel                                          operate/power                                       and USB connector

Manual controls and status indicators
The Digital TV Recorder is equipped with a set of manual                                       The status indicators are found on the right of the front panel of the Digital TV Recorder.

controls on the front panel and a number of status indicators                                   Red                          This indicator is lit when the box is recording a program
                                                                                                                             otherwise it is switched off.
indicating what the Digital TV Recorder is doing.
                                                                                                Green                        This indicator is lit when the box is playing a program otherwise
The controls are grouped together into a button cluster on the left hand side of the box.
                                                                                                                             it is switched off.
The options are up, down, left, right, menu and OK.
From full TV (normal) screen the up, down, left and right buttons will invoke the channel       Amber                        This indicator is lit when there is a message waiting.
banner. Pressing menu will display the TV guide screen. When TV guide screen
is displayed the up, down, left and right buttons are used to navigate, and OK chooses the     The USB 2.0 connector on the right of the front panel is reserved for future use.
highlighted selection.
                                                                                               Note: The Digital TV Recorder will already have been installed by our engineer, and set to work with the TV and
All the functionality available from the front panel controls is available using the           other equipment. If unsure please refer to the manual that came with the Digital TV Recorder or call Vodafone
remote control.                                                                                helpline on 0508 888 800 to verify connectivity.

Page 9                                                                                                                                                                                 Digital TV Recorder User Guide
Getting started
The remote control
The batteries
The remote control requires 2 new AA alkaline batteries.
Remove the battery cover from the back of the remote control.
Match the batteries to the (+) and (–) marks inside the battery compartment,
then insert the batteries.
Press the battery cover back into place.
Operation
After inserting the batteries, the remote control unit (RCU) is ready to operate the Digital
TV Recorder, by pressing the STB key.
The RCU can also be used to control the television and DVD/VCR player/recorder, by
choosing the operating mode from TV, STB or DVD (see the remote control documentation
for further information on setting up and using the remote control in this way).
Brief description of the remote control functionality for the box is outlined overleaf.
Digital TV Recorder User Guide Page 10Getting started
Remote control functions 1 Mute Turns the sound OFF or ON.
2 Live TV When using the guide this key switches back to full screen TV
(live or recorded TV).
2
1 3 3 Power Switches the box between operate mode and standby mode.
4 4 TV Switches to universal television mode.
6 7
5 8
10 STB Switches to Digital TV Recorder mode.
9 11
DVD Switches to universal DVD/VCR mode.
12
5 Guide Invokes the TV guide screen.
6 Favs Invokes the favourites screen.
7 Planner Invokes the planner screen where recordings and reminders are listed.
8 Now’s good Shows available Pay per View movies, including those already rented.
9 Back While watching TV, tunes to the previously tuned channel. When using the
guide goes back to previous screen.
10 Menu When the TV guide is displayed, pressing this key puts the focus of the
remote control on the QuickJump menu. While watching normal
full-screen TV, this key displays the QuickJump menu on the lower third
of the screen.
11 Information Opens and closes the information banner when available.
12 Vol + / - Increases and decreases the audio volume.
Page 11 Digital TV Recorder User GuideGetting started
13 Left / Right Navigates the screen.
Remote control functions
14 Up / Down Navigates the screen.
15 OK In the channel banner, tunes to the listed channel or sets a
reminder. In the TV guide it tunes to the currently highlighted
programme, plays the currently highlighted item, sets a
reminder or confirms an option.
16 CH + / - During live TV viewing, tunes to the next/previous channel.
16
13 15
17 Transport These keys operate the transport functions KEYS (PLAY, REC, FF,
14 REW etc.) of your decoder
18 Filter Activates the filter bar when available.
17
19 Envelope This key is used to access messages sent by Vodafone.
18 19
20 20 Red/Green/ Functionality depends on screen. See navigation bar for
Yellow/Blue assignment.
21 Number keys Select channels directly by entering the 3-digit channel code.
21 Also, use number keys to type in the 4-digit user PIN.
22 23
22 Options Activates the options dialog when available.
23 Text Activates TeleTEXT (future feature).
Digital TV Recorder User Guide Page 12On-screen symbols – a quick guide
The following outlines the symbols that can be seen on screen Restricted to persons 13 years and over
while using the Digital TV Recorder system.
16
Restricted to 16 and over. Indicates that the film or programme contains
Dialog symbols moderate impact content and is not recommended for persons under
16 years of age. It is a legally restricted category.
Attention Loading/processing
18 Restricted to 18 and over. Indicates that the film or programme contains
high impact content and is legally restricted to adults.
Note: Some material classified as 18 may be offensive to sections of the
Help Save adult community.
The parental rating symbols above can have further sub rating classifications displayed.
Information Locked/PIN protected These will be seen along side the parental rating symbols. The sub-ratings symbols and
their definitions are as follows
Record/record series Play Content may offend Violence and language
may offend.
Language may offend Violence, language and
Rating symbols sexual content may
offend.
General audience. Suitable for family viewing and indicates the film Sexual content may Violence and sexual
G contains very mild content. offend content may offend.
PG
Parental guidance. May contain material which some children find Contains violence Violence, language and
confusing or upsetting, and may require the guidance of parents or sexual content may
guardians. It is not recommended for viewing by persons under 15 offend.
without guidance from parents or guardians.
As an example, a programme with the rating 16 and the sub rating means that the
M
Mature. Suitable for mature audiences, more suited to viewers of 16 content is intended for those aged 16 years and older and that the programme contains
years and older. strong language with violent and sexual material.
Page 13 Digital TV Recorder User GuideOn-screen symbols – a quick guide
Information symbols
High definition Record/recorded Parental guidance
Widescreen Record failed My settings
Reminder Now’s Good available for viewing General settings
Keep Renting (processing request) Engineering settings
Series link Series (or part of a series)
Digital TV Recorder User Guide Page 14Navigating the Digital TV Recorder functions Basic rule “point and select” There is one basic rule needed to use your Digital TV Recorder. This rule is called “point and select”. With this rule mastered any part of your Digital TV Recorder’s functionality can be used. Point is where the arrow keys are pressed on the remote control, or the front panel of the box. Pressing the arrow keys moves the “on-screen” highlight to different items on the screen. Once the item on screen has been highlighted, select it by pressing the key on the remote control. To return to the previous screen or tune to the previous channel, press . To exit to normal mode, press . The full TV screen This is the default, or normal viewing mode used to enjoy the selected programme or recording on TV. The remote control is used to select the programme to watch via the interactive TV guide, the channel banner or if you already know the 3-digit channel number just enter it directly using the number keys. Pressing at any time can access information on the current programme. The transport keys can be used to pause, rewind, record or review content using the transport functions from the remote control. PIN Some programmes are restricted by parental guidance settings or require an additional purchase (like Now’s Good movies) and so will require the 4-digit user PIN (personal identification number) to be entered using the number pad on the remote control. This PIN can be changed through the Settings > My settings menu. Page 15 Digital TV Recorder User Guide
Navigating the Digital TV Recorder functions
QuickJump menu
The QuickJump menu is a quick access menu that allows access
to different features of the Digital TV Recorder system.
It is displayed as a menu along the bottom of the screen, in front of the current
programme, or on the top of the screen when in the guide screens.
The QuickJump menu displays when the key          is pressed on the remote control. Pressing
   again closes the QuickJump menu.

The right and left keys     on the remote control can be used to scroll left or right to
highlight the feature area required for selection. Pressing the key jumps to the selected
menu item screen, displaying the choices within that feature.
If nothing is selected and the QuickJump menu is left idle it will disappear off screen after
a few seconds.

QuickJump display
The QuickJump displays as a horizontal scrolling list of
symbols representing each feature area of the Digital TV
Recorder system.
Each symbol will display a text label when scrolling, for example the text TV guide appears
                                                                                                Each of the symbols are labelled as follows
when the     symbol is highlighted, along with the prompt OK indicating that pressing the
   key on the remote control will select the TV guide.

TV guide, favourites, planner and Now’s Good can also be called directly from the remote
control by using the guide , favs , planner        and Now’s Good        keys.
                                                                                                TV guide      Planner       Now’s Good    Settings   Favourites

Digital TV Recorder User Guide                                                                                                                                    Page 16
Navigating the Digital TV Recorder functions
Interactive TV guide
The interactive TV guide screen displays channel and – The filter bar, which sits between the QuickJump menu and the programme guide grid,
providing a way to sort the information viewable on screen by category. In the case of
programme information for the next 7 days, listed by the TV guide, the filter bar allows sorting of channels by different categories.
channel number. – The programme guide grid containing the channel listing to the left and programme
To get to the TV guide, press the key on the remote control, or select from the listings to the right.
QuickJump menu. This shows: – The navigational bar along the bottom of the screen where navigation features are
– A resized TV feed (viewed as the surfer in the TV guide screen below) on the top displayed. The content of this bar can change depending on the area of the TV guide
right corner of the screen which continues to show the current playing programme screens highlighted.
(live or recorded content). Pressing live TV on the remote control returns you to (normal) full screen TV.
– The QuickJump menu to the left of the resized TV feed.
Date and time
Resized TV feed
QuickJump menu
Filter bar
Programme listing with
status where applied
Channel listing Programme guide grid
Navigation bar
Page 17 Digital TV Recorder User GuideNavigating the Digital TV Recorder functions
Navigating the TV guide screen
The remote control is used to move around the TV guide screen The information key displays the event information banner for the focussed item,
with details about the currently selected programme such as start and end time, name, HD
using the right, left, up, down, OK and coloured keys. (if applicable), parental rating, genre, duration.
Up Programme information is available whenever the key on your remote control is
pressed and focus is on a particular programme in the TV guide, full TV screen, planner,
channel banner, favourites or Now’s Good screens.
Left Right
The information available on this screen will depend on the focussed program.
For example, if a program is focussed in the Now’s Good screen then entitlement or
purchase information will be available, or if already viewing/playing a program then
Down
a progress bar may be displayed.
Right: In the grid the right key on the remote control moves the selection to the next
programme on the same channel, up to the end of the 7-day limit. While in the TV guide, it is possible to record a programme by highlighting the
programme title and pressing the record key on the remote control. It is possible to
Left: In the grid the left key on the remote control moves the selection to the previous
record currently running programmes or setup a scheduled recording for programmes
programme on the same channel
that have not yet started.
Up: The up key on the remote control sets the selection to the channel above the current
The record symbol will appear alongside the title of the selected programme.
one in the grid. If at the top of the grid and the up key is used then the filter bar is selected.
Pressing the record key a second time turns off the recording previously set.
Pressing up again selects the QuickJump menu
If a recording fails for any reason the record symbol displayed alongside the
Down: The down key on the remote control sets the selection to the channel below the
programme will change from to . Reasons for recording failures can include
current one in the grid. If the bottom channel is already focussed, this key press has no
recording conflicts (schedule may have changed) or not enough space on disk like disk
effect.
full (see settings).
: Use this key on the remote control to tune to the selected channel. If the programme Note: Up to two programmes can be recorded at the same time.
has not yet started a reminder will be set. Pressing again will remove the reminder.
Note: The reminder symbol will not be displayed if the recording symbol is already displayed for an
individual programme.
Red key: Page up - Pages up to the previous page of channels. If already at the top
page this key has no effect.
Green key: Page down - Pages down to the next page of channels. If already at last
page this key has no effect.
Yellow key: -24 hours - Shows programme listings 24 hours before those currently listed.
Blue key: +24 hours - Shows the programme listings 24 hours from current screen.
Digital TV Recorder User Guide Page 18Using the channel banner The channel banner displays in the bottom third of the TV screen, showing programming information while continuing to watch TV or recorded programmes. The channel banner displays information on the current channel logo, channel number and name, current date and time, what’s on now and what’s on next. It also displays the parental rating symbol and the HD symbol when applicable. While watching the current programme it is possible to browse programme information for later programmes or different channels over the next 24 hours by using the up, down, left and right keys on the remote control, as represented on screen by up , down , left and right . Press the key to choose the programme to watch, if now playing, or to set a reminder if scheduled to start in the future. Pressing will record the current programme, or the programme currently focussed if that programme is currently running or will set a scheduled recording if the programme occurs in the future. Pressing (information) will display the more detailed event information for the focussed programme. While the channel banner is displayed the channels can be changed using the CH+ and the CH- keys . The channel banner will update to show information on the new channel and programmes, with the programme now running focussed by default. The channel banner remains on the screen for approximately 3 seconds if not in use. You can change this setting by changing the time on the banner timeout in settings. Page 19 Digital TV Recorder User Guide
Using the planner
   The planner shows a list of recordings, reminders, series links                                A-Z: Shows the planner listings in alphabetical order
   and shows that are kept.                                                                       Reminders: Show all reminders set
                                                                                                  Viewed: Shows all recordings that have already been viewed. This can be useful if you
   Planner shows recordings that have been viewed (fully or partly), scheduled recordings,
                                                                                                  want to choose recordings to delete to free up space.
   recordings taking place right now, and failed recordings. It also shows any reminders
   scheduled in the future. In your planner you can view the amount of space used and free        Recorded: Shows all programmes that have already been recorded. Useful for managing
   in the disk space meter.                                                                       existing recordings.
   Using the remote control, the filter bar can be browsed to refine what is shown in the grid:   Keep: Shows all recordings (existing and scheduled) that have been marked for keep
   All: Shows all planner listings                                                                Series: Shows all recordings (existing and scheduled) that are part of a series link.
   Newest: Shows all the newest recordings, including upcoming recordings.

                                Filter bar
                                                                                                                                                                   Disk space meter

Programme guide grid showing
 programme list, rating, status,
      and channel information.

   Digital TV Recorder User Guide                                                                                                                                                         Page 20
Using the planner
Each row in the grid represents a planner listing, which gives details on the programme Pressing the options key will show the options available for the focussed recording.
name, if it is HD, the parental rating, the status (recorded, recording, viewed etc.), These options change depending on the programme highlighted, in this example ‘series
related symbols (reminder, series link, keep, recording) and the channel number/name. link’ , ‘keep’ and ‘close’ are the options available for the recording choice. Other
The status of each planner listing will fall into one of the following categories: options that can be available are remove keep, Reminder , Remove reminder and
remove series.
HH/MM/DDD: Time that a programme is scheduled to display a reminder/record. While in the options menu use the up and down keys to highlight an option and press the
OK key to select or the BACK key to cancel.
Recording: Recording is in progress. Setting keep on a recording avoids deleting recordings by accident, or stops someone
else deleting it. Trying to delete a planner listing which has a keep symbol associated
Recorded: Programme is recorded but not yet viewed.
with it, will prompt for the 4-digit user PIN. The keep symbol can be removed from a
planner listing using the options menu. The options menu is displayed by pressing the
Viewed: Programme has been (fully or partly) viewed.
yellow key on the remote control.
Note: The Digital TV Recorder will not delete any recordings marked for keep without input of the 4-digit user
Playing: Programme is being played.
PIN, regardless of other settings.
Part recorded: Programme has been partially recorded, but an error (e.g. power failure)
prevented it from fully recording.
Failed: Programme could not be recorded. Reasons may include the disk being full,
scheduling conflicts (especially for series), or the set top box being turned off when the
recording was due to start.
The up, down left and right keys are used to navigate around the screen and the
navigation bar along the bottom of the screen shows the available functionality assigned
to the coloured keys of the remote control.
The function of the OK key can change from view for programmes already recorded
to reminder for scheduled recordings. If the recorded programmes are governed by
parental controls, input of the 4-digit user PIN will be required.
Page 21 Digital TV Recorder User GuideUsing the planner
Recordings Recording conflicts
The Digital TV Recorder allows two recordings to be setup and The Digital TV Recorder can record up to two programmes at a
run at the same time. time. Trying to setup a third recording will invoke the recording
A watched programme can be recorded by simply pressing the record key on the conflict notification.
remote control. Recording of a programme scheduled for viewing at a later time can be This notification will provide the option to cancel the current recording request or cancel
setup from the TV guide or channel banner by highlighting the programme and one of the existing recordings (running or scheduled).
pressing the record key .
To cancel the recording just requested press the back key on the remote control. To
Programmes which are currently recording, or are scheduled to record in the future, will cancel an existing scheduled recording press the red key .
be indicated by having the record symbol next to the programme title.
This allows cancellation of a conflicting recording during the requested time period.
Recordings can be cancelled at any time from the TV guide screen by pressing the record
Once a scheduled recording has been cancelled the Digital TV Recorder will then be able
key , or in the planner screen by highlighting the scheduled recording and pressing the
to process the request for the ‘new’ recording and will return to the screen from which the
blue key as per the navigation bar. The record symbol alongside the programme
request originated, i.e. the planner or TV guide screen.
will disappear.
The programme for which the recording was requested will now have a failed recording
Partial recordings can be seen in the planner if there was a problem during recording.
symbol next to its title.
Partial recordings may be empty i.e. not have any viewable content to play as these failed
at the beginning or some may contain some playable content where the recording failed
having started normally.
The status column will show ‘failed’. The failed recording symbol is used to mark
the failed recording in the planner, TV guide and channel bar. To see the failure reason go
to the Planner, select the failed recording and press the button. The reason will be
displayed at the bottom of the dialogue box.
Possible causes include lack of space on the hard disk in the box, or some interruption of
service during the recording, which ended the recording.
Deleting a recording marked for ‘keep’ will require you input your PIN to verify the delete.
There are a few rules around recordings to remember.
There can only be two recordings setup to run at any one time (including recordings that
overlap). Trying to setup a third recording will display the recording conflict screen.
Now’s Good programmes cannot be recorded. If the programme selected for recording is
part of a series an option will be presented to setup recording for the whole series.
It is not possible to record on channels outside your subscription. It is possible to record
restricted content, but the 4-digit user PIN will be required to view the recording.
For example parental controlled content will require input of the 4-digit user PIN to access
the recording.
Digital TV Recorder User Guide Page 22Using the planner
Recording a series Removing a series link
When setting up a recording, and the programme selected is A series link can be removed so that no future recordings are
part of a series, the system will ask if you want to record just this scheduled for that series.
programme or record the whole series via a record once/record To remove a series link, select an existing or pending recording that is part of a series as
series notification. denoted by the series link icon . Press the options key to display the options popup
and select “remove series link”.
Selecting to record the series will invoke the ‘please wait’ notification while the box When the link is removed, all pending recordings for the series will be removed. Removing
searches the 7-day schedule for episodes of the series. a series link does not delete any existing recordings already recorded as part of that series.
When setting up a series recording, all episodes in the series are marked for recording. A series link may also be removed by selecting a pending recording that is part of a series
The box will not check that there are any recording conflicts at the time of series record and pressing the blue key . The box will prompt to confirm the series link should be
setup, as these recordings will be scheduled for future execution. A scheduling conflict removed.
may result in FAILED recordings if more than two programs are scheduled to record at
the same time.
Note: A series recording will indefinitely create recordings for the series until it is removed from the planner, or a
Removing a recording
period of 30 days elapses without any further programs in the series appearing in the TV guide/EPG. To remove a recording, press the blue key . The box will prompt to confirm that the
recording should be deleted.
Page 23 Digital TV Recorder User GuidePlaying a recording, replaying live TV
Playing recorded content is as simple as selecting the recorded Playing recordings
programme and pressing the OK key . Within a recording using the fast-forward key will fast forward through the
The viewing experience can be enhanced at any time by using the Transport keys on the programme, until the end of the recording is reached. At the end of the recording the
remote. The same keys can be used to manipulate the viewing experience while watching planner screen is again displayed if there is no further key press on the remote.
“live” TV. Pressing the fast-forward key multiple times speeds up the fast-forward, and pressing
While viewing recorded programmes using the Transport keys will display a partial screen, the rewind key will slow it down, return to play mode or rewind the programme
the transport screen, over the full TV screen. This will show which current function like depending on the number of key presses.
play , pause , fast-forward or rewind is selected and display the speed of Pressing the play key returns to normal play mode from the existing pause/fast-
any rewinding/fast-forwarding video. forward/rewind while the pause key pauses the current action and the stop key
The transport screen will disappear from the TV screen after the banner timeout has stops the replay mode and brings you back to the planner screen.
elapsed if not used. When rewinding, pressing the rewind key multiple times speeds up the rewind speed,
pressing the fast-forward key slows down the rewind speed, returns to play mode or
fast-forward, depending on the number of key presses.
Stopping/re-starting recording playback
When you press stop while viewing a recording, the stop position within the recording is
automatically bookmarked.
The next time the recording is chosen for viewing the system will prompt continue from
the last viewed point or start at the beginning again.
Highlight the preference using the up and down keys on the remote control and press
to select. Your recording will then play as requested.
Digital TV Recorder User Guide Page 24Playing a recording, replaying live TV
Pause/play live TV
The Digital TV Recorder allows manipulation of live TV
using similar functionality as used to how you watch
recorded programmes.
The live stream TV is fed into a continuous buffer on the Digital TV Recorder that supports
stopping, reviewing or pausing the live TV. This buffer can store up to 60 minutes of the
programme being watched.
The transport display is shown in front of the live TV programme
indicating the status of the choice (pause, rewind, fast-forward, play). Notice this screen
differs slightly from playing recorded programmes, as it does not have a progress bar.
Using the transport keys the programme can be paused using the pause key ,
and resumed by pressing the play key or pause key when ready to resume.
Using the key rewinds the programme to review/replay content to be viewed again,
moves forward, unless already at the live feed in which case normal live
TV is displayed.
When live TV is paused the length of time elapsed since pausing is shown on the
transport screen.
If the Digital TV recorder has been paused for more than 60 minutes it will commence
playing. Any live TV older than 60 minutes from that point will be erased from the
live TV buffer.
If the channel is changed at any time i.e. while paused/viewing, the previously stored
buffer contents are lost as the buffer is cleared to make way for the newer programme
just selected.
Page 25 Digital TV Recorder User GuideNow’s Good (Pay per View) With Now’s Good new movie releases can be enjoyed by ordering them using your remote control. Now’s Good can be selected directly by using the Now’s Good key on the remote control, via the TV guide or via the QuickJump menu. The filter bar refines the selection according to the groups shown e.g. HD, comedy, kids, action. Now’s Good listings can be navigated one at a time using the up and down keys denoted by the arrows on screen, and move across the screen using the left and right keys , denoted by arrows . The coloured keys on the remote control can be used to page up, page down, and to go forward or back 24 hours over the 7-day listings schedule. Each programme that has already been rented will have the Now’s Good icon shown in the programme schedule just to the left of the programme title. To view additional event or programme information on the selection at any time use the info key on the remote control. Pressing the info key again closes the information view. The programme information view shows information like the programme name, programme classification, genre, parental guidance information, a brief synopsis of the content, and the option to rent if not already rented. If the programme has already been rented the programme the remaining entitlement is shown. Digital TV Recorder User Guide Page 26
Now’s Good (Pay per View)
Now’s Good (Pay per View) content that has already been rented
can be watched at any time during the rental period. The rental
period will typically be for 24 hours and will be shown at time of
rental purchase.
Remaining entitlement can be viewed in the event information screen by highlighting the
programme in the programme schedule and pressing the info button . The entitlement
information for that programme will be shown on the right.
To view a programme already rented highlight the programme on the programme
schedule and press the OK key    .
If the rented programme is restricted by parental control settings, the system will prompt
for the 4-digit user PIN to allow access.
To set a reminder for upcoming programmes highlight the programme on the programme
schedule and press the OK key       on the remote control. The reminder symbol  will
appear to the left of the programme on the programme schedule.

Page 27                                                                                      Digital TV Recorder User Guide
Now’s Good (Pay per View)                                                                                    Rental details: Cost,
                                                                                                             order code ID, duration;
                                                                                                             Choice: rent or cancel

Purchasing Now’s Good (Pay per View)
Now’s Good content can be viewed by selecting the programme
to watch and pressing the OK key   .
This will display the programme information screen including the option to rent. Choosing
the option to rent will prompt for the 4-digit user PIN to verify the purchase.
Displayed on the right hand side of this information screen are details about the rental like
cost and the order code ID. The order code ID is useful if you have any issues viewing the
rented content.
Choose to rent by selecting the rent button                        and pressing the OK key            . To
exit the event information dialog select cancel.
If choosing to proceed then the system will prompt to input the 4-digit user PIN. Once the
PIN is validated the programme will become available within a few minutes.
The programme listing will have the grey Now’s Good symbol                       displayed while the
system processes the rental request.
This will change to the colour Now’s Good symbol                   once the rental is available
for viewing.
If the content is of a controlled type, for example with an 18 rating, the box will prompt for
input of the 4-digit user PIN to view.
The prompt for PIN input will depend on the parental control settings and the time of day
(The Digital TV Recorder will always prompt for the 4-digit user PIN when content is rated
18 and the time of day is between 6 am and 8 pm).
Note: The context of the OK key     changes, and may represent rent, watch or reminder throughout the
Now’s Good screens. The exact context will be shown on the navigation bar at the bottom of the respective
Now’s Good screen.

Digital TV Recorder User Guide                                                                                                      Page 28
Managing favourite channels and parental control
Managing favourite channels Parental control of viewing
The Digital TV Recorder system supports favourites, a list of The Digital TV Recorder can restrict what programmes are
favourite channels that are accessed regularly, making finding freely viewable.
them easier. The top right area of most interactive screens will show the currently playing channel or
The current favourites can be viewed from the QuickJump menu or any screen with a recording. This area will be blank if the current content is unviewable e.g. due to parental
QuickJump component, or by pressing the FAVS key on the remote control. control levels, or to lack of entitlement, or for radio only channels.
Setting up favourites is done using the settings menus, from Settings > My settings > A parental check is always performed after changing to a new channel, when playing a
Favourite channels. This is covered in the section on settings. recording, and when a new programme begins. The box will prompt for the 4-digit user PIN
to watch any content that exceeds the current parental level.
No prompt is necessary if the channel remains unchanged and a user PIN has already
been entered for an programme with an equal or lesser rating than the one starting.
The parental control is set at the box level, so setting parental control to 16, as indicated by
the symbol 16 , will block all content from Digital TV Recorder with a rating higher than
16, without
the use of the 4-digit user PIN (excludes news, current affairs).
Between the hours of 6 am to 8 pm, the box will always ask for the 4-digit user PIN before
allowing access to any programme which has an 18 rating regardless of the parental
control level setting on the box.
Parental control preferences can be set in the Settings > My settings menu. This menu
requires the 4-digit user PIN to access and make any changes.
Page 29 Digital TV Recorder User GuideNotifications
During normal operation of the Digital TV Recorder different notification
messages can pop-up on the TV screen. Each notification will
require an option to be chosen or acknowledgement of the
message using the remote control.
Typical types of notifications to be seen include
Saving changes: Select yes or no Not subscribed: When trying to access a channel and the channel is not part of the
subscription.
Reminders: Where reminders are set for programmes or recordings a reminder
notification will pop-up at the set time before the event takes place. The reminder Please wait: This notification can be displayed when the system is updating or if the
preferences can be set in Settings > My settings > Reminder preferences. You can system is trying to find information about content being accessed for, example checking
set reminders to be disabled or display for 1 min, 1.5 mins, 3 mins and 5 mins before the if a programme is part of a series link.
programme is scheduled to start.
Disk full: This will be displayed if the box has the recording management set to
Play program: When viewing a recording previously stopped, the box asks to start “warning” (see settings) and there is not enough space for an upcoming recording. If
the recording view from the beginning or continue from where the previous viewing no action is taken on the notification it will continue to be displayed until 90 seconds
stopped. before the recording is due to start. Then the system will automatically remove the
oldest viewed recordings to make enough space for the new recording.
PIN entry: To enter the 4-digit user PIN for parental control programmes or when
Note: If the disk space management is set to ‘Ignore’ in settings and no explicit action is taken to free up disk
viewing Now’s Good content for the first time. space after being warned to do so, all the new recordings will fail.
Digital TV Recorder User Guide Page 30You can also read