ASUG i.MX Android Security User's Guide - NXP Semiconductors
←
→
Page content transcription
If your browser does not render page correctly, please read the page content below
ASUG
   i.MX Android™ Security User's Guide
   Rev. android-10.0.0_2.6.0 — 15 January 2021                                                                                    User's Guide

                                                                                        Contents
1 Preface                                                                               1     Preface............................................ 1
                                                                                        2     Overview of i.MX Android Security
                                                                                              Features.......................................... 1
1.1 About This Document                                                                 3     Customization work on i.MX Android
                                                                                              Security Features ........................... 4
This is a guide of how to do customization work on security features supported
                                                                                        4     Revision History............................ 36
by i.MX Android software. It provides an overview of the i.MX Android security
features and it focuses on how to configure and use these security features.
The released code can be built into images both with and without Trusty OS integrated while the Trusty OS related contents in
this document can only be applied on the images with Trusty OS integrated.

1.2 Conventions
The following conventions are used in this document:
  • Software code is shown in Consolas font.
  • ${MY_ANDROID} is a reference to the i.MX Android source code root directory.
  • ${MY_TRUSTY} is a reference to i.MX Trusty OS source code root directory.

2 Overview of i.MX Android Security Features

2.1 Introduction of security-related hardware modules
Security features are based on security-related codes, which need to do some cryptographic calculations to protect security data.
Security requires that only security-related code is allowed to run on certain hardware resources. Therefore, these hardware
resources are called security-related hardware modules. There are some security hardware modules on the i.MX platform, which
co-work with the Trusty OS to guarantee security:
  • CAAM: Cryptographic Acceleration and Assurance Module, is a hardware component of a System on Chip (SoC)
    that provides security assurance and hardware acceleration of cryptographic algorithms, packet encapsulation and
    decapsulation, and other cryptographic operations.
  • TrustZone: ARM TrustZone creates an isolated secure world, which can be used to provide confidentiality and integrity to the
    system. It is used to protect high-value code and data for diverse use cases like authentication. It is frequently used to provide
    a security boundary for the Trusted Execution Environment, like Trusty OS.
  • TZASC: TrustZone Address Space Controller, is an Advanced Microcontroller Bus Architecture (AMBA) compliant SoC
    peripheral. It is a high-performance, area-optimized address space controller to protect security-sensitive software and data
    in a trusted execution environment against potentially compromised software running on the platform.
  • CSU: Central Security Unit sets access control policies between the bus masters and bus slaves, enabling the peripherals to
    be separated into distinct security domains.
  • xRDC: On i.MX 8QuadMax and i.MX 8QuadXPlus, the eXtended Resource Domain Controller (xRDC) replaces the RDC and
    TrustZone components (CSU, TZASC, etc.), which can be found in previous i.MX processors.
NXP Semiconductors
Overview of i.MX Android Security Features
i.MX 8QuadMax and i.MX 8QuadXPlus SoC contains a mix of Cortex-A and Cortex-M CPUs, which frequently operate in
an asymmetric mode with different software environments executing on them. To keep these software environments from
unintentionally interfering with each other, the SoC contains xRDC to enforce isolation. The xRDC operates in a manner like
ARM's TrustZone. Transactions from masters are annotated with user-side band information to indicate their domain and the
access control logic allows/disallows accesses to peripherals/memory based on this information.
• AHAB/HABv4: The Advanced High Assurance Boot (AHAB) and High Assurance Boot (HABv4) support authentication on
the images by using cryptography operations to prevent unauthorized software from being executed during the device boot
sequence. Details about how to verify images with HAB can be found in Chapter 2.1.
• SCU: The System Controller Unit (SCU) is only for i.MX 8QuadMax and i.MX 8QuadXPlus platforms. It consists of a
Cortex-M4 processor and a set of peripherals and interfaces to connect to an external PMIC and to control internal
subsystems. The SCU Cortex-M4 is the first processor to boot the chip. The SCU is dedicated to:
— Boot management
— Power management
◦ External power management by communicating with external PMIC
◦ Internal power management of all the subsystems
— Clock and reset management
— I/O configuration and muxing
— Resource partitioning/access control
• SECO: The Security Controller Subsystem (SECO) is only for i.MX 8QuadMax and i.MX 8QuadXPlus platforms. It manages
several security hardware modules (CAAM, SNVS, OTP, ADM, etc.) to perform cryptography acceleration and ensure the
security of the whole system.
• eMMC RPMB: RPMB is a separate physical partition in the eMMC device designed for secure data storage. Every access to
RPMB is authenticated and it allows the host to store data to this area in an authenticated and replay protected manner.
In Trusty OS, the RPMB partition is managed as the secure storage to store all critical data like lock/unlock status, rollback
index, etc.
The following table lists the modules on the i.MX 8QuadMax, i.MX 8QuadXPlus, i.MX 8M Mini, i.MX 8M Quad platforms:
Table 1. Modules on the i.MX 8QuadMax, i.MX 8QuadXPlus, i.MX 8M Mini, i.MX 8M Quad platforms
Modules i.MX 8QuadMax and 8QuadXPlus i.MX 8M Quad, 8M Mini, 8M Nano, and
8M Plus
CAAM Y Y
TZASC N Y
CSU N Y
xRDC Y N
AHAB Y N
HABv4 N Y
SCU Y N
SECO Y N
eMMC Y Y
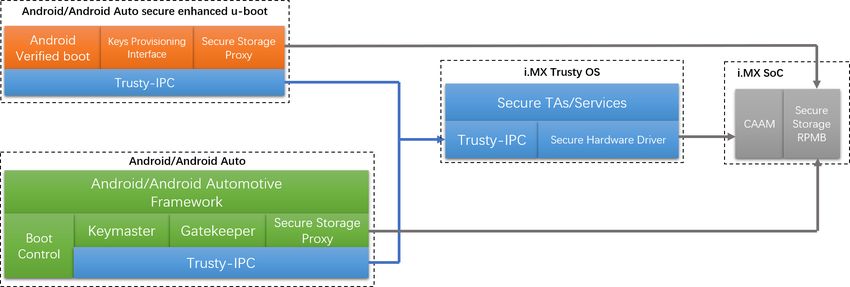
2.2 i.MX Android security framework
i.MX Android/Android Automotive security framework includes secure enhanced U-Boot, Android/Android Auto, i.MX Trusty OS,
and the related hardware.
i.MX Android™ Security User's Guide, Rev. android-10.0.0_2.6.0, 15 January 2021
User's Guide 2 / 38NXP Semiconductors
Overview of i.MX Android Security Features
Secure enhanced U-Boot provides the Android Verified Boot module, keys provisioning interface, and secure storage proxy.
Android Verified Boot assures the end user of the integrity of the software loaded and started by secure-enhanced U-Boot. This
is defined by Google, and more details can be found in https://source.android.com/security/verifiedboot/avb.
Key provisioning interface provides the RPMB keys, key attestation, and AVB keys provisioning interface. These interfaces can
be used to inject the keys into the device to make it secure.
Secure Storage Proxy is the client of Secure Storage service from Trusty OS. It helps to access the RPMB secure storage device
by SoC IPs.
Android/Android Auto platform, based on Google’s design, integrates the Keymaster HAL, Gatekeeper HAL, and Secure
Storage proxy.
Keymaster HAL uses trusty-backed one and supports Keymaster V2 and Keymaster V3 APIs. For more details about keymaster,
see https://source.android.com/security/keystore.
Gatekeeper also uses the Trusty-backed gatekeeper HAL. For more details about gatekeeper, see https://source.android.com/
security/authentication/gatekeeper.
i.MX Trusty OS is based on Trusty OS that is released from Google. Secure TAs and services are integrated in it. Trusty OS is a
very important module for the whole security of i.MX Android/Android Auto platform.
Trusty OS provides a trusty-ipc, which is used to realize communication between secure and non-secure world. Trusty OS has
the hardware driver for CAAM used for keyblob calculation and security algorithm acceleration.
The following figure shows the logic between these components.
Figure 1. i.MX Android security framework
The following figure shows the i.MX Android/Android Auto security trust chain.
Figure 2. i.MX Android security trust chain
i.MX Android™ Security User's Guide, Rev. android-10.0.0_2.6.0, 15 January 2021
User's Guide 3 / 38NXP Semiconductors
Customization work on i.MX Android Security Features
Secure root key is programed into the One Time Programmable (OTP) eFuse hardware in i.MX chips and work as the root trust
of the solution. It is used by CAAM to generate other keys. In the trust chain, the HAB/AHAB, AVB, and DM-Verity are used by a
different level to verify the specific images or encrypt user data.
After power-on, the boot process begins, U-Boot and Trusty OS are loaded by ROM code. They are the first to be verified by ROM
code with HAB/AHAB. They can only be executed after they pass the verification. U-boot loads the Linux kernel and uses AVB to
verify it before jumping to the Linux kernel. The Linux kernel mounts the Android file system. Data access from Android file system
will be verified by DM-Verity to assure integrity. The security chain is formed by these features.
3 Customization work on i.MX Android Security Features
3.1 Verifying images with HAB
The i.MX family of application processors provide the High Assurance Boot (HAB) feature in the on-chip ROM. The ROM is
responsible for loading the initial image and verifying the image before the image is executed.
Due to the new architecture, multiple firmware and software images are required to boot i.MX 8Quad and i.MX 8M family devices.
NXP defines "container" to organize images. AHAB for i.MX 8Quad devices can recognize the format of "container" and verify
the images in a container. For i.MX 8M devices, these images are stored in the format of Flattened Image Tree (FIT) with an
appropriate Image Vector Table (IVT) set. HABv4 for i.MX 8M devices can recognize this format and verify the images. By default,
HAB verification is enabled and i.MX chip is in open stage, so failure of HAB verification does not block the boot process. After
closing the chip, only correctly signed images can be executed.
This section covers AHAB used on i.MX 8Quad family devices and HABv4 used on i.MX 8M family devices.
3.1.1 Verifying images with AHAB
AHAB is closely bound with "container". Detailed information about "container" can be found in the Reference Manual of specific
chips. According to the Reference manual, the hash values of multiple firmware and software components are stored in the
container header. The container sign process described below embeds an SRK table in the container and signs the container. The
contents described in the sign process is used to verify the container during the boot time.
For i.MX 8QuadMax MEK and i.MX 8QuadXPlus MEK, "container" is used to organize the SECO firmware, SCU firmware,
Cortex-M4 software, Trusty OS, and U-Boot.
When U-Boot has SPL enabled, three containers are used to organize the images. If SPL is not enabled, two containers are used.
We now distinguish containers by the order of these containers being loaded.
When the U-Boot image used by UUU does not have SPL enabled, two containers are used. The first container only has the
SECO firmware in it, and this container is provided as a binary file and signed by NXP. The second container is constructed
in build time and appended to the first container. The second container contains U-Boot, and it is not signed by default. Take
u-boot-imx8qm-mek-uuu.imx as an example, its high-level layout structure is shown in the following figure.
Figure 3. Layout structure when SPL is not enabled
When U-Boot to be flashed to the board has SPL enabled, three containers are used. The first container only has the SECO
firmware in it, and this container is provided as a binary file and signed by NXP. The second container is constructed in build time
and appended to the first container. This container contains SPL. The third container is also constructed in build time. It contains
i.MX Android™ Security User's Guide, Rev. android-10.0.0_2.6.0, 15 January 2021
User's Guide 4 / 38NXP Semiconductors
Customization work on i.MX Android Security Features
U-Boot proper. The two containers constructed at build time are not signed by default. These three containers are in two files if
dual-bootloader is enabled. For single bootloader condition, taking "u-boot-imx8qm-trusty.imx" of standard Android images as an
example, layout structure is shown in the following figure.
Figure 4. Layout structure when SPL is enabled with single bootloader
For dual-bootloader condition, taking "spl-imx8qm.bin" and "bootloader-imx8qm.img" of Android Automotive as an example, the
layout structure is shown in the following figure.
Figure 5. Layout structure when SPL is enabled with dual bootloaders
To sign the containers constructed in the process of building Android images, perform the following steps:
1. Download Code Signing Tool (CST) from the NXP official website. Decompress the package using the following command:
$ tar zxvf cst-3.1.0.tgz
2. Generate AHAB PKI tree. After the tool package is decompressed, enter the directory of release/keys/, and execute the
following command:
$ ./ahab_pki_tree.sh
i.MX Android™ Security User's Guide, Rev. android-10.0.0_2.6.0, 15 January 2021
User's Guide 5 / 38NXP Semiconductors
Customization work on i.MX Android Security Features
Then enter some parameters based on the output of this script. An example is as follows:
Do you want to use an existing CA key (y/n)?: n
Do you want to use Elliptic Curve Cryptography (y/n)?: y
Enter length for elliptic curve to be used for PKI tree:
Possible values p256, p384, p521: p384
Enter the digest algorithm to use: sha384
Enter PKI tree duration (years): 5
Do you want the SRK certificates to have the CA flag set? (y/n)?: n
After the preceding command is successfully executed, private keys are under the keys/ directory, and public key
certificates are under the crts/ directory.
3. Generate AHAB SRK tables and eFuse hash.
Enter the directory of release/crts/, and execute the following command:
$ ../linux64/bin/srktool -a -s sha384 -t SRK_1_2_3_4_table.bin \
-e SRK_1_2_3_4_fuse.bin -f 1 -c \
SRK1_sha384_secp384r1_v3_usr_crt.pem,\
SRK2_sha384_secp384r1_v3_usr_crt.pem,\
SRK3_sha384_secp384r1_v3_usr_crt.pem,\
SRK4_sha384_secp384r1_v3_usr_crt.pem
After the command is executed successfully, the SRK table and its SHA512 value are generated and saved respectively
in two files under release/crts/.
The SRK table is embedded in the container in the process of signing that container. Therefore, during the boot time, it can
be used to verify the signature. If the signature is authenticated, the hash value of firmware and software images can be
trusted to verify the corresponding firmware and software. The SRK table SHA512 value will be fused to the OTP eFuse
hardware and work as the "secure root key", it is used to verify the SRK table embedded in the container.
Files generated in release/keys/ and /release/crts/ are very important. If the SRK HASH value is fused to the chip and
then the chip is changed from open to close state, the board can only boot with images signed with these files.
If you are a user of both i.MX 8Quad and i.MX 8M devices, use two copies of this CST respectively for two device families,
since this process will generate files with the same names in the same directory, while these files should be prevented from
being overwritten.
4. Build Android images to construct the containers to be signed.
To use AHAB to verify images in SPL, enable "CONFIG_AHAB_BOOT" configurations in the corresponding defconfig files
in U-Boot code. They are not enabled by default. For i.MX 8QuadMax MEK and i.MX 8QuadXPlus MEK, the defconfig files
are listed as follows. Some are used in standard Android platform, and some are used in Android Automotive platform.
imx8qm_mek_androidauto_trusty_defconfig
imx8qm_mek_androidauto_trusty_secure_unlock_defconfig
imx8qxp_mek_androidauto_trusty_defconfig
imx8qxp_mek_androidauto_trusty_secure_unlock_defconfig
imx8qm_mek_androidauto2_trusty_defconfig
imx8qm_mek_androidauto2_trusty_md_defconfig
imx8qxp_mek_androidauto2_trusty_defconfig
imx8qm_mek_android_defconfig
imx8qxp_mek_android_defconfig
imx8qm_mek_android_trusty_defconfig
imx8qm_mek_android_trusty_secure_unlock_defconfig
imx8qxp_mek_android_trusty_defconfig
imx8qxp_mek_android_trusty_secure_unlock_defconfig
i.MX Android™ Security User's Guide, Rev. android-10.0.0_2.6.0, 15 January 2021
User's Guide 6 / 38NXP Semiconductors
Customization work on i.MX Android Security Features
"mkimage_imx8" is used to construct containers. It outputs the layout information of a container on standard output when
constructing it. When building the Android images, save the log information of the build system. For example, execute the
following command:
$ ./imx-make.sh –j12 2>&1 | tee make_android.txt
During the build process, the build system output information is also saved in make_android.txt.
After Android Auto images for i.MX 8QuadMax MEK and i.MX 8QuadXPlus MEK are built, all the files to be signed for
both standard Android and Android Automotive are listed in the following table. The three examples mentioned above can
be categorized into two when signing the images: the image file directly generated by mkimage_imx8 and the image file
not directly generated by mkimage_imx8. Because mkimage_imx8 will output the container layout information into a file
generated by itself, if the image file is directly generated by mkimage_imx8, the layout information parameter can be directly
used. If the final image is assembled with intermediate files generated by mkimage_imx8, the layout information parameters
need to be properly processed before being used.
Table 2. Image files for i.MX 8QuadMax and i.MX 8QuadXPlus
Image file Remark
spl-imx8qm.bin Two containers, one is signed by NXP, and one is not signed, directly generated by
mkimage_imx8.
bootloader-imx8qm.img One container, not signed, directly generated by mkimage_imx8.
spl-imx8qm-secure-unlock.bin Two containers, one is signed by NXP, and one is not signed, directly generated by
mkimage_imx8.
bootloader-imx8qm-secure-unlock.img One container, not signed, directly generated by mkimage_imx8.
spl-imx8qxp.bin Two containers, one is signed by NXP, and one is not signed, directly generated by
mkimage_imx8.
bootloader-imx8qxp.img One container, not signed, directly generated by mkimage_imx8.
spl-imx8qxp-secure-unlock.bin Two containers, one is signed by NXP, and one is not signed, directly generated by
mkimage_imx8.
bootloader-imx8qxp-secure-unlock.img One container, not signed, directly generated by mkimage_imx8.
u-boot-imx8qm-mek-uuu.imx Two containers, one is signed by NXP, and one is not signed, directly generated by
mkimage_imx8.
u-boot-imx8qxp-mek-uuu.imx Two containers, one is signed by NXP, and one is not signed, directly generated by
mkimage_imx8.
u-boot-imx8qm.imx Three containers, one is signed by NXP, and the other two are not signed, assembled
with two files generated by mkimage_imx8.
u-boot-imx8qxp.imx Three containers, one is signed by NXP,and the other two are not signed, assembled
with two files generated by mkimage_imx8.
u-boot-imx8qm-trusty.imx Three containers, one is signed by NXP, and the other two are not signed, assembled
with two files generated by mkimage_imx8.
u-boot-imx8qxp-trusty.imx Three containers, one is signed by NXP, the other two are not signed, assembled
with two files generated by mkimage_imx8.
If SPL is enabled, single bootloader image like "u-boot-imx8qm-trusty.imx" is assembled with two files generated by
mkimage_imx8. In fact, dual bootloader condition keeps these two files separated as you can see in the preceding table,
while single bootloader condition appends one file after another at 1 KB aligned boundary.
i.MX Android™ Security User's Guide, Rev. android-10.0.0_2.6.0, 15 January 2021
User's Guide 7 / 38NXP Semiconductors
Customization work on i.MX Android Security Features
5. Get the layout information of containers in a file.
Layout information is needed when signing the container. To be more specific, it is the offset information of the container
and the container signature block in a file. Code signing tool uses these offsets to locate the container in a file. The layout
information can be found in make_android.txt just generated. With the following principles, the offset of the container to be
signed in a file can be easily found.
The generated files with containers to be signed mentioned before are built based on different U-Boot defconfig files.
Different U-Boot compilation targets with different U-Boot defconfig files can be found in ${MY_ANDROID}/device/fsl/
imx8q/mek_8q/BoardConfig.mk. Android Auto related part is listed below, with some annotations.
# bootloader-imx8qm.img and spl-imx8qm.bin
TARGET_BOOTLOADER_CONFIG := imx8qm:imx8qm_mek_androidauto_trusty_defconfig
# bootloader-imx8qm-secure-unlock.img and spl-imx8qm-secure-unlock.bin
TARGET_BOOTLOADER_CONFIG += imx8qm-secure-
unlock:imx8qm_mek_androidauto_trusty_secure_unlock_defconfig
# bootloader-imx8qxp.img and spl-imx8qxp.bin
TARGET_BOOTLOADER_CONFIG += imx8qxp:imx8qxp_mek_androidauto_trusty_defconfig
# bootloader-imx8qxp-c0.img and spl-imx8qxp-c0.bin
TARGET_BOOTLOADER_CONFIG += imx8qxp-c0:imx8qxp_mek_androidauto_trusty_defconfig
# bootloader-imx8qxp-secure-unlock.img and spl-imx8qxp-secure-unlock.bin
TARGET_BOOTLOADER_CONFIG += imx8qxp-secure-
unlock:imx8qxp_mek_androidauto_trusty_secure_unlock_defconfig
# bootloader-imx8qm.img and spl-imx8qm.bin
TARGET_BOOTLOADER_CONFIG := imx8qm:imx8qm_mek_androidauto2_trusty_defconfig
# bootloader-imx8qm-md.img and spl-imx8qm-md.bin
TARGET_BOOTLOADER_CONFIG += imx8qm-md:imx8qm_mek_androidauto2_trusty_md_defconfig
# bootloader-imx8qxp.img and spl-imx8qxp.bin
TARGET_BOOTLOADER_CONFIG += imx8qxp:imx8qxp_mek_androidauto2_trusty_defconfig
# bootloader-imx8qxp-c0.img and spl-imx8qxp-c0.bin
TARGET_BOOTLOADER_CONFIG += imx8qxp-c0:imx8qxp_mek_androidauto2_trusty_defconfig
# u-boot-imx8qm.imx
TARGET_BOOTLOADER_CONFIG := imx8qm:imx8qm_mek_android_defconfig
# u-boot-imx8qxp.imx
TARGET_BOOTLOADER_CONFIG += imx8qxp:imx8qxp_mek_android_defconfig
# u-boot-imx8qxp-c0.imx
TARGET_BOOTLOADER_CONFIG += imx8qxp-c0:imx8qxp_mek_android_defconfig
# u-boot-imx8qm-trusty.imx
TARGET_BOOTLOADER_CONFIG += imx8qm-trusty:imx8qm_mek_android_trusty_defconfig
# u-boot-imx8qm-trusty-secure-unlock.imx
TARGET_BOOTLOADER_CONFIG += imx8qm-trusty-secure-
unlock:imx8qm_mek_android_trusty_secure_unlock_defconfig
# u-boot-imx8qxp-trusty.imx
TARGET_BOOTLOADER_CONFIG += imx8qxp-trusty:imx8qxp_mek_android_trusty_defconfig
# u-boot-imx8qxp-trusty-c0.imx
TARGET_BOOTLOADER_CONFIG += imx8qxp-trusty-c0:imx8qxp_mek_android_trusty_defconfig
# u-boot-imx8qxp-trusty-secure-unlock.imx
TARGET_BOOTLOADER_CONFIG += imx8qxp-trusty-secure-
unlock:imx8qxp_mek_android_trusty_secure_unlock_defconfig
# u-boot-imx8qm-mek-uuu.imx
TARGET_BOOTLOADER_CONFIG += imx8qm-mek-uuu:imx8qm_mek_android_uuu_defconfig
# u-boot-imx8qxp-mek-uuu.imx
TARGET_BOOTLOADER_CONFIG += imx8qxp-mek-uuu:imx8qxp_mek_android_uuu_defconfig
# u-boot-imx8qxp-mek-c0-uuu.imx
TARGET_BOOTLOADER_CONFIG += imx8qxp-mek-c0-uuu:imx8qxp_mek_android_uuu_defconfig
The defconfig file name can be used to locate the layout information of containers. Search the defconfig file name in
make_android.txt just generated. A line prompts that the build process for that defconfig file has been finished. Container
and container signature block offset can be found in several lines before this line.
i.MX Android™ Security User's Guide, Rev. android-10.0.0_2.6.0, 15 January 2021
User's Guide 8 / 38NXP Semiconductors
Customization work on i.MX Android Security Features
Search the log file for container layout information. For the condition that images to be signed are directly
generated by mkimage_imx8, the container layout information of "u-boot-imx8qm-mek-uuu.imx" with the defconfig file of
"imx8qm_mek_android_uuu_defconfig" like below can be found in the log file. Unrelated lines are ommited and represented
with ellipsis.
CST: CONTAINER 0 offset: 0x400
CST: CONTAINER 0: Signature Block: offset is at 0x590
...
=================== Finish building imx8qm-mek-
uuu:imx8qm_mek_android_uuu_defconfig ===================
The container layout information of "bootloader-imx8qm.img" and "spl-imx8qm.bin" with the defconfig file of
"imx8qm_mek_androidauto_trusty_defconfig" like below can be found in the log file. The layout information of the first two
lines is for "bootloader-imx8qm.im", and the information in the following two lines are for "spl-imx8qm.bin".
CST: CONTAINER 0 offset: 0x0
CST: CONTAINER 0: Signature Block: offset is at 0x190
...
CST: CONTAINER 0 offset: 0x400
CST: CONTAINER 0: Signature Block: offset is at 0x610
...
=================== Finish building
imx8qm:imx8qm_mek_androidauto_trusty_defconfig ===================
For the condition that images to be signed are not directly generated by mkimage_imx8 , taking "u-boot-imx8qm-trusty.imx"
with the defconfig file of "imx8qm_mek_android_trusty_defconfig" as an example, the following information should be
retrieved in the log file. The first two lines are for the intermediate file "u-boot-atf-container.img". This file is the third
container that has Arm Trusted Firmware and U-Boot proper in it. The layout information in the following two lines are for
another intermediate file that has the second container in it. This intermediate file will be padded to 1 KB aligned boundary.
Then "u-boot-atf-container.img" is appended to this file. Therefore, the second two lines can be directly used, while the first
two lines should be added with an offset, which is 388 KB, 0x61000 in hexadecimal. Then the offset of the third container
in the final "u-boot-imx8qm-trusty.imx" is 0x61000. Its signature offset in the file is 0x61000+0x190=0x61190.
CST: CONTAINER 0 offset: 0x0
CST: CONTAINER 0: Signature Block: offset is at 0x190
...
CST: CONTAINER 0 offset: 0x400
CST: CONTAINER 0: Signature Block: offset is at 0x610
...
append u-boot-atf-container.img at 388 KB
...
=================== Finish building imx8qm-
trusty:imx8qm_mek_android_trusty_defconfig ===================
The same method can be used on other targets. The targets for UUU generates one file with one set of offset values. All
offset values can be found and a summary is in the following table.
Table 3. Container offset information
Files having container to be signed Container offset in the file Container signature block offset
bootloader-imx8qm.img 0x0 0x190
spl-imx8qm.bin 0x400 0x610
Table continues on the next page...
i.MX Android™ Security User's Guide, Rev. android-10.0.0_2.6.0, 15 January 2021
User's Guide 9 / 38NXP Semiconductors
Customization work on i.MX Android Security Features
Table 3. Container offset information (continued)
Files having container to be signed Container offset in the file Container signature block offset
u-boot-imx8qm-mek-uuu.imx 0x400 0x590
u-boot-imx8qm-trusty.imx 0x4000x61000 0x6100x61190
6. Sign the image files.
Copy the files to be signed to the directory of release/linux64/bin/ in Code Signing Tool (CST) directory. The binary
file named cst is used to sign these files. This cst needs the CSF description file to be provided as an input file when it
is executed. CSF examples are in the directory of ${MY_ANDROID}/vendor/nxp-opensource/uboot-imx/doc/imx/ahab/
csf_examples/. We copy one cst_uboot_atf.txt to CST release/linux64/bin/.
Make some changes to the cst_uboot_atf.txt just copied based on the image to sign. For the condition that images to
be signed are directly generated by mkimage_imx8, taking "u-boot-imx8qm-mek-uuu.imx" as an example, the modification
is as follows:
@@ -4,9 +4,9 @@ Version = 1.0
[Install SRK]
# SRK table generated by srktool
-File = "../crts/SRK_1_2_3_4_table.bin"
+File = "../../crts/SRK_1_2_3_4_table.bin"
# Public key certificate in PEM format on this example only using SRK key
-Source = "../crts/SRK1_sha384_secp384r1_v3_usr_crt.pem"
+Source = "../../crts/SRK1_sha384_secp384r1_v3_usr_crt.pem"
# Index of the public key certificate within the SRK table (0 .. 3)
Source index = 0
# Type of SRK set (NXP or OEM)
@@ -16,6 +16,6 @@ Revocations = 0x0
[Authenticate Data]
# Binary to be signed generated by mkimage
-File = "u-boot-atf-container.img"
+File = "u-boot-imx8qm-mek-uuu.imx"
# Offsets = Container header Signature block (printed out by mkimage)
-Offsets = 0x0 0x110
+Offsets = 0x400 0x590
Then execute the command below:
$ ./cst -i cst_uboot_atf.txt -o signed-u-boot-imx8qm-mek-uuu.imx
With preceding command successfully executed, signed-u-boot-imx8qm-mek-uuu.imx is generated. Copy it back to
the output directory, and change its name as before, since uuu_imx_android_flash script flashes images based on
their names.
Based on the description of signing "u-boot-imx8qm-mek-uuu.imx", sign all the other images directly generated by
mkimage_imx8 like "bootloader-imx8qm.img", "spl-imx8qm.bin", etc. Signing process of images not directly generated by
mkimage_imx8 is a bit different. It should be signed twice. Taking "u-boot-imx8qm-trusty.imx" as an example, first make the
following change to the original "cst_uboot_atf.txt":
@@ -4,9 +4,9 @@ Version = 1.0
[Install SRK]
# SRK table generated by srktool
-File = "../crts/SRK_1_2_3_4_table.bin"
+File = "../../crts/SRK_1_2_3_4_table.bin"
i.MX Android™ Security User's Guide, Rev. android-10.0.0_2.6.0, 15 January 2021
User's Guide 10 / 38NXP Semiconductors
Customization work on i.MX Android Security Features
# Public key certificate in PEM format on this example only using SRK key
-Source = "../crts/SRK1_sha384_secp384r1_v3_usr_crt.pem"
+Source = "../../crts/SRK1_sha384_secp384r1_v3_usr_crt.pem"
# Index of the public key certificate within the SRK table (0 .. 3)
Source index = 0
# Type of SRK set (NXP or OEM)
@@ -16,6 +16,6 @@ Revocations = 0x0
[Authenticate Data]
# Binary to be signed generated by mkimage
-File = "u-boot-atf-container.img"
+File = "u-boot-imx8qm-trusty.imx"
# Offsets = Container header Signature block (printed out by mkimage)
-Offsets = 0x0 0x110
+Offsets = 0x400 0x610
Then execute the command below:
$ ./cst -i cst_uboot_atf.txt -o first_signed_u-boot-imx8qm-trusty.imx
Apply the following change on the "cst_uboot_atf.txt" as below to do the second sign
@@ -16,6 +16,6 @@ Revocations = 0x0
[Authenticate Data]
# Binary to be signed generated by mkimage
-File = "u-boot-imx8qm-trusty.imx"
+File = "first_signed_u-boot-imx8qm-trusty.imx"
# Offsets = Container header Signature block (printed out by mkimage)
-Offsets = 0x400 0x610
+Offsets = 0x61000 0x61190
And exeucte the command below:
$ ./cst -i cst_uboot_atf.txt -o second_signed_u-boot-imx8qm-trusty.imx
With preceding command successfully executed, "second_signed_u-boot-imx8qm-trusty.imx" is generated, copy it back to
the output directory, and change its name as before. All the images not directly generated by mkimage_imx8 can be signed
with preceding method. SPL enabled single bootloader images can be signed with this method.
Images are signed now. When booting with signed images, SRK table embedded in image file is used to verify the signature.
Embedded SRK table is verified based on its hash value. The hash value is programed in OTP efuse in i.MX chips, so it is
not tempered by others. Perform the following steps to fuse the SRK hash value.
7. Dump the SRK hash value.
Change the directory to release/crts/ in Code Signing Tool (CST). Execute the following command to dump the SRK
hash value:
$ od -t x4 SRK_1_2_3_4_fuse.bin
0000000 d436cc46 8ecccda9 b89e1601 5fada3db
0000020 d454114a b6cd51f4 77384870 c50ee4b2
0000040 a27e5132 eba887cf 592c1e2b bb501799
0000060 ee702e07 cf8ce73e fb55e2d5 eba6bbd2
8. Use the U-Boot fuse command to fuse the hash value to a chip.
Because the fuse command is removed from U-Boot for Android Auto images to shorten the boot time, we use UUU to load
the U-Boot used by UUU to RAM, and then use the fuse command.
Change the board to serial download mode, and execute the following command to download U-Boot to RAM. It then enters
fastboot mode.
i.MX Android™ Security User's Guide, Rev. android-10.0.0_2.6.0, 15 January 2021
User's Guide 11 / 38NXP Semiconductors
Customization work on i.MX Android Security Features
For i.MX 8QuadMax, it is as follows:
$ sudo ./uuu_imx_android_flash.sh -f imx8qm -i
For i.MX 8QuadXPlus, it is as follows:
$ sudo ./uuu_imx_android_flash.sh -f imx8qxp -i
With the commands above executed, U-Boot used by UUU under the current working directory is loaded to RAM on board
and it enters fastboot mode.
On the U-Boot console, it shows that U-Boot is in fastboot mode. Press "CTRL+C" to exit fastboot mode and enter U-Boot
command mode.
For i.MX 8QuadMax, execute the following commands on the U-Boot console:
=> fuse prog 0 722 0xd436cc46
=> fuse prog 0 723 0x8ecccda9
=> fuse prog 0 724 0xb89e1601
=> fuse prog 0 725 0x5fada3db
=> fuse prog 0 726 0xd454114a
=> fuse prog 0 727 0xb6cd51f4
=> fuse prog 0 728 0x77384870
=> fuse prog 0 729 0xc50ee4b2
=> fuse prog 0 730 0xa27e5132
=> fuse prog 0 731 0xeba887cf
=> fuse prog 0 732 0x592c1e2b
=> fuse prog 0 733 0xbb501799
=> fuse prog 0 734 0xee702e07
=> fuse prog 0 735 0xcf8ce73e
=> fuse prog 0 736 0xfb55e2d5
=> fuse prog 0 737 0xeba6bbd2
For i.MX 8QuadXPlus, execute the following commands on the U-Boot console:
=> fuse prog 0 730 0xd436cc46
=> fuse prog 0 731 0x8ecccda9
=> fuse prog 0 732 0xb89e1601
=> fuse prog 0 733 0x5fada3db
=> fuse prog 0 734 0xd454114a
=> fuse prog 0 735 0xb6cd51f4
=> fuse prog 0 736 0x77384870
=> fuse prog 0 737 0xc50ee4b2
=> fuse prog 0 738 0xa27e5132
=> fuse prog 0 739 0xeba887cf
=> fuse prog 0 740 0x592c1e2b
=> fuse prog 0 741 0xbb501799
=> fuse prog 0 742 0xee702e07
=> fuse prog 0 743 0xcf8ce73e
=> fuse prog 0 744 0xfb55e2d5
=> fuse prog 0 745 0xeba6bbd2
Now, images are signed and SRK hash value is fused. The images can be flashed to boards. For how to flash i.MX Android
images, see the Android™ Release Notes (ARN).
i.MX Android™ Security User's Guide, Rev. android-10.0.0_2.6.0, 15 January 2021
User's Guide 12 / 38NXP Semiconductors
Customization work on i.MX Android Security Features
The chip is now in open stage, and verification failure does not block the boot process. To make sure that SRK hash value
is correctly fused and images are correctly signed, check the SECO event during boot. After "CONFIG_AHAB_BOOT"
is enabled in the defconfig file of U-Boot, use a U-Boot command to check the SECO events. After images are signed
and SRK hash value is programed, boot the board to U-Boot command mode. On the U-Boot console, execute the
following command:
=> ahab_status
If preceding command outputs the SECO event, use the following code to check whether it is related to AHAB verification.
0x0087EE00 = The container image is not signed.
0x0087FA00 = The container image was signed with wrong key that is not matching the OTP
SRK hashes.
For example, if the SRK hash value is programed, but images are not signed, after ahab_status is executed, the following
prompt is displayed on the console:
=> ahab_status
Lifecycle: 0x0020, NXP closed
SECO Event[0] = 0x0087EE00
CMD = AHAB_AUTH_CONTAINER_REQ (0x87)
IND = AHAB_NO_AUTHENTICATION_IND (0xEE)
SECO Event[1] = 0x0087EE00
CMD = AHAB_AUTH_CONTAINER_REQ (0x87)
IND = AHAB_NO_AUTHENTICATION_IND (0xEE)
After it is confirmed that the SRK hash value is correctly fused, and signed images do not cause AHAB related SECO
events, execute the following command on the U-Boot console to close the chip:
=> ahab_close
Note that this close operation is irreversible to the chips and the closed chips does not boot up if AHAB verification fails.
3.1.2 Verifying images with HABv4
HABv4 verifies images based on Image Vector Table (IVT) and Flattened Image Tree (FIT). Detailed information of the boot image
format can be found in the Reference Manual of specific chips. According to the Reference manual, the sign process described
below embeds the Command Sequence File (CSF) generated by code signing tool in the final image. The CSF is used to verify
the images during the boot time.
To sign the images for i.MX 8M devices, perform the following steps:
1. Download Code Signing Tool (CST) from NXP official website.
Decompress the package with the following command:
$ tar zxvf cst-3.1.0.tgz
2. Generate the HABv4 PKI tree.
After the tool package is decompressed, enter the directory of release/keys/, and execute the following command:
./hab4_pki_tree.sh
i.MX Android™ Security User's Guide, Rev. android-10.0.0_2.6.0, 15 January 2021
User's Guide 13 / 38NXP Semiconductors
Customization work on i.MX Android Security Features
Then enter some parameters based on the output of this script. An example is as follows:
Do you want to use an existing CA key (y/n)?: n
Do you want to use Elliptic Curve Cryptography (y/n)?: n
Enter key length in bits for PKI tree: 2048
Enter PKI tree duration (years): 5
How many Super Root Keys should be generated? 4
Do you want the SRK certificates to have the CA flag set? (y/n)?: y
3. Generate AHAB SRK tables and eFuse hash.
Enter the directory of release/crts/, and execute the following command:
$ ../linux64/bin/srktool -h 4 -t SRK_1_2_3_4_table.bin -e \
SRK_1_2_3_4_fuse.bin -d sha256 -c \
SRK1_sha256_2048_65537_v3_ca_crt.pem,\
SRK2_sha256_2048_65537_v3_ca_crt.pem,\
SRK3_sha256_2048_65537_v3_ca_crt.pem,\
SRK4_sha256_2048_65537_v3_ca_crt.pem
After the preceding commands are executed successfully. The SRK table and its SHA256 value is generated and saved
respectively in two files under release/crts/.
The SRK table is embedded in the CSF. Therefore, during the boot time, it can be used to verify the signature. The SRK
table SHA256 value is fused to the OTP eFuse hardware and works as the "secure root key". It is used to verify the SRK
table in CSF.
Files generated in "release/keys/" and "/release/crts/" are very important. If the SRK HASH value is fused to the chip and
then changes the chip from open to close state, the board can only boot with images signed with these files.
If you are a user of both i.MX 8Quad and i.MX 8M devices, use two copies of this CST respectively for two device families,
since this process generates files with the same names in the same directory, while these files should be prevented from
being overwritten.
4. Build Android images to generate the file to be signed.
To support HAB features, enable "CONFIG_IMX_HAB" configurations in the corresponding defconfig files in U-Boot code.
They are not enabled by default. Taking i.MX 8M Mini EVK and i.MX 8M Nano EVK as an example, the files are:
imx8mm_evk_android_defconfig
imx8mm_evk_android_dual_defconfig
imx8mm_evk_android_trusty_defconfig
imx8mm_evk_android_trusty_secure_unlock_defconfig
imx8mm_evk_android_trusty_dual_defconfig
imx8mm_evk_android_uuu_defconfig
Layout information of the final U-Boot image is needed during the signing process. When building the Android images, save
the log information of build system. For example, execute the following command:
$ ./imx-make.sh –j12 2>&1 | tee make_android.txt
During the build process, the build system output information is also saved in make_android.txt.
5. Get the layout information of the file to be signed.
i.MX Android™ Security User's Guide, Rev. android-10.0.0_2.6.0, 15 January 2021
User's Guide 14 / 38NXP Semiconductors
Customization work on i.MX Android Security Features
Final U-Boot image files are generated with different U-Boot defconfig files. Taking i.MX 8M Mini as an example, different
U-Boot compilation targets with different U-Boot defconfig files can be found in ${MY_ANDROID}/device/fsl/imx8m/
evk_8mm/BoardConfig.mk. They are listed below with some annotations.
TARGET_BOOTLOADER_CONFIG := imx8mm:imx8mm_evk_android_defconfig
TARGET_BOOTLOADER_CONFIG += imx8mm-dual:imx8mm_evk_android_dual_defconfig
TARGET_BOOTLOADER_CONFIG += imx8mm-trusty:imx8mm_evk_android_trusty_defconfig
TARGET_BOOTLOADER_CONFIG += imx8mm-trusty-secure-
unlock:imx8mm_evk_android_trusty_secure_unlock_defconfig
TARGET_BOOTLOADER_CONFIG += imx8mm-trusty-dual:imx8mm_evk_android_trusty_dual_defconfig
TARGET_BOOTLOADER_CONFIG += imx8mm-evk-uuu:imx8mm_evk_android_uuu_defconfig
Search the defconfig file name in the log of make_android.txt just generated for a line prompt that the build process for
that defconfig file is finished. The layout information needed in the signing process is several lines before that. The layout
information needs to be categorized based on whether dual-bootloader is enabled. The defconfig files with "dual" substring
in their names have dual-bootloader enabled. On the contrary, the ones without "dual" substring in their names do not
enable dual-bootloader.
For the single bootloader condition, take "imx8mm_evk_android_uuu_defconfig" as an example. Its corresponding output
file is "u-boot-imx8mm-evk-uuu.imx". The lines directly related to the layout info of this output file are listed below, and
unrelated lines are ommited and represented with ellipsis.
Loader IMAGE:
...
csf_off 0x2d600
spl hab block: 0x7e0fc0 0x0 0x2d600
...
Second Loader IMAGE:
...
sld_csf_off 0x58c20
sld hab block: 0x401fcdc0 0x57c00 0x1020
...
0x40200000 0x5AC00 0xAE710
0x402AE710 0x109310 0x8630
0x920000 0x111940 0x91D0
...
=================== Finish building imx8mm-evk-
uuu:imx8mm_evk_android_uuu_defconfig ===================
For the dual-bootloader condition, take "imx8mm_evk_android_trusty_dual_defconfig" as an example. Its corresponding
output files are "spl-imx8mm-trusty-dual.bin" and "bootloader-imx8mm-trusty-dual.img". The lines directly related to the
layout info of this output file are listed below, and unrelated lines are ommited and represented with ellipsis.
Loader IMAGE:
...
csf_off 0x2d600
spl hab block: 0x7e0fc0 0x0 0x2d600
...
Second Loader IMAGE:
...
sld_csf_off 0x58c20
sld hab block: 0x401fcdc0 0x57c00 0x1020
...
0x40200000 0x5AC00 0xAE710
0x402AE710 0x109310 0x8630
0x920000 0x111940 0x91D0
i.MX Android™ Security User's Guide, Rev. android-10.0.0_2.6.0, 15 January 2021
User's Guide 15 / 38NXP Semiconductors
Customization work on i.MX Android Security Features
...
=================== Finish building imx8mm-evk-
uuu:imx8mm_evk_android_uuu_defconfig ===================
The same method of retrieving the layout information can be used on other targets.
6. Sign the image files.
Copy the files to be signed to the directory of release/linux64/bin/ in Code Signing Tool (CST) directory. The binary file
named CST is used to sign these files. This CST needs CSF description file to be as an input file when it is executed. CSF
examples are in the directory of ${MY_ANDROID}/vendor/nxp-opensource/uboot-imx/doc/imx/habv4/csf_examples/
mx8m_mx8mm/. Copy "csf_fit.txt" and "csf_spl.txt" to Code Signing Tool (CST) release/linux64/bin/. The file to be signed
also needs to be copied to this directory. The signing process is different between single bootloader condition and
dual-bootloader condition. The examples of the two conditions are described together in this section, but in practice,
different U-Boot target files should be signed with the following steps one by one.
For the single bootloader example with "imx8mm_evk_android_uuu_defconfig" defconfig file, make the following
modifications on the "csf_fit.txt" and "csf_spl.txt" just copied.
diff --git a/csf_fit.txt b/csf_fit.txt
index d9218ab..dfd0ded 100644
--- a/csf_fit.txt
+++ b/csf_fit.txt
@@ -8,12 +8,12 @@
[Install SRK]
# Index of the key location in the SRK table to be installed
- File = "../crts/SRK_1_2_3_4_table.bin"
+ File = "../../crts/SRK_1_2_3_4_table.bin"
Source index = 0
[Install CSFK]
# Key used to authenticate the CSF data
- File = "../crts/CSF1_1_sha256_2048_65537_v3_usr_crt.pem"
+ File = "../../crts/CSF1_1_sha256_2048_65537_v3_usr_crt.pem"
[Authenticate CSF]
@@ -23,14 +23,14 @@
# Target key slot in HAB key store where key will be installed
Target index = 2
# Key to install
- File = "../crts/IMG1_1_sha256_2048_65537_v3_usr_crt.pem"
+ File = "../../crts/IMG1_1_sha256_2048_65537_v3_usr_crt.pem"
[Authenticate Data]
# Key slot index used to authenticate the image data
Verification index = 2
# Authenticate Start Address, Offset, Length and file
- Blocks = 0x401fcdc0 0x057c00 0x01020 "flash.bin", \
- 0x40200000 0x05AC00 0x9AAC8 "flash.bin", \
- 0x00910000 0x0F56C8 0x09139 "flash.bin", \
- 0xFE000000 0x0FE804 0x4D268 "flash.bin", \
- 0x4029AAC8 0x14BA6C 0x06DCF "flash.bin"
+ Blocks = 0x401fcdc0 0x57c00 0x1020 "u-boot-imx8mm-evk-uuu.imx", \
+ 0x40200000 0x5AC00 0xAE710 "u-boot-imx8mm-evk-uuu.imx", \
+ 0x402AE710 0x109310 0x8630 "u-boot-imx8mm-evk-uuu.imx", \
+ 0x920000 0x111940 0x91D0 "u-boot-imx8mm-evk-uuu.imx"
diff --git a/csf_spl.txt b/csf_spl.txt
index 39adf7a..80165a8 100644
--- a/csf_spl.txt
+++ b/csf_spl.txt
@@ -8,12 +8,12 @@
[Install SRK]
i.MX Android™ Security User's Guide, Rev. android-10.0.0_2.6.0, 15 January 2021
User's Guide 16 / 38NXP Semiconductors
Customization work on i.MX Android Security Features
# Index of the key location in the SRK table to be installed
- File = "../crts/SRK_1_2_3_4_table.bin"
+ File = "../../crts/SRK_1_2_3_4_table.bin"
Source index = 0
[Install CSFK]
# Key used to authenticate the CSF data
- File = "../crts/CSF1_1_sha256_2048_65537_v3_usr_crt.pem"
+ File = "../../crts/CSF1_1_sha256_2048_65537_v3_usr_crt.pem"
[Authenticate CSF]
[Unlock]
# Leave Job Ring and DECO master ID registers Unlocked
Engine = CAAM
- Features = MID
+ Features = MID, MFG
[Install Key]
# Key slot index used to authenticate the key to be installed
@@ -28,10 +28,10 @@
# Target key slot in HAB key store where key will be installed
Target index = 2
# Key to install
- File = "../crts/IMG1_1_sha256_2048_65537_v3_usr_crt.pem"
+ File = "../../crts/IMG1_1_sha256_2048_65537_v3_usr_crt.pem"
[Authenticate Data]
# Key slot index used to authenticate the image data
Verification index = 2
# Authenticate Start Address, Offset, Length and file
- Blocks = 0x7e0fc0 0x1a000 0x2a600 "flash.bin"
+ Blocks = 0x7e0fc0 0x0 0x2d600 "u-boot-imx8mm-evk-uuu.imx"
For the dual-bootloader example with "imx8mm_evk_android_trusty_dual_defconfig" defconfig file, make the following
modifications on the "csf_fit.txt" and "csf_spl.txt" just copied.
diff --git a/csf_fit.txt b/csf_fit.txt
index d9218ab..dfd0ded 100644
--- a/csf_fit.txt
+++ b/csf_fit.txt
@@ -8,12 +8,12 @@
[Install SRK]
# Index of the key location in the SRK table to be installed
- File = "../crts/SRK_1_2_3_4_table.bin"
+ File = "../../crts/SRK_1_2_3_4_table.bin"
Source index = 0
[Install CSFK]
# Key used to authenticate the CSF data
- File = "../crts/CSF1_1_sha256_2048_65537_v3_usr_crt.pem"
+ File = "../../crts/CSF1_1_sha256_2048_65537_v3_usr_crt.pem"
[Authenticate CSF]
@@ -23,14 +23,14 @@
# Target key slot in HAB key store where key will be installed
Target index = 2
# Key to install
- File = "../crts/IMG1_1_sha256_2048_65537_v3_usr_crt.pem"
+ File = "../../crts/IMG1_1_sha256_2048_65537_v3_usr_crt.pem"
[Authenticate Data]
# Key slot index used to authenticate the image data
Verification index = 2
# Authenticate Start Address, Offset, Length and file
- Blocks = 0x401fcdc0 0x057c00 0x01020 "flash.bin", \
- 0x40200000 0x05AC00 0x9AAC8 "flash.bin", \
i.MX Android™ Security User's Guide, Rev. android-10.0.0_2.6.0, 15 January 2021
User's Guide 17 / 38NXP Semiconductors
Customization work on i.MX Android Security Features
- 0x00910000 0x0F56C8 0x09139 "flash.bin", \
- 0xFE000000 0x0FE804 0x4D268 "flash.bin", \
- 0x4029AAC8 0x14BA6C 0x06DCF "flash.bin"
+ Blocks = 0x401fcdc0 0x0 0x1020 "bootloader-imx8mm-trusty-dual.img", \
+ 0x40200000 0x3000 0xAF2D0 "bootloader-imx8mm-trusty-dual.img", \
+ 0x402AF2D0 0xB22D0 0x8630 "bootloader-imx8mm-trusty-dual.img", \
+ 0x920000 0xBA900 0xA1D0 "bootloader-imx8mm-trusty-dual.img", \
+ 0xBE000000 0xC4AD0 0x164C50 "bootloader-imx8mm-trusty-dual.img"
diff --git a/csf_spl.txt b/csf_spl.txt
index 39adf7a..80165a8 100644
--- a/csf_spl.txt
+++ b/csf_spl.txt
@@ -8,12 +8,12 @@
[Install SRK]
# Index of the key location in the SRK table to be installed
- File = "../crts/SRK_1_2_3_4_table.bin"
+ File = "../../crts/SRK_1_2_3_4_table.bin"
Source index = 0
[Install CSFK]
# Key used to authenticate the CSF data
- File = "../crts/CSF1_1_sha256_2048_65537_v3_usr_crt.pem"
+ File = "../../crts/CSF1_1_sha256_2048_65537_v3_usr_crt.pem"
[Authenticate CSF]
[Unlock]
# Leave Job Ring and DECO master ID registers Unlocked
Engine = CAAM
- Features = MID
+ Features = MID, MFG
[Install Key]
# Key slot index used to authenticate the key to be installed
@@ -28,10 +28,10 @@
# Target key slot in HAB key store where key will be installed
Target index = 2
# Key to install
- File = "../crts/IMG1_1_sha256_2048_65537_v3_usr_crt.pem"
+ File = "../../crts/IMG1_1_sha256_2048_65537_v3_usr_crt.pem"
[Authenticate Data]
# Key slot index used to authenticate the image data
Verification index = 2
# Authenticate Start Address, Offset, Length and file
- Blocks = 0x7e0fc0 0x1a000 0x2a600 "flash.bin"
+ Blocks = 0x7e0fc0 0x0 0x34200 "spl-imx8mm-trusty-dual.bin"
Execute the following commands to generate CSF with the CSF description file. They are the same for single bootloader
condition and dual-bootloader condition.
$ ./cst --i=csf_spl.txt --o=csf_spl.bin
$ ./cst --i=csf_fit.txt --o=csf_fit.bin
Execute the following commands to embed the CSF into the U-Boot image.
# For the single bootloader example with "imx8mm_evk_android_uuu_defconfig" defconfig file
$ dd if=csf_spl.bin of=u-boot-imx8mm-evk-uuu.imx seek=$((0x2d600)) bs=1 conv=notrunc
$ dd if=csf_fit.bin of=u-boot-imx8mm-evk-uuu.imx seek=$((0x58c20)) bs=1 conv=notrunc
# For the dual bootloader example with "imx8mm_evk_android_trusty_dual_defconfig" defconfig file
$ dd if=csf_spl.bin of=spl-imx8mm-trusty-dual.bin seek=$((0x34200)) bs=1 conv=notrunc
$ dd if=csf_fit.bin of=bootloader-imx8mm-trusty-dual.img seek=$((0x1020)) bs=1 conv=notrunc
i.MX Android™ Security User's Guide, Rev. android-10.0.0_2.6.0, 15 January 2021
User's Guide 18 / 38NXP Semiconductors
Customization work on i.MX Android Security Features
With preceding commands successfully executed, "u-boot-imx8mm-evk-uuu.imx" or "spl-imx8mm-trusty-dual.bin" and
"=bootloader-imx8mm-trusty-dual.img" are well signed. Then sign other images according to the description of the
signing process.
Image are signed now. When booting with signed images, the SRK table embedded in the image file is used to verify the
signature. Embedded SRK table is verified based on its hash value. The hash value is programed in OTP eFuse in i.MX
chips, so it is not affected by others. The way to fuse SRK hash value will be described.
7. Dump the SRK hash value.
Change directory to release/crts/ in Code Signing Tool (CST). Execute the following command to dump the SRK
hash value:
hexdump -e '/4 "0x"' -e '/4 "%X""\n"' SRK_1_2_3_4_fuse.bin
0x20593752
0x6ACE6962
0x26E0D06C
0xFC600661
0x1240E88F
0x1209F144
0x831C8117
0x1190FD4D
8. Use the U-Boot fuse command to fuse the hash value to a chip.
Flash the image just signed to the board, and then boot to U-Boot command mode, and execute the following command
to fuse the SRK hash value. This is the same for i.MX 8M Mini, i.MX 8M Nano, i.MX 8M Quad, and i.MX 8M Plus.
fuse prog -y 6 0 0x20593752 0x6ACE6962 0x26E0D06C 0xFC600661
fuse prog -y 7 0 0x1240E88F 0x1209F144 0x831C8117 0x1190FD4D
Now, images are signed, and the SRK hash value is fused. The chip is in open stage, and the verification failure does not
block the boot process. One way to make sure that the SRK hash value is correctly fused and images are correctly signed
is to check HAB events and U-Boot log. Reboot the board to U-Boot command board and execute the following command:
=> hab_status
Make sure there is no HAB EVENT reported. Before SPL invokes HAB to verify the FIT part, it first validates the CSF. Make
sure there is no CSF related error as follows in the boot log.
Error: CSF header command not found
After it is confirmed that the SRK hash value is correctly fused, and signed images do not cause HAB event, execute the
following command on the U-Boot console to close the chip.
=> fuse prog -y 1 3 0x2000000
This close operation is irreversible to the chips and closed chips do not boot up if HABv4 verification fails.
3.2 Configurations on TEE
i.MX Android™ Security User's Guide, Rev. android-10.0.0_2.6.0, 15 January 2021
User's Guide 19 / 38NXP Semiconductors
Customization work on i.MX Android Security Features
3.2.1 Memory region configuration in ATF
The TEE binary is loaded to DRAM at the address of $BL32_BASE by SPL. By default, the load address $BL32_BASE is
defined as 0xFE000000. It is specified during the process of generating the bootloader image with imx-mkimage. For example,
you can specify the load address as 0xFF000000 for i.MX 8QuadMax and i.MX 8QuadXPlus in ${MY_ANDROID}/vendor/
nxp-opensource/imx-mkimage as follows:
diff --git a/iMX8QM/soc.mak b/iMX8QM/soc.mak
index 355851e..fe70191 100644
--- a/iMX8QM/soc.mak
+++ b/iMX8QM/soc.mak
@@ -82,7 +82,7 @@ u-boot-atf-container.img: bl31.bin u-boot-hash.bin
fi
if [ -f "tee.bin" ]; then \
if [ $(shell echo $(ROLLBACK_INDEX_IN_CONTAINER)) ]; then \
- ./$(MKIMG) -soc QM -sw_version $(ROLLBACK_INDEX_IN_CONTAINER) -rev B0 -c -ap bl31.bin
a53 0x80000000 -ap u-boot-hash.bin a53 0x80020000 -ap tee.bin a53 0xFE000000 -out u-boot-atf-
container.img; \
+ ./$(MKIMG) -soc QM -sw_version $(ROLLBACK_INDEX_IN_CONTAINER) -rev B0 -c -ap bl31.bin
a53 0x80000000 -ap u-boot-hash.bin a53 0x80020000 -ap tee.bin a53 0xFF000000 -out u-boot-atf-
container.img; \
else \
./$(MKIMG) -soc QM -rev B0 -c -ap bl31.bin a53 0x80000000 -ap u-boot-hash.bin a53 0x80020000
-ap tee.bin a53 0xFE000000 -out u-boot-atf-container.img; \
fi; \
diff --git a/iMX8QX/soc.mak b/iMX8QX/soc.mak
index 56422e0..d917dc3 100644
--- a/iMX8QX/soc.mak
+++ b/iMX8QX/soc.mak
@@ -73,7 +73,7 @@ u-boot-atf.itb: u-boot-hash.bin bl31.bin
u-boot-atf-container.img: bl31.bin u-boot-hash.bin
if [ -f tee.bin ]; then \
if [ $(shell echo $(ROLLBACK_INDEX_IN_CONTAINER)) ]; then \
- ./$(MKIMG) -soc QX -sw_version $(ROLLBACK_INDEX_IN_CONTAINER) -rev B0 -c -ap bl31.bin
a35 0x80000000 -ap u-boot-hash.bin a35 0x80020000 -ap tee.bin a35 0xFE000000 -out u-boot-atf-
container.img; \
+ ./$(MKIMG) -soc QX -sw_version $(ROLLBACK_INDEX_IN_CONTAINER) -rev B0 -c -ap bl31.bin
a35 0x80000000 -ap u-boot-hash.bin a35 0x80020000 -ap tee.bin a35 0xFF000000 -out u-boot-atf-
container.img; \
else \
./$(MKIMG) -soc QX -rev B0 -c -ap bl31.bin a35 0x80000000 -ap u-boot-hash.bin a35 0x80020000
-ap tee.bin a35 0xFE000000 -out u-boot-atf-container.img; \
fi; \
After loading the TEE binary to DRAM, the ATF tries to kick it at the address of $BL32_BASE with the size of $BL32_SIZE, which are
defined in ${MY_ANDROID}/vendor/nxp-opensource/arm-trusted-firmware/plat/imx/$(PLAT)/include/platform_def.h.
By default, $BL32_BASE is defined as 0xFE000000 and $BL32_SIZE is 0x02000000, but you can configure them as needed. For
example, $BL32_BASE can be configured as 0xFF000000 and $BASE_SIZE can be configured as 0x03000000 for i.MX 8QuadMax
and i.MX 8QuadXPlus as follows:
diff --git a/plat/imx/imx8qm/include/platform_def.h b/plat/imx/imx8qm/include/platform_def.h
index b305bfc..6f9f7d4 100644
--- a/plat/imx/imx8qm/include/platform_def.h
+++ b/plat/imx/imx8qm/include/platform_def.h
@@ -37,8 +37,8 @@
#define BL31_LIMIT 0x80020000
#ifdef TEE_IMX8
-#define BL32_BASE 0xfe000000
-#define BL32_SIZE 0x02000000
i.MX Android™ Security User's Guide, Rev. android-10.0.0_2.6.0, 15 January 2021
User's Guide 20 / 38You can also read