Installation and Update Instructions for IUCLID 6 Server - Europa EU
←
→
Page content transcription
If your browser does not render page correctly, please read the page content below

Installation and Update Instructions for IUCLID 6 Server
Installation and Update Instructions for IUCLID 6 Server                                            i

Legal Notice
The information in this document does not constitute legal advice. Usage of the information
remains under the sole responsibility of the user. The European Chemicals Agency does not
accept any liability with regard to the use that may be made of the information contained in this
document.

Title:          Installation and Update Instructions for IUCLID 6 Server
Issue date:     November 2020
Language:       en

IUCLID 6 is developed by the European Chemicals Agency in association with the OECD.
© European Chemicals Agency, 2020
Reproduction is authorised provided the source is fully acknowledged in the form
“Source: European Chemicals Agency, http://echa.europa.eu/”, and provided written notification is
given to the ECHA Communication Unit (publications@echa.europa.eu).
If you have questions or comments in relation to this document, please send them to ECHA via the
information request form at the address below, quoting the reference and issue date given above:
https://echa.europa.eu/contact

European Chemicals Agency
Mailing address: P.O. Box 400, FI-00121 Helsinki, Finland
Visiting address: Telakkakatu 6, Helsinki, Finland
Installation and Update Instructions for IUCLID 6 Server                                                  ii

Changes to this document
    Date               Modification
    19/11/2020         Name of document changed to include a reference to the IUCLID Updater Tool.
                       Added description of customisation of the top bar in the web interface.
    28/10/2020         Updated for the release of IUCLID 6.5. The classic interface is no longer
                       available by default on the webservices page.
    27/05/2020         Explained how to run IUCLID 6 Server as a Windows Service after running the
                       IUCLID 6 Update Tool. Edited the entry on setting the path to JDK in Linux.
    29/04/2020         Updated for the April release of IUCLID 6.4. The web application server was
                       changed from GlassFish to Payara.
    30/10/2019         Updated for IUCLID 6.4.
    07/08/2019         Clarified the setting of a limit for bulk import/export in section 5.9.
    24/04/2019         Described the changes required to move to Open Java, and the consequences
                       for the update process.
    13/11/2018         Updated the section 3.2 IUCLID 6 Server as a Windows service.
    24/10/2018         Updated for version IUCLID 6 v3.1.1. Added a description of how the
                       introduction of the HTML user-interface affects the installation of IUCLID 6.
    04/12/2017         For installation on Linux, added more detail and made corrections. Added
                       instructions on how to set the memory used by the Updater tool.
    14/11/2017         Updated for version IUCLID 6 v2.0.0. Described the new functionality of the
                       Updater tool.
    28/04/2017         Updated values of versions for IUCLID 6 v1.3.0.
    31/01/2017         For backing up a Derby database, only vendor documentation should be used.
                       Added more information on adjustment of memory requirements. Added advice
                       on use of built-in JDK with the Migrator and Updater tools. Updated values for
                       IUCLID 6 v1.2.0.
    14/10/2016         Added entry to trouble shooting for OutofMemory.
                       For migration, set the example values of the address of the IUCLID 6 database
                       to be consistent with the screenshot.
    30/09/2016         Added location of webstart landing page. Updated values for IUCLID 6 v1.1.0.
    21/06/2016         Added new section for the Updater tool.
                       More detail is given on how to verify the results of a migration from IUCLID 5.6
                       to IUCLID 6.
                       Java 7 is no longer supported by the ECHA Helpdesk for use with IUCLID 6 or
                       any of its helper java applications.
    27/05/2016         Added section on backup/restore of the database.
Installation and Update Instructions for IUCLID 6 Server                                                                                                                     iii

     Date                       Modification
                                Recommended that starting the migrator with a graphical interface is done using
                                the script i5db-ui-migrator.cmd.
                                Corrected and edited the section on SSL.
                                Locking of the User SuperUser.
                                Changed default value of Xmx4096m from 1024 to 4096.
                                Corrected the version of the Derby server to 10.11.1.1.
                                Added entry to trouble shooting for Invalid maximum heap size.
     29/04/2016                 First version

Table of Contents
Changes to this document ................................................................................................ ii
Table of Contents.............................................................................................................. iii
Table of Figures ................................................................................................................. v
Table of Tables .................................................................................................................. vi
1. Introduction.................................................................................................................. 1
2. Prerequisites ................................................................................................................ 1
      2.1. Hardware .......................................................................................................................... 1
            2.1.1. Server ...................................................................................................................................... 1
            2.1.2. Java client user interface ......................................................................................................... 2
      2.2. Software ........................................................................................................................... 2
            2.2.1. Server ...................................................................................................................................... 3
            2.2.2. Java Web Start for the client or "classic" user interface .......................................................... 3
3. Installation of IUCLID 6 Server ................................................................................... 4
      3.1. IUCLID Server started and stopped from a script.............................................................. 4
            3.1.1. Starting and stopping IUCLID Server using scripts under Windows ....................................... 4
            3.1.2. Starting and stopping IUCLID 6 Server using scripts on Linux ............................................... 5
               3.1.2.1.       The path to JDK........................................................................................................................... 6
      3.2. IUCLID 6 Server as a Windows service ............................................................................ 6
4. Check the Payara server from its HTML console ..................................................... 8
      4.1. Payara Welcome page ..................................................................................................... 8
      4.2. Payara Administration Console ......................................................................................... 8
      4.3. Check the file server.log ................................................................................................. 10
      4.4. The welcome page of IUCLID 6 Server .......................................................................... 10
            4.4.1. Configuring the welcome page of IUCLID 6 Server .............................................................. 11
      4.5. Use the new IUCLID interface - HTML ............................................................................ 12
      4.6. Use the classic IUCLID interface – Java client ................................................................ 14
            4.6.1. Environment settings ............................................................................................................. 17
      4.7. Check import (optional)................................................................................................... 18
Installation and Update Instructions for IUCLID 6 Server                                                                                                                          iv

5. Configuration of the IUCLID 6 Server ...................................................................... 19
     5.1. Set the title of the Java client window ............................................................................. 19
     5.2. Setting ports to non-default values.................................................................................. 19
           5.2.1. Running more than one IUCLID application on the same host ............................................. 20
     5.3. Database installation and initialisation ............................................................................ 21
           5.3.1. Oracle .................................................................................................................................... 21
              5.3.1.1.       Installation ..................................................................................................................................21
              5.3.1.2.       Initialisation .................................................................................................................................22
              5.3.1.3.       Database driver ..........................................................................................................................22
              5.3.1.4.       Database type ............................................................................................................................22
              5.3.1.5.       Database connection credentials................................................................................................22
           5.3.2. Derby Embedded with no database server ........................................................................... 23
              5.3.2.1.       Database driver ..........................................................................................................................23
              5.3.2.2.       Database type ............................................................................................................................23
              5.3.2.3.       Configure the embedded database server to not start................................................................23
              5.3.2.4.       Database connection credentials................................................................................................23
           5.3.3. Derby Embedded with a database server ............................................................................. 24
              5.3.3.1.       Database driver ..........................................................................................................................24
              5.3.3.2.       Database type ............................................................................................................................24
              5.3.3.3.       Configure the embedded database server..................................................................................24
              5.3.3.4.       Database connection credentials................................................................................................24
           5.3.4. Derby Network Server ........................................................................................................... 25
              5.3.4.1.       Installation of Derby (JavaDB) ....................................................................................................25
              5.3.4.2.       Database driver ..........................................................................................................................25
              5.3.4.3.       Database type ............................................................................................................................25
              5.3.4.4.       Configure the embedded database server to not start................................................................26
              5.3.4.5.       Database connection credentials................................................................................................26
     5.4. Set temporary directory .................................................................................................. 26
     5.5. Set JVM memory options ................................................................................................ 27
     5.6. Configuring SSL on the application server ...................................................................... 27
     5.7. Configure Background Jobs (Optional) ........................................................................... 29
     5.8. Configuring logging ......................................................................................................... 30
           5.8.1. Installations using an external log indexing solution such as Splunk .................................... 33
           5.8.2. Installations not using an external indexing solution ............................................................. 34
     5.9. Configuring the upper limit to the size of bulk import and export jobs - IMQ .................... 34
     5.10. Instance Based Security (IBS) .................................................................................... 35
     5.11. Locking of the User SuperUser ................................................................................... 35
     5.12. Backup/Restore of the database ................................................................................. 36
           5.12.1. Oracle ................................................................................................................................ 36
           5.12.2. Derby ................................................................................................................................. 36
     5.13. Customisation of the top bar of the web user-interface................................................ 36
           5.13.1. Logo in the top bar ............................................................................................................ 36
           5.13.2. Links to external content in the top bar ............................................................................. 37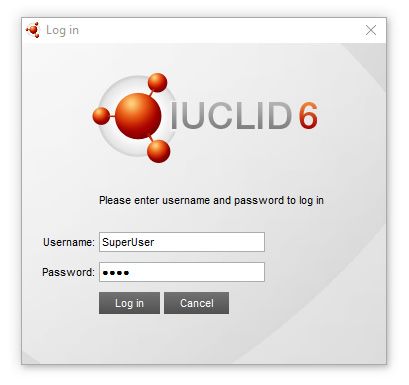
Installation and Update Instructions for IUCLID 6 Server                                                                                                               v

6. Monitoring .................................................................................................................. 39
      6.1. Application log files ......................................................................................................... 39
      6.2. Database location (Derby/Javadb) .................................................................................. 39
      6.3. Working directories ......................................................................................................... 40
7. IUCLID 6 trouble-shooting ........................................................................................ 41
      7.1. No free port within range / Port already in use ................................................................ 41
      7.2. Unsupported major.minor version 51.0 ........................................................................... 41
      7.3. http:/webstart gives 404 Not found ....................................................................... 41
      7.4. http:/webstart downloads an old version of the jnlp file......................................... 41
      7.5. JMS resource not created ............................................................................................... 42
      7.6. The client displays HTTP Status 500 .............................................................................. 42
      7.7. Out of Memory ................................................................................................................ 42
      7.8. Invalid maximum heap size............................................................................................. 42
      7.9. Error messages in server.log that can safely be ignored ................................................. 43
      7.10. Other errors in server.log file ....................................................................................... 43
            7.10.1. Exception in thread … ....................................................................................................... 43
            7.10.2. Waiting for changelog lock…............................................................................................. 44
8. Migration of data to IUCLID 6 Server from IUCLID 5 Server or earlier .................. 45
9. Updating IUCLID 6 Server ......................................................................................... 45
      9.1. Running Updater tool with a graphical wizard ................................................................. 46
            9.1.1. Select the installation of IUCLID 6 Server ............................................................................. 46
            9.1.2. Set the location of the back-up archive ................................................................................. 48
            9.1.3. Set the database connection parameters.............................................................................. 49
               9.1.3.1.       Database connection parameters for IUCLID 6 Server ..............................................................49
            9.1.4. Was the IUCLID 6 installation migrated from IUCLID 5, and is the IUCLID 5 database still
                   accessible? ............................................................................................................................ 50
               9.1.4.1.       Database connection parameters for IUCLID 5 ..........................................................................51
            9.1.5. Summary page ...................................................................................................................... 51
            9.1.6. Follow the update process..................................................................................................... 52
               9.1.6.1.       Logging of the Updater tool ........................................................................................................54
            9.1.7. Increasing the memory for the graphical Updater tool .......................................................... 54
            9.1.8. Starting IUCLID 6 Server after an update ............................................................................. 55
               9.1.8.1.       Starting IUCLID on Linux after an update from a version before IUCLID 6 Server v4.14.1 ........55
               9.1.8.2.       IUCLID as a Windows Service after an update from a version before IUCLID 6 Server v4.14.1 55
            9.1.9. Restore .................................................................................................................................. 56
      9.2. Running Updater tool without a graphical wizard ............................................................ 59
            9.2.1. Increasing the memory for the Updater tool when run with no graphical interface ............... 61
      9.3. Automatic notification of the availability of an update ...................................................... 62

Table of Figures
Figure 1:      Windows Firewall dialogue ............................................................................................ 5
Figure 2:      Set the Startup type of the Windows service to Automatic (Delayed Start) .................... 7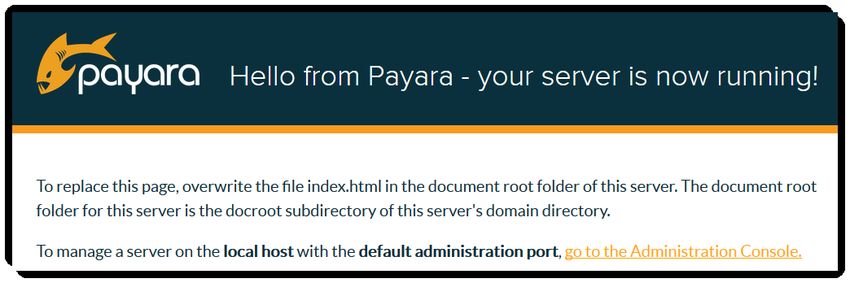
Installation and Update Instructions for IUCLID 6 Server                                                                                     vi

Figure 3:      Payara Server Welcome page ...................................................................................... 8
Figure 4:      Log in page of the Payara Administration Console ........................................................ 8
Figure 5:      Payara 4 Administration Console .................................................................................. 9
Figure 6:      IUCLID deployed in Payara Server ............................................................................. 10
Figure 7:      The welcome page of IUCLID 6 Server ....................................................................... 11
Figure 8:      The log-in window of the HTML user interface for IUCLID 6 Server ............................ 12
Figure 9:      The main window of the HTML user interface of IUCLID 6 Server............................... 13
Figure 10:     How to tell that the web interface has loaded fully ....................................................... 14
Figure 11:     Confirmation of trust in publisher of application ........................................................... 15
Figure 12:     Pre-flight check: Summary of settings for the Webstart environment used to run the
               Java client for IUCLID 6 Server. .................................................................................. 15
Figure 13:     The log-in window of the Java client user interface for IUCLID 6 Server ..................... 16
Figure 14:     The main window of the Java client user interface of IUCLID 6 Server ....................... 17
Figure 15:     Where to find the Environment settings in the Java client interface ............................. 17
Figure 16:     Environment settings and the Java client OSGI jar files .............................................. 18
Figure 17:     Logs for domain in Payara .......................................................................................... 32
Figure 18:     Customised logo in the top bar of the web interface .................................................... 37
Figure 19:     Checking a custom URL in the external links .............................................................. 39
Figure 20:     The contents of the Updater tool’s directory for Windows ............................................ 45
Figure 21:     The first page of the graphical interface of the Updater tool ........................................ 47
Figure 22:     Set the path to the automatic backup .......................................................................... 48
Figure 23:     Database connection parameters................................................................................ 49
Figure 24:     Database connection parameters for IUCLID 5 ........................................................... 50
Figure 25:     Summary of the update process before it is carried out............................................... 52
Figure 26:     Windows security alert for the Updater tool ................................................................. 53
Figure 27:     Successful update....................................................................................................... 54
Figure 28:     Choose to restore an installation of IUCLID 6 Server .................................................. 57
Figure 29:     Select a backup archive from which to restore an installation of IUCLID 6 Server ....... 58
Figure 30:     Summary of the restore process before it is carried out .............................................. 59

Table of Tables
Table 1:  Hardware recommendations for small to medium types of server installation with 2 to
          10 simultaneous users and less than 1000 Substances ................................................ 1
Table 2:  Hardware recommendations for a large type of server installation with 10s of
          simultaneous users and more than 1000 Substances ................................................... 2
Table 3:  Hardware recommendation for Java client user interface .............................................. 2
Table 4:  Software for small to medium types of server installation with 2 to 10 simultaneous
          users and less than 1000 Substances........................................................................... 3
Table 5:  Software for a large type of server installation with 10s of simultaneous users and more
          than 1000 Substances .................................................................................................. 3
Table 6:  Running the Java client interface using Java Web Start ................................................ 4
Table 7:  Current configuration of IUCLID 6 ............................................................................... 30
Table 8:  Log files in directory named iuclid6 ............................................................................. 32
Table 9:  The location of the database for IUCLID 5 .................................................................. 51
Table 10: Logging of the Updater tool ......................................................................................... 54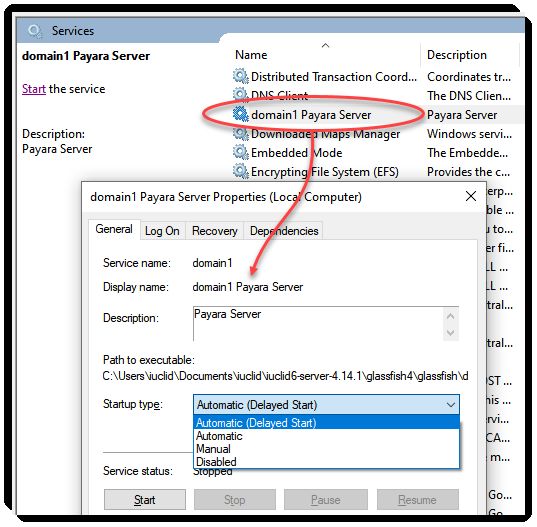
Installation and Update Instructions for IUCLID 6 Server                                             Page 1 | 62

1. Introduction
IUCLID 6 Server is available to download free of charge from the IUCLID 6 website. There are two
packages: one for Windows, and one for Linux. The packages contain all the necessary software
to run IUCLID 6 Server on an existing installation of either Windows or Linux. In addition to
IUCLID 6 Server the packages contain: Payara 4, a database of type Derby (JavaDB), and Java 8
JDK for either Windows or Linux. If required, it is possible to replace those software components
with equivalents obtained separately from IUCLID 6 Server. See the section Prerequisites > 2.2
Software for more details.
The default database in the installation package is already initialised as a IUCLID 6 database.
Post-installation configuration is described in section 5, Configuration of the IUCLID 6 Server.

2. Prerequisites

2.1. Hardware
IUCLID 6 Server and database software can be installed on the same server machine, or on two
separate servers. For separate servers we recommend a 1 gigabit per second network. It is also
possible to run the IUCLID 6 Server on a cluster of application servers with a load balancer.
Clustering the database is implemented via the normal database clustering procedures.
The recommended amount of RAM available on the machines is indicated in the table below. More
may be required if there are many simultaneous users, and/or a large database.
There should be at least two cores available for the application server and at least 2 cores for the
database server. We recommend the use of fast and reliable server hard drives. Data should be
backed-up regularly.
For the Java client user interface, we recommend 4 GB RAM and two processor cores. There
should be a 1 gigabit per second network between a client and the server.

2.1.1.     Server

Table 1:    Hardware recommendations for small to medium types of server installation with 2 to 10
            simultaneous users and less than 1000 Substances

                             Characteristic                 Value

    Application server       CPU/Cores                      Dual Core / 3.0 GHz
                             Memory                         8 GB*
    Database server          CPU/Cores                      Dual Core / 3.0 GHz
                             Memory                         4 GB
    Network                  Topology/Firewall/Proxy        Connection between database and
                                                            application server (Gigabit wired)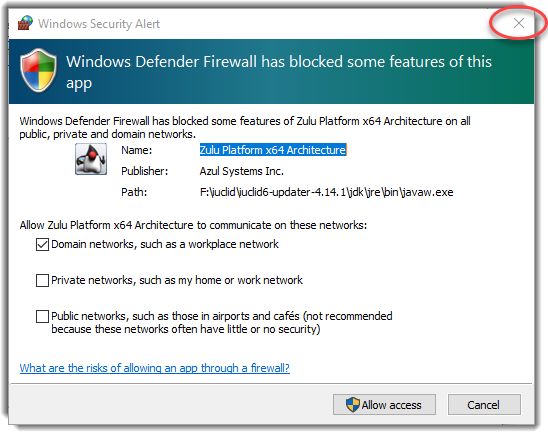
Installation and Update Instructions for IUCLID 6 Server                                             Page 2 | 62

* Note that if the amount of memory available for the application server is less than 8 GB this
requirement can be decreased by decreasing the maximum memory allocated to Java. How to do
that is explained in section 5.5 Set JVM memory options. For example, if the value of the
parameter Xmx is decreased from 4 GB to 2 GB, the system requirement for the server is
reduced from 8 GB to 6 GB.

Table 2:    Hardware recommendations for a large type of server installation with 10s of simultaneous users
            and more than 1000 Substances

                            Characteristic       Value

    Application server      CPU/Cores            Cluster of 2 servers, each with 6 CPUs (2.40 GHz)
                            Memory               8 GB per server
    Database server         CPU/Cores            4 CPUs (2.40 GHz)
                            Memory               8 GB
    Network                 Topology/            Connection between database and application
                            Firewall/Proxy       server (Gigabit wired)

2.1.2.     Java client user interface

Table 3:    Hardware recommendation for Java client user interface

                             Characteristic      Value
    Java client machine      CPU/Cores           Dual Core/ 2.0 GHz
                             Memory              4 GB

2.2. Software
In the tables below the required software is Java JDK 8, IUCLID 6 Server, Payara 4 and a
database. IUCLID 6 Server comes with a Java database built-in, but for large installations with tens
of simultaneous users and thousands of substance datasets, we recommend using an Oracle
database instead.
The release of IUCLID 6 Server in October 2020 is bundled with Open JDK instead of the Oracle
Java SE 8 JDK used before April 2019. This is due to a change that was made in the way Oracle
provides support. See the following link for more details
https://www.oracle.com/technetwork/java/java-se-support-roadmap.html.
IUCLID 6 Server does not depend on any specific Open JDK 8 distribution; though testing was
performed with Red Hat and Azul Zulu Open JDK.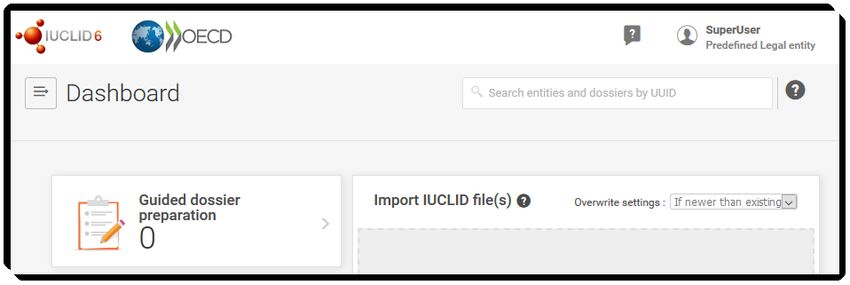
Installation and Update Instructions for IUCLID 6 Server                                               Page 3 | 62

2.2.1.     Server

Table 4:    Software for small to medium types of server installation with 2 to 10 simultaneous users and less
            than 1000 Substances

    Software        Product                 Version      Source

    Java            JDK                     8            Azul Zulu Open JDK 8
                                                         (Supplied with IUCLID 6 Server)
                                                         https://www.azul.com/downloads/zulu/

                                                         Oracle Java SE 8 JDK
                                                         http://www.oracle.com/technetwork/java/javase/
                                                         downloads/index.html

    Application     Payara Server           4            (Supplied with IUCLID 6 Server)
    server                                               https://payara.fish/

    IUCLID 6        IUCLID 6 Server         v5.x         http://iuclid6.echa.europa.eu/

Table 5:    Software for a large type of server installation with 10s of simultaneous users and more than 1000
            Substances

    Software        Product                 Version      Source
    Java            JDK                     8            Azul Zulu Open JDK 8
                                                         (Supplied with IUCLID 6 Server)
                                                         https://www.azul.com/downloads/zulu/

                                                         Oracle Java SE 8 JDK
                                                         http://www.oracle.com/technetwork/java/javas
                                                         e/downloads/index.html

    Application     Payara Server           4            (Supplied with IUCLID 6 Server)
    server                                               https://payara.fish/
    Database        Oracle                  12c, 19c     https://www.oracle.com/database/index.html
    Database        Oracle                  **           http://www.oracle.com/technetwork/database/f
    driver                                               eatures/jdbc/index.html
                                                         **Download the appropriate JDBC thin driver.
    IUCLID 6        IUCLID 6 Server         v5.x         https://iuclid6.echa.europa.eu/

2.2.2.     Java Web Start for the client or "classic" user interface
To connect to IUCLID 6 Server using the Java client, or "classic", user interface, the machine on
which the client is run must have Java 8 JRE with Java Web Start technology. The recommended
options are shown below. Pay attention to licencing and security when choosing which option to
use. The name of the executable file required to start the interface is javaws.
Installation and Update Instructions for IUCLID 6 Server Page 4 | 62
Table 6: Running the Java client interface using Java Web Start
Platform Product
Windows, Oracle Java SE 8 JRE
macOS,
Linux
Windows Red Hat Open JDK 8 for Windows.
Linux Use the package manager of the Linux distribution to install icedtea-web.
3. Installation of IUCLID 6 Server
Download the package for IUCLID 6 Server from the IUCLID website. The path and name of the
directory to which the package is downloaded is referred to in this manual as .
Move and/or copy the package to the installation directory of IUCLID 6. Unzip the downloaded
package. This extracts a directory named iuclid6-server-, which is referred to in
this manual as . It contains the installation folder for Payara, which is
referred to in this manual as . Note that IUCLID is delivered with
set to a value of glassfish4. This is because IUCLID used to be
delivered with GlassFish 4, but now it is delivered with Payara 4. Retaining the previous directory
name meant that no changes were required to the scripts used with IUCLID.
The server component of IUCLID 6 Server, which is deployed in Payara Server, can be started in
two different ways, as described in the next two subsections. Before starting IUCLID 6 Server,
ensure that no applications are running on conflicting ports. The defaults are 8080 and 4848.
Starting a user interface that connects to the server is described in 4.4 The welcome page of
IUCLID 6 Server.
3.1. IUCLID Server started and stopped from a script
IUCLID 6 Server can be started and stopped by running scripts delivered with it, as described in
the subsections below. This method is convenient if you do not have administrator rights to the
host machine, or you do not want to run IUCLID 6 Server as a service in Windows, which is
described in the next section, 3.2 IUCLID 6 Server as a Windows service.
3.1.1. Starting and stopping IUCLID Server using scripts under Windows
By default, the JDK that is delivered with IUCLID 6 Server is used.
The path to the JDK is controlled by the value of the parameter AS_JAVA, which is set within the
following file:
\glassfish4\glassfish\config\asenv.bat
Under Windows the path to the JDK is relative to the settings file asenv.bat. Therefore, to use
the JDK that is delivered with IUCLID, the line in the file asenv.bat is:
set AS_JAVA=..\..\..\jdkInstallation and Update Instructions for IUCLID 6 Server Page 5 | 62 If no value is set for the parameter, Windows looks for a path to JDK in the environment variable PATH. Alternatively, it is possible to use the absolute path to the JDK. To start IUCLID 6 Server, run the following script. \start_Iuclid6_server.bat If the following message appears, close it by clicking on the cross at the top right. Figure 1: Windows Firewall dialogue If the start script was not run from the command line, a command line window opens. After a few minutes the window closes, although usually the startup process has not yet finished, and can take up to a further 10 minutes. To stop IUCLID 6 Server, run the following script: \stop_Iuclid6_server.bat For instructions on how to view a graphical user interface of IUCLID 6 Server, proceed to section 4 Check the Payara server from its HTML console. 3.1.2. Starting and stopping IUCLID 6 Server using scripts on Linux Some scripts need to be set as executable. Do this using the following command: $ chmod +x *.sh
Installation and Update Instructions for IUCLID 6 Server                                 Page 6 | 62

To start IUCLID 6 Server, run the following script.
/start_Iuclid6_server.sh
To stop IUCLID 6 Server, run the following script:
/stop_Iuclid6_server.sh

3.1.2.1.    The path to JDK
The path to JDK is controlled using the parameter AS_JAVA, within the following file:
/glassfish4/glassfish/config/asenv.conf
The value of AS_JAVA that is delivered in the installation package causes the JDK that was
delivered with IUCLID to be used. The value is:
$AS_INSTALL/../../jdk
If you need to change the path to JDK consider the following.
1. To set an absolute path to the JDK of your choice, set:
   AS_JAVA=""
2. To use a system installation of JDK, set:
   AS_JAVA=""
   Dependent on the system, it may be necessary to add the path of JDK to the variable PATH as
   follows:
First find JDK using the following command:
$ whereis java
Then insert the output of the command above into the command below:
$ export PATH=:$PATH
Check the value of PATH using:
$ echo $PATH

3.2. IUCLID 6 Server as a Windows service
The script start_Iuclid6_server.bat starts IUCLID 6 Server. After a restart of Windows, it
will need to be restarted manually. However, IUCLID 6 Server can be run as a service in Windows
that starts automatically when Windows starts. To do that, carry out the following steps:
1. Edit the following file
   \glassfish\config\asenv.bat

    Edit the value of the parameter AS_JAVA to contain the absolute path to JDK. To use the JDK
    that is delivered with IUCLID 6 Server use the line:
    set AS_JAVA=\jdk

    For example
    set AS_JAVA=C:\Programs\iuclid-6-server-4.14.1\jdk
Installation and Update Instructions for IUCLID 6 Server Page 7 | 62
2. Create the Windows service using a command from a console that was started using (right-
click) Run as Administrator. The simplest command, which uses default values to
create a service with the same name as the Payara domain for the instance of IUCLID is:
\bin\asadmin create-service domain1
3. To check and manage the newly created service, open the management window for services in
Windows using:
right-click on Start > Computer Management > Services and Applications
> Services
It is recommended to set the Startup Type of the service to Delayed Start. This is set in the
properties of the service which are accessed by right-clicking on the name of the service in the
list, as shown in the example below.
Figure 2: Set the Startup type of the Windows service to Automatic (Delayed Start)
4. Once the service has been created correctly, select the service, and then click on Start the
service.Installation and Update Instructions for IUCLID 6 Server Page 8 | 62 On updating from a version before IUCLID 6 Server v4.14.1, the move from GlassFish to Payara means that step 1 above must be repeated. For more details, see section 9.1.8.2 IUCLID as a Windows Service after an update from a version before IUCLID 6 Server v4.14.1. 4. Check the Payara server from its HTML console This section describes the steps to check that Payara is running correctly. 4.1. Payara Welcome page The address of the Payara welcome page is: http://:8080 If the browser is running on the same machine as Payara, the value of can be set to localhost. You should see the following. Figure 3: Payara Server Welcome page 4.2. Payara Administration Console There is a link to the administration console on the page shown above. The address is: http://:4848 Figure 4: Log in page of the Payara Administration Console Log in using the credentials:
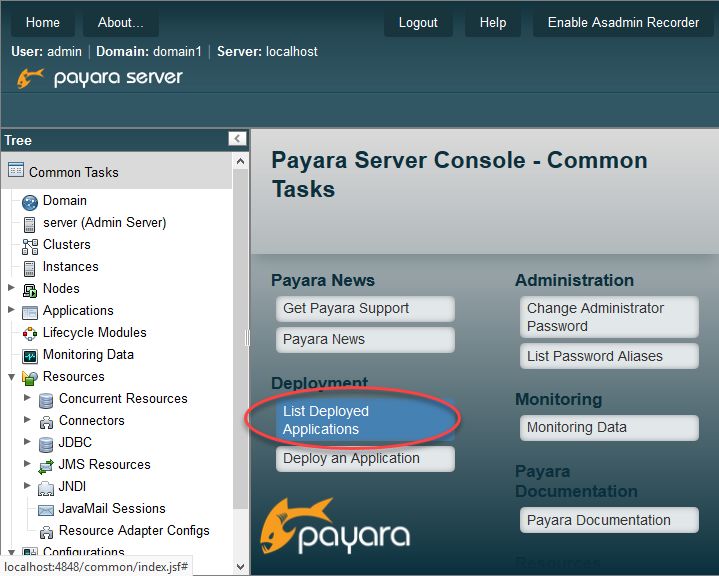
Installation and Update Instructions for IUCLID 6 Server                         Page 9 | 62

User name = admin
Password = admin123

Figure 5:   Payara 4 Administration Console

Select List Deployed Applications. IUCLID is iuclid6-ui-nx--industry.
Installation and Update Instructions for IUCLID 6 Server                                  Page 10 | 62

Figure 6:   IUCLID deployed in Payara Server

If the server is not running, check for errors in the log file shown on start-up:
\glassfish\domains\domain1\logs\server.log

4.3. Check the file server.log
Path to log file:
\glassfish\domains\domain1\logs\server.log

Expected entry in log file:
[YYYY-MMM-DDTHH:MM:SS.MMM+ZZZZ] [Payara 4.1] [INFO] []
[org.glassfish.osgijavaeebase] [tid: _ThreadID=* _ThreadName=pool-*-
thread-*] [timeMillis: *] [levelValue: 800] [[
  deployed bundle eu.echa.iuclid6.war [*] at file:
\glassfish\domains\domain1\osgi-
cache\felix\bundle379\data\applications\bundle*-*\]]

4.4. The welcome page of IUCLID 6 Server
The address of the welcome page of IUCLID 6 Server is:
http://:8080/webstart
If the browser is running on the same machine as Payara, the value of  can be set to
localhost. Note that the first time IUCLID 6 Server is run, it may take several minutes before this
page becomes available. The delay should be less for subsequent start-ups. Whilst IUCLID 6
Server is starting, the browser gives error 404. If the response remains as 404 for over 20 minutes,
check for errors in the following log file:
\glassfish\domains\domain1\logs\server.log
Installation and Update Instructions for IUCLID 6 Server                                         Page 11 | 62

When IUCLID 6 Server has started, the browser displays the following:

Figure 7:   The welcome page of IUCLID 6 Server

Unless settings have been changed, IUCLID 6 Server is now running using the default values
supplied in the IUCLID 6 Server download package. The default database is in the directory shown
below:
\glassfish\domains\domain1\databases
For the configuration of a different database, for example Oracle, see section 5.3 Database
installation and initialisation. Even if the default database is not used, it may be useful to try it out
first for testing purposes, and to become familiar with other aspects of the installation.
The next step is to open a user interface to IUCLID 6 Server. By default, on the welcome page, the
user can select to open only the web interface. If the Java client, or "classic" interface is required,
see the IUCLID web site for instructions on how make it available. The new interface requires only
a web browser. The classic interface is a Java client that requires Java webstart to launch.

4.4.1. Configuring the welcome page of IUCLID 6 Server
In some cases, it may be convenient to have the page shown above pointing at more than one
instance of IUCLID 6. For example, to allow users to choose between separate test and production
instances of IUCLID 6. This can be done by editing the HTML that is contained within the file
index.jsp that is located within the installation of IUCLID 6 in the following archive file:
Installation and Update Instructions for IUCLID 6 Server                                     Page 12 | 62

\glassfish\domains\domain1\iuclid6\iuclid6-war-
.war
The file is at the top level of the folder structure in the archive. The archive can be opened by
various applications, for example 7-Zip.

4.5. Use the new IUCLID interface - HTML
The address of the HTML user interface of IUCLID 6 Server is:
http://:8080/iuclid6-web/
To open the interface from the welcome page, click on the button:

This opens the log-in page shown below:

Figure 8:   The log-in window of the HTML user interface for IUCLID 6 Server

Log in with the following credentials:
Username=SuperUser
Password=root

On logging in, the HTML interface for IUCLID 6 opens displaying the Dashboard page, as shown
below.
Installation and Update Instructions for IUCLID 6 Server                               Page 13 | 62

Figure 9:   The main window of the HTML user interface of IUCLID 6 Server

On first starting IUCLID 6 Server it is possible to view the web interface before all of its
components have loaded. One way to tell when all the components have been loaded, and the
interface is ready to use, is when the button New Substance appears, as shown below.
Installation and Update Instructions for IUCLID 6 Server                                   Page 14 | 62

Figure 10: How to tell that the web interface has loaded fully

4.6. Use the classic IUCLID interface – Java client
For instructions on how make the Java client, or "classic" interface available, see the IUCLID web
site.
On the machine used to view the interface, ensure that a Java Runtime 1.8+ is installed that
supports Java Web Start, as described in section 2.2.2 Java Web Start for the client or "classic"
user interface.
If the window shown below is displayed with name=IUCLID 6, and publisher=European Chemicals
Agency, click on Run.
Installation and Update Instructions for IUCLID 6 Server                                             Page 15 | 62

Figure 11: Confirmation of trust in publisher of application

The next window to be shown is the Pre-flight check, as shown below, which shows the values of
some parameters relevant to Webstart.

Figure 12: Pre-flight check: Summary of settings for the Webstart environment used to run the Java client for
           IUCLID 6 Server.

Once the Java client has started, the login window opens, as shown below, and the Pre-flight
check closes automatically. The values of the parameters displayed above in the Pre-flight check
Installation and Update Instructions for IUCLID 6 Server Page 16 | 62 can be viewed from within the Java client under the main menu item Help > Environment settings. See the next section for more details. The first time the Java client is run per computer, per user, the start-up takes more time than for subsequent start-ups. Figure 13: The log-in window of the Java client user interface for IUCLID 6 Server Log in with the following credentials: Username=SuperUser Password=root On logging in, the main window of the Java client for IUCLID 6 opens, displaying the home page, as shown below.
Installation and Update Instructions for IUCLID 6 Server                                    Page 17 | 62

Figure 14: The main window of the Java client user interface of IUCLID 6 Server

4.6.1.   Environment settings
The values of the parameters displayed in the pre-flight check can be viewed from within the
IUCLID 6 Server Java client under the main menu item Help > Environment settings., as shown
below.

Figure 15: Where to find the Environment settings in the Java client interface

The OSGI jars that were indicated briefly in the pre-flight check can be seen in full under the button
OSGI bundles > View, as shown below.
Installation and Update Instructions for IUCLID 6 Server                                 Page 18 | 62

Figure 16: Environment settings and the Java client OSGI jar files

4.7. Check import (optional)
A good way of testing whether the installation has worked, is by importing some test data that is
supplied with the download. Extract the directory named TestData from the installation package
into the parent directory of the installation of IUCLID 6 Server. There are various ways of doing
that, but some examples are given below:

Example for Windows with 7-Zip
C:\applications\iuclid6 7z x –y \
TestData

Example for Linux
$ unzip –o / TestData/\*
Installation and Update Instructions for IUCLID 6 Server                                     Page 19 | 62

Using the Import function in the graphical user interface of IUCLID 6 Server, to import the test file
named InstallationTest.i6z which is in the directory named TestData. This should import
a Legal entity that has the name Test Legal Entity Please Delete. Check that the import of the file
was successful by viewing the legal entity in the graphical user interface. To do that in the Java
client, click on the icon for Legal entity at the lower left of the home page, and then look in the
navigation pane on the left. After a successful test, delete the imported Legal entity.
If the import was not a success, first check section 5.4 Set temporary directory.

5. Configuration of the IUCLID 6 Server
The server side of IUCLID 6 Server is configured using the following files:
\glassfish\domains\domain1\config\domain.xml
\glassfish\domains\domain1\config\
server.settings.properties
The Java client side of IUCLID 6 Server is configured using the following file:
\glassfish\domains\domain1\config\
client.settings.properties
Some typical changes to the default values that may be required are described below. Any
changes to the files above, take effect only on starting the server.

5.1. Set the title of the Java client window
The title of the window for the Java client application of IUCLID 6 Server is set using the parameter
named client.window.title in the settings file:
\glassfish\domains\domain1\config\client.settings.pr
operties
The default value is IUCLID 6.

5.2. Setting ports to non-default values
To avoid port conflicts, it can be necessary to run IUCLID at ports that are different from the default
values.
For example, the default value for the HTTP listener port is 8080. This port is used to access the
web interface. It is set in the following two configuration files:
(1)
\glassfish\domains\domain1\config\domain.xml
The XML path to the value of the port with its default value is:
Installation and Update Instructions for IUCLID 6 Server                                    Page 20 | 62

...

...

...

(2)
\glassfish4\glassfish\config\asenv.bat
The line in which the port is set to its default value:
set HTTP_LISTENER_PORT=8080

To run IUCLID on port 9080, change both the values indicated above from 8080 to 9080 and then
restart IUCLID. After that, the web interface of IUCLID is available at the address given below:
http://:9080/iuclid6-web/

5.2.1.   Running more than one IUCLID application on the same host
Sometimes it may be required to run more than one instance of IUCLID on the same host. For
example, to compare the functionality of two different versions directly. If you do this bear in mind
the resources required. It is neither recommended nor supported to try running more than one
instance of IUCLID in the same application server. However, it is possible to run more than one
instance of IUCLID 6 Server on the same host in their own application servers, by using different
values of the ports indicated below for each instance. The process of setting the ports is the same
as that described above in the section on the HTTP listener port.

(1)
Ports set in the following configuration file:
\glassfish\domains\domain1\config\domain.xml
The XML elements containing the default values for ports are:
Installation and Update Instructions for IUCLID 6 Server Page 21 | 62 (2) Ports set in the following configuration file: \glassfish4\glassfish\config\asenv.bat The default values are: set ASADMIN_LISTENER_PORT=4848 set HTTP_LISTENER_PORT=8080 set HTTP_SSL_LISTENER_PORT=8181 set JMS_PROVIDER_PORT=7676 set IIOP_LISTENER_PORT=6700 set IIOP_SSL_LISTENER_PORT=4820 set IIOP_SSL_MUTUALAUTH_PORT=4920 set JMX_SYSTEM_CONNECTOR_PORT=8686 Remember to avoid port conflicts, edit both files, and then restart IUCLID. 5.3. Database installation and initialisation IUCLID 6 Server is designed to work with either an Oracle database or a Derby (JavaDB) database. For instructions on Oracle, go straight to section 5.3.1 Oracle. There are three ways of setting up the database software Derby (JavaDB), as described in sections below. For a complete description of Derby (JavaDB) and Derby Network Server, see the documentation provided by the vendor at: https://db.apache.org/derby/manuals/index.html 5.3.1. Oracle 5.3.1.1. Installation The installation of an Oracle database is not covered by this document. Please refer to the vendor’s documentation.
Installation and Update Instructions for IUCLID 6 Server                                   Page 22 | 62

5.3.1.2.    Initialisation
A database user must be created before running IUCLID 6 Server. All the objects belonging to the
user will be created when IUCLID 6 Server is first run. Create and configure the user manually by
performing the following commands as sysdba. Do not place values in quotes.
$ create user  identified by ;
$ alter user  default tablespace  quota
unlimited on ;
$ grant connect to ;
$ grant resource to ;

5.3.1.3.    Database driver
Place the JDBC thin driver appropriate to your version of Oracle and Java 8 in the directory:
\glassfish\domains\domain1\lib

5.3.1.4.    Database type
The database type is set in the following configuration file:
\glassfish\domains\domain1\config\domain.xml
For the element jdbc-resource that has an attribute of jndi-name with a value of
jdbc/iuclid6, set the value of the attribute pool-name as shown below:

5.3.1.5.    Database connection credentials
The credentials of the database connection are set in the following configuration file:
\glassfish\domains\domain1\config\domain.xml
The values for the credentials are placed in the attributes of elements named property that are in
the element named jdbc-connection-pool for the type of database set in section 5.3.1.4
above.

Example for Oracle
Note the attribute/value pair below of name="IUCLID6_OraclePool".
Installation and Update Instructions for IUCLID 6 Server                                  Page 23 | 62

5.3.2.     Derby Embedded with no database server
IUCLID 6 Server contains an initialised IUCLID 6 database of type Derby Embedded that is fully
contained within the following directory:
\glassfish\domains\domain1\databases\iuclid6
Where the path to the database is required, the value above is used. Bear in mind that with this
configuration, only one client can connect to the database at once. For example, this means that if
any database client, such as Squirrel, is connected to the database, IUCLID 6 Server cannot
connect to the database. To connect a database client and IUCLID 6 Server to the database at the
same time, see the methods described in sections Derby Embedded with a database server 5.3.3
and Derby Network Server 5.3.4.

5.3.2.1.     Database driver
The driver for Derby Embedded is supplied with Derby Embedded and therefore you do not have
to do anything. For information purposes only, the driver is:
\javadb\lib\derby.jar

5.3.2.2.     Database type
The database type is set in the following configuration file:
\glassfish\domains\domain1\domain.xml
For the element jdbc-resource that has an attribute of jndi-name with a value of
jdbc/iuclid6, set the value of the attribute pool-name as shown below:

5.3.2.3.     Configure the embedded database server to not start
Set the database server to not start by setting the following parameter in file domain.xml, inside
:
-Dderby.drda.startNetworkServer=false

5.3.2.4.     Database connection credentials
The credentials of the database connection are set in the following configuration file:
\glassfish\domains\domain1\config\domain.xml
The values for the credentials are placed in the attributes of elements named property that are in
the element named jdbc-connection-pool for the type of database set in section 5.3.2.2
above.
Installation and Update Instructions for IUCLID 6 Server                                  Page 24 | 62

Example for Derby Embedded with no database server
Note the attribute/value pair below of name="IUCLID6_Embedded_DerbyPool".

5.3.3.     Derby Embedded with a database server
Use Derby Embedded with a database server where more than one simultaneous connection to
the database is required. In this configuration IUCLID 6 Server uses a database server, both of
which run in the same instance of Java.

5.3.3.1.     Database driver
The driver is supplied in the installation package of IUCLID 6 Server.

5.3.3.2.     Database type
The database type is set in the following configuration file:
\glassfish\domains\domain1\config\domain.xml
For the element jdbc-resource that has an attribute of jndi-name with a value of
jdbc/iuclid6, set the value of the attribute pool-name as shown below:

5.3.3.3.     Configure the embedded database server
In the settings file domain.xml, inside  set the database
server to start, by including the following line:
-Dderby.drda.startNetworkServer=true

5.3.3.4.     Database connection credentials
The credentials of the database connection are set in the following configuration file:
\glassfish\domains\domain1\config\domain.xml
Installation and Update Instructions for IUCLID 6 Server                                 Page 25 | 62

The values for the credentials are placed in the attributes of elements named property that are in
the element named jdbc-connection-pool for the type of database set in section 5.3.3.2
above.

Example for Derby Embedded with a database server
Note the attribute/value pair below of name="IUCLID6_Embedded_DerbyPool".

5.3.4.     Derby Network Server
Use Derby Network Server where the database server needs to be run either in a separate
instance of Java on the same host as IUCLID 6 Server or, on a different host to IUCLID 6 Server.

5.3.4.1.     Installation of Derby (JavaDB)
Install the Derby (JavaDB) software on the host of the database server. Derby (JavaDB) version
10.11.1.1 has been tested and found to work with IUCLID 6 Server. Later versions should work but
have not been tested. Decide on the location of the directory that contains databases within the
filesystem of the host, hereafter referred to as .
In  run the appropriate version for the operating system of the script named:
…javadb\bin\startNetworkServer
The Derby Network Server should now be running. A log file named, derby.log is created in the
directory .
When the server side of IUCLID 6 is run, it attempts to connect to a database inside a directory
named iuclid6 that is within the directory . If no such directory exists, one is
created.

5.3.4.2.     Database driver
The driver is supplied in the installation package of IUCLID 6 Server.

5.3.4.3.     Database type
The database type is set in the following configuration file:
Installation and Update Instructions for IUCLID 6 Server                                  Page 26 | 62

\glassfish\domains\domain1\config\domain.xml
For the element jdbc-resource that has an attribute of jndi-name with a value of
jdbc/iuclid6, set the value of the attribute pool-name as shown below:

5.3.4.4.    Configure the embedded database server to not start
Set the database server to not start by setting the following parameter in file domain.xml, inside
:
-Dderby.drda.startNetworkServer=false

5.3.4.5.    Database connection credentials
The credentials of the database connection are set in the following configuration file:
\glassfish\domains\domain1\config\domain.xml
The values for the credentials are placed in the attributes of elements named property that are in
the element named jdbc-connection-pool for the type of database set in section 5.3.4.3
above.

Example for Derby Network Server
Note the attribute/value pair below of name="IUCLID6_External_DerbyPool".

5.4. Set temporary directory
This feature allows a directory to be set to which attachments and imports are stored temporarily
before they are added to the database. If the addition to the database is successful, the file is
Installation and Update Instructions for IUCLID 6 Server                                      Page 27 | 62

deleted from the directory. If the addition to the database fails for some reason, the file remains in
this directory. Such files are not automatically deleted by IUCLID 6 Server. Therefore, it is
recommended that this folder is emptied on a regular basis.
The directory is indicated by the value of the parameter:
environments.attachments.temp.dir:
in the following settings file:
\glassfish\domains\domain1\config\server.settings.pr
operties

The directory must be writeable by the server. Ensure that the value of the path conforms to the
formatting requirements of the operating system. Under Microsoft Windows, use escaped
backslash (\\) delimiters between the nodes in the path, for example:
\\temp\\iuclid6

5.5. Set JVM memory options
The memory settings for the server can be set in the file:
\glassfish\domains\domain1\domain.xml
Within the section:
//;
in the line:
-Xmx4096m
An example showing the context is given below:

               -XX:PermSize=64m
               -XX:MaxPermSize=192m
               -Xmx4096m
Be aware that a value of less than 4096m can cause problems during the importation of data.
In the file domain.xml there is an alternative instance of the parameter Xmx to the one shown
above, but it is in a different context, and has no effect. Its context is:
-XX:NewRatio=2
-Xmx512m

5.6. Configuring SSL on the application server
IUCLID 6 Server is delivered such that SSL can be used for the connection between the server
and the Java client user interface without the need for additional configuration. However, it is
supplied with a self-signed certificate that causes browsers to give security warnings. To avoid
such warnings, an appropriate certificate must be installed, as described below. It is recommended
You can also read