Blackboard Learn 9.1 SP 13 - There's More To Learn New Features and the Basics
←
→
Page content transcription
If your browser does not render page correctly, please read the page content below
Blackboard Learn 9.1 SP 13
          There’s More To Learn

New Features and the Basics
              Faculty Guide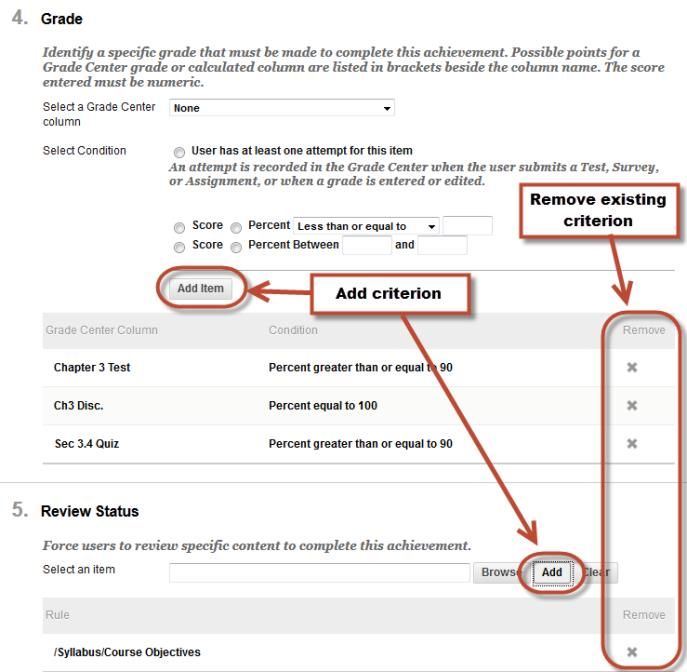
Blackboard 9.1 Basics
                                                                      Faculty Guide

                   Blackboard 9.1 Basics Faculty Guide
                                                    Contents

         Logging In                                                     5

         Getting Started                                                5

                 Course Creation                                        5

                 Course Enrollment                                      5

                 Accessing Courses                                      5

                 Modifying the My Courses Module                        5

         Course Shell                                                   6

         Introductory Splash Screen                                     6

         NEW Global Navigation Menu                                     7
                 My Bb Tools                                            7
                 My Bb Profile                                          8
                 My Bb People                                           9
                 My Bb Posts                                            9
                 My Bb Updates                                         10
                 Text to Text to Voice Notifications                   11
                 New Content Editor                                    11
                 Assessment Item Analysis                              12
                 Video Everywhere                                      14
                 Calendar Redesigned                                   15
                 Discussion Board Re-Designed                          17

                 Enhanced: Fill - in - the - Blank Questions           18

                 Test Access Log                                       19
                 Inline Assignment Grading                             20
                 Retention Center                                      20

Page 2
Blackboard 9.1 Basics
                                                                                    Faculty Guide

          Blackboard 9.1 Basics Faculty Guide
                                             Contents

        Test Availability Exceptions & Exporting Test Questions                      21

        Show Test Results and Feedback to Students                                   21
        Achievements Tool                                                            22
        Align Rubric Row Criteria to Goals                                           25

Manage Course Menu                                                                   26
Control Panel                                                                        26
Announcements                                                                        27
Add a New Announcement                                                               27
Instructor Information/Office Hours                                                  27
Adding Course Content                                                                27
Assignments & Assessments                                                            28

        Assignments                                                                  28
                   Download Student Assignment Submissions & Clear Attempt           29
         Assessments                                                                 30
                   Add Test                                                          30
                   Edit Test Options                                                 30
                   Grading Student Submissions                                       31
                   Clear Student Assignment Attempt                                  31

Discussion Board                                                                     31

The Grade Center                                                                     32
       Create a Grade Center Column                                                  32
       Manually Enter a Grade                                                        33
       Grade Center Icons                                                            33

                                                                                        Page 3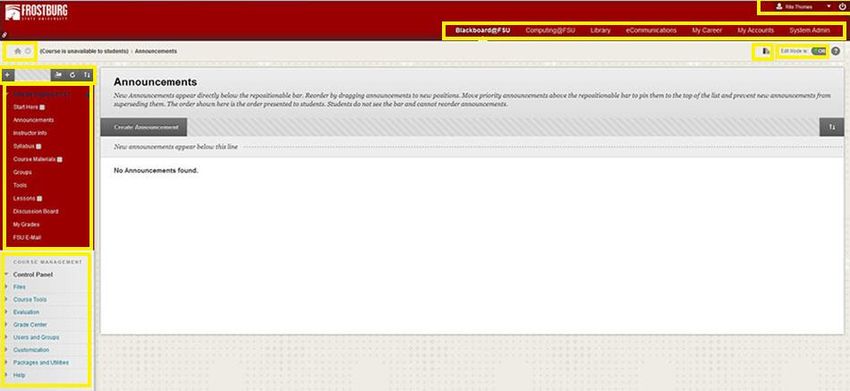
Blackboard 9.1 Basics
                                                                         Faculty Guide

                  Blackboard 9.1 Basics Faculty Guide
                                                   Contents

     Send Email                                                           33
               Send Email from Control Panel                              33
               Send Email from Grade Center                               33
     Course Availability                                                  34
               Make Your Course Available                                 34
     Course Style Settings                                                34
               Customize the Color and Style of Course Menu               34
     Course Copy                                                          35
     Export & Import                                                      35
               Exporting Your Course                                      35
               Import Course Package to a New Course                      35
     Bb Collaborate Session                                          36-40

     Blackboard Assistance Contact Information
     Functional Assistance -
     The Office of Instructional Design & Delivery
     ACIT@frostburg.edu
     Anita McGregor - Administrative Assistant at: 301.687.7090
     Rita Thomas - Instructional Technologist at: 301.687.3172
     Monday - Friday 8:00 a.m. - 4:30 p.m.

     Technical Assistance -
     FSU Help Desk
     helpdesk@frostburg.edu
     301.687.7777
     Monday - Friday 8:00 a.m. - 4:30 p.m.

Page 4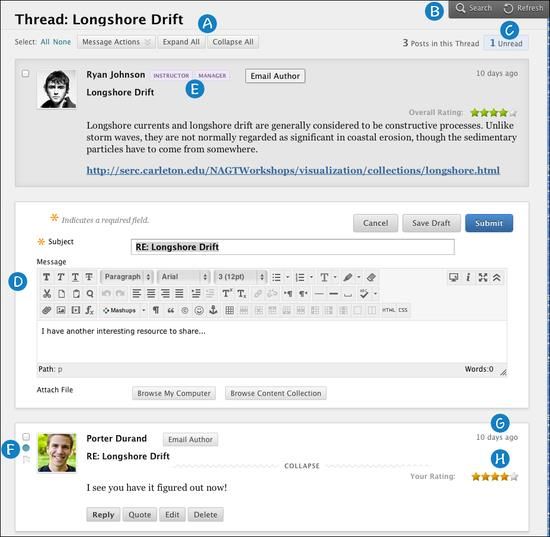
Blackboard 9.1 Basics
                                                                                                        Faculty Guide

Blackboard 9.1 SP 13 - Basics Faculty Guide
This guide will give you instruction on the basic features of Blackboard 9.1 and the NEW features of Ser-
vice Pack (SP) 13. For more information on advanced features, please visit FSU’s Blackboard support site
at http://www.frostburg.edu/blackboard/

Logging In
To login to Blackboard go to
http://blackboard.frostburg.edu
Your login credentials are the same as your FSU
email/PAWS information. If you do not know this
information, please contact the University's Help
Desk at 301.687.7777 or helpdesk@frostburg.edu

Getting Started
Course Creation -
All courses that are officially created in PAWS will automatically have a Blackboard course
component created to correspond with them (please note - each section of each course will have its own
Blackboard course component).
Course Enrollment -

When an instructor is assigned to a specific course or a student enrolls for that course, those enrollments
are automatically reflected in Blackboard. You do not need to request student enrollments. The only
exception would be if you would like to request a teaching assistant or an additional instructor to be
given access to your course. In this circumstance, email the Office of Academic Computing & Instruction-
al Technologies (ACIT) at ACIT@frostburg.edu and the request will be processed for you.
Accessing Courses -
Once you are logged into Blackboard, under the tab
Blackboard@FSU you will see the My Courses panel.
Courses that you are either teaching or enrolled in will
be listed in this panel. Click on the course name to
enter the course.
Modifying the My Courses Panel -
Courses appear within the
My Courses Panel. After
some time has passed, the
courses listed in your My Courses panel may be overwhelming. You can edit which courses are listed in
the panel by following these steps:
1. From the My Courses panel, hover over My Courses and click the cog icon located in the upper right
   corner.
2. Uncheck the courses you do not wish to be displayed and Click Submit.

                                                                                                            Page 5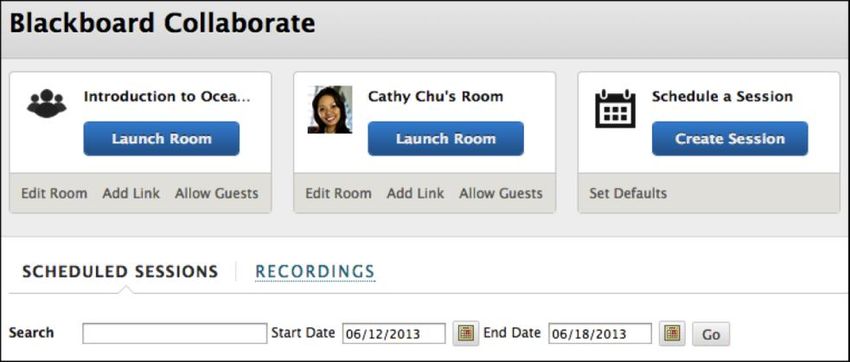
Blackboard 9.1 Basics
                                                                                                                Faculty Guide

       Course Shell
       Each Blackboard course shell is the same by default. The Blackboard environment includes:
        A. Open Quick Links                                E. Add Content or Tool Links
        B. Task-Based Navigation - allows you to jump     F. Course Menu - modify as you like
           from one course to another allowing you to
                                                          G. Control Panel
           perform the same task across multiple courses.
                                                          H. Course Theme - Select from drop-down menu
        C. Global Navigation Menu - one-click entry ac-
           cess to My Blackboard and Log out button.      I. Edit Mode Button - Leaving Edit Mode ‘On’
                                                             allows you to edit content within the window.
        D. Menu Area (Tabs)

                                                                                                                     c
   A                                                                                                                 D
   B                                                                                             H
                                                                                                              I
   E

   F

                                                                This image is an example of a course shell.

   G

               Introduction- Splash Screen

         The first time you log
         onto the new version
         of Blackboard 9.1 SP
         13, a splash screen
         appears.
         The screen welcomes
         you to the new ver-
         sion and asks if you
         would like to see the
         new features that
         were added.

Page 6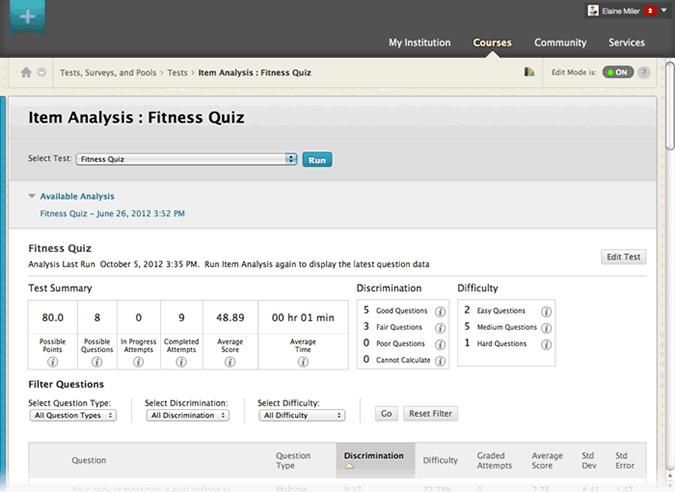
Blackboard 9.1 Basics
                                                                                                       Faculty Guide

My Blackboard: It consolidates critical information from all of your Courses and Organizations.

New Global Navigation Menu: Always present in the top right corner, the new navigation menu is
the entry point to My Blackboard. Also, it provides one-click access to your Courses, Organizations,
Settings, and Help. Click on the drop down arrow to the right of your name in the upper right corner.
Notifications - the numbers in red tell you if there’s something that’s new or needs your attention.

                 The five new tools that make
                 up My Blackboard are: Profile,
                 Posts, Updates , My Grades,
                 and People.

      My Blackboard Tools

        Profile - Enhanced Cloud Profile.
        Bb Home - gives you an overview of the items that are due & have been recently graded. Stu-
        dents - Move your cursor over View to reveal your grade.
        Posts - This page displays the latest posts in the courses and organizations you are enrolled in
        and follow.
        Updates - Review a list of notifications alerting you to important events and information. For
        example: you can see when an assignment has been graded.
        My Grades - View your grades for each assignment, test, or activity in all of your courses. Sort
        the grades by date or course.
        Retention Center - is an instructor-only tool that enables you to give focused attention to
        students who need it.
        My Calendar - Review everything you have due and be reminded of when you need to com-
        plete it.
        People - Find and interact with peers, classmates and instructors.
        Messages - Message users outside of the course environment.
        Spaces - Work and communicate collaboratively with others in your academic network.

                                                                                                           Page 7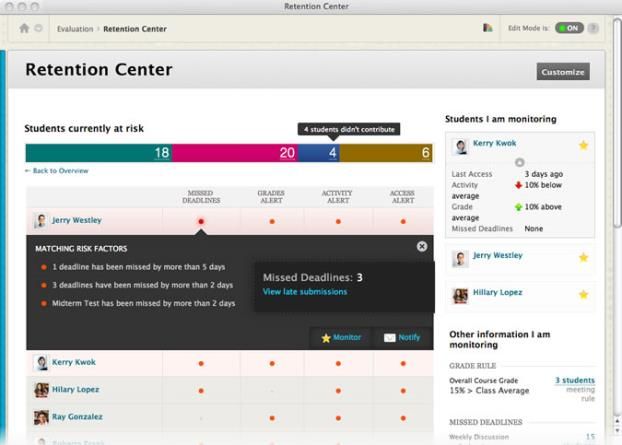
Blackboard 9.1 Basics
                                                                                                             Faculty Guide

            My Blackboard: Profile & Profile Card

     Access Your Profile
     Click the arrow next to your name in the page header to access the global navigation menu. Click the emp-
     ty profile image or your existing image to access your profile.
                                                            You can upload a profile image that is used to repre-
                                                            sent you throughout the system and within the great-
                                                            er Blackboard academic network.

                                                          Your personal image appears in the page header,
                                                          people tool, blogs, journals, discussions, wikis, and
                                                          roster. Your profile avatar also appears in the notifi-
                                                          cations modules—What's New, Needs Attention, and To
     Do—which may appear on the My Institution tab or on a course's home page. The image you upload to your
     profile page overwrites any other avatar images you have with your user account.

     Setting Up Your Profile

     Add a profile avatar - you can upload an image of yourself to your profile or change your existing profile
     image. Images must be les than 5 megabytes in size and at least 50 x 50 pixels in dimension. Acceptable
     file formats include GIF, PNG, JPG, and JPEG.

     Follow the steps on the page you see:

     1. Click the arrow next to your name in the page header to access the global navigation menu.

     2. Click the empty profile image or your ex-
        isting images to access your profile.

     3. On the profiles page, click the Settings &
        Privacy link.

     4. The Settings & Privacy section appears in
        the right panel. Click Change Picture to
        upload an image from your computer.

     5. Click Save.

     Find, View, and Follow Other Users

     You can find and interact with anyone with a user profile. From your course -
     visit your class roster and class contributions to blogs, journals, discussions,
     and wikis. From the people page in My Blackboard and from the Spaces page
     in My Blackboard. The preview will include your name, avatar, institution
     name, graduation date and top eight tiles. Click View Profile to see the full
     profile and interact with the owner. You can click the flag icon to report
     inappropriate content in the profile.

Page 8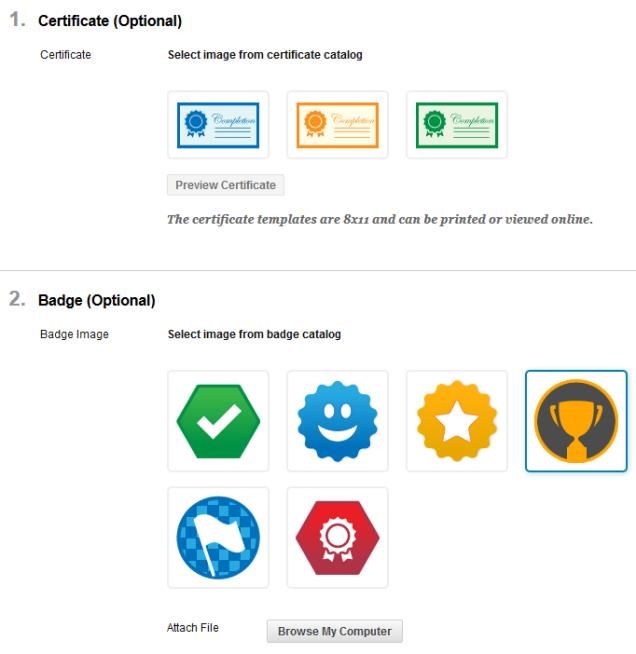
Blackboard 9.1 Basics
Faculty Guide
Learn Profiles are now connected to profiles on MyEdu - a site dedicated to helping students achieve
their goals and position them for career success. This is a robust educational profile. Emphasis on the
students’ outcomes and job-ready skills have become a prime metric in gauging success.
Follow Other Users
You can follow or message users from their profile cards. If you select the Follow button on users’ pro-
files, their posts and comments from their profiles are aggregated on your posts page in My Blackboard.
The People page in My Blackboard provides access to requests to follow you, who is currently following
you, and who you are following.
My Blackboard: Peoples Tool
The People tool enables you to discover others in your academic network. You can see
who is in each of your Courses and Organizations, as well as, everyone across your entire
school that has made their profile visible
school - wide.
1. Click on the Open Global Navigation Menu
2. Click on the Peoples Tool (Smiley face
icon)
3. The Edit My Blackboard Profile page popu-
lates
My Blackboard: Posts Tool
Each new post is shown on the right with a preview of the content, location and author. Click
the post to expand the content on the left. Click Reply or Quote to continue the conversation.
1. Click on the Open Global Navigation Menu
2. Click on the Posts Tool (Postcard icon)
The Posts tool in My Blackboard displays the Posts from Discussion Boards
latest posts in the courses and organizations you
Journals
are enrolled in and follow. The Posts tool con-
solidates posts from all of your courses and or- Wikis
ganizations:
Blogs
Page 9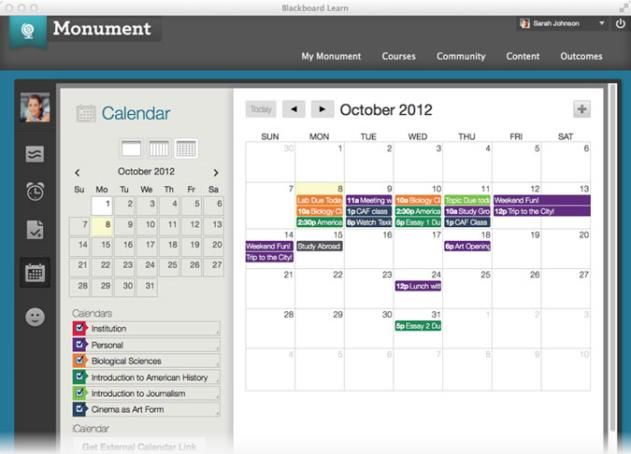
Blackboard 9.1 Basics
Faculty Guide
My Blackboard: Posts Continued:
Journal, Wiki, and Blog posts, you can comment
right from within the Posts interface or you can
click to see the full context of the post in the
course environment.
Discussion Board posts, you can click right into the
interface in the course environment where you can
type your reply. So it’s simple to both stay up -to
-date and involved in the conversation.
My Blackboard: Updates Tool
Updates Tool - The updates tool consoli- When an assignment or assessment is due
dates all of your Notifications from
When assignments and assessments need
across all your Courses and Organiza-
grading
tions. Notifications remain in My Black-
board for a month. Notification Preferences - allows you to choose
exactly what you want to show up in this tool.
1. Click on the Open Global Navigation
Menu Click on the cog in the upper right corner. The
filters are:
2. Click on the Updates Tool (Clock
icon) Look at all notifications at once
The tool updates you on: Look at only those notifications from one
particular Course or Organization
Course Announcements
All Course Announcements
When new content or assignments are added
to a course
Page 10Blackboard 9.1 Basics
Faculty Guide
Text and Text - to -Voice Notifications
Enhancement for all users
Now, you can opt in to receive automated course notifications and system wide an-
nouncements through texts and/or text-to-voice calls.
Stay updated anytime and/or anywhere from your mobile device. Click on Open Global
Navigation Menu, Scroll down to Settings and Click on Settings, Click on Edit Notifica-
tion Settings.
Choose a course on the left located un-
der Edit Individual Course settings or
Courses I am teaching located on the
right side & look for Bulk Edit Notifica-
tion Settings. Scroll down to 3. Set-
tings. The middle column is for mobile
devices.
New Content Editor
Enhancement for all users
The new and improved Content Editor enables
simple content creation through an easy to use
interface. The editor reads, writes and ren-
ders modern HTML . Content you created in
Microsoft Word will copy with a degree of ex-
actness.
Easily add rich content, such as, Mashups
Expand the Content Editor for full-frame
editing
Resize images
Find/replace
Simple icons in the toolbar for everyday
use
New Math Editor in Bb Learn that simplifies creation and delivery of equations by enabling editing
directly from the Content Editor. The new math editor supports saving and copy/paste of equa-
tions using mathML.
Page 11Blackboard 9.1 Basics
Faculty Guide
New Content Editor Continued
Two Views of the Content Editor - Simple Mode and Advanced Mode. Change the view in the upper-
right corner of the content editor.
Simple Mode - The simple mode contains a minimal set of the most used text formatting functions.
Click the show more function - represented by two down pointing arrows - to access more editor
functions.
Advanced Mode - The advanced mode includes every available formatting and object attachment func-
tion. Click the show less function - represented by two up pointing arrows to view only one row of
functions.
Expanding content editor window; Find/Replace; New Math Editor; and Word Count are new
features.
Assessment Item Analysis
Assessment Item Analysis provides statistics on overall test performance and individual test ques-
tions. You can use this information to improve questions for future test administrations or to adjust
credit on current attempts.
There are 3 locations to access item
analysis within the assessment work-
flow. It is available in the contextual
menu for a:
Test deployed in a content area
Deployed test listed on the Tests
page
Grade Center column
Page 12Blackboard 9.1 Basics
Faculty Guide
Assessment Item Analysis Continued
At-a-glance summary - provides insight into student performance on that assessment and how the
question items performed.
From this summary page, when you scroll down, you can see a list of questions sorted in order of dis-
crimination - with the most ineffective listed on top. A simple red dot next to a question tells you if
the question requires review.
How to Run an Item Analysis on a Test
You can run it on tests that include single or multiple attempts, question sets, random blocks, auto-
graded question types, and questions that need manual grading. For tests with manually graded ques-
tions that have not yet been assigned scores, statistics are generated only for the scored questions. Af-
ter you manually grade questions, run the item analysis again. Statistics for the manually graded ques-
tions are generated and the test sum-
mary statistics are updated.
1. Go to one of the following loca-
tions to access item analysis:
A test deployed in a con-
tent area.
A deployed test listed on
the Tests page.
A Grade Center column
for a test.
2. Access the test’s contextual menu
3. Select Item Analysis
4. In the Select Test drop-down list,
select a test. Only deployed tests
are listed.
5. Click Run.
6. View the item analysis by clicking
the new report's link under the
Available Analysis heading or by clicking View Analysis in the status receipt at the top of the page.
The new Item Analysis feature helps you easily refine your tests by evaluating the quality and validity
of each question. Ineffective questions can be easily identified and then you can quickly
correct them with the Automatic Regrade feature.
In the Grade Center, click on the column heading of a test, select Item Analysis. Select
Test and click on the Run button. The green status bar appears. Click on View Analysis.
Page 13Blackboard 9.1 Basics
Faculty Guide
After examining the question, you can see whether it was poor wording, vague answer choices or some
other factor. If you decide to change or update that question, you can immediately take action right
from this page by clicking the “Edit Test” button located in the upper right corner of the summary
page. You will be taken directly to the assessment where you can use the automatic regrading feature
to either update or delete the question and regrade it - even if students have already completed the
assessment.
Video Everywhere
Video Everywhere is a feature of the content editor. The icon is located as the first item on the third
row. The feature provides the ability for instructors and students to:
Record a video on the fly using a webcam and have it seamlessly embedded in course materials,
interactions, and feedback through the content editor.
Reuse previously recorded videos by choos-
ing from one’s own “library” of videos on
YouTube. Log into your YouTube account
and click on Dashboard to see your record-
ed video(s).
Click on the Record from Webcam button.
Click on the Sign in to YouTube button &
sign in.
Click on the Grant Access button.
Click on Record from Webcam button.
Click the Start Recording button & Click
OK.
Playback your video and when satisfied,
click on the Upload button.
Page 14Blackboard 9.1 Basics
Faculty Guide
Calendar Redesigned
The Calendar in Blackboard Learn has been significantly enhanced:
When accessed from My Black-
board or the Tools menu on the
Blackboard@FSU tab, the calen-
dar displays a consolidated view
of all institution, course, organi-
zation, and personal calendar
events for a user. Calendar
events are color coded by
course.
How to Access the Calendar
1. On the course menu, click
Tools.
2. On the Tools page, select
Calendar.
OR
1. On the Blackboard@FSU tab,
select Calendar in the Tools panel.
OR
1. From the global navigation menu, select Calendar.
2.
How to Create an Event
1. On the calendar, click the plus (+) to create a new event. You can also click inside a date to create
an event.
2. Type the New Event Name.
Select a Calendar to associate the event to, such as your personal calendar.
Only instructors and administrators can add events to the course and institution calendars.
3. Select the Start and End times.
4. Type the Event Description. There is a 4,000-character limit for event descriptions. Click Save.
How to Edit or Delete an Event
On the Calendar, navigate to the date of the event in the main view.
From the event you can:
Click the event to edit or delete it.
Drag an event to another date in the main view to change the date of the event. The time of the
event and calendar it is associated with remain the same. See the picture on the top of the next page.
Page 15Blackboard 9.1 Basics
Faculty Guide
Drag an event from the main view to another date on the smaller monthly view to change the date.
Course Items With Due Dates:
When you create items with due dates, such as tests or assignments, the calendar event automatically
appears on the course calendar for that day.
For calendar events associated to content items, all adaptive release and availability rules are handled,
ensuring that the release of an item is in synch with the calendar.
How to Add a Calendar Link to the Course Menu
If you want students to access the course calendar from your course, you can add a link to the course
menu for one-click access to the tool. You can also customize the name of the link.
1. Change Edit Mode to ON and point to the plus sign above the course menu. The Add Menu Item drop
-down list appears.
2. Select Tool Link.
3. Type a Name for the link.
4. From the Type drop-down list, select Calendar.
5. Select the Available to Users check box.
6. Click Submit.
Page 16Blackboard 9.1 Basics
Faculty Guide
Discussion Board Redesigned
The Thread Detail page is thoroughly redesigned, yet, maintains all of its existing functions. High-
lights include:
All posts on one page - all of the posts in a thread are now visible at the same time on one page.
Role highlighting - posts made by forum managers and moderators now contain the user’s course
role and forum role.
Inline replies - when replying to a post, the content editor window appears on the same page, in
the context of the discussion.
Post First Setting - instructors can use a new forum setting to require students to post to a forum
before they can see other students’ posts.
Page 17Blackboard 9.1 Basics
Faculty Guide
Discussion Board Redesigned Continued
The Thread Detail Page maintains all of its existing functions. All of a thread’s posts are now visible
at the same time on one page. Larger avatars help you easily identify the author.
A. Expand All and Collapse All manage the visibility of posts on the page. All of the batch actions
are still available.
B. Functions appear when you point to the page - point your mouse anywhere on the Thread Detail
page, and action bar functions such as Search and Refresh appear at the top. When you point to
a post, the Reply, Quote, and Expand or Collapse functions appear. This increases the vertical
screen space available for viewing posts.
C. Click the number of unread posts to see a collection of only the unread posts in the thread.
D. Inline replies provide the content editor on the same page, within the context of the discussion.
You are not taken to a new page to post a reply.
E. Posts made by forum managers and moderators highlight the user’s course role and forum role. If
your school has custom roles, they are displayed. Role highlighting is available only in the discus-
sion board; highlighting of discussion board posts within the Bb Stream will be available in a fu-
ture Learn release.
F. New Mark as Read indicator. The icon is blue when the post is unread and white when it has been
read. Posts are marked as read as you scroll down the page, after a slight delay. Only posts that
are viewed on-screen and expanded are marked as read, so posts are not automatically marked
read by quickly scrolling down the page. You can manually change the status of a message by
clicking the Mark as Read icon.
G. Post dates are displayed as relative dates such as "7 days ago." When you point to the relative
date, the absolute date of creation or editing and the number of views displays.
H. Overall Rating shows the average rating for a post, if the Rate Posts feature is turned on. When
you point to the rating area, it changes to show Your Rating.
Fill in the Blank Questions - Enhanced
When creating a fill in the blank ques-
tion, you can choose three different
options for the correct answer: Con-
tains, Exact Match, Pattern Match. By
selecting Contains from the drop down
list, it will allow for abbreviations or
partial answers.
Also, you have the option to select Case
Sensitive.
Page 18Blackboard 9.1 Basics
Faculty Guide
Fill in the Blank Questions - Enhanced Continued
When grading Fill in the Blank questions, you can
use “contains” and “pattern match.” For exam-
ple, instead of trying to enter all possible correct
answers to the question: Who was the first presi-
dent of the United States? You can select
“contains” and type Washington instead of typing
George Washington, Washington, President Wash-
ington, President George Washington, etc.)
Test Access Log
Test Access Log provides detailed information on student test attempt interactions. When a student ran
into problems during a test, the log will show the time a test was started. Also, if a network or Internet
disruption occurred during the test the log would show an unusual gap in time.
1. In your course, click on Full Grade Center in the Control Panel.
2. Find the test column and locate the individual.
3. Click on Grade Details in the cell of the individual, click on View Grade Details,; Click on View At-
tempts; Click on the Test Information Drop Down.
4. Click on the Access Log button on the Attempts page of the test.
Page 19Blackboard 9.1 Basics
Faculty Guide
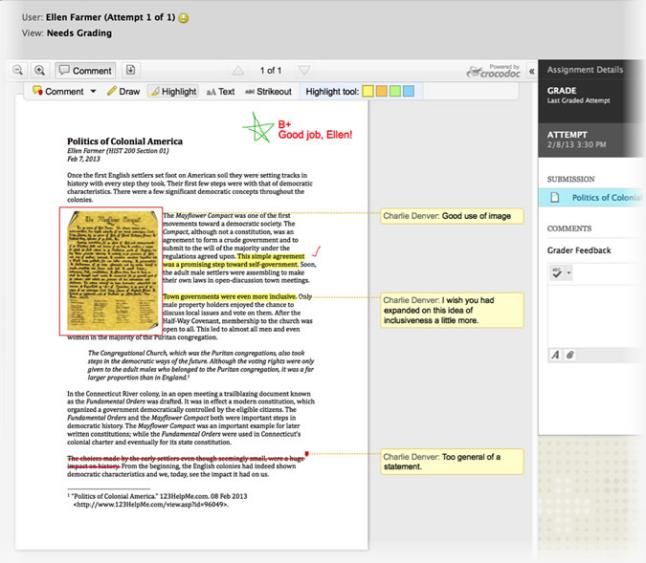
Inline Assignment Grading
Inline Assignment Grading is a re-
vision to the workflow for grading
Assignments in Blackboard Learn.
Instead of requiring Instructors to
download student-submitted files
to view or edit those submissions,
Instructors will now be able to
view student-submitted files
“inline,” i.e. in the web browser,
without requiring any plugins, ap-
plets, or client-side applications.
Additionally, annotation tools will
be made available as part of the
inline viewer, enabling Instruc-
tors to provide feedback includ-
ing comments, highlights, and
even drawings/annotations direct-
ly on the inline view of the docu-
ment.
Retention Center
The Retention Center provides an
easy-to-use data visualization and
pre-configured rules for identifying
at-risk students in a course. Be-
cause it requires no set up on the
part of the instructor or adminis-
trator, it automatically calls out
students who may need the instruc-
tor’s attention, making it easy for
instructors to catch and respond to
risk factors quickly, while there is
time to help the at-risk students
succeed in the course.
Page 20Blackboard 9.1 Basics
Faculty Guide
Test Availability Exceptions & Exporting Test Questions
To edit options for a deployed test or survey, ac- Time of test
cess a test or survey’s contextual menu and select,
Auto submit on or off
Edit the Test Options or Edit the Survey Options.
Availability of test using start and end dates
New settings have been added to Test and Survey
Options pages, available only after the test is add-
Force completion on or off
ed to a content area, called Test Availability Ex-
ceptions. The new settings allow you to select one
Exporting Test Questions
or more groups of students and make a number
of exceptions to the already established availabil-
ity settings. You can use exceptions to provide an All questions are now retained in exported and imported
accommodation to a disabled student or provide tests, including questions that originate outside the ex-
accommodations for technology and language dif- ported test, such as Question Sets, Random Blocks, and
ferences. Question Links. When the user exports a test and imports
it back into a different course, all questions are now pre-
You can change these settings at any time, even sent irrespective of their origin.
after the test has been attempted by some stu-
dents. If conflicts in rules occur, the most permis- Questions that are in question sets and random blocks in
sive settings for that user or groups of users is the originating test are imported into the new course in
granted. For example, students would receive the question pools. Single questions that were linked in the
greatest number of attempts, longest availability originating test are imported as “native” (non-linked)
time, and so on. questions.
You can create exceptions for:
Number of attempts
Show Test Results & Feedback to Students
Feedback Mode Description
Due Date and Late Submissions
A new setting allows instructors to decide
whether to allow a student to take a test after
the due date has passed. If students are not al- When Sets the time when test results
lowed to take a test after the due date has and feedback are show to stu-
passed, they will receive a message telling them dents:
the test cannot be completed because the due
date has passed. After Submission
One-time View
When you allow late submissions, they are clear-
ly marked on the Needs Grading page - the View On Specific Date
All Attempts.
After Due Date
By setting up rules, you can set the release of After Availability and End
progressive feedback to keep test results secure
Date
and prevent cheating.
After Attempts are Graded
Page 21Blackboard 9.1 Basics
Faculty Guide
Achievements Tool
The Achievements tool allows instructors to issue rewards to students in the form of badges and cer-
tificates. You designate criteria for issuing rewards to students. The students can see which rewards
they have earned and what is required of them to receive additional rewards. This will provided in-
sight into learning progression toward defined competencies. You can easily see which students have
reached learning milestones. Students
are able to publish badges to Mozilla Open
Backpack, transporting evidence of their
learning outside of Blackboard Learn.
Creating & Issuing Achievements -
1. From the Control Panel, click on
Course Tools and select Achieve-
ments.
2. Click on Create Achievement.
3. Select the type of achievement.
Course Completion: The cer-
tificate reward is required; an
additional badge is optional.
Milestone: The reward can
only be a badge.
Custom: The reward can be a badge, certificate, or both.
4. Type in a title for the Achievement you are creating.
5. Select a presentation location (a place in the course where students are likely to earn the badge
or certificate).
6. Determine if students can see the existence of the achievement before earning it.
Choose Yes, if the reward is meant to motivate all students.
Choose No, if there are special rewards that will only be granted to specific students that
should not be seen by everyone.
4. Optionally, type a description. Clearly define what you expect students to complete to earn the
associated reward.
7. Click Define Triggers to continue.
** IMPORTANT: An achievement will not be presented to students in the student view of the
achievements tool until a trigger rule is defined and a reward is selected.
Page 22Blackboard 9.1 Basics
Faculty Guide
Achievements Tool Continued
Defining Criteria Triggers for Achievements - You can define one or more rules that will trigger the
release of the reward. Note: You must define at least one rule.
The achievements tool is built upon the content adaptive release technology of Blackboard Learn. This
currently includes the following:
Attempts on test, surveys or assignments
Grades on tests, surveys, assignments, graded discussion boards, graded wikis, graded blogs, grad-
ed journals
Manual Grade Center columns
Marked Reviewed statuses on course content
Group membership or specific users
Starting date for earning an achievement
Note: Setting a Display After date means that students cannot earn the reward before that date,
even if they have already met the criteria. It is not the same as an end date and is not a deadline.
To create a rule, name it, and set each criterion necessary for fulfilling the requirements of the
achievement. You can cre-
ate additional criteria for
grade and review status by
clicking the add functions.
Example: If students must
complete four exams in
your course and have a fi-
nal grade of 70%, there
would be five criteria:
Attempt on Exam
A,
Attempt on Exam
B,
Attempt on Exam
C,
Attempt on Exam
D, and
Grade for the
running total
column of at
least 70%.
Page 23Blackboard 9.1 Basics
Faculty Guide
Achievements Tool Continued
In circumstances where different criteria are possible, click Add Another Rule to create another rule.
For example, if a learner needs an accommodation and has a different performance requirement to
receive the reward.
To manually award an Achievement, use the membership criteria options to select the recipient(s).
For example - giving a mayor badge for being a discussion leader.
Click Select Reward to continue.
Choosing the Reward - on the final page, choose the reward. Depending on the achievement type,
different options are presented.
Course Completion: The certificate reward is required; an additional badge is optional.
Milestone: The reward can only be a badge.
Custom: The reward can be a badge, certificate, or both.
You can preview how a certificate will appear to students. It includes the issuing institution as speci-
fied by the administrator, the user’s name, the course name, and the date the criteria of the achieve-
ment were met.
For badges, you can select an image from the catalog or upload a custom image. An uploaded badge
image is available for reuse within
your course. If you uploaded an
image and need to remove it, you
can delete the file from the
Course Files in the Achievements
directory. Uploaded images are
automatically resized.
The issuer name is pre-populated
based on the administrator’s set-
tings. If appropriate, and allowed
by the administrator, you can
modify the issuer name. An expi-
ry date can be specified for the
badge and, if allowed by the ad-
ministrator, the badge can option-
ally be available for publishing to
recipients’ Mozilla Badge Back-
packs.
Select Submit to issue the
achievement.
Page 24Blackboard 9.1 Basics
Faculty Guide
Achievements Tool Continued
Copy/Import/Export/Archive/Restore Behavior - Achievements are dependent on both content and
adaptive release rules. If only content is copied between courses, the trigger rules will be lost. If
content is not included in a copy or export/import, achievements are not captured. As long as both
content and adaptive release rules are selected in the process, Achievements will be handled
properly.
Viewing Achievements and Recipi-
ents - In the Achievements tool under
Course Tools in the Control Panel, in-
structors can see all of the Achieve-
ments defined in the course, as well
as, a count of recipients for each of
the Achievements. Clicking the
“Recipients” link shows details about
those students who have earned each
of the Achievements. Clicking a stu-
dent's name will present that student’s
view of the “My Achievements” page.
The “Date Received” shown in the
screenshot lets the instructor know
when the students saw the notification
of their earning of the Achievement; typically this is immediately upon earning. But, in cases where
instructor grading or manual awarding was involved, the date received is when the student was
shown their Achievement reward.
Align Rubric Row Criteria to Goals
Instructors can now align individual criteria listed in the row of a rubric to course goals, providing a level
of aligning a specific criterion to course goals using a rubric.
1. From any row in a rubric, select Add Alignments from the
contextual menu.
2. Click Add Alignment to search for course goals.
3. Select goals and Submit.
Page 25Blackboard 9.1 Basics
Faculty Guide
Manage Course Menu - New Items can be created and current items deleted/modified. Select
Add Menu Item button (the plus sign) and add one of the following:
1. Content Area - Place where course content will exist
(e.g., Assignments, Exams, Lessons, Course Material, etc.)
2. Module Page -
3. Blank Page - Direct link to a content item (e.g. PowerPoint,
Journal Article, etc.)
4. Tool Link - Link to any tool within the Blackboard course (e.g. Dis-
cussion Board, Announcements, Calendar, My Grades, Roster, Wikis,
etc.)
5. Web - Link to any website outside of Blackboard.
6. Course Link - Direct link to content previously existing in the course
(e.g. an exam that is currently available under the Exam button).
7. External Link - Link to any website outside of Blackboard.
8. Subheader - An inactive link that will allow you to divide your con-
tent areas into sections.
9. Divider - A line that divides menu buttons into groups.
Remove Menu Item -
To remove an existing course menu item, click the action
menu button to the right of the menu item name and se-
lect Delete. You will then be prompted to confirm your
request by clicking OK. You have the option to Rename
Link or Hide Link. Selecting Hide Link will hide the link
from users instead of removing it completely.
Reorder Menu Item -
To reorder the course menu items, hover over the item; then click and hold
the up/down arrow to the left of the menu item name and drag/drop the item
to its new position.
Control Panel
In Blackboard 9.1 the control Panel tools and
functions are located within a subpanel that
can be accessed by clicking the corresponding
action menu button.
Page 26Blackboard 9.1 Basics
Faculty Guide
Announcements
The Announcements
page is the default
Entry Point into the
course.
Add a New Announcement -
From the Control Panel, click the action menu button for Course
Tools, then select Announcements. From the Announcements page
you will then click Create Announcement and complete the following:
1. Announcement Information - Give the announcement a subject,
then type the message of the announcement in the appropriate
field.
2. Web Announcement Options - Choose the announcement to be
Not Date Restricted or Date Restricted (choosing this option will
allow you to enter Display After and Display Until options).
3. Course Link - Provide a direct link to an item currently existing in
the course.
4. Click Submit.
Instructor Information/Office Hours
Instructor information can be posted in the appropriate course menu item.
1. From the Course Menu, click Instructor Info (if you do not have an Instructor
Info menu button, add a new Tool Link menu item, and label it Instructor Info.
From the dropdown menu, select Contacts - be sure to select Available to Users.
2. Click the Create Contact button in the upper right corner of the Contacts window, fill out the
form, and click Submit.
Adding Course Content
Adding content to your Blackboard course
can be accomplished in any Content Area
(e.g. Assignments, Course Materials, Les-
sons, etc.).
From any Content Area in the Course menu,
select the action menu in the Build Content
button.
Page 27Blackboard 9.1 Basics
Faculty Guide
Adding Course Content Continued
Select from one of the following options: *Note on Mashups: This feature
allows instructors to add multime-
Create: New Page: dia content to a course from an
external website. This content is
Item Content Folder
used in a variety of ways within a
File Module Page course: a standalone piece of
course content, part of a test
McGraw-Hill Content Blank Page
question, a topic on a discussion
Pearson’s MyLab/Mastering Mashups: board, or part of an assignment.
If you are using Mashups, please
Audio Flickr Photo
be sure that the Mashup is public
Image SlideShare Presentation and not private. When using third
party Mashups, be sure to verify
Video YouTube Video
that the Mashup is allowed under
Web Link copyright.
Learning Module
Lesson Plan
Assignments & Assessments
Test, Survey, Assignment, Self and Peer Assessments, McGraw - Hill Assignment, Mobile Compatible
Test, and Turnitin Direct Assignment can be added to your course
through the Create Assessment but-
ton within any Content Area. If for
some reason you do not see these
options, re-enable them through the
following steps:
1. From the Control Panel, click Cus-
tomization, then Tool Availability.
2. Put a check beside all the tools you wish to be made available in that
specific course and click Submit.
Assignments -
When an Assignment is created, a Grade Center item corresponding to that Assignment will automati-
cally be created. Instructors now have the ability to allow either a limited or unlimited number of sub-
mission attempts. To create an Assignment:
1. From a Content Area from within a course select Create Assessment, then select Assignment.
2. Give the Assignment a name and type any instructions or description in the Instructions field.
3. Attach a file (optional).
Page 28Blackboard 9.1 Basics
Faculty Guide
4. Enter number of points possible.
5. Select Availability, Number of Attempts, Date Restrictions, and Track Number of Views option.
6. Enter Due Date.
7. Select Recipients. (If you select Groups of Students, you must have groups created already.)
8. Click Submit.
Download Student Assignment Submissions -
When a student has submitted a file for an Assignment,
a green circle with a white exclamation mark will ap-
pear in the associated Grade Center column indicating
the item is ready for grading. Please note that files up-
loaded to an Assignment or submitted as an Assignment should have short file names with no spaces
or special characters in the name (numbers and letters only).
Submission attempts can be viewed one at a time or all submission can be downloaded into a .zip file.
To view submission attempts one at a time:
1. From the Control Panel, click Grade Center, then either Full Grade Center or
Assignments (both will let you view the Assignment).
2. Hover the cursor over the area with the green box with the white exclamation
point, click the action menu button, and select View Grade Details.
3. From this window you will select View Attempt, then click the file name to
download.
To download multiple submission attempts at once:
1. From the Control Panel, click Grade Center, then either Full Grade Center or
Assignments (both will let you view the Assignment).
2. Click the action menu button in the Assignment column and select Assignment
File Download.
3. Select all users you wish to download and click Submit. You will then be
prompted to download the .sip file containing all Assignment submissions.
Clear Student Assignment Attempt -
1. Click Grade Center in the Control Panel, then choose either Full Grade Center or Assignments.
2. Click on the cell of the Needs Graded icon and click the action menu button, then select
View Grade Details.
3. From this window, select Clear Attempt, then click on OK to confirm your request.
Page 29Blackboard 9.1 Basics
Faculty Guide
Assessments -
Tests, Surveys, and Self and Peer Assessments are all created in the same manner
within Blackboard. Create a Test -
1. From a Content Area within a course, click Create Assessment, followed by
Test, then Create.
2. Give the test a Name, Description and Instructions (optional), then click Submit.
3. Add questions to the test by using the Create Question, Reuse Question, and/or
Upload questions options on the Test Canvas page.
For more information on specific test question types, please visit the blackboard Support Site at
http://www.frostburg.edu/blackboard/
Add a Test to a Content Area -
Once the test has successfully been created, you must manually
add the test to any Content Area within the specific Blackboard
course.
1. From a Content Area within a course, click Create Assess-
ment, then Test.
2. Tests that have been created and are not currently deployed
in another Content Area will appear within the heading Add
Test. Select the test you wish to deploy and click Submit.
Edit Test Options -
Once you click Submit, the Test Options page will appear. Or, next to the test name, click on the ac-
tion menu button (Drop down arrow) and select Edit Test Options. From this page you have the ability
to edit the following:
1. Test Information
2. Test Availability
3. Due Date
4. Self Assessment Options
5. Test Feedback
6. Test Presentation
After you have edited the Test Options, click Submit.
Page 30Blackboard 9.1 Basics
Faculty Guide
Grading Student Submissions -
Blackboard has the ability to automatically grade tests that contain certain types of test questions (e.g.
multiple choice, true/false, etc.). When these types of questions are used, you do not need to manually
enter a grade. However, if you choose to utilize ques-
tion types such as short answer, essay, or file
response, you will need to manually enter a grade.
1. From the Control Panel click Grade Center, then
either Full Grade Center or Tests (both will let
you view the Test).
2. Hover the cursor over the area with the
exclamation point in the green box, click the ac-
tion menu button,
and select View Grade Details.
3. From this window click View Attempts. The
student’s test submission will appear and show
each test answer. You can then assign the allotted points and click Save and Exit.
Clear Student Test Attempt -
1. From the Control Panel click Grade Center, then either Full Grade Center or Tests (both will
let you view the Test).
2. Hover the cursor over the area with the exclamation
point in the green box, click the action menu but-
ton, and select View Grade Details.
3. From this window select Clear Attempt, then OK to
confirm your request.
At some point in time, you may need to clear a student’s test attempt so they may resubmit.
IMPORTANT: Please note that when any attempt is cleared, it is removed from the entire system.
We cannot retrieve that attempt.
Discussion Board
The Discussion Board is an interactive tool made up of forums that
can be organized around a particular subject.
Create a Forum -
1. From the Course Menu, click Discussions (if you do not have a
Discussions menu item, add a new Tool Link menu item and la-
bel it Discussions, from the dropdown menu select Discussion
Board - be sure to select Available to Users). Once in the Dis-
cussions area, click the Create Forum button.
Page 31Blackboard 9.1 Basics
Faculty Guide
Create a Forum cont’d -
2. Complete the following information:
A. Name & Description
B. Set Forum Availability Options
C. Establish Forum Settings and Grading Options
3. Click Submit.
The Grade Center
The Grade Center is an effective record-keeping tool to support student learning. The Grade Center
opens into a spreadsheet view listing student users in rows and graded items in columns. All features
of the Grade Center can be accessed through the spreadsheet and grades are recorded automatically for
assignments, assessments, and surveys. Course work managed outside of the Blackboard system will
need to be managed manually.
Create a Grade Center Column -
1. From the Control Panel click Grade Center, then
Full Grade Center.
2. From the toolbar above the students name, click
Create Column.
3. Complete the following fields:
A. Column Name F. Select a Category (optional - however,
if you choose to weight your grades by
B. Grade Center Display Name (optional)
category you will need to select the
C. Descriptions (optional) appropriate choice.)
D. Choose a Primary Display Option G. Points Possible
E. Secondary Display Option (optional) H. Add Rubric
4. Choose a due date or leave none selected.
5. Select from the following options:
A. Include Column in Grade Center Calculations - the column is included in the possible
selections of items when creating Calculated Columns such as Weighted Grade Columns
or Total Point Columns.
B. Show this Column in My Grades - Grades will appear in My Grades (the student view),
View Grades, and the Report Card module (when available).
C. Show Statistics (average and mean) for this column to Students in My Grades - Includes
statistical information with the grade value when shown to students.
6. Click Submit.
Page 32Blackboard 9.1 Basics
Faculty Guide
Manually Enter a Grade -
To manually enter a grade into the Grade Center, click into the box associated with the student and
grade center column. The text field to enter the grade will turn yellow. Enter the grade and hit return
on your keyboard.
Grade Center Icons - User Unavailable - User no longer has access to the course.
Column Not Visible to Users - Column is not visible to students.
Completed - Item has been completed by student. This icon will be seen on grading columns
that are Surveys or if the grading column has had the Complete/Incomplete associated with it.
Needs Grading - Student has submitted an assignment that needs to be graded. This icon will
appear on Assignment columns and Test columns containing essay or short answer questions.
Override - The instructor has manually changed a student’s grade on an Assessment or
Assignment.
Attempt in Progress - A student is currently using this Assessment or Assignment.
External Grade - Should be set to the grade the instructor wants to be known as the final
grade for the course.
Grade Exempted for this User - The student has been allowed to skip this grading column
without penalty by the instructor.
Error - Grade Center Error.
For more information on specific Grade Center functionalities, please visit the Blackboard Support Site
at http://www.frostburg.edu/blackboard/
Send Email
There are numerous ways to send emails to users enrolled in your Blackboard course.
All user emails are associated with FSU email accounts. When an email is initiated from
within Blackboard, it is automatically sent to the recipient's FSU email. This
process cannot be changed.
Send Email from Control Panel -
To send an email from the Control Panel click Course Tools, then Send Email.
You will be prompted to choose a group of users or select individual users. Fill in
the associated fields and click Submit.
Send Email from Grade Center -
1. From the Control Panel click Grade Center, then
Full Grade Center.
2. Put a check in the box beside all email recipients’ names. Click
Email above the user names, then Email Selected Users.
3. Fill in applicable fields and click Submit.
Page 33Blackboard 9.1 Basics
Faculty Guide
Course Availability
When a course is created in Blackboard, it is automatically set to
not currently available. Upon login, all unavailable courses are
denoted with an “not currently available” statement to the right
of the course name in the My Courses Module under the Black-
board@FSU tab. You must manually make your courses availa-
ble for students to have access.
Make Your Course Available -
1. From the Control Panel click
Customization, then Properties.
2. Under number 3, Set Availabil-
ity, select Yes.
Course Style Settings
The Course Style settings control how the course appears to users. By selecting colors,
buttons, and text, you can individualize the appearance of the menu. In addition, a
course banner may be added to the top of the course entry page. There are two ways
to customize style settings.
Change Course Themes Icon
1. Click on the Change Course Theme Icon and select a color theme. Scroll
down the list for different color options.
Customize the Color and Style of Course Menu -
From the Control Panel click Customization, then Teaching Style.
1. Select Course Structure, a preview of the course menu is displays. Se-
lect a Focus on the left side panel, then click on the Use This Structure
button.
2. Select Course Entry Point. Announcements is set as the default set-
ting.
3. Select Course Theme (Over 50 professionally designed themes available.)
4. Select Menu Style - by selecting Text or Buttons, then choosing a color or button style, the pre-
view image will reflect those changes.
5. Course Menu Display - Permit Both Views is the default setting.
6. Default Content View - Icon and Text is the default setting.
7. Select Banner - Click on Browse My Computer button to navigate to the picture of your choice.
Banners should be saved as .jpg or .gif files. The suggested size of a course banner is 600 pixels (wide) X 100 pixels
(long).
8. Submit - Click on Submit button. A pop-up window displays stating that you chose to change the
structure, Click OK. The Course Style will be updated.
Page 34Blackboard 9.1 Basics
Faculty Guide
Instructors who teach the same course from semester to semester may wish to reuse the content posted
in their original Blackboard course. This can be accomplished by using Course Copy or Exporting the
course material then Importing that material into the new course.
Course Copy
From the Control Panel click Packages and Utilities, then Course Copy.
Course Type - it is set to a default setting. Under number 2 - Copy Option,
click on the Browse button to choose the Course Destination.
Select Course Materials: Click the Select All button to copy over all materials or click next to each indi-
vidual item that you want copied over. A checkmark will appear next to the item enabling those items
to be copied. Click Submit.
Export and Import
Exporting Your Course -
1. From the Control Panel click Packages and Utilities, then Export/
Archive Course.
2. Click the Export Package button in the upper left corner of the Export Course page (clicking Ar-
chive will make an exact copy of your course including enrollments and user information. You do
not want this option if you are going to use the course content in a different semester).
3. Under number 3, Select Course Materials, select all the materials to include in the Export Package,
then click Submit.
4. A green banner will appear at the top of the page. An email will be sent to your FSU account when
the Export Package is ready for download (packages are downloaded into a .zip file).
5. Once you have received the confirmation email, return to the Export/Archive Course page of the
course you exported from.
6. Click on the underlined file name that ends with ‘.zip’. You will then be prompted to save the .zip
file to your local computer. It is important to remember where you save this .zip file. You will
need the file to import to the new course (DO NOT open the .zip file once downloaded. If opened,
the package cannot be Imported).
Import Course Package to a New Course -
1. From the Control Panel click Packages and Utilities, then
Import Package/View Logs.
2. Click the Import Package button in the upper left corner of the Import Package/View Logs page.
3. Under number 2, Select a Package, click Browse to select the .zip file on your local computer that
was downloaded from the previous Export.
4. Under number 3, Select Course Materials, choose the course materials from the package you wish to
import to the new course, then click Submit.
5. A green banner will appear at the top of the page. An email will be sent to your FSU account when
the Import Package process is complete.
Page 35Blackboard 9.1 Basics
Faculty Guide
Bb Collaborate Sessions
For every course, Blackboard Collaborate generates two types of rooms that require no schedul-
ing.
Course Room: A default room provided for your course that lasts as long as the duration of your course.
By default, the room is titled with your course name and is always available.
By default, students enter your Course Room as participants. Instructors and administrators enter as
moderators. You can allow all participants to join as moderators so collaboration can start without your
presence.
If you have supervision concerns, you can completely turn off your Course Room at the course level.
Use your Course Room to acclimate students to your course setup, introduce new concepts, host Q and A
sessions, lead study sessions, and grade group presentations.
My Room: A default room provided for each instructor that lasts as long you retain an account on the
system. By default, the room is titled with your name and is always available.
My Room is accessible from any course where you have the instructor role.
You can disallow participants from a certain course to enter your room.
By default, students enter your room as participants. You can allow all students to join as moderators
or only allow select users from a course you teach to join your room.
Use My Room to provide office hours or help to users across all your courses. When privacy is a con-
cern, create a new session and restrict access to only the user you need to discuss an issue with.
The Main Blackboard Collaborate Page
You can enter an existing room, edit settings for existing rooms, set defaults for sessions you want to cre-
ate, create new sessions from this page, and search existing sessions and recordings.
Begin Collaborating
Click Launch Room to enter a room. The Launch Room function only appears if the session is ready to be
launched. On the Room Details page, click Launch Room to initiate Blackboard Collaborate.
Page 36Blackboard 9.1 Basics
Faculty Guide
Bb Collaborate Sessions - Main Page
The Main Blackboard Collaborate Page
You can enter an existing room, edit settings for existing rooms, set defaults for sessions you want to
create, create new sessions from this page, and search existing sessions and recordings.
Begin Collaborating
Click Launch Room to enter a room. The Launch Room function only appears if the session is ready to be
launched. On the Room Details page, click Launch Room to initiate Blackboard Collaborate.
Collaborate Launcher Pop-up Window
With some operating systems, when users click the Launch Room function, a pop-up window provides
the following two options.
1. If you do not have the Collaborate Launcher, download it now, and when complete, double-click
the .collab file in your Downloads folder to launch your session.
2. f you have already downloaded the Collaborate Launcher, double-click the .collab file in your
Downloads folder to launch your session.
You may find you do not need to use the launcher as the .jnlp file opens your session properly after
clicking Launch Room.
If you want to continue using the launcher for future sessions, click the You many need Collaborate
Launcher link at any time to access the pop-up window again.
You can learn more about downloading or using the Collaborate Launcher from the link provided in
the pop-up window.
Page 37Blackboard 9.1 Basics
Faculty Guide
Bb Collaborate Sessions Continued
Edit Settings
You can customize any of your rooms. Click Edit Room to adjust settings for simultaneous speakers,
private messages, the recording options, and more.
Add a Course Link
Click Add Link to create a course link to the room in one of your course areas, such as a content area
or learning module. When you add a course link, students can access the room at a designated time
alongside the relevant content in your course.
Allow Guests
You can send guests a URL to access your Blackboard Collaborate session. In the pop-up window, add
your guests' email addresses and click Send Invitations. In the email from you, your guests will be able
to view the session details such as when the session starts and ends. After clicking the URL, they can
access the same Launch Room link as your students do to initiate Blackboard Collaborate.
Search Sessions and Recordings
Type a keyword or phrase in the Search box to locate a specific session or recording. You can also pro-
vide a date range for the search. Results are limited to the scheduled sessions or available recordings
listed in the course you are in.
Page 38You can also read