Kodak EasyShare M763/M863/MD863 digital camera - Extended User Guide
←
→
Page content transcription
If your browser does not render page correctly, please read the page content below

Kodak EasyShare
M763/M863/MD863 digital camera

Extended User Guide
www.kodak.com
For interactive tutorials: www.kodak.com/go/howto
For help with your camera: www.kodak.com/go/m763support,
www.kodak.com/go/m863support, www.kodak.com/go/md863support

Eastman Kodak Company
Rochester, NY 14650
© Eastman Kodak Company, 2007
All screen images are simulated.
Kodak, EasyShare, and Perfect Touch are trademarks of Eastman Kodak Company.
P/N 2F6824_en

Product features

Front view

            1                2
                                  3
                                      4     5
                                                    6

                                                                         7

                                                                         8

                                                                        9

                             11                                        10

1   Shutter button                    7   Lens
2   Mode dial                         8   Speaker
3   Flash button                      9   USB
4   On/Off button                     10 DC-In (5V)     , for optional AC adapter
5   Flash                             11 Microphone
6   Self-timer/video light

www.kodak.com/go/support                                                        i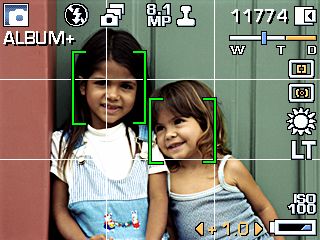
Product features

Back view
                            1       2        3       4
                                                             5
                                                                 6

                                                                      7

                                                                 optional memory card
             14                                          8       (sold separately)
                   13           12 11 10         9

 1   LCD                                8    SD or SDHC memory card slot
 2   Ready/Battery charging light       9    Battery compartment
 3   Delete button                      10   Share button
 4   Zoom button (Wide/Telephoto)       11   Menu button
 5                                      12   Review button
 6   OK button                          13 Dock connector
 7   Strap post                         14 Tripod socket

ii                                                   www.kodak.com/go/support
Table of contents                                                                                           1
1 Setting up your camera .........................................................................1
     Attaching the strap ....................................................................................... 1
     Loading the battery ....................................................................................... 1
     Charging the battery ..................................................................................... 2
     Turning on the camera .................................................................................. 3
     Setting the language, date/time..................................................................... 3
     Storing pictures on an SD/SDHC card ............................................................. 4
2 Taking pictures/videos ...........................................................................5
     Taking a picture ............................................................................................ 5
     Taking a video .............................................................................................. 6
     Using optical zoom ....................................................................................... 7
     Using the flash.............................................................................................. 8
     Using different picture-taking modes ............................................................. 9
     Using camera Help ...................................................................................... 11
     Taking panoramic pictures........................................................................... 12
     Understanding the picture-taking icons........................................................ 13
3 Working with pictures/videos ..............................................................14
     Reviewing pictures/videos ........................................................................... 14
     Using sound tags ........................................................................................ 16
     Deleting pictures/videos .............................................................................. 17
     Using the menu button in Review................................................................ 18
     Using Kodak Perfect Touch technology ........................................................ 19
     Cropping pictures........................................................................................ 19
     Editing videos ............................................................................................. 20
     Running a slide show .................................................................................. 21
     Viewing pictures/videos in different ways..................................................... 24
     Selecting multiple pictures/videos ................................................................ 26
     Copying pictures/videos............................................................................... 26
     Understanding the review icons................................................................... 27

www.kodak.com/go/support                                                                                          iii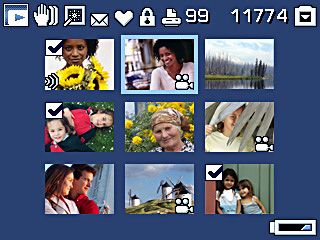
Table of contents

4 Doing more with your camera .............................................................29
      Using the menu button to change settings................................................... 29
      Customizing your camera ............................................................................ 33
      Using the self-timer..................................................................................... 36
      Using burst ................................................................................................. 37
      Using exposure compensation to adjust picture brightness ........................... 37
      Using the framing grid to compose a picture................................................ 38
      Sharing your pictures................................................................................... 38
5 Transferring and printing pictures .......................................................45
      Installing the software................................................................................. 45
      Transferring pictures with the USB cable...................................................... 46
      Printing pictures.......................................................................................... 47
      Dock compatibility for your camera.............................................................. 49
6 Troubleshooting ..................................................................................50
      Camera problems........................................................................................ 50
      Camera/computer communications.............................................................. 52
      LCD screen messages .................................................................................. 53
7 Getting help ........................................................................................56
8 Appendix .............................................................................................58
      Camera specifications ................................................................................. 58
      Care and maintenance ................................................................................ 61
      Upgrading your software and firmware........................................................ 61
      Storage capacities ....................................................................................... 61
      Important safety instructions ....................................................................... 62
      Battery life .................................................................................................. 63
      Limited Warranty ........................................................................................ 63
      Regulatory compliance ................................................................................ 65

iv                                                                       www.kodak.com/go/support
1         Setting up your camera
Attaching the strap

Loading the battery

                                       Kodak Li-Ion
                                       rechargeable
                                       digital camera
                                       battery KLIC 7001

To extend battery life, see page 63.

www.kodak.com/go/support                                   1
Setting up your camera

Charging the battery
                                          USB AC adapter                      Battery
                                                                              Charging
                                                                              light
Kodak USB AC adapter                      USB cable
(included)

                                                                             First, turn
                                                                             OFF the
Kodak EasyShare camera
                            Battery Charging light                           camera.
or printer docks
(may be sold separately)
For dock compatibility, see                                                  Charge until
page 49.                                                                     the Battery
                                                                             Charging
                                                                             light turns
                                                                             off (up to 3
Kodak 5V AC adapter,                                                         hours).
Kodak Li-Ion universal
battery chargers
(sold separately)

                              Connect the USB cable to the computer’s USB port, not a Hub.
Your computer
                              Make sure the computer is turned on and not in sleep mode.

            Learn more about USB              www.kodak.com/go/USBcharging
            charging
            Purchase battery charging         www.kodak.com/go/accessories
            accessories

2                                                      www.kodak.com/go/support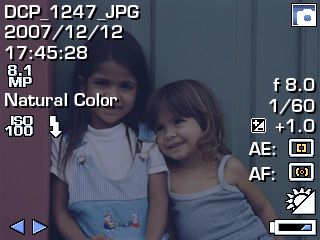
Setting up your camera

Turning on the camera

Setting the language, date/time

                                                       Language:
                                                  1            to change.

                                                  2     OK     to accept.

                                                       Date/Time:
                                                  1    At the prompt, press OK.

                                                  2            to change.
                                                               for previous/next field.
                                                        OK     to accept.

NOTE: To change the date/time and language in the future, use the Menu button (page 33).

www.kodak.com/go/support                                                                   3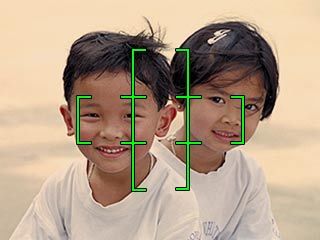
Setting up your camera

Storing pictures on an SD/SDHC card
Your camera has internal memory. You can purchase an SD or SDHC memory card to
conveniently store more pictures and videos (www.kodak.com/go/m763accessories,
www.kodak.com/go/m863accessories, www.kodak.com/go/md863accessories). We
recommend Kodak SD or SDHC cards.

    1   Turn off the camera.

    2   Insert or remove the
        optional card.

    3   Turn on the camera.

          CAUTION:
          A card can only be inserted one way; forcing it may cause
          damage. If you insert or remove a card while the camera is
          accessing it, the card, pictures, or camera may be damaged.
See page 61 for storage capacities.

4                                               www.kodak.com/go/support
2 Taking pictures/videos
Taking a picture
1 3
Press the Shutter button
On/Off button halfway to focus and set
exposure.
When the framing marks
turn green, press the
Shutter button completely
down.
2
Framing marks
Reviewing the picture just taken
After you take a picture or video, the LCD displays a quickview for approximately
10 seconds. (To exit the quickview sooner, press the Shutter button halfway.)
The picture is saved
unless you press the
Delete button. Delete button
Press to play a video.
to adjust the volume
during playback
To review pictures/videos anytime, see page 14.
www.kodak.com/go/support 5Taking pictures/videos
Using the framing marks
Framing marks indicate the camera focus area. The camera attempts to focus on
foreground subjects, even if the subjects are not centered in the scene.
Framing marks 1 Press the Shutter button halfway.
When the framing marks turn green, focus is
accomplished.
2 If the camera is not focusing on the desired subject
(or if the framing marks disappear), release the
Shutter button and recompose the scene.
3 Press the Shutter button completely down to
take the picture.
NOTE: Framing marks do not appear in all modes. When you use AF Zone and set Center Zone, the framing
marks are fixed at Center Wide. Multiple framing marks may appear when faces are detected in
Auto mode (see page 9).
Taking a video
3
1
On/Off button Press the Shutter button
completely down and
release.
To stop recording, press
and release the Shutter
button again.
2
6 www.kodak.com/go/supportTaking pictures/videos
Using optical zoom
Use optical zoom to get up to 3X closer to your subject.
1 Use the LCD to frame your subject.
2 Press Telephoto (T) to zoom in. Press Wide Angle
(W) to zoom out.
The zoom indicator shows zoom status.
3 Take the picture or video.
NOTE: For focus distances, see page 58.
■ Always use the auto focus framing marks,
page 6.
Optical Digital
zoom zoom ■ If you are not using zoom (1X, wide angle), you
range range can be as close as 13.8 in. (35 cm) to your
subject.
W T D ■ As you zoom, you need to move further from
your subject.
Using the digital zoom
Use digital zoom in any Still mode or during video recording to get up to 5X
magnification beyond optical zoom for a combined zoom of 15X.
1 Press Telephoto (T) to the maximum optical zoom limit. Release the button, then
press it again.
2 Take the picture.
NOTE: You may notice decreased image quality when using digital zoom. The slider on the zoom indicator
turns red when the picture quality reaches the limit for an acceptable 4 x 6-in. (10 x 15 cm) print.
www.kodak.com/go/support 7Taking pictures/videos
Using the flash
Use the flash when you take pictures at night, indoors, or outdoors in heavy shadows.
Press the button repeatedly to scroll
through flash modes (see Flash modes below).
The current flash mode appears in the LCD screen.
Flash-to-subject distance
Zoom position Flash distance
Wide angle 0.6–3.5 m (2–11.5 ft) @ ISO 320
Telephoto 0.6–2.0 m (2–6.6 ft) @ ISO 320
Flash modes Flash fires
Auto When the lighting conditions require it.
Flash
Off Never.
Fill Every time you take a picture, regardless of the lighting conditions. Use when
the subject is in shadow or is “backlit” (when the light is behind the subject).
In low light, hold the camera steady or use a tripod.
Red- If Red-eye Pre-flash is turned off: If Red-eye Pre-flash is turned on:
eye ■ The flash fires once and the ■ The flash fires once so the eyes
camera automatically become accustomed to the flash, then
corrects red-eye in the fires again when the picture is taken.
picture.
To turn the Red-eye Pre-flash feature on/off, see page 33.
8 www.kodak.com/go/supportTaking pictures/videos
Using different picture-taking modes
Mode dial
Choose the mode that best suits your
subjects and surroundings.
Use this mode For
Auto General picture taking—offers an excellent balance of image quality
and ease of use.
Digital Image Minimizing the effects of camera shake and subject movement.
Stabilization
Close-up Close range. Use available light instead of flash if possible.
SCN Scene Point-and-shoot simplicity when taking pictures under special
conditions. (See page 10.)
High ISO People in low-light scenes indoors using a higher ISO.
ISO
Video Capturing video with sound. (See page 6.)
Favorites Reviewing favorite pictures. (See page 40.)
www.kodak.com/go/support 9Taking pictures/videos
Scene modes
Choose a Scene mode—for great pictures in practically any situation!
1 Turn the Mode dial to Scene .
2 Press to display Scene mode descriptions.
If the mode description turns off before you finish reading it, press OK.
3 Press OK to choose a Scene mode.
Use this For
SCN mode
Portrait Full-frame portraits of people.
Panorama Stitching up to 3 captured images from left to right into one image.
Left-Right
Panorama Stitching up to 3 captured images from right to left into one image.
Right-Left
Sport Subjects in motion.
Landscape Far-away scenes. The camera uses infinity auto-focus. Auto-focus framing
marks are not available in Landscape.
Night Reducing red eye of people in night scenes or low-light conditions. Place the
Portrait camera on a flat, steady surface or use a tripod.
Night Distant scenery at night. Flash does not fire. Place the camera on a flat, steady
Landscape surface or use a tripod.
Snow Bright snow scenes.
Beach Bright beach scenes.
Text/ Documents. Focus is set to Auto Focus (see page 32).
Document
Fireworks Bright, colorful light displays. Flash does not fire. Place the camera on a flat,
steady surface or use a tripod.
Flower Close-ups of flowers or other small subjects in bright light. Focus is set to Auto
Focus (see page 32).
10 www.kodak.com/go/support
view single picture.Taking pictures/videos
Use this For
SCN mode
Manner/ Quiet occasions, like a wedding or lecture. Flash and sound are disabled.
Museum
Self-Portrait Close-ups of yourself. Assures proper focus and minimizes red eye.
Children Action pictures of children in bright light.
Backlight Subjects that are in shadow or “backlit” (when light is behind the subject).
Candle light Capturing subjects in low light.
Sunset Capturing the deep hues seen at sunset.
Using camera Help
To better understand each menu option, use camera Help. Select an option you want
to learn more about, then press the Zoom telephoto (T) button.
T Turn on Help
Scroll up/down
OK Turn off Help
www.kodak.com/go/support 11Taking pictures/videos
Taking panoramic pictures
Use panorama to “stitch” up to 3 pictures into a panoramic scene.
NOTE: For best results, use a tripod. Individual pictures are not saved, even if panorama capture is
cancelled before stitching occurs. (Picture size is set to 3.1 MP for each picture. Exposure
Compensation, White Balance, AF Zone, AF Control, and Color Mode are set with the first picture.
The flash is set to Off.)
1 Turn the Mode dial to SCN.
2 Press on the 4-way button to highlight Panorama Left-Right or Panorama
Right-Left (depending on the direction you want to pan), then press the OK
button.
3 Take the first picture.
After a quickview, the LCD displays the liveview and an “overlay” from the first picture.
4 Compose the second picture. Make the overlay from the first picture cover the
same portion in the new picture. (You can press the Delete button to re-take a
picture.)
5 If you are taking only 2 pictures, press the OK button to stitch them together.
After you take 3 pictures, the pictures are automatically stitched together. The LCD
displays a quickview for approximately 5 seconds.
1 2 3
Take 2 or 3
pictures.
Get 1 panoramic
picture.
12 www.kodak.com/go/supportTaking pictures/videos
Understanding the picture-taking icons
Picture size
Self-timer/Burst Date stamp
Flash Pictures/time remaining
Camera Storage location
mode Zoom: Wide, Telephoto,
Album Digital
name Focus zone
Framing Exposure metering
marks White balance
Long time exposure
Framing
grid ISO speed
Battery level
Exposure compensation
In capture mode—shutter pressed halfway
Camera
mode
Auto Exposure/
Auto Focus warning
Battery level
Exposure compensation
www.kodak.com/go/support 133 Working with pictures/videos
Reviewing pictures/videos
Press the Review button to view and work with your pictures/videos. Press Review
again to exit. (To display pictures/videos on a television, see page 25.)
1 Press the Review button.
2 Press to view previous/next picture/video.
To save battery power, use an optional Kodak
OK EasyShare dock or Kodak 5-volt AC adapter. (Visit:
www.kodak.com/go/m763accessories,
www.kodak.com/go/m863accessories,
www.kodak.com/go/md863accessories.)
Review
NOTE: Pictures taken at 3:2 and 16:9 picture sizes have a black bar at the top and bottom. A video’s
duration is displayed at the top of the LCD.
Magnifying pictures
1 Press the Review button.
2 Press W/T to magnify 2X–8X.
3 Press to view other parts of the
picture.
4 Press OK to return to 1X.
NOTE: If you press while at 1X, the view changes from
single-picture to multi-up thumbnail pictures. (See page 24.)
14 www.kodak.com/go/supportWorking with pictures/videos
Playing a video
1 Press during playback to reverse at 2X, 4X.
2 Press the Review button.
3 Press to find previous/next video.
4 Press to play. Press OK to pause/unpause.
Playback speed 5 Press during pause to view previous/next
4X 2X 1X 2X 4X
video frame.
Reverse Forward
6 Press during playback to adjust the
volume.
7 Press during playback to play at 2X, 4X.
Viewing picture/video information
1 Press the Review button.
2 Repeatedly press to turn on/off status icons
and picture/video info.
www.kodak.com/go/support 15Working with pictures/videos
Using sound tags
You can add a unique sound/message (up to 1 minute long) to your picture.
NOTE: Only one tag can be added to each picture (not to videos).
Recording a sound tag
1 Press the Review button, then to find a
picture.
2 Press the Menu button, then to
highlight Sound Tag. Press the OK button.
3 Choose Record, then press OK.
4 Follow the screen prompts.
The sound tag is applied to your picture.
■ Press the Menu button to exit the menu.
Playing a sound tag
1 Press the Review button, then to find a
OK tagged picture.
2 Press to play the sound tag.
3 Press to adjust the volume.
Review 4 Press OK to pause or replay the sound tag during
playback.
16 www.kodak.com/go/supportWorking with pictures/videos
Deleting pictures/videos
1 Press the Review button.
2 Press for previous/next picture/video.
3 Press the Delete button.
4 Follow the screen prompts.
Using the undo delete feature
If you accidentally delete a picture, use Undo Delete to retrieve it. This feature is
available only immediately after you delete a picture in Review mode and when the
Undo Delete option appears.
1 Press to highlight Undo Delete.
2 Press OK.
The deleted picture (overlaid with the Delete menu) appears.
3 Select Exit to exit the Delete menu.
Protecting pictures/videos from deletion
1 Press the Review button.
2 Press for previous/next picture/video.
3 Press the Menu button.
4 Press to highlight Protect, then press OK.
The Protect icon appears with the protected picture/video.
■ Press the Menu button to exit the menu.
CAUTION:
Formatting a card deletes all (including protected) pictures/videos.
Formatting internal memory deletes all pictures/videos, email addresses,
album names, and favorites.
www.kodak.com/go/support 17Working with pictures/videos
Using the menu button in Review
1 Press the Review button, then the Menu button.
2 Press to find:
■ Review to view pictures/videos
■ Edit to edit pictures/videos
■ Setup for other camera settings (page 33)
3 Press to highlight a setting, then press the OK button.
4 Choose an option, then press the OK button.
Options Options
Select/Deselect All See page 26 Perfect Touch tech. See page 19
Pictures
View By See page 24 Crop See page 19
Album See page 42 Sound tag See page 16
Protect/Unprotect See page 17 Make Picture See page 20
Slide Show See page 21 Videos Trim See page 20
Copy See page 26 Action Print See page 21
Multimedia See page 23
Slideshow
Multi-up See page 24
18 www.kodak.com/go/supportWorking with pictures/videos
Using Kodak Perfect Touch technology
Kodak Perfect Touch technology helps ensure better, brighter pictures.
1 Press the Review button, then for previous/next picture.
2 Press the Menu button, then press to find Edit.
3 Press to highlight Perfect Touch tech., then press OK.
The enhancement is previewed in a split screen. Press to view other parts of the
picture.
4 Press OK. Follow the screen prompts to replace the original picture or to save the
enhanced picture as a new one.
NOTE: You cannot enhance previously enhanced pictures.
■ Press the Menu button to exit the menu.
Cropping pictures
You can crop a picture so that only the desired portion of the picture remains.
1 Press the Review button, then to find a
picture.
2 Press the Menu button. Press to find Edit.
Picture Cropped picture
3 Press to highlight Crop, then press OK.
4 Press Telephoto (T) to zoom in, or to move the crop box. Press OK.
5 Follow the screen prompts.
The picture is cropped. The original is saved. (Cropped pictures cannot be cropped
again.)
■ Press the Menu button to exit the menu.
www.kodak.com/go/support 19Working with pictures/videos
Editing videos
Making a picture from a video
You can choose a single frame from a video, then make a picture suitable for printing.
1 Press the Review button, then to find a video.
2 Press the Menu button. Press to find Edit.
3 Press to highlight Make Picture, then
press OK.
Video Picture
4 Press to select a video frame.
5 Follow the screen prompts to save the picture.
A picture is created. (The original video is saved.)
■ Press the Menu button to exit the menu.
Trimming a video
You can delete an unwanted portion from the beginning or end of a video.
1 Press the Review button, then to find a
video.
2 Press the Menu button. Press to find Edit.
3 Press to highlight Trim, then press .
Video Trimmed video 4 Follow the screen prompts. (Use fast-forward and
fast-reverse, if needed.)
The video is trimmed. (You can save it as a new video
or replace the original.)
■ Press the Menu button to exit the menu.
20 www.kodak.com/go/supportWorking with pictures/videos
Making a video action print
From a video, you can make a 4-, 9-, or 16-up picture, suitable for a 4 x 6-inch
(10 x 15 cm) print.
1 Press the Review button, then to find a
video.
2 Press the Menu button. Press to find Edit.
Video 4-, 9-, or 3 Press to highlight Video Action Print,
16-up picture then press OK.
4 Choose an option, then press OK.
Auto options: The camera includes the first and last frames, then 2, 7, or 14
equally spaced frames.
Manual options: You choose the first and last frames; the camera chooses 2, 7,
or 14 equally spaced frames.
■ Press the Menu button to exit the menu.
Running a slide show
Use Slide Show to display your pictures/videos on the camera or on a television (see
page 25). During a slide show, you can adjust the volume on a sound tag you
recorded (see page 16).
Starting the slide show
1 Press the Review button, then the Menu button.
2 Press to highlight Slide Show, then press the OK button.
3 Press to highlight Begin Show, then press the OK button.
Each picture/video is displayed once.
To interrupt the Slide Show, press the OK button.
www.kodak.com/go/support 21Working with pictures/videos
Changing the slide show display interval
The default interval setting displays each picture for 5 seconds. You can set the display
interval from 3–60 seconds.
1 On the Slide Show menu, press to highlight Interval, then press the OK
button.
2 Select a display interval.
To scroll through the seconds quickly, press and hold .
3 Press the OK button.
The interval setting remains until you change it.
Running a continuous slide show loop
When you turn on Loop, the slide show is continuously repeated.
1 On the Slide Show menu, press to highlight Loop, then press the OK
button.
2 Press to highlight On, then press the OK button.
3 Press to highlight Begin Show, then press the OK button.
The slide show repeats until you press the OK button or until battery power is
exhausted. The Loop feature remains until you change it.
22 www.kodak.com/go/supportWorking with pictures/videos Running a multimedia slide show Multimedia Slide Show is similar to Slide Show, but also offers music and visual effects. First, select 2-20 pictures (see page 26). Then: 1 Press the Review button. 2 Press to highlight Multimedia Slide Show, then press the OK button. 3 Press to highlight a choice from the menu below, then press the OK button. ■ Begin Show ■ Music ■ Effect ■ Play Order Each picture/video is displayed once. To interrupt the slide show, press the OK button. After the slide show plays, you may save or modify it. www.kodak.com/go/support 23
Working with pictures/videos

Viewing pictures/videos in different ways
Viewing as thumbnails (multi-up)
                                1 Press the Review button.
                                2 Press the Zoom Wide Angle (W) button to change
                                  from single-picture view to multi-up thumbnails.
                                3 Press Telephoto (T) to return to single-picture view.
                                    ■   To select multiple pictures/videos, see page 26.
                                    ■   Press the Review button to exit Review.

Viewing by date or by album
1 Press the Review button, then the Menu button.
2 Press             to highlight View By, then press the OK button.
3 Press          to highlight All (default), Date, or Album, then press the OK button.
     ■   Press                to highlight a date or album, then press the T button. To
         return to the list of dates or albums, press the W button.
     ■   Press the Review button to exit Review.
     ■   For more information about albums, see page 42.

24                                                     www.kodak.com/go/support
Working with pictures/videos
Viewing on a television using an A/V cable
You can display pictures/videos/slide shows on a television, computer monitor, or any
device equipped with a video input. To connect the camera to a television, use an A/V
(audio/video) cable (may be sold separately), then see page 14 or page 21.
NOTE: Ensure that the Video Out setting (NTSC or PAL) is correct (see page 35). The slide show stops if you
connect/disconnect a cable while the slide show is running. (Image quality on a television screen
may not be as good as on a computer monitor or when printed.)
1 Turn off the camera.
2 Connect the A/V cable.
3 Turn on the camera.
4 View pictures/videos/slide shows on television.
CAUTION:
Turn off the camera before connecting/disconnecting the A/V cable.
Failure to do so may cause damage to the camera, pictures, or
memory card.
www.kodak.com/go/support 25Working with pictures/videos
Selecting multiple pictures/videos
Use the multi-select feature when you have two or more pictures/videos to print,
transfer, delete, etc. (Multi-select is used most effectively in Multi-Up mode, page 24.)
1 Press the Review button, then to find a
picture/video.
2 Press the OK button to select pictures/videos.
A check mark appears on the picture. You can now
Selected print, transfer, or delete the selected pictures. You can
pictures press OK a second time to remove a check mark.
Copying pictures/videos
You can copy pictures/videos from a card to internal memory or from internal memory
to a card.
Before you copy, make sure that:
■ A card is inserted in the camera.
■ The camera’s image storage location is set to the location from which you are
copying (see page 34).
Copy pictures/videos:
1 Press the Review button, then the Menu button.
2 Press to highlight Copy, then press OK.
3 Press to highlight an option.
4 Press OK.
NOTE: Pictures/videos are copied, not moved. To remove pictures/videos from the original location after
copying, delete them (see page 17).
Tags that you applied for print, email, and favorites are not copied. Protection settings are not
copied. To apply protection to a picture/video, see page 17.
26 www.kodak.com/go/supportWorking with pictures/videos
Understanding the review icons
Pictures
Favorite Protect
Email tag Print tag/number of prints
Kodak Perfect Touch
Blur warning Picture number
Review mode Image storage location
Album name
Play time
Volume control indicator
(sound tags)
Battery level
Videos
Video length
Video number
Review mode Image storage location
Play time
Video control indicator
Battery level
www.kodak.com/go/support 27Working with pictures/videos Understanding blur warning icons A picture blur warning icon is displayed during quickview and review. Green—Picture is sharp enough for an acceptable 4 x 6-inch (10 x 15 cm) print. Yellow—Picture may be sharp enough for an acceptable 4 x 6-inch (10 x 15 cm) print or sharpness is not determined. Red—Picture is not sharp enough for an acceptable 4 x 6-inch (10 x 15 cm) print. White—Printability is still being determined. 28 www.kodak.com/go/support
4          Doing more with your camera
Using the menu button to change settings
You can change settings to get the best results from your camera.
NOTE: Some settings remain until you change them; others, until you change modes or turn off the camera.
      Some modes offer limited settings.
1 Press the Menu button.
2 Press           to choose a tab:
    ■             Capture for the most common picture-taking settings
    ■             Capture plus for other picture-taking settings
    ■             Setup for other camera settings
3 Press            to highlight a setting, then press the OK button.
4 Choose an option, then press the OK button.
NOTE: For Review and Review plus options, see page 18.

www.kodak.com/go/support                                                                            29
Doing more with your camera
Using the capture tab
Press Menu, , ,
Options
and OK to access settings
Picture Size M763 For M863
Choose a picture resolution. 7.1 MP Pictures at the highest resolution, 8.1 MP
For recommended print sizes, (4:3) largest file size (4:3)
visit:
6.3 MP Printing on EasyShare printer 7.2 MP
www.kodak.com/go/printsizes
(3:2) docks and photo printers (3:2)
5.3 MP 6.1 MP
HDTV format in high resolution
(16:9) (16:9)
5.0 MP Medium file size 5.0 MP
(4:3) (4:3)
3.1 MP Medium file size 3.1 MP
(4:3) (4:3)
2.2 MP Printing on EasyShare printer 2.2 MP
(3:2) docks and photo printers (at a (3:2)
lower resolution than 6.3/7.2 MP)
2.1 MP HDTV format 2.1 MP
(16:9) (16:9)
1.2 MP Email, Internet, or to conserve 1.2 MP
(4:3) space (4:3)
Long Time Exposure None, 0.5, 1.0, 2.0, 4.0 seconds
Choose how long the shutter
stays open.
30 www.kodak.com/go/supportDoing more with your camera
Press Menu, , ,
Options
and OK to access settings
Color Mode High Color
Choose color tones. Natural Color
Unavailable in Video mode. Low Color
Black & White
Sepia—pictures have a reddish-brown, antique look.
NOTE: EasyShare software also lets you change a color picture to
black-and-white or sepia.
Unavailable in Video mode.
Date Stamp On
Imprint the date on pictures. Off
Not available on panoramic
pictures.
Using the capture plus tab
Press Menu, , ,
Options
and OK to access settings
White Balance Auto—automatically corrects white balance. Ideal for general
Choose your lighting picture taking.
condition. Daylight—for pictures in natural lighting.
Tungsten—corrects the orange cast of household light bulbs.
Ideal for indoor pictures under tungsten or halogen lighting
without flash.
Fluorescent—corrects the green cast of fluorescent lighting.
Ideal for indoor pictures under fluorescent lighting without
flash.
Open Shade—for pictures in shade in natural lighting.
www.kodak.com/go/support 31Doing more with your camera
Press Menu, , ,
Options
and OK to access settings
Face Detection Capture On—In Auto mode (and in SCN modes designed for pictures
Choose if faces get focus of people), the camera attempts to focus on faces.
priority. Off
Exposure Metering Multi-Pattern—evaluates lighting conditions throughout
Evaluate light levels at specific the image to give an optimum picture exposure. Ideal for
areas of a scene. general picture taking.
Center-Weight—evaluates the lighting conditions of the
subject centered in the lens. Ideal for backlit subjects.
Spot—similar to Center-weighted, except the metering is
concentrated on a smaller area of the subject centered on the
LCD.
AF Zone Multi-zone—evaluates 5 zones to give an even picture focus.
Select a large or concentrated Ideal for general picture taking.
area of focus. Center-zone—evaluates the small area centered on the LCD.
Ideal when precise focus of a specific area in the picture is
needed.
NOTE: For the best pictures, the camera is set to Multi-zone when in
Landscape mode.
ISO Speed Choose a lower ISO setting in brightly lit scenes; use a higher
Control the camera’s ISO for low-light scenes.
sensitivity to light. M763—Auto (default), 80, 100, 200, 400, 800, 1600
M863—Auto (default), 64, 100, 200, 400, 800, 1600
NOTE: ISO returns to Auto when the camera is set to Portrait or SCN
mode.
Unavailable in Video mode.
Sharpness High
Control picture sharpness. Normal
Low
32 www.kodak.com/go/supportDoing more with your camera
Press Menu, , ,
Options
and OK to access settings
Red-eye Pre-flash On—red eye flash fires before the picture is taken.
Choose whether a pre-flash Off—red eye flash does not fire.
fires when the flash is in Red
Eye mode.
Blur Warning On
See page 28. Off
Maintain Settings Exit
Choose which settings are Flash
saved, even after the camera is Color Mode
turned off. White Balance
Available only in Auto mode. Face Detect Capture
Exposure Metering
AF Zone
ISO Speed
Sharpness
Video Size 640 x 480
Available only in Video mode. 320 x 240
Customizing your camera
Use Setup to customize your camera settings.
1 In any mode, press the Menu button.
2 Press to highlight Setup, then press OK.
3 Press to highlight a setting, then press OK.
4 Choose an option, then press OK.
5 Press the Menu button to exit.
www.kodak.com/go/support 33Doing more with your camera
NOTE: Press the T (Telephoto Zoom) button for information about camera settings and options. These
settings remain until you change them.
Press Menu, , , and OK to
Options
access settings
LCD Brightness Power Save
High Power
Image Storage Auto—the camera uses the card if one is in the
Choose a storage location for camera. If not, the camera uses internal
pictures/videos. memory.
Internal Memory—the camera always uses
internal memory, even if a card is installed.
Set Album Exit
Choose Album names. Clear All—selected album settings are
You can apply different Set Album choices to cancelled.
videos and to pictures. See page 43.
Orientation Sensor On
Orient pictures/videos so that they are Off
displayed with the correct side up.
Camera Sounds Themes—applies the same sound effect set to
Choose sound effects. all functions.
Individual—choose a sound effect for each
function.
Sound Volume Off
High
Medium
Low
Date & Time See page 3.
34 www.kodak.com/go/supportDoing more with your camera
Press Menu, , , and OK to
Options
access settings
Auto Power Off 10 minutes
Choose inactivity time until camera turns off. 5 minutes
3 minutes
1 minute
Video Out NTSC—used in North America and Japan.
Choose the regional setting that lets you PAL—used in Europe and China.
connect the camera to a television or other
external device.
Language See page 3.
Reset Camera Reset settings to their default.
Available in all modes except SCN-Custom.
Format Memory Card—deletes everything on the
card; formats the card.
CAUTION: Cancel—exits this setting.
Formatting deletes all Internal Memory—deletes everything in
pictures/videos, including internal memory including email addresses,
those that are protected. album names, and favorites; formats the
Removing a card during internal memory.
formatting may damage
the card.
About
View camera information.
www.kodak.com/go/support 35Doing more with your camera
Using the self-timer
Use the self-timer when you want to be included in a picture, or to ensure a steady
Shutter button press. Place the camera on a steady surface or tripod.
1 In any Still mode, press the button repeatedly
to choose:
10 seconds—A picture is taken after a 10-second
delay (so you have time to get into the scene).
2 seconds—A picture is taken after a 2-second
button delay (for a steady, auto-shutter release on a
tripod).
2 shot—The first picture is taken after a 10-second
delay. A second picture is taken 8 seconds later.
2 Compose the scene.
3 Press the Shutter button halfway, then
completely down.
The camera takes the picture/pictures after the delay.
NOTE: Self-timer is not available in menu mode.
36 www.kodak.com/go/supportDoing more with your camera
Using burst
Use burst to take up to 3 pictures in rapid succession.
1 In most Still modes, press the button
repeatedly until appears on the LCD.
2 Press the Shutter button halfway to focus and set
exposure.
button 3 Press the Shutter button completely down and
hold it to take pictures.
The camera stops taking pictures when you release the
Shutter button, when the pictures are taken, or when
there is no more storage space.
NOTE: During quickview, you can delete all pictures in the burst series. To delete selectively, do so in
Review (see page 17). Burst is not available in menu mode.
Using exposure compensation to adjust picture
brightness
Before you take a picture, you can adjust exposure compensation to make pictures
darker or lighter.
■ Press to decrease exposure compensation.
■ Press to increase exposure compensation.
The exposure compensation level is shown on the LCD; the LCD gets brighter or dimmer.
www.kodak.com/go/support 37Doing more with your camera
Using the framing grid to compose a picture
The framing grid divides the LCD into thirds—vertically and horizontally. This is
helpful if, for example, you want to balance a picture between water, earth, and sky.
To turn on/off the framing grid, repeatedly press
.
Sharing your pictures
Press the Share button to tag your pictures and videos. When they are transferred to
your computer, you can share them. Use the Share button:
■ Any time. (The most recent picture/video taken is then displayed.)
■ After pressing the Review button.
Tagging pictures for printing
1 Press the Share button. Press to locate a picture.
2 Press to highlight Print, then press OK.
3 Press to select the number of copies (0-99). Zero removes the tag for that
picture.
Optional: You can apply a print quantity to other pictures. Press to locate a
picture. Press to change the print quantity. Repeat until the desired print
quantity is applied to pictures.
4 Press OK.
The Print icon appears in the status area.
5 Press the Share button to exit the menu.
38 www.kodak.com/go/supportDoing more with your camera
Printing tagged pictures
When you transfer the tagged pictures to your computer, the Kodak EasyShare
software print screen opens. For details, click the Help button in EasyShare software.
For more information on printing from your computer, printer dock, PictBridge
enabled printer, or card, see page 47.
NOTE: For the best 4 x 6 in. (10 x 15 cm) prints, set the camera to the 3:2 picture size setting (see
page 30.)
Tagging pictures and videos for emailing
First—on your computer
Use Kodak EasyShare software to create an email address book on your computer.
Then copy up to 32 email addresses to the camera’s internal memory. For details, click
the Help button in EasyShare software.
Second—tag pictures/videos on your camera
1 Press the Share button. Press to locate a picture/video.
2 Press to highlight Email, then press OK.
The Email icon appears in the status area.
3 Press to highlight an email address, then press OK.
4 To tag other pictures/videos with the same address, press to scroll through
them. When the picture you want is displayed, press OK.
5 To send the pictures/videos to more than one address, repeat step 3 for each
address.
Selected addresses are checked.
6 To remove a selection, highlight a checked address and press OK. To remove all
email selections, highlight Clear All.
7 Press to highlight Exit, then press OK.
8 Press the Share button to exit the menu.
www.kodak.com/go/support 39Doing more with your camera
Third—transfer and email
When you transfer the tagged pictures/videos to your computer, the Email screen
opens and lets you send them to the addresses you specified. For details, click the
Help button in Kodak EasyShare software.
Tagging pictures as favorites
Want to keep copies of your favorite pictures on your camera?
Start with the Share button!
1. Tag pictures as 1 Press the Share button. Press to locate a picture.
favorites
2 Press to highlight Favorite, then press OK.
The Favorite icon appears in the status area. To remove the tag, press
OK again.
NOTE: Sound tags (see page 16) are retained with tagged pictures and can be
deleted only in Review mode.
2. Transfer 1 Load and use the EasyShare software that was packaged with this
pictures to your camera. (See page 45.)
computer 2 Connect the camera to the computer using the USB cable (see
page 46) or an EasyShare dock.
The first time you transfer pictures, the software helps you make choices
about your favorite pictures. Then, your pictures are transferred to the
computer. Favorite pictures (smaller versions of the originals) are loaded
to the Favorites section of your camera’s internal memory.
3. View favorites 1 Turn the Mode dial to Favorites .
on your camera 2 Press to scroll through favorites.
NOTE: The camera holds a limited number of favorites. Use Camera Favorites in the EasyShare software to
customize the size of your camera Favorites section. Videos tagged as favorites remain in the
Favorites folder in EasyShare software. For details, click the Help button in EasyShare software.
40 www.kodak.com/go/supportDoing more with your camera
Optional settings
In Favorites mode, press the Menu button to access optional settings.
Slide Show (page 21) Remove favorites (page 41)
Multi-up (page 24)
NOTE: Pictures taken at 3:2 and 16:9 picture sizes have a black bar at the top and bottom. A video’s
duration is displayed at the top of the LCD.
Removing favorites from your camera
1 Turn the Mode dial to Favorites .
2 Press the Menu button.
3 Highlight Remove Favorites, then press OK.
All pictures stored in the Favorites section of internal memory are removed. Favorites are
restored the next time you transfer pictures to the computer.
4 Press the Menu button to exit the menu.
Preventing favorites from transferring to the camera
1 Open Kodak EasyShare software. Click the My Collection tab.
2 Go to the Albums view.
3 Click the Camera Favorites Album for your camera.
4 Click Remove Album.
The next time you transfer pictures from your camera to the computer, use the Camera
Favorites Wizard/Assistant to either recreate your Camera Favorites Album or to turn off
the Camera Favorites feature.
www.kodak.com/go/support 41Doing more with your camera
Preventing camera favorites from synchronizing with the software
If you don’t want to use the favorites feature:
1 Open EasyShare software.
2 From the Tools menu, select Cameras/Viewers > Sync and Transfer Manager.
3 Click to highlight your camera, then click Camera Favorites Album Properties.
NOTE: If your camera model is not visible, use the USB cable to connect your camera to the computer.
4 Drag the Internal Memory slider to 0%, then click OK.
5 Close the Sync and Transfer Manager window.
Camera favorites will no longer synchronize with EasyShare software.
To turn on the sync feature, select Yes, synchronize with my software.
To delete favorites from your camera, press the Delete button while in Favorites mode.
Printing and emailing favorites
1 Turn the Mode dial to Favorites . Press to locate a picture.
2 Press the Share button.
3 Highlight Print or Email, then press OK.
NOTE: Favorites that were taken on this camera (not imported from another source) are good for prints up
to 4 x 6 in. (10 x 15 cm).
Tagging pictures/videos for albums
Use the Album feature in Review mode to tag the pictures/videos in your camera with
album names.
First—on your computer
Use EasyShare software to create albums on your computer, then copy up to 32 album
names to the camera’s internal memory. See EasyShare software Help for details.
42 www.kodak.com/go/supportDoing more with your camera Second—on your camera 1 Press the Review button, then locate the picture or video. 2 Press the Menu button. 3 Press to highlight Album, then press OK. 4 Press to highlight an album folder, then press OK. To add other pictures to the same album, press to scroll through the pictures. When the picture you want is displayed, press OK. To add the pictures to more than one album, repeat step 4 for each album. The album name appears with the picture. A plus (+) after the album name means the picture was added to more than one album. To remove a selection, highlight an album name and press OK. To remove all album selections, select Clear All. Third—transfer to your computer When you transfer the tagged pictures/videos to your computer, EasyShare software opens and categorizes your pictures/videos in the appropriate album folder. See EasyShare software Help for details. Pre-tagging for album names Use the Set Album feature to pre-select album names before you take pictures or videos. Then, all the pictures or videos you take are tagged with those album names. First—on your computer Use the EasyShare software that was packaged with your camera to create album names on your computer. The next time you connect the camera to the computer, copy up to 32 albums to the album name list. See EasyShare software Help for details. www.kodak.com/go/support 43
Doing more with your camera

Second—on your camera
1 In any mode, press the Menu button.
2 Press         to highlight Set Album, then press OK.
3 Press        to highlight an album name, then press OK. Repeat to mark pictures
  or videos for albums.
  Selected albums are noted with a check mark.
4 To remove a selection, highlight an album name and press OK. To remove all
  album selections, select Clear All.
5 Highlight Exit, then press OK.
  Your selections are saved. If you turn on the LCD, your album selection is displayed on
  the screen. A plus (+) after the album name means more than one album is selected.
6 Press the Menu button to exit the menu.
Third—transfer to your computer
When you transfer the tagged pictures or videos to your computer, EasyShare
software opens and categorizes your pictures in the appropriate album. See EasyShare
software Help for details.

44                                                     www.kodak.com/go/support
5          Transferring and printing
              pictures
Installing the software
           CAUTION:
           Install EasyShare software before connecting the camera to the
           computer. Failure to do so may cause the software to load
           incorrectly.
1 Close all software applications that are open on your computer (including
  anti-virus software).
2 Place the EasyShare software CD into the CD-ROM drive.
3 Load the software:
   Windows OS—if the install window does not appear, choose Run from the Start
   menu and type d:\setup.exe where d is the drive letter that contains the CD.
   Mac OS X—double-click the CD icon on the desktop, then click the Install icon.
4 Follow the on-screen instructions to install the software.
NOTE: When prompted, take few minutes to electronically register your camera and software. To register
      later, visit www.kodak.com/go/register.
5 If prompted, restart the computer. If you turned off anti-virus software, turn it back
  on. See the anti-virus software manual for details.
For information on the software applications included on the EasyShare software CD,
click the Help button in EasyShare software.

www.kodak.com/go/support                                                                            45
Transferring and printing pictures
Transferring pictures with the USB cable
1 Turn off the camera.
2 Connect the USB cable (U-8).
3 Turn on the camera.
Kodak EasyShare software opens on your computer
and prompts you through the transfer process.
NOTE: Visit www.kodak.com/go/howto for an online tutorial on connecting.
Also available for transferring
You can also use these Kodak products to transfer your pictures and videos.
■ Kodak EasyShare camera dock, Kodak EasyShare printer dock (see page 47)
■ Kodak multi-card reader, Kodak SD multimedia card reader-writer
Purchase these and other accessories at a dealer of Kodak products or visit
www.kodak.com/go/m763accessories, www.kodak.com/go/m863accessories,
.www.kodak.com/go/md863accessories.
46 www.kodak.com/go/supportTransferring and printing pictures Printing pictures Printing with a Kodak EasyShare printer dock Dock your camera to the Kodak EasyShare printer dock and print directly—with or without a computer. Purchase this and other accessories at a dealer of Kodak products or visit www.kodak.com/go/m763accessories, www.kodak.com/go/m863accessories, www.kodak.com/go/md863accessories. Direct printing with a PictBridge enabled printer Your camera is compatible with PictBridge technology, so you can print directly to PictBridge enabled printers. You need: ■ Camera with fully charged batteries ■ PictBridge enabled printer ■ USB cable (may be sold separately) Connecting the camera to a PictBridge enabled printer 1 Turn off the camera and printer. 2 Connect the appropriate USB cable from the camera to the printer. (See your printer user guide or visit www.kodak.com/go/m763accessories, www.kodak.com/go/m863accessories, www.kodak.com/go/md863accessories.) www.kodak.com/go/support 47
Transferring and printing pictures

Printing from a PictBridge enabled printer
1 Turn on the printer. Turn on the camera.
  The PictBridge logo is displayed, followed by the current picture and menu. (If no
  pictures are found, a message is displayed.) If the menu interface turns off, press any
  button to redisplay it.
2 Press             to choose a printing option, then press OK.
     Current Picture—Press                  to choose a picture. Choose the number of copies.
     Tagged Pictures—If your printer is capable, print pictures that you tagged for
     printing and choose a print size.
     Index Print—Print thumbnails of all pictures. This option requires one or more
     sheets of paper. If the printer is capable, choose a print size.
     All Pictures—Print all pictures in internal memory, on a card, or in Favorites.
     Choose the number of copies.
   Image Storage—Access internal memory, a card, or Favorites.
NOTE: During direct printing, pictures are not permanently transferred or saved to the computer or printer.
Disconnecting the camera from a PictBridge enabled printer
1 Turn off the camera and printer.
2 Disconnect the USB cable from the camera and the printer.

Using a printer that is not PictBridge enabled
For details on printing pictures from your computer, click the Help button in EasyShare
software.

48                                                               www.kodak.com/go/support
Transferring and printing pictures
Ordering prints online
Kodak Gallery (www.kodakgallery.com) is one of the many online print services
offered in the Kodak EasyShare software. You can easily:
■ Upload your pictures.
■ Edit, enhance, and add borders to your pictures.
■ Store pictures, and share them with family and friends.
■ Order high-quality prints, photo greeting cards, frames, and albums—and have
them delivered to your door.
Printing from an optional SD card
■ Automatically print tagged pictures when you insert your card into a printer with
an SD card slot. See your printer user’s guide for details.
■ Make prints at an SD-capable Kodak picture maker/picture kiosk. (Contact a
location before visiting. Visit www.kodak.com/go/picturemaker.)
■ Take the card to your local photo retailer for professional printing.
Dock compatibility for your camera
To see which Kodak EasyShare docks are compatible with your camera, visit
www.kodak.com/go/dockcompatibility.
Purchase camera docks, printer docks, and other accessories at a dealer of Kodak
products or visit www.kodak.com/go/m763accessories,
www.kodak.com/go/m863accessories, www.kodak.com/go/md863accessories.
www.kodak.com/go/support 496 Troubleshooting For step-by-step product support, visit www.kodak.com/go/m763support, www.kodak.com/go/m863support, or www.kodak.com/go/md863support and select Interactive Troubleshooting & Repairs. Camera problems If... Try one or more of the following Camera does not ■ Remove the battery, then reinsert correctly (see page 1). turn on. ■ Install new battery. Camera does not ■ Charge rechargeable battery (see page 2). turn off. Camera buttons and controls do not function Battery does not ■ See page page 2 or visit www.kodak.com/go/usbcharging. charge using USB charging. Pictures remaining ■ The camera is operating normally. Continue taking pictures. number does not decrease after taking a picture. Short battery life ■ Limit the following activities that quickly deplete battery power: with Kodak Li-Ion reviewing pictures/videos on the LCD; excessive use of the flash. rechargeable digital camera battery KLIC-7001. 50 www.kodak.com/go/support
Troubleshooting

If...               Try one or more of the following
Stored pictures are ■ Retake pictures. Do not remove card while the camera is accessing it.
corrupted.               Keep rechargeable batteries charged.
                      ■ Transfer pictures to the computer (see page 46), then format the card
                         in the camera (see page 35).
                         Caution: Formatting a card deletes all pictures and videos,
                         including protected files.
In Review mode, ■ Check the image storage location setting (see page 34).
you do not see a
picture (or the
expected picture)
on the LCD screen.
In Review mode, a ■ Transfer the picture to the computer (see page 46), then format the
blue or black            card in the camera (see page 35).
screen is displayed Caution: Formatting a card deletes all pictures and videos,
instead of a          including protected files.
picture.
Picture is too light. ■ Decrease Exposure Compensation (see page 37).
                    ■ Turn off the flash, then move back from the subject.
Picture is not clear. ■ Clean the lens (see page 61).
                      ■ Make sure your camera is not in Close-up mode.
                      ■ Move so there is at least 13.8 in. (35 cm) between the camera and the
                        subject.
                      ■ Place the camera on a flat, steady surface or use a tripod.
Picture is too dark. ■ Turn on the flash (see page 8).
                    ■ Move so that the distance between you and the subject is within the
                       effective flash range (see page 59).
                    ■ Use Fill flash (page 8) or change your position so light is not behind
                      the subject.
                    ■ Increase Exposure Compensation (see page 37).

www.kodak.com/go/support                                                                   51
Troubleshooting
If... Try one or more of the following
Camera does not ■ Purchase a certified SD/SDHC card.
recognize SD card. ■ Reformat the card (see page 35).
Caution: Formatting a card deletes all pictures and videos,
including protected files.
■ Insert a card into the slot, then push to seat (see page 4).
Camera freezes up ■ Turn the camera off, then back on.
when a card is ■ Make sure the camera is turned off before inserting or removing a
inserted or card.
removed.
Memory card full. ■ Insert a new card (see page 4), transfer pictures to the computer (see
page 46), or delete pictures (see page 17).
Memory card and ■ Transfer pictures to the computer (see page 46), then format the card
internal memory or internal memory (see page 35).
full. Caution: Formatting a card deletes all pictures and videos,
including protected files.
Camera/computer communications
If... Try one or more of the following
The computer does ■ Turn on the camera (see page 3).
not communicate ■ Make sure the battery is fully charged (see page 2).
with the camera.
■ Connect the USB cable to camera and computer port (see page 46).
■ Install the software (see page 45).
■ Disconnect the USB cable. Close all software applications. Re-install
the software (see page 45).
■ Disconnect camera from the computer. Close all software applications,
reconnect camera.
52 www.kodak.com/go/supportYou can also read