Email Collector Quick Start Guide - Juniper Networks
←
→
Page content transcription
If your browser does not render page correctly, please read the page content below

Email Collector Quick Start Guide

Modified: 2019-06-11

Copyright © 2019, Juniper Networks, Inc.

Juniper Networks, Inc.
1133 Innovation Way
Sunnyvale, California 94089
USA
408-745-2000
www.juniper.net

Juniper Networks, the Juniper Networks logo, Juniper, and Junos are registered trademarks of Juniper Networks, Inc. in the United States
and other countries. All other trademarks, service marks, registered marks, or registered service marks are the property of their respective
owners.

Juniper Networks assumes no responsibility for any inaccuracies in this document. Juniper Networks reserves the right to change, modify,
transfer, or otherwise revise this publication without notice.

Email Collector Quick Start Guide
Copyright © 2019 Juniper Networks, Inc. All rights reserved.

The information in this document is current as of the date on the title page.

YEAR 2000 NOTICE

Juniper Networks hardware and software products are Year 2000 compliant. Junos OS has no known time-related limitations through the
year 2038. However, the NTP application is known to have some difficulty in the year 2036.

END USER LICENSE AGREEMENT

The Juniper Networks product that is the subject of this technical documentation consists of (or is intended for use with) Juniper Networks
software. Use of such software is subject to the terms and conditions of the End User License Agreement (“EULA”) posted at
https://support.juniper.net/support/eula/. By downloading, installing or using such software, you agree to the terms and conditions of
that EULA.

ii                                                                                                  Copyright © 2019, Juniper Networks, Inc.
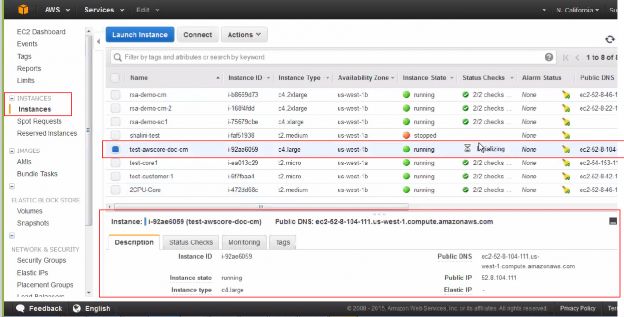
Table of Contents
                                     About the Documentation . . . . . . . . . . . . . . . . . . . . . . . . . . . . . . . . . . . . . . . . . . . . ix
                                        Documentation and Release Notes . . . . . . . . . . . . . . . . . . . . . . . . . . . . . . . . . . ix
                                        Documentation Conventions . . . . . . . . . . . . . . . . . . . . . . . . . . . . . . . . . . . . . . . ix
                                        Documentation Feedback . . . . . . . . . . . . . . . . . . . . . . . . . . . . . . . . . . . . . . . . . xi
                                        Requesting Technical Support . . . . . . . . . . . . . . . . . . . . . . . . . . . . . . . . . . . . . xii
                                             Self-Help Online Tools and Resources . . . . . . . . . . . . . . . . . . . . . . . . . . . xii
                                             Creating a Service Request with JTAC . . . . . . . . . . . . . . . . . . . . . . . . . . . . xiii
          Chapter 1                  Email Collector Quick Start Guide . . . . . . . . . . . . . . . . . . . . . . . . . . . . . . . . . . . 15
                                     Overview . . . . . . . . . . . . . . . . . . . . . . . . . . . . . . . . . . . . . . . . . . . . . . . . . . . . . . . . . . 15
                                     On-Premise Juniper ATP Appliance-MTA-Receiver Deployments . . . . . . . . . . . . . 16
                                     Generalized Administrator Tasks for Juniper ATP Appliance On-Premise MTA
                                          Deployments . . . . . . . . . . . . . . . . . . . . . . . . . . . . . . . . . . . . . . . . . . . . . . . . . . . 17
                                     On-Premise BCC Email Collector Deployments . . . . . . . . . . . . . . . . . . . . . . . . . . . 18
                                     Configuring Collector Email Journaling . . . . . . . . . . . . . . . . . . . . . . . . . . . . . . . . . . 19
                                          Email Journaling . . . . . . . . . . . . . . . . . . . . . . . . . . . . . . . . . . . . . . . . . . . . . . . . 19
                                          Create a Journaling Mailbox on the Exchange Server . . . . . . . . . . . . . . . . . . . 20
                                          Configuring a Mailbox Database . . . . . . . . . . . . . . . . . . . . . . . . . . . . . . . . . . . . 21
                                          Configuring Microsoft Exchange Server 2013 Journaling . . . . . . . . . . . . . . . . . 21
                                          Configuring Microsoft Exchange Server 2010 Journaling . . . . . . . . . . . . . . . . . 23
                                               Create a journaling contact . . . . . . . . . . . . . . . . . . . . . . . . . . . . . . . . . . . . 23
                                               Create an SMTP send connector . . . . . . . . . . . . . . . . . . . . . . . . . . . . . . . . 25
                                               Activate journaling . . . . . . . . . . . . . . . . . . . . . . . . . . . . . . . . . . . . . . . . . . . 28
                                               Implement journal rules (select users only) . . . . . . . . . . . . . . . . . . . . . . . 31
                                          Configuring Exchange-Server Journal Polling from the Juniper ATP Appliance
                                               CM Web UI . . . . . . . . . . . . . . . . . . . . . . . . . . . . . . . . . . . . . . . . . . . . . . . . . 33
                                          Configuring Office 365 Journaling . . . . . . . . . . . . . . . . . . . . . . . . . . . . . . . . . . 34
                                     Configuring Gmail Journaling . . . . . . . . . . . . . . . . . . . . . . . . . . . . . . . . . . . . . . . . . . 35
                                     Core/CM and All-in-One Email Collector Installation Options . . . . . . . . . . . . . . . 38
                                     Installing the Juniper ATP Appliance Collector Open Virtual Appliance (OVA) . . 39
                                          OVA Deployment vSwitch Setup . . . . . . . . . . . . . . . . . . . . . . . . . . . . . . . . . . . 41
                                          To install the JATP Appliance OVA to a VM . . . . . . . . . . . . . . . . . . . . . . . . . . . 41
                                     Installing and Configuring the AWS vCore AMI . . . . . . . . . . . . . . . . . . . . . . . . . . . . 43
                                          Part 1- Amazon AWS Management Console vCore AMI Configuration . . . . . . 43
                                          Part 2 - Running the Juniper ATP Appliance vCore AMI Instance . . . . . . . . . . 49
                                     Verifying AWS Configurations . . . . . . . . . . . . . . . . . . . . . . . . . . . . . . . . . . . . . . . . . 53
                                     Configuring Juniper ATP Appliance Email Traffic Collection . . . . . . . . . . . . . . . . . 54
                                     Setting the same Device Key Passphrase on all Juniper ATP Appliance
                                          Devices . . . . . . . . . . . . . . . . . . . . . . . . . . . . . . . . . . . . . . . . . . . . . . . . . . . . . . . . 57
                                     Verifying Configurations and Traffic from the CLI . . . . . . . . . . . . . . . . . . . . . . . . . . 57

Copyright © 2019, Juniper Networks, Inc.                                                                                                                          iii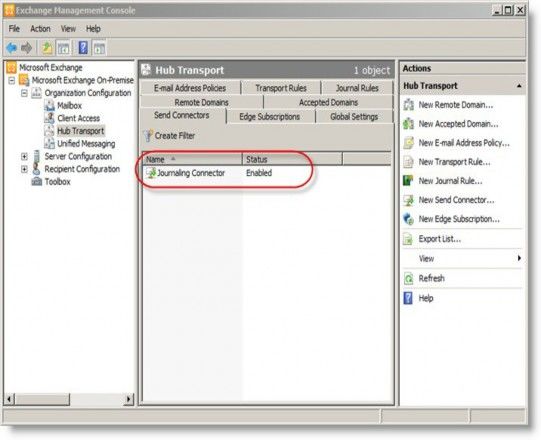
Email Collector Quick Start Guide

                                    Accessing the Juniper ATP Appliance Central Manager Web UI . . . . . . . . . . . . . . 58
                                        To Log in to the Central Manager Web UI . . . . . . . . . . . . . . . . . . . . . . . . . . . . 58
                                    Changing the Appliance Type . . . . . . . . . . . . . . . . . . . . . . . . . . . . . . . . . . . . . . . . . 60
                                    Appendix A: Deploy JATP Email Threat Mitigation for Office 365 (A Start to Finish
                                        Example) . . . . . . . . . . . . . . . . . . . . . . . . . . . . . . . . . . . . . . . . . . . . . . . . . . . . . . 62
                                        Overview . . . . . . . . . . . . . . . . . . . . . . . . . . . . . . . . . . . . . . . . . . . . . . . . . . . . . . 62
                                        Register a New Application in the Azure Portal . . . . . . . . . . . . . . . . . . . . . . . . 63
                                        Obtain the Application ID and Object ID . . . . . . . . . . . . . . . . . . . . . . . . . . . . . 63
                                        Obtain the Directory ID . . . . . . . . . . . . . . . . . . . . . . . . . . . . . . . . . . . . . . . . . . . 64
                                        Provide API Access Permissions . . . . . . . . . . . . . . . . . . . . . . . . . . . . . . . . . . . 64
                                        Download the Manifest File . . . . . . . . . . . . . . . . . . . . . . . . . . . . . . . . . . . . . . . 65
                                        Configure Email Mitigation Settings in JATP . . . . . . . . . . . . . . . . . . . . . . . . . . 65
                                        Upload the Manifest File . . . . . . . . . . . . . . . . . . . . . . . . . . . . . . . . . . . . . . . . . 66
                                        Configure Office 365 Journaling for JATP Mitigation . . . . . . . . . . . . . . . . . . . . 66
                                        Configure the Email Collector on JATP . . . . . . . . . . . . . . . . . . . . . . . . . . . . . . 69
                                        Test the Configuration . . . . . . . . . . . . . . . . . . . . . . . . . . . . . . . . . . . . . . . . . . . 70
                                    What to Do Next? . . . . . . . . . . . . . . . . . . . . . . . . . . . . . . . . . . . . . . . . . . . . . . . . . . . 70

iv                                                                                                            Copyright © 2019, Juniper Networks, Inc.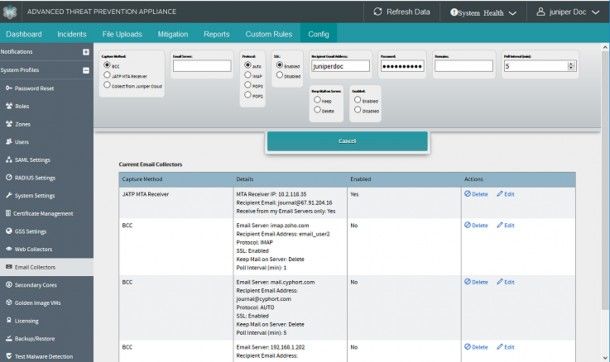
List of Figures
Chapter 1 Email Collector Quick Start Guide . . . . . . . . . . . . . . . . . . . . . . . . . . . . . . . . . . . 15
Figure 1: Juniper ATP Appliance Email Collection and Detection Options . . . . . . . 16
Figure 2: Juniper ATP Appliance Email MTA-Receiver Deployment Options: (a)
for Office 365 and Gmail Analysis . . . . . . . . . . . . . . . . . . . . . . . . . . . . . . . . . . . 17
Figure 3: Juniper ATP Appliance Email MTA-Receiver Deployment
Options:(b) . . . . . . . . . . . . . . . . . . . . . . . . . . . . . . . . . . . . . . . . . . . . . . . . . . . . . 17
Figure 4: Send Connector Settings . . . . . . . . . . . . . . . . . . . . . . . . . . . . . . . . . . . . . 22
Figure 5: Setting Journal Rules . . . . . . . . . . . . . . . . . . . . . . . . . . . . . . . . . . . . . . . . . 23
Figure 6: Microsoft Office 365 Admin Center . . . . . . . . . . . . . . . . . . . . . . . . . . . . . 34
Figure 7: Setting a New Journal Rule . . . . . . . . . . . . . . . . . . . . . . . . . . . . . . . . . . . . 35
Figure 8: Google Gmail Admin Home Journaling Settings . . . . . . . . . . . . . . . . . . . 36
Figure 9: Journaling Criteria required by Juniper ATP Appliance MTA . . . . . . . . . . . 37
Figure 10: Setting the Juniper ATP Appliance MTA as the Gmail Recipient:
JATP_mta@FQDN . . . . . . . . . . . . . . . . . . . . . . . . . . . . . . . . . . . . . . . . . . . . . . . 38
Figure 11: Both the vSwitch and the port-group are in promiscuous mode . . . . . . 40
Figure 12: Central Manager Dashboards . . . . . . . . . . . . . . . . . . . . . . . . . . . . . . . . . 59
Figure 13: Available Appliance Types, CLI appliance-type Command . . . . . . . . . . 61
Figure 14: Application ID and Object ID . . . . . . . . . . . . . . . . . . . . . . . . . . . . . . . . . . 63
Figure 15: Directory ID . . . . . . . . . . . . . . . . . . . . . . . . . . . . . . . . . . . . . . . . . . . . . . . . 64
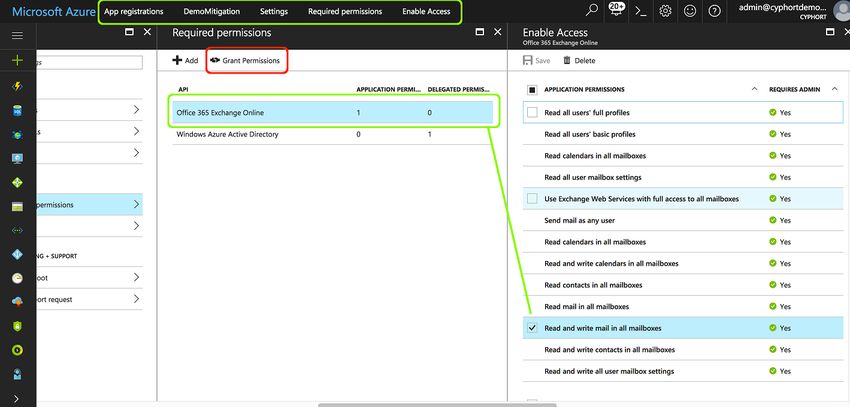
Figure 16: Grant Permissions . . . . . . . . . . . . . . . . . . . . . . . . . . . . . . . . . . . . . . . . . . 65
Figure 17: Download Manifest File . . . . . . . . . . . . . . . . . . . . . . . . . . . . . . . . . . . . . . 65
Figure 18: JATP Email Mitigation Settings . . . . . . . . . . . . . . . . . . . . . . . . . . . . . . . . 66
Copyright © 2019, Juniper Networks, Inc. v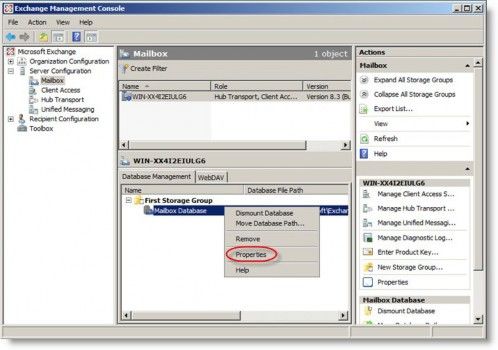
Email Collector Quick Start Guide

vi                                  Copyright © 2019, Juniper Networks, Inc.
List of Tables
                                     About the Documentation . . . . . . . . . . . . . . . . . . . . . . . . . . . . . . . . . . . . . . . . . . ix
                                     Table 1: Notice Icons . . . . . . . . . . . . . . . . . . . . . . . . . . . . . . . . . . . . . . . . . . . . . . . . . . x
                                     Table 2: Text and Syntax Conventions . . . . . . . . . . . . . . . . . . . . . . . . . . . . . . . . . . . . x
          Chapter 1                  Email Collector Quick Start Guide . . . . . . . . . . . . . . . . . . . . . . . . . . . . . . . . . . . 15
                                     Table 3: Table 3-1 Email Collector Install Options . . . . . . . . . . . . . . . . . . . . . . . . . 38
                                     Table 4: Provisioning Requirements . . . . . . . . . . . . . . . . . . . . . . . . . . . . . . . . . . . . 40
                                     Table 5: Sizing Options . . . . . . . . . . . . . . . . . . . . . . . . . . . . . . . . . . . . . . . . . . . . . . . 41
                                     Table 6: CLI Commands . . . . . . . . . . . . . . . . . . . . . . . . . . . . . . . . . . . . . . . . . . . . . 54
                                     Table 7: Configurations and Traffic CLI . . . . . . . . . . . . . . . . . . . . . . . . . . . . . . . . . . 57

Copyright © 2019, Juniper Networks, Inc.                                                                                                                     vii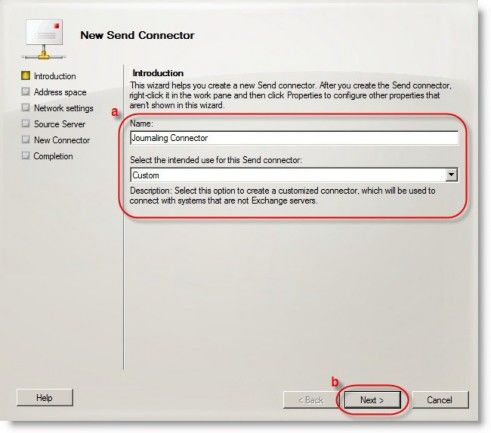
Email Collector Quick Start Guide

viii                                Copyright © 2019, Juniper Networks, Inc.
About the Documentation

                               •   Documentation and Release Notes on page ix
                               •   Documentation Conventions on page ix
                               •   Documentation Feedback on page xi
                               •   Requesting Technical Support on page xii

Documentation and Release Notes
                                                                                            ®
                               To obtain the most current version of all Juniper Networks technical documentation,
                               see the product documentation page on the Juniper Networks website at
                               https://www.juniper.net/documentation/.

                               If the information in the latest release notes differs from the information in the
                               documentation, follow the product Release Notes.

                               Juniper Networks Books publishes books by Juniper Networks engineers and subject
                               matter experts. These books go beyond the technical documentation to explore the
                               nuances of network architecture, deployment, and administration. The current list can
                               be viewed at https://www.juniper.net/books.

Documentation Conventions

                               Table 1 on page x defines notice icons used in this guide.

Copyright © 2019, Juniper Networks, Inc.                                                                               ix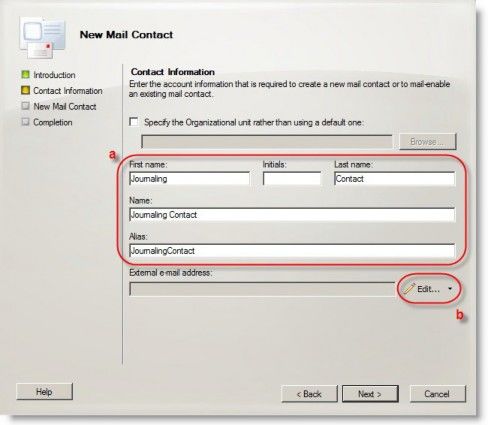
Email Collector Quick Start Guide

Table 1: Notice Icons

    Icon           Meaning                               Description

                   Informational note                    Indicates important features or instructions.

                   Caution                               Indicates a situation that might result in loss of data or hardware damage.

                   Warning                               Alerts you to the risk of personal injury or death.

                   Laser warning                         Alerts you to the risk of personal injury from a laser.

                   Tip                                   Indicates helpful information.

                   Best practice                         Alerts you to a recommended use or implementation.

                                   Table 2 on page x defines the text and syntax conventions used in this guide.

Table 2: Text and Syntax Conventions

    Convention                                  Description                                     Examples

    Bold text like this                         Represents text that you type.                  To enter configuration mode, type the
                                                                                                configure command:

                                                                                                    user@host> configure

    Fixed-width text like this                  Represents output that appears on the           user@host> show chassis alarms
                                                terminal screen.
                                                                                                No alarms currently active

    Italic text like this                       •   Introduces or emphasizes important          •   A policy term is a named structure
                                                    new terms.                                      that defines match conditions and
                                                •   Identifies guide names.                         actions.
                                                                                                •   Junos OS CLI User Guide
                                                •   Identifies RFC and Internet draft titles.
                                                                                                •   RFC 1997, BGP Communities Attribute

    Italic text like this                       Represents variables (options for which         Configure the machine’s domain name:
                                                you substitute a value) in commands or
                                                configuration statements.                           [edit]
                                                                                                    root@# set system domain-name
                                                                                                      domain-name

x                                                                                                    Copyright © 2019, Juniper Networks, Inc.
About the Documentation
Table 2: Text and Syntax Conventions (continued)
Convention Description Examples
Text like this Represents names of configuration • To configure a stub area, include the
statements, commands, files, and stub statement at the [edit protocols
directories; configuration hierarchy levels; ospf area area-id] hierarchy level.
or labels on routing platform • The console port is labeled CONSOLE.
components.
< > (angle brackets) Encloses optional keywords or variables. stub ;
| (pipe symbol) Indicates a choice between the mutually broadcast | multicast
exclusive keywords or variables on either
side of the symbol. The set of choices is (string1 | string2 | string3)
often enclosed in parentheses for clarity.
# (pound sign) Indicates a comment specified on the rsvp { # Required for dynamic MPLS only
same line as the configuration statement
to which it applies.
[ ] (square brackets) Encloses a variable for which you can community name members [
substitute one or more values. community-ids ]
Indention and braces ( { } ) Identifies a level in the configuration [edit]
hierarchy. routing-options {
static {
route default {
; (semicolon) Identifies a leaf statement at a
nexthop address;
configuration hierarchy level.
retain;
}
}
}
GUI Conventions
Bold text like this Represents graphical user interface (GUI) • In the Logical Interfaces box, select
items you click or select. All Interfaces.
• To cancel the configuration, click
Cancel.
> (bold right angle bracket) Separates levels in a hierarchy of menu In the configuration editor hierarchy,
selections. select Protocols>Ospf.
Documentation Feedback
We encourage you to provide feedback so that we can improve our documentation. You
can use either of the following methods:
• Online feedback system—Click TechLibrary Feedback, on the lower right of any page
on the Juniper Networks TechLibrary site, and do one of the following:
Copyright © 2019, Juniper Networks, Inc. xiEmail Collector Quick Start Guide
• Click the thumbs-up icon if the information on the page was helpful to you.
• Click the thumbs-down icon if the information on the page was not helpful to you
or if you have suggestions for improvement, and use the pop-up form to provide
feedback.
• E-mail—Send your comments to techpubs-comments@juniper.net. Include the document
or topic name, URL or page number, and software version (if applicable).
Requesting Technical Support
Technical product support is available through the Juniper Networks Technical Assistance
Center (JTAC). If you are a customer with an active Juniper Care or Partner Support
Services support contract, or are covered under warranty, and need post-sales technical
support, you can access our tools and resources online or open a case with JTAC.
• JTAC policies—For a complete understanding of our JTAC procedures and policies,
review the JTAC User Guide located at
https://www.juniper.net/us/en/local/pdf/resource-guides/7100059-en.pdf.
• Product warranties—For product warranty information, visit
https://www.juniper.net/support/warranty/.
• JTAC hours of operation—The JTAC centers have resources available 24 hours a day,
7 days a week, 365 days a year.
Self-Help Online Tools and Resources
For quick and easy problem resolution, Juniper Networks has designed an online
self-service portal called the Customer Support Center (CSC) that provides you with the
following features:
• Find CSC offerings: https://www.juniper.net/customers/support/
• Search for known bugs: https://prsearch.juniper.net/
• Find product documentation: https://www.juniper.net/documentation/
• Find solutions and answer questions using our Knowledge Base: https://kb.juniper.net/
• Download the latest versions of software and review release notes:
https://www.juniper.net/customers/csc/software/
• Search technical bulletins for relevant hardware and software notifications:
https://kb.juniper.net/InfoCenter/
xii Copyright © 2019, Juniper Networks, Inc.About the Documentation
• Join and participate in the Juniper Networks Community Forum:
https://www.juniper.net/company/communities/
• Create a service request online: https://myjuniper.juniper.net
To verify service entitlement by product serial number, use our Serial Number Entitlement
(SNE) Tool: https://entitlementsearch.juniper.net/entitlementsearch/
Creating a Service Request with JTAC
You can create a service request with JTAC on the Web or by telephone.
• Visit https://myjuniper.juniper.net.
• Call 1-888-314-JTAC (1-888-314-5822 toll-free in the USA, Canada, and Mexico).
For international or direct-dial options in countries without toll-free numbers, see
https://support.juniper.net/support/requesting-support/.
Copyright © 2019, Juniper Networks, Inc. xiiiEmail Collector Quick Start Guide xiv Copyright © 2019, Juniper Networks, Inc.
CHAPTER 1

Email Collector Quick Start Guide

                               •   Overview on page 15
                               •   On-Premise Juniper ATP Appliance-MTA-Receiver Deployments on page 16
                               •   Generalized Administrator Tasks for Juniper ATP Appliance On-Premise MTA
                                   Deployments on page 17
                               •   On-Premise BCC Email Collector Deployments on page 18
                               •   Configuring Collector Email Journaling on page 19
                               •   Configuring Gmail Journaling on page 35
                               •   Core/CM and All-in-One Email Collector Installation Options on page 38
                               •   Installing the Juniper ATP Appliance Collector Open Virtual Appliance (OVA) on page 39
                               •   Installing and Configuring the AWS vCore AMI on page 43
                               •   Verifying AWS Configurations on page 53
                               •   Configuring Juniper ATP Appliance Email Traffic Collection on page 54
                               •   Setting the same Device Key Passphrase on all Juniper ATP Appliance
                                   Devices on page 57
                               •   Verifying Configurations and Traffic from the CLI on page 57
                               •   Accessing the Juniper ATP Appliance Central Manager Web UI on page 58
                               •   Changing the Appliance Type on page 60
                               •   Appendix A: Deploy JATP Email Threat Mitigation for Office 365 (A Start to Finish
                                   Example) on page 62
                               •   What to Do Next? on page 70

Overview

                               Welcome to the Juniper ATP Appliance Email Collector Quick Start Guide.

                               Juniper ATP Appliance’s Email Collector detects malicious URLs and attachments
                               delivered via email and correlates these detections with web downloads and lateral
                               spread events. There are three Juniper ATP Appliance email options:

                               •   An On-Premise Email MTA-Receiver

                               •   A BCC or Journal Email Server Account

Copyright © 2019, Juniper Networks, Inc.                                                                               15
Email Collector Quick Start Guide
Figure 1: Juniper ATP Appliance Email Collection and Detection Options
NOTE: A Juniper ATP Appliance Advanced license is required for advanced
Email Detection configurations.
Related • On-Premise Juniper ATP Appliance-MTA-Receiver Deployments on page 16
Documentation
• On-Premise BCC Email Collector Deployments on page 18
• Core/CM and All-in-One Email Collector Installation Options on page 38
On-Premise Juniper ATP Appliance-MTA-Receiver Deployments
Juniper ATP Appliance MTA Receiver deployments collect emails from different servers
including Office 365, Gmail and MS Exchange. It also supports any other email
servers/anti-spam gateway that supports additional SMTP receivers for sending emails
to the Juniper ATP
Appliance MTA Receiver (without adding any SMTP envelop headers to make the original
email an attachment). The Juniper ATP Appliance admin must configure the supported
servers (to direct the email stream to the Juniper ATP Appliance MTA Receiver) using
the email address setup on the MTA Receiver (for example: CustomerX@MTA-IP or
CustomerX@DomainName.
Juniper ATP Appliance’s On-Premise MTA Receiver extracts objects/URL links and submits
them to the Juniper ATP Appliance Core for analysis. With multi-vector threat detection,
if existing security infrastructure fails to detect a phishing link, Juniper ATP Appliance
monitors the download from that link, detects the CnC callbacks caused by the download,
correlates any lateral spread that the download can trigger, and blocks the threat with
mitigation. Benefits include:
• Visibility into email borne threats at high scale (2.4 Million emails/day)
16 Copyright © 2019, Juniper Networks, Inc.Chapter 1: Email Collector Quick Start Guide
• Detection of Malicious Email Attachments and URL Links
• Ability to quarantine malicious emails
Figure 2: Juniper ATP Appliance Email MTA-Receiver Deployment Options: (a) for Office
365 and Gmail Analysis
Figure 3: Juniper ATP Appliance Email MTA-Receiver Deployment Options:(b)
Related • Generalized Administrator Tasks for Juniper ATP Appliance On-Premise MTA
Documentation Deployments on page 17
• On-Premise BCC Email Collector Deployments on page 18
Generalized Administrator Tasks for Juniper ATP Appliance On-Premise MTA
Deployments
After installing a Juniper ATP Appliance Core or All-in-One system, both of which contain
an Email Traffic Collector in the Core component, an admin will need to perform the
following tasks:
Copyright © 2019, Juniper Networks, Inc. 17Email Collector Quick Start Guide
• open a firewall rule to allow emails from office 365/gmail to the mta (from
*.protection.outlook.com to JunipeATPmta_external_ip:25)
• use the external ip address or fqdn of the mta to create a journal rule in office 365
(user@1.1.1.1 or user@customer.com)
• configure mailbox name and mta ip from the Juniper ATP Appliance web interface in:
• System Profiles > Email Collector > Add New Email Collector > Juniper ATP Appliance
MTA Receiver
• Configure Mitigation information To Auto-Mitigate: Environmental Settings > Email
Mitigation Settings
• ports used:
• (Collection) Office 365 / Gmail / Exchange Connects To MTA using TCP:25 (Inbound)
(TLS Can Be Enabled)
• (Submission) MTA Connects To Core/CM Using TCP:443
• (Mitigation) Core/cm Connects To Office 365/ Gmail Using TCP:443 (Outbound)
Related • On-Premise BCC Email Collector Deployments on page 18
Documentation
On-Premise BCC Email Collector Deployments
This method of email collection relies on a BCC or Journal mailbox which receives copies
of emails to be inspected. The Juniper ATP Appliance BCC email collector periodically
pulls these emails to examine them for threats.
Microsoft Exchange Server journaling can be configured to record a copy (a journal) of
enterprise email messages, and then periodically send them to a journal mailbox on the
Exchange Server.
NOTE: No email or email data is stored on the Traffic Collector. On the Juniper
ATP Appliance Core, extracted objects and some meta data (such as source
and destination email addresses, timestamp data, etc., are stored and Juniper
ATP Appliance logs email header info in the log file. No text from the email
is retained (except for the attachment(s) for malware detonation and
analysis)
Exchange Server 2010 can be configured to support envelope journaling only. This means
that a copy is made of each email message body and its transport information. The
transport information is essentially an envelope that includes the email sender and all
recipients. The Juniper ATP Appliance Email Collector polls the Exchange Server for
journal entries and as scheduled, pulls all the emails in the journal account from the
exchange server to the Collector. The Email Collector uses journaling for initial traffic
analysis and email attachment monitoring/ inspection.
18 Copyright © 2019, Juniper Networks, Inc.Chapter 1: Email Collector Quick Start Guide
All urls and email attachments are sent from the Email Collector to the Juniper ATP
Appliance Core for detonation in the Juniper ATP Appliance SmartCore. When email-based
malware or malicious email attachments are detected, the journal entry is incorporated
into the analysis results by the Juniper ATP Appliance Central Manager and sent out as
a notification to the Juniper ATP Appliance administrator, with corresponding mitigation
and/or infection verification actions detailed in the Central Manager Web UI.
NOTE: Juniper ATP Appliance supports journaling for Exchange 2010 and
later.
To setup Email Collector Journaling, refer to the next section.
Configuring Collector Email Journaling
After installing a Juniper ATP Appliance Core or All-in-One system, both of which contain
an Email Traffic Collector in the Core component, you will need to configure an exchange
server journal account for the Collector to poll, and set Postfix to forward Gmail Bcc
(blind carbon copies) of all mail traffic to the Collector as a default forwarding mechanism.
• Email Journaling on page 19
• Create a Journaling Mailbox on the Exchange Server on page 20
• Configuring a Mailbox Database on page 21
• Configuring Microsoft Exchange Server 2013 Journaling on page 21
• Configuring Microsoft Exchange Server 2010 Journaling on page 23
• Configuring Exchange-Server Journal Polling from the Juniper ATP Appliance CM Web
UI on page 33
• Configuring Office 365 Journaling on page 34
Email Journaling
Juniper ATP Appliance Traffic Collectors continuously monitor and inspect all network
traffic for malware objects; extracting and sending objects to the Core for distribution to
the Windows or Mac Detection Engines.
For Windows traffic, Microsoft Exchange Server journaling can be configured to record
a copy (a journal) of enterprise email messages, and then periodically send them to a
journal mailbox on the Exchange Server.
NOTE: No email or email data is stored on the Traffic Collector. On the Juniper
ATP Appliance Core, extracted objects and some meta data (such as source
and destination email addresses, timestamp data, etc., are stored and Juniper
ATP Appliance logs email header info in the log file. No text from the email
is retained (except for the attachment(s) for malware detonation and
analysis)
Copyright © 2019, Juniper Networks, Inc. 19Email Collector Quick Start Guide
Exchange Server 2010 can be configured to support envelope journaling only. This means
that a copy is made of each email message body and its transport information. The
transport information is essentially an envelope that includes the email sender and all
recipients.
The Juniper ATP Appliance Email Collector polls the Exchange Server for journal entries
and as-scheduled, pulls all the emails in the journal account from the exchange server
to the Collector. The Email Collector uses journaling for initial traffic analysis and email
attachment monitoring/inspection. All email traffic (and email attachments) are sent
from the Email Collector to the Juniper ATP Appliance Core for detonation in the Windows
or Mac OS X detection engines.
When email-based malware or malicious email attachments are detected, the journal
entry is incorporated into the analysis results by the Juniper ATP Appliance Central
Manager and sent out as a notification to the Juniper ATP Appliance administrator, with
corresponding mitigation and/or infection verification actions detailed in the Central
Manager Web UI.
NOTE: Juniper ATP Appliance supports journaling for Exchange 2010 and
later.
To setup Email Collector Journaling, use the following procedures:
Create a Journaling Mailbox on the Exchange Server
NOTE: See also “Configuring Microsoft Exchange Server 2013 Journaling.”
1. Launch Microsoft Exchange Management Console.
2. Expand Recipient Configuration node and click on Mailbox node.
3. Select New Mailbox… from the Actions pane.
4. Select User Mailbox option and click Next.
5. Select New user option and click Next.
6. Enter New user mailbox details
7. Enter the ‘User information’ details for the Collector to which the new journaling
mailbox will be assigned and click Next.
8. Enter an ‘Alias’ for the journaling mailbox and click Next.
20 Copyright © 2019, Juniper Networks, Inc.Chapter 1: Email Collector Quick Start Guide
9. Click Next again and review the new mailbox summary for the new mailbox to create,
then click New.
10. Now that the journaling mailbox is created, configure standard journaling by configuring
a Mailbox Database.
Configuring a Mailbox Database
• In the Microsoft Exchange Management Console>Server Configuration, click on Mailbox
database.
• In the Toolbox Actions of Selected Mailbox Database, click on Properties.
• In the Mailbox Database Properties page, go to the General tab and select the Journal
Recipient checkbox, BUT, before selecting the checkbox, first click on Browse and
choose which mailbox will get all messages from the mailbox database. After checking
Journal Recipient, click OK to finish.
Configuring Microsoft Exchange Server 2013 Journaling
[See also Configuring Microsoft Exchange Server 2010 Journaling in the next section.]
1. Login to the MS Exchange Server Admin Center at: https://exchnageserverip/ecp/
2. Select the Send Connectors tab.
3. Navigate to mail flow>>send connectors and enter Send Connector settings:
Copyright © 2019, Juniper Networks, Inc. 21Email Collector Quick Start Guide
Figure 4: Send Connector Settings
4. Save the connector settings.
5. Navigate to Compliance Management>>Journal Rules to configure Journal rules.
6. Provide the mailboxname and ip address in the “Send Journal Reports To” field .
NOTE: This should match the mailbox name configured at the Juniper
ATP Appliance Email Collector Config>System Profiles>Email Collector
Web UI page.
22 Copyright © 2019, Juniper Networks, Inc.Chapter 1: Email Collector Quick Start Guide
Figure 5: Setting Journal Rules
Configuring Microsoft Exchange Server 2010 Journaling
To configure Journaling on your Exchange 2010 server, follow these steps:
• Set up a journaling contact
• Configure an SMTP send connector
• Activate journaling
• Implement journal rules (select users only)
[See also Configuring Microsoft Exchange Server 2013 Journaling in the previous section.]
• Create a journaling contact on page 23
• Create an SMTP send connector on page 25
• Activate journaling on page 28
• Implement journal rules (select users only) on page 31
Create a journaling contact
1. Select Start > All Programs > Microsoft Exchange Server 2010 > Exchange
Management Console.
2. Click the + sign to the left of your Exchange server.
3. Click the + sign to the left of Recipient Configuration.
4. Click Mail Contact under Recipient Configuration.
5. In the Mail Contact page (a), click New Mail Contact in the Actions pane (b).
Copyright © 2019, Juniper Networks, Inc. 23Email Collector Quick Start Guide
6. Select the New Contact option (a) and then click Next (b).
7. In the New Mail Contact window, type Journaling in the First Name field, Contact in
the Last Name field and Journaling Contact in the Alias field (a). Click Edit (b).
8. Type the journaling address (a) and click OK (b).
NOTE: The journaling address is unique to your organization. If you were
provided with this address, please contact customer support.
9. Click Next.
24 Copyright © 2019, Juniper Networks, Inc.Chapter 1: Email Collector Quick Start Guide
10. Click New.
11. Click Finish.
Create an SMTP send connector
1. Select Start > All Programs > Microsoft Exchange Server 2010 > Exchange
Management Console.
2. Click the + sign to the left of your Exchange server.
3. Click the + sign to the left of Organization Configuration.
4. Click Hub Transport.
5. Click the Send Connectors tab.
6. In the Actions pane, click New Send Connector.
7. Type Journaling Connector for the Name field, for the Select the intended use for this
Send connector dropdown list, select Custom (a). Click Next (b).
Copyright © 2019, Juniper Networks, Inc. 25Email Collector Quick Start Guide
8. Click Add. The SMTP Address Space window opens.
9. In the Address field, type the Address Space (a). Leave the cost at 1 and then click OK
(b).
10. Click Next.
26 Copyright © 2019, Juniper Networks, Inc.Chapter 1: Email Collector Quick Start Guide
11. Select the Route mail through the following smart hosts option and then click Add.
12. Select the Fully qualified domain name (FQDN) option, type the smart host provided
to you and then click OK.
13. Click Next.
14. Select None for the Configure smart host authentication settings and then click Next.
NOTE: Exchange 2010 servers automatically send all outbound email via
TLS encryption: no outbound security configuration is required by the
Administrator.
15. Click Next.
16. Click New.
17. Click Finish. The configured send connector is shown below.
Copyright © 2019, Juniper Networks, Inc. 27Email Collector Quick Start Guide
Activate journaling
1. Select Start > All Programs > Microsoft Exchange Server 2010 > Exchange
Management Console.
2. Click the + sign to the left of your Exchange server.
3. Click the + sign to the left of Organization Configuration.
4. Click Mailbox.
5. In the Database Management tab, right click your mailbox database and select
Properties.
28 Copyright © 2019, Juniper Networks, Inc.Chapter 1: Email Collector Quick Start Guide
6. Click the Maintenance tab.
7. Select the Journal Recipient check box (a), and then click Browse (b).
Copyright © 2019, Juniper Networks, Inc. 29Email Collector Quick Start Guide
8. Select Journaling Contact (a) and then click OK (b).
30 Copyright © 2019, Juniper Networks, Inc.Chapter 1: Email Collector Quick Start Guide
9. Click OK. Message journaling is now activated.
Implement journal rules (select users only)
1. Select Start > All Programs > Microsoft Exchange Server 2010 > Exchange
Management Console.
2. Click the + sign to the left of your Exchange server.
3. Click the + sign to the left of Organization Configuration.
4. Click Hub Transport.
5. Click the Journal Rules tab.
6. In the Actions pane, click New Journal Rule. The New Journal Rule window appears.
7. In the Rule Name field, type Journaling Rule (a) and then click Browse (b).
Copyright © 2019, Juniper Networks, Inc. 31Email Collector Quick Start Guide
8. Select Journaling Contact from the list and then click OK.
9. Select the Journal messages for recipient check box and then click Browse.
10. Select Journaling Distro from the list (a) and click OK (b).
32 Copyright © 2019, Juniper Networks, Inc.Chapter 1: Email Collector Quick Start Guide
• Click OK to complete configuration of journal rules for select users in your organization.
Configuring Exchange-Server Journal Polling from the Juniper ATP Appliance CM Web UI
1. From the Juniper ATP Appliance Central Manager Config> System Profiles> Email
Collector, click the Add New Email Collector button, or click Edit for an existing Collector
listed in the Current Email Collectors table.
2. Enter and select the email journaling settings in the displayed configuration fields:
Email Server [IP], Protocol, SSL, Mailbox Name, Password, Poll Interval (in minutes),
Keep Mail on Server, and Enabled.
Copyright © 2019, Juniper Networks, Inc. 33Email Collector Quick Start Guide
Configuring Office 365 Journaling
To set up Office 365 Journaling for Juniper ATP Appliance email mitigation:
1. Log in to the Microsoft Office 365 Admin Center.
2. From the Office 365 Admin Center, select Admin Centers > Exchange.
Figure 6: Microsoft Office 365 Admin Center
3. Select Compliance Management > Journal Rules.
34 Copyright © 2019, Juniper Networks, Inc.Chapter 1: Email Collector Quick Start Guide
4. Click on the + sign to add a new Journal Rule.
5. Complete the new journal rule form fields.
Figure 7: Setting a New Journal Rule
Related • Configuring Gmail Journaling on page 35
Documentation
Configuring Gmail Journaling
Use the following procedure to configure email journaling for Gmail:
1. Navigate to the Google Admin Home site at https://admin.google.com/AdminHome.
2. From the Google Admin Console Dashboard, navigate to Apps->G
Suite->Gmail->Advanced Settings.
NOTE: To view Advanced Settings, scroll to the bottom of the Gmail page.
3. Navigate to the Compliance Section and click Add Another Compliance Rule to setup
deliver to the Juniper ATP Appliance MTA.
Copyright © 2019, Juniper Networks, Inc. 35Email Collector Quick Start Guide
Figure 8: Google Gmail Admin Home Journaling Settings
4. Select the options as displayed in the sample screenshot below (Setting 1 and 2):
36 Copyright © 2019, Juniper Networks, Inc.Chapter 1: Email Collector Quick Start Guide
Figure 9: Journaling Criteria required by Juniper ATP Appliance MTA
5. Be sure to add the Recipient information (this is the Juniper ATP Appliance MT); for
example: JATP_mta@FQDN or JATP_mta@ip.
Copyright © 2019, Juniper Networks, Inc. 37Email Collector Quick Start Guide
Figure 10: Setting the Juniper ATP Appliance MTA as the Gmail Recipient:
JATP_mta@FQDN
• Refer to the Juniper ATP Appliance Operator’s Guide for information about configuring
email detection mitigations.
Related • Configuring Collector Email Journaling on page 19
Documentation
Core/CM and All-in-One Email Collector Installation Options
Table 3: Table 3-1 Email Collector Install Options
Product Component Deployment Location(s) Model Options
Juniper ATP Appliance Core Locate anywhere in the enterprise network, in a clustered Juniper ATP Appliance
Engine deployment, and/or in remote branch office(s)
Juniper ATP Appliance Virtual Locate anywhere in the enterprise network and/or in Juniper ATP Appliance, OVA VM,
or Secondary Core Engine remote branch office(s); Connected logically to the vCore for AWS
(Windows) Primary Core.
Juniper ATP Appliance Central Locate anywhere in the enterprise network as part of the Packaged with the Core Engine
Manager [Primary] Core; Manages traffic collector objects and [Primary Core in the case of
multi-platform Detonation engine detection, analysis and clustered deployments]
reporting (Web UI).
Juniper ATP Appliance Web Locate at any network location; most typical: Internet (or Juniper ATP Appliance Web
Traffic Collector network) egress. Collector
38 Copyright © 2019, Juniper Networks, Inc.Chapter 1: Email Collector Quick Start Guide
Table 3: Table 3-1 Email Collector Install Options (continued)
Product Component Deployment Location(s) Model Options
Juniper ATP Appliance Email Locate between the anti-spam gateway and the network’s A component of the Juniper ATP
Traffic Collector internal mail server(s), such as MS-Exchange. The Email Appliance Core or Allin- One
Collector does not parse email messages out of a SPAN System
port; deployment requires an account to login to a special
email account (Journaled or BCC) to get email for analysis
using POP or IMAP.
Juniper ATP Appliance Mac OS Locate anywhere in the enterprise network and/or in Juniper ATP Appliance on Mac
X remote branch office(s); Connected logically to the Mini Device
Primary Core.
Juniper ATP Appliance All-In- Locate anywhere in the enterprise network. Juniper ATP Appliance
One
Global Security Services (GSS) Configured for any of the Juniper ATP Appliance CM/ Core Service
appliances or All-in-One appliances.
clustered or virtual Software and Cloud-based deployment: Virtual Collector, Many options; refer to respective
Virtual Core for AWS, and vCore (OVA) Juniper ATP Appliance Quick
Start Guide
NOTE: For hardware installation instructions, refer to the Juniper Networks
Advanced Threat Prevention Appliance Hardware Guide.
Related • Installing the Juniper ATP Appliance Collector Open Virtual Appliance (OVA) on page 39
Documentation
• Installing and Configuring the AWS vCore AMI on page 43
• Changing the Appliance Type on page 60
Installing the Juniper ATP Appliance Collector Open Virtual Appliance (OVA)
Juniper ATP Appliance’s extensible deployment options include a Virtual Collector
(vCollector) product, as an Open Virtual Appliance, or OVA, that runs in virtual machines.
Specifically, a Juniper ATP Appliance OVA-packaged image is available for VMware
Hypervisor for vSphere 6.5, 6.0, 5.5 and 5.0. Virtual Collector models supporting 25 Mbps,
100 Mbps, 500 Mbps and a 1.0 Gbps are available.
An OVF package consists of several files contained in a single directory with an OVF
descriptor file that describes the Juniper ATP Appliance virtual machine template and
package: metadata for the OVF package, and a Juniper ATP Appliance software image.
The directory is distributed as an OVA package (a tar archive file with the OVF directory
inside).
Copyright © 2019, Juniper Networks, Inc. 39Email Collector Quick Start Guide
Figure 11: Both the vSwitch and the port-group are in promiscuous mode
Virtual Collector Deployment Options
Two types of vCollector deployments are supported for a network switch SPAN/TAP:
1. Traffic that is spanned to a vCollector from a physical switch. In this case, traffic is
spanned from portA to portB. ESXi containing the Juniper ATP Appliance vCollector
OVA is connected to portB. This deployment scenario is shown in the figure above.
2. Traffic from a virtual machine that is on the same vSwitch as the vCollector. In this
deployment scenario, because the vSwitch containing the vCollector is in promiscuous
mode, by default all port-groups created will also be in promiscuous mode. Therefore,
2 port groups are recommended wherein port-groupA (vCollector) in promiscuous
mode is associated with the vCollector, and port-groupB (vTraffic) represents traffic
that is not in promiscuous mode.
NOTE: Traffic from a virtual machine that is not on the same vSwitch as
the vCollector is not supported. Also, a dedicated NIC adapter is required
for the vCollector deployment; attach the NIC to a virtual switch in
promiscuous mode (to collect all traffic). If a vSwitch is in promiscuous
mode, by default all port-groups are put in promiscuous mode and that
means other regular VMs are also receiving unnecessary traffic. A
workaround for that is to create a different port-group for the other VMs
and configure without promiscuous mode.
Table 4: Provisioning Requirements
VM vCenter Version Support Recommended vCollector ESXi vCollector CPUs vCollector Memory
Hardware
VM vCenter Server Version: 6.5, Processor speed 2.3-3.3 GHz Reservation: Default Memory Reservation:
6.0, 5.5 and 5.0 Default
As many physical CORES as CPU Limit: Unlimited
vSphere Client Version: 6.5, 6.0, virtual CPUs Memory Limit:
5.5 and 5.0 Hyperthreaded Core Sharing Unlimited
Hyperthreading: either enable or Mode: None (if Hyperthreading
ESXi version: 5.5.0 and 5.5.1 disable is enabled on the ESXi)
40 Copyright © 2019, Juniper Networks, Inc.Chapter 1: Email Collector Quick Start Guide
Table 5: Sizing Options
Number of
Model Performance vCPUs Memory Disk Storage Emails/Day
vC--v500M 500 Mbps 8 16 GB 512 GB 720 thousand
vC--v1G 1 Gbps 16 16 GB 512 GB 1.4 million
vC-v2.5G 2.5 Gbps 24 32 GB 512 GB 2.4 million
NOTE: VDS and DVS are not supported in this release.
• OVA Deployment vSwitch Setup on page 41
• To install the JATP Appliance OVA to a VM on page 41
OVA Deployment vSwitch Setup
1. Identify the physical network adapter from which the spanned traffic is received, then
create a new VMware Virtual Switch and associate it with the physical network adapter.
2. Click on Virtual Switch Properties. On the Ports tab, select vSwitch and click on the
Edit button.
3. Select the Security tab and change Promiscuous Mode to accept, then click OK. Click
OK again to exit.
4. Create a new port-group “vtraffic” in the Virtual Switch. This new port-group will be
assigned to your vCollector later. See vSwitch Tip below for information about
troubleshooting this setup.
To install the JATP Appliance OVA to a VM
1. Download the JATP OVA file to a desktop system that can access VMware vCenter.
2. Connect to vCenter and click on File>Deploy OVF Template.
3. Browse the Downloads directory and select the OVA file, then click Next to view the
OVF Template Details page.
4. Click Next to display and review the End User License Agreement page
5. Accept the EULA and click Next to view the Name and Location page
6. a default name is created for the Virtual Email Collector. If desired, enter a new name.
Copyright © 2019, Juniper Networks, Inc. 41Email Collector Quick Start Guide
7. Choose the Data Center on which the vCollector will be deployed, then click Next to
view the Host/Cluster page.
8. Choose the host/cluster on which the vCollector will reside, then click Next to view
the Storage page.
9. Choose the destination file storage for the vCollector virtual machine files, then click
Next to view the Disk Format page. The default is THIN PROVISION LAZY ZEROED
which requires 512GB of free space on the storage device. Using Thin disk provisioning
to initially save on disk space is also supported.
Click Next to view the Network Mapping page.
10. Set up the Virtual Email Collector management interface: This interface is used to
communicate with the JATP Central Manager (CM). Assign the destination network
to the port-group that has connectivity to the CM Management Network IP Address.
11. IP Allocation Policy can be configured for DHCP or Static addressing-- Juniper
recommends using STATIC addressing. For DHCP instructions, skip to Step 12. For IP
Allocation Policy as Static, perform the following assignments:
• IP Address: Assign the Management Network IP Address for the Virtual Collector;
it should be in the same subnet as the management IP address for the JATP Central
Manager.
• Netmask: Assign the netmask for the Virtual Collector.
• Gateway: Assign the gateway for the Virtual Collector.
• DNS Address 1: Assign the primary DNS address for the Virtual Collector.
• DNS Address 2: Assign the secondary DNS address for the Virtual Collector.
12. Enter the Search Domain and Hostname for the Virtual Collector.
13. Complete the JATP vCollector Settings:
• New JATP CLI Admin Password: this is the password for accessing the Virtual
Collector from the CLI.
• JATP Central Manager IP Address: Enter the management network IP Address
configured for the Central Manager. This IP Address should be reachable by the
Virtual Collector Management IP Address.
• JATP Device Name: Enter a unique device name for the Virtual Collector.
• JATP Device Description: Enter a description for the Virtual Collector.
• JATP Device Key Passphrase: Enter the passphrase for the Virtual Collector; it should
be identical to the passphrase configured in the Central Manager for the Core/CM.
Click Next to view the Ready to Complete page.
42 Copyright © 2019, Juniper Networks, Inc.Chapter 1: Email Collector Quick Start Guide
14. Do not check the Power-On After Deployment option because you must first (next)
modify the CPU and Memory requirements (depending on the sizing options available).
It is important to reserve CPU and memory for any virtual deployment.
15. To configure CPU and memory reservation:
• For CPU reservation: Right click on vCollector-> Edit settings:
• Select Resources tab, then select CPU.
• Under Reservation, specify the guaranteed CPU allocation for the VM. It can be
calculated based on Number of vCPUs processor speed.
• For Memory Reservation: Right click on vCollector -> Edit settings.
• In the Resources tab, select Memory.
• Under Reservation, specify the amount of Memory to reserve for the VM. It should
be the same as the memory specified by the Sizing guide.
16. If Hyperthreading is enabled, perform the followings elections:
• Right click on the virtual collector -> Edit settings.
• In the Resources tab, select HT Sharing: None for Advanced CPU.
17. Power on the Virtual Email Collector.
Related • Installing and Configuring the AWS vCore AMI on page 43
Documentation
Installing and Configuring the AWS vCore AMI
Juniper ATP Appliance vCore for AWS requires both Juniper ATP Appliance and AWS
licensed accounts. The installations and configuration process uses both the Amazon
AWS Management Console (Part 1) as well as the Juniper ATP Appliance vCore Central
Manager Web UI and CLI (Part 2).
NOTE: After purchasing the vCore AMI license, share the vCore AMI with your
AWS customer account by using the AWS Management Console to configure
and launch the vCore AMI. Refer to the Juniper ATP Appliance vCore for AWS
Quick Start Guide for more information.
A general AWS AMI configuration workflow is provided below; be sure to refer to the
AWS Management Console operations guide for more detailed console usage information.
• Part 1- Amazon AWS Management Console vCore AMI Configuration on page 43
• Part 2 - Running the Juniper ATP Appliance vCore AMI Instance on page 49
Part 1- Amazon AWS Management Console vCore AMI Configuration
1. Log into your AWS database account at the Amazon AWS Management Console.
Copyright © 2019, Juniper Networks, Inc. 43Email Collector Quick Start Guide
console.aws.amazon.com
2. From the AWS Management Console Dashboard, select EC2 services.
3. In EC2 Services, click the IMAGES>AMIs option from the left menu of the AWS Console.
Also click on the drop-down menu to change the image ownership type from "Owned
by Me" to "Private Images".:
4. Select the Juniper ATP Appliance AMI image to be installed by clicking its radio button
in the table.
5. From the Zone DropDown menu, select the Zone for which the AMI is to be configured.
In our example, the Juniper ATP Appliance “rsa-demo-cm” AMI is selected. (The Juniper
ATP Appliance AMI will have been shared with you before you launch the AWS Core.)
44 Copyright © 2019, Juniper Networks, Inc.Chapter 1: Email Collector Quick Start Guide
6. Click Launch to begin configuration of this Juniper ATP Appliance vCore AMI instance,
in EC2, for your enterprise.
7. From the “Choose an Instance Type” page, select an instance type for the AMI. In our
example, we selected “c4 large”. Click Next: Configure Instance.
8. From the “Configure Instance Details” page, select an existing customer-defined
Virtual Private Cloud (VPC) from the Network dropdown menu; in our example, we’ve
selected rsa-demo-1.
To create a new VPC, click the Create New VPC link and follow the stepped procedure.
9. Define the VPC subnet in the Subnet field; in our example, we used AWS 10.2.0.0/16.
To create a new subnet, click the Create New Subnet link and follow the stepped
procedure.
10. Confirm that the subnet us using an Auto-Assigned Public IP, as in the example shown
above. This allows the Juniper ATP Appliance vCore to be accessed from the Internet.
Copyright © 2019, Juniper Networks, Inc. 45Email Collector Quick Start Guide
11. Click to Enable termination protection to protect against accidental termination.
NOTE: Each AMI instance uses a private IP and a public IP. If you are
planning on installing one vCore + Central Manager with several Secondary
Core, you must have a public IP address assignment. Note that the
Secondary Core does not need a public IP because it doers not contain a
Web UI.
ALSO: Some enterprises connect their AWS VPC to a private network
using VPN. In this case, there is no need to assign a public IP to the subnet
because internet access can be configured via the VPN.
12. Click Next: Add Storage.
NOTE: Click "Encrypted" to encrypt the data volume.
13. Juniper ATP Appliance already provides 1 TeraByte of storage in the Core. Due to the
limitations of the AWS storage volume max size, there is no need for further
configuration on this page; do not add extra storage to the vCore. Click Next.
46 Copyright © 2019, Juniper Networks, Inc.Chapter 1: Email Collector Quick Start Guide
14. From the “Tag Instance” page, click Create Tag and enter a tag name and description.
Click Next: Configure Security to proceed.
15. A security group is essentially a firewall in AWS. Most customers already have a
preexisting firewall, so choose Select an existing security group, or Create a new
security group. Do ensure there are rules in the Security Group that allow
communication between AWS Core and AWS Secondary Cores.
16. If creating a new security group, enter a name and description in the Security Group
Name field and the Description field, respectively.
17. Enter port designation; Juniper ATP Appliance vCore only allows for port 22, 80 and
443. Click Next.
Copyright © 2019, Juniper Networks, Inc. 47Email Collector Quick Start Guide
NOTE: You can configure an SSH key although the Juniper ATP Appliance
vCore already includes password protection. To add extra protection, add
a key pair first, then use Juniper ATP Appliance password for CLI-only
login. AWS requires you to set a key pair. You will not be able to use a
pem-only login.
18. To configure an SSH Key, select an existing key pair or create a new key pair:
19. If selecting an existing security group, select then choose from the list and click Next.
The “Review Instance Launch” page displays:
48 Copyright © 2019, Juniper Networks, Inc.Chapter 1: Email Collector Quick Start Guide
20. From the “Review Instance Launch” page, review the Instance Launch details, then
either click Edit Instance to make changes, or click Launch to instantiate.
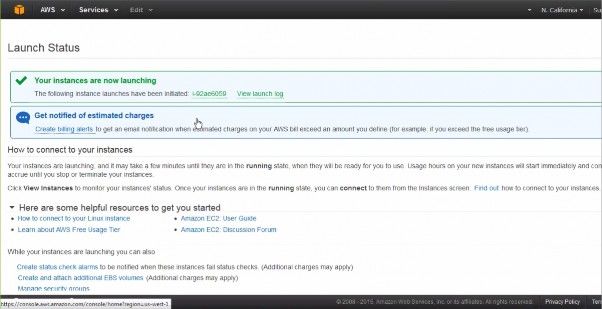
The Launch Status window displays;
Part 2 - Running the Juniper ATP Appliance vCore AMI Instance
Next, you will initialize the Juniper ATP Appliance vCore AMI Instance from the AWS
Management Console, then verify the AMI at the Juniper ATP Appliance Central Manager
CLI using the show ip command.
Copyright © 2019, Juniper Networks, Inc. 49Email Collector Quick Start Guide
1. Open the AWS Management Console Instances page to view the launched AMI
Instance status. When a launched Instance finishes initializing, it will display a green
icon to indicate “running” status.
2. Select the launched Instance then open the panel at the bottom of the Instances
table to review Instance details.
3. Copy the Instance ID and the Instance Type “c4-large2.” for the vCore CLI configuration.
50 Copyright © 2019, Juniper Networks, Inc.Chapter 1: Email Collector Quick Start Guide
NOTE: It is very important to be aware that the private IP address is the
DHCP setting, and it will stay static in AWS and should never change during
proper operations.
Note also that you cannot change the AMI hostname, although you can
change the DNS if necessary.
About DNS: Because the AWS vCore is not located in the enterprise, the
reverse DNS on threat targets do not resolve to the expected target
hostname. This is rarely confusing when connected via VPN from the
corporate network to the VPC. Generally, internal DNS servers are not
exposed outside the enterprise, so Juniper ATP Appliance cannot configure
the AWS vCore to reach an internal DNS server. If the internal DNS server
uses an outward facing IP address and you, as admin, are willing to allow
connections to it, this is a reasonable solution. Note that the DNS server
that the vCore uses will not have the DNS information of the networks
where the Juniper ATP Appliance Traffic Collector is located. This is typical
of distributed deployments where the Traffic Collector and the Core/CM
are not located in the same enterprise networks.
4. Copy the Public IP address to access the vCore AWS Instance CLI via SSH/Putty:
5. At the Juniper ATP Appliance CLI prompt, type server to enter CLI Server mode, then
from Server mode, run the CLI command show ip to display private and public IPs, as
shown below. These should match the AWS configuration.
NOTE: For more information about AWS-specific CLI commands, and
usage of CLI modes and commands, refer to the Juniper ATP Appliance CLI
Command Reference.
Copyright © 2019, Juniper Networks, Inc. 51Email Collector Quick Start Guide
NOTE: Hybrid Cloud/Private Network deployments are not yet supported.
All Juniper ATP Appliance Core components must be co-located on the
AWS at this time. This means you cannot install the vCore on AWS and a
Secondary Core on a private enterprise network (unless the private
enterprise network is connected the to VPC where the AWS Core is located
using VPN).
6. After launching the AWS Core, the AMI vCore instance will boot up just like a regular
appliance, and after the vCore comes up, the next step is to run CLI setup wizard at
the vCore CLI just like a regular virtual Core. Refer to the Juniper ATP Appliance
Core/Central Manager Quick Start Guide for instructions on running the wizard to
configure a Virtual Core. Also in the Quick Start Guide is information about installing
additional Cores, Clustered Cores, Secondary Cores or OVA Cores.
NOTE: On the first boot of a virtual core (either AMI or OVA) with two
disks configured, the appliance takes time to set up the second disk to be
used. During this process, the system is not ready for use; the full process
may take up to 10 minutes. Wait 10 minutes after first boot before logging
into the system to begin configuring it.
7. To create Secondary Cores for this AWS vCore, return to the AWS Management
Console and launch a few more AMI Instances, then login to their CLIs via SSH and
point those vCore Central Manager IP Addresses to the primary vCore CM. This process
is described in the Juniper ATP Appliance Core/Central Manager Quick Start Guide in
the section on Clustered Deployments.
52 Copyright © 2019, Juniper Networks, Inc.You can also read