HID Biometric Manager - Administration Guide - Trusted Identities
←
→
Page content transcription
If your browser does not render page correctly, please read the page content below
HID® Biometric Manager™
Administration Guide

PLT-04029, B.1
March 2021
HID® Biometric Manager™ Administration Guide

Powering
Trusted Identities

Powering                                                                       HID® Biometric Manager™
             Trusted Identities                                                                Administration Guide

Copyright
© 2021 HID Global Corporation/ASSA ABLOY AB. All rights reserved.
This document may not be reproduced, disseminated or republished in any form without the prior written
permission of HID Global Corporation.

Trademarks
HID GLOBAL, HID, the HID Brick logo, the Chain Design, iCLASS SE, HID Signo, Seos, HID Mobile Access,
HID Reader Manager, HID Elite, HID Origo and HID Biometric Manager are trademarks or registered
trademarks of HID Global, ASSA ABLOY AB, or its affiliate(s) in the US and other countries and may not be
 used without permission. All other trademarks, service marks, and product or service names are
trademarks or registered trademarks of their respective owners.

Contacts
For additional offices around the world, see www.hidglobal.com/contact/corporate-offices.
Americas and Corporate                                       Asia Pacific
611 Center Ridge Drive                                       19/F 625 King’s Road
Austin, TX 78753                                             North Point, Island East
USA                                                          Hong Kong
Phone: +1 866 607 7339                                       Phone: +852 3160 9833
Europe, Middle East and Africa (EMEA)                        Brazil
3 Cae Gwyrdd                                                 Condomínio Business Center
Green Meadow Springs                                         Av. Ermano Marchetti, 1435
Cardiff CF15 7AB                                             Galpão A2 - CEP 05038-001
United Kingdom                                               Lapa - São Paulo / SP Brazil
Phone: +44 (0) 1440 711 822                                  Phone: +55 11 5514-7100

HID Global Technical Support: www.hidglobal.com/support.

What's new
Date               Description                                                                             Revision
March 2021         Updates to support HID Biometric Manager Service Pack 2.3 (Signo 25B) Reader            B.1
                   Firmware Version 1.5.1.44 and HID Biometric Manager Software Version 1.0.1212.60729).

A complete list of revisions is available in Revision history.

PLT-04029, B.1                                           2                                                 March 2021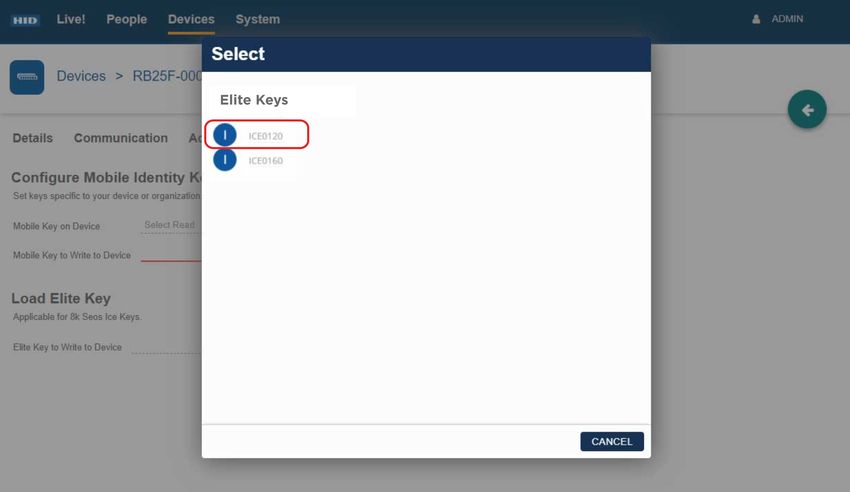
Powering                                                                HID® Biometric Manager™
             Trusted Identities                                                         Administration Guide

                 HID® Bio me t r ic Ma n a ge r ™Admin is t r a t io n Gu id e

Introduction                                                                                              5
   1.1 Document purpose                                                                                   6
   1.2 Intended audience                                                                                  6
   1.3 Related material                                                                                   6
   1.4 Physical Access Control System overview                                                            7
   1.5 HID Biometric Manager server application                                                           8
       1.5.1 System requirements                                                                          8
       1.5.2 Credential Database                                                                          8
       1.5.3 Reader Service                                                                               8
       1.5.4 Data Import                                                                                  9
       1.5.5 HID Biometric Manager Server Window Icons                                                   10
   1.6 HID Biometric Manager Web UI                                                                      10
   1.7 Signo 25B                                                                                         10
   1.8 Panels and Door Controllers                                                                        11
   1.9 Network setups examples                                                                            12
HID Biometric Manager                                                                                    13
   2.1 Overview                                                                                          14
   2.2 About Section in the UI                                                                           14
   2.3 Network usage                                                                                      15
   2.4 HID Biometric Manager initial setup                                                               16
       2.4.1 HID Biometric Manager software install                                                      16
       2.4.2 HID Biometric Manager initial login                                                          18
   2.5 Resetting administration password                                                                  21
       2.5.1 Configure time zone setting                                                                 22
   2.6 Device installation and configuration                                                             24
       2.6.1 Configure device settings                                                                   26
       2.6.2 Device firmware update                                                                      29
       2.6.3 Individual device firmware update                                                           32
       2.6.4 Reset a device                                                                              33
       2.6.5 Uninstall a device                                                                          34
   2.7 Enrollment                                                                                        35
       2.7.1 Enroll people                                                                               35
       2.7.2 Enroll Cards                                                                                37
       2.7.3 Enroll Biometrics                                                                           41
   2.8 Preventing user fingerprint display during enrollment                                             44
       2.8.1 Write fingerprint templates to a card                                                       45
   2.9 Create HID Biometric Manager operators                                                            47
   2.10 Bypass finger TOC Settings                                                                       49

PLT-04029, B.1                                                                   3               March 2021
Powering                                               HID® Biometric Manager™
             Trusted Identities                                        Administration Guide

       2.10.1 Enrollment without fingerprints                                           49
       2.10.2 Enrollment with fingerprints                                              50
   2.11 BioTemplate settings                                                             51
       2.11.1 Configuring Template expiry date                                           51
   2.12 Configuring schedule for deleting expired templates                             52
       2.12.1 Override System Template Expiry                                           53
   2.13 Configure device template encryption                                            54
   2.14 Delete all templates                                                            55
   2.15 Load HID Elite keys                                                             55
   2.16 Configure software/firmware update settings                                     57
   2.17 Setting static IP for HBM network                                               59
   2.18 Setting static IP for a specific device                                         60
   2.19 Enforce Seos read                                                               61
   2.20 Device profiles                                                                 62
       2.20.1 Create a device profile                                                   62
       2.20.2 Edit a device profile                                                     64
       2.20.3 Delete a device profile                                                   68
   2.21 Device health indication                                                        69
   2.22 Device debug page                                                               70
   2.23 Tamper settings                                                                 72
   2.24 Backup and recovery                                                             73
       2.24.1 Generate recovery key                                                     73
       2.24.2 Backup procedure                                                          74
       2.24.3 Restore procedure                                                         75
   2.25 System monitoring and Reports                                                   77
       2.25.1 View HID Biometric Manager events                                         77
       2.25.2 Transaction Reports                                                       78
HID Origo set up                                                                        80
   A.1 Setup prerequisites                                                               81
       A.1.1 HID Mobile Identities setup                                                 81
       A.1.2 HID Reader Manager setup                                                    81
       A.1.3 Mobile Access user setup                                                    81
   A.2 Validate a Reader Manager account in HID Biometric Manager                       82
   A.3 Test MOB keys are working correctly                                              84
Fingerprint template encryption                                                         85
Acronyms and terminology                                                                87

PLT-04029, B.1                                        4                         March 2021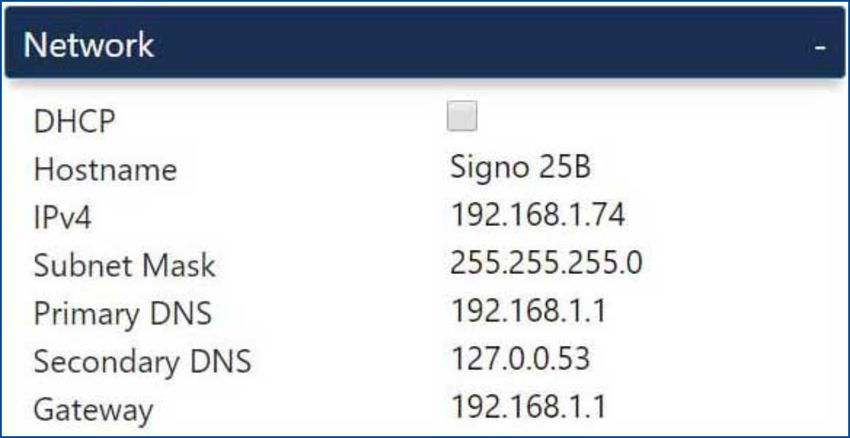
Section 01
                       Introduction

Powering
Trusted Identities
Powering                                                                      HID® Biometric Manager™
             Trusted Identities                                                               Administration Guide

1.1 Document purpose
The document provides procedures for administrations to install and setup HID® Biometric Manager™ and
procedures for HID Biometric Manager (HBM) operators to carry out tasks associated with HID® Signo™
Biometric Reader and Controller 25B installation, people enrollment, and credential/biometric data
management.
HID Global is bringing the iCLASS SE® Signo 25B into the Signo™ family of readers and rebranding it as
the HID Signo Biometric Reader 25B.
Both units share the same hardware. Refer to the HID Signo 25B Firmware Release Notes (PLT-04911) for
information regarding new firmware updates.
The Signo 25B is launched with Service Pack 2.3 and SP2.3 is available as an update for RB25F customers.
Note: Unless specified, all SP2.3 features are available for RB25F customers. The features not compatible
      with the RB25F will be called out explicitly throughout the document.
For more information on the Signo 25B device, refer to HID Signo 25B User Guide (PLT-04900).

1.2 Intended audience
This document is intended for personnel performing the following roles:
  n   HID Biometric Manager administrator: The document provides procedural information for the default
      administrator to initially setup and configure the HID Biometric Manager application.
  n   HID Biometric Manager operators: The document provides procedural information for HID Biometric
      Manager operators to install and configure network detected Signo 25B devices, enroll people in the
      system, add credentials and biometric data.
  n   HID Signo 25B Biometric Reader installers: The document provides information relating to the Signo
      25B, including the wiring specification and wiring options.

1.3 Related material
Refer to this document:                   For information on:
HID Mobile Access® Solution Overview      The HID Mobile Access solution, how system components interact with
(PLT-02078)                               each other, and how to get the best out of the solution.
HID Mobile Access Frequently Asked        The Mobile Access solution, Mobile Access Portals, Mobile IDs, Mobile
Questions (PLT-02085)                     Access Apps, Mobile-enabled readers, onboarding process, and security.
HID Reader Manager™ Solution User Guide   The HID Reader Manager solution, HID Reader Manager App for iOS
(iOS) (PLT-03683)                         devices, and the HID Reader Manager Portal.
HID Reader Manager Solution User Guide    The HID Reader Manager solution, HID Reader Manager App for Android
(Android) (PLT-03858)                     devices, and the HID Reader Manager Portal.
HID Mobile Access Solutions Overview      Procedures for Mobile Access Administrators to manage mobile users and
(PLT-02078)                               credentials through the HID Mobile Origo Management Portal.
HID Mobile Access App User Guide          Installation, configuration, and use of the HID Mobile Access App for iOS
(PLT-02077)                               and Android devices.

PLT-04029, B.1                                         6                                                  March 2021
Powering                                                                   HID® Biometric Manager™
             Trusted Identities                                                            Administration Guide

1.4 Physical Access Control System overview
A Physical Access Control System (PACS) provides services for enrolling card holders, assigning access
rights, configuring access points and their associated access criteria, monitoring, and reporting. These
components are focused on access authorization. The HID Biometric Manager and Signo 25B solution
components are designed to be integrated into the PACS to provide strong authentication at access
points.
When a card holder presents their credential to a Signo 25B access point reader, it performs authentication
functions to establish whether the user is who they claim to be. If the authentication is successful the PACS
panel or controller is notified of the request for access. The panel then checks the access rights for the
presented credential to see if the card holder is authorized for access. If authorization is successful it opens
the door.
The diagram below provides a high level view of the various system solution components as deployed
within a PACS. The function of each component is described in the following sub sections. The
components with HID Biometric Manager service box are typically deployed on the same server as the
PACS headend software.
Note: Multiple Signo 25B devices and PACS Panel/Door Controllers can be added. HID Biometric Manager
      can control up to 2,000 Signo 25B devices.

PLT-04029, B.1                                         7                                             March 2021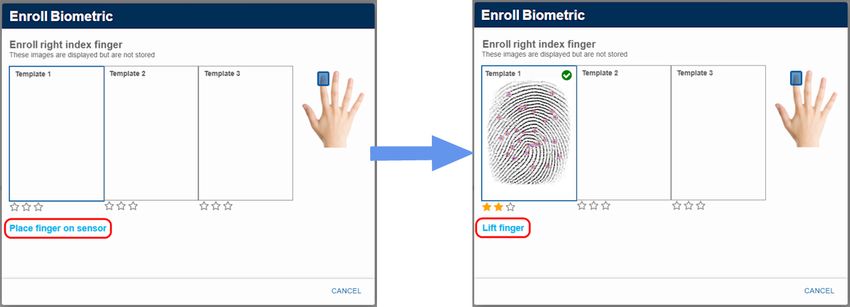
Powering                                                                HID® Biometric Manager™
              Trusted Identities                                                         Administration Guide

1.5 HID Biometric Manager server application
The HID Biometric Manager is an application that acts as both a web server and a container for
background tasks and jobs.
The web server allows you to configure Signo 25B device settings via a web browser, register credential
holders, and to distribute this information to the devices. It also collects and stores logged events from the
Signo 25B.

1.5.1 System requirements
HID Biometric Manager system requirements:
  n   Intel® i5 2.3 GHz
  n   RAM 8 GB
  n   Available Disk Space 20 GB
  n   Windows 7® (Minimum). Windows® 10 (Preferred)

1.5.2 Credential Database
The Credential Database is a SQL database that the PACS Service uses to store the credential data that has
been gathered through manual registration or Data Import. It also stores configuration data and transaction
logs for all installed Signo 25B devices.

1.5.3 Reader Service
This runs as a background service and automatically synchronizes data between the HID Biometric
Manager and the Signo 25B devices.

PLT-04029, B.1                                        8                                            March 2021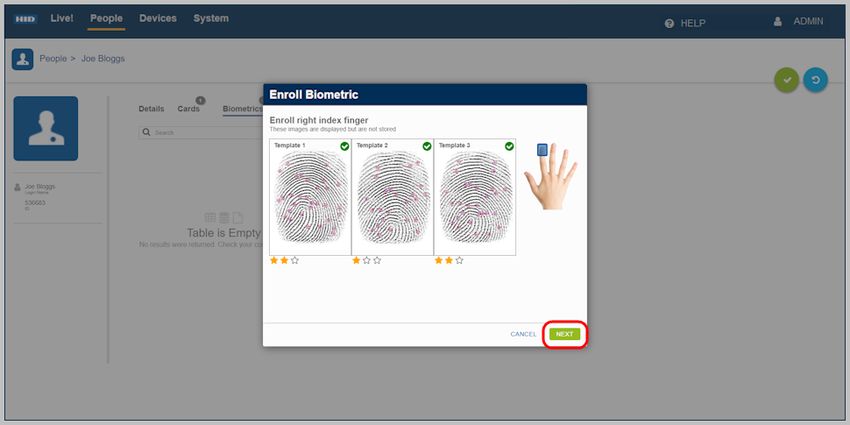
Powering                                                               HID® Biometric Manager™
             Trusted Identities                                                        Administration Guide

1.5.4 Data Import
The HID Biometric Manager Data Import component allows credential and credential holder information to
be imported into the HID Biometric Manager database from a third party PACS headend. This ensures that
the output of the Signo 25B matches expected input of the third party controller.
People and credentials can be imported into the system using an Excel or CSV file. Each column needs a
header row containing the criteria that populates the Source column and the data for each criteria below in
the data rows as shown:
Header Row                 "Firstname"                   "Lastname"              "IDNumber"
Data Rows                  "James"                       "Code"                  "007"
                           "Jane"                        "Code"                  "006"

After a file is imported, the Source column values need to be mapped to the Destination column values in
the drop down menu.

PLT-04029, B.1                                       9                                           March 2021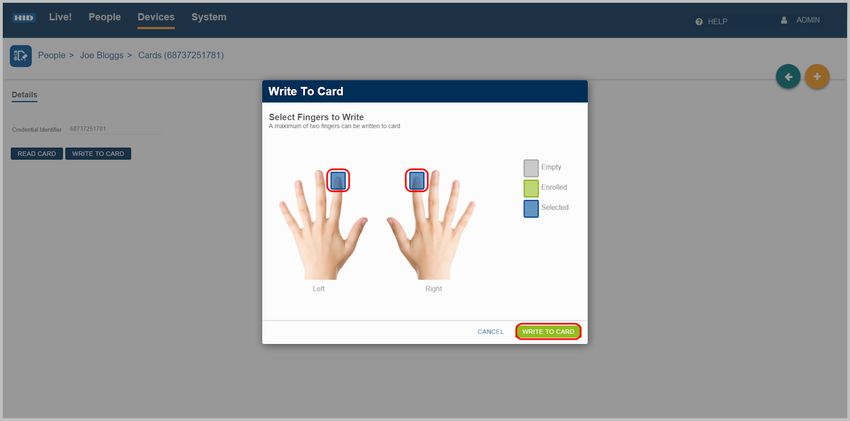
Powering                                                                      HID® Biometric Manager™
             Trusted Identities                                                               Administration Guide

1.5.5 HID Biometric Manager Server Window Icons
Icon                                   Description                Status
                                       Webserver
                                                                       - Initial state

                                                                       - Ready

                                                                       - Busy with startup

                                                                       - Failed to start

                                       Database
                                                                       - Initial state

                                                                       - Ready

                                                                       - Busy with startup

                                                                       - Failed to start

                                       Engine
                                                                       - Initial state

                                                                       - Ready

                                                                       - Busy with startup

                                                                       - Failed to start

1.6 HID Biometric Manager Web UI
The HID Biometric Manager provides a web server which supplies content to any device which supports a
compatible browser and is accessible on the network such as Google Chrome™ and Internet Explorer®.
This interface is used to install and configure Signo 25B readers. It is also used to perform user registration
including fingerprint enrollment. Any one of the Signo 25B devices can be selected as the enrollments
device from the browser.
Other functions include the ability to view transactions on the device in real time, and to download and
trigger updates for both the HID Biometric Manager software and the Signo 25B device firmware.

1.7 Signo 25B
The Signo 25B is a biometric card and fingerprint reader. It authenticates users according to one of four
modes:
  1. Fingerprint only
  2. Card only
  3. Two variations of card with finger
        a. Fingerprint data stored to card
        b. Fingerprint data stored to device
See Acronyms and terminology as configured by the HID Biometric Manager. When the credential holder
is authenticated, the data is output to a third party controller.

PLT-04029, B.1                                        10                                               March 2021
Powering HID® Biometric Manager™
Trusted Identities Administration Guide
1.8 Panels and Door Controllers
These components are standard PACS hardware panels that are wired to door sensors and controls, card
readers, and general digital input and output to control and monitor other security devices. They make
access decisions based on credential IDs and are designed to continue functioning when communication
with the PACS headend is interrupted. A PACS panel makes an authorization decision about whether the
credential has access rights to a particular area. The authorization decision is made after the authentication
is successfully completed by the Signo 25B which ensures the credential is authentic.
The following diagram shows an example of the system.
Note:
n The entire system is located inside the firewall.
n Multiple Signo 25B devices and PACS Panel/Door Controllers can be added. HID Biometric Manager
can control up to 2,000 Signo 25B devices.
PLT-04029, B.1 11 March 2021Powering HID® Biometric Manager™
Trusted Identities Administration Guide
1.9 Network setups examples
The HID Biometric Manager installation wizard is expected to manage the vast majority of network
configurations. When using HID Biometric Manager during discovery and installation of Signo 25B devices,
it defaults to hostname Signo 25B Server.
Note: Switching between DHCP and Static IP means that the certificates will no longer work. To resolve
this, re-install the unit with the target settings set in HBM.
Scenario 1 - DHCP network, Signo 25B devices have dynamic IP, Server has a static IP
In this system setup the server has a static IP or the DHCP server assigns an IP with a permanent lease.
Signo 25B devices have an Ethernet connection on the same LAN as the server running HID Biometric
Manager. The network is configured so that the DCHP server dynamically assigns IPs (which may have a
limited lease time) to Signo 25B.
Scenario 2 - DHCP network, Signo 25B devices have dynamic IP, Server has a dynamic IP
In this system setup the server has a DHCP assigned IP.
Signo 25B devices have an Ethernet connection on the same LAN as the server running HID Biometric
Manager. The network is configured so that the DCHP server dynamically assigns IPs (which may or may
not have limited lease time).
HID Biometric Manager is installed on the server using the setup install wizard. During installation of Signo
25B devices in HID Biometric Manager, you must select and use the default server hostname. In the event
where the server IP address changes, the hostname will reflect back to the server hostname.
Note: Setting HID Biometric Manager to a static IP will cause issues on this network.
Scenario 3 - HID Biometric Manager installed on a Server and connects to DHCP network
This is the same as Scenario 2 except HID Biometric Manager is running on a Server. This means that it is
likely that HID Biometric Manager will not be running all the time. When HID Biometric Manager is not
running, Signo 25B devices will be in an off-line mode. In off-line mode they will run as configured and log
events, however enrollment will not be possible.
Scenario 4 - Network without DHCP
The HID Biometric Manager install wizard carries out setup and assigns a hostname.
PLT-04029, B.1 12 March 2021Section 02
HID Biometric Manager
Powering
Trusted IdentitiesPowering HID® Biometric Manager™
Trusted Identities Administration Guide
2.1 Overview
HID® Biometric Manager™ is a web application that streamlines the management and configuration of
Signo 25B devices and allows application operators to manage people enrollment, credentials and
fingerprint templates. HID Biometric Manager uses the following operator roles to control access to
management tasks:
n Super Administrator: The super administrator is the initial default user account (cannot be deleted).
This operator installs and initially configures HID Biometric Manager software, and
creates/administers operator roles within the application see 2.4 HID Biometric Manager initial setup.
n Administrator: This operator role has full access to HID Biometric Manager web application with
functions to install and manage Signo 25B devices see 2.6 Device installation and configuration and
enroll people in the system, add credentials, collect and store associated biometric data see 2.7
Enrollment.
n Device Administrator: This operator role is intended for HID partner technicians involved in the setup
and maintenance of the Biometric Management environment as well as configuration and update of
the Signo 25B. This operator role has limited access to user information.
n Enrollment: This operator role has full access to HID Biometric Manager web application. however is
limited to the day-to-day activities of enrolling people in the system, adding credentials, collecting
and storing associated biometric data see 2.7 Enrollment.
2.2 About Section in the UI
Selecting the ABOUT button creates a pop-up window showing the HBM Software Version number.
To close the pop-up window select OK.
PLT-04029, B.1 14 March 2021Powering HID® Biometric Manager™
Trusted Identities Administration Guide
2.3 Network usage
This table shows the HID Biometric Manager network usage.
Protocol Port Source Destination Direction Comment
ICMP Server Device Outgoing
TCP 22 Server Device Outgoing SSH for firmware update
TCP 82 Client Server Outgoing Client Server Outgoing HTTPS from browser
client to server
TCP 443 Client Server Outgoing Client Server Outgoing HTTPS from browser
client to server
TCP 443 Server Internet Outgoing Connection to Azure
https://hidbiomanager.azurewebsites.net/
Used for FW update
TCP 443 Server Internet Outgoing RCAM connection to Origo
n https://prod-rfp.firebaseio.com/
n https://prod-
readermanager.hidglobal.com/
Used to roll to Elite and for FW update.
TCP 1819 Server Server - RCAM to HBM. This all happens on the same
physical computer.
TCP 3000 Server Device Outgoing One time use (per device) for install. Server
needs to tell device about MQTT settings to talk
to it.
TCP 8883 Device Server Outgoing MQTT
UDP 10500 Server Device Outgoing/Incoming Device Discovery and Device Network Settings.
PLT-04029, B.1 15 March 2021Powering HID® Biometric Manager™
Trusted Identities Administration Guide
2.4 HID Biometric Manager initial setup
2.4.1 HID Biometric Manager software install
It is recommended that HID Biometric Manager is installed on a DHCP network server that automatically
provides and assigns IP addresses, default gateways and other network parameters to client devices.
Note: The user installing the HID Biometric Manager software needs to be logged in on the server as a
Windows Administrator.
1. Download the HID Biometric Manager.exe file from the download site to your server:
https://www.hidglobal.com/signo25b
2. Double click on the HID Biometric Manager.exe file to launch the installation wizard.
Note: If the server system language is configured to one of the supported languages then the install
wizard instructions and HID Biometric Manager will automatically default to the server system
language. Supported languages:
n English n Portuguese
n German n Russian
n Spanish n Simplified Chinese
n French n Japanese
n Italian n Korean
3. Select the HID Biometric language and click OK.
4. On the initial installation wizard screen, click Next.
PLT-04029, B.1 16 March 2021Powering HID® Biometric Manager™
Trusted Identities Administration Guide
5. Read the License Agreement. Select I accept the agreement, and click Next.
Note: If you do not accept the License Agreement, click Cancel to end the installation setup process.
6. Follow the installation wizard prompts until the setup has finished installing HID Biometric Manager
on your machine.
PLT-04029, B.1 17 March 2021Powering HID® Biometric Manager™
Trusted Identities Administration Guide
2.4.2 HID Biometric Manager initial login
On the server where HID Biometric Manager has been installed:
1. Double-click on the HID Biometric Manager desktop shortcut or navigate to the installation folder
(usually, C:\Program Files (x86)\HID Global\Biometric Manager\bin) and double-click on the HID
Biometric Manager.exe file.
Note: The size of the database may impact how long it takes the HID Biometric Manager application
to launch. Start up feedback is indicated with an on screen progress bar.
2. On the HID Biometric Manager Server application screen, click on the Open Client Connection link to
access the HID Biometric Manager application login screen. Record the Client Connection link url as
this can be distributed and used to access the HID Biometric Manager application from a client PC on
the same network.
Note: If the Open Client Connection link url fails to connect to HID Biometric Manager due to a port
issue, change the default port number (443) in the link url to:
http://hostname:82/HIDBiometric/HIDBiometricManager.html
PLT-04029, B.1 18 March 2021Powering HID® Biometric Manager™
Trusted Identities Administration Guide
3. Enter the initial default admin User Name (admin) and Password (password) and click LOGIN.
Note: A pop-up window containing the EULA will open after the initial login, this needs to be
accepted.
4. For security reasons it is recommended that the default admin login credentials are immediately
changed. Click on the System option and select Operators.
PLT-04029, B.1 19 March 2021Powering HID® Biometric Manager™
Trusted Identities Administration Guide
5. Click on the Edit icon [ ] associated with the displayed system admin user.
6. Select the Security option under Change Password:
n Enter the default Old Password.
n Enter a New Password, then re-enter the new password to confirm.
Note: There are currently no password format rules. Clicking on the eye icon when entering the
new password will display the password.
7. Click the Save icon to save this new password. A notification will appear confirming that all changes
have been saved at the bottom of the window.
8. Close the HBM browser window and login again using the default username (admin) and new
password.
PLT-04029, B.1 20 March 2021Powering HID® Biometric Manager™
Trusted Identities Administration Guide
2.5 Resetting administration password
Resetting the administrator password can be achieved in the HID Biometric Manager Server under
Security>Account before log in.
This method is used when the administrator wants to change the administrator password as shown in 2.4.2
HID Biometric Manager initial login
The new password created must be used in the HBM explorer UI.
PLT-04029, B.1 21 March 2021Powering HID® Biometric Manager™
Trusted Identities Administration Guide
2.5.1 Configure time zone setting
Setting the time zone will configure the time zone for the instance of HID Biometric Manager running on the
server.
1. Click on the System option.
2. Select the Date/Time option to access system time zone settings.
3. Select the Time Zone arrow icon to access a list of selectable regions and countries.
PLT-04029, B.1 22 March 2021Powering HID® Biometric Manager™
Trusted Identities Administration Guide
4. Select the desired country or region from the displayed list.
Note: Use the Search field to narrow your search criteria for a listed time zone.
5. On the Date/Time screen click the Save icon to save your time zone setting.
PLT-04029, B.1 23 March 2021Powering HID® Biometric Manager™
Trusted Identities Administration Guide
2.6 Device installation and configuration
Device installation and configuration with HID Biometric Manager can only be carried out by the
Administrator or Device Administrator role. For initial configuration or when no devices are installed, HID
Biometric Manager opens on the Devices screen with the option to install a device. If devices are already
installed Biometric Manager opens on the People screen, see 2.7 Enrollment.
1. Launch HID Biometric Manager and login as an Administrator or Device Administrator operator.
2. To initially install a device, on the Devices screen, click INSTALL DEVICE.
Note: If devices are already installed, to add additional devices click the Install icon [ ].
3. In the Install pop-up window, click SCAN NETWORK to view the complete list of available devices.
Note: If no devices are found check the ports listed in 2.3 Network usage are open within any firewall
applications running on the computer or server. The Search function can be used to search the
list of displayed devices.
4. Select a device from the displayed list and click FINISH.
PLT-04029, B.1 24 March 2021Powering HID® Biometric Manager™
Trusted Identities Administration Guide
Note: The Host Name should not include any underscores.
5. When the installation has completed the Devices screen displays the installed device.
Note: Installed devices are automatically added to the default device profile named Devices. The
default device profile can be edited or new profiles can be added to the system.
Note: To uninstall a device, see 2.6.5 Uninstall a device.
PLT-04029, B.1 25 March 2021Powering HID® Biometric Manager™
Trusted Identities Administration Guide
2.6.1 Configure device settings
To access and configure settings associated with an installed device:
1. On the Devices screen, highlight a device entry from the displayed list. The Edit/Delete icons appear
on the screen for the highlighted device.
2. Click on the Edit icon [ ] associated with the device to access the device settings screen.
3. On the Devices screen, if not already displayed, select Details.
4. Under Device Information you can edit the following:
n Name/Description: Enter a logical name for the device. As an option enter a description for the
device.
n Profile: Click on the arrow icon to select a device profile. Click EDIT PROFILE SETTINGS to
configure the settings for the displayed device profile, see 2.20.2 Edit a device profile.
PLT-04029, B.1 26 March 2021Powering HID® Biometric Manager™
Trusted Identities Administration Guide
5. On the Devices screen, select Communication.
6. On the Communication screen you can configure:
n Network Settings: To use a static IP address select the Static option. Enter a static IP address
(IPv4) and also the Subnet Mask and Gateway.
n Host Connections Mode: Set as Wiegand (default).
n BLE Settings: Enable/disable BLE Mobile Access.
n Operation Modes: Select the desired operation mode to enable/disable the Tap or Twist and
Go gesture operation.
n Range and Power Settings: Set the read range for Tap and Twist and Go and the setting for
Transmit Power.
n READ: Read mobile keys from the device.
n WRITE: Write mobile keys to the device. Before Mobile keys can written to the device, keys have
to loaded onto HID Biometric Manager, see HID Origo set up.
Note: The default range settings for Tap, Twist and Go and Transmit Power are displayed in HID
Biometric Manager. It is recommended that the default Transmit Power setting (-4 dBm) is
not exceeded unless absolutely necessary as range and transmit power settings work in
tandem to increase/decrease effective read range.
7. If the Communication settings have been changed, click the Save icon [ ].
PLT-04029, B.1 27 March 2021Powering HID® Biometric Manager™
Trusted Identities Administration Guide
8. On the Devices screen select Advanced. On the Advanced screen you have options to:
n SYNC: Syncs all device settings in HID HID Biometric Manager to the device.
n FACTORY DEFAULT: Restores all device settings to the original factory defaults, see 2.6.4 Reset a
device.
n REBOOT DEVICE: Reboots the device.
Note: Live! tab will show the power down/up for clarification that the device has rebooted.
n UPDATE FIRMWARE: Allow user to update device firmware through HBM or from a local file.
n CHANGE PASSWORD: Change the device password. The device password provides device security
on the LAN if secure mode is not enabled.
n ENABLE SECURE MODE/DISABLE SECURE MODE: This turns on encryption in the communication
channel.
9. Click SYNC option. For the selected device all settings are copied from HID Biometric Manager to the
Signo 25B.
PLT-04029, B.1 28 March 2021Powering HID® Biometric Manager™
Trusted Identities Administration Guide
2.6.2 Device firmware update
An indication that a firmware update is available for a device is provided on the Devices screen. If the
displayed version number for a device is not green then this indicates that a firmware update is available
for that device.
Device firmware updates can take up to approximately 25 minutes per device, including updates of the
reader board. Updates may complete faster depending on the HID Origo™ connection and the number of
uninterrupted updates.
Important: It is recommended that device firmware updates should be carefully scheduled as all devices
are updated and will be unavailable for use during the firmware update period.
To update device firmware:
1. Select the System option and click Update.
PLT-04029, B.1 29 March 2021Powering HID® Biometric Manager™
Trusted Identities Administration Guide
2. Click CHECK FOR UPDATES. Review the displayed firmware update information and click Install to
trigger the firmware update process.
An indication of the firmware update progress is displayed in a pop-up window.
Note: The Progress Report bar indicates firmware update progress against total devices. For example, if
two devices are being updated then 50% progress indicates one device updated out of two devices.
Devices are updated in series with information displayed on the current device being updated.
3. When the firmware update is indicated as complete, click OK.
Note: Any partial or failed firmware updates are indicated in the Upgrade Summary table.
PLT-04029, B.1 30 March 2021Powering HID® Biometric Manager™
Trusted Identities Administration Guide
A partial update means that the system was not able to complete the secondary step of applying
advanced updates, for example, as a result of the connection to the HID Origo not being setup (see HID
Origo set up) or being interrupted.
A partially updated device will run the installed level of firmware however features, such as mobile access,
and firmware fixes will not be available.
4. Check the Devices screen to verify device firmware versions.
PLT-04029, B.1 31 March 2021Powering HID® Biometric Manager™
Trusted Identities Administration Guide
2.6.3 Individual device firmware update
This feature gives the option to install from the Local Drive or reinstall the latest firmware version to a
specific or individual device.
This is done on the Advanced tab of the selected device.
Install from Local Drive
1. Select the check box for Install From Local Drive
2. Click UPDATE FIRMWARE.
3. Click CONFIRM in the pop-up window and then select the update file from the file explorer window to
begin the update.
4. Click OK when the update has finished to complete.
Reinstall Firmware
To reinstall firmware:
1. Select the check box for Reinstall Firmware.
2. Click UPDATE FIRMWARE.
3. Click CONFIRM in the pop-up window.
Note: This operation will take around 25 minutes to complete.
4. Click OK when the update has finished to complete.
Important: The device will be offline while the firmware update is in progress.
PLT-04029, B.1 32 March 2021Powering HID® Biometric Manager™
Trusted Identities Administration Guide
2.6.4 Reset a device
To clear all device settings, including IP address and port:
1. On the Devices screen, highlight a device entry from the displayed list. The Edit/Delete icons appear
on the screen for the highlighted device.
2. Click on the Edit icon [ ] associated with the device to access the device settings screen.
3. On the Devices screen select Advanced and the FACTORY DEFAULT option.
4. Select FACTORY DEFAULT to confirm the action.
Note: Where communication between HID Biometric Manager and the Signo 25B is not possible, factory
default reset can be carried out at the reader, see HID Signo 25B User Guide (PLT-04900).
PLT-04029, B.1 33 March 2021Powering HID® Biometric Manager™
Trusted Identities Administration Guide
2.6.5 Uninstall a device
To uninstall a device (possibly as a means to resolving issues by removing the device from the server
database, power cycling, then re-installing the device):
1. On the Devices screen, highlight a device entry from the displayed list. The Edit/Delete icons appear
on the screen for the highlighted device.
2. Click on the Delete icon [ ] associated with the device.
3. Click UNINSTALL to confirm the uninstall action.
4. You will be notified of a successful device uninstall, click OK.
Note: If all devices have been uninstalled in HID Biometric Manager, you will have to option to install
a devices on the Devices screen, see 2.6 Device installation and configuration.
PLT-04029, B.1 34 March 2021Powering HID® Biometric Manager™
Trusted Identities Administration Guide
2.7 Enrollment
Enrolling people in the system, adding credentials and collecting associated biometric data can be carried
out by an Administrator operator or a Enrollment operator.
2.7.1 Enroll people
1. Launch HID Biometric Manager and login as either Administrator operator or Enrollment operator.
2. Click on the People option. If no people are enrolled in HID Biometric Manager the People screen is
empty and you have the option to enroll a person. Click ENROLL PERSON.
Note: If people are already enrolled, click the Add icon [ ] to enroll additional people.
3. Enter the persons details (First Name/Last Name) and an ID number.
Note: An ID number is sent when an enrolled finger is presented without a card set up.
4. Select the Active option to make this enrolled person active in the system.
Note: If the Active option is not selected the enrolled person will have an inactive status in the
system and the person's record is not displayed on the People screen.
5. Click the Save icon [ ].
PLT-04029, B.1 35 March 2021Powering HID® Biometric Manager™
Trusted Identities Administration Guide
The enrolled person record is displayed on the People screen. To add additional people, click on the New
icon [ ] and enter the new persons details.
Note: To display people that have an inactive status, click the filter icon [ ] and select the Show Inactive
People option.
PLT-04029, B.1 36 March 2021Powering HID® Biometric Manager™
Trusted Identities Administration Guide
2.7.2 Enroll Cards
1. On the People screen select a displayed person record.
2. On the Cards screen click ADD CARD.
3. At this point on the Details screen you can either scan a card to obtain the card details or, if no card
is available, manually enter card details.
Scan card for card details
1. On the Details screen, click READ CARD. If more than one reader is installed, select a device from the
displayed list.
2. Within five seconds, present a card to the Signo 25B device.
Note: The card types supported by the device is configured in the device profile settings, see 2.20.2
Edit a device profile.
3. Click the Save icon [ ] to save this Credential Identifier.
Note: The credential recorded in HID Biometric Manager must also be present in the third party
PACS software running on the PACS Server.
PLT-04029, B.1 37 March 2021Powering HID® Biometric Manager™
Trusted Identities Administration Guide
The operator can now collect and add biometric data associated with this enrolled person, see 2.7.3 Enroll
Biometrics.
Manually enter card details
If no card is available to scan, card details can be entered manually:
1. On the Details screen, select the arrow icon [ ] associated with the Format field.
2. Select the Credential Format appropriate for the card in use.
PLT-04029, B.1 38 March 2021Powering HID® Biometric Manager™
Trusted Identities Administration Guide
3. Enter a Credential Number (decimal) and if displayed, enter the Facility Code.
4. Click the Save icon [ ] to save these card details.
The manually entered card details are displayed with the decimal Credential Number converted to
hexadecimal in the Credential Identifier field.
Note: The credential recorded in HID Biometric Manager must also be present in the third party PACS
software running on the PACS Server.
PLT-04029, B.1 39 March 2021Powering HID® Biometric Manager™
Trusted Identities Administration Guide
PLT-04029, B.1 40 March 2021Powering HID® Biometric Manager™
Trusted Identities Administration Guide
2.7.3 Enroll Biometrics
1. On the People screen select a displayed person record.
2. Click the Biometrics option.
3. Click ENROLL to start the biometric enrollment process.
4. In the Enroll Biometric pop-up window select the fingers you wish to enroll and click Next.
Note: If you intend to make use of the Template on Card option as the authentication mode you will
only be able to copy two of these templates to the card. However the system can store all ten
fingers, if needed.
5. Select a device from the displayed list and click Next.
Note: Device names can be changed to a logical name for easier identification, see 2.6.1 Configure
device settings.
PLT-04029, B.1 41 March 2021Powering HID® Biometric Manager™
Trusted Identities Administration Guide
6. For the highlighted finger you will be prompted to followed by . It is recommended that you follow the on-screen prompts, in the correct sequence, to ensure
a successful finger scan.
Note: For information regarding the correct method of presenting fingers to the scanner during the
biometric enrollment process, see HID Signo 25B User Guide (PLT-04900).
7. Continue to follow the on-screen prompts until you have successfully scanned the first finger three
times. Click Next.
Note: A score of at least one star per scan is needed. A poor score will require that you scan the
finger another three times.
PLT-04029, B.1 42 March 2021Powering HID® Biometric Manager™
Trusted Identities Administration Guide
8. You will be prompted to proceed onto the next finger scan. Follow the on-screen instructions until
you have successfully scanned the next finger three times.
9. If there is a problem when scanning a finger, a pop-up window will give the options to SKIP that
finger, RETRY to scan again, or ABORT to cancel enrollment.
10. When all of the selected fingers have been successfully scanned, click Done. The enrolled fingerprints
are associated with the top credential in the credential list
Note: If the top credential in the credential list is deleted then enrolled fingerprints are associated
with the next credential in the list. If all credentials are deleted then the biometrics are also
deleted.
PLT-04029, B.1 43 March 2021Powering HID® Biometric Manager™
Trusted Identities Administration Guide
2.8 Preventing user fingerprint display during enrollment
During fingerprint enrollment the User Interface (UI), displays in real time the fingerprint that is being
enrolled. There is the option to prevent the fingerprint image being displayed for privacy.
Go to System>Enrollment Settings and select the Display fingerprints tick box for the fingerprints to be
displayed. Deselect the tick box to remove the fingerprint display.
Click SAVE to finish.
With the Display fingerprints deselected, the fingerprints will be replaced with a green tick once each scan
of the finger has been completed.
Select DONE to Finish
PLT-04029, B.1 44 March 2021Powering HID® Biometric Manager™
Trusted Identities Administration Guide
2.8.1 Write fingerprint templates to a card
If you intend to make use of the Template on Card option as the authentication mode you will only be able
to copy two fingerprint templates to the card.
Note: Template on Card only supports Seos 8K GDF v2 .
1. On the People screen select a displayed person record.
2. On the Cards screen select a displayed Credential Identifier.
3. Click WRITE TO CARD to copy the templates to the card.
4. Select the fingers (maximum of two) you wish to be written to the card and click WRITE TO CARD.
5. You will have approximately five seconds to present the supported card to the Signo 25B device in
order to write the profiles to the card. The LED bar will flash while writing to the card. Keep the card in
the reader field until the LED bar returns to it’s default color.
PLT-04029, B.1 45 March 2021Powering HID® Biometric Manager™
Trusted Identities Administration Guide
6. You will be notified when the card has been successfully written to.
For a Template on Card authentication mode, the enrolled person can now enter the door by presenting
this card, immediately followed by the correct finger scan on the Signo 25B.
Note: When presenting the card and fingerprint, there is a time window of 1 second between card and
fingerprint scan.
PLT-04029, B.1 46 March 2021Powering HID® Biometric Manager™
Trusted Identities Administration Guide
2.9 Create HID Biometric Manager operators
HID Biometric Manager uses the following operator roles to control access to management tasks:
n Administrator: This operator role has full access to HID Biometric Manager web application with
functions to install and manage Signo 25B devices, enroll people in the system, add credentials, and
collect and store associated biometric data.
n Device Administrator: This operator role is intended for HID partner technicians involved in the setup
and maintenance of the Biometric Management environment as well as configuration and update of
the Signo 25B. This operator role has limited access to user information.
n Enrollment: This operator role has full access to HID Biometric Manager web application, however is
limited to the day-to day activities of enrolling people in the system, adding credentials, collecting
and storing associated biometric data.
To create HID Biometric Manager operator roles:
1. Click on the System option.
2. Select the Operators option to access software and firmware update settings.
PLT-04029, B.1 47 March 2021Powering HID® Biometric Manager™
Trusted Identities Administration Guide
3. To add and operator, click the New icon [ ].
4. On the Operators Details screen enter the following:
n Login: Enter a login name for this operator.
n Profile: Select the operator profile, Administrator, Device Administrator, or Enrollment.
n Link to: Link this operator profile to a person.
n Password/Confirm Password: Enter a password (re-enter to confirm) for this operator.
5. Click the Save icon [ ] to save the operator profile.
PLT-04029, B.1 48 March 2021Powering HID® Biometric Manager™
Trusted Identities Administration Guide
2.10 Bypass finger TOC Settings
The option to bypass the fingerprint Template on Card (TOC) feature can be toggled on or off by going to
System>Security Settings>Card Write Settings. The check box can be selected to enable the bypass or
deselected to disable.
This allows an individual to be in Card Only mode if the Device Profile is set to Template on Card mode.
2.10.1 Enrollment without fingerprints
To configure enrollment without fingerprints for the Bypass Finger TOC feature:
With the system bypass selected, the option for TOC bypass will be available under the Cards>Details tab.
Important: TOC Bypass must be selected before selecting WRITE TO CARD
With the TOC Bypass selected, click WRITE TO CARD and select the desired device if more than one
device is available.
PLT-04029, B.1 49 March 2021Powering HID® Biometric Manager™
Trusted Identities Administration Guide
When the card is scanned, the finger scanner will illuminate but the Live! feed will only register a Credential
Read for users with the TOC Bypass selected on the users card details.
Note: If the TOC Bypass is deselected, an alert message will appear stating that no templates have been
enrolled when WRITE TO CARD is selected.
Note: If the system bypass is deselected the TOC Bypass will not be available. An alert message will
appear stating that no templates have been enrolled when WRITE TO CARD is selected.
2.10.2 Enrollment with fingerprints
To configure enrollment with fingerprints for the Bypass Finger TOC feature:
With the system bypass selected, the option for TOC bypass will be available under the Cards>Details tab.
Important: TOC Bypass must be selected before selecting WRITE TO CARD
With the TOC Bypass selected, click WRITE TO CARD and select the desired device if more than one
device is available.
When the card is scanned, the finger scanner will not illuminate and the Live! feed will only register a
Credential Read for users with the TOC Bypass selected on the users card details.
If either the system Enable Bypass Finger TOC Feature or the TOC Bypass is left deselected, when
selecting WRITE TO CARD the Select fingers to write window will appear. Select a maximum of two
fingers and select WRITE TO CARD.
Switch to the Live! screen and scan the card. The fingerprint scanner will then illuminate for the finger to be
scanned. An event will appear for a Credential Read transaction followed by a Biomatch transaction.
PLT-04029, B.1 50 March 2021Powering HID® Biometric Manager™
Trusted Identities Administration Guide
2.11 BioTemplate settings
The BioTemplate settings can be found under System>BioTemplate Settings, and allows the configuration
of:
n Template expiry date
n Deleting expired templates schedule
n Delete all HBM database templates
2.11.1 Configuring Template expiry date
Expiry dates can be allocated to individual templates. The system settings are set by default during
enrollment but they can be changed during enrollment and later if needed.
To set the Template expiry date:
1. Navigate to System>BioTemplate Settings.
2. Under Configure Biometric Template Expiry Date, click the arrow to select a Unit of Expiry.
3. Select the desired Unit of Expiry from the drop down list.
4. Enter an Expiry Value.
5. All new templates will now inherit the Expiry Date set in the biometric template schedule. This is visible
alongside the template.
PLT-04029, B.1 51 March 2021Powering HID® Biometric Manager™
Trusted Identities Administration Guide
2.12 Configuring schedule for deleting expired templates
To avoid a backlog of expired templates, a schedule can be configured to automatically delete the expired
templates. This is done through the BioTemplate Settings window.
Note: The schedule applies to all Biometric Templates enrolled after the schedule is set.
Use the drop down arrow to enter the desired Schedule Unit of Time and enter a Schedule Value.
PLT-04029, B.1 52 March 2021Powering HID® Biometric Manager™
Trusted Identities Administration Guide
2.12.1 Override System Template Expiry
When enrolling a biometric template, it will automatically inherit the system template that is set.
During enrollment the system template expiration can be overridden by selecting the tick box to Override
System Template Expiry.
The Unit of Time can then be selected using the drop down and the value can be determined. Click Done to
save the template and expiry date.
PLT-04029, B.1 53 March 2021Powering HID® Biometric Manager™
Trusted Identities Administration Guide
2.13 Configure device template encryption
Configuring the device template encryption allows different levels of encryption for individual devices.
Disabling the device template encryption allows operation without connecting the device to the server.
To configure the template encryption go to the Devices page and select the required device. Under the
Advanced tab there is the option to REDUCE TEMPLATE SECURITY.
Important: Read the information given in the pop-up window before confirming the action.
Click CONFIRM in the pop-up window.
Note: This mode is advised for users with network instability.
Audit trail of template encryption
Once the device has rebooted it will appear as an event in the LIVE! feed.
Run a System>Transaction Report to make sure disabling the template encryption appears on the
transaction report.
PLT-04029, B.1 54 March 2021Powering HID® Biometric Manager™
Trusted Identities Administration Guide
2.14 Delete all templates
All templates in the HBM database can be manually deleted by going to the BioTemplate Settings screen
and selecting the Delete button under Manually Delete all Templates in the Database.
2.15 Load HID Elite keys
This feature allows HID Reader Technician to push HID Elite™ keys to the customer via the web. Currently,
only Seos® cards are supported by the HID Elite keys.
Note: Standard keys will not work on the Signo 25B once Elite keys have been loaded to the device.
Note: After a factory reset, the device cannot be checked for standard or Elite key configurations.
The reader technician account needs to be setup in order to perform this operation. See A.2 Validate a
Reader Manager account in HID Biometric Manager
Note: You need to be fully enrolled in HID Elite with an ICE Key reference for Signo 25B to load your ICE
Key in the field. This may require contacting HID Credential Programs for confirmation of enrolment.
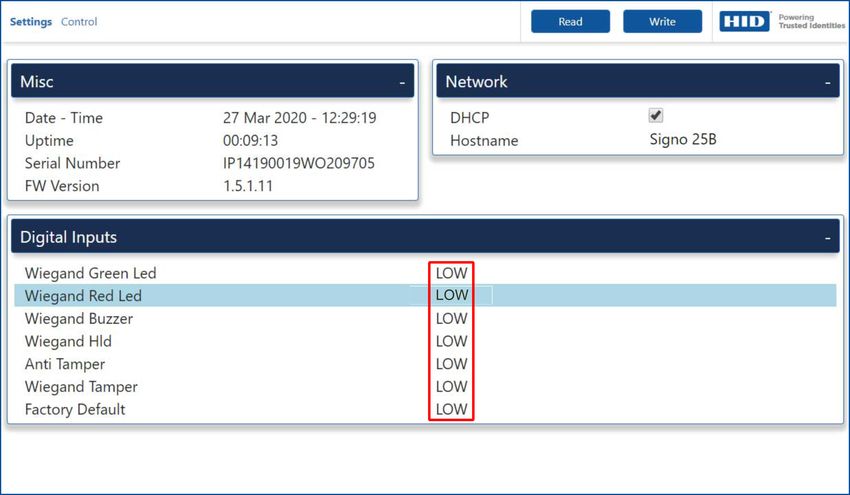
To load Elite keys:
1. Select a device.
2. Open the Key Management tab.
3. Click the arrow to select Elite keys.
4. Select a key set to load.
PLT-04029, B.1 55 March 2021Powering HID® Biometric Manager™
Trusted Identities Administration Guide
5. With the key set selected, click Write.
PLT-04029, B.1 56 March 2021Powering HID® Biometric Manager™
Trusted Identities Administration Guide
2.16 Configure software/firmware update settings
To configure how HID Biometric Manager software and device firmware are updated:
1. Click on the System Option.
2. Select the Update option to access software and firmware update settings.
3. Select the arrow icon associated with:
n HID Biometric Manager: To access options to configure how HID Biometric Manager software
updates are installed.
n Device Firmware: To access options to configure how device firmware updates are installed.
PLT-04029, B.1 57 March 2021Powering HID® Biometric Manager™
Trusted Identities Administration Guide
4. Select the desired update option and click Apply.
5. Click CHECK FOR UPDATES to check if software/firmware updates are available. Update Status
information is displayed on the screen.
n If new HID Biometric Manager software is available and selected, the installation progress is
displayed in your browser. Once the installation is complete the HID Biometric Manager Server
application will automatically shut down and re-start. You will be prompted to log back into
the HID Biometric Manager.
n If new device firmware is available, see 2.6.2 Device firmware update.
PLT-04029, B.1 58 March 2021Powering HID® Biometric Manager™
Trusted Identities Administration Guide
2.17 Setting static IP for HBM network
HID Biometric Manager has a feature that allows each device and the HBM network to have a static IP
address. When all connected devices and the HBM network are configured with the correct static IP
settings, the system continues to operate if the DHCP server is turned off.
Note: This must be set before installing any devices. If this is changed after device installation, devices
must be re-installed.
To set the static IP for the HBM network:
1. Select Network Settings from the System menu.
2. Select IP Address and click the arrow to select a Host IP from the list.
Note: Tick the Manual Entry box to manually enter the IP Address.
3. Click Save to finish.
PLT-04029, B.1 59 March 2021Powering HID® Biometric Manager™
Trusted Identities Administration Guide
2.18 Setting static IP for a specific device
To set the static IP for an individual device:
1. Open the Devices page.
2. Select a device to configure.
3. On the Devices page, select the Communications tab.
4. Tick the Static box to set the static IP address.
Note: The IP address can also be changed to a user selected value.
5. Click Save to finish.
PLT-04029, B.1 60 March 2021Powering HID® Biometric Manager™
Trusted Identities Administration Guide
2.19 Enforce Seos read
The reader will only read PACS data of a Seos card with this feature enabled. If you are only using
credentials that are multi technology HID cards, with Seos or Seos cards with static UID, the Enforce Seos
PACS feature is recommended.
The Enforce Seos PACS option can be toggled on or off in Device Profiles under the Advanced tab.
Click Save to finish.
Note: If using Seos credentials without this option enabled, the PACS data read will not be consistent.
PLT-04029, B.1 61 March 2021Powering HID® Biometric Manager™
Trusted Identities Administration Guide
2.20 Device profiles
A device profile contains a set of attributes that you can associate with a device, or group of devices, and
is the primary means by which you can manage devices. HID Biometric Manager comes with a default
device profile named Devices and installed devices are automatically placed in this default device profile.
2.20.1 Create a device profile
To create a new device profile:
1. Click on System and select the Device Profiles option.
PLT-04029, B.1 62 March 2021Powering HID® Biometric Manager™
Trusted Identities Administration Guide
2. Click the Add icon [ ].
3. Enter a Name and optional Description for the new device profile, then click the Save icon [ ].
Note: Select the arrow icon associated with Authentication Mode to select an Authentication Mode.
Device Profile attributes can now be edited. See 2.20.2 Edit a device profile.
4. The created device profile is listed on the Device Profiles screen. To edit a profile, highlight a device
profile from the displayed list. The Edit/Delete icons appear on the screen for the highlighted device
profile.
PLT-04029, B.1 63 March 2021Powering HID® Biometric Manager™
Trusted Identities Administration Guide
5. Click on the Edit icon [ ] associated with the device profile to access the profile attributes. See
2.20.2 Edit a device profile.
2.20.2 Edit a device profile
To edit the attributes of device profile:
1. On the System screen, highlight a device profile from the displayed list. The Edit/Delete icons appear
on the screen for the highlighted device profile.
2. Click on the Edit icon [ ] associated with the device profile.
PLT-04029, B.1 64 March 2021Powering HID® Biometric Manager™
Trusted Identities Administration Guide
3. On the Device screen, if not already displayed, select Details. On the Details screen you can edit the
device profile Name and Description and select the Authentication Mode (for a definition of the
Authentication Modes, see Acronyms and terminology.
Note: The authentication mode set here is the default when no authentication mode schedule has
been configured.
4. On the Device screen, select Audio/Visual.
5. Click the on an Event type from the displayed list to choose the attributes for the selected event.
6. Click SAVE to save the selected setings.
Note: Click USE DEFAULTS to revert back to the default settings for the selected event.
Note: Steps 7-8 are optional.
7. On the Device screen, select Authentication.
PLT-04029, B.1 65 March 2021Powering HID® Biometric Manager™
Trusted Identities Administration Guide
8. Click ADD SCHEDULE to schedule when a device will operate in a special Authentication Mode.
Select a schedule from the list and click Next.
Note: Click CREATE SCHEDULE to create a new authentication schedule.
Note: Creating a schedule allows the device to operate in different authentication modes for
different parameters for example, day of the week or time of the day. If no schedule is created
the default schedule of 24/7 will be applied.
9. On the Device screen, select Devices to view the list of devices that belong to this device profile. Any
changes made to this device profile will be applied to these listed devices.
10. Click the Add icon [ ] to add a device to this device profile.
PLT-04029, B.1 66 March 2021You can also read