GETTING STARTED IN UBUNTU 8.10 - Using Ubuntu Intrepid Ibex | Avram Hein
←
→
Page content transcription
If your browser does not render page correctly, please read the page content below
GETTING STARTED IN UBUNTU 8.10

Using Ubuntu Intrepid Ibex | Avram Hein
Copyright © 2009 Avram Hein.

Permission is granted to copy, distribute and/or modify this document under the terms of the
GNU Free Documentation License, Version 1.3 or any later version published by the Free
Software Foundation; with no Invariant Sections, no Front-Cover Texts, and no Back-Cover
Texts.

A copy of the license is included in the section entitled "GNU Free Documentation License".

Trademarks

Any trademarks, logos and service marks ("Marks") mentioned in this guide are the property of
their owners, whether Canonical or third parties. Linux is a registered trademark of Linus
Torvalds. Debian is a trademark of Software in the Public Interest, Inc. Windows is a trademark
of Microsoft Corporation. Ubuntu and Canonical are registered trademarks of Canonical Ltd.

Warranty

The information in this book is distributed on an “as is” basis without warranty. Although every
precaution has been taken in the preparation of this work, neither the author nor any
publishers shall have any liability to any person or entity with respect to any loss or damage
caused or alleged to be caused directly or indirectly by the information contained in this work.
Table of Contents
Introduction ............................................................................................... 1
   Philosophy .............................................................................................. 1
   GNU/Linux .............................................................................................. 1
   GNOME Desktop Environment .................................................................... 1
   System Requirements .............................................................................. 1
Installation ................................................................................................. 2
   Acquiring Ubuntu ..................................................................................... 2
   Single Booting ......................................................................................... 3
   Dual Booting ........................................................................................... 7
   Windows-based Installation ..................................................................... 12
   Windows-based Uninstallation ................................................................. 14
Startup .................................................................................................... 18
   Virtualization ......................................................................................... 18
   Live CD................................................................................................. 18
   Dual Boot Startup .................................................................................. 20
   Wubi Statup .......................................................................................... 20
   Login .................................................................................................... 21
Desktop ................................................................................................... 22
   Applications Menu .................................................................................. 24
   Places Menu .......................................................................................... 24
   System Menu ........................................................................................ 25
   Panel Applet .......................................................................................... 25
   Notification Area .................................................................................... 25
   Time and Date ....................................................................................... 26
   Shutdown Menu ..................................................................................... 26
   Window List .......................................................................................... 26
   Desktop ................................................................................................ 26
   Show Desktop ....................................................................................... 27
   Workspace ............................................................................................ 27
   Trash Can ............................................................................................. 28
Network Configuration ............................................................................... 28
   Wireless................................................................................................ 29
   Wired ................................................................................................... 30
Printer Configuration ................................................................................. 30
Installing and Uninstalling Software ............................................................. 31
   Software Repositories ............................................................................. 31
   Canonical-maintained Repositories ........................................................... 31
   Additional Repositories ........................................................................... 31
   Installing and Uninstalling ....................................................................... 33
   Manual Installation ................................................................................. 34
Customizing Ubuntu .................................................................................. 34
   Proprietary Drivers ................................................................................. 34
   Proprietary Codecs ................................................................................. 35
   Adobe Flash .......................................................................................... 36
   Display Resolution.................................................................................. 37
   Visual Effects......................................................................................... 38
   Microsoft TrueType Fonts ........................................................................ 41
Security ................................................................................................... 42
   Malware ................................................................................................ 43
Technical Support ..................................................................................... 44

GNU Free Documentation License ................................................................ 45
  0. PREAMBLE ......................................................................................... 45
  1. APPLICABILITY AND DEFINITIONS ....................................................... 45
  2. VERBATIM COPYING ........................................................................... 47
  3. COPYING IN QUANTITY ....................................................................... 47
  4. MODIFICATIONS ................................................................................ 47
  5. COMBINING DOCUMENTS ................................................................... 49
  6. COLLECTIONS OF DOCUMENTS ............................................................ 49
  7. AGGREGATION WITH INDEPENDENT WORKS ......................................... 50
  8. TRANSLATION ................................................................................... 50
  9. TERMINATION ................................................................................... 50
  10. FUTURE REVISIONS OF THIS LICENSE ................................................ 51
  11. RELICENSING .................................................................................. 51
  ADDENDUM: How to use this License for your documents ........................... 51
Introduction

Introduction
     Ubuntu is an community developed, open source operating system based on
     the Debian GNU/Linux distribution and designed for usability. It is that is
     designed for desktop computer users (a server version is also available).

Philosophy
     Ubuntu’s development is based on the open source philosophy. At the core
     of the Ubuntu philosophy are three principles:
     1.      Every computer user should have the freedom to download, run, copy,
             distribute, study, share, change and improve their software for any
             purpose, without paying licensing fees.
     2.      Every computer user should be able to use their software in the
             language of their choice.
     3.      Every computer user should be given every opportunity to use
             software, even if they work under a disability.

GNU/Linux
     GNU/Linux (commonly referred to as Linux) refers to UNIX-like computer
     operating systems based on the Linux kernel. There are many distributions
     of Linux besides Ubuntu. Linux distributions are frequently installed on
     servers and other hardware, such as mobile and embedded devices.

GNOME Desktop Environment
     Ubuntu uses the GNOME desktop environment. A desktop is the type of
     graphic user interface used by Linux.
     Other official derivatives of Ubuntu use other desktop environments.
     Kubuntu uses the KDE desktop environment and Xubuntu uses the Xfce
     desktop environment.

System Requirements
                 Minimum                  Recommended              For additional visual
               Requirements               Requirements                   effects

          300 MHz x86 processor      700 MHz x86 processor       1.2 GHz x86 processor

          64 MB of RAM               384 MB of RAM               384 MB of RAM

          4 GB of hard disk space    8 GB of hard disk space     8 GB of hard disk space

          VGA graphics card          Graphics card capable of    Advanced graphics card
          capable of 640 × 480       1024 × 768 resolution
          resolution

          CD-ROM drive or network    Sound card                  Sound card
          card

                                     Network or Internet         Network or Internet
                                     connection                  connection

1                                           Getting Started with Ubuntu 8.10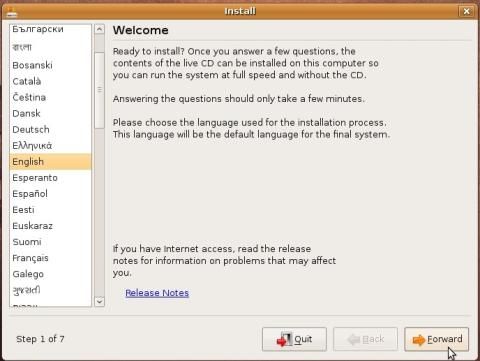
Acquiring Ubuntu
Users running 64-bit (x86-64) PCs should install the 64-bit version of
Ubuntu. The Windows-based installation (Wubi) option requires Microsoft
Windows 98, Windows 2000, Windows XP, Windows Vista, or Windows 7
Installation
There are many common ways to install and run Ubuntu. You can run
Ubuntu:
as your sole operating system (single booting).
in addition to another operating system (dual booting).
within your existing operating system (virtualization).
from your CD disc drive, using the Live CD.
Acquiring Ubuntu
To acquire Ubuntu, you can order a free CD from Canonical or purchase a
CD or DVD from a distributer. For information on ordering Ubuntu see the
Ubuntu website at http://www.ubuntu.com.
You can also download and burn the image to a CD or DVD. You can
download the Ubuntu installer from Canonical. Downloading the installer
requires a blank CD or DVD, and a CD or DVD burner that is capable of
burning disc images.
To download Ubuntu:
1. Using your web browser, navigate to
http://www.ubuntu.com/getubuntu/download
2. Select Desktop Edition, and then click Ubuntu 8.10.
3. In the Choose a download location near you menu, select the location
closest to you.
4. Click Begin Download. A pop up window opens, prompting you
where to run or save the file.
5. In Internet Explorer, click Run to automatically open the installation
file in a CD burning utility or click Save to save the file to your disk.
In Mozilla Firefox, select Open with to open the installation file in a
CD burning utility or select Save File to save the file to your disk.
2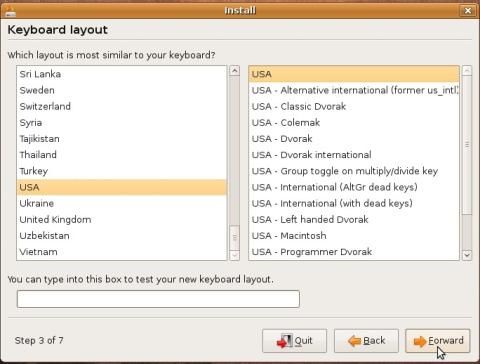
Installation
After downloading the Ubuntu installation CD image, you need to burn it to
a CD or DVD.
To burn the installation disk to a CD or DVD
1. Place a recordable CD or DVD into your CD/DVD drive.
2. Load an application that is capable of burning .ISO image files to CDs
or DVDs.
3. Using your CD and DVD writing program, copy the disk image to your
blank CD or DVD.
NOTE: Some CD/DVD writing programs are not capable of
burning a CD image (.ISO). Ensure that your program can
burn the disk image.
Single Booting
If you want to run Ubuntu and no other operating system on your computer
then single booting may be your desired installation option.
To install Ubuntu:
1. Insert the Ubuntu disc into your CD drive.
2. Start or restart your computer. The Language screen appears.
3 Getting Started with Ubuntu 8.10
Single Booting

3.   Select your desired language and press Enter. The startup window
     appears.

4.   Select Install Ubuntu and press Enter. The Welcome window
     appears.

                                                                    4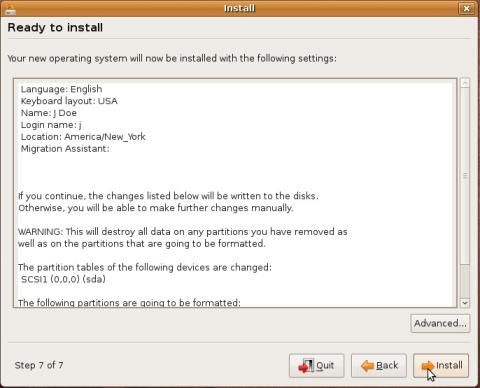
Installation

      5.       From the taskbar, choose your preferred language. Click Forward.
               The Where are you? window appears.

      6.       From the Selected city box, choose your closest location. Click
               Forward. The Keyboard layout window appears.

5                                              Getting Started with Ubuntu 8.10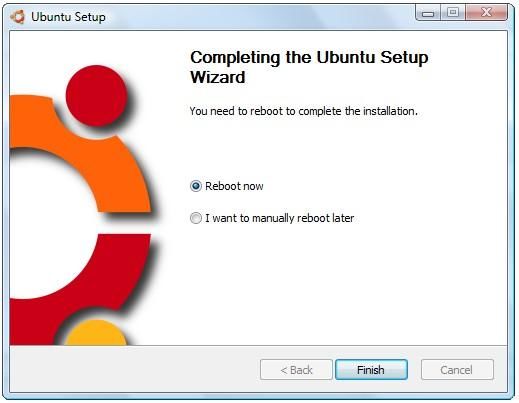
Single Booting

7.   Select your keyboard layout. To test if you have chosen the correct
     layout, enter characters in the text box. Click Forward. The Prepare
     disk space window appears.

8.   Select Guided – use entire disk and select the hard drive that you
     want to install Ubuntu. Click Forward. The Who are you? window
     appears.
         WARNING: Installing Ubuntu on your entire hard disk will erase
         all data that is currently on the drive.

                                                                      6
Installation
9. In the What is your name? field, enter your name.
10. In the What name do you want to use to log in? field, enter a login
name.
11. In the Choose a password to keep your account safe field, enter a
password in both text boxes.
12. In the What is the name of your computer? Field, enter a name to
identify your computer.
13. If you are the only user and wish to avoid the login screen, check Log
in automatically (optional).
14. Click Forward. The Ready to install window appears.
15. Verify that the language, layout, location, and personal information
are correct and click Install. The installation wizard begins.
16. When the installation wizard finishes, the installation complete window
appears. Click Restart now to restart your computer. Ubuntu is now
installed.
Dual Booting
You can run both Ubuntu and another operating system on your computer.
When running multiple operating systems, when you start or restart your
computer you can choose which operating system that you want to run.
1. Insert the Ubuntu disc into your CD drive.
7 Getting Started with Ubuntu 8.10Dual Booting
2. Start or restart your computer. The Language screen appears.
3. Select your desired language and press Enter. The startup window
appears.
8Installation
4. Select Install Ubuntu and press Enter. The Welcome window
appears.
5. From the taskbar, choose your preferred language. Click Forward.
The Where are you? window appears.
9 Getting Started with Ubuntu 8.10Dual Booting
6. From the Selected city box, choose your closest location. Click
Forward. The Keyboard layout window appears.
7. Select your keyboard layout. To check that you have chosen the
correct layout type, enter characters in the text box. Click Forward.
The Prepare disk space window appears.
8. Select Guided – resize.
10Installation
9. In the New partition size area, drag the area between the two
partitions to create your desired partition sizes. Click Forward. The
Who are you? window appears.
WARNING: Installing Ubuntu on an existing disk partition will
erase all data that is currently on the partition. Installing Ubuntu
on your entire hard disk will erase all data that is currently on the
drive.
10. Enter your name, login name, password, and a name to identify your
computer. If you will be the only user and wish to avoid the login
screen, check Log in automatically (optional). Click Forward. The
Ready to install window appears.
11 Getting Started with Ubuntu 8.10Windows-based Installation
11. Verify that the language, layout, location, and personal information
are correct and click Install. The installation wizard begins.
12. When the installation wizard finishes, the installation complete window
appears. Click Restart now to restart your computer. Ubuntu is now
installed.
Windows-based Installation
The Windows-based Ubuntu Installer (Wubi) allows you to install and
uninstall Ubuntu from within Microsoft Windows. It lets a Microsoft Windows
user try Ubuntu without risking any data loss due to disk formatting or
partitioning.
Wubi requires Windows 98, 2000, XP, Vista, or Windows 7.
NOTE: Hibernation is not supported when installing Ubuntu via
Wubi.
To install Ubuntu:
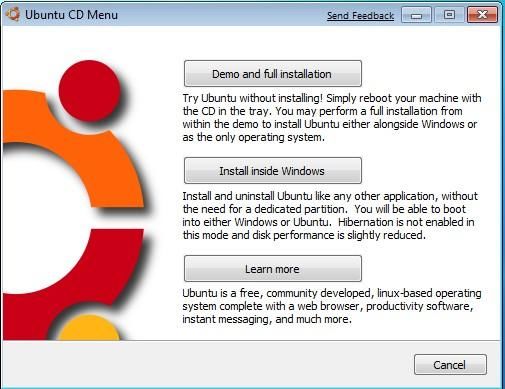
1. Within Microsoft Windows, insert the Ubuntu installation disc into your
CD drive. The Ubuntu CD Menu appears.
12Installation
2. Select Install inside Windows. The Ubuntu Setup window appears.
3. In the Installation Drive list, select the drive that you want to install
Ubuntu.
4. In the Installation Size list, select the amount of space that you want
to allocate to Ubuntu.
5. In the Desktop Environment list, select Ubuntu.
6. In the Language list, select your preferred language.
7. In the Username box, enter a username for your Ubuntu account.
8. In the Password box, enter a password for your Ubuntu account.
Repeat this password on the second line.
9. Select Install. The Ubuntu Setup progress window appears. When
Ubuntu has finished installing, the Completing the Ubuntu Setup
Wizard window appears.
13 Getting Started with Ubuntu 8.10Windows-based Uninstallation
10. Select Reboot now and click Finish. Your computer restarts and the
Windows Boot Manager appears.
11. Using your keyboard’s and arrow keys, select Ubuntu and press
Enter. Ubuntu loads and the Checking the installation wizard appears.
Ubuntu is now installed.
NOTE: Since Wubi installs Ubuntu on the same file partition as
Windows, there may be a slight degradation in Ubuntu’s
performance over time due to file fragmentation.
Windows-based Uninstallation
When installed from Microsoft Windows, Ubuntu can be uninstalled using
Microsoft Window’s standard Add or Remove Programs/Uninstall a program
option.
14Installation
To uninstall Ubuntu in Windows XP:
1. From the Start menu, select Control Panel. The Control Panel
appears.
2. Select Add or Remove Programs. Add or Remove Programs
appears.
3. Select Ubuntu and click Remove. The Wubi Uninstall window
appears.
4. Click Uninstall. Ubuntu uninstalls. The Completing the Wubi Uninstall
Wizard appears.
5. Click Finish. Ubuntu is uninstalled.
15 Getting Started with Ubuntu 8.10Windows-based Uninstallation
Removing Ubuntu in Windows Vista or Windows 7 follows the standard
Uninstall a program option in Microsoft Windows.
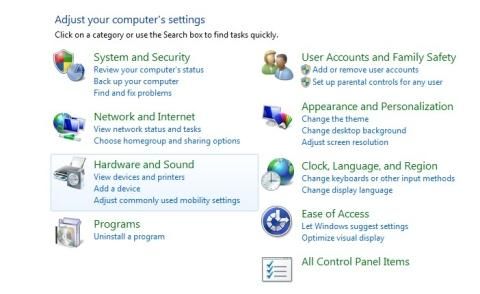
To uninstall Ubuntu in Windows Vista or Windows 7:
1. From the Start menu, select Control Panel. The Control Panel
appears.
2. Under Programs, select Uninstall a program. The Uninstall or
change a program window appears.
16Installation
3. Select Ubuntu and then click Uninstall/Change. The Wubi Uninstall
window appears.
4. Click Uninstall. The progress wizard appears. The Completing the
Wubi Uninstall Wizard appears.
5. Click Finish. Ubuntu is uninstalled.
17 Getting Started with Ubuntu 8.10Virtualization
Startup
You can load Ubuntu as soon as you turn on your computer or, if you dual
boot, you can choose between loading Ubuntu or another operating system.
Virtualization
You can use virtualization technology to run Ubuntu within your existing
operating system. Virtualization is the process in which a “guest” operating
system is run under a “host” operating system. Virtualization allows you to
run other operating systems within your current operating system. Because
a virtual machine runs within your existing operating system you cannot
allocate your entire system’s RAM to the guest operating system, and thus
running Ubuntu as the guest operating system tends to be slower than
running Ubuntu as the host operating system.
Live CD
The included Live CD allows you to test Ubuntu without making any changes
to your computer's configuration.
To run Ubuntu from the Live CD
1. Insert the Ubuntu disc into your compact disk drive.
2. Start or restart your computer. The Language screen appears.
18Startup
3. Select your desired language and press Enter. The start up window
appears.
4. Select Try Ubuntu without any changes to your computer and
press Enter. Ubuntu loads.
NOTE: Because Ubuntu is running off your CD and not a writable
drive, files saved to the Ubuntu file system will not be stored in
multiple sessions. Be sure to save and install files to your hard
disk drive.
19 Getting Started with Ubuntu 8.10Dual Boot Startup
Dual Boot Startup
If you are running Ubuntu and another operating system in multiple
partitions then you need to choose which operating system you want to run.
To choose an operating system when dual booting:
1. Turn on or restart your computer. The GRUB loader appears.
2. Using your keyboard’s and arrow keys, select the operating
system that you want to load. Press Enter. The desired operating
system loads.
NOTE: The default operating system is Ubuntu. If you do not
choose an operating system within several seconds, Ubuntu will
automatically load.
Wubi Statup
If you installed Ubuntu via the Wubi installer, the Windows Boot Manager
loads. You can choose which operating system to run.
20Startup
To choose an operating system:
1. Turn on or restart your system. The Windows Boot Manager appears.
2. Using your keyboard’s and arrow keys, select the operating
system that you want to load. Press Enter. The desired operating
system loads.
NOTE: The default operating system is Microsoft Windows. If you
do not choose an operating system, Microsoft Windows will
automatically load.
Login
As soon as Ubuntu loads, the login screen appears. This allows multiple
users to have their own customized desktop and prevents unauthorized
users from accessing your data.
21 Getting Started with Ubuntu 8.10Login
To login to Ubuntu:
1. In the Username box, enter your username. Press Enter. The
Password screen loads.
2. In the Password box, enter your password. Your entered text displays
as bullets. Press Enter. The Ubuntu desktop loads.
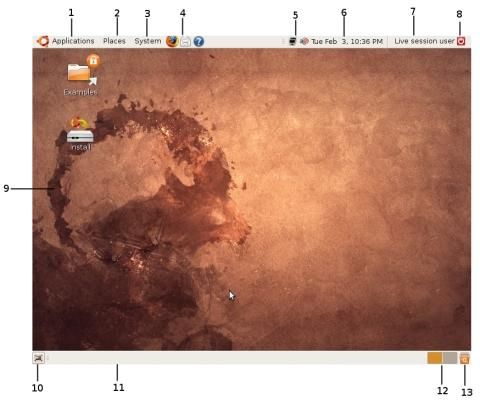
Desktop
The Ubuntu interface uses the graphical GNOME desktop environment. From
the desktop you can perform tasks such as: add or remove software, access
22Desktop
files and folders, launch applications, change the date and time, set your
location, and restart or shutdown your computer.
Number Label
1 Application Menu
2 Places Menu
3 System Menu
4 Panel Applet
5 Notification Area
6 Time and Date
7 User Menu
8 Shutdown Menu
9 Desktop
10 Show Desktop
11 Window List
12 Workspace
13 Trash Can
23 Getting Started with Ubuntu 8.10Applications Menu
Applications Menu
The Applications menu is the location that you find and run your installed
programs. You can also add and remove software from the Applications
menu.
Places Menu
The Places menu provides access to folders and directories, both within the
Ubuntu partition and, if dual booting, your other operating system’s
partition, as well as removable media.
24Desktop
System Menu
The System menu provides access to common system tasks. It is also
possible to switch users, or shut down your computer from this menu.
Panel Applet
The Panel Applet area provides access to the most commonly used
programs, such as the Mozilla Firefox browser and Evolution e-mail
program.
Notification Area
The Notification Area provides access to sound and networking options. This
menu also displays an icon when operating system updates are available.
25 Getting Started with Ubuntu 8.10Time and Date
Time and Date
You can set the time and date with the time and date menu. In the Time
and Date menu, you can also set your location.
Shutdown Menu
You can shut down, switch users, or restart your computer using the
shutdown menu.
Window List
The Window List allows you to switch between multiple applications.
Desktop
The Desktop is a central place to store commonly accessed files, or
temporarily save files or documents. The desktop allows you to add and
customize icons, windows, toolbars, folders, wallpapers, and desktop
widgets.
26Desktop
Show Desktop
The Show Desktop button hides open windows and switches the view to
the desktop. Click it to quickly revert to the desktop.
Workspace
Ubuntu allows you to work in multiple workspaces. Workspaces are also
referred to as virtual desktops. Virtual desktops can help you organize your
workflow. For example, you can have one virtual desktop with your office
applications open, a second virtual desktop with your Internet applications,
a third virtual desktop for your multimedia applications, and a forth virtual
desktop open with system utility applications. Virtual desktops are also
useful if you have multiple monitors connected. You can then configure a
desktop for each monitor.
Pressing the Switch Workspace icon allows you to switch between
workspaces. You can add up to 36 virtual desktops.
To add virtual workspaces:
1. Right click on the Workspace icon and select Preferences. The
Workspace Switcher Preferences dialog box appears.
2. Under Workspaces, in the Number of workspaces window, enter
your desired number of workspaces (up to 36).
3. Click Close.
27 Getting Started with Ubuntu 8.10Trash Can
Trash Can
The Trash Can allows you to restore deleted files or permanently delete
files.
To permanently delete files in the trash can:
1. Right click on the Trash icon. The right click menu appears.
2. Select Empty Trash. The Empty all of the items from the trash?
window appears.
3. Click Empty Trash. The trash empties and your files delete.
Network Configuration
You can use a wired or wireless network to connect to the Internet and
other computers over your network.
28Network Configuration
Wireless
Ubuntu automatically detects secured and unsecured wireless networks.
Wireless networks are displayed with the icon in the notification area.
To connect to a publically-broadcast wireless
network:
1. In the notification area, click the wireless icon.
2. Select the wireless network that you wish to connect to.
3. If the network is encrypted, the Authentication required by wireless
network window appears. In the Password box, enter the network
password and click Connect. The wireless network connects.
You can also connect to wireless networks that do not broadcast their
network name (SSID).
29 Getting Started with Ubuntu 8.10Wired
To connect to a hidden wireless network:
1. In the notification area, click the wireless icon .
2. Select Connect to Hidden Wireless Network. The Hidden wireless
network window appears.
3. In the Network Name field, enter the name (SSID) of the wireless
network.
4. In the Wireless Security field, select the wireless network encryption
type and enter the network password.
5. Click Connect. The wireless network connects.
Wired
On most standard configurations, Ubuntu will automatically recognize your
wireless network when you plug in your Ethernet cable from your modem or
router to your computer.
To connect to a wired network:
1. Plug one end of a RJ45 Ethernet cable to your modem or router.
2. Connect the other end to your computer’s Ethernet port. The wired
network connects.
Printer Configuration
Ubuntu will automatically detect most printers.
To setup your printer:
1. Plug one end of the appropriate plug into your printer.
2. Plug the other end into your computer.
3. Turn on your printer. Your printer is detected.
30Installing and Uninstalling Software
You can check that your printer is automatically detected and working
properly.
To verify that your printer is properly installed:
With your printer turned on, from the System menu, click on
Administration, and then click on Printing. Your printer is shown
as an icon in the Printing window.
You can also print a test page. A test page lets you check that your printer
is working, as well as check ink level and quality.
To print a test page:
1. With your printer turned on, from the System menu, click on
Administration, and then click on Printing. The Printer configuration
window opens.
2. Double click the printer icon.
3. Click Print Test Page. The test page prints.
Installing and Uninstalling Software
There are two ways to install and uninstall software. The customary method
is to add and remove software from maintained repositories. Maintained
distributions are a collection of open source software maintained by content
providers, developers, and Linux distributions. Each distribution has both
official and unofficial distributions. In addition, you can manually install
software by downloading or obtaining an installer.
Software Repositories
Linux customarily uses software repositories to manage software
management. Instead of purchasing software from a store or downloading it
from a particular application’s website Linux users receive software from
software repositories. There are different repositories depending on your
build of Linux that are customized to ensure maximum compatibility.
Because most software used by Ubuntu is open source, the source code can
be modified to meet the specific needs of Ubuntu. Ubuntu repositories,
maintained by Canonical, are tested and modified to ensure maximum
compatibility.
Canonical-maintained Repositories
The distributions designed for Ubuntu are maintained by Canonical.
Canonical-maintained depositories are automatically installed. Canonical-
maintained repositories provide tested software that has maximum
compatibility with Ubuntu. If your desired software is available, it is
recommended that you use the Canonical-maintained repository.
Additional Repositories
Besides Canonical, other repositories may provide access to software that is
not available in the official Canonical-maintained repositories. The package
manager provides access to many different repositories.
31 Getting Started with Ubuntu 8.10Additional Repositories
To add repositories:
1. From the System menu, select Administration, and then Software
Sources. The quick introduction box opens.
2. Click Close. The Software Sources window opens.
3. Select the Third-Party Software tab.
4. Click Add.
5. In the APT line: box, enter the type, location, and components of the
repository that you wish to add.
6. Click Add Source. The repository is added.
32Installing and Uninstalling Software
Installing and Uninstalling
To install software:
1. From the Applications menu, select Add/Remove. The Add/Remove
Applications window appears.
2. Under the Show menu, choose your desired repository.
Application type Description
All available applications Shows all applications
from included
repositories, including
proprietary software such
as drivers
All Open Source Shows only open source
applications applications from all
included repositories
Canonical-maintained Shows only the
applications applications maintained
by Canonical and verified
for your Ubuntu
distribution
(recommended).
Third party applications Shows only non-
Canonical applications
3. In the applications sidebar, select the type of application you wish to
install.
4. Select the application that you wish to install and click Apply
Changes. The application installation window appears. Your
application installs.
33 Getting Started with Ubuntu 8.10Manual Installation
To uninstall applications:
1. From the Applications menu, select Add/Remove. The Add/Remove
Applications window appears.
2. From the Show menu, select Installed applications only.
3. Find the application that you want to uninstall and remove its
checkbox and click Apply Changes. The application installation
window appears. Your application uninstalls.
Manual Installation
While it is preferable to install software using the repositories, this is not
always possible. Sometimes, you may want to install software that is not
available in a Linux repository. Linux repositories generally only provide
open source software. The most up-to-date version of software may also
not yet be available in repositories. Therefore, it is sometimes necessary to
manually install software.
Ubuntu is based on Debian. Therefore, the best extension for manual
installation is .deb. If you have the option of Linux packages, choose either
Ubuntu or Debian.
To manually install software from the Internet:
1. Locate the appropriate version to download.
NOTE: There are many distributions of Linux and they are not all
compatible with each other. Some installers may only specify
that it runs on Linux and not specify for which distribution it was
written for. There is a chance that, without recompiling, it may
not install properly in Ubuntu.
2. Download the software to a directory or the desktop.
3. Click on the software file. The program installs.
Customizing Ubuntu
After installation, several customizations allow a more pleasant operating
environment. Suggest customizations include installing proprietary drivers,
codecs, Adobe Flash, and Microsoft TrueType fonts, optimizing your
resolution, and customizing your display for enhanced graphics.
Proprietary Drivers
Ubuntu comes pre-installed with open source drivers. Your system may be
configured with proprietary hardware drivers. For copyright reasons, Ubuntu
may not come pre-installed with these drivers. If Ubuntu does not recognize
all of your hardware you may need to manually install your hardware
drivers.
34Customizing Ubuntu
To manually install proprietary drivers:
1. From the System menu, select Administration, and then Hardware
Drivers. The Hardware Drivers window opens.
2. Select the hardware drivers that you wish to install. If you do not have
any proprietary hardware drivers, no items will be listed.
3. Select Activate.
4. Select Close. Your drivers are now installed.
Proprietary Codecs
Codecs are necessary to run multimedia files. A codec is a device or
computer program that encodes and decodes digital data. Different codecs
are used to view multimedia on your computer. Many common multimedia
files require proprietary codecs. In order to maximize your multimedia
experience, as well as enable access to some common websites, it is
strongly recommended that you install proprietary multimedia codecs.
These are necessary in order to play common media types such as MP3,
MPG, WMV, and DivX video files.
LEGAL NOTICE: Using of proprietary codecs is legally restricted.
Check that you are legally permitted to use them in your country
prior to installation.
To install proprietary codecs
1. From the Applications menu, select Add/Remove. If prompted,
enter the administrator password. The Add/Remove window appears.
2. From the Show menu, select All available applications.
35 Getting Started with Ubuntu 8.10Adobe Flash
3. Select ubuntu-restricted-extras. The Enable the installation of
unsupported and restricted software? box appears.
4. Select Enable.
5. Click Apply Changes. The Apply the following changes? window
appears.
6. Click Apply. The proprietary codecs install.
Adobe Flash
Adobe Flash is a proprietary multimedia platform that is commonly used in
many web sites. If Adobe Flash did not install with the ubuntu-restricted-
extras file, then you can install it manually.
To manually install the latest version of the Adobe
Flash player
1. Browse to the Adobe Flash website at
http://get.adobe.com/flashplayer/
2. Click Different operating system or browser?
36Customizing Ubuntu
3. In the Select an operating system drop-down list, select Linux. The
Select an installer type drop-down list displays.
4. In the Select an installer type drop-down list, select .deb for Ubuntu
8.04+.
5. Click Agree and install now.
6. Select Open with GDebi Package Installer and click OK. The GDebi
Package Installer opens.
7. Select Install Package. Adobe Flash installs.
Display Resolution
You can modify your monitor's display resolution. This can make images
appear clearer and crisper.
37 Getting Started with Ubuntu 8.10Visual Effects
To adjust your display resolution:
1. From the System menu, select Preferences, and then Screen
Resolution. The resolution window appears.
2. From the Resolution list, select your desired resolution
3. Click Apply and then Close. Your resolution is changed.
Visual Effects
You can customize the look and feel of your desktop and add 3D
acceleration and special effects to your computer with Compiz Fusion. Users
with embedded graphics cards capable of 3D acceleration can use this
application to create 3D graphics effects.
To enable advanced visual effects:
1. From the System menu, select Preferences, and then Appearance.
The Appearance window opens.
38Customizing Ubuntu
2. Select the Visual Effects tab.
3. Select Extra and click Close. Advanced visual effects are now
enabled.
In order to enable the full set of features, the full Compiz Fusion
configuration utility needs to be installed. This allows you to control your
desktop effects.
To install Compiz Fusion Configuration Manager:
1. From the System menu, select Administration, and then Synaptic
Package Manager. Synaptic Package Manger opens.
39 Getting Started with Ubuntu 8.10Visual Effects
2. Select compizconfig-settings-manager. The Mark additional
required changes window opens.
3. Click Mark. The Apply the following changes? window appears.
4. Click Apply. The Compiz Fusion Configuration Manager installs.
40Customizing Ubuntu
You can access the Compiz Fusion Configuration Manager from the System
menu.
To run the Compiz Fusion Configuration Manager:
From the System menu, select Preferences, and then
CompizConfig Settings Manager. The Compiz Fusion
Configuration Manager opens.
Microsoft TrueType Fonts
If you are collaborating with users of Microsoft Office, viewing web sites that
specify preferred fonts in their style sheets, or otherwise working with
others who use proprietary software and proprietary operating systems, it is
likely that their documents and web sites use Microsoft TrueType Fonts
(TTF). Installing Microsoft TrueType Fonts may enhance compatibility
between shared documents and allow you to view web sites as designed.
To install Microsoft TrueType Fonts:
1. From the System menu, select Administration, and then Synaptic
Package Manager. Synaptic Package Manger opens.
2. Select msttcorefonts and click Apply. The Mark additional required
changes window opens.
41 Getting Started with Ubuntu 8.10Microsoft TrueType Fonts
3. Click Mark. The Apply the following changes? window opens.
4. Click Apply. Microsoft TrueType Fonts (TTF) installs.
LEGAL NOTICE: This installs Microsoft TrueType Fonts (TTF)
only. Due to licensing restrictions, it does not install and it is not
recommended that you install Microsoft ClearType Fonts.
Security
Unlike Microsoft Windows, Linux has very few native viruses. This has led to
misconception that there are no viruses in Linux and that there is no need
to install anti-virus software in any Linux distribution. However, as Linux
(and, in particular, the Ubuntu distribution) has gained in popularity, the
number of malicious programs within Linux has increased.
While Linux (and the Ubuntu distribution) is safer than Microsoft Windows, it
is still recommended that you install software that protects against malware
(viruses, spyware, Trojan horses, and other threats). This is particularly
important if you will be sharing files with Microsoft Windows users or
moving files between an Ubuntu partition and Microsoft Windows partition in
order to not accidentally send infected files to Microsoft Windows
computers.
42Security
Malware
There are several anti-virus applications for Linux computers, including:
Software Website License
Avast! Linux Home http://www.avast.com/eng/avast-for- Freeware for home
Edition linux-workstation.html users
AVG Anti-Virus http://free.avg.com/download?prd=afl Freeware for non-
Free Edition for commercial use
Linux
Avira http://www.avira.com/ Freeware and
commercial
ClamAV http://www.clamav.net/ Open source
F-Secure http://www.f-secure.com/ Commercial
Kaspersky Linux http://www.kaspersky.com/linux Commercial
Security
The ClamAV program is open source and included in Ubuntu’s repositories.
To install ClamAV:
1. From the Applications menu, click Add/Remove. The Add/Remove
Applications menu appears.
2. Under Show menu, select All available applications.
3. Under System Tools, select Virus Scanner.
4. Select Apply Changes. The Enable the installation of community
maintained software dialog box appears.
5. Select Enable.
43 Getting Started with Ubuntu 8.10Malware
6. Select Apply Changes. The Apply the following changes window
appears.
7. Select Apply. ClamAV installs.
Technical Support
Technical support and further assistance is provided in several forums.
Support Type URL
Official https://help.ubuntu.com/8.10/
Documentation
Community https://help.ubuntu.com/community
Contributed
Documentation
Canonical http://www.ubuntu.com/support/paid
Professional
Support
Web forums http://www.ubuntu.com/support/community/webforums
Technical https://answers.launchpad.net/ubuntu
Answers
System
Additional official and unofficial support options can be found on Ubuntu’s
website at http://www.ubuntu.com/support.
44GNU Free Documentation License
GNU Free Documentation License
Version 1.3, 3 November 2008
Copyright © 2000, 2001, 2002, 2007, 2008 Free Software Foundation, Inc.
Everyone is permitted to copy and distribute verbatim copies of this license
document, but changing it is not allowed.
0. PREAMBLE
The purpose of this License is to make a manual, textbook, or other
functional and useful document "free" in the sense of freedom: to assure
everyone the effective freedom to copy and redistribute it, with or without
modifying it, either commercially or noncommercially. Secondarily, this
License preserves for the author and publisher a way to get credit for their
work, while not being considered responsible for modifications made by
others.
This License is a kind of "copyleft", which means that derivative works of
the document must themselves be free in the same sense. It complements
the GNU General Public License, which is a copyleft license designed for free
software.
We have designed this License in order to use it for manuals for free
software, because free software needs free documentation: a free program
should come with manuals providing the same freedoms that the software
does. But this License is not limited to software manuals; it can be used for
any textual work, regardless of subject matter or whether it is published as
a printed book. We recommend this License principally for works whose
purpose is instruction or reference.
1. APPLICABILITY AND DEFINITIONS
This License applies to any manual or other work, in any medium, that
contains a notice placed by the copyright holder saying it can be distributed
under the terms of this License. Such a notice grants a world-wide, royalty-
free license, unlimited in duration, to use that work under the conditions
stated herein. The "Document", below, refers to any such manual or work.
Any member of the public is a licensee, and is addressed as "you". You
accept the license if you copy, modify or distribute the work in a way
requiring permission under copyright law.
A "Modified Version" of the Document means any work containing the
Document or a portion of it, either copied verbatim, or with modifications
and/or translated into another language.
A "Secondary Section" is a named appendix or a front-matter section of the
Document that deals exclusively with the relationship of the publishers or
authors of the Document to the Document's overall subject (or to related
matters) and contains nothing that could fall directly within that overall
subject. (Thus, if the Document is in part a textbook of mathematics, a
Secondary Section may not explain any mathematics.) The relationship
could be a matter of historical connection with the subject or with related
matters, or of legal, commercial, philosophical, ethical or political position
regarding them.
The "Invariant Sections" are certain Secondary Sections whose titles are
designated, as being those of Invariant Sections, in the notice that says that
45 Getting Started with Ubuntu 8.101. APPLICABILITY AND DEFINITIONS
the Document is released under this License. If a section does not fit the
above definition of Secondary then it is not allowed to be designated as
Invariant. The Document may contain zero Invariant Sections. If the
Document does not identify any Invariant Sections then there are none.
The "Cover Texts" are certain short passages of text that are listed, as
Front-Cover Texts or Back-Cover Texts, in the notice that says that the
Document is released under this License. A Front-Cover Text may be at
most 5 words, and a Back-Cover Text may be at most 25 words.
A "Transparent" copy of the Document means a machine-readable copy,
represented in a format whose specification is available to the general
public, that is suitable for revising the document straightforwardly with
generic text editors or (for images composed of pixels) generic paint
programs or (for drawings) some widely available drawing editor, and that
is suitable for input to text formatters or for automatic translation to a
variety of formats suitable for input to text formatters. A copy made in an
otherwise Transparent file format whose markup, or absence of markup,
has been arranged to thwart or discourage subsequent modification by
readers is not Transparent. An image format is not Transparent if used for
any substantial amount of text. A copy that is not "Transparent" is called
"Opaque".
Examples of suitable formats for Transparent copies include plain ASCII
without markup, Texinfo input format, LaTeX input format, SGML or XML
using a publicly available DTD, and standard-conforming simple HTML,
PostScript or PDF designed for human modification. Examples of transparent
image formats include PNG, XCF and JPG. Opaque formats include
proprietary formats that can be read and edited only by proprietary word
processors, SGML or XML for which the DTD and/or processing tools are not
generally available, and the machine-generated HTML, PostScript or PDF
produced by some word processors for output purposes only.
The "Title Page" means, for a printed book, the title page itself, plus such
following pages as are needed to hold, legibly, the material this License
requires to appear in the title page. For works in formats which do not have
any title page as such, "Title Page" means the text near the most prominent
appearance of the work's title, preceding the beginning of the body of the
text.
The "publisher" means any person or entity that distributes copies of the
Document to the public.
A section "Entitled XYZ" means a named subunit of the Document whose
title either is precisely XYZ or contains XYZ in parentheses following text
that translates XYZ in another language. (Here XYZ stands for a specific
section name mentioned below, such as "Acknowledgements",
"Dedications", "Endorsements", or "History".) To "Preserve the Title" of such
a section when you modify the Document means that it remains a section
"Entitled XYZ" according to this definition.
The Document may include Warranty Disclaimers next to the notice which
states that this License applies to the Document. These Warranty
Disclaimers are considered to be included by reference in this License, but
only as regards disclaiming warranties: any other implication that these
Warranty Disclaimers may have is void and has no effect on the meaning of
this License.
46GNU Free Documentation License
2. VERBATIM COPYING
You may copy and distribute the Document in any medium, either
commercially or noncommercially, provided that this License, the copyright
notices, and the license notice saying this License applies to the Document
are reproduced in all copies, and that you add no other conditions
whatsoever to those of this License. You may not use technical measures to
obstruct or control the reading or further copying of the copies you make or
distribute. However, you may accept compensation in exchange for copies.
If you distribute a large enough number of copies you must also follow the
conditions in section 3.
You may also lend copies, under the same conditions stated above, and you
may publicly display copies.
3. COPYING IN QUANTITY
If you publish printed copies (or copies in media that commonly have
printed covers) of the Document, numbering more than 100, and the
Document's license notice requires Cover Texts, you must enclose the
copies in covers that carry, clearly and legibly, all these Cover Texts: Front-
Cover Texts on the front cover, and Back-Cover Texts on the back cover.
Both covers must also clearly and legibly identify you as the publisher of
these copies. The front cover must present the full title with all words of the
title equally prominent and visible. You may add other material on the
covers in addition. Copying with changes limited to the covers, as long as
they preserve the title of the Document and satisfy these conditions, can be
treated as verbatim copying in other respects.
If the required texts for either cover are too voluminous to fit legibly, you
should put the first ones listed (as many as fit reasonably) on the actual
cover, and continue the rest onto adjacent pages.
If you publish or distribute Opaque copies of the Document numbering more
than 100, you must either include a machine-readable Transparent copy
along with each Opaque copy, or state in or with each Opaque copy a
computer-network location from which the general network-using public has
access to download using public-standard network protocols a complete
Transparent copy of the Document, free of added material. If you use the
latter option, you must take reasonably prudent steps, when you begin
distribution of Opaque copies in quantity, to ensure that this Transparent
copy will remain thus accessible at the stated location until at least one year
after the last time you distribute an Opaque copy (directly or through your
agents or retailers) of that edition to the public.
It is requested, but not required, that you contact the authors of the
Document well before redistributing any large number of copies, to give
them a chance to provide you with an updated version of the Document.
4. MODIFICATIONS
You may copy and distribute a Modified Version of the Document under the
conditions of sections 2 and 3 above, provided that you release the Modified
Version under precisely this License, with the Modified Version filling the
role of the Document, thus licensing distribution and modification of the
Modified Version to whoever possesses a copy of it. In addition, you must
do these things in the Modified Version:
A. Use in the Title Page (and on the covers, if any) a title distinct from that
of the Document, and from those of previous versions (which should, if
47 Getting Started with Ubuntu 8.104. MODIFICATIONS
there were any, be listed in the History section of the Document). You may
use the same title as a previous version if the original publisher of that
version gives permission.
B. List on the Title Page, as authors, one or more persons or entities
responsible for authorship of the modifications in the Modified Version,
together with at least five of the principal authors of the Document (all of its
principal authors, if it has fewer than five), unless they release you from
this requirement.
C. State on the Title page the name of the publisher of the Modified Version,
as the publisher.
D. Preserve all the copyright notices of the Document.
E. Add an appropriate copyright notice for your modifications adjacent to
the other copyright notices.
F. Include, immediately after the copyright notices, a license notice giving
the public permission to use the Modified Version under the terms of this
License, in the form shown in the Addendum below.
G. Preserve in that license notice the full lists of Invariant Sections and
required Cover Texts given in the Document's license notice.
H. Include an unaltered copy of this License.
I. Preserve the section Entitled "History", Preserve its Title, and add to it an
item stating at least the title, year, new authors, and publisher of the
Modified Version as given on the Title Page. If there is no section Entitled
"History" in the Document, create one stating the title, year, authors, and
publisher of the Document as given on its Title Page, then add an item
describing the Modified Version as stated in the previous sentence.
J. Preserve the network location, if any, given in the Document for public
access to a Transparent copy of the Document, and likewise the network
locations given in the Document for previous versions it was based on.
These may be placed in the "History" section. You may omit a network
location for a work that was published at least four years before the
Document itself, or if the original publisher of the version it refers to gives
permission.
K. For any section Entitled "Acknowledgements" or "Dedications", Preserve
the Title of the section, and preserve in the section all the substance and
tone of each of the contributor acknowledgements and/or dedications given
therein.
L. Preserve all the Invariant Sections of the Document, unaltered in their
text and in their titles. Section numbers or the equivalent are not
considered part of the section titles.
M. Delete any section Entitled "Endorsements". Such a section may not be
included in the Modified Version.
N. Do not retitle any existing section to be Entitled "Endorsements" or to
conflict in title with any Invariant Section.
O. Preserve any Warranty Disclaimers.
If the Modified Version includes new front-matter sections or appendices
that qualify as Secondary Sections and contain no material copied from the
Document, you may at your option designate some or all of these sections
as invariant. To do this, add their titles to the list of Invariant Sections in
48GNU Free Documentation License
the Modified Version's license notice. These titles must be distinct from any
other section titles.
You may add a section Entitled "Endorsements", provided it contains
nothing but endorsements of your Modified Version by various parties—for
example, statements of peer review or that the text has been approved by
an organization as the authoritative definition of a standard.
You may add a passage of up to five words as a Front-Cover Text, and a
passage of up to 25 words as a Back-Cover Text, to the end of the list of
Cover Texts in the Modified Version. Only one passage of Front-Cover Text
and one of Back-Cover Text may be added by (or through arrangements
made by) any one entity. If the Document already includes a cover text for
the same cover, previously added by you or by arrangement made by the
same entity you are acting on behalf of, you may not add another; but you
may replace the old one, on explicit permission from the previous publisher
that added the old one.
The author(s) and publisher(s) of the Document do not by this License give
permission to use their names for publicity for or to assert or imply
endorsement of any Modified Version.
5. COMBINING DOCUMENTS
You may combine the Document with other documents released under this
License, under the terms defined in section 4 above for modified versions,
provided that you include in the combination all of the Invariant Sections of
all of the original documents, unmodified, and list them all as Invariant
Sections of your combined work in its license notice, and that you preserve
all their Warranty Disclaimers.
The combined work need only contain one copy of this License, and multiple
identical Invariant Sections may be replaced with a single copy. If there are
multiple Invariant Sections with the same name but different contents,
make the title of each such section unique by adding at the end of it, in
parentheses, the name of the original author or publisher of that section if
known, or else a unique number. Make the same adjustment to the section
titles in the list of Invariant Sections in the license notice of the combined
work.
In the combination, you must combine any sections Entitled "History" in the
various original documents, forming one section Entitled "History"; likewise
combine any sections Entitled "Acknowledgements", and any sections
Entitled "Dedications". You must delete all sections Entitled
"Endorsements".
6. COLLECTIONS OF DOCUMENTS
You may make a collection consisting of the Document and other
documents released under this License, and replace the individual copies of
this License in the various documents with a single copy that is included in
the collection, provided that you follow the rules of this License for verbatim
copying of each of the documents in all other respects.
You may extract a single document from such a collection, and distribute it
individually under this License, provided you insert a copy of this License
into the extracted document, and follow this License in all other respects
regarding verbatim copying of that document.
49 Getting Started with Ubuntu 8.10You can also read