SPRK Manual Farelogix - Version 10.1 03/2021 - NDC Partner Program
←
→
Page content transcription
If your browser does not render page correctly, please read the page content below
Farelogix

SPRK
Manual

  Version 10.1
   03/2021

                 -1-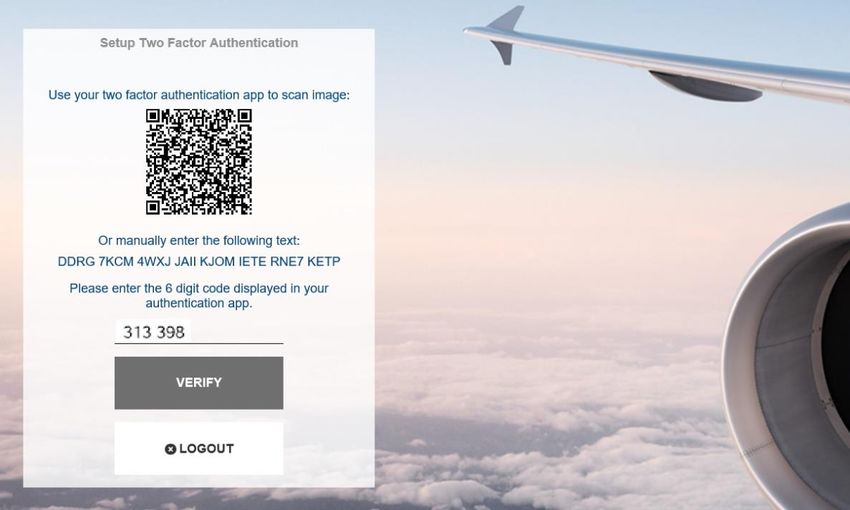
Content
1   INTRODUCTION .................................................................................................................................. 5
    1.1      LANDING PAGE ...........................................................................................................................................5
             1.1.1 Login ..........................................................................................................................................5
             1.1.2 Password reset .........................................................................................................................5
    1.2      2-FACTOR AUTHENTICATION .....................................................................................................................6
             1.2.1 Activation of 2-Factor Authentication ..................................................................................6
             1.2.2 Prerequisites for 2-Factor Authentication ............................................................................6
             1.2.3 Examplary application of WinAuth ........................................................................................6
             1.2.4 Setup the 2-Factor Authentication in SPRK ........................................................................7
    1.3      RESERVATION SCREEN ............................................................................................................................ 10
    1.4      ACTION ICONS ........................................................................................................................................ 11
2   PNR (PASSENGER NAME RECORD) ................................................................................................12
    2.1      ADDING PASSENGER DATA WITH QUICK TRAVELER................................................................................... 12
    2.2      ADDING PASSENGER DATA USING PROFILES ............................................................................................ 12
    2.3      ADDING PASSENGER DATA WITH THE TOOLBOX ....................................................................................... 13
             2.3.1 Adding passenger name, DOB and gender ....................................................................... 13
             2.3.2 Change/Delete passenger data .......................................................................................... 14
             2.3.3 Telephone .............................................................................................................................. 14
             2.3.4 Email ....................................................................................................................................... 15
             2.3.5 Form of payment .................................................................................................................. 15
             2.3.6 Address .................................................................................................................................. 16
             2.3.7 APIS ........................................................................................................................................ 16
             2.3.8 CLID ........................................................................................................................................ 17
             2.3.9 SSR ......................................................................................................................................... 17
                          2.3.9.1          Add SSRs during the booking process ........................................................................... 17
                          2.3.9.2          Change an existing SSR.................................................................................................... 18
                          2.3.9.3          Cancel an SSR .................................................................................................................... 18
             2.3.10 OSI .......................................................................................................................................... 19
             2.3.11 Remark ................................................................................................................................... 19
    2.4      HISTORY ................................................................................................................................................. 20
3   ITINERARY .........................................................................................................................................21
    3.1      ADD AIR / FLIGHT SEARCH ..................................................................................................................... 21
             3.1.1 Flight search interface.......................................................................................................... 21
             3.1.2 Flight search settings ........................................................................................................... 21
             3.1.3 Add flights to shopping cart via Fare Search .................................................................... 23
             3.1.4 Add flights to shopping cart via Air Availability ................................................................ 25
             3.1.5 Fare Quote ............................................................................................................................. 25
    3.2      BOOK A FLIGHT SEGMENT........................................................................................................................ 27
             3.2.1 Store a booking ..................................................................................................................... 27
             3.2.2 Find/Display booking ........................................................................................................... 28
             3.2.3 Change a booked flight segment ....................................................................................... 29
    3.3      DELETE A BOOKING ................................................................................................................................. 30
             3.3.1 Delete flight segments......................................................................................................... 30
             3.3.2 Delete the booked itinerary ................................................................................................. 30
    3.4      DISPLAY/DELETE/RECALCULATE A STORED FARE ................................................................................... 31
             3.4.1 Display fare notes for stored fare ....................................................................................... 31
             3.4.2 Display/Modify fare calculation and endorsements ........................................................ 31
             3.4.3 Delete stored fare ................................................................................................................. 32
             3.4.4 Auto Pricing/Recalculation of fare ..................................................................................... 32
             3.4.5 Manually create a fare .......................................................................................................... 33
             3.4.6 Pricing Special Fares with Wildcards ................................................................................. 34
             3.4.7 Baggage Allowance .............................................................................................................. 36
    3.5      PNR SPLIT .............................................................................................................................................. 37

                                                                                                                                                           -2-
4   ANCILLARY SERVICES ......................................................................................................................38
    4.1      ADVANCED SEAT RESERVATION (ASR) .................................................................................................... 38
             4.1.1 ASR booking process ........................................................................................................... 38
             4.1.2 Status of ASR Elements....................................................................................................... 39
    4.2      OPTIONAL SERVICES................................................................................................................................ 39
             4.2.1 Add optional services ........................................................................................................... 39
                          4.2.1.1          Baggage (FBAG, SBAG, ABAG) ....................................................................................... 40
                          4.2.1.2          Business lounge access .................................................................................................... 40
                          4.2.1.3          In-Flight Wi-Fi .................................................................................................................... 41
                          4.2.1.4          Fixprice / Cash Upgrade ................................................................................................... 41
                          4.2.1.5          A la carte dining on Lufthansa long-haul flights ............................................................ 43
                          4.2.1.6          Unaccompanied minor (UMNR) ...................................................................................... 45
                          4.2.1.7          Oxygen ................................................................................................................................ 47
             4.2.2 Delete a chargeable service before document issuance ................................................. 48
    4.3      EMD-A .................................................................................................................................................. 49
             4.3.1 Issue an EMD-A .................................................................................................................... 49
             4.3.2 Void EMD within the same day ........................................................................................... 51
             4.3.3 EMD restrictions on Lufthansa Group airlines mixed itineraries .................................... 52
5   TICKETING .........................................................................................................................................53
    5.1      ISSUE A TICKET ........................................................................................................................................ 53
    5.2      DISPLAY TICKET IMAGE ........................................................................................................................... 54
    5.3      VOID TICKET WITHIN THE SAME DAY ........................................................................................................ 54
    5.4      REFUND .................................................................................................................................................. 55
             5.4.1 Automated Refund ............................................................................................................... 55
             5.4.2 Manual Refund ...................................................................................................................... 56
             5.4.3 Cancel Refund ....................................................................................................................... 56
    5.5      REVALIDATION OF LUFTHANSA TICKETS................................................................................................... 57
    5.6      EXCHANGE .............................................................................................................................................. 58
             5.6.1 Add flight segments for exchange ..................................................................................... 58
             5.6.2 Auto-Exchange...................................................................................................................... 59
                          5.6.2.1          Auto-Exchange with additional collection and rebooking fee ..................................... 60
                          5.6.2.2          Auto-Exchange with refundable amount........................................................................ 61
             5.6.3        Manual Exchange .................................................................................................................. 62
                          5.6.3.1          Exchange with additional collection and rebooking fee ............................................... 63
                          5.6.3.2          Exchange with refundable amount.................................................................................. 64
                          5.6.3.3          Exchange with manual pricing ......................................................................................... 66
                          5.6.3.4          Manual Exchange due to Irregular Operations (SKCHG & INVOL) ............................. 69
                          5.6.3.5          Manual Exchange of old valid tickets in a new reservation ......................................... 74
    5.7      PRINT AND E-MAIL ................................................................................................................................. 77
             5.7.1 Print ........................................................................................................................................ 77
             5.7.2 E-mail ..................................................................................................................................... 77
6   OFFICE QUEUES ................................................................................................................................78
    6.1      OFFICE QUEUE NUMBERS ........................................................................................................................ 78
    6.2      WORKING WITH QUEUES......................................................................................................................... 79
    6.3      ADD PNR TO QUEUE ............................................................................................................................... 80
    6.4      BULK QUEUE MOVE ................................................................................................................................ 81
    6.5      CHANGE OF OWNERSHIP QUEUE ............................................................................................................ 81
7   GROUP BOOKINGS IN SPRK.............................................................................................................82
8   PROFILE MANAGEMENT ..................................................................................................................83
    8.1      TRAVELER PROFILE ................................................................................................................................. 83
             8.1.1 Create ..................................................................................................................................... 83
             8.1.2 Modify .................................................................................................................................... 84
             8.1.3 Delete ..................................................................................................................................... 85
    8.2      COMPANY PROFILE ................................................................................................................................. 86
             8.2.1 Create ..................................................................................................................................... 86
             8.2.2 Modify .................................................................................................................................... 86

                                                                                                                                                               -3-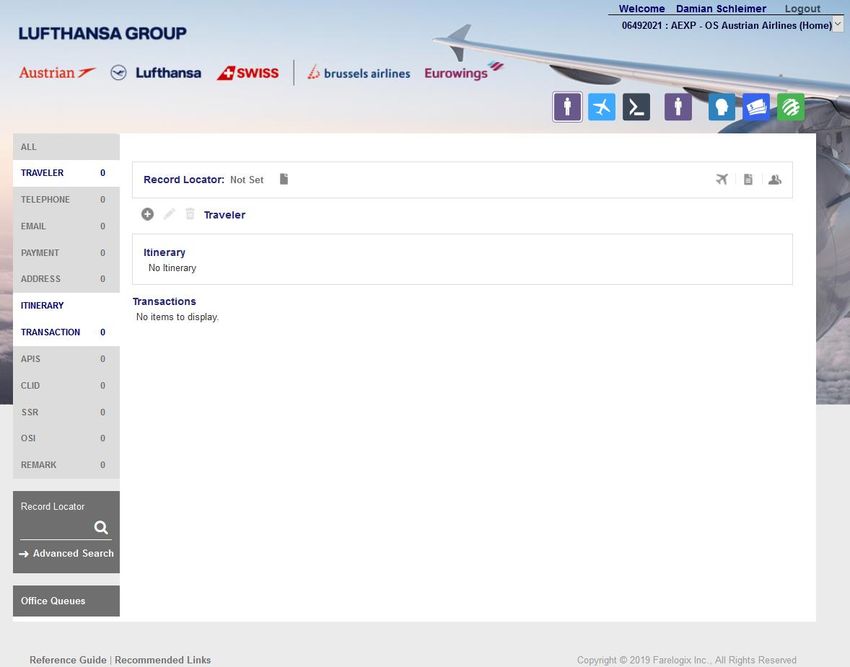
8.2.3 Delete ..................................................................................................................................... 87
               8.2.4 Assign a traveler to a company profile ............................................................................... 88
     8.3       AGENCY PROFILE/AGENCY ADMINISTRATION ......................................................................................... 89
               8.3.1 Create user ............................................................................................................................ 89
               8.3.2 Defined user Roles: .............................................................................................................. 90
               8.3.3 Modify user ............................................................................................................................ 90
               8.3.4 Delete user............................................................................................................................. 90
               8.3.5 Reset user password ............................................................................................................ 90
               8.3.6 2-Factor Reset ...................................................................................................................... 91
9    REPORTS............................................................................................................................................92
     9.1       MIRFLX .................................................................................................................................................. 92
     9.2       COUNTER SALES REPORT (CSR) ............................................................................................................ 94
10   SETTINGS...........................................................................................................................................95
     10.1 USER PREFERENCES ............................................................................................................................... 95
     10.2 PCC BRIDGING ....................................................................................................................................... 95
          10.2.1 Display/Add/Delete Bridging .............................................................................................. 96
          10.2.2 Emulation ............................................................................................................................... 96
11   VERSION ............................................................................................................................................97
12   LEGAL INFORMATION ......................................................................................................................97

                                                                                                                                                       -4-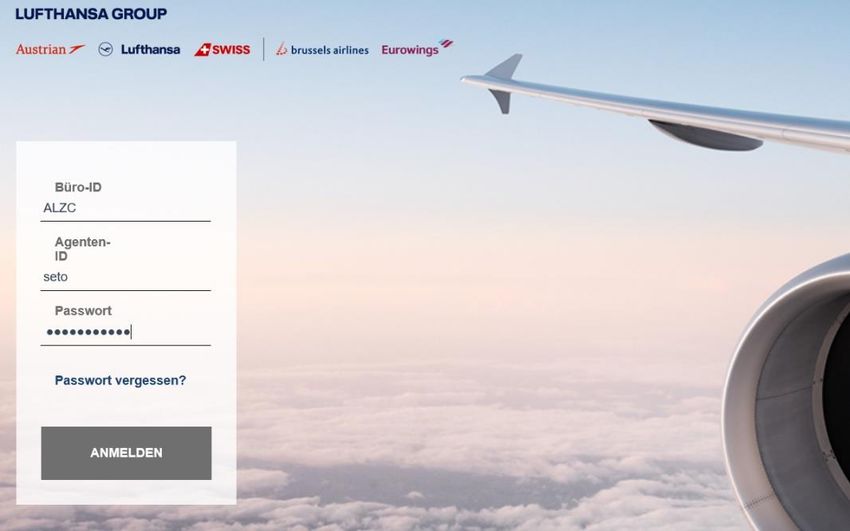
1       Introduction
1.1 Landing page
Use the following link to start the web application:        https://dcwebc.farelogix.com/SPRK-lhg/

1.1.1   Login
To access SPRK, log in entering your 4-letter office ID/PCC, agent ID, and password and confirming with
. The password is case sensitive.

Make sure the Lufthansa Group airlines-branded landing page is shown; if not, please check if you have
used the correct link.

1.1.2   Password reset
The landing page also provides the function of password reset. Therefore, click
 and enter the requested data to receive a password reset
link via e-mail. Make sure the specified e-mail address matches the one
specified in the user settings. If no email address is stored or if it does not
match, the password can not be reset.

If you do not log in to your SPRK account for 90 days, it will be deactivated. The
agency admin has the rights to reactivate SPRK sub-accounts (see chapter 8.3).

For reactivation of agency admin accounts, please contact LHG Direct Connect
Service Support. If an account is then not reactivated within 30 days, it will be
permanently deleted.

                                                                                               -5-
1.2 2-Factor Authentication
1.2.1   Activation of 2-Factor Authentication
The activation of the 2-Factor Authentication will happen at PCC level. Once there is an agreement
between agency and airline to activate this new functionality, all users of the activated PCC will have to use
the 2-Factor Authentication method without exception.

The following steps need to be performed, before a use of 2-Factor Authentication is possible:

    1) Agree with LHG on a specific date of 2-Factor Authentication activation
    2) Download the mobile phone tool or desktop tool (e.g. WinAuth) as per instructions in chapter 1.2.3
    3) Perform initial login to SPRK and link the account with the 2-Factor Authentication tool as
       described in chapter 1.2.4

1.2.2   Prerequisites for 2-Factor Authentication
A 2-Factor Authentication Tool is needed to be able to link it with the SPRK user account. There are several
apps in the market (e.g. Google Authenticator, Microsoft Authenticator, Authy) for mobile phone or
computer. The user can install one of the authentication tools on their device and then link to the SPRK
account in a similar way as described in this document.

Please also bear in mind that you can link only one 2-Factor Authentication Tool with your SPRK account.
That means if you link your SPRK account with WinAuth, you will not be able to link it with Google
Authenticator on your mobile device for the same SPRK account.

If you need to change the device (computer or mobile phone) from where you access SPRK, you need to
request a reset of the 2-Factor authentication. This can be done by your local agency admin (see
chapter 8.3.6). Once the reset has been done, the authentication tool on the new device can be linked again
with your SPRK account.

1.2.3   Examplary application of WinAuth
In the following chapters, we will only show an examplary installation of the WinAuth application on a PC.
WinAuth was selected because it can be used without requiring users to be administrator on their computer
nor to use a separate private mobile device. Other applications can be used on your computer, according to
your IT policy.

Download the WinAuth App from the below weblink: https://winauth.github.io/winauth/
Further instructions for WinAuth can be found on the internet under the below weblink:
https://sf360.zendesk.com/hc/en-au/articles/360025875072-Multi-Factor-Authentication-MFA-How-
do-I-use-WinAuth-
Please mind that the version of the tool can change. At the time of creation of this manual, the current
version was 3.6.2.

There will be no description of a setup on a mobile device due to the variability of tools, hardware and
operating systems. The only difference when setting up the 2-Factor Authentication tool on your mobile
device is that you don’t have to type in or copy the 32-digit code but simply scan a QR code from the SPRK
2-Factor Authentication setup screen.

                                                                                                  -6-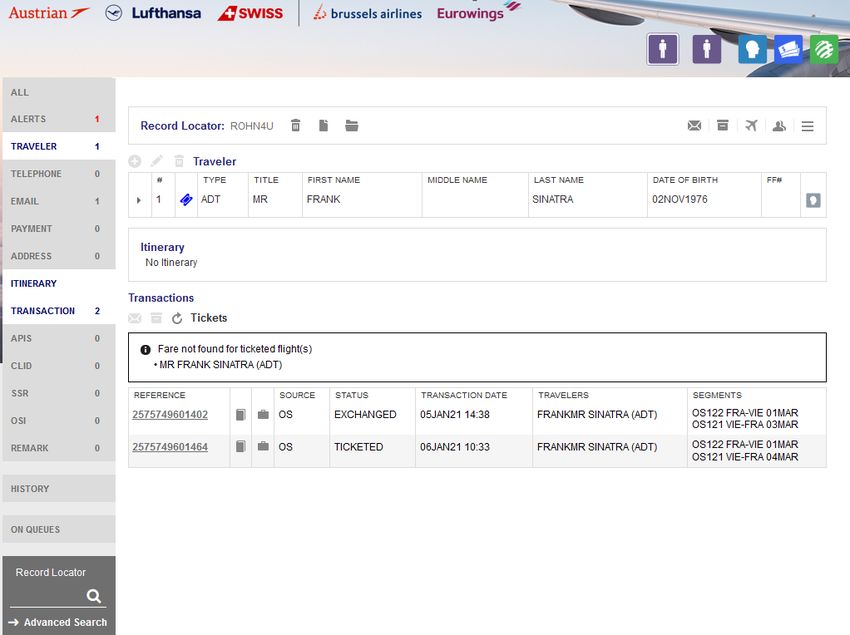
1.2.4   Setup the 2-Factor Authentication in SPRK
Please note that if you link your SPRK account with the WinAuth tool on a certain computer, you will
only be able to login to SPRK where the WinAuth tool can be executed.

1) Open SPKR and sign in with your user and password.

2) The setup page for 2-Factor Authentication appears. Select the 32-digit code and copy it.

3) Start the WinAuth tool and click on “ADD” in the pop-up window (it might be that first you have to click
   through their terms and conditions).

                                                                                               -7-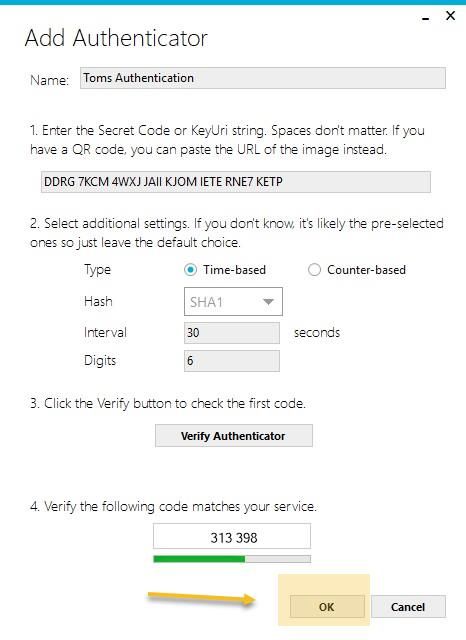
4) The next screen “Add Authenticator” appears. Under the field “Name”, enter any kind of personalized
   name or leave as “Authenticator”.

5) Paste the previously copied 32-digit code from the SPRK setup screen in the WinAuth tool (first step)

6) Leave step 2 as suggested, then click on “Verify Authenticator” in step 3.
   A 6-digit code will appear below step 4.

7) Select the 6-digit code in step 4 and copy, then paste it to the SPRK setup screen and click on
   . (this step needs to be done quickly, as the 6-digit code expires quickly. If this happens, just
   use the next 6-digit code that is generated)

8) You will now successfully enter SPRK and the 2FA setup in SPRK is finished.

                                                                                                  -8-
9) IMPORTANT: You need to finish the setup of your WinAuth Tool. Switch back to your WinAuth tool and
   click on the “OK” button

10) In the next WinAuth screen you can optionally specify a password for the WinAuth tool.

11) Finally, click on “OK” and the setup is completed. The WinAuth tool will start and show a fresh 6-digit
    code that can be used for login with SPRK.

                                                                                                 -9-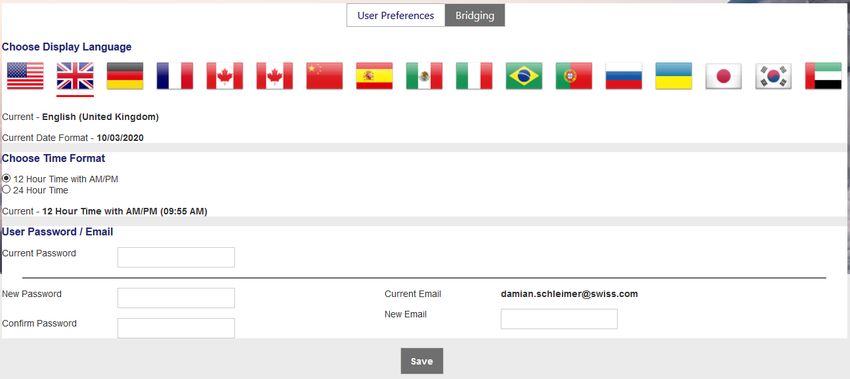
1.3 Reservation Screen
Once logged in, the reservation screen is displayed. This is the main screen from which all other functions
can be used.

                                                                        1

                                                                 2

                                                                                     3

                                  4

          5

                6

                7

                             8

(1)     Log-in information, Log-out button, Agency IATA number, Office-ID (PCC)

(2)     Action icons – see chapter 1.4

(3)     Quick-start options
               Direct sell – usage not promoted
               Quick Traveler function – see chapter 2.1
                 Traveler information from profile – see chapter 2.2

(4)     Display of existing booking information in the PNR

(5)     PNR Toolbox - see chapter 2.3
        Add, modify or delete mandatory/optional PNR information. Click (dark background) to activate
        function to be displayed in the reservation. The number shown equals the quantity of items.

(6)     Advanced Search – see chapter 3.2.2

(7)     Work with Office Queues – see chapter 6

(8)     Opens a new window, accessing the Farelogix SPRK Reference Guide or recommended links.

                                                                                                 - 10 -
1.4 Action Icons
On the top right of the Reservation Screen, there are several action icons that allow you to navigate through
SPRK.
Current Reservation The default icon shows the current reservation (far left).
Add Air To be used to shop for flights and fares - see chapter 3.1
Add Reservation Start a new reservation. Five PNRs can be opened at the same time.
For each itinerary, a “Current Reservation” icon will be created (far
left).
Profile Management Work with traveler, agent or agency profiles - see chapter 8
Reports Download XML data files for usage in mid- and back-office systems
and display sales reports - see chapter 9
Settings Changing language, time format, change/reset user password and e-
mail, access to PCC Bridging - see chapter 10
- 11 -2 PNR (Passenger Name Record)
2.1 Adding passenger data with quick traveler
Using the Quick Traveler Icon in the upper right of the reservation screen can save a lot of time as it
allows all mandatory information to be added at the same time.
Use the drop-down menu to add more passengers.
When completing the form, all data to create a PNR.
2.2 Adding passenger data using profiles
If you have an existing Traveler or Company profile, you can use the stored data to create a new booking.
See chapter 8 for setting up profiles.
Click on the Profile Icon to start the quick profile search option.
You can search by traveler or company name. To view all travelers from one company, activate “List all
associated Travelers”.
Select from the similar name list if the search shows
more than one result.
Click on the traveler’s name to select.
- 12 -All data showing “Auto” Mode will be transferred to the
PNR using the button.
Alternatively, select a single item by clicking on the
button.
returns to similar name list.
returns to search screen.
2.3 Adding passenger data with the toolbox
You can find the PNR toolbox on the left-hand side of the reservation screen.
Click data element (dark background = deactivated) to activate function to be displayed in the reservation
(white background). The number is the quantity of items.
2.3.1 Adding passenger name, DOB and gender
Activate Traveler by clicking on it in the toolbox and click on the Add Icon to add a passenger.
- 13 -Fill in the traveler’s details.
You can select a passenger type code (PTC), add infants and/or add a frequent flyer number.
For additional passengers, click on the Add Icon .
If you add the date of birth and gender, an SSR element with TSA information will be created automatically.
Click on to enter the names into the PNR.
2.3.2 Change/Delete passenger data
Please refer to the Lufthansa Group airlines booking & ticketing policy for the rules of a name correction and
name changes.
- Name corrections (changing up to two characters of the whole name) can only be conducted for
unticketed PNRs where all flights are operated by Lufthansa Group airlines
Choose the line with the name you want to change and click on the button above.
To delete a name, select the line and click on the button.
2.3.3 Telephone
Activate Telephone and click on add to add a passenger.
Select the phone type, add the phone number, select the contact language and click .
On activating the operational contact tick box, SSR CTCM will be created for this passenger.
Back in the reservation screen, select an existing telephone entry and click to modify or to delete the
existing phone number.
- 14 -2.3.4 Email
Activate Email and click on to add an email address.
Add the email, select the contact language, and click .
On activating the operational contact tick box, SSR CTCE will be created for this passenger.
Back in the reservation screen, select an existing email entry and click to modify or to delete the
existing email.
2.3.5 Form of payment
Activate Payment and click on to add a form of payment. Choose between a credit card and other forms
of payment (cash, cheque, invoice), fill in the requested data fields and click .
Back in the reservation screen, select the desired payment entry and click to modify or to delete the
selected form of payment.
- 15 -Important note for UATP cards (e.g. Air Plus):
Once the UATP Company Type is selected and a valid Air Plus card number is entered, Farelogix will
validate the card and enable fields that will be used to provide additional information. Depending on the
way the card is set up, a combination field will appear that are free-form text and will evaluate whatever is
entered into them.
Once the UATP Company Type is selected and a valid Air Plus card number is entered, hitting Enter or
clicking anywhere outside the Number field will validate the card and display fields that will be used to
provide additional information.
Important Note: The UATP card type does not require a CCV code when issuing documents; this differs
from all other supported cards.
2.3.6 Address
Activate Address and click on to add an address element.
Select an existing address entry and click to modify or to delete the selected address.
Back in the reservation screen, select the desired payment entry and click to modify or to delete the
selected address.
2.3.7 APIS
Travelling to some countries requires APIS (Advance Passenger Information System) before issuing a ticket.
If you have already included the date of birth and gender in the name element, the APIS element will be
created automatically.
Activate APIS and click on to add an APIS element. You can then add an APIS PictureID, APIS
Supplementary and Address.
Select an existing APIS entry and click to modify or to delete the selected APIS element.
- 16 -2.3.8 CLID
Activate CLID and click on to add a CLID.
Select an existing CLID entry in the reservation screen and click to modify or to delete the selected
CLID.
2.3.9 SSR
Important note:
Please be aware that in SPRK this function should only be used for non-chargeable services.
Unaccompanied minors should not be booked with this function, instead please refer to chapter 4.2.
2.3.9.1 Add SSRs during the booking process
To add an SSR during flight booking, activate the “SSR” panel in the tool box and click .
- 17 -IATA SSR Code: Choose a (non-chargeable) SSR from the drop-down list.
Text: For some SSR requests, additional text is mandatory. A warning message will occur.
Use the same text formats as in your GDS.
Travelers: Select a passenger or “All” for all passengers.
Segments: Select flight segments or “All” for all flight segments.
your request and you will receive airline feedback on Queue.
Please note:
When adding a telephone number or an email address, there is a little check box labelled “Operational
Contact”. By checking this box, an SSR CTCM or CTCE will be created in the PNR. Therefore, there is no
separate SSR CTCM or SSR CTCE in the SSR drop-down menu as the same result can be achieved with the
“Operational Contact” check-box:
2.3.9.2 Change an existing SSR
Activate the “SSR” panel, select the service that needs to be modified and click .
Make changes in the mask and . The airline response will be given on Queue.
2.3.9.3 Cancel an SSR
Activate the “SSR” panel, select the service that needs to be deleted and click .
- 18 -2.3.10 OSI
Activate OSI (other service information) and click on to add an OSI element.
Add the airline code and additional information in the text box. Click .
The input of the OSI-element for a corporate client number (such as Partner Plus Benefit) must follow the
following format: Airline = YY, Text = CP/LHxxxxxxxxxxx, where CP means corporate program and the x’s
are the designated corporate client number.
Select an existing OSI entry in the reservation screen and click to modify or to delete the selected
OSI.
2.3.11 Remark
Activate Remark and click on to add a Remark.
Use the drop-down menu to select one of the remark types and use the text box for entering text.
Click .
Select an existing Remark in the reservation screen and click to modify or to delete the selected
remark.
- 19 -2.4 History
Using the history button on the reservation screen will open a detailed list of all the actions
that have occurred and have resulted in changes to the PNR.
One of the most powerful features is that the PNR elements can be grouped by dragging
the header up into the space at the top of the list.
For example, click the Category header above to see the effect of dragging it up to the top
panel. See the Glossary of Terms for a listing of the PNR History Categories.
It is sometimes easier to use the Filter to isolate an item in PNR History. To do this, click
the Filter icon to the right of the header, then click the Down Arrow on the Filter box, and
then Select an Item from the menu.
Action Codes:
FLX HISTORY CODE DESCRIPTION
AS / ASA Add Segment
AD Add (catch all) Doc FQTV Commission Seat
AF Add FOP
AR Add Remark
AT Add Ticketing
AOS Add OSI
ASR Add SSR
XSA Delete Segment
XS Delete (catch all) Doc Seat
XF Delete FOP
XFF Delete Frequent Flyer
XR Delete Remarks
XOS Delete OSI
XSR Delete SSR
XT Delete Ticketing
CT Exchange Ticket
CN Change Name
AN Add Name
SP Split PNR
IT Claim PNR
XASC Delete Notification
AASC Add Notification
- 20 -3 Itinerary
3.1 Add Air / Flight Search
Please visit our homepage to see a description, the conditions and FAQs for our Europe fares and Economy
light fare on long-haul flights.
3.1.1 Flight search interface
All flight and fare search functions are provided using the “Add Air” button .
There is no need to enter PNR data before using Add Air functions.
7
1
3
2
4 5 6
(1) Itinerary type: Choose the itinerary type for your search criteria.
Round Trip, One Way, Multi City
(2) Search criteria: Depart/Arrive
Enter 3-letter code or full city name to choose from name list.
Date
Add the date by choosing from the calendar or using one of the
following formats:
15JUL DDMMM
15JUL19 DDMMMYY
15.07.19 DD.MM.YY
Time
Set time preference using the drop-down menu.
(3) Options: Apply more search criteria (e.g., airline, cabin, booking class)
(4) Search Settings: Opens a search setting panel.
See chapter 3.1.2.
(5) Fare Search: Search for the available fares for selected routing.
See chapter 3.1.3.
(6) Air Availability: Availability display for selected routing without fares.
See chapter 3.1.4.
(7) Fare Quote: Fare display for selected routing without availability information.
See chapter 3.1.5.
3.1.2 Flight search settings
Clicking the gear icon opens a search setting panel.
Clicking on one of the options will open the section to enter data:
- 21 -Pricing Options
The first section allows the restriction of a fare
search by type. The options are as follows:
Published Fares:
Fares shown for all markets and agencies
without any negotiation.
Contract Fares:
Also known as Private Fares. These rates are
only available to certain groups of agents, markets or companies.
Both: This is the default setting, which will search by both fare types.
Advance Purchase: Include fares with an advance purchase restriction.
Allow Penalties: Include fares where penalties apply.
Allow Min. Stay: Include fares that have a minimum stay requirement.
Allow Max. Stay: Include fares that have a maximum stay requirement.
Fare Quote Override Options
Checking this box will retrieve a Fare Quote (only!) for a date
that has already passed. Currency override can be used by
entering the IATA currency code. The default is the local
currency of the agency.
The historical pricing function is deactivated and not supported in SPRK.
Travelers
Type: Displays a list of Passenger Type Codes (PTC) that
can be selected for the fare; click the arrow to display the
list.
Travelers: This field confirms the number of passengers with the same PTC included in the pricing
request; click the spinner or enter the number to select.
Travelers Add/Remove: Clicking the Plus allows one or more travelers with a different PTC to the
default traveler to be added.
Fare selection Options:
Enter a ticket designator code to limit the fare search to
that particular code.
Qualifiers:
Pricing Qualifiers are codes associated with Airline-
sponsored to select from the list of Qualifier options, click
the drop-down menu labelled Type.
Tax Exemption Options:
You can apply tax exemption by using one of the following
options:
Apply Exemption to All:
Selecting Yes will apply exemption to all taxes
Government Body:
Free-form text box to enter taxing authority
Country:
Enter first letter to display a Country Code list
Province (CA):
Click the drop-down menu to display Canadian provinces
Tax Code:
Enter tax code
Collection Point:
Enter the first letter of an Airline Code to display a list
Tax Type:
Add tax type
- 22 -Service Filters:
The Services Filter option can be used to narrow the
selection of flights based on the Services offered.
3.1.3 Add flights to shopping cart via Fare Search
Use for the lowest available fares for a requested routing (Best Buy).
2
3
1
5
4
(1) Use and to open/close single fare displays with flight options.
(2) Use to select one of the airline options, departure/arrival time or connections.
(3) Modify your search options
(4) The top row shows the fare families for intercontinental flights. Use the mouse-over
function to receive a list of services included in the fare.
Our Europe fare families will be displayed here on applicable continental flights within
Europe.
(5) The Symbols show which services are included in the offered fare.
Use the mouse-over function to see a description.
Click on the fare to select. For a round-trip, scroll down as you need to select all flight segments.
Once selected, you can add the flights and fare to the shopping cart , open the seatmap or display
all available fares by clicking on .
When opening the Shopping Cart, you can add optional services to your flights – see chapter 4.2.
- 23 -Afterwards, all fare details and tax calculations are displayed.
Clicking on “Fare Information” will give you a first indication if continuous pricing was applied to this offer,
in that case you will find the indicator (/Y) behind the fare basis in the new window.
Clicking on the text boxes (Additional Fare Details, Itinerary Details, Bag Fees) will display further
information regarding each respective category.
The calculation will be stored in the booking after confirming with .
The shopping cart itinerary is then displayed on the reservation screen.
Continue with chapter 3.2.
- 24 -3.1.4 Add flights to shopping cart via Air Availability
Please note that Continuous Pricing is not applied to searches via Air Availability.
Click to start and display a list of flights sorted by departure and travel time.
Choose the desired booking class and click on .
You can add the flight to the shopping cart , store the fare for selected booking class , display all
available fares for the selected flight or do a Best Buy to create a booking and fare for the lowest
available fare.
3.1.5 Fare Quote
Using the Fare Quote button shows a list of fare details, including the fare basis, booking class and fare
restrictions.
The radio button to the right (under the magnifying glass header) opens the corresponding Fare Search
display, which will allow you to select a flight.
- 25 -The display provides basic fare information. You can display the corresponding fare note display using .
- 26 -3.2 Book a flight segment
3.2.1 Store a booking
To save the flights shown in the shopping cart in the airline system, select one or all segments and click
.
Now the Farelogix filekey (Record locator) is displayed and the flight segments show the actual booking
status (HK, HL, etc.).
The Airline Filekey will be shown as reference when hovering the mouse over the fare number (here: 1).
To close the booking or start a new reservation click .
- 27 -3.2.2 Find/Display booking
Allows the entry of a known six-character code that identifies a PNR.
If you do not know the record locator (filekey), use the “Advanced Search” option.
“Advanced Search” provides a wide range of search options.
Search for Reservation: Entering the traveler name will display a list of PNRs matching the criteria
entered.
FLX Advanced Search: Provides an advanced feature to search for PNRs via a flight
number, date range or frequent traveler number.
Search for Ticket/Document: Provides the ability to search for the PNR using the
ticket/Document number.
Claim Reservation: To claim a booking for ticketing. The PNR must be created in “Book-a-
group”.
Flight Stats: Provides the ability to check the status of the flight.
- 28 -3.2.3 Change a booked flight segment
Display the booking, then add the new flights to the shopping cart.
The Itinerary screen is now split into two parts: “Booked – Air” and “Shopping Cart – Air”
Use the pin to select the segments you want to cancel, then activate the check box for the segments you
want to keep. Then click to process the change.
If no fare calculation number is shown in the column “Fare”, it will be necessary to reprice the booking.
Select the booked segments and use the option.
Choose your reprice options and click .
Optional Services will be offered after using . The new fare calculation is displayed. To store the
fare in the booking, use .
- 29 -3.3 Delete a booking
3.3.1 Delete flight segments
Select the segments you want to cancel and click .
4
4
4
44
4
3.3.2 Delete the booked itinerary
To cancel the whole itinerary, use the “bin icon” . This will disable the PNR and you cannot add new
flights to that booking.
Confirm the warning message and you will receive a confirmation that the booking has been cancelled
successfully.
- 30 -3.4 Display/Delete/Recalculate a stored fare
If a fare is stored, the fare number is displayed in the column “Fare”.
Using the mouse-over function gives additional information to the filed fare.
Display fare notes
See chapter 3.4.1
Display/Modify fare calculation
See chapter 3.4.2.
Delete fare calculation
See chapter 3.4.3.
3.4.1 Display fare notes for stored fare
You can display the fare notes for a stored fare using .
If more than one fare exists, you will receive a list to select the fare note you want to display.
Choose “View” or “Mini” to display fare note/mini-rules.
Once the display of all categories is shown, a filter can be set to retrieve only single categories.
3.4.2 Display/Modify fare calculation and endorsements
If you have saved a fare, you can use the pen symbol at any time to call up and change the associated fare
calculation.
Use the “Tax Details” drop-down menu to display all taxes included in the calculation.
- 31 -3.4.3 Delete stored fare
You can delete an existing fare calculation using .
3.4.4 Auto Pricing/Recalculation of fare
Retrieve the booking and select the flights you want to calculate.
Click on to start the calculation.
Choose from the pricing options (see chapter 3.1) and .
If optional services are offered on the flight, you can add them to the booking. Afterwards, you will receive
the calculated fare. To open the calculation, bags fee details, etc., click on the topic of each line.
- 32 -If rebooking (another booking class) is required, use the button to process or
without rebooking.
3.4.5 Manually create a fare
A manual fare can be stored by selecting the flights and using to receive the fare calculation
mask.
All ticket data can be filled in manually or copied from a previous ticket.
- 33 -Use the arrow to view all tax details and to add, delete or modify taxes.
Once the mask has been completed, use to store the fare in the reservation.
3.4.6 Pricing Special Fares with Wildcards
Sometimes it is difficult to price a fare via the general Fare Search or via Air Availability. If you experience
issues with retrieving a special fare such as TOs or any other fares, you can force them by using the
wildcard functionality, as the complete Fare Basis Code is not required anymore.
It is sufficient to enter fare basis elements as Wildcards:
- C-FLEX wildcard “-SFX”
- EU-Cont wildcards “-LGT” for Light/“-CLS” for Classic/“-FLX” for Flex”
“-BXX” for Business Saver / “-BUZ” for Business
- Intercont wildcards “-NN” for non-refundable and non-changeable /
“-NC” for non-refundable and changeable with fee /
“-RC” for refundable and changeable with fee /
“-FF” for Fully Flexible
- Tour operator wildcard “-TO”
1) Click Add Air .
2) Add the desired flight segments to the shopping cart via Air Availability (see chapter 3.1.4).
- 34 -3) Select flight segments and click on price.
4) Add a fare base identifier such as “-TO” or “-CLS” to each Fare Basis Code field as a wildcard,
select the corporate ID or leave the field blank depending on the fare type, and enter the corporate
account code if applicable.
5) The specific fare type can then be revised in the fare information section
- 35 -3.4.7 Baggage Allowance
The button can be used to show the industry standard for calculating excess baggage.
However, please note that Lufthansa Group airlines have their own baggage policy.
Please check the button for information on booking optional additional baggage.
- 36 -3.5 PNR Split
Note: A PNR split is only possible if the PNR contains at least one active flight.
This procedure allows an agent to divide a booking containing multiple passengers. A separate Split action
must be performed for each traveler. The traveler named in the request will receive the new Record Locator
associated with the split PNR. The two reservations will be linked as related reservations, and should be
available via a link.
Select a traveler as the person receiving a new filekey and click on the split icon.
Confirm the warning message and you will receive a new filekey for the previously selected person.
The original (Master) filekey is available at the top of the reservation screen.
You can easily switch to the corresponding reservation selecting the filekey in the drop-down list.
Note: The split process is only completed once you have received a new airline filekey. Use the mouseover
function on the fare number.
If the reference is “PENDING”, please wait until you have received the new airline filekey. You can reload
the booking by clicking on the Farelogix Filekey on top of the reservation screen.
- 37 -4 Ancillary Services
4.1 Advanced seat reservation (ASR)
4.1.1 ASR booking process
After creating the booking, you can book a specific seat using the seat icon on the reservation screen or
clicking the button after selecting the respective flight segments.
Once you have the seat map, use the mouse-over function to display the seat characteristics and price
options.
Select the passenger for whom you want to reserve a seat and mark the selected seats (highlighted) and
.
Back on the reservation screen, the seat icon has changed to (person on a seat). To display the seat
number, use the seat icon or the arrow icon to open the seat details.
In case the seat is subject to charge, it is mandatory to issue an EMD according to the deadline mentioned
in the SSR, otherwise the seat reservation will be cancelled.
See chapter 4.3 for a description of how to issue an EMD.
- 38 -4.1.2 Status of ASR Elements
The status of the requested ASR Elements will be shown as HN.
The status of the confirmed ASR Elements will be shown as HD.
EMDs can only be issued for confirmed ASRs.
The confirmation of ASR Elements can take a few minutes.
4.2 Optional services
4.2.1 Add optional services
Optional services - if offered for the respective flight - can be added after the booking was created or as
post-ticketing process. Select the flight segments for which you want to add the desired services and click
.
- 39 -Add the desired optional services from the list by clicking on the button with the traveler name and service
price, it will then be marked blue. Click Continue to proceed.
The service is requested as an SSR element. The charge will be collected during the issuing process through
an EMD, that will then be displayed in the “Transaction panel”. Please follow chapter 4.3.
4.2.1.1 Baggage (FBAG, SBAG, ABAG)
For additionally added baggage, an SSR will be created upon selecting the service for the desired
passenger. Open payment needs to be collected by issuing an EMD – A as the fulfilment document. See
chapter 4.3.
- First Bag / FBAG is only available when booking Light (LGT) Fares
- Second Bag / SBAG is only available for flights to and from North and Central America
- Additional Bag / ABAG is only available on LX flights
4.2.1.2 Business lounge access
For business lounge access with Lufthansa, an SSR will be created upon selecting the service for the
desired passenger. Open payment needs to be collected by issuing an EMD – A as the fulfilment document.
See chapter 4.3.
If business lounge access has been added for a SWISS flight, the following window will open with a link to
buy the desired lounge access:
- 40 -4.2.1.3 In-Flight Wi-Fi
For FlyNet (LH/OS) and SWISS Connect (LX intercont only), the following window will open with a link to
buy the desired Wi-Fi service:
4.2.1.4 Fixprice / Cash Upgrade
FixPrice Upgrade or Cash Upgrade is offered as a post ticketing service that allows upgrading to an upper
cabin class with a fixed price.
Upgrade Eligibility for LH
Upgrade is offered from six weeks to four hours before departure time
Upgrade is depending on availability of target booking class
LH is the validating carrier for the Ticket/LH Ticket Stock
LH is both marketing and operating carrier
None of the following SSRs exist in the segment(s) and PNR for which FixPrice Upgrade is being
requested:
VDAL MEQT MEDA INAD UMNR STCR AOXY POXY DEPU DEPA EXST CBBG FQTU UPGD PLUS
STAR
Upgrade eligibility with OS
Upgrade is offered from six weeks to four hours before departure time
Upgrade is depending on availability of target booking class
OS is the validating carrier for the Ticket/OS Ticket Stock
OS is both the marketing and operating carrier.
None of the following SSRs exist in the segment(s) and PNR for which FixPrice Upgrade is being
requested:
MEDA INAD UMNR STCR AOXY POXY DEPU DEPA EXST CBBG FQTU UPGD PLUS STAR
Upgrade Possibilities
Economy to Premium Economy Premium Economy to Business
Economy to Business Business to First
Upgrade Process
Choose the flight segments for the upgrade and click (see chapter 4.2.1.)
Select the desired upgrade option for the selected flight segments.
- 41 -Select the preferred method of payment in the bottom of the services window and click .
- 42 -This will create the SSR UPGD and issue an EMD-A as fulfillment document.
Both will be displayed in the updated reservation screen in the itinerary and transaction sections.
Note:
For LH, multiple fixprice upgrades for different flight segments can be fulfilled through a single EMD-A.
For OS, only one flight segment can be upgraded at the time, each upgrade needing a single EMD-A.
4.2.1.5 A la carte dining on Lufthansa long-haul flights
With A la carte dining, Lufthansa offers a selection of seven different à la carte menus for an extra charge.
These culinary meal options are bookable during the initial booking process and as post ticketing service
(until 24h before departure) in SPRK.
Eligibility
Economy on intercontinental Lufthansa flights out of Frankfurt or Munich
Premium Economy on intercontinental Lufthansa flights out of Frankfurt or Munich
Please check our website for the general terms and conditions of this service.
Booking Process
Choose the flight segments for that you want to add the meal service and click (see chapter
4.2.1.)
- 43 -The available meal options are then displayed in the services window. A short meal description and allergy
advice is given. An image of the meal is displayed when clicking on the camera icon .
Select the desired meal option for the selected flight segments and click .
The SSR EDML will be created and the airline system will confirm the service after a short time.
- 44 -After confirmation, the outstanding payment needs to be collected by issuing an EMD – A as fulfilment
document. See chapter 4.3.
4.2.1.6 Unaccompanied minor (UMNR)
Before adding UMNR as a service, review the operating airlines’ rules for this service and follow the given
instructions accordinly.
First add the child as PTC CNN and the date of birth as prerequesites for a successful UMNR service
request.
Then, search for flights as in chapters 3.1.3 or 3.1.4, but select the unaccompanied minor service in the
pricing of optional services window and continue the booking process.
- 45 -In the following pricing overview window, a CNN fare has been priced and the unaccompanied minor
service is selected in the included optional services and shown in summary of all charges.
- 46 -Once the selection has been put in the shopping cart, the respective information is shown when clicking the
arror next to the flight segment. The emerging box below the respective flight segment shows information
about the added services, in this case the UNMR service.
Once the flight segments including the UMNR service are booked and a Farelogix record locator has been
created, the UMNR will be initially shown as pending (HN) until manually confirmed by the airline. Iit may
take a while until this service receives a confirmed (HD) status after the booking was created.
After confirmation, the outstanding payment needs to be collected by issuing an EMD – A as fulfilment
document. See chapter 4.3.
4.2.1.7 Oxygen
The optional service Oxygen will be issued as pending (HN) until manually confirmed by the airline. Thus, it
may take a while until this service receives a confirmed (HD) status after issuance.
- 47 -4.2.2 Delete a chargeable service before document issuance
Chargeable services can be deleted before the EMD is issued.
Therefore click the arrow next to the flight segment to show the added service information.
Then click on the trash bin icon and confirm the pop-up warning to delete the service.
For voiding an EMD on day of issuance, see chapter 4.3.2.
- 48 -4.3 EMD-A
4.3.1 Issue an EMD-A
For the following ancillary services, it is necessary to issue an EMD-A via SPRK:
- OXYGEN
- UNACCOMPANIED MINOR
- SEAT RESERVATION for chargeable seats
- FBAG / FIRST BAG (for LIGHT Fare only)
- SBAG / SECOND BAG (for LX flights to and from North America)
- ABAG / ADDITIONAL BAG (for LX flights only)
- BLG / BUSINESS LOUNGE ACCESS (for LH flights only)
- UPGD / FIXPRICE UPGRADE (only for LH and OS flights)
- EDML / A LA CARTE DINING (only on LH long-haul flights)
a) During the ticketing process:
In one step with the purchase of the “Air Segments”:
Add the desired services to the booking and wait until their status changes to confirmed (HD). Click
the Farelogix record locator to update the booking. Once confirmed, click .
Select the travelers and click .
- 49 -You can also read