Making the Most of Outlook and OneNote in Office 2010 - K2 Enterprises - Copyright 2011. Reproduction or reuse for purposes other than a K2 ...
←
→
Page content transcription
If your browser does not render page correctly, please read the page content below
Making the Most of
           Outlook and OneNote
               in Office 2010
                                           K2 Enterprises

                                                      1
Copyright © 2011. Reproduction or reuse for purposes other than a K2 Enterprises' training event is prohibited.
Making the Most of Outlook and OneNote
            in Office 2010
Contents
Session Description: ..................................................................................................................... 3
Using Outlook 2010 – The Ribbon Interface ............................................................................ 4
   Modifying the Quick Access Toolbar .................................................................................... 4
   Work With the Conversation View (2010 only) ................................................................... 6
   Ignoring a Conversation .......................................................................................................... 7
   Cleaning Up Conversations .................................................................................................... 8
   Acting on Conversations ......................................................................................................... 9
   Quick Steps (2010 only) ......................................................................................................... 10
   Instant Search (2010 only) ..................................................................................................... 12
   Outlook People Pane (2010 only) ......................................................................................... 14
   Outlook Today ........................................................................................................................ 15
   Universal Drag-and-Drop ..................................................................................................... 18
   Using Categories to Organize............................................................................................... 20
   Using Folders and Categories Together.............................................................................. 24
   Using Rules with Folders and Categories........................................................................... 24
   Contacts and Address Books ................................................................................................ 26
   Sharing Contacts with Others............................................................................................... 30
Getting Started With OneNote 2010 ........................................................................................ 34
   What is OneNote? .................................................................................................................. 34
       Working with OneNote..................................................................................................... 35
       Creating new Notebooks and Working with Pages...................................................... 36
       Creating, moving, and deleting sections and pages ..................................................... 37
       Working with subpages .................................................................................................... 37
       Creating a note on a page ................................................................................................. 37

                                                                     2
Copyright © 2011. Reproduction or reuse for purposes other than a K2 Enterprises' training event is prohibited.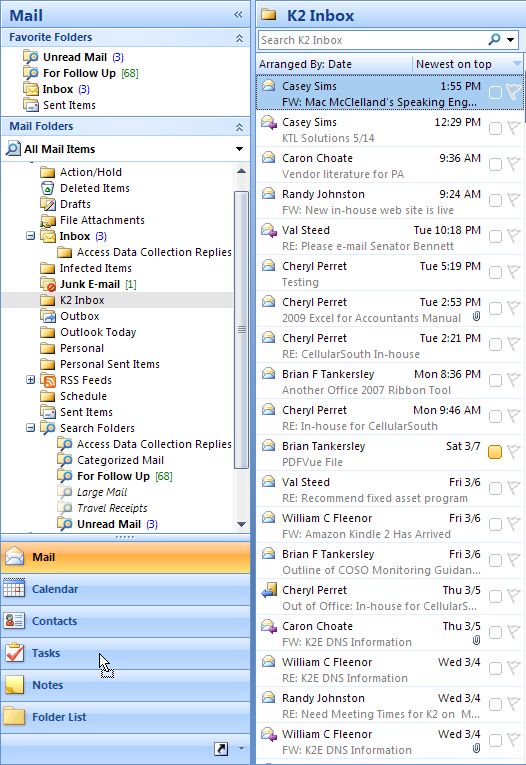
Adding Content to Notes ...................................................................................................... 37
     Working with unfiled notes ............................................................................................. 37
     Copying and pasting content ........................................................................................... 38
     Adding Images from Screen Clippings and Pictures ................................................... 38
     Adding or Recording Audio Video Files ........................................................................ 39
 Formatting Notes.................................................................................................................... 40
 Viewing and Organizing Information................................................................................. 41
     Organizing the user interface ........................................................................................... 41
     Creating multiple page views in new windows ............................................................ 42
     Searching a notebook......................................................................................................... 42
     Creating links to pages, files, or locations ...................................................................... 42
     Tagging notes ..................................................................................................................... 43
     Understanding sections and section groups .................................................................. 43
 Working with Tables.............................................................................................................. 45
     Creating and working with tables ................................................................................... 45
     Formatting tables and data ............................................................................................... 46
     Moving tables and data ..................................................................................................... 47

Session Description:
Do you know what Outlook 2010 and its new sibling, OneNote 2010 can do for you?
Outlook 2010 features Quick Steps, Conversation View, and other time-saving
features which can help you work more effectively. OneNote integrates seamlessly
with Outlook and fills the void that many accountants encounter in keeping track of
daily information. Come find out how Outlook 2010 can save you hours of time per
week, and how you can use OneNote to organize, collaborate, share, search, and
sync your notes with others.

                                                                   3
Copyright © 2011. Reproduction or reuse for purposes other than a K2 Enterprises' training event is prohibited.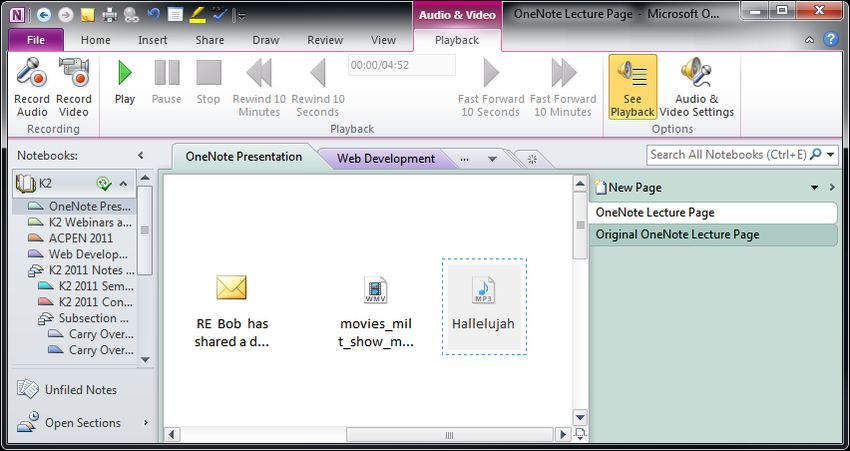
Using Outlook 2010 – The Ribbon Interface
Outlook 2010 users must now deal with the ribbon interface. Those users migrating
from Office 2007 will not face a steep learning curve because Office 2007 used the
ribbon interface. However, those upgrading from Office 2003 or earlier editions will
find the change disruptive at first. The biggest challenge will be to find where
frequently used commands are placed in the ribbon. Notwithstanding the problems you
may encounter, the ribbon provides a number of advantages, among them much better
organization of settings and menu options than found in prior versions. Options are
easy to find and settings are straightforward, as shown in Figure 1.

                             Figure 1 – Setting Section of the Ribbon

Modifying the Quick Access Toolbar
First, users should modify the Quick Access Toolbar (QAT) to improve productivity.
The few minutes that it takes to make these modifications will pay handsome
dividends. K2 instructors recommend making the following changes:

                                                      4
Copyright © 2011. Reproduction or reuse for purposes other than a K2 Enterprises' training event is prohibited.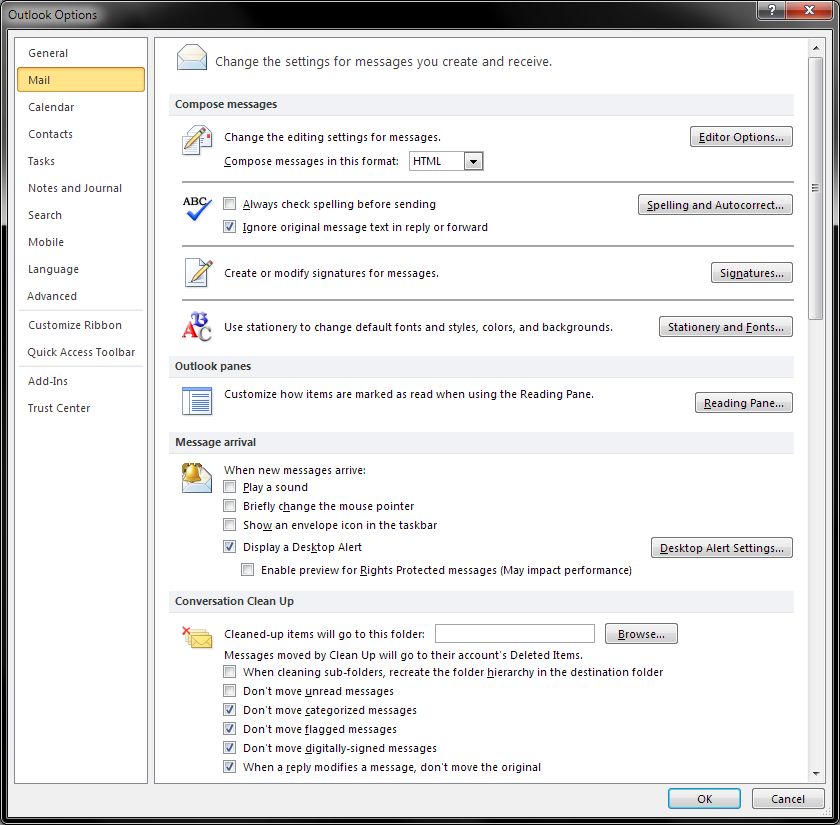
1. Right-click on the QAT and select Show Quick Access Toolbar Below the
      Ribbon. Moving the QAT reduces the amount of mouse movement to access the
      toolbar and makes it easier to read.

   2. Add frequently used commands to the QAT. For example, if you often work on
      slow network connections, add the Work Offline command from the Send/
      Receive tab. Simply right-click on any command in the ribbon and select Add to
      Quick Access Toolbar from the context-sensitive menu.

   3. Customize the QAT to include commands that are not found in the ribbon.
      Right-click on the QAT and select Customize Quick Access Toolbar to open the
      Outlook Options dialog box shown in Figure 2. From here you can commands,
      such as Save All Attachments, as well as rearrange commands or add separators
      to better organize the QAT.

                          Figure 2 – Modifying the Quick Access Toolbar

                                                      5
Copyright © 2011. Reproduction or reuse for purposes other than a K2 Enterprises' training event is prohibited.
Work With the Conversation View (2010 only)
E-mail messages can now be viewed by Conversation. When Conversations are
enabled, messages in the Message List that share the same subject can be viewed in a
single thread. Users can quickly review and act on individual messages or complete
Conversations. Conversations are identified in the Message List with a white arrow
point. The messages within each Conversation are sorted with the newest message at the
top of the expanded list. As new messages in the thread are received, the entire
Conversation is positioned in the Message List in the Date order currently active. When
users click on a Conversation header in the Message List, the newest message in the
thread is displayed in the Reading Pane. Any Conversation that contains unread
messages has a bold subject in the message header along with a count of the unread
messages in the thread. Expanded Conversations display any unread messages with a
bold heading. In default, Conversations can include messages from multiple folders.
For example, messages sent by a user are typically saved in the Sent Items folder, but
will appear and be grouped in a Conversation with messages in the Inbox, as shown in
Figure 3.

              Figure 3 – Conversation Thread Expanded in the Message List

When a message gets two or more responses, a Conversation can split into multiple
related but separate threads, as shown in Figure 4. Click on one of the splits to show the
messages from that split in the Reading Pane. Click on an individual message inside a
split to display its Reply Line - a dotted line that shows the messages to which it replies.
Note that the Conversation in Figure 4 displays the messages using the optional
indented view, which shows the newest message at the bottom of the thread. To use the
indented view, select View, Conversations, Use Classic Indented View.

                                                      6
Copyright © 2011. Reproduction or reuse for purposes other than a K2 Enterprises' training event is prohibited.
Each of the orange circles
represents a separate thread.
Figure 4 – A Single Conversation Split into Separate Threads
To view messages in Conversations, the Message List must be arranged in date order.
To enable Conversations, select View, Conversations, and then check Show Messages
in Conversations, as shown in Figure 5.
Figure 5 – Enabling Conversation View in the Message List
By design, Conversations are grouped by subject. Messages with the
same subject are grouped in a Conversation, even if the messages are
unrelated. This may cause problems for some users who send or receive
messages with commonly used subjects.
Ignoring a Conversation
Users can keep unwanted conversations out of their Inbox by using the Ignore
Conversation command, which moves all received and future messages of selected
conversations to the Deleted Items folder. Messages stored in Sent Items are not moved.
This functionality improves user productivity by acting as a gatekeeper to the Inbox,
7
Copyright © 2011. Reproduction or reuse for purposes other than a K2 Enterprises' training event is prohibited.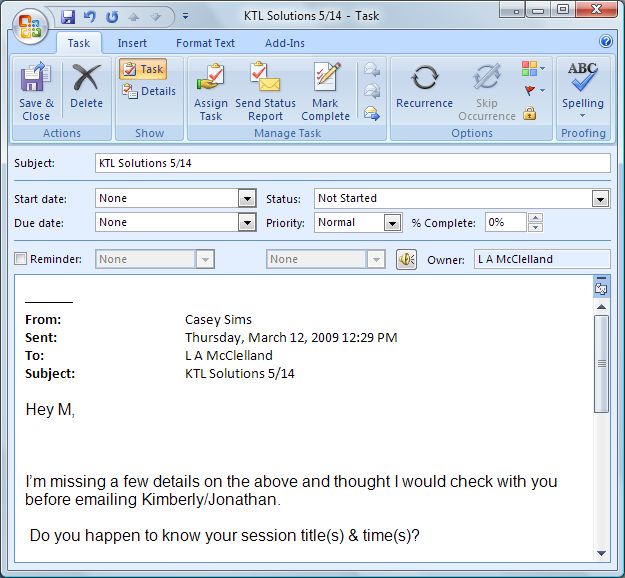
sending unwanted messages directly to Deleted Items without blocking senders or
creating specialized rules.
To ignore a conversation:
1. In the Message List, click on any message in the conversation to be ignored and
then select Home, Ignore, as shown in Figure 6. Click Ignore Conversation to
confirm the action.
Figure 6 – Choosing to Ignore a Conversation
2. If a message related to a conversation to be ignored is open, select Message,
Ignore, also shown in Figure 6. Click Ignore Conversation to confirm the action.
To stop ignoring a conversation:
1. In the Deleted Items folder, select the conversation or any message within the
conversation to be recovered.
2. Click Home, Ignore. Click Stop Ignoring Conversation to confirm the action.
The conversation will be moved back to the Inbox, and future messages will be
delivered.
An ignored conversation can only be recovered if it is still available in
the Deleted Items folder.
Cleaning Up Conversations
Users can reduce the size of a Conversation with the Clean Up command. It moves all
of the older, redundant messages in a conversation to a specified folder. In default,
items are moved to Deleted Items, but users may specify a different folder by selecting
File, Options, Mail, Conversation Clean Up. Individual conversations or all
conversations within a folder or set of folders can be cleaned up with a single
command.
8
Copyright © 2011. Reproduction or reuse for purposes other than a K2 Enterprises' training event is prohibited.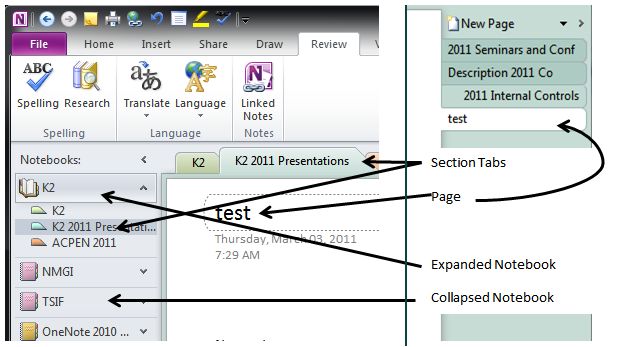
Figure 7 – Cleaning Up a Conversation

To clean up a conversation, select the conversation in the Message List and then click
Home, Clean Up, Clean Up Conversation, as shown in Figure 7. Redundant messages
in the Conversation are moved to the Deleted Items folder. Clean Up always keeps the
most recent message of any thread in the Inbox, along with messages in the
Conversation that are flagged, categorized, or have attachments. Note how six messages
in the conversation in Figure 7 are reduced to two messages, while maintaining the
thread map of the entire conversation. Clean Up frees up space in the Inbox without
losing information by deleting older, redundant messages. To undo a clean-up
operation, find the conversation in Deleted Items and drag it back to the Inbox.

Acting on Conversations
The Conversation view is designed to reduce Inbox clutter and improve user
productivity by grouping e-mail messages into threaded conversations by subject.
Based on research conducted by Microsoft, users can expect a 40% reduction in Inbox
items. User productivity can be improved by acting on an entire conversation rather
than individual messages. As a unit, a conversation can be deleted, moved, categorized,
or marked as read. Once a conversation is categorized, all new messages arriving in that

                                                      9
Copyright © 2011. Reproduction or reuse for purposes other than a K2 Enterprises' training event is prohibited.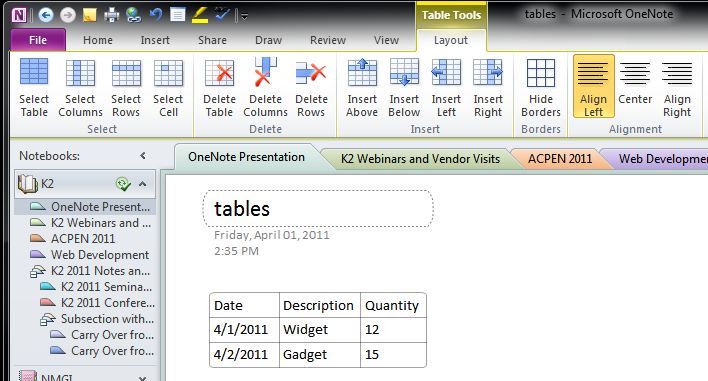
conversation are automatically categorized. Working on a group of messages rather
than on individual messages saves users considerable time. Based on internal research,
Microsoft estimates that the time users spend in the Inbox will be reduced by up to 46%.
Using the Conversations view, users can expect to:

   •   Reduce the amount of visual information in the Inbox by collapsing
       conversations into single items

   •   See entire conversations including related messages in Sent Items or filed in
       other folders

   •   Better understand who replied to whom when reading lengthy conversations

   •   Speed up e-mail activities by acting on Conversations rather than individual
       messages

   •   Quickly hide annoying messages by using Ignore

   •   Trim down the size of the Inbox without losing information by using Clean Up to
       remove older, redundant messages

Quick Steps (2010 only)
Repetitive, multistep procedures can be converted to single clicks with Quick Steps. For
example, if users initiate messages to their managers frequently, the conventional
process requires opening and addressing a new message before composing the message
itself. A custom Quick Step can eliminate the first two steps in the process. Quick Steps
are executed from the Quick Steps gallery on the Home tab, as shown in Figure 8.

                    Figure 8 – Executing Quick Steps from the Home Tab

Outlook has six preconfigured Quick Steps, identified in the following table, that can be
customized or renamed to suit users' needs.

                                                      10
Copyright © 2011. Reproduction or reuse for purposes other than a K2 Enterprises' training event is prohibited.
Quick Step Action
Moves the selected message to a mail folder specified by a
Move to:
user and marks the message as read.
To Manager Forwards the message to a user's manager.
Team E-mail Forwards the message to others in the team.
Moves the message to a specified mail folder, marks the
Done
message complete, and then marks it as read.
Opens a reply to the selected message, and then deletes the
Reply & Delete
original message.
Creates a new Quick Step to execute any sequence of com-
Create New
mands.
The first time a user executes a Quick Step, Outlook prompts the user to specify any
required details and rename the Quick Step if desired, as shown in Figure 9.
Figure 9 – Customizing a Quick Step on First Use
To add additional actions or to customize the Quick Step beyond the simple
customizations illustrated, click Options to open the Edit Quick Step dialog box, as
shown in Figure 10. To access all available options, click the Show Options link. In this
case, notice that the subject, flag, and importance can be set along with a custom text
11
Copyright © 2011. Reproduction or reuse for purposes other than a K2 Enterprises' training event is prohibited.message and a keyboard shortcut. More importantly, additional actions can be added to
the Quick Step so that multistep processes can be accomplished with a single click.
To edit an existing Quick Step, click the drop-down arrow in the lower right-hand
corner of the Quick Step gallery and select Manage Quick Steps.
Figure 10 – Adding More Complex Customizations to a Quick Step
Instant Search (2010 only)
Outlook 2007 introduced Instant Search but Outlook 2010 makes it significantly easier
and more intuitive for users to narrow their search results by adding search criteria.
Whenever users click in the Search box at the top of the Message List, the Search Tools
contextual tab is displayed, as shown in Figure 11. Users can select from a wide variety
of criteria – From, Subject, Has Attachments, etc. – and can select from a list of locations
to search – Current Folder, All Subfolders, All Mail Items, or All Outlook Items.
12
Copyright © 2011. Reproduction or reuse for purposes other than a K2 Enterprises' training event is prohibited.Figure 11 – Search Tools Contextual Tab
Instant Search is available in all Outlook folders – Mail, Calendar, Contacts, Tasks,
Notes, or the Journal. Look for the Search box at the top of the main application
window in folders other than Mail, or press CTRL + E to access Instant Search from any
folder location. Note that search field criteria are specific to the type of folder being
searched. If the desired criteria are not exposed on the Search Tools contextual tab, click
More for a complete list of search fields. The criteria for the ten most recent searches are
maintained on the Recent Searches drop-down list, as shown in Figure 12.
Figure 12 – Ten Most Recent Searches are Maintained for Easy Reuse
13
Copyright © 2011. Reproduction or reuse for purposes other than a K2 Enterprises' training event is prohibited.Outlook People Pane (2010 only)
The new Outlook Social Connector connects users to social and business networks that
they frequent. Users can connect to SharePoint, Windows Live, and popular third-party
sites, such as Facebook, LinkedIn, or MySpace. Users can view the profiles and updates
of existing friends and add new connections without leaving Outlook. Connecting
Outlook to a social network requires a connector published by a third-party network or
Microsoft for SharePoint and Windows Live.
Figure 13 – Outlook People Pane
14
Copyright © 2011. Reproduction or reuse for purposes other than a K2 Enterprises' training event is prohibited.With Outlook Social Connector, users can:
• Synchronize their contact data into Outlook and obtain information about their
friends and colleagues.
• See status updates from various networks and view recently posted files or view
shared photos.
• Connect to SharePoint Server 2010 social data and receive updates from their
workplace, such as newly posted or tagged documents, or recent site activity.
• Easily track the communication history of correspondents by viewing related
Outlook content, such as recent e-mail conversations, meetings, or shared
document, as shown in Figure 13.
Outlook Today
Outlook Today is the home page of Outlook, a web-based dashboard interface to a
user's messages, calendar, and tasks. To open the dashboard, click on the Outlook
Today button located on the Advanced toolbar, as shown in Figure 14.
Figure 14 – Access Outlook Today from the Advanced Toolbar
The dashboard, shown in Figure 15 flanked by a docked Navigation Pane on the left
and a docked To-Do Bar on the right, is customizable and can be configured to open
automatically when Outlook is opened.
The dashboard shown in Figure 15 displays the standard two-column look with a user's
calendar on the left and message folders and task list on the right. Each of the section
headings – Calendar, Messages, and Tasks – are clickable links that take users directly
to their calendar, inbox, and task list respectively.
15
Copyright © 2011. Reproduction or reuse for purposes other than a K2 Enterprises' training event is prohibited.Figure 15 – Outlook Today Dashboard
Within each section are clickable links to individual calendar items, message folders,
and tasks. This dashboard allows users to see all of their actionable items in a single,
clickable user interface, similar in look, feel, and action to a web page.
To customize the dashboard, click on Customize Outlook Today in the upper right-
hand corner of the display to open the Customize Outlook Today panel, as shown in
Figure 16. The panel allows users to set startup options, choose folders to display and
their display order, select tasks to display and their display order, and modify the look-
and-feel style of the dashboard.
16
Copyright © 2011. Reproduction or reuse for purposes other than a K2 Enterprises' training event is prohibited.Figure 16 – Customizing Outlook Today
Note that the folder list displayed in Outlook Today can include folders
other than message folders. In fact, the list can include any folders, such
as Contacts or Notes. Also note that the order of folder display can be
altered from the default ascending alphabetic order. Simply remove all
checks from the folder list and then click OK. Reopen the folder list and
carefully check the folders to be displayed in the order that the folders are to
be displayed. Click OK to complete the process.
17
Copyright © 2011. Reproduction or reuse for purposes other than a K2 Enterprises' training event is prohibited.Universal Drag-and-Drop
The interface of Microsoft Outlook allows users to drag-and-drop items to organize or
create new items. Here are some of the ways that users can quickly and easily organize
their communications, calendar and tasks:
1. Drag messages from the Inbox and drop them into other folders in the folder list
to organize them.
Figure 17 – Using Drag-and-Drop to Create a New Task from a Message
18
Copyright © 2011. Reproduction or reuse for purposes other than a K2 Enterprises' training event is prohibited.2. Drag messages to the Tasks button in the Navigation Pane to create new tasks,
as shown in Figure 17. In default, the subject of the message becomes the title of
the task, and the message body is contained in the task notes.
3. Drag messages to the Task List on the To-Do Bar. This flags the messages for
follow up with a due date consistent with the date group into which the
messages were dropped.
4. Drag messages and drop them into existing Tasks. The messages become
embedded or attached items.
5. Drag messages to the Contacts button on the Navigation Pane to create new
contacts from the sender information in the message. The message body is
added to the Notes field of the contact.
6. Drag messages to the Calendar button on the Navigation Pane to create new
calendar items. In default, the subject of the message becomes the title of the
calendar item, and the message is contained in the calendar notes.
7. Drag messages to the appropriate dates on the thumbnail calendars in the To-Do
Bar to create new calendar items. In default, the subject of the message becomes
the title of the calendar item, and the message is contained in the calendar notes.
8. Drag contacts to the Mail button in the Navigation Pane to create a new message
addressed to the contacts.
9. Drag tasks to the Calendar button on the Navigation Pane to create new calendar
items. In default, the title of the task becomes the title of the calendar item, and
the task detail is contained in the calendar notes.
10. Drag calendar items to the Mail button on the Navigation Pane to create new e-
mail messages. In default, the title of the calendar item becomes the subject of
the message, and the calendar detail is included in the message body.
11. Drag messages to the Notes button on the Navigation Pane to create new notes.
In default, the message body becomes the note body.
The purpose of the preceding discussion is to make clear that the user interface in
Microsoft Outlook supports universal drag-and-drop. Almost any Outlook item can be
used to create another Outlook item quickly and easily using this process. This
functionality eliminates the need to rekey information and dramatically improves user
productivity.
19
Copyright © 2011. Reproduction or reuse for purposes other than a K2 Enterprises' training event is prohibited.Using Categories to Organize
Categories are a color-coding and tagging system to organize messages within folders
and across multiple folders. Think of categories as virtual folders, similar in operation to
labels in Gmail. With categories there is no need to create a complex folder structure.
Messages and other Outlook items can be assigned to one or more categories, which
allow users to access those items quickly and easily. Outlook comes with a number of
predefined categories, but users can customize the list to meet their own needs. Each
category is associated with a user-specified color so that messages and items can be
visually identified with a category.
To assign a category to a message:
1. Right-click on the Category Box for the item of interest in the Message List and
select the appropriate category. Alternatively, click on the Categories button on
the Standard tool bar as shown in Figure 18.
Figure 18 – Assigning a Category to a Message
Figure 19 illustrates the process and effect of assigning a category to an e-mail message.
Note that the Category Box is now filled with the color assigned to the category, and the
message header has been modified to include an identically colored bar with the name
20
Copyright © 2011. Reproduction or reuse for purposes other than a K2 Enterprises' training event is prohibited.of the category assigned. This allows users to visually distinguish messages of one
category from another quickly and easily.
Figure 19 – Effect of Assigning a Category to a Message
To assign multiple categories to a message, repeat the process for assigning a single
category for the requisite number of categories. Alternatively, click All Categories, near
the bottom of the category list, and check the categories to be assigned to the message or
other Outlook item, as shown Figure 20.
21
Copyright © 2011. Reproduction or reuse for purposes other than a K2 Enterprises' training event is prohibited.Figure 20 – Assigning Multiple Categories to a Message
Note that categories may be created, renamed, or deleted in the Color Categories dialog
box. Follow along with your instructor as we create, rename, and delete several
categories.
Earlier, categories were described as virtual folders that could be used to group
messages with similar characteristics. To view the categories as a group, simply select
one of the built-in search folders, Categorized Mail, from the folder list as shown in
Figure 21.
Figure 21 – View Messages in Categories as Virtual Folders
22
Copyright © 2011. Reproduction or reuse for purposes other than a K2 Enterprises' training event is prohibited.All mail that has been assigned one or more categories will be displayed in the message
list within groups that can be expanded or collapsed to display the desired messages.
Messages that have been assigned to more than one category will appear in each group
to which it has been assigned. All categorized messages will appear in their respective
groups, regardless of the physical folders in which the messages reside. In other words,
categories act as virtual folders, organizing messages across multiple physical folders to
provide quick and easy access to messages with some common characteristics.
Figure 22 – E-mail Displayed in Groups by Category
Figure 22 shows e-mail grouped by category in the Message List as it is displayed by
the built-in Search folder, Categorized Mail. Note how the same message appears in
two categories. This functionality makes it easy for users to organize messages for later
access, even when a single message fits logically into two or more categories.
23
Copyright © 2011. Reproduction or reuse for purposes other than a K2 Enterprises' training event is prohibited.Using Folders and Categories Together
Folders and categories should be thought of as complementary functionality that can be
used together for more effective organization. For example, folders could be used to
provide a simple high-level organization structure, while categories could be used to
provide additional levels of detail. While folders provide an intuitive organizational
structure for most users, each message can only be stored in a single folder unless
multiple copies of a message are made. Further, dealing with a complex folder structure
reduces productivity. Categories overcome these disadvantages by allowing messages
to be logically associated without the necessity of creating or maintaining a complex
folder structure.
Categories are best used to organize work. They provide a visual cue to easily and
quickly determine from or to whom messages were received or sent, the project or team
with which they were associated, whether they're personal or business-related, or
whether they are identified with any other important characteristic. They are especially
useful for messages that require grouping across several characteristics. For example, a
single message concerning a meeting with a key client may need to be organized by
who requested the meeting, the type of engagement, and the staff member in charge. In
this case, three categories could be assigned to the message without requiring a complex
folder structure.
Using Rules with Folders and Categories
Generally, rules are used to perform some action on messages automatically as they are
sent or received. For example, rules can be used to move messages from someone or
containing specific words in the subject to a folder, or they can be used to assign
messages to a category. Rules automate what would otherwise be manual processes
and are synergistic when used in conjunction with folders and categories. In other
words, rules can be used to automate the process of organizing messages.
To create a rule to move messages from other staff members of the same organization to
a Company Inbox:
1. Create a new first-level folder named Company Inbox in the folder list. (This step
is not absolutely necessary because users can create new folders as part of the
rule building process.)
2. From the menu, select Tools, Rules and Alerts to open the Rules and Alerts
dialog box.
3. Click New Rule on the E-mail Rules tab to start the Rules Wizard.
24
Copyright © 2011. Reproduction or reuse for purposes other than a K2 Enterprises' training event is prohibited.4. Select Move messages from someone to a folder in the Stay Organized section
of the Step 1 selection box.
5. In the Step 2 section box, click on the people or distribution list link to open the
Rule Address dialog box. Select the senders or distribution list to which the rule
is to apply and click OK.
6. Then, click the specified folder link and select the Company Inbox folder in the
Rules and Alerts dialog box. Click OK. Note that folders can be created in this
dialog.
7. Click Next, Next, Next, Next. In the Finish rule setup pane, give the rule a
descriptive name, click Finish, and then click OK to complete the process, as
shown in Figure 23.
In this simple rule, multiple senders were selected from the address book. If your
organization has a large staff, selecting individual senders would be a cumbersome
process. In these circumstances, the best course of action would be to start from a blank
rule and move all messages with some specified text in the sender field to the Company
Inbox. The specified text would be the domain name of the organization, such as
k2e.com, which would catch all internal messages. Follow along with your instructor as
we explore starting from a blank rule.
If a user has multiple rules, the rules execute in order from the top of the
list to the bottom as displayed in the Rules and Alerts dialog box. Keep
in mind that the order in which the rules execute affect the effectiveness
of the process. If rules are not working properly, use the arrows above
the rules list to move rules up and down in the list to affect the order of
execution. Note also that a rule can be enabled or disabled using the
checkbox to the left of a rule name.
25
Copyright © 2011. Reproduction or reuse for purposes other than a K2 Enterprises' training event is prohibited.Figure 23 – Creating a Rule to Move Messages to a Company Inbox
Contacts and Address Books
The Address Book is a container for working with Contacts folders and other address
lists, such as the Global Address List (GAL) if an organization uses Microsoft Exchange
Server. In default, the Outlook Address Book, which is created automatically, contains
all of the contacts in the main Contacts folder, the GAL, and any additional contacts
folders that have been created by a user. The Address Book is opened each time a
message is addressed by clicking the To, Cc, or Bcc buttons in a new message window,
as shown in Figure 24.
26
Copyright © 2011. Reproduction or reuse for purposes other than a K2 Enterprises' training event is prohibited.Figure 24 – Accessing the Address Book from a New Message
The Address Book displays a contact's name, display name and e-mail address or fax
number. Distribution lists are displayed in boldface. Note the drop-down list used to
display specific address lists. Also note that each contact may have multiple address
book entries, one for each e-mail address or fax number contained in the contact record.
The Address Book presents two of the most common frustrations experienced by
Outlook users: 1) a user's desired contact list is not displayed in default, requiring a user
to select the appropriate list each and every time the Address Book is used, and 2) the
contact list is displayed in ascending alphabetical order by first name rather than last
name.
To change the default address list:
1. From the menu, select Tools, Address Book to open the Address Book dialog
box.
27
Copyright © 2011. Reproduction or reuse for purposes other than a K2 Enterprises' training event is prohibited.2. In the Address Book dialog box, select Tools, Options from the menu to open
the Addressing dialog box.
3. In the Addressing dialog box, select the desired address list from the Show this
address list first drop-down menu, as shown in Figure 25.
4. Click OK and then close the Address Book.
Figure 25 – Selecting the Default Address List in the Address Book
To change the display order of contacts in the Address Book:
1. From the menu, select Tools, Account Settings to open the Account Settings
dialog box.
2. In the Account Settings dialog box, select the Address Books tab.
3. Select the address book for which the display order is to be changed and click
Change to open the Microsoft Office Outlook Address Book dialog box.
28
Copyright © 2011. Reproduction or reuse for purposes other than a K2 Enterprises' training event is prohibited.4. Select File As (Smith, John) as the Show names by display order, as shown in
Figure 26.
5. Click Close, Close to complete the process.
Figure 26 – Changing the Name Display Order in the Address Book
Note that the File As display order is last name, first name in default. If a
user has changed the File As setting from the default for any contacts,
the custom settings will persist in the Address Book.
The File As order can be modified in the general settings of each
individual contact record. The global File As order can also be modified.
From the main menu, select Tools, Options and then click Contact
Options on the Preferences tab.
29
Copyright © 2011. Reproduction or reuse for purposes other than a K2 Enterprises' training event is prohibited.Sharing Contacts with Others
There are three primary methods of sharing contacts with other users: 1) attaching
contacts or business cards to a message and sending it to the intended recipient, 2)
sharing via Exchange, or 3) exporting contacts to a file that can be imported by another.
Attaching a contact to an outgoing message is a simple process. Click Attach Item on
the Message tab, select the Contacts folder in the Look in box, and then select the
contact or contacts to be attached, as shown in Figure 27. Use CTRL + Click to select
multiple contacts.
Figure 27 – Attaching Contacts to a Message
Alternatively, click Business Card on the Message tab and select Other Business
Cards. While this process is normally used for attaching the business card of the sender,
30
Copyright © 2011. Reproduction or reuse for purposes other than a K2 Enterprises' training event is prohibited.any contact can be attached as a business card. Note that this method attaches cards to
messages as well as inserts cards in the body of messages. Again, use CTRL + Click to
select multiple contacts.
Contacts can be sent to others directly from the Contacts folder. Select a single contact
or multiple contacts using CTRL + Click, and then right-click to select Send Full
Contact. Select the contact format, either In Internet Format (vCard) or In Outlook
Format, to create an automated message for communicating the contacts to the intended
recipient.
Recipients can add these attachments or business cards to their contacts by dragging the
attachments or cards to their Contacts folder. If a contact with the same name exists,
users will have the opportunity to update their existing contact or to create a new one.
Figure 28 – Sharing Contacts in Exchange
In default, the recipient will be granted access to your Contacts folder with Reviewer
(read-only) permissions. To change or remove permission levels for shared users, right-
click on a shared folder and select Change Sharing Permissions from the context-
sensitive menu, as shown in Figure 29. Select a user and then select the Permission
31
Copyright © 2011. Reproduction or reuse for purposes other than a K2 Enterprises' training event is prohibited.Level desired. Click OK to apply the change. To remove a user's access permissions,
select the user and click Remove.
Figure 29 – Changing Shared User Permissions
Outlook has a full range of built-in permissions. The following list identifies the built-in
permission levels and the rights conferred to shared users:
• Owner – Create, read, modify, and delete all items and files, and create
subfolders. As the folder owner, you can change the permission levels others
have for the folder.
• Publishing Editor – Create, read, modify, and delete all items and files, and
create subfolders.
• Editor – Create, read, modify, and delete all items and files.
• Publishing Author – Create and read items and files, create subfolders, and
modify and delete items and files you create.
• Author – Create and read items and files, and modify and delete items and files
you create.
32
Copyright © 2011. Reproduction or reuse for purposes other than a K2 Enterprises' training event is prohibited.• Contributor – Create items and files only. The contents of the folder do not
appear.
• Reviewer – Read items and files only.
• None – No permission; no folder access.
• Custom – Perform activities defined by the folder owner.
Note that a delegate can only be granted Author or Editor permissions.
In a shared contacts folder, all contact details are available to those sharing the folder.
To make the details of a specific contact private, open the contact and click Private on
the Contact tab, as shown in Figure 30.
Figure 30 – Marking a Contact Private
Users can access folders shared by other Exchange users. Simply click Open Shared
Contacts in the Navigation Pane, enter the e-mail address of the user sharing the
Contacts folder of interest, and click OK. If a user has been granted permission to access
the requested Contacts folder, it will appear and be accessible in the People's Contacts
group on the Navigation Pane. If a user does not have the requisite permission,
Outlook denies access but provides an easy means for requesting access, as shown in
Figure 31.
Figure 31 – Denial of Access to a Shared Contacts Folder
33
Copyright © 2011. Reproduction or reuse for purposes other than a K2 Enterprises' training event is prohibited.Getting Started With OneNote 2010
What is OneNote?
Microsoft OneNote is a computer program for free-form information gathering and
multi-user collaboration. It is used to gather users’ notes, drawings, and audio in one
place, much like the bound paper journal of past years. OneNote 2007 and later can also
be used to share information with other users of Microsoft OneNote 2007, or later, via
the Internet.
Microsoft OneNote could be thought of as a basic word processor where users can enter
typed text, create tables, and insert pictures. However, unlike a word processor, users
can simply write anywhere in the document page by clicking or taping on the location
where they wish to enter data.
One of the nicest features of OneNote is that the user does not need to issue a save
command as Microsoft OneNote automatically saves every change in real time when
the change occurs.
Information in Microsoft OneNote is saved in Pages which are organized into
Notebooks. OneNote's interface is an electronic version of the traditional binder
approach which is used for making notes, and for gathering materials related to the
subject.
OneNote notebooks are designed for collecting, organizing, and sharing what you
might think of as unpolished materials; while word processors are usually targeted at
creating a document in a final, to be published form. The difference shows in certain
features and characteristics: Pages can be arbitrarily large; images can be pasted into a
Page without quality loss; there is no support for enforcing a uniform page layout or
structure. Pages can be moved inside the binder, annotated with a stylus, word-
processing or drawing tools. Users may add embedded multimedia recordings and web
links. OneNote's file format (.one) is proprietary. The published API has resulted in a
small number of extensions being written. While OneNote is most commonly used on
laptops or desktop PCs, it has additional features for use on Tablet PCs using a stylus.
OneNote provides integration of search features and indexing into a free-form graphics
and audio repository. Images (e.g., screen captures, embedded document scans, or
photographs) can be searched for embedded text content. Electronic ink annotations can
also be searched as text. Audio recordings can also be searched phonetically by giving a
text key, and can be replayed, concurrently, with the notes taken during the recording.
Its multi-user capability allows offline editing and later synchronization and merging at
the paragraph level. This makes it a tool for workgroups that collaborate on research
34
Copyright © 2011. Reproduction or reuse for purposes other than a K2 Enterprises' training event is prohibited.whose members are not always online. OneNote is designed as a collaborative tool and
allows more than one person to work on the same page at the same time, making it a
shared whiteboard tool as well.
Let’s begin working with OneNote.
Working with OneNote
OneNote launches from an icon or Start Menu list. You will notice when you open
OneNote that the layout is similar to other Office Suite products as OneNote uses the
now popular Ribbon navigation.
Organize a Notebook (left) Into
Sections (top) with Pages &
Subpages along the side.
Insert text or multi-media
files anywhere on a page.
Opening, closing, and saving notebooks
The left Notebook navigation pane shows what Notebooks are available for you to use.
Clicking on a Notebook selects that Notebook. If a Notebook is not open and available,
right click on the Notebook navigation pane and select Open Notebook, or click on the
File (Backstage) Tab and select Open to open an existing Notebook or create a new one.
To close a Notebook, right click on the Notebook you wish to close from the left
Notebook Pane and selecting the Close option.
35
Copyright © 2011. Reproduction or reuse for purposes other than a K2 Enterprises' training event is prohibited.You may close OneNote completely from File Exit.
There is no need to save changes before closing OneNote or a notebook. OneNote saves
everything you enter into it automatically in real-time.
Also, OneNote never completely shuts down unless you close it from the Icon Tray.
Even then, it is still running in memory and will automatically start when you boot
your Windows computer until you change the option to open on Start Up. To save a
specific Page, Section or Notebook, click on File, Save As. OneNote can save any
Notebook or Page as a Word, PDF, XPS, or Web Page.
Creating new Notebooks and Working with Pages
When you first open OneNote, you will notice a few default Notebooks provided for
you. Close any of these you think you may not use. If you change your mind, you can
always reopen them. Notebooks are saved in My Documents/OneNote Notebooks. To
create a new Notebook, right click on the Notebook Navigation Pane, select Notebook
and complete the form window that is presented.
36
Copyright © 2011. Reproduction or reuse for purposes other than a K2 Enterprises' training event is prohibited.Creating, moving, and deleting sections and pages
Notebooks are composed of Sections (the tabs along the top), Pages, and Subpages
(listed down the right hand panel). These are created similarly to Notebooks by right
clicking in the Section bar along the top for a new Section, or in the Pages Panel along
the right-hand side, or from the drop down at the top of the Pages Panel.
Working with subpages
You can continue to enter data onto a Page almost indefinitely, but creating subpages
allows you to better organize topics. Subpages will roll up into the Page tab they are
under, so to navigate to a Subpage, click on the roll-out arrow on the appropriate Page
tab. If there is no roll-out arrow, there are no subpages. If the subpage tabs are left open
to view, you will notice that the text is slightly indented to indicate an outline of pages.
Note that Subpages are
indented under a Page and can
roll-up by clicking on the Page,
or the down arrow to conserve
space.
Creating a note on a page
To create a note, simply click anywhere on a page and begin typing; OneNote is free
form. Note boxes will expand to the right as you type. Each note is surrounded by a
frame. To move the frame anywhere on the page, simply move the cursor over the frame
or the top frame bar, left click and drag. By right clicking in the box, you will see
options to cut, move, and copy the note, as well as more advanced options.
Adding Content to Notes
Working with unfiled notes
You can create a note on the fly by pressing the Windows button and the letter N. This
will open a window for you to enter an unfiled note, which you can come back later and
37
Copyright © 2011. Reproduction or reuse for purposes other than a K2 Enterprises' training event is prohibited.expand, move, or delete. These types of quick notes may also be referred to as Side-
notes.
Copying and pasting content
Content can come from almost anywhere you can Ctrl-C or use the Copy command to
copy text or images to the Clipboard. First, select and copy the information from the
application, such as Word for example. Then, open OneNote, select the Notebook to
include, click on the page tab and Ctrl-V, or Home Paste command to paste the
information. If you want to paste to a new page, hover over the page tab where you
want to insert a new page and move your cursor slightly to the right. You will see a
small box appear. Simply move up or down and click on the new page box to insert an
untitled page and then paste your text and rename the page.
Adding Images from Screen Clippings and Pictures
At some point, you may want to add a clip from a screen to a notebook. Clipping
information from a web-page is a common example.
1. Open the application or screen containing whatever data you wish to capture.
2. Locate the cursor at the location on the Notebook Page where you want to paste
the screen clip and click.
3. From the OneNote Insert Tab, click on Screen Clipping; your screen will turn
pale and cross hairs will appear.
4. Move the cursor to where you want to start the clip and then left click and drag,
encompassing the area you want to capture, and then release the left mouse key.
The selected information will appear as a clip in OneNote at the location you
selected.
To add a picture to a notebook page:
1. Click on the location of a page where you want the image to appear
38
Copyright © 2011. Reproduction or reuse for purposes other than a K2 Enterprises' training event is prohibited.2. From the OneNote Insert Tab select Picture.
3. Navigate to the picture you want to capture. If the file you are looking for is of a
specific format, you can select that from the Insert Picture window to the right of
the File name box.
4. Select the image you want by clicking on it and it will appear on your OneNote
page.
Adding or Recording Audio Video Files
1. Click on the Insert Tab and Attach File, and then navigate to the file you wish to
attach.
2. Select the audio file and it will be copied and embedded into the note page.
3. Left click on the icon and drag it to the location on the page you would like to
display the icon and filename.
4. When an audio or video file is selected, you will see a new Audio & Video
Contextual Tab on the Ribbon. This ribbon, when selected, includes the
navigation buttons you will need, as well as Audio & Video Settings button for
changing default settings.
When you select an audio file,
an Audio & Video Contextual
Tab appears with the icons you
need to play or record.
To record an audio comment, or what is being said around you, click on the Insert Tab
and Record audio. As the recording is continuing, you may also type in brief notes that are
tied back to the audio recording so that you can come back later and listen to specific cut outs of
the entire recording. Coming back later and hovering on specific text will cause a play
button to appear on the right. Click the play button to listen. This same technique works
for recording video as well. To set the link, remember to go to File Options Audio &
Video settings and set the option for playing linked audio and video at the top of the
right options box.
39
Copyright © 2011. Reproduction or reuse for purposes other than a K2 Enterprises' training event is prohibited.Adding files
Commonly we want to attach electronic files to our notebooks, kind of like when we
used to paperclip or staple a document to our journals. To attach a file to a Notebook
Page, click on the Insert Tab, Attach File and browse to the file you want. When the file is
double clicked, it will open in its native application.
Sending to OneNote
Microsoft Office Suite and Microsoft Browser have a method for you to send
information directly to OneNote. The simplest way is to select the text you want to see
in OneNote and then click on File Print and select the OneNote 2010 Printer. Then
move the information to the appropriate Page in OneNote.
Formatting Notes
As you use OneNote to take notes, don’t worry about the formatting. Just type or write
with your stylus. You can easily come back and edit and format the text as needed.
Formatting in OneNote works just like Microsoft Word or Excel. You can edit and
format from the Ribbon Home Tab or you can use the Mini Tool Bar. It is also easy to
use format text from the Styles Group on the Home tab as well. The instructor will
demonstrate multiple ways to edit and format text.
Using bullets and numbering
Like Microsoft Word and Excel, OneNote includes tools on the Home Tab for
formatting lists and adjusting margin display. The instructor will demonstrate using
features of the Paragraph group.
Checking spelling
Spell checking, again, works identical to the other Microsoft Office Suite applications.
Select Spelling from the Review Tab on the Ribbon. To set defaults, go to File Options
and select Proofing. Remember, spelling and proofing settings, as well as the dictionary,
is the same across the entire Office Suite.
40
Copyright © 2011. Reproduction or reuse for purposes other than a K2 Enterprises' training event is prohibited.Viewing and Organizing Information
Organizing the user interface
When you become an active OneNote user, you will find yourself with a number of
notebooks and each may have many sections. This can be a little distracting when
working and all the notebooks are visible on the left notebook navigation panel.
Collapsing notebooks you are not working with, and subsequently, expanding
notebooks you are working with makes it much easier and quicker to navigate.
Clicking on the down (expand) or up (collapse) arrow by each notebook will accomplish
this goal. We never seem to have enough work space on our desktop so if you would
like to maximize your workspace in the open notebook section page, you can collapse
the Notebooks Panel or the Pages Panel by clicking corresponding arrow on each.
Click on the View Tab to select the work setting that fits best for what you are doing.
The default view is Normal View and you should see that selected to the far left of the
View Ribbon Tab, Views Group. Selecting Full-Page View gives you the entire page and
hides the side panels and the ribbon bar.
If you want to see only the ribbon, click on the down error to the far right of the Ribbon
bar. If you are busy boiler plating the common practice of compiling a document from
many other documents, you should select the Dock to Desktop view. This will dock
OneNote to the desktop next to your active application window making it easier to
copy and paste back and forth. This works great with larger monitors. To return,
simply click on the Normal View option again. In the Dock To Desktop view, the
Normal view button will be at the top of the docked OneNote window. Try each of
these to see how different the Views are and the advantages of each.
41
Copyright © 2011. Reproduction or reuse for purposes other than a K2 Enterprises' training event is prohibited.Creating multiple page views in new windows
Similar to Excel, you can open multiple page views by creating a new window. This
simply opens another window to the same view as the current OneNote window.
1. Click on the View Tab, New Windows, to create a new view of the opened
Notebook,
2. Arrange these windows and click on different pages as you need.
3. As in Excel, these are only views into the same OneNote session, so changing any
page on any open view effects that Notebook across all views.
Searching a notebook
The more notebooks, sections, and pages you
create, the more important it becomes to be
able to find and reference information. The
Search feature in OneNote can be found
quickly in the top right above the Page Panel.
You can search all notebooks, a section, or
page by clicking on the down arrow to the right of
the search box. If you have enabled indexing of
audio and video files, search will even search
these files and let you know how far into the
recording the search criteria can be found. This
is set from File Options Audio & Video and
enables Audio Search at the bottom of the
options windows. Note that this may save
significant indexing as well as search time.
Creating links to pages, files, or locations
One of the best ways to stay organized is to use linking. To create a link, click and drag
to highlight area to link, and then click Insert Tab and Link, or right click and select
Link. Because you can now share notebooks and pages over the Internet with others,
you want links to be intuitive and easy to follow. If you are linking to a file on your
local system or protected network folder, others may not have access to the link.
42
Copyright © 2011. Reproduction or reuse for purposes other than a K2 Enterprises' training event is prohibited.You can also read