Navitel Navigator User Guide
←
→
Page content transcription
If your browser does not render page correctly, please read the page content below

Navigation Software

                   Navitel Navigator
                                     User Guide

© 2011 NAVITEL s.r.o. All rights reserved.
© 2007 Join-Stock Company “CNT”. All rights reserved.
The contents of this Guide, as well as any attached demo materials, are the sole proprietary of
Joint Stock Company "CNT" and NAVITEL s.r.o. Any commercial use of this Guide may be
carried out only with written permission from Join-Stock Company "CNT" and NAVITEL s.r.o.
The information contained in this document shall not be changed without prior notice given to
Join Stock Company "CNT" and NAVITEL s.r.o.
Contents
1 Getting ready ............................................................................................................ 4
1.1      Safety requirements ...................................................................................................... 4
2 Program interface ..................................................................................................... 5
3 Functionality ............................................................................................................. 8
3.1      Route ............................................................................................................................. 8
         3.1.1 Planning a route from a position determined automatically ......................... 8
         3.1.2 Planning a route basing on search results .................................................. 8
         3.1.3 Route editing ............................................................................................. 15
3.2      Track recording ........................................................................................................... 16
3.3      Creation of a waypoint ................................................................................................. 17
4 Settings ................................................................................................................... 18
4.1      Map settings ................................................................................................................ 18
         4.1.1 Map orientation ......................................................................................... 18
         4.1.2 Automatic zoom ........................................................................................ 18
         4.1.3 Visual effects ............................................................................................. 19
         4.1.4 Map tilt....................................................................................................... 19
         4.1.5 Reset position ........................................................................................... 19
4.2      Navigation ................................................................................................................... 19
         4.2.1 Vehicle ...................................................................................................... 19
         4.2.2 Route on roads/direct line ......................................................................... 20
         4.2.3 Avoid ......................................................................................................... 20
         4.2.4 Guidance prompt ....................................................................................... 20
         4.2.5 Lock on Road ............................................................................................ 20
         4.2.6 Rerouting................................................................................................... 20
4.3      POI filter ...................................................................................................................... 21
4.4      Alert settings................................................................................................................ 22
4.5      Settings profiles ........................................................................................................... 23
4.6      Online service setting .................................................................................................. 24
4.7      Setting of user maps ................................................................................................... 26
4.8      Interface setting ........................................................................................................... 27
4.9      Regional settings ......................................................................................................... 28
         4.9.1 Interface language..................................................................................... 28
         4.9.2 Map language ........................................................................................... 28
4.9.3 Language of voice prompts ....................................................................... 28
         4.9.4 Keyboard layout ........................................................................................ 29
         4.9.5 Keyboard language ................................................................................... 29
         4.9.6 Units of measurement ............................................................................... 29
4.10 System settings ........................................................................................................... 30
5 My Navitel ................................................................................................................ 33
5.1      Purchase maps ........................................................................................................... 33
5.2      Download maps........................................................................................................... 33
5.3      Updates ....................................................................................................................... 33
5.4      Help ............................................................................................................................. 33
6 Additional information ........................................................................................... 34
6.1      “Map” screen ............................................................................................................... 34
         6.1.1 Viewing the map ........................................................................................ 34
         6.1.2 Scaling the map ........................................................................................ 34
         6.1.3 GPS cursor................................................................................................ 34
         6.1.4 Compass ................................................................................................... 34
         6.1.5 Information panels ..................................................................................... 35
6.2      Satellites ...................................................................................................................... 35
6.3      Weather ....................................................................................................................... 36
6.4      Gauges and meters ..................................................................................................... 37
         6.4.1 List of gauges ............................................................................................ 37
7 Eventual errors and troubleshooting .................................................................... 42
7.1      Eventual errors ............................................................................................................ 42
7.2      Starting the program after a crash ............................................................................... 43
1 Getting ready
If “Navitel.Navigator” is installed in a built-in or portable navigation device it is recommended that
the user guide to the device be properly studied before starting the program.

Instruction for installation of the program to a tablet/smartphone/telephone is available at
http://navitel.cz/en/support/instructions/nn-install.

You can find the instruction on program registration at http://navitel.cz/en/support/instructions/nn-
registration/.

You can view the instruction on purchase                    of   the    program     and    maps    at
http://navitel.cz/en/support/instructions/buy-a-map/.

1.1 Safety requirements
• Program setting adjustment and route planning must be done before starting the vehicle.

• Changing of program settings and/or editing of the route after starting the movement must be
done only after the vehicle has been stopped in a proper place.

• When moving it is recommended not to be distracted from driving by looking at the screen of
your navigation device, but to follow voice prompts having checked the sound settings of the
device before starting movement.

• You must observe driving regulations, including speed limits and lanes, and maneuver only
where allowed and safe.

                        Remember! Road safety is of prior importance!

4
2 Program interface
Figures 1 to 4 show the main elements of the interface. Description of the elements is given below
in Table 1 – Elements of interface.

Note: The device in the pictures is shown only as an example. The model of the user’s device
and orientation of the screen may differ from those shown in the picture.

                                                                                                5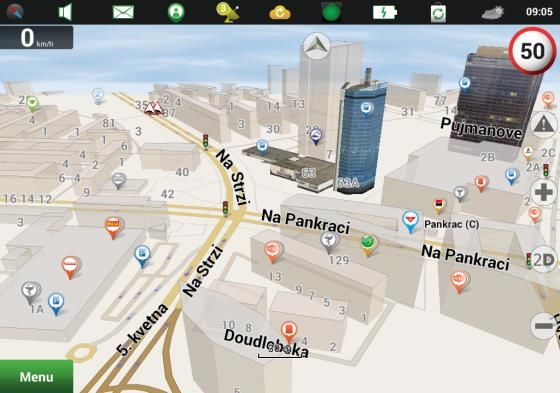
Table 1 – Elements of interface

№     Designation                                   Brief description
1    GPS                 GPS/GLONASS connection indicator. Colours of the icon: grey –
                         receiver is turned off; red – receiver is turned on, but there is no
                         connection with satellites; yellow – bad connection; green –
                         connection is established. The number in the icon shows the number
                         of satellites with which connection was established. Tapping on the
                         icon opens the menu in which the user can switch the receiver on or
                         off or proceed to the “Satellites” screen or to receiver settings.
2    Compass             Tapping on the icon opens the context menu, which controls options
                         of map orientation (“North Up”, “Track Up”), the view of the map (Plain
                         view “2D” and Panoramic view “3D”) and the skins (“Night skin”, “Day
                         skin”, “Auto”).
3    Information         The upcoming maneuver. It shows turnings, distance to the next
     panel               maneuver. Tapping on the sign opens the menu where the user can
                         stop route guidance and control other route options.
4    Information         The name of the street following the maneuver.
     panel
5    Back to position    The button is active if the map has been moved, and a map area other
                         than that of current position is being displayed. Short tapping on the
                         button returns the map to the current position.
6    Speed               Current speed.
7    Route               Active route.
8    GPS cursor          The mark indicates the current position of the device when the GPS
                         receiver is turned on. See more information in 8.1.3 “GPS-cursor” of
                         the guide.
9    Lane                Displaying of road lanes with possible maneuvers.
10   Progress bar        Indication of approaching to the maneuver.
11   Menu                Button opening the main menu of the program.
12   Information         Displaying of data provided by meters and gauges (distance, speed,
     panel               time).
13   Information         Name of the current street (active only when connection with satellites
     panel               is established). The direction is displayed if the map does not contain
                         this information.
14   Scale button        Zoom out button. Short tapping changes the scale by a set value,
                         holding the butting changes the scale faster.
15   2D/3D               Switching between the plain 2D and the panoramic 3D map views,
                         possible for the map scales of 5 to 300 meters. Map tilt depends on
                         the scale: the greater the scale, the less the tilt.
16   Scale button        Zoom in button. Short tapping changes the scale by a set value,
                         holding the button changes the scale faster.
17   “Navitel.Events”    Button for controlling the “Navitel.Events” service.
18   “Friend”            Shows location of the friend added in the “Navitel.Friends” service. If
                         the icon is grey the friend is offline; if the icon is green the friend is
                         online.
19   “Navitel.Traffic”   Icon for controlling the “Navitel.Traffic” service. The icon displays
                         general traffic intensity on ten-point scale.
20   Time                Current time which is read from the settings of the device.
21   Battery charge      Icon indicating the level of battery charge. Tapping on the icon shows
                         free device memory.

6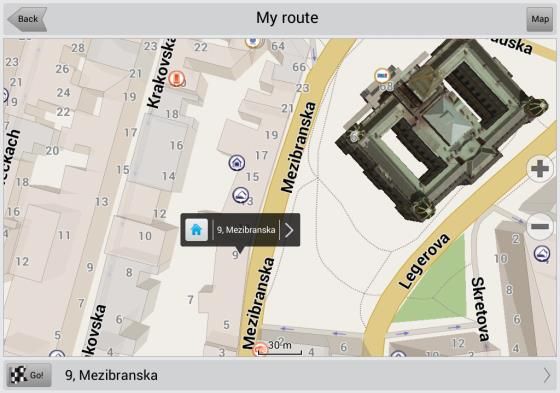
22   “Navitel.Friends” Icon to open the menu of the “Navitel.Friends” service. The service is
                        intended for adding friends, viewing their location and exchanging
                        messages with them.
 23   Route panel       Displays the route, current location and traffic jams on the route.
 24   Sound             Tapping on the icon opens the sound settings.
 25   “Navitel.SMS”     Button for reading/sending messages and using coordinates in them.
                        The number of unread messages is shown near the icon.
 26   “Event”           Road event marked by other users of the “Navitel.Events” service.
 27   Point on the Short tapping on the map marks the point for further operations with
      map               it: saving as a waypoint, adding to the route or viewing the information
                        on the object, and others.
 28   “Save”            Saves the point marked in the map as a waypoint.
 29   “Cursor”          Shows the menu for operations with the point marked on the map.
 30   Waypoint          Waypoints, previously created by the user and marked on the map.
                        Tapping on the point opens the panel to work with the waypoint.
 31   Point of interest Various objects included in the map (traffic lights, subway stations,
                        fuel stations, etc.).
 32   Track recording Button for track recording: red – recording is on, grey – recording is
                        stopped.
 33   Updates           Provides access to the program and map updates
 34   Weather           Tapping on the icon opens the “Navitel.Weather” screen.
 35   “Back”            Returning to the previous screen.
 36   “Go!”             Tapping on the button creates a route to the selected point.
 37   “Map”             Tapping on the button opens the main “Map” screen.
 38   Information       Displays information on the point selected on the map. Pressing on
      panel             the information panel displays additional data and options.
 39   Right/Left        Shows information about the objects, located in the vicinity of the
                        current point.
 40   Copy              Copies coordinates of the selected object.
 41   “Route through” The button is active only when there is an existing route. Tapping on
                        the button marks the selected point as a point of the route. The last
                        added point becomes the first one in the route after the starting point.
 42   “Set finish”      The button is active only when there is an existing route. Tapping on
                        the button continues the route up to the marked point making it the
                        destination point.
 43   “Set start”       Tapping on the button determines the selected point as a starting point
                        of the route (GPS/GLONASS receiver must be switched off).
 44   “Go!”             Tapping on the button creates a route to the selected point.
 45   “Navitel.SMS”     Tapping on the button sends data of the point via the “Navitel.SMS”
                        service.

Note! The icons to be shown on the display are selected in the interface settings. To proceed to
the screen select “Menu” → “Settings” → “Interface”. See point 6.8 of the present guide for more
information on the interface settings.

                                                                                                   7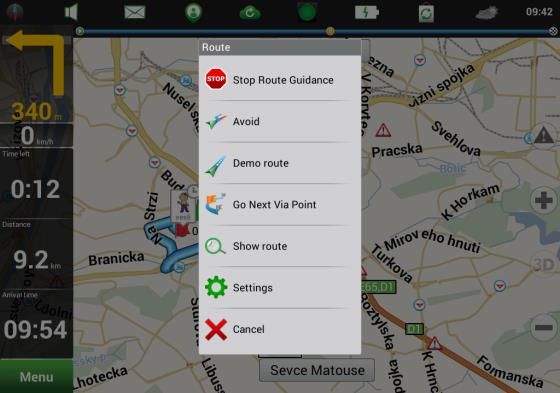
3 Functionality

3.1 Route
To plan a route from an automatically determined current position (GPS receiver is switched on)
select a destination point on the map or determine it in the program menu. It is also possible to
mark the starting point on the map or set it in the program menu, when there is no established
GPS connection.

3.1.1 Planning a route from a position determined automatically
1. When the GPS/GLONASS receiver is switched on and connection with satellites is established
the current position is determined automatically. To have a route planned from this position select
an object which will be the destination point by tapping on the map. Use “+”/“–” buttons to zoom
in/out for easier finding the object in the map.

2. Having selected the object, press “Cursor” in the bottom part of the screen (Fig.5).

3. Press “Go!” in the bottom left corner of the screen (Fig. 6). The program will automatically
create a route to the point.

                 Fig. 5                                                    Fig. 6

Note! On maps, which do not contain the information for route planning (roads, buildings, other
objects), the route will be displayed as a straight line connecting the current location and the
selected destination point.

3.1.2 Planning a route basing on search results
All route points can be as well set manually in the program menu. The program allows several
options for finding objects in the map.

8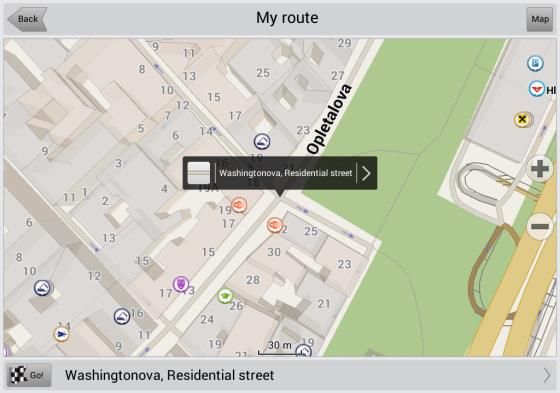
To proceed to these options, press “Menu” in the bottom left corner of the “Map” screen (Fig.7)
and select “Find” (Fig.8).

                 Fig. 7                                                       Fig. 8

3.1.2.1 By address
1. Select “Menu” → “Find” → “By Address”.

2. Select country, settlement (city, town), street, a building in the street or another street that
intersects it (Fig.9).

Entry line will be displayed after pressing the corresponding data field. All parameters must be
selected from the prompts dropping down at typing under the entry line. The virtual keyboard can
be shown and hidden using the keyboard icon in the top right corner of the screen (Fig.10).

                 Fig. 9                                                       Fig. 10

A field becomes active only when the previous field has been filled out. If a field is not active when
the previous parameter is set, this means that the map does not contain such information.

For setting a partial address, for instance for finding a street, set the address till the street level
and press “Result” in the top right corner of the screen (Fig. 9).

When all address parameters have been set, the object will be shown in the “My route” screen
(Fig. 6).

                                                                                                     9
3. Press “Go!” in the bottom left corner of the “My route”
screen to plan a route to the selected object, or press
the address field (or object name field) to proceed to
the “Properties” screen (Fig. 11) where you can choose
to press “Go!” to plan a route to the selected point or set
it as a starting point of the route by pressing “Set start”.

“Route through” and “Finish” are active only when
there is an existing route. Pressing of “Route through”
adds the point to the existing route. When several points
are added to the route the last added point becomes the                        Fig. 11
first one after the starting point. Pressing “Finish” makes the marked point the destination point of
the route. The point previously determined as the destination becomes the last route point before
the new destination point.

3.1.2.2 Nearest places
It is important to determine the reference point in this search option.

A reference point is a point in relation to which the nearest places will be found.

1. Select “Menu” → “Find” → “Nearest Places”.

2. For search of an object select one of the following
reference points (Fig. 12):

“Current location” – search of an object near the
current position (the option is available only when
GPS/GLONASS connection is established);

“Cursor” – search of an object near the cursor on the
map;

“Postal address” – search of an object near a particular
                                                                            Fig. 12
address;

“By route” (active when there is an existing route) –
search of an object along the route;

“Finish” (active when there is an existing route) –
search of an object near the destination point;

“History” – selection of an object form the list of objects
that have been previously searched for.

3. Select the object category and subcategory where
                                                                             Fig. 13
available (Fig.13).

10
4. Start typing the name of the object and select the
object from the prompts (Fig. 14).
The virtual keyboard can be shown and hidden using
the keyboard icon in the top right corner of the screen.
All the objects are listed according to distance from the
reference point: the nearest objects are shown at the top
of the list, the farthest are at the bottom of the list.
5. Press “Go!” in the bottom left corner of the “My route” Fig. 14
screen (Fig. 15) to plan a route to the selected object, or
tap on the object name field to proceed to the “Properties” screen (Fig. 16) where you can
choose:
Fig. 15 Fig. 16
“Go!” – the object becomes the destination point. If there is an existing route all its points except
for the starting point will be deleted;
“Set start” – the object becomes the starting point of the route;
“Route through” (when there is an existing route) – the object becomes a route point. When
several points are added, the last added one becomes the first route point after the starting point;
“Finish” (when there is an existing route) – the object becomes the destination point of the route.
All route points will be retained, and the point previously set as the destination point becomes the
last route point before the new destination point.
3.1.2.3 Friends
This search option helps to see the current location of
friends added in the “Navitel.Friends” service, and to
plan a route to meet them.
1. Select “Menu” → “Find” → “Friends”.
2. Select a friend from the list (Fig.17).
Fig. 17
11A screen will display information on current location of
the friend (Fig.18).
3. Press “Go!” in the bottom left corner of the screen
(Fig.18) to plan a route to the friend’s location, or tap on
the address field to proceed to the “Properties” screen,
where you can choose:
“Go!” – the friend’s location becomes the destination
point. If there is an existing route all its points except for
the starting point will be deleted; Fig. 18
“Set start” – the friend’s location becomes the starting point of the route;
“Route through” (when there is an existing route) – the friend’s location becomes a route point.
When several points are added the last added one becomes the first route point after the starting
point;
“Finish” (when there is an existing route) – the friend’s location becomes the destination point of
the route. All route points will be retained, and the point previously set as the destination point
becomes the last route point before the new destination point.
For more information on the “Navitel.Friends” service, please, refer to
http://navitel.cz/support/instructions/navitelfriends.
3.1.2.4 Waypoints
Coordinates of particularly interesting objects or objects which are often visited can be saved as
waypoints (see point 5.3 “Creation of a waypoint”). A route can be planned to a waypoint
previously created by the user.
1. To plan a route select “Menu” → “Find” → “Waypoints”.
2. Press the arrow to the right of the name field of the point (Fig. 19) to proceed to the “Properties”
screen.
3. Select one of the following options in the “Properties” screen (Fig. 20):
Fig. 19 Fig. 20
12“Go!” – the point becomes the destination point. If there is an existing route all its points except
for the starting point will be deleted;
“Set start” – the point becomes the starting point of the route;
“Route through” (when there is an existing route) – the point becomes a route point. When
several points are added the last added one becomes the first route point after the starting point;
“Finish” (when there is an existing route) – the point becomes the destination point of the route.
All route points will be retained, and the point previously set as the destination point becomes the
last route point before the new destination point.
3.1.2.5 History
This section of the menu contains all objects and addresses that have been searched for in the
program with any search option. All objects are listed according to the date of search: the newest
are at the top of the list, the oldest ones are at the bottom of the list.
1. Select “Menu” → “Find” → “History”.
2. Press the arrow to the right of the object (Fig. 21) to proceed to the “Properties” screen.
3. Select one of the following options in the “Properties” screen (Fig. 22):
Fig. 21 Fig. 22
“Go!” – the object becomes the destination point. If there is an existing route all its points except
for the starting point will be deleted;
“Set start” – the object becomes the starting point of the route;
“Route through” (when there is an existing route) – the object becomes a route point. When
several points are added the last added one becomes the first route point after the starting point;
“Finish” (when there is an existing route) – the object becomes the destination point of the route.
All route points will be retained, and the point previously set as the destination point becomes the
last route point before the new destination point.
133.1.2.6 Favorites
This section of the menu contains all objects and
addresses that have been most often used as route
points or most often searched for in the program with
any search option. Unlike the “History” option all objects
are listed here according to frequency of use – the
objects used most often are at the top of the list.
1. Select “Menu” → “Find” → “Favorites”.
2. Press the arrow to the right of the object (Fig. 23) to
proceed to the “Properties” screen. Fig. 23
3. Select one of the following options in the “Properties”
screen (Fig. 24):
“Go!” – the object becomes the destination point. If there
is an existing route all its points except for the starting
point will be deleted;
“Set start” – the object becomes the starting point of the
route;
“Route through” (when there is an existing route) – the Fig. 24
object becomes a route point. When several points are
added, the last added one becomes the first route point after the starting point;
“Finish” (when there is an existing route) – the object becomes the destination point of the route.
All route points will be retained, and the point previously set as the destination point becomes the
last route point before the new destination point.
3.1.2.7 By coordinates
The search option helps to find an object by its coordinates. It is possible to input coordinates
manually, or insert the coordinates which have been copied in the “Properties” screen of the
object. The button for copying is to the right from the coordinates field (Fig.25).
Fig. 25 Fig. 26
143.1.3 Route editing
1. Press the sign of an upcoming maneuver in the top left corner of the “Map” screen (Fig. 26).
2. Select one of the following options:
“Stop Route Guidance” – removes the route from the map (Fig. 27). If the route simulation mode
is switched on the “Stop demo” option will be displayed instead for stopping the route simulation.
“Avoid” – indicates that further movement is no longer possible starting from the current position.
The program will plan another route.
“Demo route” (GPS/GLONASS receiver must be switched off) – starts simulation of movement
along the route to see all maneuvers and other road information. Such demonstration helps to
find the parts of the route that the user might want to avoid, and to plan an alternative route.
Fig. 27 Fig. 28
“Go Next Via point” – deletes the next route point (Fig. 28).
“Show route” – shows the complete route on the map, including all its points.
“Settings” – displays the “Navigation” screen (see point 6.2) for setting navigation parameters.
A route can also be edited by tapping on the map to mark a point and setting it as a starting,
destination or other route point in the “Properties” screen.
When there is an existing route, the last selected point may be determined as a new destination
point by pressing “Go!”. All other points except for the starting point and the new destination point
will be deleted. Pressing the “Set start” button determines the selected point as a starting point.
Pressing the “Route through” button adds the selected point to the existing route. When several
route points are added the last added one becomes the first route point after the starting point.
Pressing the “Finish” button makes the selected object the destination point of the route. All route
points will be retained, and the point previously set as the destination point becomes the last route
point before the new destination point.
Access to the route editing options is also possible via the main menu of the program. Press
“Menu” in the bottom left corner of the main screen, then select “Route”.
The menu contains the following options for route editing: “Edit route” (search for points with the
“Find” options), “Show route”, “Avoid”, “Demo route”. Here you can stop route simulation and
15delete a created route by pressing the “STOP” button in the upper right part of the screen near
the information panel, which indicates the remaining distance and time to the destination point,
and arrival time.
This menu allows viewing the plan of the route (“Route plan”) containing information on every
maneuver, including the name of the street and distance to the maneuver. Route export function
for its further use or storing in another device, and route import function for storing routes from
another device are also available here.
To export the route press “Export”, select the folder for saving the route, the file type and enter
the name of the route. At the bottom of the screen there is the “New folder” button for creating a
new folder, and the “Up” button for navigation to the upper level of the catalogue of folders.
The “Import” function allows viewing of recorded tracks and importing of routes, which are
adjusted to the current navigation settings on importing: select the folder containing the recorded
route and the type of the file. At the bottom of the screen there is the “New folder” button for
creating a new folder, and the “Up” button for navigation to the upper level of the catalogue of
folders.
3.2 Track recording
Track recording is possible only with established GPS
connection.
Use the “Track record” button on the main panel of the
“Map” screen to switch recording on (becomes red) or
off (becomes grey). To show the button on the panel
select “Menu” → “Settings” → “Interface” → “Map
buttons” → “Track record” (the icon which a tick must
be green).
Switching on/off of the function is also possible from the Fig. 29
program menu. Select “Menu” → “Settings” →
“Tracks” and set the “On/Off” slider in the “Track
record” field (Fig. 29) in the corresponding position.
Here the user can also set the track file format by means
of a special slider.
Tap on the “Track’s folder” field to select a folder to
store track files (Fig. 30) and confirm by pressing “ОК”
in the top right corner of the screen.
Fig. 30
“Show latest 10 000 track points” allows displaying of the track covered within the last 10 000
seconds on the map. To switch the function on/off set the “On/Off” slider in the in the
corresponding position.
163.3 Creation of a waypoint
1. To create a waypoint mark an object on the map
• By tapping on the map, or
• By finding the object with tone of the search options in the “Menu”. For example, select the
object in the “History” option: “Menu” → “Find” → “History” → select an object (Fig. 31) → press
Fig. 31 Fig. 32
the “Map” button in the top right corner of the “My route” screen (Fig. 32).
2. Press “Save WP” in the bottom right corner of the screen (Fig. 33).
3. Enter the name the point, set its description and determine its type (Fig. 34) in the “Waypoint”
screen. If the name of the point is not set by the user the program will assign a three-character
number to it.
Fig. 33 Fig. 34
174 Settings
Route settings, displaying of routes, road data, functional buttons, as well as program settings
are determined in the “Settings” section of the menu.
4.1 Map settings
Select “Menu” → “Settings” → “Map” to determine the settings for displaying a map and objects
on the map.
4.1.1 Map orientation
The following options of map orientation are available (Fig. 35):
“Map’s north is on top” – the map view will always be north-oriented;
“Rotate map with movement” – the map will be oriented in the travel direction. Set the switch in
the corresponding position to select an option.
4.1.2 Automatic zoom
The “Automatic zoom” function controls automatic map scaling depending on the speed and
upcoming maneuvers. The following parameters for automatic scaling are adjustable in the
program (Fig. 36):
“Used scales” – setting of the minimum and maximum scales for automatic zooming;
“Preferred zoom” – setting of a value of a preferred scale, which must fit in the range between
the selected min. and max. used scales.
Only manual map scaling is possible if the “Automatic zoom” function is switched off. To switch
the function on/off set the “On/Off” slider in the corresponding position, as shown in figure 36.
Fig. 35 Fig. 36
184.1.3 Visual effects
The following visual effects are available for setting in
the program:
• Object border smoothing;
• Smooth motion;
• Smooth zoom (Fig. 37).
Set the “On/Off” slider in a corresponding position to
switch the function on/off.
Fig. 37
The “Draw models from” option allows setting the map
scale when 3D models of objects must be displayed
(Fig. 38).
Note! Activation of visual effects may increase the time
for map rendering.
4.1.4 Map tilt
To set the parameters of map tilt for 3D view of the map,
set the slider leftward for minimum tilt (similar to 2D Fig. 38
mode) or rightward for a greater tilt (Fig.38).
4.1.5 Reset position
The “Reset position” function helps to display current position (GPS cursor or a marked point),
if the map was moved. It is possible to set the time after which the displaying will return to the
current position (Fig. 38): 5 s, 10 s, 15 s, 20 s or “Never” (the function is off).
4.2 Navigation
For navigation setting adjustment select “Menu” →
“Settings” → “Navigation”. This menu section contains
parameters that are taken into account on planning a
route and movement along the route.
4.2.1 Vehicle
The option helps to determine the mode of travel and
type of vehicle for route planning (Fig. 39): pedestrian,
bicycle, car/motorcycle, taxi, bus, emergency, delivery,
truck. To determine the means of transport, tap on the
Fig. 39
“Vehicle” field and the select the suitable option.
The option is applicable only if the map contains corresponding data.
194.2.2 Route on roads/direct line
Set the slider to a corresponding position to determine how the program should plan the route:
on roads, or as a straight line connecting the starting and the destination points (Fig. 39).
4.2.3 Avoid
The program allows avoiding certain road objects when the route is being planned. The following
options may be switched on/off by setting the “On/ Off”
slider in a corresponding position:
• “Avoid toll roads”;
• “Avoid unpaved roads”;
• “Avoid ferry connections” (Fig. 40).
When an option is on, the program will try to avoid
planning a route which would include such objects.
Fig. 40
4.2.4 Guidance prompt
Set the slider to one of the positions within the interval between “More distance” (the earliest
possible) and “Less distance” (the latest possible) to determine the time when the program must
inform of the upcoming maneuver (Fig. 40).
4.2.5 Lock on Road
This function assures displaying of the current position
in relation to the route. When the function is switched off
the cursor may wobble, which occurs because of
constant recalculation of current position of the receiver
for example at any attempt to avoid even a tiny obstacle
on the road, or at low quality of GPS signal. To “lock”
the cursor on the road when the user follows the route
the option must be on.
Select one of the options with a slider: “Don’t lock” (the
function is off); Closer 20m; Closer 50m; Closer 100m; Fig. 41
Closer 200m; Closer 500m; Auto (Fig. 41).
4.2.6 Rerouting
The “Rerouting” option allows determining the situation when the created route must be replanned
automatically by the program.
The user can set two parameters here: recalculation of the route in case of deviation from the
current route or when a faster route can be planned.
20“When off-route” – the parameter allows setting the distance of deviation from the current route,
when the program must replan a route from the current position: determine the distance by setting
the slider in a corresponding position within the intervals of 20 m to 100 m.
“When found a route faster” – the parameter allows setting the time for the cases, when there
is a possibility for the program to replan a route that would be faster than the set time value:
determine the time by setting the slider in a corresponding position within the intervals of 5 min to
20 min.
4.3 POI filter
For adjustment of settings for point of interest (POI)
filtration select “Menu” → “Settings” → “POI filter”.
This submenu represents the points of interest divided
into categories (Fig.42).
Tapping on “+” to the left of the category opens the list
of subcategories.
Tap on the category name field to switch displaying of
all POI of the given category on/off. The round icon with Fig. 42
a tick is green if the category is active (being displayed
on the map), and grey – if the category is inactive. The
icon will be half grey, half green when only some
subcategories have been selected.
Tapping on the “Setting” button to the right of the
category opens the screen containing the following
parameters (Fig.43):
• “Turn off all” – switching off of all POI of the category;
• “Edit all” – editing of settings for displaying of the POI Fig. 43
of the category;
Tapping on “Edit all” opens additional parameters for the
category, which are (Fig.44):
• “Seen on scales” – setting of the minimum and the
maximum values of the map scales, which will show
icons of the POI of the given category;
• “Show POI names” – switching on/off of the function.
Having activated the function set the scale value for the
Fig. 44
“Labels seen on scales” option to determine the map
scale when names of the objects will be displayed on
21the map. This scale value is related to the map scale values set for the “Seen on scales”
parameter (Fig.44). Confirm by pressing “OK” in the top right corner of the screen.
Displaying of some of road objects (for example, traffic lights) cannot be switch off. Their
displaying on the map depends only on the scale of the map.
To reset the category tap on “Restore defaults” (Fig. 43).
“All types” shown at the top of the screen (Fig. 42) allows application of the same parameters to
all POI categories. It is further possible to set special values for a certain category/subcategory,
which would be applied only to it.
4.4 Alert settings
To determine alert settings select “Menu” → “Settings” → “Alerts”.
The “Speed limits” function is intended for informing the driver that the speed limit for the current
part of the road has been exceeded. There are two options available: sound alert and visual alert.
The option of sound alert is switched on/off with the
“On/Off” slider in the “Enable sound alert” field. For the
sound alert option it is possible to choose voice alert or
signal alert by setting the slider to a corresponding
position (Fig. 45), and to condition the trigger for the alert:
“Always alert”, “Overspeed is 0 km/h, 10 km/h, 20 km/h,
..., 100 km/h”. If “Overspeed is 0 km/h” is selected the
alert will trigger as soon as the speed limit has been
reached. If "Always alert" is selected the alert will trigger
on entering a part of the road with a speed limit different Fig. 45
from the previous one.
The visual alert option is intended for alerting the driver
with the help of special markings on the map. This option
can be switched on/off by setting the “On/Off” slider in the
“Enable visual alert” field to a corresponding position. It
is also possible to set the trigger condition for the visual
alert: “Always alert”, “Overspeed is 0 km/h, 10 km/h, 20
km/h, ..., 100 km/h”. When the option is on, a speed limit
sign is displayed in the upper right part of the “Map”
screen (Fig. 46).
Fig. 46
22The “SPEEDCAM” function is intended for informing the driver of speed cameras, radars,
dangerous crossroads, speed bumps and pedestrian crossings. There are two options available:
sound alert and visual alert.
The option of sound alert may be switched on/off with the
“On/Off” slider in the “Enable sound alert” field. For the
sound alert option it is possible to choose voice alert or
signal alert by setting the slider to a corresponding
position (Fig. 47), and to condition the trigger for the alert:
“Always alert”, “Overspeed is 0 km/h, 10 km/h, 20 km/h,
..., 100 km/h”.
The visual alert option is intended for alerting the driver
of dangers or obstacles on the route with the help of
Fig. 47
special markings on the map. This option can be
switched on/off by setting the “On/Off” slider in the “Enable visual alert” field to a corresponding
position. It is also possible to set the trigger condition for the visual alert: “Always alert”,
“Overspeed is 0 km/h, 10 km/h, 20 km/h, ..., 100 km/h”.
Tap on the “Selecting SPEEDCAM types” field to select the types of SPEEDCAM of which the
user must be informed and switch the required SPEEDCAMs on/off by setting the “On/Off” slider
to a corresponding position.
To switch the automatic SPEEDCAM file updating by downloading it from NAVITEL® server
select “Menu” → “Settings” → “Online services” and set the “On/Off” slider in the “Update
SPEEDCAM” field to “On” position. To switch the option off set the slider to “Off” position.
The “Show traffic lanes” option is intended for displaying information on road lanes and
admissible maneuvers on roads with two or more traffic lanes in one direction. To switch the
option on/off set the “On/Off” slider to a corresponding position.
4.5 Settings profiles
Select “Menu” → “Settings” → “Profiles” to create or
edit profiles of settings. Here the user can also switch
between existing profiles (Fig.48).
Tap on “Add” in the bottom left corner of the “Profiles”
screen to save the current settings as a profile, enter the
name of the profile and confirm by tapping on “OK” in
the top right corner of the screen. All the parameters can
be reset to the default ones by tapping on “Reset” in the
bottom right corner of the “Profiles” screen. The program
will be restarted. Fig. 48
23To edit the name of the profile tap on “Edit” in the top right corner of the screen of profiles, then press “Edit” in the profile name field, type in a new name and press “OK” in the top right corner of the screen. Press “Done” in the top right corner of the “Profiles” screen to complete the editing. To delete a profile tap on “Edit” in the top right corner of the “Profiles” screen, then press the red button to the left of the profile name and tap on “Delete”. Editing and removal of a current profile is not possible. To apply a profile, select the profile and confirm. 4.6 Online service setting Online services are accessible only from devices having Internet connection. Select “Menu” → “Settings” → “Online services” to set parameters of online services. “Connection with Internet” helps to control access of the program to the Internet. To set a condition for access to the Internet (“Allow”, “Forbid”, “Allow (except GPRS)”, “Allow (except roaming)” or “Always ask”) set the slider to a corresponding position (Fig.49). “Use jams for automatic routing” is intended for planning a route with regard to traffic density. To switch the function on/off set the “On/Off” slider to a corresponding position (Fig. 49). The device must be connected to the Internet for the program to be able to Fig. 49 download the information about traffic density. “Show jams on map” is intended for displaying traffic density on the map. To switch the function on/off set the “On/Off” slider in a corresponding position. More detailed information is available at NAVITEL® website at http://navitel.cz/en/holdups. “Show weather on map” displays weather in the current area. To switch the function on/off set the “On/Off” slider to a corresponding position. To set the parameter for weather information updating (“Update weather manually” or “Update weather automatically”) set the slider to a corresponding position (Fig.50). “Allow Navitel.SMS receipt” is intended for reception of messages from other users of the program. To switch the function on/off set the “On/Off” slider to a corresponding position (Fig.50). Fig. 50 24
“Show Navitel.SMS pop-up window automatically” displays a notification of a new message
(Fig.50). To switch the function on/off set the “On/Off” slider to a corresponding position. Tap on
the SMS icon in the upper panel of the main screen to see incoming messages if automatic
displaying is not switched on.

 “Enable events displaying” displays road events, the information on which was received from
other users of the program (Fig.51). To switch the function on/off set the “On/Off” slider to a
corresponding position. More detailed information on “Navitel.Events” is available at NAVITEL®
website at http://navitel.cz/en/holdups/events.

“Enable downloading up to date POI information via
the internet” downloads dynamic information about
POI, such as fuel prices at gas stations, showtimes at
movies and other. Set the “On/Off” slider to a
corresponding position (Fig.51) to switch the function
on/off. More detailed information about the service is
available        at      NAVITEL®        website     at
http://navitel.cz/en/holdups/dynamicpoi.

“Enable auto updates” checks automatically if program
                                                                            Fig. 51
and map updates are available. To switch the function
on/off set the “On/Off” slider to a corresponding position.

“Turn on Navitel.Friends” allows activation of the “Navitel.Friends” service. To switch the
function on/off set the “On/Off” slider to a corresponding position.

Tapping on “Navitel.Friends Settings” opens the menu of the service. More detailed information
about        the      service       is      available     at NAVITEL®         website        at
http://navitel.cz/en/support/instructions/navitelfriends.

“Turn on Navitel.Cloud” allows activation of the “Navitel.Cloud” service which is intended for
storage of program settings, waypoints and objects from the “History”/”Favorites” in the
NAVITEL® cloud storage. To switch the function on/off set the “On/Off” slider to a corresponding
position.

Tapping on “Navitel.Cloud Settings” opens the menu of the service, where the user can switch
the function on/off, and select which data should be saved in the cloud storage.

“Update SPEEDCAM” updates the file, containing information on road cameras, speed cameras,
dangerous crossroads, speed bumps and pedestrian crossings, by downloading a new file from
the server of NAVITEL®. To switch automatic updating of the SPEEDCAM file on/off set the
“On/Off” slider to a corresponding position.

                                                                                                25
4.7 Setting of user maps Atlas is a set of maps which are used by the program for finding places and planning routes. Select “Menu” → “Settings” → “User maps” to access the settings of an atlas and to control the current set of maps (Fig. 52). The screen shows all atlases, folders where they are stored in the device and the number of maps included in them. All the downloaded NAVITEL® maps are stored in the “Navitel maps” atlas. Fig. 52 To create a new atlas complete the following steps: 1. Proceed to the root catalogue of the device, find \NavitelContent \Maps and create a new folder there, which will become the future atlas. 2. Copy the necessary maps and the file containing the word “earth” from \NavitelContent \Maps to the newly created folder. 3. Select “Menu” → “Settings” → “User maps” → “Add atlas” in the bottom left corner of the screen. 4. Open \NavitelContent \Maps and tap on the globe icon to the right of the new folder (Fig. 53). 5. The program will create an atlas and index maps. To switch from a current atlas to another one select “Menu” → “Settings” → “User maps”, tap on the atlas and confirm your choice. Note, that all other atlases will Fig. 53 be closed. To delete an atlas tap on “Edit”, then tap on a red icon with a cross to the left of the name of the atlas and tap on “Delete”. When atlas is deleted the files of the maps remain on the device. To delete all created atlases tap on “Delete all atlases” in the bottom right corner of the “Atlases” screen. Removal of a current atlas is not possible. 26
4.8 Interface setting
For setting the program interface select “Menu” → “Settings” → “Interface”. To select the icons
which must be shown on the main screen select “Map buttons” (Fig. 54).

                  Fig. 54                                                    Fig. 55

Here it is possible to select the functions, which the user wants to show or hide in the main screen.
The icon of a function is green when it’s being displayed and grey when displaying is switched
off; if the icon is half green, half grey, this means that the function will not be displayed when it
comes to a certain status (Fig. 55). It is possible to set more detailed display statuses for some
functions. Press the “ + ” icon near the function and mark the statuses which should or should not
be displayed (green color – the status will be displayed, grey color – the status will not be
displayed).

It is possible to manually choose the day or night skin of the program, or choose automatic skin
change by setting the slider in a corresponding position (Fig. 54) in the “Skin” field.

The user can set the time when the “Menu”, “Cursor”,
“Compass”, “GPS” and other buttons must be hidden
after the last action of the user in the “Hide buttons” field.
Set the time by means of the slider (Fig. 56).

The user can set the time when the program must hide
menus of functional buttons/icons in the “Hide menu”
field. Set the time by means of the slider (Fig. 56).

“Show scroll bar” allows displaying/hiding the scroll bar
in the right part of the screen: set the “On/Off” slider to a                Fig. 56
corresponding position (Fig. 56).

                                                                                                  27
4.9 Regional settings
Select “Menu” → “Settings” → “Regional settings” to determine the language of the program
interface and of voice prompts, as well as keyboard layout and units of measurement.
4.9.1 Interface language
The user can choose a language of the program interface in the “Interface language” field (Fig.
57): tap on the field and select a language in the list.
4.9.2 Map language
“Map language” allows setting of the language for displaying of data on the map (Fig. 57). The
language selected in “Interface language” is set as a map language by default. If the map does
not support a language, the English will be used. Tap on the “Map language” field and select a
language in the list to choose a language.
Fig. 57 Fig. 58
4.9.3 Language of voice prompts
The language of voice prompts is set in the “Voice” field which provides access to voice packages
for several languages. To choose a language tap on “Voice” and select a voice package in the
list.
To hear a sample voice message tap on the speaker icon to the right of the of the voice package.
The function is available only for voice packages that have been installed in the program. To
download and install a new voice package (connection to the Internet is required) tap on the arrow
near the voice package and confirm (Fig. 58).
Voice packages are also available for downloading at
http://navitel.cz/en/downloads/voice_packets (for devices supporting .SPX files).
284.9.4 Keyboard layout
The user can set the keyboard layout in “Keyboard layout” (Fig. 57).
Available layouts:
• Qwerty v1 is a standard keyboard layout used on most desktop PCs. Additional keys are located
on the right side;
• Qwerty v2 is the same layout as the above mentioned one which only changes for vertical
orientation of the screen;
• Qwerty v3 is the same layout of letters as the first one, additional symbols being located at the
bottom of the screen;
• Abcd is a layout of the alphabetical left to right order of letters;
• Use cellular layout for search is a layout similar to the layout of buttons of a mobile phone
(Fig. 57). To switch it on/off set the “On/Off” slider to a corresponding position.
Vibration of the device in response to use of program keyboard is switched on/off by setting the
“On/Off” slider in “Vibrate on key press” to a corresponding position.
4.9.5 Keyboard language
“Keyboard language” allows selection of languages which will be available for switching in the
program keyboard (Fig. 59). To select a language set the slider to “On” position.
Fig. 59 Fig. 60
4.9.6 Units of measurement
The units of measurement that can be set by the user include those of length and speed, format
of coordinates, address and azimuth, as well as elevation/altitude, depth, and area. Tap on the
corresponding field and select a suitable format (Fig. 60).
29You can also read