FIBA MANUAL FOR REFEREES - Advanced 3 person officiating version 1.1 - CLUB DEL ARBITRO
←
→
Page content transcription
If your browser does not render page correctly, please read the page content below
FIBA MANUAL FOR
       REFEREES
            Advanced
  3 person officiating
               version 1.1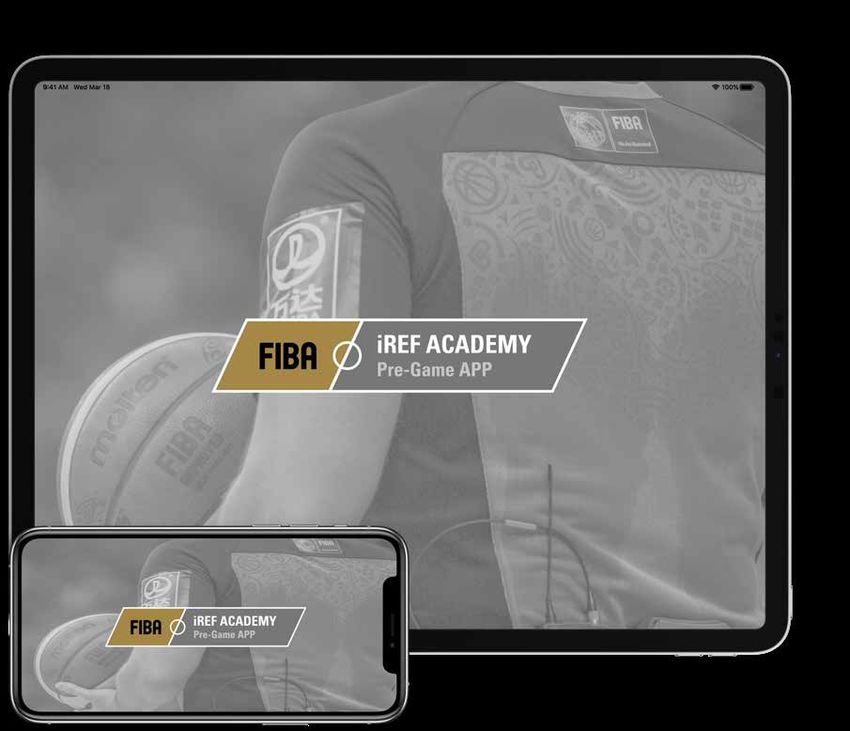
This Referees Manual is based on
        FIBA Official Basketball Rules 2020.
   In case of discrepancy between different
        language editions on the meaning or
      interpretation of a word or phrase, the
                         English text prevails.
           The content cannot be modified
         and presented with the FIBA logo,
       without written permission from the
                  FIBA Referee Operations.
       Throughout the Referees Manual, all
references made to a player, coach, referee,
   etc., in the male gender also apply to the
 female gender. It must be understood that
      this is done for practical reasons only.

                              December 2020,
                          All Rights Reserved.

FIBA - International Basketball Federation
                 5 Route Suisse, PO Box 29
                    1295 Mies Switzerland
                             fiba.basketball
                     Tel: +41 22 545 00 00
                    Fax: +41 22 545 00 99

              This material is created by the
                   FIBA Referee Operations.
   If you identify an error or a discrepancy in
this material,please notify the FIBA Referee
  Operations at refereeing@fiba.basketball

                        FIBA MANUAL FOR REFEREES
               ADVANCED 3 person officiating / v1.1   P/2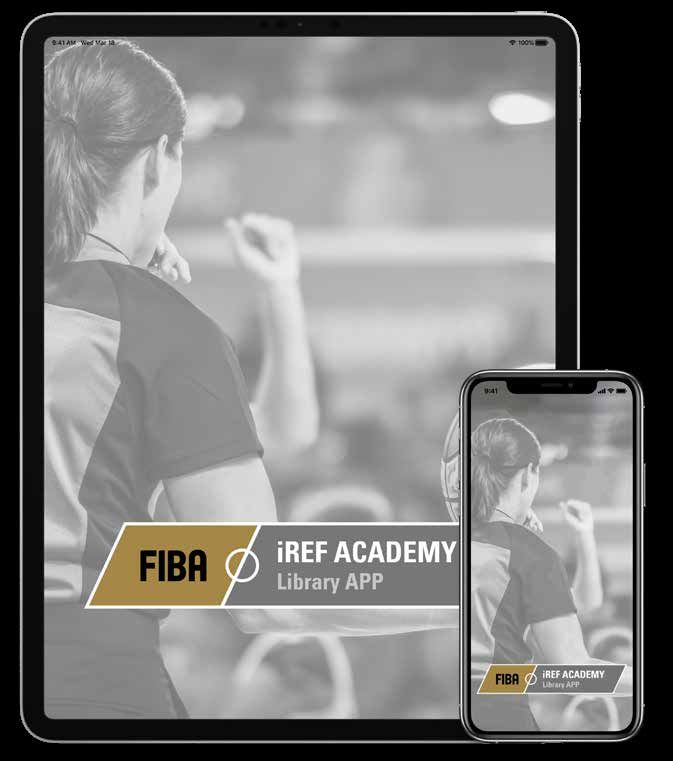
Download Now!
              FIBA iRef Academy Apps

                                 FIBA iRef Academy Library App
                                 Gives you access to all public material
                                 published by FIBA.
                                 It contains a wide range of topics from
                                 grassroots to the elite level. The App
                                 includes videos, manuals and guidelines
                                 published by FIBA Referee Operations for
                                 referees, commissioners, table officials,
                                 referee instructors, video operators.
                                 It also contains the latest Basketball Rules
                                 with Interpretations available.

FIBA iRef Academy Pre-Game App
Specialised App for pre-game
preparation of the basketball
referees developed by FIBA.
It contains videos, pre-game
checklist, technical manuals,
FIBA basketball rules and
official interpretations
(OBRI), full & half court with
referees, players, coverage
area symbols, drawing tool,
able to save your own play-
situations.

   standard quality global connection
foreword
Basketball, as a game, is progressing in skill and speed every day. It is a natural environmental
development process that takes place unconditionally and it is called evolution. The game and more so
refereeing has completely changed from 10 years ago. Presently, top level refereeing is improving at
least at the same speed as the game itself and higher standards of performance are expected every
year. The pace of change has necessitated the adoption of a motto: “What was considered exceptionally
good yesterday, is considered standard quality today and below average quality tomorrow”.
This FIBA Advanced 3 Person Officiating Manual presents more in depth mechanics for successful
basketball refereeing at the elite level. To successfully operate in higher levels of basketball, referees
are expected to train and use these mechanics in all games. To use the advanced content, referees
are required to first master the FIBA Basic 3PO Manual knowledge in order to build a solid and lasting
foundation.
This advanced manual complements other FIBA technical manuals for officiating. FIBA basic technical
manuals offer entry level training content for minimum standards of FIBA officiating, while FIBA
Advanced technical manuals give a more in-depth look and are targeted to a more advanced group
of referees. Advanced materials include all the same information that can be found in a Basic Manual
plus additional and more detailed instructions on the subject. It is important for referees to refer to the
most appropriate manual based upon their existing skill level.
In addition, the FIBA Referee Operations produces a variety of supporting material, namely “Improve
Your…” series (for example ‘Improve Your... Rotation’). These brief guides provide more insight and
details on how to work with the content mentioned in this manual.
In the case of a discrepancy between any guidelines in the Manual and the Official Basketball Rules
(OBR) and/or the Official Basketball Rules Interpretations (OBRI), the latter (OBR and OBRI) will prevail.

                                                                                    FIBA MANUAL FOR REFEREES
                                                                           ADVANCED 3 person officiating / v1.1   P/4
table of contents
FOREWORD

CHAPTER 1
1. Introduction & general                                                            7
1.1 Basketball officiating                                                           7
1.2 Image of an elite basketball referee                                             7

CHAPTER 2
2. Advanced Three person officiating (3po)                                          9
2.1 Introduction                                                                    9
2.2 Symbols used                                                                    9
2.3 General court positions                                                        10
2.4 Pre-Game / half-time positions                                                 12
2.5 Jump ball & start of the quarters                                              12
2.6 Court coverage                                                                 14
2.7 Rotation                                                                       15
2.8 Lead position & transition                                                     20
2.9 Trail position & transition                                                    22
2.10 Centre position & transition                                                  24
2.11 Fast break                                                                    26
2.12 Press defence                                                                 27
2.13 Out-of-bounds & throw-ins                                                     28
2.14 Shot coverage (general & 3 points attempts)                                   29
2.15 Time-outs                                                                     29
2.16 Substitutions                                                                 31
2.17 Eight seconds & backcourt violations                                          31
2.18 Shot clock coverage                                                           31
2.19 Basket interference & goaltending                                             32
2.20 Reporting fouls & switching                                                   33
2.21 Free throw coverage                                                           40
2.22 Rebounding coverage                                                           41
2.23 Last shot                                                                     42

CHAPTER 3
3. Signals & terminology                                                           45
3.1 Official referees’ signals                                                     45
3.2 Basic basketball officiating terminology                                       54

                                                            FIBA MANUAL FOR REFEREES
                                                   ADVANCED 3 person officiating / v1.1   P/5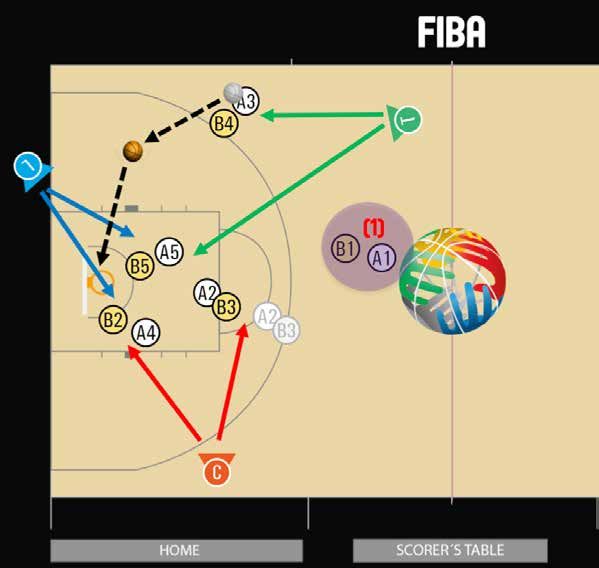
Introduction &
      General

               FIBA MANUAL FOR REFEREES
      ADVANCED 3 person officiating / v1.1   P/6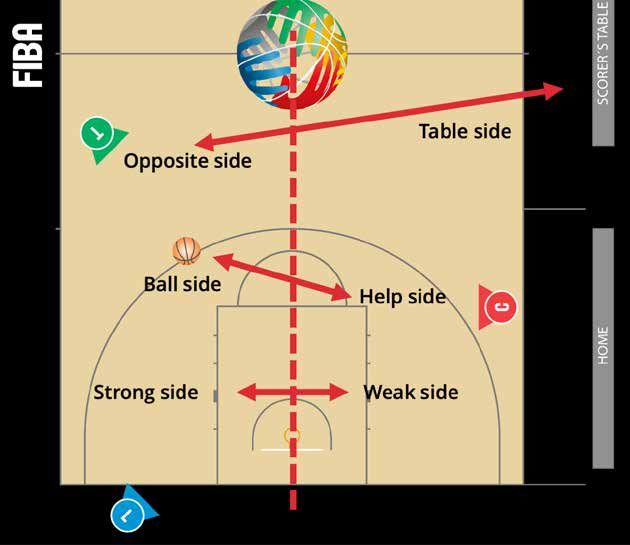
Chapter 1
1. INTRODUCTION & GENERAL
1.1 BASKETBALL OFFICIATING
Generally, sports officiating is challenging and more so in the game of basketball – especially where
ten athletic players are moving fast in a restricted area. Naturally the game has changed and the
court has actually become larger, not in actual court size but in the playing and refereeing sense. Play
situations are spread all over the court with every player able to play in almost every position. Naturally
this sets a new requirement for basketball refereeing. It is good to remember that improving daily
should not be considered as actual progress but rather is only designed to keep pace with the game’s
development – this is called evolution and this will occur regardless if we want it or not.
Sometimes there is a tendency to define basketball officiating as a very complex combination of
various skills. It is true it requires many abilities by the referee, but the bottom line is that all these
skills aim to achieve one thing - being ready to referee the play or handle situations that may arise
during the game.
                                               Refereeing is:
                              Anticipate what will happen — Active mind-set
                         Understand what is happening — Basketball knowledge
                    React properly for what has happened — Mental Image Training

1.2 IMAGE OF AN ELITE BASKETBALL REFEREE
FIBA has one golden rule when it comes to prioritising referee training for FIBA games - Game Control.
The intent is to ensure a smooth running and dynamic game where players are able to showcase their
basketball skills. This is the image FIBA is looking for. The two or three appointed referees are the ones
who are responsible for this game control.
It is good to define and remember that game control is different to game management. Ultimately, it
is the Referees that are in charge of the game. They define what is allowed and what is not – nobody
else.
Having said that, it is equally important that referees look and act like they are in charge. Referees
should give a non-verbal message that they are ready and able to make decisions. The core function of
refereeing is decision making. Referees need to feel comfortable in making decisions without hesitation
in the decision making process. Of course, the correctness of these decisions can be analysed after
the event and so referees must demonstrate confidence and trust or at the very least present so that
others view them this way (perception).
Therefore, FIBA has added the topic of “court presence” to its training program. It includes mental
training with an “I am in charge” concept. This will be combined with a physical training plan to create
an image of a strong and athletic body, fitting into the image of professionalism and promoting game
control.

                                “Controlling is an attitude”

                                                                                    FIBA MANUAL FOR REFEREES
                                                                           ADVANCED 3 person officiating / v1.1   P/7
ADVANCED
   Three Person
Officiating (3PO)

                 FIBA MANUAL FOR REFEREES
        ADVANCED 3 person officiating / v1.1   P/8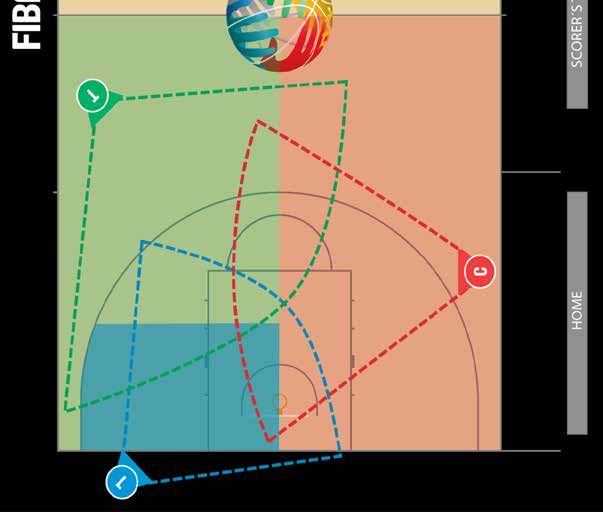
Chapter 2
2. ADVANCED THREE PERSON OFFICIATING (3PO)
2.1 INTRODUCTION
Three referees is the best way to have an elite level game officiated. If it was not, the NBA, WNBA,
NCAA, FIBA and all of the top leagues in the world would not use this system. In modern basketball,
the game is spread all over the court and multiple actions take place simultaneously. 3PO is a great tool
to implement correct IOT principles and to provide more time to actually process the play analytically
(start-middle-end of the play) before making a decision. The analyses show that correct “no calls” are
higher with 3PO than 2PO, and first illegal actions are called rather than reactions. These both actually
decrease the number of calls and allow for a more dynamic game.
The key to successful 3PO is one simple word: trust. You must trust your partners. Only then can you
concentrate on your primary area of coverage, and not have to worry about what is going on in your
partner’s area. Ideally, all three referees should have one primary in 3PO and there should be no need
to referee any secondary coverage.
At the top level of officiating, 3PO is seamless teamwork where all three referees are individually
refereeing where the others cannot, each covering part of the court, or at the advanced level, covering
a different part of the very same play. However, before progressing to an advanced level, it is important
to have a solid knowledge and understanding of 3PO basics.

2.2 BASIC BASKETBALL OFFICIATING TERMINOLOGY
Basic terms used in all FIBA Manuals can be found in “Basic basketball officiating terminology“
publication. It can be downloaded from FIBA iRef Academy Library App. It is advisable to know these
terms and their meaning before studying the material.

2.3 SYMBOLS USED

SYMBOL                         EXPLANATION
                               Trail referee or “T”, in green colour on diagrams.
                               Lead referee or “L”, in blue colour on diagrams.
                               Centre referee or “C”, in red colour on diagrams.
                               The base of the triangle represents the facing direction of the referee.
                               Previous positions of Trail, Lead and Centre.
                               Same principle (grey=previous) is applied to all symbols (ball, players
                               etc.)

                               Crew Chief (CC), Umpire 1 (U1), Umpire 2 (U2)

                               Direction of the play

                                                                                   FIBA MANUAL FOR REFEREES
                                                                          ADVANCED 3 person officiating / v1.1   P/9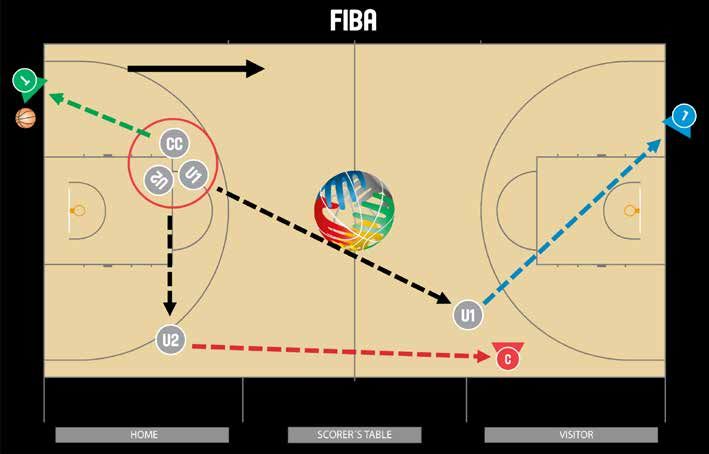
SYMBOL                          EXPLANATION

                                Direction of the Trail (green), Lead (blue) and Centre (red) referee

                                Referee blowing the whistle

                                Action Spot - Foul Called

                                Coverage area

                                Reporting referee indicated by the frame colour
                                (T=green, L=blue, C=red)

                                Player A1 (offensive player), B1 (defensive player)

                                Dribble

2.4 GENERAL COURT POSITIONS
Target: Understand the basic court positions of Trail, Lead and Centre in 3PO, and positions before the
game and during the time-outs.
Let’s start with some key terms regarding the court positions.
TERM                            EXPLANATION
Strong side –refereeing (SSR)   Side of the court where the Lead & Trail referees are located (in 3PO).
Weak side – refereeing (WSR)    Side of the court where the Centre referee is located (in 3PO).
Ball-side (BS)                  This refers to the position of the ball. When the playing court is divided
                                by an imaginary line extending from basket to basket, the side of the
                                playing court on which the ball is located is called the “ball-side”.
Help side (HSB)                 The half of the front court opposite to where the ball is located.

Table side (TS)                 This refers to the side of the playing court which is closest to the
                                scorer’s table.
Opposite side (OPS)             This refers to the side of the playing court which is furthest away from
                                the scorer’s table.

                                                                                     FIBA MANUAL FOR REFEREES
                                                                            ADVANCED 3 person officiating / v1.1   P / 10
Trail (T) The Trail is the referee who is positioned approximately at the edge of
the team bench area nearer to the centre line and on the same side as
the L (always strong side) and who stands behind the play.
Lead (L) The Lead is the referee who is positioned at the endline. The Lead
should be always on the ball-side as much of possible (strong side).
Centre (C) The Centre is the referee who is positioned on the opposite side of the
frontcourt from the L (usually opposite ball-side) at the free-throw line
extended (set-up position). Depending on the location of the ball, C may
be on either side of the frontcourt. Standard working area for C is on the
court.
Diagram 1:
Trail, Lead, Centre, Strong-side, Weak side, Ball-
side, Help side, Table side and Opposite side.
The whole idea of 3PO is based on the concept that two referees (T & L) are on ball side as much as
possible. This gives them at least two different angles on ball side play situations and analyses has
demonstrated that this leads to higher decision making accuracy. To achieve this during the game the
referees need to adjust their triangle by rotating (see “2.8 Rotation” on page 15).
Diagram 2: Diagram 3:
Front court basic positions for Trail, Lead and Centre Front court basic positions for Trail, Lead and Centre
when the L is located on the table-side. when the L is located on opposite-side.
FIBA MANUAL FOR REFEREES
ADVANCED 3 person officiating / v1.1 P / 112.5 PRE-GAME / HALF-TIME POSITIONS
The standard positioning before the game and during the half-time is described in Diagram 4.
If the referees are warming-up properly, one referee observes the court while the other two warm-up
on the outside of the sideline (Diagram 5). The referees should rotate into different positions in order
to have a proper warm-up and to observe the teams. More on this subject in “Improve Your... Game
Warm Up & Streching“ publication.
Diagram 4: Diagram 5:
Standard pre-game position. Optional pre-game position when two referees can
warm-up all the time.
2.6 JUMP BALL & START OF THE QUARTERS
Target: To identify and understand the procedures during the opening jump ball and start of the quarters.
The position of the referees during the opening jump-ball:
1. The Crew Chief (CC) is responsible for tossing the jump ball from a position facing the scorer’s
table.
2. The umpires take positions on the opposite sidelines. U1 is table-side close to midcourt line and
U2 is opposite side, near the edge of the team bench area.
3. U1 responsibilities:
a. Calling for a re-jump on a poor toss or a jumper violation.
b. Giving the time-in signal to start the game clock when ball is legally tapped.
4. U2 responsibility: observing the eight (8) non-jumpers for possible violations and fouls.
Diagram 6:
The Crew Chief administers the toss and U1
is located close to midcourt line to observe
possible poor toss and violations by jumpers,
U2 is located opposite site observing the
possible violations by non-jumpers.
FIBA MANUAL FOR REFEREES
ADVANCED 3 person officiating / v1.1 P / 12Jump ball – play goes to Crew Chief’s left
Diagram 7:
1) U1 becomes L, 2) U2 becomes C, 3) The Crew
Chief moves to the sideline where was U1 and
become T.
Jump ball – play goes to Crew Chief’s right
Diagram 8:
1) U2 becomes L, 2) U1 becomes C, 3) The Crew
Chief (CC) moves to the sideline where was U2
and become T.
Start of the 2nd, 3rd & 4th quarter and overtime:
The positioning of the referees is 1) The Crew Chief (CC) administers the throw-in at midcourt and
becomes T 2) U1/U2 position themselves in L position opposite-side and in C position table-side.
Diagram 9:
The Crew Chief will always be the administering
referee for the throw-in opposite-side to start
the quarters. U1 and U2 will place themselves
either in L or C position.
FIBA MANUAL FOR REFEREES
ADVANCED 3 person officiating / v1.1 P / 132.7 COURT COVERAGE
Target: To identify and understand the basic coverage in the frontcourt.
When 3PO works optimally with experienced, professional referees, they will only need to officiate
in their own primaries. If all three referees cover their primaries, there is in theory no need for any
secondary coverage. The basic principle is that a referee should have an open look on the play, and
should be in position to referee an area which the other two referees are unable to observe.
In the diagrams below, the Lead has the smallest area of coverage by size, but the analyses clearly
indicate that the Lead still makes about 50-60% of all foul calls in the game. This is the result of the so
called “action area” (also known as “bus-station”) which is the post on the ball-side. In other words,
most of the plays end up in the action area and if Lead is on ball-side, as Lead should be, he/she has
the best angle to cover any play in the action area. This is why it is critical to have two referees (T&L =
strong side) on ball side as much as possible.
Naturally, the game is dynamic but coverage areas in theory are static. This is why there are two
different descriptions of the coverage areas: Principle (static – Diagram 10 & Diagram 11) and
Functional (dynamic - Diagram 12 & Diagram 13) which will have naturally overlapping or dual coverage
in the same primary.
Diagram 10: Diagram 11:
Court coverage in principle by all T, L and C when the L Court coverage in principle by all T, L and C when the L
is located on the table-side. is located on opposite-side.
FIBA MANUAL FOR REFEREES
ADVANCED 3 person officiating / v1.1 P / 14Diagram 12: Diagram 13:
The functional court coverage by all T, L and C when The functional court coverage by all T, L and C when
the L is located on the table-side. the L is located on opposite-side.
2.8 ROTATION
Target: To identify the need, time and proper techniques of rotation.
The successful outcome of 3PO depends on how many of the play situations involving the ball are
covered by the strong side referees (L & T). For that reason, 3PO has rotational movements that allows
the Lead to change the position (rotate) on the endline to the other side of the court.
Lead always initiates and dictates the rotation. It is very important that Lead is always looking for
reasons to rotate (not reasons not to rotate). This active mind-set keeps 3PO coverage active in the
frontcourt ensuring two referees are on ball side as much as possible. While it may appear to those
who do not have experience with 3PO that the referees are just moving in rotation and that it is not
important how the rotation is executed, it should be understood there is a specific technique in each
position during the rotation. L, T & C must constantly be aware of when & how to rotate, and when to
switch their area of coverage.
The keys to the successful technique of a proper rotation, especially by L who initiates it, are (1) proper
distance to rotate (close down), (2) proper timing to rotate (when ball moves to the weak side), and (3)
proper technique (assess, move sharply, no hesitation).
During some games analysed, it has been identified that more play situations have ended up with a
drive or a shot from the weak side rather than from the strong side, meaning that only one referee (C)
has ball coverage. This is contrary to the philosophy and meaning of 3PO.
When analysing the rotations at the advanced level, we should always consider whether a rotation
was possible in the case of a weak side shot and/or drive. If the answer is yes, then there is room to
improve. But first it is crucial to learn to understand the concept of rotation and basic techniques to be
able to execute effectively.
FIBA MANUAL FOR REFEREES
ADVANCED 3 person officiating / v1.1 P / 15Rotation in summary:
1. Ball moves to the middle of the court (Zone/Rectangle 2) -> Lead closes down
2. Ball moves to the weak side (outside Zone/Rectangle 2) -> A) Lead rotates to the weak side and
B) Trail rotates to the new Centre position.
3. Lead has completed the rotation and is ready to referee the play -> Centre rotates to the new
Trail position. Rotation is completed.
4. When there is a quick shot or a drive from the weak side, there should be no rotation initiated by
Lead (see Phase 2a –Pause).
5. When rotating, Lead walks sharply (never runs). This allows Lead to abort the rotation in the
case of a quick shot or drive from the weak side, or a change in the direction of the play.
Rotation has 4 different phases:
1. Phase 1: Close Down When the ball is in the middle of the court (rectangle 2), Lead should move
to the close down position in order to be ready to rotate when the ball moves to the weak side
(outside of rectangle 2).
If ball returns back to the strong side, Lead will kick out to the normal set-up position.
Note: Close down position is not the position to referee the play. If there is a drive to the basket
or a shot, Lead in close down position should move out in order to have proper distance and
angle for the play.
Diagram 14: Diagram 15:
Ball moves and remains at rectangle 2 – Lead moves If ball moves back to the strong side – Lead moves
to close down position. back to the initial position.
2. Phase 2: Rotation by Lead & Trail When the ball moves to the weak side, Lead starts the rotation
as soon as possible. At the same time, Trail moves into the new Centre position.
a. Phase 2a: Rotation by Lead – Pause When the ball has arrived to the weak side, the Lead
should analyse if there is a chance for a quick shot or a drive from the weak side. This one
second (“one breath”) delay is called Pause. If a player with the ball takes a shot or drives to
the basket, there will be no rotation and the Centre needs to cover the play on the weak side.
Why – the principles of distance & stationary refereeing an individual play still need to be
respected (above all).
FIBA MANUAL FOR REFEREES
ADVANCED 3 person officiating / v1.1 P / 16b. Phase 2b: Rotation by Lead – Scan the Paint When rotating, Lead should walk straight and
sharply, while actively refereeing all the time. If there are players in the paint, they are Lead’s
primary and if not, Lead looks for the next active matchup(s) or players that might arrive to
the action area (bus station) on the new strong side.
Diagram 16: Diagram 17:
Ball moves to the middle of the court, L closes down. Ball moves to the weak side, L rotates and scans the
C prepares to start covering on the ball. paint or closest match-up.
c. Phase 2c: Rotation by Trail to Centre position As soon as the Trail has ensured that the
Centre has picked up the ball on the weak side, the Trail should re-focus their vision and pick up
the new weak side post play before starting the rotation. Studies have indicated that this is one
of the weakest links during the rotation procedure, because often Trail remains locked in with
the ball whilst rotating and without first re-focusing vision onto the weak side action.
Diagram 18:
When Centre has picked-up the ball, Trail shall pick-up
the new weak side post play asap.
d. Phase 2d: Rotation “not completed” by Lead When Leads uses the proper technique to
rotate (early start, walking sharply), Lead will be able to stop the rotation any time and
return back to the initial position. The most common situations are drive/shot from the
weak side during the rotation or skip pass to the other side of the court. When this occurs,
the Centre does not move anywhere yet and will stay in Centre position. The Trail will return
back to the initial position as Trail. As a principle, if Lead has passed the middle point of the
backboard or the paint, the rotation should be completed as this is the point of no return.
FIBA MANUAL FOR REFEREES
ADVANCED 3 person officiating / v1.1 P / 17Diagram 19: Diagram 20:
Drive/shot from the weakside and Lead is able to Skip pass to the other side, Lead is able to stop and
abort and return back to referee. return back to the ballside.
3. Phase 3: Lead arrives to the ball side and Centre rotates to new Trail position
After Lead has completed the rotation, Centre is the last person to rotate to the new Trail
position.
a. Phase 3a: Coverage by Centre & Lead Centre will stay in centre position and referee the ball
and any play around it until Lead has completed the rotation, is ready to referee the play, and
the play is no longer active. If the play is progressing during the Lead rotation, Centre will stay
with the play until it is completed and no longer active, before rotating to Trail. Our primary
target is to continue to referee any play and then to move to the new position (rotate). As a
result, there will always be two Centres momentarily.
b. Phase 3b: Rotation by Centre to the Trail position When Centre moves up to the Trail position,
this movement should be backwards and facing the basket at all times (45*).
Diagram 21: Diagram 22:
C will stay with the play until L has completed the Old C is always the last one to move to the new T
rotation and is ready to referee. position (moving backwards) and now the rotation is
completed.
FIBA MANUAL FOR REFEREES
ADVANCED 3 person officiating / v1.1 P / 184. Misbalance – “partners do not pick-up” the rotation While it should be avoided, there will be
times when not all of the referees will be aware that there is a rotation in progress, and then
a change in the direction of play occurs. Where this occurs, the referees should not panic as
there are two options to adjust properly during a breakdown in the rotation while in transition.
Normally, there is always at least one referee (but usually two), who is (are) aware of the situation.
a. Option 1: New Lead & Centre should always look for their partners and court balance while
in transition. Identify what side the new Trail is on in the backcourt, and adjust accordingly in
order to have correct balance when arriving in the frontcourt. You can use your voice or pre-
designated signals amongst the crew to draw the attention of the referee who has missed
the initial rotation.
b. Option 2: New Trail is always the last chance to balance the court coverage during a missed
rotation in transition. Normally the new Trail has more time and an ideal view to see the
progress of the transition play. If necessary, new Trail can move to the other side of the court
during transition to have Trail and Lead on the same side. However, this should happen in the
backcourt.
Diagram 23:
New C & L should always control the court in
transition, before they arrive at the free throw
line extended on the frontcourt.
Diagram 24:
Second option is that new T balances the court
coverage by crossing the court diagonally, on
the backcourt.
FIBA MANUAL FOR REFEREES
ADVANCED 3 person officiating / v1.1 P / 192.9 LEAD POSITION & TRANSITION
Target: To identify proper working area and coverage in the Lead positon
During transition, the new Lead should be ahead of the play and arrive to the baseline in four seconds
or less, and should be in a position ready to referee. The new Lead should also be in good position to
referee the play throughout transition down the floor. This is only possible when the following correct
techniques are applied:
a. Stay with the previous play before the new transition – namely, wait until the ball has entered
the basket in the case of a successful shot for goal or when a defensive player has gained control
of a rebound;
b. After turning with a power step, be sure to face the court all the time (when done properly, the
referee should also able to pick-up the game clock);
c. Start transition with full speed and maintain it until arriving at the baseline;
d. Face the court during the entire transition (actively looking for next play to come and refereeing
the defence);
e. Run straight to the baseline to set-up position (keeping same distance from the play all the way)
– “out-side/out-side” angle;
f. Stop on the baseline with “one-two” count in a stationary position, and be ready to referee the
play when it starts.
Diagram 25:
L moves correctly with straight line to the
endline maintaining the same distance from
the play – speed and size of the players remains
same from the start to the end.
Diagram 26:
L curves incorrectly close to the basket and
the play is coming at L. The angle changes
completely because players look bigger and
faster.
FIBA MANUAL FOR REFEREES
ADVANCED 3 person officiating / v1.1 P / 20Lead works on the baseline on a 45° angle facing the basket. Position should be not more than 1
metre from the baseline and normally outside the paint. The Lead’s working area is from three-point
line to the edge of the backboard.
The normal set-up point for Lead is between the lane line of the key, and the three-point line. The Lead
should move on the baseline according to the movement of the ball, ensuring they have position on the
edge of the play. The Lead should work off-the court.
The Lead should normally make all violation/foul calls on the strong side of the court below free-throw
line. Studies have proved that when the Lead makes calls on the weak side (other side of the court),
especially on a drive (high contact), the decisions are incorrect, and in many cases, fantasy calls occur
with guessing (foul called where contact was legal or no contact at all). This type of call is called “Lead
cross call” and should not happen. The Lead must trust that the Centre will make the call if there is
illegal contact (trusting Lead & active Centre). On weak side drives Lead may call low and front swipes
and illegal hand contacts from Lead´s side and which Centre is unable to see. Lead must have an open
angle to make the call.
Diagram 27: Diagram 28:
Lead working area is between 3 point line and edge of Lead must trust to the Centre who has to be active
the board. To find out if you have the correct position and ready cover his/her primary. The diagram
is to check that you will see the front of the rim. demonstrates the “cross call” by Lead what is incorrect.
When ball comes to the strong side post (Lead’s side) lead should prepare for a possible drive to the
basket by taking few steps wider. This is called “Lead cross step”. This allows Lead to see a possible
drive to the basket, identify the possible help defence from the weak side, and implement the same
“Distance & Stationary” principle as in transition.
Diagram 29: Diagram 30:
When ball comes to the strong side low post, Lead L has taken the cross steps and turned slightly towards
prepares for the next play and by taking cross steps the basket. This new angle allows to referee the defence
to have wider angle covering the next possible play. in the drive and prepare for the help defense.
FIBA MANUAL FOR REFEREES
ADVANCED 3 person officiating / v1.1 P / 212.10 TRAIL POSITION & TRANSITION
Target: To identify proper working area and coverage in the Trail position
During transition, the new Trail should always trail the play (behind the play – not in line or in front of
the play). This way the Trail is able to easily control the clocks and analyse the next possible plays to
come. This is only possible when the following correct techniques are implemented:
Wait behind the baseline until the ball is either passed to a teammate on the court after a made basket
and the thrower-in has advanced on to the court (the new Trail should wait to have a minimum of 3
meters distance from the ball before they step on to the court);
Always maintain a proper distance behind the play – 1-2 steps (no yo-yo running);
Be the last to arrive in the front court, and have a 45° angle facing the basket (all players should be
between straight arms extended = right/left side sideline & left/right side centre line).
Diagram 31:
New T applies correct techniques by waiting
behind the endline that ball is passed to the
team mate after the basket and the thrower-in
has advanced to the court.
Diagram 32:
T maintains the proper distance always behind
the play (no yo-yo running) facilitating the
steady wide angle and T is able to control the
clocks and see the set-ups on the frontcourt.
Trail working area is between team bench area line and centre line. The Trail should be able to control
a wide area if they are keeping a proper distance from the players with an active mind-set to analyse
the next movements of the players. Trail normally works on the court.
FIBA MANUAL FOR REFEREES
ADVANCED 3 person officiating / v1.1 P / 22When the ball moves closer to the Trail’s sideline, Trail should move further into the court to maintain
the open angle. Whenever a dribbler is positioned in front of Trail, the Trail should be assessing which
direction the dribbler will move next. Whenever a player moves in one direction, the Trail should move
to the other direction - this is called “Trail Cross Step”. When the play is over, the Trail should return
closer to the sideline in the standard working position.
Diagram 33: Diagram 34:
Trail working area is between team bench area line Whenever T is straight-lined, assess which side the
and centre line. If ball moves to close to strong side player will move next. When player moves T should
sideline, T should take one-two steps on the court to react and take cross step to the opposite direction of
maintain wide angle. the players.
FIBA MANUAL FOR REFEREES
ADVANCED 3 person officiating / v1.1 P / 232.11 CENTRE POSITION & TRANSITION
Target: To identify proper working area and coverage in the Centre positon
During the transition from Centre to Centre, the referee in question has to follow these techniques:
a. Stay with the previous play before the new transition. Namely, wait until the ball has entered
the basket in the case of a successful attempt for goal, or until a defensive player has gained
control of a rebound;
b. Face the court during the entire transition (actively looking for next play to come and
refereeing defence);
c. Run straight to the frontcourt free throw line extended (set-up position);
d. When a transition play is advancing on the weak side, Centre might need to stop momentarily
and referee the play (keep distance from the play – anticipate).
Centre working area is between top of the free throw circle and the imaginary “bottom of the free
throw line circle”. Practically speaking, this means the free throw line extended, a couple steps up, a
couple steps down. The Centre working area is normally always on the court.
Any play on the weak side towards the basket is the Centre’s primary. The Centre has to remember to
be ready to make the call when there is illegal contact or action. If the Centre misses the illegal contact
and is passive, this will force the Lead to be more active and in the worst case scenario, will result in
“Lead cross calls” (trusting Lead & active Centre).
Diagram 35: Diagram 36:
Centre normally moves in the transition from Centre’s set-up position is at free throw line extended
backcourt to frontcourt free throw line extended and working area from top of the free throw circle to
facing court covering possible any weak side the imaginary bottom of the free throw circle.
transition.
When there is a weak side drive to the basket, the Centre should take a step(s) on the court diagonally
towards the centre line, or the same principle as with the Trail. Whenever a player moves in one
direction, the Centre should move in the other direction. This is called “Centre cross step”. There will
always be a moment when the C is straight lined at the start of the drive, but this is only momentary
and is minimized with the cross step.
FIBA MANUAL FOR REFEREES
ADVANCED 3 person officiating / v1.1 P / 24Diagram 37: Diagram 38:
Ball on the weak side and C prepares to referee the Dribbler moved to the left and C correctly cross step(s)
drive to the basket (mentally ready to take cross to the right and maintains the open angle.
step).
In case of trap situation in the frontcourt on the weak side and close to the centre line, C moves closer
to the centre line to referee the play (“go wherever you need to referee the play”). After the trap
situation is over Centre will return to the normal position at the free throw line extended, unless Lead
has rotated during the trap ((although should have rotated before the trap).
Diagram 39: Diagram 40:
When there is a trap close to the centre line on the After the trap is over C will return to initial position and
weak side of the court C needs to move closer to the working area at the free throw line extended (unless L
centre line in order to cover the play properly, but this has rotated during the trap – first option).
is not rotation (unless L is rotating).
FIBA MANUAL FOR REFEREES
ADVANCED 3 person officiating / v1.1 P / 252.12 FAST BREAK
Target: To identify proper coverage and Lead-Centre cooperation during a fast break
During the fast break, it is important to understand that the Centre has to be active and has 50% of
the coverage (weak side).
Any action or contact on the weak side should be covered by Centre, and any action on the strong side
by Lead. This is the beauty of 3PO when it works properly.
It is good to practise when running from Trail to Lead in transition to automatically identify where
the Centre is on the other side of the court. When this becomes a standard procedure, it will also
automatically happen during the fast break when time is more limited.
The Lead and Centre need to run at full speed, analyse when the play will start, and then stop and
referee the play by focusing on the defence (referee defence). The weak point in coverage during the
fast break is when the new Lead curves under the basket and tries to referee the action on the weak
side. This destroys the concept of 3PO as each referee is responsible for their own primary and there
should be no need for secondary.
It is important that the Centre quickly arrives in the front court at the free throw line extended to have
the best coverage for a possible basket interference or goaltending (see also 2.20 Basket Interference
& Goaltending for more details).
Diagram 41:
C has to run fast in every fast break. It is
important that both L & C are able to have a
stationary position to referee when the play
starts. This is normally a dual coverage situation.
FIBA MANUAL FOR REFEREES
ADVANCED 3 person officiating / v1.1 P / 262.13 PRESS DEFENCE
Target: To identify proper coverage and Trail-Centre cooperation during a press
When there is more than two opponent pair of players in the backcourt the Centre has to be active
and help Trail to cover the play. If all the players are in the backcourt also the Lead has to adjust their
position closer to the play ready to cover any potential long passes.
All players in the backcourt
Diagram 42:
T and C referee the action in the backcourt.
More than 4 opponent players in the backcourt
Diagram 43:
T referees behind the play. C takes a position
close to centre line to referee players in front
or backcourt. L takes position on the endline to
referee players in frontcourt.
FIBA MANUAL FOR REFEREES
ADVANCED 3 person officiating / v1.1 P / 272.14 OUT-OF-BOUNDS & THROW-INS
Target: To understand coverage on out-of-bounds plays to ensure that only one referee always makes the
“out-of-bounds” call.
3PO covers all of the boundary lines in the frontcourt. Only the Trail has two lines to cover. The basic
rule is that Lead covers the baseline, Centre covers the weak side sideline, and Trail covers the strong
side sideline and centre line.
When the game continues with a throw-in there should always be two referees (Lead & Trail) on the
side of a throw-in.
Diagram 44:
L & C has one boundary line to cover, while T has two
lines (sideline and centreline).
Diagram 45: When the throw-in is on the Diagram 46: When the throw-in is on the frontcourt’s
frontcourt’s endline between 3 point line and edge endline between 3 point line and sideline, L’s position
of the backboard, L’s position is outside of the is between basket and throw-in spot. T mirrors the
throw-in spot (C has to be ready to cover weak side). “time-in” signal to the table.
T mirrors the “time-in” signal to the table.
FIBA MANUAL FOR REFEREES
ADVANCED 3 person officiating / v1.1 P / 282.15 SHOT COVERAGE (GENERAL & 3 POINTS ATTEMPTS)
Target: To identify and understand the coverage of each referee during shots for goal.
The basic principle is that the Lead has primary coverage on any 2 point shots on the strong side (as
demonstrated below, blue area) and the Trail has primary coverage for all 3 point shots, and 2 point
shots on the strong side.
The Centre has primary coverage on all shots on the weak side (see Diagram 47).
Whenever there is dual coverage (restricted area, rectangle 2), the basic principle is that the respective
referee covers their side of the play (see Diagram 48).
See also “2.11 Covering a shot (protect the shooter)” on page 18, “2.3 Refereeing the defence” on page
11 & “2.4 Stay with the play” on page 11 in FIBA Referee Manual –Individual Officiating Techniques
(IOT).
Diagram 47: Diagram 48:
L has normally the primary coverage in blue area, T in In dual coverage areas it is important that both referees
green area and C in red area. have the discipline to process the entire play and try to
focus only for their side of the defensive players.
2.16 TIME-OUTS
After the table officials have notified the referees about the time-out request, normally the Trail or
Centre closest to the table will signal the time-out.
Referees have three standard positions during the time-outs (always on the opposite side). They can
select any of the three positions they feel are the most appropriate (Note: leave the ball on the court
where the game will be resumed).
When a time-out has 20 seconds remaining, two referees will move close to the team bench areas
in order to be ready to activate the teams to return back to the court when the 50 seconds warning
signal sounds.
FIBA MANUAL FOR REFEREES
ADVANCED 3 person officiating / v1.1 P / 29Diagram 49:
The three standard time-out positions, always
in the opposite side.
Diagram 50:
When 20 seconds remaining of the time-out,
two referees move close to the team bench
areas.
Last 2:00 minutes (L2M) time-out protocol
(where a team has the opportunity to advance the ball to the frontcourt)
When the clock shows 2:00 minutes or less in the fourth quarter and in overtime when the team
requesting the time-out is entitled to possession of the ball from its backcourt:
• Referees have three standard positions during the time-outs (always on the opposite side).
They can select any of the three positions they feel are the most appropriate.
• During the time-out, the ball is to remain in the hands of the crew chief ( this signals that a
decision for the throw-in location is yet to be made).
• When a time-out has 20 seconds remaining, the crew chief and the one of the umpires will move
close to the team bench areas. The crew chief will go to the team that is entitled to possession
of the ball.
• When the 50 seconds signal sounds the officials will activate the teams to return back to the
court.
• The crew chief will ask the head coach to decide whether the throw-in will remain in the
backcourt or whether it will advance to the frontcourt. The crew chief will verbally confirm the
decision with the Head Coach (e.g. “The throw-in will be in the back / front court.”). The crew
chief will show a signal to the location of the throw-in by pointing to and moving to that location
for the throw-in. Verbal support of this will accompany the signal.
• The crew chief will normally administer the throw-in, with the other two referees adjusting their
positions accordingly.
• The referees shall ensure that the shot clock is appropriately set (reset/remain) before the throw-in.
FIBA MANUAL FOR REFEREES
ADVANCED 3 person officiating / v1.1 P / 302.17 SUBSTITUTIONS
Trail or Centre closest to the table will administer the substitutions. All substitutions should be
completed as quickly as possible. As soon as all substitutions are completed the administering referee
should make sure there is a correct number of players on the playing court and shall then communicate
by establishing eye contact with the active referee with the ball.
Substitutions after a foul call
After the calling referee has finished the reporting to the table it is the responsibility of the new table
side referee (Trail or Centre) to administer substitutions.
Diagram 51:
T has finished reporting and moves to a new
position for free throws. New C will then
administer substitutions.
2.18 EIGHT SECONDS & BACKCOURT VIOLATIONS
Normally Trail has the primary responsibility to count the 8 seconds. On all press situations Centre
should be ready to assist the Trail (physically and mentally engaged with the play).
Trail also has the primary responsibility on all centre line violations. Sometimes the Centre can also
help with possible backcourt violations when the ball is played on the weak side before returning to
the backcourt.
2.19 SHOT CLOCK COVERAGE
Normally it is the outside referees (Trail and Centre) who have primary responsibility for shot clock
violations. Also the Lead should be aware of the time on the shot clock and to be ready to assist Trail /
Centre in their decisions. It is vital for referees to know when the shot clock period is nearing its end to
be able to make correct decisions in shot clock situations.
At all times the active referee administering the throw-in should check the shot clock to be sure it is set
correctly. This must be done before referee passes the ball to the thrower-in.
Note: When the backboard is equipped with yellow lighting along its perimeter at the top, the lighting takes
precedence over the shot clock signal sound.
FIBA MANUAL FOR REFEREES
ADVANCED 3 person officiating / v1.1 P / 312.20 BASKET INTERFERENCE & GOALTENDING
Normally the Trail or Centre referee is responsible to determine if a basket interference or goaltending
violation occurs. The referee opposite the shot has the primary responsibility for the flight of the ball
and goaltending / basket interference violations. See also Diagram 93 & Diagram 94.
If a basket is awarded due to basket interference or goaltending the calling referee shall stop the clock
and count the goal by showing the correct official signal.
Basket interference & goaltending on a fast break
In fast break situations it is primarily Centre´s and secondarily Lead’s responsibility to cover the possible
basket interference or goaltending violation. If the Centre is not ready to cover (physically not engaged
with the play) the fast break it becomes Lead´s responsibility. In this case the Lead should stop ahead
of the endline to be able to see the ring and front of the backboard.
Diagram 52: Normally in fast break situations
Centre is responsible for basket interference or
goaltending violations.
Diagram 53: If Centre is not engaged with the
fast break then it becomes Lead´s responsibility
to cover basket interference / goaltending
violations. In this case the Lead should stop
ahead of the endline to be able to see the ring
and front of the backboard.
Basket interference & goaltending on a foul play
On all plays resulting in a foul call the Trail and Centre should not relax after the call. Instead they
should hold their position, maintain their focus and follow the situation until the end (when the ball no
longer has possibility to enter the basket) and be ready to make possible BI / GT call.
FIBA MANUAL FOR REFEREES
ADVANCED 3 person officiating / v1.1 P / 322.21 REPORTING FOULS & SWITCHING
Target: To identify and know the correct positions and procedures after a foul is called.
Principle for the switches:
Free throws (ball remains in the frontcourt):
a. Referee who reports the foul, moves to the opposite side in T position
b. Other 2 fill up the empty spots
Throw-in (ball remains in the frontcourt):
a. Referee who reports the foul, moves to the opposite side in T or C position
b. Other 2 fill up the empty spots
Minimize distance – walk sharp – think where is your next position after reporting. If two referees call
the same foul, the referee who is on the opposite side will report the foul.
In all situations referees should try to minimize switches. Sometimes there is no switching needed,
sometimes all three referees need to move in order for the above rules to be implemented.
Reporting:
a. Use clear voice
b. Sharp signals
c. Rhythm
See also “2.8.1. Reporting” on page 16 in FIBA Referee Manual –Individual Officiating Techniques (IOT) for
reporting technique and procedures.
FIBA MANUAL FOR REFEREES
ADVANCED 3 person officiating / v1.1 P / 33Play remains in frontcourt, continued by throw-in
Diagram 54: Diagram 55:
Call frontcourt table side by L – ball remains in the Call frontcourt table side by T – ball remains in the
frontcourt (throw-in) frontcourt (throw-in)
Diagram 56: Diagram 57:
Call frontcourt opposite side by L – ball remains in the Call frontcourt opposite side by T – ball remains in
frontcourt (throw-in) the frontcourt (throw-in)
Diagram 58: Diagram 59:
Call frontcourt table side by C – ball remains in the Call frontcourt opposite side by C – ball remains in
frontcourt (throw-in) the frontcourt (throw-in)
FIBA MANUAL FOR REFEREES
ADVANCED 3 person officiating / v1.1 P / 34Diagram 60: Diagram 61:
Double call frontcourt by T & C – ball remains in the Double call frontcourt by T & C – ball remains in the
frontcourt (throw-in) frontcourt (throw-in)
Diagram 62: Diagram 63:
Double call frontcourt table side by T & L – ball Double call frontcourt opposite side by T & L – ball
remains in the frontcourt (throw-in) remains in the frontcourt (throw-in)
Diagram 64: Diagram 65:
Double call frontcourt by L & C – ball remains in the Double call frontcourt by L & C – ball remains in the
frontcourt (throw-in) frontcourt (throw-in)
FIBA MANUAL FOR REFEREES
ADVANCED 3 person officiating / v1.1 P / 35Play remains in frontcourt, continued by free throw(s)
Diagram 66: Diagram 67:
Call frontcourt table side by L – ball remains in the Call frontcourt table side by T – ball remains in the
frontcourt (free throws) frontcourt (free throws)
Diagram 68: Diagram 69:
Call frontcourt opposite side by L – ball remains Call frontcourt opposite side by T – ball remains in
frontcourt (free throws) the frontcourt (free throws)
Diagram 70: Diagram 71:
Call frontcourt table side by C – ball remains in the Call frontcourt opposite side by C – ball remains in
frontcourt (free throws) the frontcourt (free throws)
FIBA MANUAL FOR REFEREES
ADVANCED 3 person officiating / v1.1 P / 36Diagram 72: Diagram 73:
Double call frontcourt by T & C – ball remains in the Double call frontcourt by T & C – ball remains in the
frontcourt (free throws) frontcourt (free throws)
Diagram 74: Diagram 75:
Double call frontcourt table side by T & L – ball Double call frontcourt opposite side by T & L – ball
remains in the frontcourt (free throws) remains in the frontcourt (free throws)
Diagram 76: Diagram 77:
Double call frontcourt by L & C– ball remains in the Double call frontcourt by L & C – ball remains in the
frontcourt (free throws) frontcourt (free throws)
FIBA MANUAL FOR REFEREES
ADVANCED 3 person officiating / v1.1 P / 37Play continues from new backcourt by throw-in
Note: When a foul is called in the backcourt or there is an offensive foul in the frontcourt, there is no switch
unless it is necessary to facilitate the new position of the reporting referee on the opposite side (no long
switches).
Diagram 78: Diagram 79:
Call backcourt table side by L – ball moves new Call backcourt opposite side by L – ball moves new
direction (throw-in) direction (throw-in)
Diagram 80: Diagram 81:
Call backcourt table side by T – ball moves new Call backcourt opposite side by T – ball moves new
direction (throw-in) direction (throw-in)
Diagram 82: Diagram 83:
Call backcourt table side by C – ball moves new Call backcourt opposite side by C – ball moves new
direction (throw-in) direction (throw-in)
FIBA MANUAL FOR REFEREES
ADVANCED 3 person officiating / v1.1 P / 38Play continues from the opposite end of the court by free throw(s)
Diagram 84: Diagram 85:
Call backcourt table side by L – ball moves new Call backcourt opposite side by L – ball moves new
direction (free thows) direction (free thows)
Diagram 86: Diagram 87:
Call backcourt table side by T – ball moves new Call backcourt opposite side by T – ball moves new
direction (free thows) direction (free thows)
Diagram 88: Diagram 89:
Call backcourt table side by C – ball moves new Call backcourt opposite side by C – ball moves new
direction (free throws) direction (free throws)
FIBA MANUAL FOR REFEREES
ADVANCED 3 person officiating / v1.1 P / 392.22 FREE THROW COVERAGE
Target: To understand coverage and responsibilities during free throw situations and on following
rebound plays.
In 3PO the Lead is the active referee in all free throw situations. Lead will administer all the free throws.
During last free throw Lead is responsible for the players in rebound places on table side of the restricted
area. For the last free-throw, the Lead should be positioned in the normal Lead set up position.
Centre indicates the number of free-throws using the official signals. On the all free throws, Centre
is responsible of checking that there is no violation from the shooter. During last free throw Centre is
responsible for the players in rebound places on opposite side of the restricted area. During the free-
throws, the Centre is to be positioned near the side line in the normal Centre position.
Trail is responsible for the rest of the players behind the free-throw line extended and behind the
3-point line during all free throws.
When a violation occurs during the free throw and the ball is in the air, the referee should immediately
blow the whistle to indicate the violation (exception: fake by free-throw shooter). This is to minimize
any unnecessary escalation of physical contact between players after a violation occurs. There is no
need to wait if the ball enters the basket or not.
If the ball enters the basket:
a. violation by free-throw shooter - basket is not valid
b. violation by other players – basket is valid, whistle is to be ignored and play will continue with
throw-in as after any successful last free-throw.
Diagram 90: Only Centre indicates the number of Diagram 91: Primary responsibilities during last or
free throws using the official signals. only free throw.
When there is a last free-throw with opposing players in the new front court: Trail adjusts towards the
new frontcourt (position depends on the number of the players in the frontcourt and time of the game).
Diagram 92:
Trail adjusts position towards the new
frontcourt during last free-throw if there is
opposing players in the new front court.
FIBA MANUAL FOR REFEREES
ADVANCED 3 person officiating / v1.1 P / 402.23 REBOUNDING COVERAGE
Target: To identify the correct techniques for total coverage during rebounding situations to ensure that
not more than 1-2 active match-ups are covered by each referee
For successful refereeing of rebound plays it is important to understand the principles for successful
rebound techniques by the players (inside position, timing, etc.). In this section we focus on the practical
implementation of these principles and how this relates to refereeing.
First of all, it is crucial to understand that when any shot is taken, this is the key moment for the
players to move to the most profitable position in order to get the rebound. In many cases, referees
are thinking that the key moment is when ball hits the rim, which is completely too late. Keeping in
mind the key principles noted above, it is important that the referees are already in position to referee
the rebound situation when the shot is taken (active mind-set, appropriate positioning for the next
play). In doing so, the referee implements the basic IOT elements regarding Distance & Stationary, and
active mind-set facilitating the chance to process the entire play ((analytical decision) – not only to see
the end and react (emotional decision)).
The second successful technique is to define the principle that each referee has only 1-2 active match-
ups to follow during a rebound. It is not so difficult if the referee focuses only on a few players instead
of trying to cover all of the court and all the ten players. The challenge is that all referees pick-up the
different match-ups. Naturally, the Pre-Game Conference plays a significant role in the correct plan,
methods and execution.
Normally, each referee picks up the closest active match-up, and possibly one more. Normally, you are
able to rule out one match-up that will not be active during a rebound situation that needs no active
attention.
Shot from the strong side: Lead covers the match-up close to the basket (holding and clamping fouls),
Trail & Centre focus on perimeter rebounds (pushing, crashing and “over-the-back”) on their respective
sides. Centre has primary coverage on goaltending or basket interference as Trail has shot coverage
(Diagram 93).
Shot from the weak side: Lead covers the match-up close to basket (holding and clamping fouls), Trail
& Centre focus on perimeter rebounds (pushing, crashing and “over-the-back”) on their respective
sides. Trail has primary coverage on goaltending or basket interference as Centre has shot coverage
(Diagram 94).
If there are no active match-ups on your side, you need to move to the next active match-up!
(not engaged with mechanics but the play & active mind-set)
FIBA MANUAL FOR REFEREES
ADVANCED 3 person officiating / v1.1 P / 41You can also read