Wave Agent Beta 1.2 - Sound Devices
←
→
Page content transcription
If your browser does not render page correctly, please read the page content below
Wave Agent Beta 1.2
WAV File Librarian Software
for Windows and Mac Operating Systems
Software Revision 1.2

Sound Devices, LLC
E7556 State Highway 23 and 33 • Reedsburg, WI • USA
+1 (608) 524-0625 • fax: +1 (608) 524-0655
Toll-Free: (800) 505-0625
www.sounddevices.com
support@sounddevices.com
Wave Agent Beta 1.2

       Table of Contents
       Installing Wave Agent . .  .  .  .  .  .  .  .  .  .  .  .  .  .  .  .  .  .  . 3                           Preventing Duplicate Takes                                                            14
           System Requirements                                                                              3      Editing Track Name and Function                                                       15
           Mac OS                                                                                           3      Editing Sampling Rate and Frame Rate                                                  15
           Windows OS                                                                                       3      Playback at Different Speeds                                                          16
       The Main Window .  .  .  .  .  .  .  .  .  .  .  .  .  .  .  .  .  .  .  .  .  .  . 4                       Editing Start Time Code Values                                                        16
           Menu Bar                                                                                         5   The Split/Combine Window. .  .  .  .  .  .  .  .  .  .  .  .  .  . 17
           Function Buttons                                                                                 7      The Split Poly Window                                                                 17
       Transport Control Window.  .  .  .  .  .  .  .  .  .  .  .  .  .  .  . 8                                    Splitting Polyphonics                                                                 18
       Take List.  .  .  .  .  .  .  .  .  .  .  .  .  .  .  .  .  .  .  .  .  .  .  .  .  .  .  .  .  .  . 9      The Combine Mono Window                                                               19
           Importing Takes Into The Take List                                                               9      Combining Files                                                                       20
           Customizing The Take List                                                                        9      Reordering Tracks While Combining                                                     22
           Sorting The Take List                                                                            9   The Reports Window.  .  .  .  .  .  .  .  .  .  .  .  .  .  .  .  .  .  .  . 23
           Selecting a Take for Playback                                                                   10   The Playback Mixer.  .  .  .  .  .  .  .  .  .  .  .  .  .  .  .  .  .  .  .  . 25
           Selecting Multiple Takes in the Take List 10                                                         Control Mode.  .  .  .  .  .  .  .  .  .  .  .  .  .  .  .  .  .  .  .  .  .  .  .  .  . 26
           Removing Takes From the Take List                                                               11      Control Mode Meters Window                                                            27
           Copying Takes From The Take List                                                                11      Control Mode Menu Bar                                                                 28
           Renaming Takes and Files                                                                        11      Control Mode Transport Window                                                         31
           Deleting Files                                                                                  12      Control Mode 788T Take List Window                                                    31
       The Metadata Editor .  .  .  .  .  .  .  .  .  .  .  .  .  .  .  .  .  .  .  . 12                           Control Mode Take List Navigation                                                     33
           Page 1 Metadata                                                                                 12   Appendix 1 - Metadata Implementation Chart.33
           Page 2 Metadata                                                                                 13   Appendix 2 - Keyboard Shortcuts .  .  .  .  .  .  .  .  . 35
           Navigating the Metadata Editor                                                                  14   Appendix 3 - Sound Report PDF Example .  . 36
           Editing Take Metadata                                                                           14

               Welcome
                   Thank you for choosing Wave Agent, the multi-purpose, cross-platform utility for playing, editing
                   and managing WAV files. Wave Agent includes a comprehensive and indispensable range of tools
                   for preparing audio files for problem-free passage through complex production workflows. Wave
                   Agent also allows for extended metering, display, and control of a connected Sound Devices 788T.

               Key Features
                           • Playback of polyphonic and monophonic WAV and Broadcast Wave files from any source.
                             (Supports up to 32 tracks).
                           • Viewing and editing file metadata
                           • Changing of sampling rate, frame rate, and start time code metadata stamps
                           • Splitting and combining polyphonic and monophonic files with selectable track assignments
                           • Batch editing
                           • Generating customized PDF and CSV Sound Reports
                           • Large time code display
                           • Monitor mixer with faders, pans, solos, mutes, and meters
                           • Drag-and-drop operation and comprehensive keyboard shortcuts for accelerated operation
                           • 788T Track Metering, Time Code Display, Record and Stop Control, Metadata Editing
                           • Mac OS and Windows compatible

               Copyright Notice and Release
                   All rights reserved. No part of this publication may be reproduced, stored in a retrieval system, or transmitted in any form or by any
                   means, electronic, mechanical, photocopying, recording, or otherwise, without the expressed written permission of SOUND DEVICES,
                   LLC. SOUND DEVICES is not responsible for any use of this information.
                   SOUND DEVICES, LLC shall not be liable to the user of this product or third parties for damages, losses, costs, or expenses incurred by
                   purchaser or third parties as a result of: accident, misuse, abuse, or failure of this product or unauthorized modificationsor alterations to
                   this product.
                   Microsoft Windows is a registered trademark of Microsoft Corporation. Macintosh is a registered trademark of Apple Computer. Other
                   product and company names mentioned herein may be the trademarks of their respective owners.
                   The sound waves logo is a registered trademark of Sound Devices, LLC.
 2
       Beta 1.2 Features and specifications will change. Visit www.sounddevices.com for the latest documentation.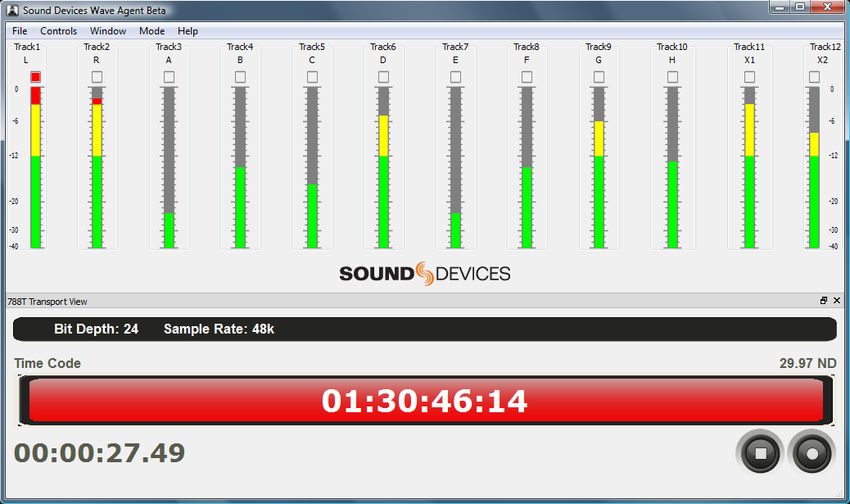
Wave Agent Beta 1.2

Installing Wave Agent

  The instructions in this guide apply to both the Mac OS and Windows OS versions of the application
  unless otherwise noted. Screen shot examples are taken from the Windows version. Where there are
  differences, screen shots and information for both Windows and Mac will be clearly detailed.

 System Requirements
   Operating Systems        Windows XP Service Pack 2
                            Windows Vista, SP1 recommended
                            Windows 7
                            MAC OS X (10.6 or greater), Intel
   Hard Drive Space         45 MB
   Display Resolution       1024 x 600 (recommended minimum)
   Control Mode             788T/788T-SSD v2.10+

  Realtime anti-virus monitoring applications may affect the performance of Wave Agent. Sound Devices
  recommends temporarily disabling or configuring them to ignore directories from which WAV files are to
  be imported.

 Mac OS
     1.   Download the Mac installation .dmg file from www.sounddevices.com
     2.   Run the WaveAgentInstall.mpkg.
     3.   Follow the installer instructions.
     4.   Once installation is complete, restart the computer.
     5.   After restart, launch the application by double-clicking Wave Agent.app located in the Wave
          Agent folder within the Applications directory.

 Windows OS
     1.   Download the installation .exe file from Sound Devices web site at www.sounddevices.com.
     2.   Run the WaveAgentInstall.exe file.
     3.   Follow the installer instructions.
     4.   Once installation is complete, restart the computer.
     5.   After restart, launch the application by double-clicking the Wave Agent icon on the Windows
          desktop.

  Wave Agent Beta 1.2 is free, unsupported software. For questions or comments,
  please send inquiries via e-mail to support@sounddevices.com or enter an inquiry
  at www.sounddevices.com/support/. Telephone support is not available for Wave
  Agent Beta 1.2

                                                                                                             3
Wave Agent Beta 1.2

       The Main Window
             Wave Agent has two main modes, Edit and Control Modes. The selected mode determines the
             overall functionality of Wave Agent. Edit Mode is the default mode and is used to manage files that
             were previously recorded. Control Mode is used during the recording, it allows for extended display
             and control- of the connected Sound Devices 788T or 788T SSD v.2.10 or higher. See Control Mode for
             details.
             Edit Mode’s Main Window is made up of two sections, the Take List of all imported takes and the
             Metadata editor. All windows and sections within them can be resized.
             Wave Agent’s commands and windows are accessed from the application’s menu bar, keyboard
             shortcuts, or the dedicated Function Buttons. Multiple windows can be open at the same time.
             Wave Agent always displays the Main Window on start up. The size and placement of the various
             windows is automatically saved so that when a window is opened, it is the same layout as when it
             was last open. Restore the factory default layout at any time by selecting Window > Restore Default
             Layout.

        Menu Bar

        Take List

        Function
           Buttons
        Vertical
            Divider

        Metadata
           Editor

        Horizontal
           Dividers

             Menu Bar                                                           Metadata Editor
             Accesses the drop-down menus for various                           Allows user to view and edit metadata fields.
             commands and functions. See Menu Bar for                           See Metadata Editor for more details.
             more details.
                                                                                Vertical Divider
             Take List                                                          Click and drag over this boundary to resize
             Displays an overview of user-selected                              the Metadata Editor/Take List to the desired
             metadata for all imported takes. See Take List                     size.
             for more details.
                                                                                Horizontal Dividers
             Function Buttons                                                   Click and drag over these areas to resize and
             Provide quick access to common functions                           hide the Metadata Info sections.
             and windows. See Function Buttons for more
             details.

 4
       Beta 1.2 Features and specifications will change. Visit www.sounddevices.com for the latest documentation.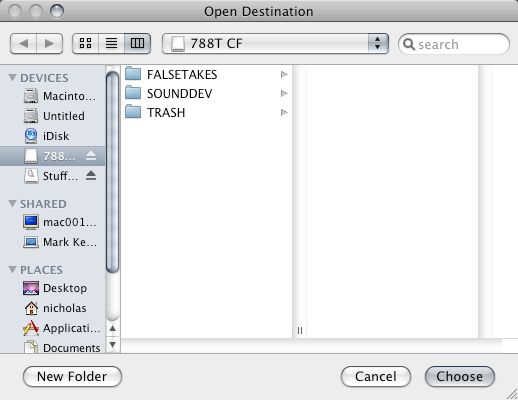
Wave Agent Beta 1.2

  Menu Bar
   Accesses the drop-down menus for various commands and functions.
   Windows Menus

File Menu
    Provides access to the File Menu.
    From the File Menu:
    • Import files using the File Browser
    • Copy files to select destinations
    • Rename select files in the Take List
    • Access the Preferences Menu
    • Exit Wave Agent

Controls Menu
   Provides access to transport controls and
   lists keyboard shortcuts for controlling the
   transport functions.

Window Menu
   Provides access to the various windows and
   lists keyboard shortcuts for opening and
   closing each panel. Allows user to quickly
   restore the factory default layout at anytime.

Mode Menu
   Selects the overall mode of operation for
   Wave Agent. Edit mode is default. Control
   Mode is only available when a 788T or
   788T-SSD v.2.10+ is connected to the
   computer via USB and is set to Connect to
   Wave Agent in the 788T Setup Menu.
Help Menu
   Provides access to the Wave Agent User
   Guide and Technical Information, Sound
   Devices Support web page, and current
   Software version information.

                                                                                       5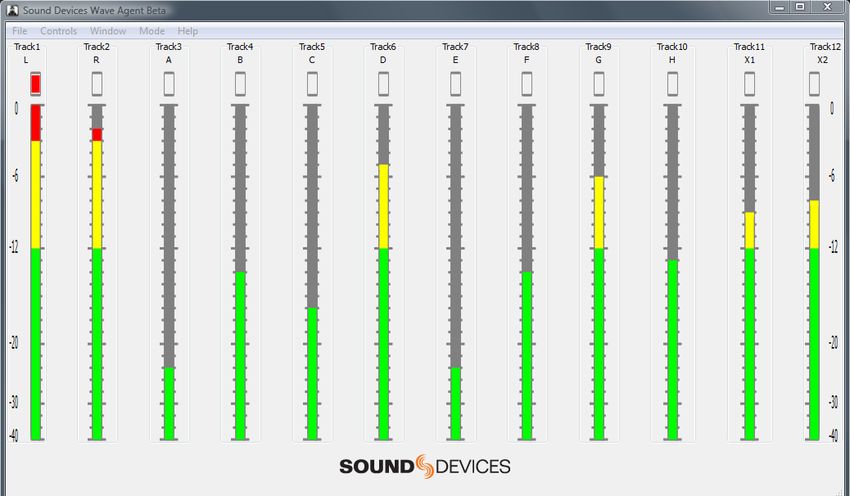
Wave Agent Beta 1.2

             Mac OS X Menus

        Wave Agent Menu
           Provides access to the Wave Agent
           Menu. From this menu:
           • View Software version information
           • Access the Preferences Menu
           • Access to Mac Services Menu
           • Hide/show Wave Agent or other
           applications
           • Exit Wave Agent

        File Menu
            • Import files to the Take List
            • Copy all files in the Take List to
            select destinations
            • Rename select files in the Take List

        Controls Menu
           Provides access to transport controls
           and lists keyboard shortcuts for
           controlling the transport functions.

        Window Menu
           Provides access to the various windows
           and lists keyboard shortcuts for opening
           and closing each panel. Allows user to
           quickly restore the factory default layout
           at anytime.

        Mode Menu
           Selects the overall mode of operation for
           Wave Agent. Edit mode is default. Control
           Mode is only available when a 788T or
           788T-SSD v.2.10+ is connected to the
           computer via USB and is set to Connect to
           Wave Agent in the 788T Setup Menu.

        Help Menu
           Provides access to application search,
           launches the Wave Agent User Guide, or
           provides direct access to Sound Devices
           Technical Support web page.

 6
       Beta 1.2 Features and specifications will change. Visit www.sounddevices.com for the latest documentation.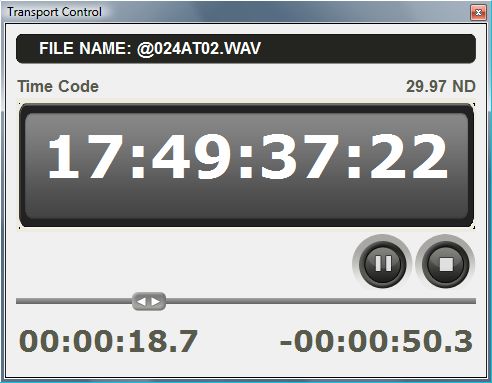
Wave Agent Beta 1.2

  Function Buttons
Import Button
   Opens the Import window from which you can select and import files.
   Ctrl + O (Windows)
   Apple + O (Mac).

Clear Button
   Click to remove the highlighted takes from the Take List. This does not delete the actual files.
   Delete (Windows)
   Fn + Delete (Mac).

Rename Button
   Click to rename the takes highlighted in the Take List. Files will be renamed according to the
   selected take’s scene and take number. Warning: this instantly renames the original file(s). This action
   cannot be undone.
   Ctrl + N (Windows)
   Apple + N (Mac).

Copy To Button
   Click to copy the highlighted takes in the Take List to a user-defined destination.
   Ctrl + C (Windows)
   Apple + C (Mac).

Delete File(s) Button
   Click to permanently delete the highlighted take(s) from the computer or attached storage medium
   from which the file(s) were imported. Warning: this permanently deletes the original file, it does not put
   the file in the Trash or Recycle Bin.

Split/Combine Button
    Opens the Split/Combine window from which WAV files can be de-interleaved or interleaved.
    Ctrl + I (Windows)
    Apple + I (Mac).

Create Report Button
   Opens the Reports window from which you can customize and create sound report PDFs.
   Ctrl + R (Windows)
   Apple + R (Mac).

Play/Pause Button
    Toggles between playing and pausing the currently selected take.
    Space Bar (Windows and Mac).

Stop Button
   Stops playback and cues to the beginning of the currently selected take.
   F3 (Windows and Mac, on the Mac you may have to press fn + F3 depending on how this is set in
   Keyboard System Preferences).

                                                                                                                7
Wave Agent Beta 1.2

       Transport Control Window
             The Transport Control window manages all playback functions. It also shows time code, absolute
             time, and remaining time values when a file is being played. The Transport Control Window can be
             set in the Preferences Menu to automatically open upon Playback.

        File Name

                                                                                                                    Frame Rate
                                                                                                                       Indicator

        Time Code
           Display

                                                                                                                    Play/Pause
                                                                                                                        Button
                                                                                                                    Stop Button
        Location Slider

        Absolute Time                                                                                               Remaining Time
           Counter                                                                                                     Counter

             Take/File Name                                                     Stop Button
             Displays the filename of the take currently                        Stops playback and cues back to the
             selected in the Take List and cued for                             beginning of the currently selected take.
             playback.
                                                                                Absolute Time Counter
             Time Code Display                                                  Represents time elapsed from the beginning
             The HH:MM:SS:FF (Hours: Minutes: Seconds:                          of the take.
             Frames) display the current time code of the
             take selected in the Take List. If the file is a                   Location Slider
             standard WAV file without a time code stamp,                       When playback is paused or stopped, drag
             absolute time is displayed. A semicolon                            the slider to the left or to the right to locate
             between the SS and FF fields indicates that the                    playback positions within the currently
             frame rate format is Drop frame (DF).                              selected take. The slider provides a visual
                                                                                indication of the current playback position of
             Frame Rate Indicator                                               a take. Functions during Play and Pause.
             Displays the time code frame rate of the
             selected take.                                                     Remaining Time Counter
                                                                                Counts down to the end of the take.
             Play/Pause Button
             Toggles between playing and pausing the
             currently selected take.

 8
       Beta 1.2 Features and specifications will change. Visit www.sounddevices.com for the latest documentation.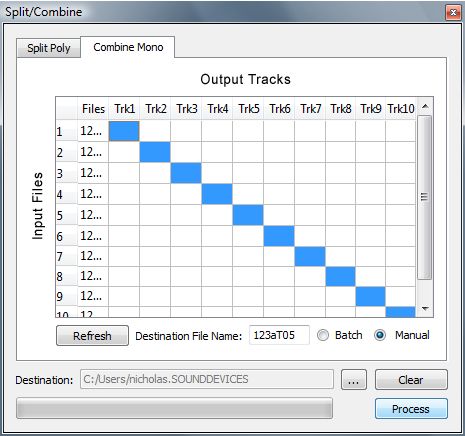
Wave Agent Beta 1.2

Take List
  The Take List is an easy-to-read summary of metadata for all imported takes. All takes imported into
  Wave Agent can be viewed in the Take List.. See Importing Takes in to the Take List.
  The Take List displays files by rows, with each row representing one take, whether or not that take is
  made up of a single, polyphonic file or a group of multiple monophonic files (siblings). Hovering the
  mouse over a take reveals the file’s location.
  The Channels column displays the number of tracks associated with each take and displays MONO
  or POLY to indicate whether the item comprises of monophonic files or a single polyphonic file.
  Takes comprising of monophonic files are also identified within the Current Name column by the
  suffix ‘_X’ appended to the take’s file name.
  An asterisk following the MONO or POLY designator; that is, (MONO*) indicates that there is a
  possible problem with the channel header information within the WAV file.

 Importing Takes Into The Take List
  Import individual files, groups of files, or entire folders of files into the Take List. Only files with a
  .WAV extension can be imported. There are two ways to import files into the Take List:
     • Drag-and-drop files or folders directly into the Take List,
     • Use the Import button to open the Import File Browser and select individual or multiple files.

  When files are imported from a folder into the Take List, Wave Agent automatically searches the folder for
  files belonging to the same take.

 Customizing the Take List
  Configure the Take List’s column headings and layout so that only relevant information is displayed.
  Add or remove columns using the Metadata Fields List: Right-click (Windows) or Ctrl + click (Mac)
  in the Take List to display the list of metadata fields available for viewing. Metadata fields with
  check marks will be displayed in the Take List. Click any item in the list to place or remove a check
  mark.
  Change the order in which the columns are displayed in the Take List by clicking and dragging the
  column headers. Change the width of any column by using the resizing tool. The resizing tool will
  appear when the cursor is placed between column headers.

 Sorting the Take List
  Organize takes in the Take List in various ways by sorting according to column headings.
  Click on any column heading to sort the Take List by that column heading type. To sort in the
  opposite direction, click on the column heading again. An arrow appears in the column heading to
  indicate sorting direction.

  When files are imported into the Take List, they are automatically sorted by Start Time Code.

                                                                                                                   9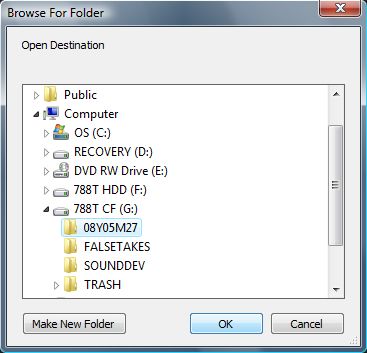
Wave Agent Beta 1.2

           Column                            Column
              Headers                           Dividers

                                                                                              Metadata
                                                                                                 Fields List

             Column Headers
             Column Headers represent the various properties of the listed takes. Choose which columns are
             displayed by using the Metadata Fields List. Change the order of columns by clicking and dragging
             a column heading.

             Column Dividers
             Click and drag a column divider to change the width of a column.

             Metadata Fields List
             Right-click (Windows) or Ctrl + click (Mac) in the Take List to display the list of metadata fields
             available for viewing. Metadata fields with check marks will be displayed in the Take List. Click any
             item in the list to place or remove a check mark.

           Selecting a Take for Playback
             Select a take for playback by clicking on it in the Take List. Alternatively, click anywhere in the list
             and use the up/down arrows to select any take.
             There are several ways to start playback. Either double click on a take or select a take with a single
             click then press the Play button in the Transport Control or Main window.

           Selecting Multiple Takes in the Take List
             In order to select multiple takes for batch editing, clearing, renaming, copying, or deleting, it is
             necessary to highlight multiple takes in the Take List. Select multiple takes in Windows by using the
             standard Shift + click or Ctrl + click selection methods. Select multiple takes in Mac, by using the
             Shift + click or Apple + click selection methods.
             Select all takes in the take list by using Ctrl + A (Windows) or Apple + A (Mac).

             When a multiple take selection is made, the Metadata Editor below shows the metadata for the last take
             that was added (clicked) to the multiple take selection. See Editing Takes - Batch Editing.

 10
       Beta 1.2 Features and specifications will change. Visit www.sounddevices.com for the latest documentation.
Wave Agent Beta 1.2
Removing Takes From the Take List
To remove items from the Take List, simply highlight the takes you want to remove and click the
Clear button or use the keyboard shortcut keys Delete (Windows) Fn + Delete (Mac).
Copying Takes From the Take List
The Copy To button is a convenient tool for copying edited files to any local destination directory
or FAT (File Allocation Table) based removable media connected via FireWire or USB. It can also be
used to use copy files across a suitably configured network. To copy files from the Take List:
1. Select a take or takes from the Take List and click the Copy To button.
2. In the destination browser, select a destination and click OK (Windows) or Choose (Mac).
Windows Mac OS
Renaming Takes and Files
WAV files with descriptive file names are useful in Post Production, even with comprehensive
metadata available in a Broadcast WAV file. Descriptive file names can immediately indicate the
contents of the file without having to import the file into a specialist application.
Wave Agent simplifies the renaming of files/takes. Wave Agent allows the user to:
• Rename individual files or batch rename files.
• Ensure file name tallies with embedded metadata.
• Ensure that file name edits are rippled through to all sibling files.
Wave Agent renames files according to their embedded scene and take metadata. For example, a file
with scene name = 001 and take number = 12 is renamed as follows:
001T12.WAV
The ‘T’ separator identifies the take number.
To rename files:
1. Select a take or takes from the Take List and click the Rename button.
2. Click OK to process or Cancel to exit without processing.
Wave Agent will not rename a take if it detects that the rename process will result in file name
duplication.
11Wave Agent Beta 1.2
Deleting Files
To permanently delete a take and its constituent files:
1. Select a take or takes from the Take List and click the Delete File(s) button.
2. Click OK to process or Cancel to exit without deleting
Deleting files permanently removes the file from the computer or attached storage medium from which the
file(s) were imported into Wave Agent. Deleted files do not get sent to the Trash or Recycle Bin.
The Metadata Editor
The Metadata Editor allows you to view and edit WAV file metadata. Select iXML, BEXT, and Format
chunk metadata are editable, including Project, Tape (Roll), Scene, Take, Track Name, Track Function,
and Notes. The Metadata Editor is also used to change sampling rate, time code frame rates, and
start time code stamps and ensures that time code information is updated accordingly. Changing
sampling rates can also be used to alter playback speed. Takes can be identified as Circle Takes or
Wild Tracks and edit descriptive notes. See Appendix 1 - Metadata Implementation Chart.
Standard WAV files do not contain bEXT or iXML information. When iXML or bEXT type metadata is
added by the user to a standard WAV, Wave Agent automatically generates Broadcast WAV metadata and
generates the necessary metadata chunks.
Page 1 Metadata
Recording Track
Info Info
General
Info
Save
Button
Notes More Info
Button
General Info
Displays various metadata including Project, Scene, Take, Tape, etc...
Recording Info
Displays various recording characteristics including sample rate, frame rate, and time code
information.
Track Info
Displays various track-related info such as channel number, track name, and track function. Track
names and functions can be edited by clicking the text fields.
12
Beta 1.2 Features and specifications will change. Visit www.sounddevices.com for the latest documentation.Wave Agent Beta 1.2
Notes
Displays notes entered by the user.
Circled Take
Clicking this check box circles the currently selected take by setting the corresponding iXML circle
flag. Circling can be used to identify or recommend which takes should be used in Post.
Wild Track
Clicking this check box identifies the currently selected take as a Wild Track by setting the
corresponding iXML wildtrack flag. Wild Tracks are typically atmosphere or sound effects
recordings that have no corresponding picture to sync with.
Save Button
Click to save metadata changes to highlighted takes in the Take List.
Keyboard Shortcut: Ctrl + S (Windows) and Apple + S (Mac).
More Info Button
Click this button to toggle between the two pages of the Metadata Editor.
Page 2 Metadata
File Set User
Info Info
History
Originator
Info
Save
Button
Sync More Info
Points Button
History Info File Set Info
Displays a selected file’s Original File Name Displays data that provides links between
and Parent Name, the name of the file from sibling files so that applications can
which the current file was derived. automatically rebuild complete takes.
User Info Sync Point Info
Additional iXML notes field. Displays sync point, cue, mark, region, and
slate position data, if available.
Originator Info
Contains information about the recorder used
and original time stamp of the recording.
13Wave Agent Beta 1.2
Navigating the Metadata Editor
The Metadata Editor is divided into two pages. Toggle between the two pages by clicking the More
Info button. Each page organizes metadata into logical groups, making it easy to view and analyze
related file properties.
For fast navigation between the Take List and the most commonly used metadata fields in page one
of the Metadata Editor, use the tab key to select among the following: Take List > Scene > Take >
Notes.
Editing Take Metadata
Metadata for single takes or a whole list of takes are editable with Wave Agent. See Appendix 1 -
Metadata Implementation Chart to see which metadata can be edited and which can be batch-edited in Wave
Agent.
Editing an Individual Take
To view and edit an individual take:
1. Highlight an individual take in the Take List by single-clicking it or by moving through takes
with the up/down arrows. The metadata for the selected take is displayed in the Metadata
Editor. To use the up/down arrows for selecting takes, click anywhere in the Take List.
2. Modify the contents of editable metadata fields, then save changes by clicking the Save
button or by using Ctrl + S (Windows) or Apple + S (MAC). If a different take is selected
from the Take List without first clicking the Save button, a warning dialog box will prompt to
discard the changes or return to take editing.
Windows OS Mac OS
When editing a take of several sibling files, Wave Agent makes changes to all associated files.
Batch Editing
To edit a batch of takes:
1. Select multiple takes in the Take List. See Selecting Multiple Takes in the Take List. The metadata
for the last selected take is shown in the Metadata Editor.
2. Modify the contents of any editable metadata field, then save the changes by clicking the
Save button or by using Ctrl + S (Windows) or Apple + S (MAC). Changes will be made to all
selected takes. If a different take is selected from the Take List without first clicking the Save
button, a warning dialog box will prompt to discard the changes or return to take editing.
Preventing Duplicate Takes
When metadata edits are saved, Wave Agent scans the Take List for files with duplicate scene/take
combinations. If a duplicate is detected, a dialog box prompts to continue or cancel the edit.
Windows OS Mac OS
14
Beta 1.2 Features and specifications will change. Visit www.sounddevices.com for the latest documentation.Wave Agent Beta 1.2
Click OK to continue. Wave Agent will prefix a duplicate take’s scene name with the + symbol. This
makes it easy to identify which takes are duplicates.
Tip: Sort by Scene Name to group all duplicate takes together in the take list.
Click Cancel to return all metadata to its original state.
Editing Track Name and Function
Track Names and Functions can be viewed and edited from within the Metadata Editor.
To edit Track Names and Functions.
1. Select a take or multiple takes by highlighting them in the Take List.
2. Locate the Track Info section of the Metadata Editor. Click the Track Name or Track Function
text field for the desired channel to be edited.
3. A text cursor will appear, edit the Track Name and/or Function.
4. Deselect the edited text field by clicking elsewhere or pressing the Enter or Tab keys.
5. Save edits by clicking the Save button or by pressing Ctrl + S (Windows) or Apple + S (MAC).
Batch Track Info editing is only applied to Takes with the same number of channels.
Editing Sampling Rate and Frame Rate
A file, or group of file’s, Sampling Rate and Time Code Frame Rate stamps can be changed from
their originally recorded value. Changing one or both of these parameters alters the file’s time code
metadata. Additionally, changing the File Sampling Rate alters the file’s playback speed. This feature
can be used to resolve various post-production problems, but it can also cause problems if misused.
Please use with caution!
Before editing the File Sample Rate or Frame Rate, check or uncheck the Preserve Start TC check
box. When the box is checked, changing the frame rate or sampling rate does not alter the Start TC
(HH:MM:SS:FF); Wave Agent recalculates the Samples Since Midnight stamp to preserve the Start
TC. By preserving the Start TC, synchronization with cameras and other time code equipment is
maintained. Preserve Start TC is checked by default and should be for most situations.
When the check box is unchecked, changing the Frame Rate or Sampling Rate will recalculate the
Start TC to preserve the Samples Since Midnight stamp. Do not use this method unless there is a
specific reason to recalculate the Start TC value.
By altering the sampling rate Wave Agent can play back files over a wide range of standard and non-
standard speeds.
To edit the Frame Rate click on the drop-down box and make a selection from the list. After you
have made changes to the sampling rate and frame rate, click Save. A dialog box will prompt you to
continue.
Windows OS Mac OS
15Wave Agent Beta 1.2
Playback at Different Speeds
By changing the file sampling rate metadata, Wave Agent can be used to playback takes at almost
any speed. For instance, changing the sampling rate of a file recorded at 96 kHz to 48 kHz will make
the take playback at half its originally recorded speed and pitch. This technique is often used for
creating special sound effects. Non-standard file sampling rates can be set too.
To set a non-standard sample rate:
1) In the file sample rate box, manually type a number from 2,000 (2 kHz) to 200,000 (200 kHz),
then press ENTER.
2) Click Save to apply the sampling rate change.
Playback speed is limited by the hardware capabilities of the computer’s sound card.
Editing Start Time Code Values
Start Time Code values can be viewed and edited from within the Metadata Editor. Standard WAV
files without time code will have a default Start TC stamp of 00:00:00:00 when imported into Wave
Agent. Standard WAV files imported and saved in Wave Agent will be converted to Broadcast WAV
files (with WAV extensions). This means the file will have additional file information called metadata
(iXML and bEXT) written to the file’s header.
Batch editing of Start Time Code values is not supported. If multiple takes are highlighted in the Take
List, the new Start Time Code value will only apply to the take currently loaded in the Metadata Editor.
To edit the Start Time Code value.
1. Select a take by highlighting the take in the Take List.
2. Click the EDIT button located in the Start TC field of the Metadata Editor.
3. The Start TC Edit Window will appear, select to Edit Manually (proceed to step 4a) or Use
Originator Time (proceed to step 4b).
4a. If Edit Manually is selected, enter a time code value using two digits in each time field
HH:MM:SS:FF. Hours should not exceed a value of 23, minutes and seconds should not
exceed a value of 59, and frames should not exceed one less of the value of the selected take’s
frame rate, for example, if the frame rate is set to 30 the value should not exceed 29. If the
entered value is invalid a prompt will appear. Reenter the time code value with a valid time.
4b. If Use Originator Time is selected, the time code value will automatically be entered
according to the take’s originator time. If a Originator Time is not available a prompt will
appear and the Start TC value will have to be entered manually (see step 4a).
5. Click OK to exit the Start TC Edit Window.
6. Click Save or Ctrl + S (Windows) or Apple + S (MAC) to save the changes.
16
Beta 1.2 Features and specifications will change. Visit www.sounddevices.com for the latest documentation.Wave Agent Beta 1.2
The Split/Combine Window
The Split/Combine window enables the splitting (de-interleaving) of polyphonic files and
combining (merging or interleaving) of monophonic sibling files into a single polyphonic file. Up to
32 tracks per take are supported.
The split and combine functions apply to all takes in the Take List except Combine Mono Manual mode.
The Split Poly Window
Split Poly Tab
Split Matrix
Destination
File Path
Destination Selector Clear Button
Progress Bar
Process Button
Wave Agent supports up to 32 tracks per take for all functions (split, combine, playback). Split/Combine
screen shots in this guide show less tracks for visual formatting purposes. The above screen shot
illustrates what the entire Split/Combine screen looks like when expanded.
17Wave Agent Beta 1.2
1. Split Poly Tab
Click to display the Split Poly window.
2. Split Matrix
Click in a cell to route an input track to a particular destination file. Blue highlighted cells indicate
the current track-to-file routing.
3. Destination File Path
Displays the destination for the processed split files.
4. Destination Selector
Click to browse for a folder destination for the processed split files.
5. Clear Button
Clears the matrix.
6. Process Button
Click to begin processing of all takes in the Take List.
7. Progress Bar
Displays the progress of the operation.
Splitting Polyphonics
Using the The Split Poly panel polyphonic WAV files selected from the Take List can be separated
into mono files. The matrix defines how tracks are grouped and split. The matrix allows splitting into
almost any combination of poly and mono files. To split poly files:
1. Select the Split Poly tab in the Split/Combine panel.
2. Select a destination directory for the split files.
3. To route a particular input track to a particular output file, click in the relevant matrix cell.
For Example, an 8-track poly file comprising of a stereo mix on tracks 1 and 2 and ISO tracks on
tracks 3-8 was recorded. Using Wave Agent’s Split Poly feature the file can be split into one stereo
poly file for the mix (tracks 1 and 2) and six mono files for the ISOs (tracks 3-8). The following screen
shot displays the proper cell selection for this particular split.
18
Beta 1.2 Features and specifications will change. Visit www.sounddevices.com for the latest documentation.Wave Agent Beta 1.2
By default, track 1 is routed to file 1, track 2 is routed to file 2 etc. This results in one track per file,
that is the poly is split into mono files only.
Wave Agent automatically names each resulting split file with a suffix that identifies the tracks that it
contains. For example, when an 8-track poly file named S001T01.wav is split into four 2-channel poly
files (tracks 1-2, tracks 3-4, tracks 5-6, tracks 7-8), the resulting file names are:
S001T01_1_2.wav
S001T01_3_4.wav
S001T01_5_6.wav
S001T01_7_8.wav
The Combine Mono Window
Combine
Mono Tab
Combine
Matrix
Refresh Button Batch/Manual
Destination Clear Button
File Path
Process
Button
Progress Destination
Bar Selector
19Wave Agent Beta 1.2
1. Combine Mono Tab 7. Progress Button
Click to display the Combine window. Indicates file operation progress.
2. Combine Matrix 8. Destination File Name
Click in a cell to route an input mono file to Enter a name for the resulting combined file
an output track of the destination file. when Manual combining is selected.
3. Destination File Path 9. Batch
Displays the destination for the combined Select to have Wave Agent automatically
files. process all files in the Take List.
4. Destination Selector 10. Manual
Click to browse for a folder destination for the Select to manually select and route mono files.
combined files.
11. Refresh Button
5. Clear Button Refreshes the matrix when the take list has
Clears the matrix. been reloaded.
6. Process Button
Click to begin the combine process.
Combining Files
The Combine Mono feature is used to join separate, related monophonic WAV files into a single
polyphonic WAV file. It can also be used to change the order of tracks; this is particularly useful for
moving a mix track so that it appears as the top track in a picture editor’s timeline, which is typically
an editor’s preference. Before combining files Wave Agent automatically assesses whether mono files
are originally from the same take. Up to 32 tracks per take are supported.
There are two methods for combining files in Wave Agent.
• Automatically batch combine all files in the Take List
• Manually select which files to combine
To batch combine files:
1. Import the required WAV files into the Take List.
2. Select the Combine Mono tab in the Split/Combine panel.
3. Select Batch.
4. Choose a destination folder for the target files.
5. Route each input mono file to an output track of the destination poly file by clicking in the
relevant matrix cells. A blue-filled cell indicates the current routing.
In batch mode, target files are automatically named by appending track number ID’s separated by
underscores to the end of the original file name.
For example, if mono files S001T1_1.wav, S001T1_2.wav, S001T1_3.wav and S001T1_4.wav which
represent tracks 1 through 4 are combined, the resulting polyphonic file is named S001T1_1_2_3_4.wav.
Tip: If desired, change the filename S001T1_1_2_3_4.wav to S001T1.wav using the rename function.
To manually combine files:
1. Import the required WAV files into the Take List
2 Select the Combine Mono tab in the Split/Combine panel
3. Select Manual.
20
Beta 1.2 Features and specifications will change. Visit www.sounddevices.com for the latest documentation.Wave Agent Beta 1.2
4. Choose a destination folder for the target file.
5. Enter a name for the target file in the Destination File Name box.
When Manual is selected,
the Destination File Name
Box appears.
6. Manually select the files you would like to combine and route them to tracks by clicking in
the relevant matrix cells. A blue-filled cell indicates the current routing.
If unrelated files are selected for combining, Wave Agent will report “Selected Files cannot be combined”.
21Wave Agent Beta 1.2
Reordering Tracks While Combining
The Combine matrix allows you to reorder tracks. For example, a mix recorded on tracks 7 and 8 can
be moved to tracks 1 and 2. This is sometimes required by AVID operators who like to have the mix
tracks appear at the top in the Avid timeline.
For example, consider a take comprising of 8 monophonic files where tracks 7 and 8 represent a
2-channel mix and tracks 1-6 represent 6 ISO tracks. To move the 2-channel mix to tracks 1 and 2 and
have tracks 1-6 shift up to tracks 3-8, select the cells as follows:
22
Beta 1.2 Features and specifications will change. Visit www.sounddevices.com for the latest documentation.Wave Agent Beta 1.2
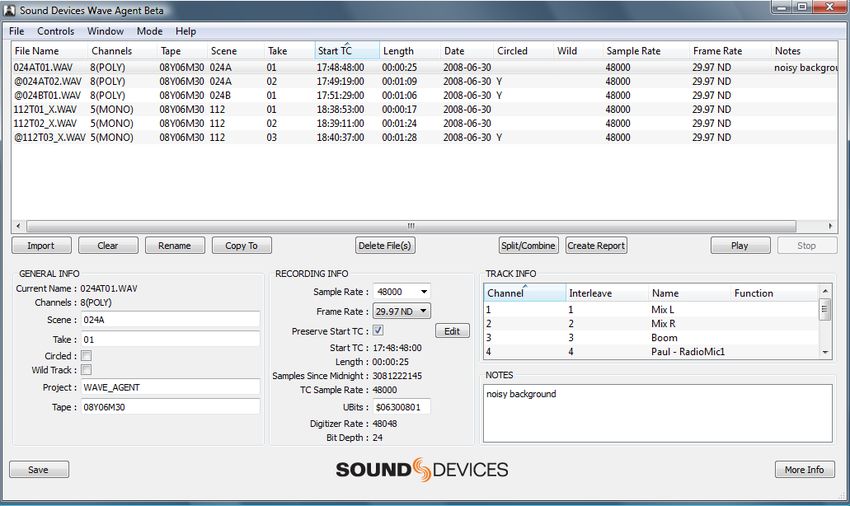
The Reports Window
The Reports window simplifies the task of creating sound reports. Sound Reports can be customized
and exported as a PDF or a CSV (Comma Separated Value) file. See Appendix 3 - Sound Report PDF
Example. The Reports window is separated into two tabbed pages:
Header Info Tab
Report Info Tab
Report Format
Column Header
Preview
Sound Report
Button
Header Info Tab
Click to display, choose, and enter project, contact, and recording parameter details. Select the
information to appear in each field of the Sound Report by clicking on the relevant drop down
boxes.
Report Info Tab
Click to choose which column headers to include in the report. Select from File Name, Scene,
Take, Tape, Channels, Sample Rate, Frame Rate, Bit Depth, Start TC, Duration, End TC, Notes (in
column or row format), Wild-track, Circled, and Track Info. Choose whether to include all the takes
contained within the Take List or only the Circled, Non-Circled and/or Wild takes.
Report Format Selector
Selects the file format in which the Sound Report will be generated. Using the drop-down-menu,
select between PDF or CSV. PDF Sound Reports will only contain fifteen column headers, this
includes the Track Info columns. CSV Sound Reports have no column header limitations and are
commonly imported into applications designed to manage spreadsheets.
Column Header Preview
Previews the layout of the column headers selected in Include Columns.
23Wave Agent Beta 1.2
Sound Report Button
Click to create your own customized Sound Report. See Appendix 3 - Sound Report PDF Example.
24
Beta 1.2 Features and specifications will change. Visit www.sounddevices.com for the latest documentation.Wave Agent Beta 1.2
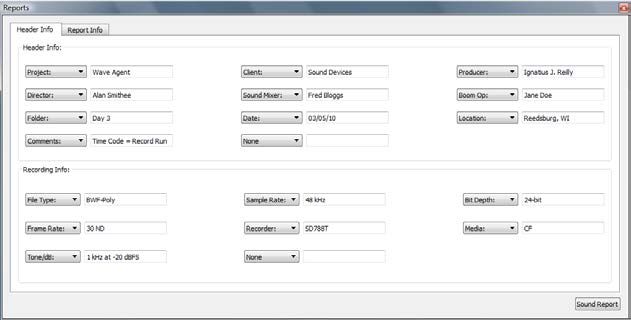
The Playback Mixer
The Playback Mixer provides multi-channel monitoring, metering, and adjustment of files while
playing back. Up to 32 tracks are supported. Faders and left-center-right pan controls are usable in
real-time to mix to the computer’s default sound card. Channel solos and mutes apply to individual
channels or groups of channels. Track names beneath the meter columns identify the source of each
track. The Playback Mixer window can be set in the Preferences Menu to automatically open upon
file Playback.
Meters always show pre-fader levels.
Pan Control
Clip Indicator
Meter
Fader
Solo
Gain Value
Track Name Mute
Pan Control Solo
Each track can be panned left , center or right. Click to solo the track.
Clip Indicator Gain Value
Displays clip/overload activity. Displays the current gain value. Gain can be
changed by entering a value between -48 dB
Meter and +12 dB.
High-resolution pre-fade meters.
Track Name
Fader Displays the track name of the channel.
Drag up/down to change track gain from -48
dB to +12 dB. Mute
Click to mute the track.
25Wave Agent Beta 1.2
Control Mode
Wave Agent Control Mode allows a Sound Devices 788T or 788T-SSD to be connected to Wave Agent
over USB. When connected, Wave Agent can be used to display 788T track metering, time code, and
various other settings. Wave Agent can also be used to start and stop recordings of the connected
788T and to enter or edit metadata for previous, current, and upcoming takes. The 788T does not
send any audio to Wave Agent over the USB connection. 788T audio is still monitored locally from
the 788T. Wave Agent does not send any audio to the computer’s sound card while in Control Mode.
Control Mode option is grayed out and unavailable when the 788T is not properly connected or
if the 788T connected is running a revision of firmware that is not compatible with the software
revision of Wave Agent. It is best practice that both Wave Agent and the 788T are running the latest
software revisions.
The 788T C. Link In port is disabled when the Setup Menu FireWire/USB: Connection is set to Connect
to Wave Agent. 788T Multi-Unit Linking and Sound Devices CL-1 and CL-2 accessories are not
supported when this mode is selected.
To connect the 788T (v. 2.10+) to Wave Agent Beta, perform the following steps.
1. Enter the 788T Setup Menu option FIREWIRE/USB: CONNECTION.
2. Select the CONNECT TO WAVE AGENT (USB ONLY) option.
3. Connect a USB cable to the 788T USB-B port and to one of the computer’s USB-A ports.
4. Launch Wave Agent Beta.
5. Click on the Mode pull-down menu. Select the Control Mode option. The Control Mode
option is grayed out and unavailable when the 788T is not properly connected.
There are three windows in Control Mode, the Meter Window, Transport Window, and 788T Take
List Window. By default the Meter and Transport windows are docked together. The Meter Window
is the main window, closing this window will exit Wave Agent altogether. To close the Transport
Window click on the X located on the right hand-side of the Vertical Divider. To separate it from the
Meter Window click and drag it away from the Meter Window or click the “Restore Down” icon
adjacent to the X. Each window can be resized to the user’s preference.
26
Beta 1.2 Features and specifications will change. Visit www.sounddevices.com for the latest documentation.Wave Agent Beta 1.2
Menu Bar
Meter
Window
Vertical
Divider
Transport
Window
The following warning screen appears when the USB connection between the computer and the 788T
is disrupted. Click OK to exit to Edit Mode, or reestablish the USB connection for Control Mode.
Things to Consider When Using Wave Agent Control Mode
The following is a list of recommended practices for best performance when using the 788T/Wave
Agent Control Mode System.
• Be certain both Wave Agent and the 788T are running the latest version of software.
• Record to one or two media.
• Record polyphonic files.
• Record to fast media such as hard drives, solid state drives, and high performance
CompactFlash cards.
• Format 788T media on a regular basis.
• Wait for the System Status messages in the Wave Agent Take List to clear before making
additional edits.
• Make metadata edits while the 788T is in standby mode, this is the most efficient time to make
edits to previously recorded takes. Editing previously recorded takes while recording, requires
having multiple files open at the same time which increases the chance of a media slow error.
Control Mode Meters Window
The Meters Window allows the user to view metering of all 12-tracks of the connected 788T.
27Wave Agent Beta 1.2
Menu Bar
Track Indicator
Clip Indicator
Meter
Menu Bar Clip Indicator
Accesses the drop-down menus for various Displays clip/overload activity.
commands and functions available in Control
Mode. See Control Mode Menu Bar for more Meter
details. High-resolution track meters. The ballistics
and peak hold time follow the settings of the
Track Indicator connected 788T.
Displays the track number and letter of the
corresponding 788T track.
Control Mode Menu Bar
Accesses the drop-down menus for various commands and functions while in Control Mode.
28
Beta 1.2 Features and specifications will change. Visit www.sounddevices.com for the latest documentation.Wave Agent Beta 1.2
Windows Control Mode Menus
File Menu
Provides access to the File Menu from
which the user can exit Wave Agent.
Controls Menu
Provides access to Control Mode Control
Menu from which the user can send
remote Record and Stop commands to the
connected 788T/788T-SSD.
Window Menu
Provides access to the Control Mode
Window Menu from which the user can
open the Transport Window, the 788T Take
List Window, or quickly restore the Factory
Default Layout.
Mode Menu
Provides access to the Mode Menu. The
selected item determines the overall mode
of operation of Wave Agent. Edit mode
is default. Control Mode is only available
when a 788T or 788T-SSD v.2.10+ is
connected via USB to the computer and is
set to Connect to Wave Agent in the 788T
Setup Menu.
Help Menu
Provides access to the Wave Agent User
Guide and Technical Information, Sound
Devices Support web page, and current
Software version information.
29Wave Agent Beta 1.2
Mac Control Mode Menus
Wave Agent Menu
Provides access to the Wave Agent
Menu. From this menu:
• View Software version information
• Access the Preferences Menu
• Access to Mac Services Menu
• Hide/show Wave Agent or other
applications
• Exit Wave Agent
File Menu
Provides access to the Control Mode
File Menu, all items are grayed out
when in Control Mode.
Controls Menu
Provides access to Control Mode Control
Menu from which the user can send
remote Record and Stop commands to the
connected 788T/788T-SSD.
Window Menu
Provides access to the Control Mode
Window Menu from which the user can
open the Transport Window, the 788T
Take List Window, or quickly restore the
Factory Default Layout.
Mode Menu
Provides access to the Mode Menu. The
selected item determines the overall mode
of operation of Wave Agent. Edit mode
is default. Control Mode is only available
when a 788T or 788T-SSD v.2.10+ is
connected via USB to the computer and is
set to Connect to Wave Agent in the 788T
Setup Menu.
Help Menu
Launches the Wave Agent User Guide or
Sound Devices Technical Support web
page.
30
Beta 1.2 Features and specifications will change. Visit www.sounddevices.com for the latest documentation.Wave Agent Beta 1.2
Control Mode Transport Window
The Control Mode Transport Window allows the user to view the rolling time code value, A-time
(absolute time), time code frame rate, bit depth, and sampling rate status of the connected 788T.
From the Control Mode Transport Window the user can also start and stop recordings of the
connected 788T.
Bit Depth Sample Rate
Frame Rate
Time Code Indicator
Stop Button
Record
Button
Absolute Time Record
Counter Indicator
Bit Depth Absolute Time Counter
Displays the Bit Depth setting of the Represents time elapsed from the beginning
connected 788T. of the take. This is available during 788T
playback and for recordings in progress.
Sample Rate
Displays the Sample Rate setting of the Record Indicator
connected 788T. Display is red when the connected 788T is in
record mode.
Time Code Counter
Displays the HH:MM:SS:FF (Hours: Minutes: Stop Button
Seconds: Frames) of the time code generated Stops recording and playback of the
or received by the connected 788T. When connected 788T.
the 788T is playing back a file, the time code
display continues to show the generated or Record Button
received time code value. Duplicates the Record button of the connected
788T.
Frame Rate Indicator
Displays the time code frame rate of the
connected 788T.
Control Mode 788T Take List Window
The Control Mode 788T Take List Window allows the user to view, enter, or edit metadata for
previous, current, and upcoming takes of the connected 788T. The 788T Take List Window is not
displayed by default, it must be opened by selecting it from the pull-down Control Mode Window
Menu or by pressing Ctrl + L for Windows or Apple + L for Mac. Just like the actual 788T Take
List, any changes are applied to all sibling files and across all available media where the take was
recorded.
The time it takes to build the Take List depends on how many files are on the attached media. Recording
while the Take List is building will slow the process down and the application may need to be restarted.
By default the Take List displays three takes, Next, Current, and Previous takes. To display ten takes
in the Take List navigate to Wave Agent Preferences and select Show Last 10 Takes then click Apply.
Wave Agent supports “copy and paste” action in the Control Mode Take List, this allows for quick
metadata edits for cells with common entries.
31Wave Agent Beta 1.2
Tip: When viewing the 788T Setup Menu option Rec: Scene Name/Number you can use the Wave Agent
Control Mode Take List Next Scene column to create multiple new entries for scene names.
Next Column Current Column Previous Column
File Name Field
Start TC Field
Scene Field
Take Field
Notes Field
Circle Take Field
False Take
System Status Button
Next Take Column Take Field
This column displays information for the take Displays the Take Number for the Next,
that will be generated upon pressing record. Current, and Previous takes, click in the cell
to edit the Take Number. The cells only allows
Current Take Column the entry of number characters. Editing the
This column displays information for the take Next Take’s Scene Name will automatically
that is either currently recording or the last reset the Take number if set to do so in
take recorded, depending on the state of the the 788T Setup Menu. If the Current Take
788T. The Current column header text is red Number is edited the Next Take Number is
when the 788T is in record mode and returns also updated.
to black when the recording is stopped.
Notes
Previous Take Column Displays the Notes for the Next, Current, and
This column displays information for the take Previous takes, click in the cell to enter or edit
recorded prior to the current take. the Notes.
PREV-1 - 7 Take Columns (not shown) Circle Take Field
These columns appear when set to Show Displays the Circle status of the take, click
Last 10 Takes in the Wave Agent Preferences in the box or press the space bar when the
Window. They display information for Circled cell is highlighted to mark/unmark a
previously recorded takes. take as circled.
File Name Field System Status
Displays the File Name for the Next, Current, Displays various messages when the system
and Previous takes. The Next File Name is busy. Wait for messages to clear before
contains an “_X” when set to recording mono. making any additional edits to ensure all edits
are saved and changes have been applied.
Start Time Code Field
Displays the Start Time Code value for the False Take Button
Current and Previous takes. Highlight any cell in the Current Take column
while in stand by mode and click the False
Scene Field
Takes button to send the Current Take to the
Displays the Scene Name for the Next,
media’s FALSETAKES folder and decrement
Current, and Previous takes, click in the cell to
the take number by one. False Take cannot be
edit the Scene Name. All text is automatically
performed on takes that have been edited.
converted into upper case characters. If the
Current Scene Name is edited the Next Scene
Name is also updated. The 788T must be in
Standby mode to edit the Next Scene Name.
32
Beta 1.2 Features and specifications will change. Visit www.sounddevices.com for the latest documentation.Wave Agent Beta 1.2
Control Mode Take List Navigation
Action Behavior
Mouse Single Click Highlights a cell.
Mouse Double Click Highlights a cell and enters text editing (if applicable).
Enter Saves and exits text edits. Enters text editing for the highlighted cell (Mac Only).
Esc Exits text edits without saving.
Up Arrow Highlights the cell above.
Down Arrow Highlights the cell below.
Left Arrow Highlights the cell to the left or moves text cursor to the left.
Right Arrow Highlights the cell to the left or moves text cursor to the right.
Tab Highlights the cell to the right. If Tab is pressed from a text edit, the changes will be saved and
the text editor for the next cell will automatically be entered.
Shift + Tab Highlights the cell to the left. If Shift + Tab is pressed from a text edit, the changes will be
saved and the text editor for the previous cell will automatically be entered.
Space Toggles circle status of the highlighted cell.
Appendix 1 - Metadata Implementation Chart
Metadata Read Edit Batch Edit
GENERAL INFO
Current Name / File Name 4 4 4
*See Note Below
Channels 4
Project 4 4 4
Roll (Tape) 4 4 4
Scene 4 4 4
Take 4 4
Circle Take 4 4 4
Wild Track 4 4 4
RECORDING INFO
File Sample Rate 4 4 4
Bit Depth 4
Digitizer Sample Rate 4
TC Frame Rate 4 4 4
Start Time Code (Samples 4 4 Updated by Wave Agent
since Midnight)
Duration 4 Updated by Wave Agent Updated by Wave Agent
U-Bits 4 4 4
Time Code Sample Rate 4 Updated by Wave Agent Updated by Wave Agent
TRACK INFO
Channel Index 4 Edited when splitting and Edited when splitting and
combining combining
Interleave Index 4 Edited when splitting and Edited when splitting and
combining combining
Track Function 4 4 4
33Wave Agent Beta 1.2
Track Name 4 4 4
Notes 4 4 4
ORIGINATOR INFO
Originator 4 Generated when converting a Generated when converting a
standard WAV to a BWF standard WAV to a BWF
Creation Date 4
Creation Time 4
Originator Reference 4 Generated when converting a Generated when converting a
standard WAV to a BWF standard WAV to a BWF
Software Revision Reads Sound Devices
7-Series software revision
FILE SET INFO
Family UID 4 4 4
Family Name 4
Total Files 4 4 4
File Set Index 4 4 4
HISTORY
Original File Name 4 Generated when converting a Generated when converting a
standard WAV to a BWF standard WAV to a BWF
Parent UID 4 Created when splitting a Created when splitting a
polyphonic polyphonic
Parent Name 4 Created when splitting a Created when splitting a
polyphonic polyphonic
SYNC POINTS
Type 4
Function 4
Comments 4
TC 4
Duration 4
The Current Name is the name of the file stored within the BEXT/IXML metadata. File Name is the
actual file name as seen when exploring computer directories. Normally Current Name and File Name
should be the same. If they are different, it highlights an inconsistency that should be resolved by Wave
Agent. An inconsistency of this type will usually be caused when a file has been renamed using an
application that does not update embedded metadata; for example, Windows Explorer or the Mac Finder.
34
Beta 1.2 Features and specifications will change. Visit www.sounddevices.com for the latest documentation.Wave Agent Beta 1.2
Appendix 2 - Keyboard Shortcuts
Function Windows Key Sequence Mac Key Sequence
Save Ctrl + S Apple + S
Exit Wave Agent Ctrl + Q Apple + Q
Import Ctrl + O Apple + O
Copy To Ctrl + C Apple + C
Rename Ctrl + N Apple + N
Stop F3 F3
Record (Control Mode Only) Alt + R Option + R
Play/Pause Space Bar Space Bar
Transport Window Ctrl + T Apple + T
Split/Combine Ctrl + I Apple + I
Reports Ctrl + R Apple + R
Playback Mixer Ctrl + M Apple + M
788T Take List (Control Mode Only) Ctrl + L Apple + L
Clear Take(s) from the Take List Delete Fn + Delete
Move Up through the Take List Up Arrow Up Arrow
Move Down through the Take List Down Arrow Down Arrow
Move between Metadata Fields Tab or Shift + Tab Tab or Shift + Tab
See Navigating the Metadata Editor
- Tab Behavior
User Guide F1 Apple + ?
Preferences Ctrl + = Apple + ,
Hide Wave Agent Apple + H
Hide Other Applications Option + Apple + H
3536
Sound Report
Project: Wave Agent Client: Sound Devices Producer: Ignatius J. Reilly
Wave Agent Beta 1.2
Director: Alan Smithee Sound Mixer: Fred Bloggs Boom Op: Jane Doe
Folder: Day 3 Date: 03/05/10 Location: Reedsburg, WI
Comments: Time Code = Record Run File Type: BWF-Poly Sample Rate: 48 kHz
Bit Depth: 24-bit Frame Rate: 30 ND Recorder: SD788T
Media: CF Tone/dB: 1 kHz at -20 dBFS
File Name Tape Scene Take Length Start TC WT Circ Notes T1 T2 T3 T4 T5 T6 T7 T8
104AT01 10Y03M05 104A 01 00:01:08 01:00:00:00 traffic noise at end MixL MixR Boom Jon Matt Jim Radio4 Boundary
104AT02 10Y03M05 104A 02 00:00:45 01:01:08:00 NG MixL MixR Boom Jon Matt Jim Radio4 Boundary
@104AT03 10Y03M05 104A 03 00:01:13 01:01:53:00 Y MixL MixR Boom Jon Matt Jim Radio4 Boundary
104AT04 10Y03M05 104A 04 00:01:31 01:03:06:00 Y atmo MixL MixR Boom Jon Matt Jim Radio4 Boundary
104BT01 10Y03M05 104B 01 00:00:36 01:04:37:00 wind noise MixL MixR Boom Jon Matt Jim Radio4 Boundary
104BT02 10Y03M05 104B 02 00:00:26 01:05:13:00 NG MixL MixR Boom Jon Matt Jim Radio4 Boundary
@104BT03 10Y03M05 104B 03 00:00:44 01:05:39:00 Y MixL MixR Boom Jon Matt Jim Radio4 Boundary
104CT01 10Y03M05 104C 01 00:00:49 01:06:23:00 NG MixL MixR Boom Jon Matt Jim Radio4 Boundary
104CT02 10Y03M05 104C 02 00:00:41 01:07:12:00 helicopter noise MixL MixR Boom Jon Matt Jim Radio4 Boundary
@104CT03 10Y03M05 104C 03 00:00:48 01:07:53:00 Y MixL MixR Boom Jon Matt Jim Radio4 Boundary
104CT04 10Y03M05 104C 04 00:00:53 01:08:41:00 NG MixL MixR Boom Jon Matt Jim Radio4 Boundary
Appendix 3 - Sound Report PDF Example
105AT01 10Y03M05 105A 01 00:00:16 01:09:34:00 coughing MixL MixR Boom Jon Matt Jim Radio4 Boundary
@105AT02 10Y03M05 105A 02 00:00:21 01:09:50:00 Y MixL MixR Boom Jon Matt Jim Radio4 Boundary
105AT03 10Y03M05 105A 03 00:00:40 01:10:11:00 Y atmo MixL MixR Boom Jon Matt Jim Radio4 Boundary
@105BT01 10Y03M05 105B 01 00:00:34 01:10:51:00 Y MixL MixR Boom Jon Matt Jim Radio4 Boundary
105BT02 10Y03M05 105B 02 00:00:55 01:11:25:00 NG MixL MixR Boom Jon Matt Jim Radio4 Boundary
105BT03 10Y03M05 105B 03 00:00:11 01:12:20:00 car alarm MixL MixR Boom Jon Matt Jim Radio4 Boundary
105BT04 10Y03M05 105B 04 00:00:40 01:12:31:00 NG MixL MixR Boom Jon Matt Jim Radio4 Boundary
Beta 1.2 Features and specifications will change. Visit www.sounddevices.com for the latest documentation.
105CT01 10Y03M05 105C 01 00:00:37 01:13:11:00 NG MixL MixR Boom Jon Matt Jim Radio4 Boundary
105CT02 10Y03M05 105C 02 00:00:38 01:13:48:00 minor wind noise at end MixL MixR Boom Jon Matt Jim Radio4 Boundary
105CT03 10Y03M05 105C 03 00:00:25 01:14:26:00 coughing MixL MixR Boom Jon Matt Jim Radio4 Boundary
@105CT04 10Y03M05 105C 04 00:00:38 01:14:51:00 Y MixL MixR Boom Jon Matt Jim Radio4 Boundary
1You can also read