DESKTOP USER GUIDE G1 - (844) 800-GOLF - GOLF Business Solutions GOLF Business ...
←
→
Page content transcription
If your browser does not render page correctly, please read the page content below
DESKTOP USER GUIDE
G1

      We support all our products, programs and services, and promise to help
      resolve any challenge you face as quickly as possible 24/7/365.

      (844) 800-GOLF             support.golfbusinesssolutions.com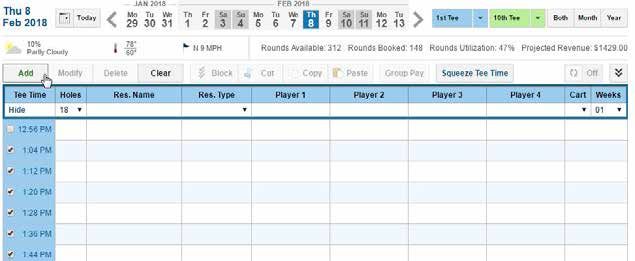
G1       Cloud-based tee sheet and POS

                                    TABLE OF CONTENTS

SYSTEM SETTINGS                                                                                            3
EMPLOYEES                                                                                                  5
TEE SHEET AND GREEN FEES                                                                                   9
CUSTOMER TAB                                                                                             18
ORDERS TAB                                                                                               21
PRODUCTS TAB                                                                                             31
MARKETING TAB                                                                                           39
REPORTING TAB                                                                                            41

2   | Jan. 2019                                    Copyright ©2019 GOLF Business Solutions. All Rights Reserved.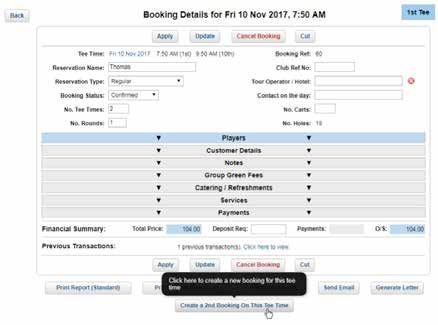
G1       Cloud-based tee sheet and POS

                                               SYSTEM SETTINGS

    Updating business information
    1. Navigate to System Settings, then Location Info.
    2. Click the pencil icon to update the following information:
       • Facility demographics
       • Primary contact
       • Secondary contact
       • Hours of operation
       • Closed dates

    Setting up GL codes
    Location-based
    1. Navigate to System Settings | GL accounts.
    2. Enter in the GL codes, COGS account numbers, and Inventory account numbers. Please be sure to reference
       your Chart of Accounts to properly assign GL codes within the system.
    3. Click Save.
    Brand-based
    1. Log in at the Brand level.
    2. Navigate to System Settings | GL accounts. You will see a “Brand Specific” tab.
    3. Enter in the GL codes, COGS account numbers, and Inventory account numbers for your “Product Hierarchy”
       items. Please be sure to reference your Chart of Accounts to properly assign GL codes within the system.
    4. Click Save.

    Setting up taxes
    1. Navigate to System Settings | Tax Types and/or System Settings | Merchandise Taxes.
    2. Enter in the following:
       • Name of the tax
       • Rate of the tax
       • If the tax is applied to green fees
       • Category and subcategory
       • Allow flexible: Gives you the ability to change the tax rate on a per product basis
    3. Click Save.

    Creating/editing areas and registers
    To setup and utilize this feature, please reach out to GolfNow Cares at 844-800-4653.

3   | Jan. 2019                                                           Copyright ©2019 GOLF Business Solutions. All Rights Reserved.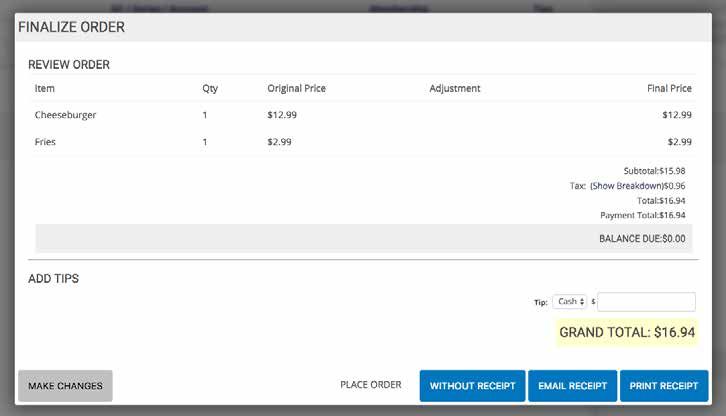
G1      Cloud-based tee sheet and POS

                                                SYSTEM SETTINGS

    Hours of Operation
    Adding hours of operation
    • To enter your hours of operation for the first time:
       • Go to System Settings | Location Info.
       • Click the pencil icon next to Hours of Operation to edit. This will open your Regular Schedule. You can also
           select specific weeks from the “select week drop down” menu.
       • Select Open Times and Closed Times from the drop down menus for each day of the week. You can also use
           the Copy Previous Day links for faster entering. If your business is closed on a day, just leave the day blank.
       • Click Save.

    Add closed dates
    • Your closed dates are any special days outside of your regular schedule in which your business is closed, like
       national holidays. No reservations can be booked when your business is closed that day. It’s a good idea to enter
       closed dates at the start of each year. To add closed dates:
       • Go to System Settings | Location Info.
       • Click the pencil icon next to Closed Dates to edit. The Edit Closed Dates page will open.
       • Click “Add Closed Date.” Select your first closed date from the Closed Date calendar.
       • Enter a description for the closed date, such as the name of the holiday. This will appear to customers.
       • Click Save. Repeat for each day your business will be closed.

    Update hours of operation/closed dates
    You can add or edit closed dates and change your hours of operation any time in System Settings | Location Info.

    For Hours of Operation, you can change your Regular Schedule or select a specific week from the drop down menu.
    Please note, if you change your hours of operation or add closed dates, be sure to update each employee’s schedule
    in the Schedules tab or in their employee profile so they will not be available when your business is closed.

4   | Jan. 2019                                                             Copyright ©2019 GOLF Business Solutions. All Rights Reserved.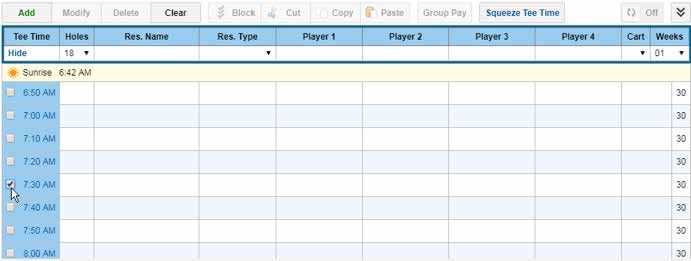
G1       Cloud-based tee sheet and POS

                                                     EMPLOYEES

    Adding an employee
    Step 1: Employee information
    1. Navigate to System Settings then Employees.
    2. Click New Employee.
       • First Name: Enter the employee’s first name.
       • Last Name (Optional): Enter the employee’s last name.
       • Gender: Select the employee’s gender.
       • Email: Enter the employee’s email address. If you want this employee to receive email notifications from the
             system, this is the email address that GolfNow One will use.
       • Create Login for this Employee (Optional and Recommended): Check the box to create a login that connects
             the employee to a G1 user account. If you check this box, you’ll add login information in Step 5. Logins can
             also be created separately and connected later.
       • Type: Select Freelancer. The Freelancer type is unrelated to compensation.
       • Status: This field is useful when an employee leaves your business. For now, just leave this as Active.
             • Specify Employment End Date
       • Employee Notes (Optional): Use this field to store additional information or notes about the employee for
             Admin use only.
       • Contact Information (Optional): Enter the employee’s contact information. To send the employee SMS
             internal notifications, enter a Mobile Phone Number, check SMS, and choose a Provider. Click Continue.
    Step 2: Compensation and benefits
    The Compensation & Benefits page that appears next is where you set up how the employee is paid. The information
    entered in this tab determines how data is calculated in the Payroll Report. G1 has many ways of handling
    compensation, the most popular methods being Flat Hourly and Commission.

    If you would like to use G1 to track payroll, please call our GolfNow Cares team at 844-800-4653 to discuss
    utilizing this tool. If you are not using G1 to track payroll, select None in Pay Type and click Continue.

    1. Fill in the following information:
       • Group: Select the Group the employee belongs to, if any.
       • Pay Type: Select one and enter amounts.
       • Pay Type Classes/Workshops: Complete this section if you offer classes and/or workshops.
       • Pay Type Products: Complete this section if you offer commission for retail product sales.
       • Vacation Days: Enter how many vacation days the employee can take in a year.
       • Sick Days: Enter how many sick days the employee can take in a year.
       • Personal Days: Enter how many personal days the employee can take in a year.
       • Employee ID: Enter the employee ID for payroll purposes. The information entered in this field will populate
             in payroll reports.
       • Exemptions: Select Has Dependents and enter the number of dependents or select Exempt.
    2. Click Continue.
    Step 3: Select services
    1. Click Continue.

5   | Jan. 2019                                                            Copyright ©2019 GOLF Business Solutions. All Rights Reserved.
G1     Cloud-based tee sheet and POS

                                                    EMPLOYEES

  Creating a new employee, continued
  Step 4: Default schedule
  This section is where you add the employee’s regular weekly schedule. The page contains a line for each day of the
  week where you can enter his/her hours for that day. Please note, this is for scheduled employees only.

  1. Day Type: Use the Day Type drop down menu to select Workday or Day Off. Vacation Day, Personal Day, and Sick
     Day are also available, but are more likely used for week-to-week schedule changes.
  2. Work Hours: Use the Start Time and End Time drop down menus to select working hours. For example, if the
     employee’s works from 9 a.m. to 5 p.m. that day, select 9:00 AM from Start Time and 5:00 PM from End Time.
  3. Lunch: You don’t have to enter the employee’s lunch hours here. You can always block out time day-by-day if
     it suits your business. If this employee does have regularly scheduled lunch hours, use the Start Time and End
     Time drop down menus to enter the time. This time will be blocked out on the calendar and labeled Lunch.
  4. Click Continue when the employee’s schedule is completed, if Create Login for Employee was selected in Step 1.
     Otherwise, click Finish.
  Step 5: Create login
  Create a login for the employee. This will appear if “Create Login for Employee” was selected in Step 1.

  1.  Fill in the following information:
      • First Name: Enter the user’s first name.
      • Last Name: Enter the user’s last name.
      • Email: Enter the user’s email address. Email is also used to send “forgot password” links.
      • Roles: Select user role(s) that best fit the employee’s responsibilities and how he/she will use G1.
      • Optional Permissions: After selecting user role(s), set optional permissions that appear below. Some roles
            do not have optional permissions.
      • Default Page: Select the starting page the user will be directed to once logged in.
      • Username: Create a username.
      • Password: Create a password. This needs to be a minimum of 8 alpha numeric characters including a capital
            letter, lowercase letter, number and special character.
      • Retype Password: Retype the password for security.
      • Allow Universal Login: Select Yes to allow the user to log in from any location. Select No to restrict access the
            user can only log in from the IP address(es) specified in System Settings > Security.
      • Require password change at next login: Check this if the user is not present to set their own password and
            you would like it to be changed the next time he/she accesses the system.
  2. Click Finish.
  Step 6: Application setting
  This section allows users to do three things: designate a server name that will display within the tablet as well on
  their receipt print outs, assign a 4 digit pin number used for Quick Login, and assign a specific register.

  1. Fill in the following information:
     • Server Name: Enter a name the Employee is comfortable with displaying within the tablet and on their guest
           receipts.
     • Pin Number: Enter a unique, 4-digit pin to be used for Quick Login.
     • Assign Register: Select the register that was created for the employee.
  2. Select “Continue” to complete the employee creation.

6 | Jan. 2019                                                             Copyright ©2019 GOLF Business Solutions. All Rights Reserved.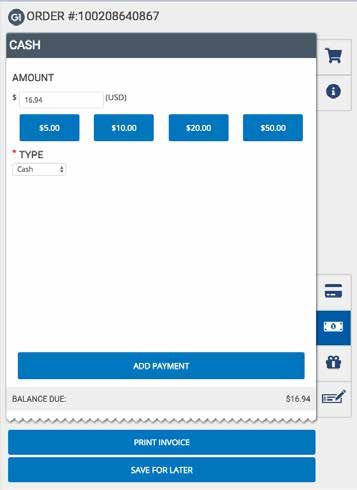
G1       Cloud-based tee sheet and POS

                                                                  EMPLOYEES

    Changing a user’s password
    1. Navigate to System Settings, then Logins.
    2. Find the user in the list and click Edit in the Actions column.
    3. Scroll down to the Login section. From this section, you can change the username and password.*
    4. Check “User must change password next login” if you’ll allow the user to set his/her own password after they log
       in with the password you just entered.
    5. Login
    6. Click Submit.

    *If you change the user’s password using this method, the system will not send an automated email with the new password. Be sure to give the user his/
                                                                                                                                       her new password.

    Creating employee groups
    Step 1: Create a group
    1. Navigate to System Settings | User Security | Groups.
    2. Click on New Group.
    3. Enter in the following: Name, Description, Status.

    Step 2: Add employees to the group
    1. Select an employee to add to the group from the
       Add Employee drop down.
    2. Click Add.
    3. Repeat the steps for all employees.

    Navigate to your Employee group list through System Settings | Employees.
    • You can filter and sort your employee list by group using the Search criteria drop down menu.

    Setting up role securities
    1. Navigate to System Settings | Roles.
    2. You can create a new role or edit an existing role from this screen.
    3. By checking the boxes in the ACCESS LIST, you will enable the section of the software for that role.
    4. The next step is going through the PERMISSIONS LIST.
       • By checking the boxes in the PERMISSIONS LIST, you will enable that role to be able to perform the action
           defined.
    5. You then are able to assign users to the roles via the System Settings | User Security Section | Logins.
       • Follow the steps: Find the login | Edit | Assign the role for that login via the role drop down.

7   | Jan. 2019                                                                                Copyright ©2019 GOLF Business Solutions. All Rights Reserved.
G1     Cloud-based tee sheet and POS

                                                    EMPLOYEES

  Utilizing the time clock feature
  1.   After logging into the system, navigate to the Schedules tab.
  2.   Click “Time Clock.”
  3.   Click “Clock in now.”
  4.   A new time stamp is now created.
  5.   To clock out, navigate back to the time clock screen and click “Clock out now.”

  Admins can see a history of each employee’s time clock entries in the Schedules tab. This is the best option if you’re
  checking clock-ins and clock-outs for the day or week, but do not need comprehensive reporting on entries. You
  can also correct an error in an employee’s time clock using this method.

  1. After logging into the system, navigate to the Schedules tab.
  2. Click “Time Clock.”
  3. Click the “Today” tab to see each employee’s entries for today.
  4. Toggle to the “History” tab to search for time clock entries for the current or previous weeks.
  Employee Time Clocks report
  The Employee Time Clocks report, in the Reports tab, offers a view of each employee’s clock-in and clock-out for the
  days in the selected date range and total hours worked based on those times. This also includes their break times
  each day.

8 | Jan. 2019                                                              Copyright ©2019 GOLF Business Solutions. All Rights Reserved.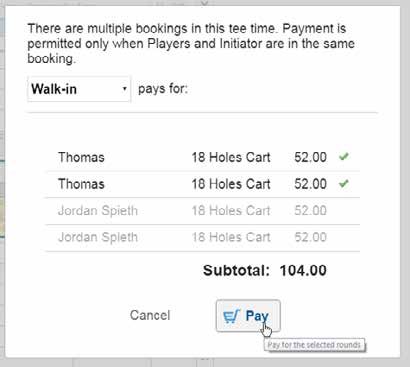
G1     Cloud-based tee sheet and POS

                                         TEE SHEET AND GREEN FEES

   Configuring the tee sheet
  1. Navigate to System Settings | Tee Sheet Settings | Configure Tee
     Sheet.
  2. The calendar at the top will indicate which days are configured
     (days have a white or gray background), as well as which days
     are not configured (days have a purple background).

  To configure a specific date or date range that is NOT currently
  configured, locate the “Configure Tee Sheet “ box below the
  calendar and follow these steps:
  1. Select an option within the “Operation” drop down menu that
      you wish to perform. If you have the same tee time intervals
      throughout the day (example: 8 minutes), select “Configure one
      or more multiple days with the same tee time interval.” If your
      tee time intervals alternate every tee time throughout the day
      (example: 7 minute/8 minute), then select “Configure one or
      more multiple days with alternative tee time intervals.”
  2. Select the year, start month and start day of month, and end month and end day of month.
  3. Select your tee time interval(s).
  4. Select the first tee time hour and first tee time minute. You will want this to be the earliest tee time you want to
      see on your tee sheet when days are the longest. The system is designed to adjust this time based on the sunrise
      in your area.
  5. Select the last tee time hour and last tee time minute. You will want this to be the latest tee time you want to see
      on your tee sheet when days are the longest. The system is designed to adjust this time based on the sunset in
      your area.
  6. Check the box next to “Do not add tee times before: sunrise.” Additionally, you also have the option to add tee
      times 1 hour before sunrise.
  7. Check the box next to “Do not add tee times before: sunset.” Additionally, you also have the option to not add
      tee times 1-3 hours before sunset.
  8. Select the day(s) to be configured.
  9. Click the “Configure Tee Sheet” button to save the configuration.

   Creating green fees and utilizing the green fee rate tool
  To create a green fee: Navigate to System Settings > Tee Sheet Settings > Green Fee Rates. Click “Add a Green Fee.”
  You can also setup the following through the Green Fee Rates section of the software.
   Multiple availabilities per Green fee
   In G1, you can create multiple availability slots within one green fee rate. This will provide more flexibility to have
   different rates for different times of the day without the need to have separate green fee rates.
   Overrides
   Overrides give you the ability to change the rate of a green fee for a particular time or date without having to edit
   the existing green fee. An override will always supersede the rate it is overriding. This is particularly useful when you
   may want to change a rate for a public holiday - providing you with more control over your green fee rates, while also
   allowing you to manage them in a quicker, easier fashion.

9 | Jan. 2019                                                                 Copyright ©2019 GOLF Business Solutions. All Rights Reserved.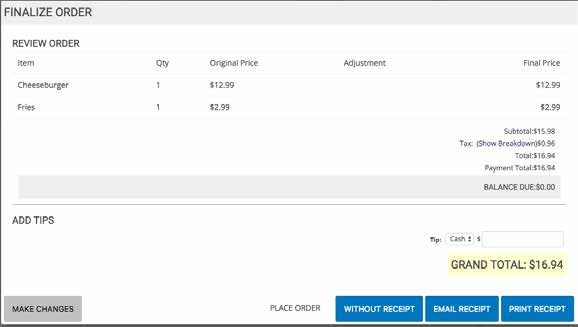
G1     Cloud-based tee sheet and POS

                                         TEE SHEET AND GREEN FEES

  Creating green fees and utilizing the green fee rate tool, continued
  Default rate
  You can also set a default green fee rate within the G1 system. This is the rate that will be added to players on the tee
  sheet, by default, if there are no other rates setup for the player based on the customer group or membership type.

  This feature has been added to streamline the process of adding players to the tee sheet. You can only have one
  default rate setup at any given time, otherwise, the tee sheet would not be able to auto select an appropriate green
  fee rate.
  Associating a cart to a green fee
  The ability to associate a cart directly to a particular green fee is also available.

  Selecting the drop down from the “Include Cart” option will allow you to specify a cart for that particular green fee
  rate. When a cart has been associated to a green fee rate, the designated price of the green fee will include the price
  of the cart product in the order.

  Please note, in order for cart(s) to be available for selection, the Cart must be created as a product.

  There are two different ways to book a tee time: directly in the tee sheet (In-Grid editor) or using the Master Row.

  Booking a tee time
  1. Navigate to the Tee Sheet tab.
  2. Ensure you are on the correct date.
  3. Click on a “tee time” to enter in your player. Once the cell turns yellow, you can edit the following information:
     • Number (#) of holes: This is the only reservation setting that cannot be edited after being saved.
     • Res. Name
     • Res. Type drop down
     • Enter in Player Names: Please note, you can utilize the “Enter” button on your keyboard to quickly create
         guest names after filling in the name of the first golfer. This feature is only applicable when booking a tee
         time using the In-Grid editor method.
     • Assigning the Green Fees: Apply green fee rates for each golfer by selecting the yellow box below the
         golfer’s name, if applicable.
     • Carts: Select the number of carts this booking will need from the Cart drop down menu, if applicable.
     • Booking notes: Click on the booking notes icon, located at the top right of the In-Grid editor, to enter in
         notes pertaining to this booking, if applicable.
  4. Click “Add” to save the reservation.

10 | Jan. 2019                                                                Copyright ©2019 GOLF Business Solutions. All Rights Reserved.
G1 Cloud-based tee sheet and POS
TEE SHEET AND GREEN FEES
Booking a tee time using the Master row
1. Navigate to the Tee Sheet tab.
2. Ensure you are on the correct date. Select the check box next to the tee time that you want to edit.
3. Click on the “Master Row”at the top of the tee sheet to enter in your players.
• Number (#) of holes: This is the only reservation setting that cannot be edited after being saved
• Res. Name
• Res. Type drop down
• Enter in Player Names: Please note, you can NOT utilize the “Enter” button on your keyboard to quickly
create guest names after filling in the name of the first golfer. The “Enter” button will save your work and
book the tee time.
• Assigning the Green Fees: Apply green fee rates for each golfer by selecting the yellow box below the
golfer’s name, if applicable.
• Carts: Select the number of carts this booking will need from the Cart drop down menu, if applicable.
• Weeks: This function can be utilized for quickly booking reoccurring tee times by selecting the number of
weeks you want the tee times to repeat, if applicable.
4. Click “Add” to save the reservation.
Booking a tee time: Additional reminders
Copy / Cut / Paste functionality
1. Select the check box next to the tee time that you want to cut / copy.
2. Click the “Copy” or “Cut” button located above the Master Row.
3. Select the check box next to the tee time that you want to paste the tee time.
4. Click the “Paste” button located above the Master Row.
Additionally, you can also book tee times by scanning in customer / member cards into the tee sheet.
Booking a league/multiple tee times
To book multiple tee times, you will NEED TO USE the Master Row.
1. Navigate to the Tee Sheet tab.
2. Ensure you are on the correct date.
3. Check the starting tee time check box.
4. Hold down the SHIFT key and click the last tee time check box to select multiple tee times.
5. Once the multiple tee times have been selected, use the Master Row to fill in the booking information.
6. In the “Res. Name” box, type in the name of the tournament / league.
7. In the “Res. Type” box, select the League reservation type.
8. Select the “Add” button to add the league or multiple tee times to the tee sheet.
Please note, keep the player slots OPEN so league players can book online.
11 | Jan. 2019 Copyright ©2019 GOLF Business Solutions. All Rights Reserved.G1 Cloud-based tee sheet and POS
TEE SHEET AND GREEN FEES
Blocking tee times
1. Navigate to the Tee Sheet tab.
2. Ensure you are on the correct date.
3. Check the starting tee time check box.
4. Hold down the SHIFT key and click the last tee time check box to select multiple tee times.
5. Once the multiple tee times have been selected, use the Master Row to fill in the booking information.
6. In the “Res. Type” box, select the Closed reservation type.
7. For each player slot, type in an “X.”
8. Select the “Add” button to block the tee sheet.
Booking recurring tee times
1. Navigate to the Tee Sheet tab.
2. Ensure you are on the correct date.
3. Check the starting tee time check box.
4. Hold down the SHIFT key and click the last tee time check box to select
multiple tee times.
5. Once the multiple tee times have been selected, use the Master Row
to fill in the booking information.
6. Next, utilize the “Weeks” column to select the number of weeks you
want the tee times to repeat.
Please note, if you are reserving times in the early morning or afternoon
and select 52 weeks out, you may receive an error stating that times are
not available. If you do, this most likely is due to Daylight Savings Time
and those time are not available. If you do receive this error, none of your
reservations will be made. Please make sure the times exist before making
multiple week bookings.
Canceling a tee time reservation
There are two methods to canceling a tee time:
1. Click into the tee time reservation, select the “Cancel Booking” button.
2. Click into the Details screen by clicking on the starting tee time, select the “Cancel Booking” button.
Modifying a tee time reservation
1. Click into the reservation to modify the tee time.
2. Make your preferred modifications, as needed.
3. Click “Modify” to save.
12 | Jan. 2019 Copyright ©2019 GOLF Business Solutions. All Rights Reserved.G1 Cloud-based tee sheet and POS
TEE SHEET AND GREEN FEES
Adjusting player quantities
1. Click into the reservation to modify the tee time.
2. Delete the player(s) from the player slots to remove quantities, or add a new player(s) to the player slots to add
quantities.
3. Click “Modify” to save.
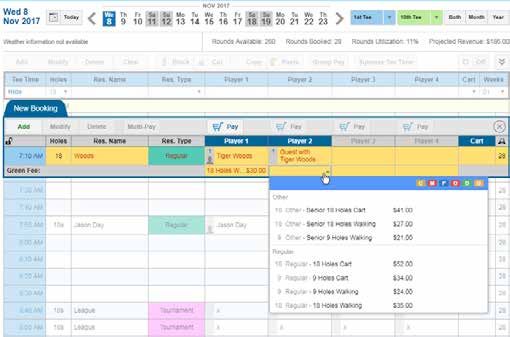
Assigning a green fee to a reservation
1. Navigate to the Tee Sheet tab.
2. Click into a reservation.
3. Click the box located below each of the player slots to prompt
the green fee drop down list.
4. Select the applicable green fee rate that applies to that
specific golfer. Repeat for each golfer in the reservation.
Please note, green fees will need to be assigned to a golfer before
they are checked in. Additionally, members will have a defaulted
green fee.
Creating a second group booking to an existing tee time
Utilize this functionality when you are looking to book a second/separate group booking within the same tee time.
You can accomplish this by using the In-Grid Editor or the Booking Details Screen.
Using the In-Grid Editor:
1. After making your first reservation, you will see a tab with “+”
next to the “Booking 1” tab.
2. A “New Booking Tab” will appear where you can now reserve
your new group. To save the reservation, click “Add.”
3. Once saved, you will see a line in the far right row, informing
you that there is a booking with two separate bookings.
Reservations will also be highlighted by the group number to the left of the name (1 or 2).
4. Click on Booking Details to see the two groups separated.
Using the Booking Details method:
1. Navigate to the Booking Details page.
2. After you fill in the first booking information, click the “Create a
2nd Booking on this Tee Time” button.
3. Select “Players” to add to your group, which will prompt you to
fill in a name and Green Fee category.
4. To save the reservation, select “Update.”
5. Selecting “Update” will save your information and take you
back to the tee sheet. “Apply” will save your work and keep you
on the Booking Details page.
13 | Jan. 2019 Copyright ©2019 GOLF Business Solutions. All Rights Reserved.G1 Cloud-based tee sheet and POS
TEE SHEET AND GREEN FEES
Checking in & collecting fees for a customer
1. Navigate to the Tee Sheet tab.
2. Click on “tee time” to check in your player.
3. Select the check mark above the player’s name indicating that the player has arrived but not paid for the round.
4. For individual payments, click “Pay” above the player you want to check in. To pay for the group, select
“Multi-Pay.”
5. After you click “Pay,” you will be brought to the Orders tab to complete the transaction.
6. Select your payment type by utilizing the payment buttons on the right hand side of the screen.
7. Click “Add Payment.”
8. Process the payment.
Utilizing Group Pay
To check in multiple players in one group, please see “Utilizing Multi-Pay” on the next page.
Sequential tee times
1. To pay for sequential tee times, click the check boxes using the block feature or manually click next to the
correct tee times.
2. Click the Group Pay button in the Master Row.
3. Select a customer from any of the tee times selected. The user is able to de-select any of the tee times that
were selected.
4. Click Pay.
5. Selected tee times populate the point of sale.
6. Process the payment.
Non-Sequential tee times
1. To pay for tee times that are non-sequential, select the check boxes next to the correct tee times.
2. Click the Group Pay button in the Master Row.
3. Select a customer from any of the tee times selected. The user is able to de-select any of the tee times that
were selected.
4. Click Pay.
5. Selected tee times populate in the point of sale (Orders tab).
6. Process the payment.
Multiple groups
1. To pay for multiple groups within the same tee times, select the check boxes next to the correct tee times.
2. Click the Group Pay button in the Master Row.
3. Select a customer from any of the tee times selected. The user is able to de-select any of the tee times that
were selected.
4. Click Pay.
5. Selected tee times populate in the point of sale (Orders tab).
14 | Jan. 2019 Copyright ©2019 GOLF Business Solutions. All Rights Reserved.G1 Cloud-based tee sheet and POS
TEE SHEET AND GREEN FEES
Utilizing Multi-Pay
Multi-Pay allows for users to pay for multiple players within a group.
To check in multiple groups at the same time, please see “Utilizing
Group Pay” on the previous page.
1. Select the booking row in the tee sheet and choose “Multi-Pay.”
2. Use the “Pays For” drop down to select which customer will be
paying for the group.
3. Verify the players that are being paid for by checking or
unchecking the player names.
4. Select Pay when you are ready to process the order.
5. After you click “Pay,” you will be brought to the Orders tab to
complete the transaction.
Tee sheet payment symbols
• Red “$”: Outstanding balance, course is expecting payment at check-in
• Blue “i”: More information has been provided about the reservation
• Purple “$” : Remaining balance on the group reservation. This happens when one person in the tee time has
checked in and the rest of the group has not.
• Green “$” : Everyone in the group has checked in and paid. There is no outstanding balance.
Utilizing squeeze times
1. Navigate to the Tee Sheet tab.
2. Click the “Squeeze Tee Time” button located above the Master Row.
3. Please note, if that button is not shown, you will need to enable this feature
through the following: System Settings | System Configuration | Toggle Yes
to enable Squeeze Times.
4. Fill in the information for the squeeze time. If you’d like to create a squeeze
time for all 18 holes, check the “Create Turn Time” box when creating the
squeeze time. Click “Add.”
OR
1. Check the boxes of 2 tee times on the tee sheet.
2. Select the “Squeeze Tee Time” button.
3. A squeeze time will automatically be created halfway between the two
selected times along with a squeeze turn time.
To remove a squeeze time
To easily remove a newly created squeeze time, we recommend blocking that time on the tee sheet. This will stop
the time from being available to book online as well as locally.
If you want to fully remove that time from the tee sheet, you will need to utilize the Configure Tee Sheet section of
Systems Settings. For more information on how to utilize this section, visit “Configuring the Tee Sheet.”
15 | Jan. 2019 Copyright ©2019 GOLF Business Solutions. All Rights Reserved.G1 Cloud-based tee sheet and POS
TEE SHEET AND GREEN FEES
Setting up cart count
1. Navigate to System Settings | Tee Sheet Settings | System Configuration | Cart Booking.
2. You can assign the number of carts when making a tee time, which means the total number of carts will
decrease on the tee sheet as carts as being used and increase when returned.
Utilizing the tee sheet blade
1. Navigate to the Tee Sheet tab.
2. Click on “person icon” located next to a player’s name on the tee sheet.
3. The customer tee sheet blade appears on the right hand side of the screen.
You can view / edit the following:
• Current tags associated to the customer / add new tags to the
customer
• Membership(s) purchased
• Upcoming booked rounds
• Recent rounds played
• YTD total sales
• Billing / shipping address
• Add a credit card on file
4. Click “Close” to exit the blade, or “View Profile” to view the full customer profile.
Utilizing player slot coloring
This features uses assigned tags to determine the slot coloring within the tee sheet.
1. Navigate to System Settings | Tee Sheet Settings | Player Slot Coloring.
2. Click New. Select the color you want to designate to the tag.
3. Type in your customer tag. Please note, you must have your customer tag created prior to assigning.
4. Click Add Tag. Click Save.
5. Your new tag will automatically be placed at the bottom of the list. To move the priority of the tags, drag and
drop within the list.
Reservation types
1. Navigate to System Settings | Tee Sheet Settings | Reservation Types.
2. In this screen, you can edit, create new and adjust colors.
3. Additionally, ensure the support check box is active.
16 | Jan. 2019 Copyright ©2019 GOLF Business Solutions. All Rights Reserved.G1 Cloud-based tee sheet and POS
TEE SHEET AND GREEN FEES
Adding booking notes to a reservation
1. Navigate to the Tee Sheet tab.
2. Click the “Booking Notes” button located in the top far right of
the In-Grid editor to enter in notes pertaining to this booking.
3. Enter in the booking notes and click “Apply” to save.
4. To save the reservation, click “Add” or click “Modify.”
You will see the Booking Note icon, which acts as a visual that
there are notes pertaining to that booking. Additionally, the staff
will be able to hover or click on the Booking Notes icon to access
the notes.
Previous transactions through Booking details
1. Click on the tee time.
2. At the bottom you will find “Previous Transactions.”
3. Select “Click Here to View.”
Please note, this will provide you the history of the tee time. You can see who made the reservation and if there were
any prior reservations that were booked then canceled.
Title for the tee sheet
1. To add a title for the tee sheet, navigate to the following: System Settings | Tee Sheet Settings | Title for Each Day.
2. Create a title that will live at the top of the tee sheet.
3. Scroll down and click “Update” to save your work.
Adding a message on the tee sheet
1. Navigate to System Settings | Tee Sheet Settings | Messages on the Tee Sheet.
2. Click on “Messages on the Tee Sheet.”
3. Select the Tee choice from the drop down.
4. Select Start/End Date.
5. Select Message Time Hour & Minutes.
6. Assign the Days of the Week.
7. Type in the Message.
8. Click the “Add” button to save the message to your tee sheet.
Weather widget
1. Navigate to System Settings | Tee Sheet Settings | System Configurations.
2. In the System Configuration section, enable Display Weather Feature.
Please note, the latitude and longitude must be filled out correctly in order for the correct data to appear.
17 | Jan. 2019 Copyright ©2019 GOLF Business Solutions. All Rights Reserved.G1 Cloud-based tee sheet and POS
CUSTOMERS TAB
Creating a new customer
1. Navigate to the Customers tab.
2. Click the New Customer button.
3. Fill in the required fields:
• First Name
• Last Name
• Email or Phone number
4. Fill in additional information about the customer.
5. Click Save.
Searching for an existing customer
1. Navigate to the Customers tab.
2. Use the “Find a Customer” search box to find an existing customer.
Please note, when searching via name, you will be able to search by first or last name.
Customer information within the profile
You will find the following information about a customer within their profile:
Summary Tab Rounds Tab
• Membership Benefits • Upcoming Rounds
• Upcoming Rounds • Recent Rounds
• Recent Rounds
• Recent Orders Orders Tab
• Products Purchased • List of the orders associated with that customer
Details Tab Billing Tab
• Edit the customer’s contact information • Add a credit card on file
• Enable a credit account
Tags Tab • View credit account statements
• Shows you the tags associated to this customer
• You have the ability to add/remove tags as needed Membership Plans Tab (this will only be active if the
customer has a membership)
Notes Tab • Shows active and inactive memberships
• Add Customer Notes • You can purchase a new membership for that
customer through this tab as well
Merging duplicate customers
1. Navigate to the Customer Tab | Find Duplicates Button.
2. Enter in a name, email or phone number to search for the duplicate customers.
3. Use the check boxes to select which customers to be merged.
4. Select the fields that will be retained after the merge.
5. Click merge at the bottom of the page to finalize.
18 | Jan. 2019 Copyright ©2019 GOLF Business Solutions. All Rights Reserved.G1 Cloud-based tee sheet and POS
CUSTOMERS TAB
Marking a customer as inactive/deleting
• Navigate to the Customer Tab | Search for Customer.
• If the customer has a red X next to their name, you can delete them (if they DO NOT have history).
• If the customer does not have a red X next to their name, navigate to the Details Tab | Mark as Inactive.
Viewing a customer’s membership
1. Navigate to the Customer Tab | Search for the customer | Membership Plans Tab. This tab will only appear if the
customer has a membership.
2. You can complete the following on this tab:
• View the Membership History
• Suspend the Membership
• Cancel the Membership
• Change the Membership
• Purchase a New Membership
• View Benefits
Creating a credit account for a customer
1. Navigate to the Customers Tab | Search for Customer | Billing Tab.
2. Complete the following:
• Select YES for Enable Credit Account.
• Select YES to make the credit account the default payment type for this customer’s order (not required).
• Enter in the credit limit.
• Enter in the % of the customer’s credit limit to reach. This will be utilized when you charge the customer for
the outstanding balance.
• NOTE: capacity must be between 5% and 95%.
• Enter a credit card that will be used to charge customer (not required).
Checking a customer’s account balance
You can quickly retrieve a customer’s account balance in their customer profile. The account balance can be found
on the left sidebar:
• Credit Limit: the amount listed here is the available line of credit that your business has granted to the
customer.
• On Account: the amount listed here is the customer pre-paid funds that your business is holding for
redemption.
• Please note, if the account balance is a positive number, then the customer has overpaid, prepaid or added
more credit to the account.
• On Credit: the amount listed here the line of credit that the customer has used.
• Available Credit: the amount listed here shows the outstanding amount that a customer can charge based on
the assigned credit limit and what has currently been charged.
Viewing an account statement for a customer
1. Navigate to the customer’s profile. Select the Billing Tab.
2. Click “View Statement.”
19 | Jan. 2019 Copyright ©2019 GOLF Business Solutions. All Rights Reserved.G1 Cloud-based tee sheet and POS
CUSTOMERS TAB
Creating a customer tag
1. Navigate to System Settings, then Customer Tags.
2. Click the “New Tag” button.
3. Fill in the following information:
• Name and Description of the tag
4. Click Save.
To assign a tag to a customer:
1. Go to the customer profile you want to edit.
2. Click the “Tags” tab.
3. Type in the tag name, and click Add.
20 | Jan. 2019 Copyright ©2019 GOLF Business Solutions. All Rights Reserved.G1 Cloud-based tee sheet and POS
ORDERS TAB
Assigning a customer to an order
• Navigate to the Orders tab.
• To add a customer to an order, click the pencil icon next to “Walk-In Customer.”
• Search for the customer by Customer name or Membership card #.
• Select an existing customer from the drop down or click the person icon to add a new customer (must have first
name, last name, phone or email).
Creating an order
1. Navigate to the Orders tab.
2. Add a new product either from the Quick Add list, scan your item, or use the search filters.
• Search filters method (pictured, below):
• Utilize the search filters to find an item.
• Click “Add to Order” once you have found your item.
• Repeat those steps, as needed, for multiple items to be added.
• Scan barcode method:
• Once the item has been scanned by the barcode, the sales item will appear in the shopping cart.
• Quick Add list method:
• This list is utilized to easily access the items you sell the most. This is the defaulted view on the Orders
tab, and you can navigate to your Quick Add list through the Department drop down menu.
• To add the item to the shopping cart, click on the “Add to Order” button associated with the item.
Saving an order for later
1. You can save an order at any time by completing the following steps:
2. Click the blue “Save for Later” button, located at the bottom of the order screen, to save the current order.
3. Utilize the “Saved Orders” drop down on the top right of the Order screen to pull that order back into the
shopping cart.
21 | Jan. 2019 Copyright ©2019 GOLF Business Solutions. All Rights Reserved.G1 Cloud-based tee sheet and POS
ORDERS TAB
Paying for an order
1. Once all items have been added to the shopping cart, select your payment type by utilizing the payment buttons
on the right hand side of the screen.
2. Click the “Add Payment” button.
3. Select one of the following to place the order:
• Without Receipt
• Email Receipt
• Print Receipt
4. If there are any additional changes that need to be made, click “Make Changes.”
22 | Jan. 2019 Copyright ©2019 GOLF Business Solutions. All Rights Reserved.G1 Cloud-based tee sheet and POS
ORDERS TAB
Overriding the price of an item
1. Click the pencil icon in the item row on the Order screen. The
field will become editable.
2. In the Final Price Column, enter a new final price or use the %
option in the drop down menu to enter a discount.
3. If a percent override is entered, the price adjusts automatically
to reflect the discount. Click Save.
Overriding tax
1. Click on the tax amount in an order to override the tax.
2. Only items with a tax type set to Flexible can be overridden in an open order.
Applying specials / discounts to an order
1. Add an item(s) to the Orders tab.
2. Select the special from the drop down menu or enter in the
special code. Please note, only the specials that are applicable to
the items in the shopping cart will appear.
3. The special will then be applied to all applicable items.
4. To remove, click the X next to the special.
Adding tips after choosing a payment method
1. Navigate to the Orders tab.
2. Add your payment to the current order, and on the “Final Actions”screen you can add in a tip.
3. Enter in the tip associated to the order in the “Add Tips” section.
4. Close the order.
Please note, this needs to be completed before selecting the receipt option and finalizing the transaction. You will
not be able to go back and add a tip if the transaction has been placed.
23 | Jan. 2019 Copyright ©2019 GOLF Business Solutions. All Rights Reserved.G1 Cloud-based tee sheet and POS
ORDERS TAB
Refunding/voiding a transaction
1. Navigate to the Orders tab | Manage Orders.
2. Use the “Find an Order” section on the left side of the screen to locate the order.
3. Select the “Order #.”
4. Click Void Order or Refund Order.
• Void Order
• Orders can be voided the same day as the credit card has not been batched (integrated credit cards).
• Refund Order
• Click the “Refund” button.
• Select the refund item.
• Select the refund method.
• Leave a refund note as applicable (internal notes on the order history).
• Click “Submit Refund.”
24 | Jan. 2019 Copyright ©2019 GOLF Business Solutions. All Rights Reserved.G1 Cloud-based tee sheet and POS
ORDERS TAB
Setting up the Auto Gratuity feature
Auto Gratuity is setup and managed within the System Settings screen within G1.
1. Select “Auto Gratuity Settings” to manage existing auto gratuities or “New Auto Gratuity” to open the Auto Gratuity
creation wizard.
2. Next, fill in the name and description of your Auto Gratuity. As a note, use a description that includes a detail of
exactly how the auto gratuity will be utilized.
3. Click the Next Button.
4. The next screen allows a user to specify rules that will be applied to the auto-gratuity by filling in the following
forms:
• How much would you like the gratuity percentage to be?
• Apply to Discounted or Original Price?
• This indicates whether auto-gratuity will be calculated based on discounted or original item price in the
event that a special discount is applied to an order.
• Should auto-gratuity apply to a minimum number of guests?
• This allows the user to specify a minimum party size in order for auto-gratuity to be applied.
• Ex. Indicating a minimum number of guests as 5 would be that this auto-gratuity will only apply to
parties of 5 or more.
• Do you want to set up a minimum for an order?
• This allows the user to specify a minimum order total that must be reached before auto-gratuity will
apply.
• Ex: Indicating a minimum amount of $100 would mean that auto-gratuity will only apply to orders of
$100 or more.
5. Click the Next Button.
6. The following screen allows the user to specify whether or not the auto-gratuity is taxable.
• Selecting “Yes” prompts the user to choose which taxes apply to the auto-gratuity. Different tax types can
be configured and managed through Tax Types within the System Settings Menu.
7. Click the Next Button.
8. The following screen prompts the user to select whether the auto-gratuity applies to all customers or only
certain member types.
• Selecting “Yes” allows the user to specify which memberships the auto gratuity will apply to. Different
Membership Levels can be configured and managed through Membership Plans within the System Settings
Menu.
• Selecting “All” indicates that all members will receive this auto-gratuity.
• Selecting “Some” allows the ability to highlight which memberships auto-gratuity will be applied to.
• Selecting “None” indicates that no members will be subject to this auto-gratuity. Instead, non-
members will be subject to the auto-gratuity.
9. Click the Next Button.
10. The following screen allows the user to designate which products and/or services the auto-gratuity will apply to.
• Different Packages and Services can be configured and managed through System Settings.
• Select “Add New Option Set” to begin the process.
• The user is able to specify “All, Some, or None” when selecting categories of items.
• In the example to the right, you can see “some” products selected, which them allows the user to specify
that “All” Food & Beverage products should be included.
11. When finished, the user will be prompted to name the group of products and/or services selected.
12. Selecting “Done” completes the auto-gratuity set up process.
25 | Jan. 2019 Copyright ©2019 GOLF Business Solutions. All Rights Reserved.G1 Cloud-based tee sheet and POS
ORDERS TAB
Issuing a Raincheck
There are two ways to issue a raincheck:
• Tee sheet
1. Click on the reservation name within the tee sheet. Click View.
2. Click Issue Raincheck. Enter in the dollar amount or number of holes played.
3. Print the raincheck.
• Orders Tab
1. Select the Orders tab, then select the Manage Orders sub-tab.
2. Use the Date Range or Find an Order filters on the page to search for the particular Order. You can also use
the Customize View option to provide further filtering on the Orders results.
3. Select the Order Number that you wish to issue the Raincheck on to move to the Order.
4. Select the “Issue Raincheck” option under the Order Items screen.
5. Enter in both the amount and quantity of Rainchecks to be issued. If desired, update the number of days
before the Raincheck(s) will expire. If no expiration is desired, enter 0.
6. Select “Submit Raincheck.”
Please note: Each Raincheck issued will have a unique code that begins with RC followed by 8 digits. For example:
RC00000003.
Redeeming a Raincheck
1. Starting from the tee sheet, check in the golfer. This will open the Orders tab.
2. Place additional items in the cart, if applicable.
3. Select the Gift Card or Series payment button on the right hand side of the screen.
4. Under the drop down, select “Raincheck.”
5. Enter in the Raincheck number you’d like to apply by scanning or by manually entering the raincheck.
6. Click “Lookup raincheck.”
7. Select “Add this Payment,” and close the order.
Raincheck settings
1. Select the System Settings link.
2. Under General Settings, select “Raincheck Settings.”
3. Users can edit the default number of days that a Raincheck will default to for their expiration date.
• This is the value that shows when issuing a Raincheck in the Orders tab, but can be updated for each Issued
Raincheck.
Editing receipt messages
1. Navigate to System Settings | Areas and Cash Register.
2. Click on the pencil icon next on the Receipt section to adjust settings & messages.
26 | Jan. 2019 Copyright ©2019 GOLF Business Solutions. All Rights Reserved.G1 Cloud-based tee sheet and POS
ORDERS TAB
Utilizing gift cards/gift certificates
Issuing a gift card
1. Navigate to the Orders tab.
2. Assign the customer to the order (if applicable). Add Items.
3. Click the GC/Series/Account tab.
4. Select “Gift Card” on the left side panel.
5. Enter in a message, To and From fields (if applicable).
6. Fill in the required items:
• Assign an expiration date
• Assign the Gift Card #
• Assign the Amount
7. Click “Add to Order.” Pay out the transaction as normal.
Issuing a gift certificate
1. Navigate to the Orders tab.
2. Assign the customer to the order (if applicable). Add items.
3. Click the GC/Series/Account tab.
4. Select “Gift Certificate” on the left side panel.
5. Fill in the required items:
• To and From fields
• Select a style from the drop down
• Assign an expiration date
• Assign the Amount
6. Click “Add to Order.” Pay out the transaction as normal.
7. Once you have completed the order, click to Print the gift certificate.
Redeeming a gift card/certificate
1. Put in the items being sold into the Orders tab.
2. Click the Gift Card or Series payment button.
3. Scan or enter the Gift Card/Certificate #.
4. An available amount message will appear if the card/certificate has applicable balance.
5. Click “Add Payment.” Pay out the transaction as normal.
Checking the Balance
1. Navigate to the Orders tab.
2. Click the Gift Certificate/Cards button located at the top.
3. Scan or enter the number to find the current balance, or search from the criteria drop downs.
Viewing gift certificate/card history
1. Navigate to the Orders Tab | Click the Gift Certificates/Cards button located at the top.
2. Use the search fields to find the gift card/certificate.
3. Click History in the Actions column.
Reprinting a gift certificate
1. Navigate to the Orders Tab | Click the Gift Certificates/Cards button located at the top.
2. Use the search fields to find the gift certificate.
3. Click Print PDF in the Actions column.
Voiding a gift certificate/card
1. Navigate to the Orders Tab | Click the Gift Certificates/Cards button located at the top.
2. Use the search field to find the gift/certificate.
3. Click Void in the Actions column.
27 | Jan. 2019 Copyright ©2019 GOLF Business Solutions. All Rights Reserved.G1 Cloud-based tee sheet and POS
ORDERS TAB
Paying order using a credit account
1. Navigate to the Order tab.
2. Assign the customer to the order.
3. Add items into the shopping cart.
4. Click the Credit Account payment button on the right hand side of the screen. Click “Apply.”
5. Process the payment.
Paying a deposit to a credit account
1. Navigate to the Orders tab. Assign the customer name.
2. Add items to the shopping cart.
3. Click the GC/Series/Account tab.
4. Select Credit Account and type in the amount.
5. Click “Add to Order.”
6. Pay out as normal.
Selling a membership
1. Navigate to the Orders tab.
2. Assign the customer to the order.
3. Click on the Membership tab. Toggle from the drop down to find the correct membership being sold.
4. Enter in the membership card number, if applicable. Click “Add to Order.”
5. Complete the order.
Recurring payments
1. Navigate to the Orders tab.
2. Assign the customer to the order.
3. Click on the Membership tab. Toggle from the drop down to find the correct membership being sold.
4. Select Prorated or Full Fee.
5. Prorated: Automatically reduced the first month’s fee
6. Full Fee: Charges the full fee of the membership
7. Select the day of the month to charge the recurring membership fees. Select “Auto Renew” if your business
automatically renews membership and charges to credit cards once the plan expires.
8. Enter in the membership card number, if applicable. Click “Add to Order.”
9. Complete the order.
28 | Jan. 2019 Copyright ©2019 GOLF Business Solutions. All Rights Reserved.G1 Cloud-based tee sheet and POS
ORDERS TAB
Charging for Memberships
Bulk charging
• Navigate to the Reports tab | Bulk Charge | Membership Billing. Filter the report as needed.
• Adjust the “Charge To” column by selecting from the drop down where to charge the membership to.
• Click the box to indicate who you will be charging. Click the “Charge Selected” button.
Individual Member charges
• Navigate to the Customer tab | Search for the customer/member. Navigate to the Membership Plans tab.
• Click “More Details.”
• Click “Charge” located in the Actions column. This will direct you to the Orders tab to complete the transaction.
Paying off an account
1. Navigate to the Customers tab.
2. Search for a customer utilizing the search box.
3. Once you are on the customer’s profile, select the Billing Tab.
4. Click “View Statement.” This will show the customer’s account balance statement.
5. Select “Take Payment.” This will automatically bring you to the Orders tab for the customer to pay out.
6. Select a payment type by utilizing the payment buttons on the right hand side of the screen.
7. Click the “Add Payment” button.
8. Finalize the transaction.
29 | Jan. 2019 Copyright ©2019 GOLF Business Solutions. All Rights Reserved.G1 Cloud-based tee sheet and POS
ORDERS TAB
Tournament pay-in and pay-out
Create a Gift Card - i.e. credit book (pictured, top right)
1. Create an order with no customer associated.
2. Add a $0 gift card to the order, then close the order.
• Please note, the “number” field accepts alphanumeric
characters, and should be used to name your gift card. For
example: Gift card #: MENSLEAGUE.
Pay-in (pictured, middle right)
1. In this example, each golfer that is checking in will pay $5
towards the prize fund.
2. While checking in the golfer, select the “GC / Series / Account”
tab. Select Gift Card. Create a gift card
3. Enter in the applicable “number” (i.e. MENSLEAGUE), the
amount, then check the box labeled “Add to existing card.”
Click “Add to Order.” Select your payment type, then close the
order.
4. The gift card now has $5 assigned to it. Repeat these steps as
more golfers check in for the tournament.
Pay-out (pictured, bottom right)
1. Locations can choose to pay out to credit accounts, gift cards,
or free products. In this example, we will pay out to a new gift
card. Pay-in
2. Add the customer to an order, then select the “GC / Series /
Account” tab. Select Gift Card.
3. Enter in the new gift card number and the pay-out amount.
4. Next, select “Add to Order.”
5. You will now select the “Gift card / series” payment button
(present icon). You will now be prompted to enter in the gift
card number (i.e. MENSLEAGUE).
6. Click “Lookup GC number.” Enter in the payment amount, then
select “Add Payment.”
7. Repeat this process to payout the remaining winners from the
prize fund.
Pay-out
Please note: Gift card (credit book) balances can be checked via
the Orders tab | Gift certificates / cards.
Cash close procedure
1. Navigate to the Orders tab and click into the “Cash Register” button.
2. Choose “End of Day” tab and confirm the “Close Out To” date.
3. Select “Run.”
4. Enter in your “Starting Cash” that the register opened with, the “End of Day Cash” that is in the register
(includes the opening amount), and the “Next Day Starting Cash” that the register is expected to open with for
the next shift.
5. Click OK.
6. Click “Close Out” to finalize the cash close.
7. You have the option to Print a cash close receipt, if applicable.
30 | Jan. 2019 Copyright ©2019 GOLF Business Solutions. All Rights Reserved.G1 Cloud-based tee sheet and POS
PRODUCTS TAB
Creating a new product
1. Navigate to the Products tab.
2. Click on the “New Product” button.
3. Enter in the Name, Department, Category and Subcategory of the product.
• You can additionally add the description and sales tax.
4. Click “Continue.”
5. Enter in the SKU, Barcode, Vendor, Buy Price, Sell Price, Commission, Stock number and Quick Add-On if you
want the item in your “quick add list.”
6. Enter in your current quantity on hand, or click “Unlimited” if this item will not be tracked in inventory.
7. Click “Save.”
Additionally, you can add stock level and inventory alerts:
• When enabled in System Settings | Internal Notifications, G1 can send automatic email alerts to help keep track
of inventory. To ensure inventory alerts are delivered, set appropriate permissions in System Settings | Internal
Notifications.
Creating a Quick Add folder
1. Navigate to the System Settings tab.
2. Select “Quick Add Settings” from the General Settings section.
3. Either create, edit or delete folders:
• To create a new folder, select “New Folder,” then enter the folder name. Please note, duplicate names are
not permitted.
• To change an existing folder name, select “Edit.”
• To delete a folder, select “Delete.” Please note, when a folder is deleted, all products within a folder will be
removed from the quick add widget.
Adding products to the Quick Add list
1. Navigate to the Products tab.
2. Add a new product, or edit an existing product.
3. Under the inventory section, check “Quick Add.”
4. Select the folder that the product should appear in from the drop down list. If no folder is selected, the product
will appear at the top of the Quick Add list.
5. Click Save.
31 | Jan. 2019 Copyright ©2019 GOLF Business Solutions. All Rights Reserved.You can also read