User Maual Unibox - Uni Rostock
←
→
Page content transcription
If your browser does not render page correctly, please read the page content below
User Maual
  Unibox

             IT- & Medienzentrum
             Version of 20.03.2019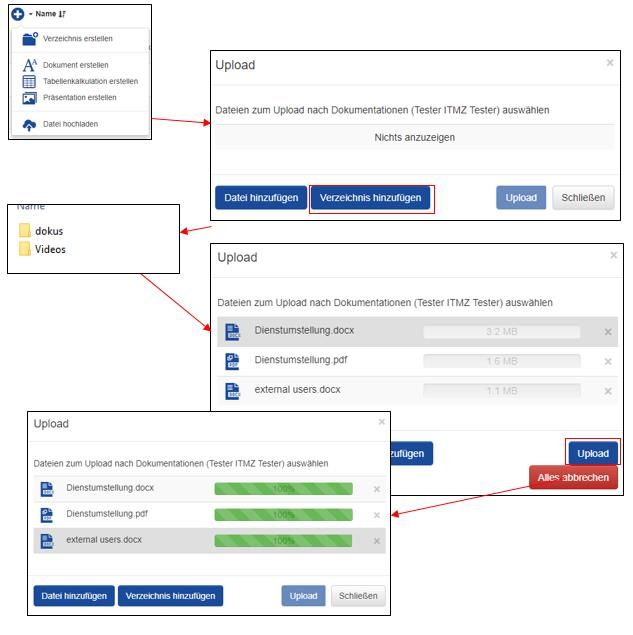
Introduction
1.     Introduction ..................................................................................................................................... 5
2.     Installation of the Client .................................................................................................................. 5
     2.1.     Installation on Windows.......................................................................................................... 5
     2.2.     Installation on Linux ................................................................................................................ 8
     2.3.     Installation on Mac OS X ......................................................................................................... 9
     2.4.     Installation on Android .......................................................................................................... 12
     2.5.     Installation on iOS ................................................................................................................. 15
3.     Login .............................................................................................................................................. 17
     3.1.     Web interface ........................................................................................................................ 17
       3.1.1.         User of the University of Rostock .................................................................................. 17
       3.1.2.         External users ................................................................................................................ 17
     3.2.     Client...................................................................................................................................... 19
4.     Account Overview ......................................................................................................................... 20
     4.1.     Account settings .................................................................................................................... 20
5.     Working with the web interface.................................................................................................... 22
     5.1.     Create a folder ....................................................................................................................... 22
     5.2.     Right Management ................................................................................................................ 22
     5.3.     Manage folder/file................................................................................................................. 22
       5.3.1.         Download ...................................................................................................................... 22
       5.3.2.         Upload ........................................................................................................................... 23
       5.3.3.         Changes ......................................................................................................................... 24
       5.3.4.         Clear............................................................................................................................... 25
       5.3.5.         Restore .......................................................................................................................... 25
       5.3.6.         Moving files ................................................................................................................... 26
       5.3.7.         Copy files ....................................................................................................................... 26
       5.3.8.         Leave folder/delete folder............................................................................................. 27
     5.4.     Sharing folders/files............................................................................................................... 27
       5.4.1.         Sharing by adding members to folders ......................................................................... 27
       5.4.2.         Release via link .............................................................................................................. 28
       5.4.3.         Make public ................................................................................................................... 29
     5.5.     Administration of quota ........................................................................................................ 30
     5.6.     Management of created link releases ................................................................................... 32

                                                                                                                                2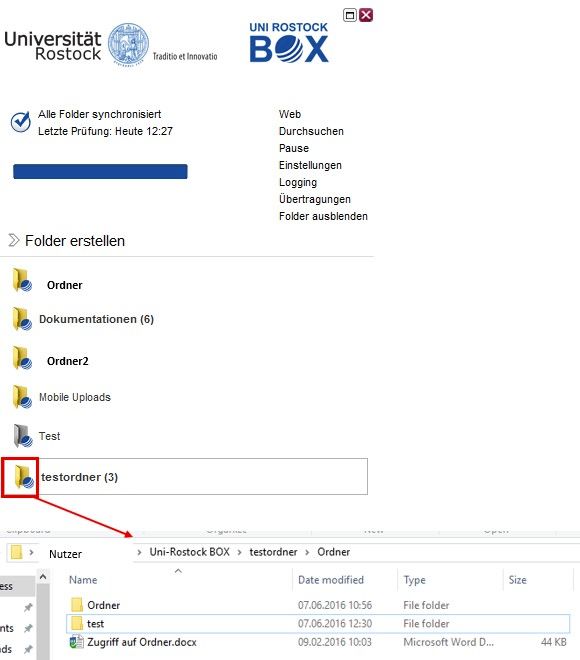
5.7.     Create and use Groups .......................................................................................................... 32
     5.8.     Create an upload form .......................................................................................................... 35
     5.9.     News ...................................................................................................................................... 37
     5.10.        Clients ................................................................................................................................ 37
     5.11.        View mode and sort option ............................................................................................... 38
       5.11.1.       Change view .................................................................................................................. 38
       5.11.2.       Sorting options .............................................................................................................. 39
     5.12.        Language............................................................................................................................ 39
6.     Edit documents online together.................................................................................................... 40
     6.1.     Web interface ........................................................................................................................ 40
7.     Working with the desktop client ................................................................................................... 45
     7.1.     Notification window .............................................................................................................. 45
     7.2.     Settings in the desktop client ................................................................................................ 45
       7.2.1.        Beginner Mode .............................................................................................................. 45
       7.2.2.        Expert mode .................................................................................................................. 48
     7.3.     Download and Upload files ................................................................................................... 55
     7.4.     Working with the context menu ........................................................................................... 58
       7.4.1.        Context menu of the Client ........................................................................................... 58
       7.4.2.        Context menu in Windows Explorer.............................................................................. 60
     7.5.     Move a folder ........................................................................................................................ 60
     7.6.     Clear....................................................................................................................................... 62
     7.7.     Restore .................................................................................................................................. 63
     7.8.     Enable delete protection ....................................................................................................... 64
8.     Android-Client ............................................................................................................................... 65
     8.1.     Folder Actions ........................................................................................................................ 65
       8.1.1.        Download ...................................................................................................................... 65
       8.1.2.        Invite .............................................................................................................................. 65
       8.1.3.        Link ................................................................................................................................ 65
       8.1.4.        Delete ............................................................................................................................ 66
     8.2.     Context-Menu at home level ................................................................................................ 66
     8.3.     Context-Menu at folder level ................................................................................................ 66
     8.4.     Upload ................................................................................................................................... 67
     8.5.     Settings .................................................................................................................................. 67
     8.6.     Hints....................................................................................................................................... 67

                                                                                                                               3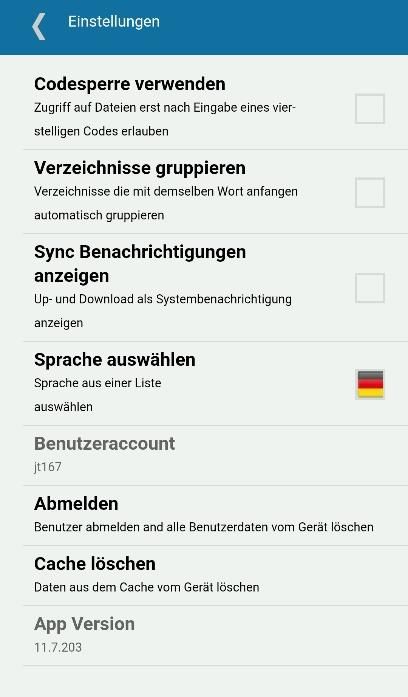
9.     FAQ ................................................................................................................................................ 68
     9.1.      Cloud memory occupied ....................................................................................................... 68
     9.2.      Copy entire folder to the Unibox........................................................................................... 70
     9.3.      Copy Link in the Edge Browser .............................................................................................. 70
     9.4.      Enable logging in the client ................................................................................................... 70
     9.5.      Using the Unibox client on the terminal server .................................................................... 70
     9.6.      Folder and file names with special characters ...................................................................... 71
     9.7.      Proxy settings ........................................................................................................................ 71
     9.8.      Why does the upload take even though the bar is green? ................................................... 72
     9.9.      Windows Phone App ............................................................................................................. 72
     9.10.         Two users on a PC.............................................................................................................. 72
10.         Terms of Use.............................................................................................................................. 73
     10.1.         Performance and user circle.............................................................................................. 73
     10.2.         Memory ............................................................................................................................. 73
11.         Contact details and contact persons ......................................................................................... 73

                                                                                                                                4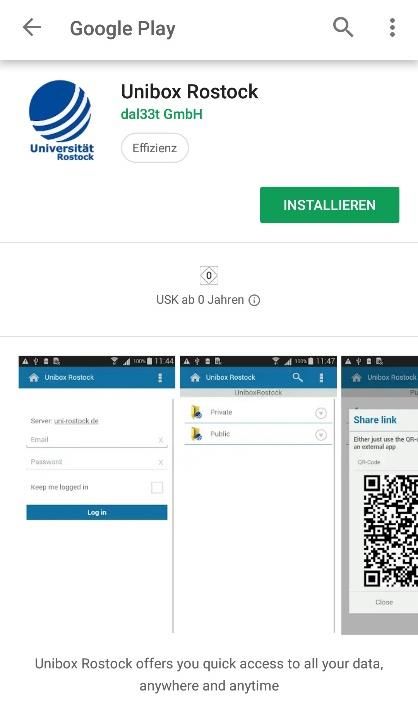
1. Introduction
Inter-institutional and interdisciplinary science and research requires team-oriented work. Thus, the
demand for suitable products that support such collaboration increases. Working together and
simply exchanging documents flexibly in this context is an important prerequisite.
With Unibox, the University of Rostock provides such a service to students and employees of the
University of Rostock. With the online storage service, it is possible to exchange, edit, save and
synchronize data between users, desktop computers and mobile devices. The data access takes place
cross-platform via a web browser or via the Unibox clients for the operating systems Windows, Max
OS, Linux, Apple iOS and Android. Each user has 10 GB of storage space available.
Frequently asked questions, as well as for one or other important settings we have documented on
our websites in the FAQ (as well as at the end of the document) (https://www.itmz.uni-
rostock.de/onlinedienste/clouddienste/unibox/faq/). Furthermore, you will find on our websites
currently known problems and related workarounds (https://www.itmz.uni-
rostock.de/onlinesienste/clouddienste/unibox/aktuelle-probleme/), as well as video tutorials on
individual functions (https: / /www.itmz.uni-
rostock.de/onlinedienste/clouddienste/unibox/videoanleitungen/)

2. Installation of the Client
Before you can use the client installed it on your desktop or mobile devices first. Below are the
installation instructions for the various operating systems.
    2.1. Installation on Windows
    1. Download the client under „Clients“ on the web interface https://unibox.uni-
       rostock.de/download_client.
    2. Run the setup and follow the installation instructions.
    3. Agree to the license agreement.

    4. Selection of the installation type:
       4.1. Automatic
                Select the installation type „Automatic“. The software will installed in the default
                directory with standard links and settings.

                                                                                    5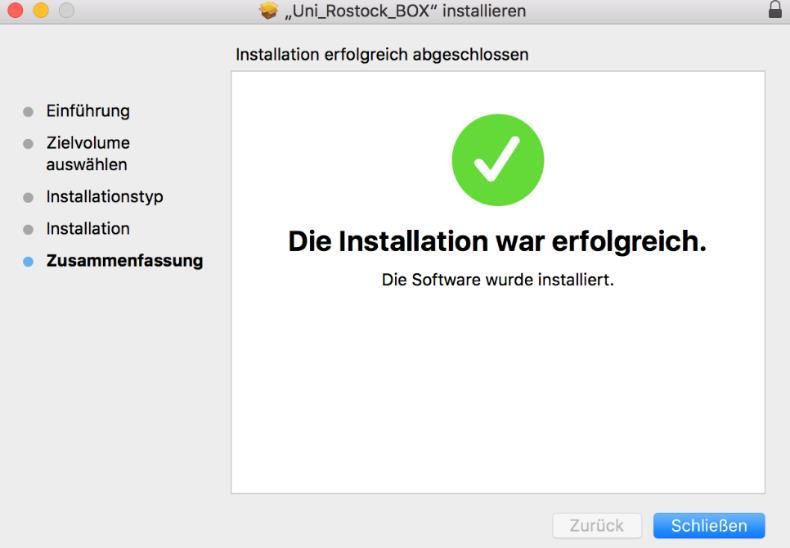
4.2. Customized
            Alternatively, you can choose the installation type „Custom“. If required, you can
            edit the destination directory here. Furthermore, you have the possibility to select
            shortcuts, the automatic start, system expansions.

5. After successful installation, the computer can restarted directly or later.

                                                                                  6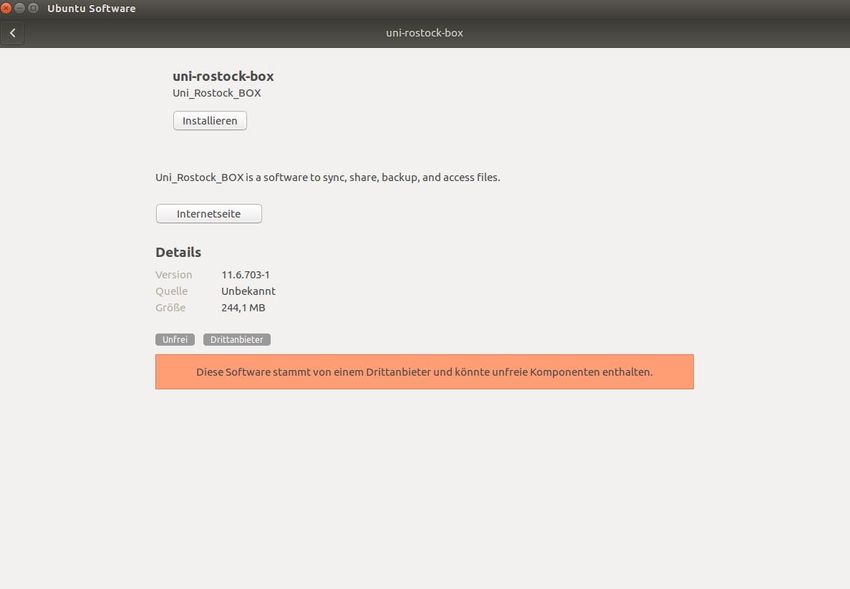
6. Then start the client and log in with your user account.

7. In the client, you have the possibility to make standard settings. By default, logging should
   enabled. If errors occur, these log files can contribute to faster problem solving.
8. Via the Windows File Manager, you have the possibility to create and edit data.

9. Now you can work with the client, store data, synchronize and work on common projects.

                                                                               7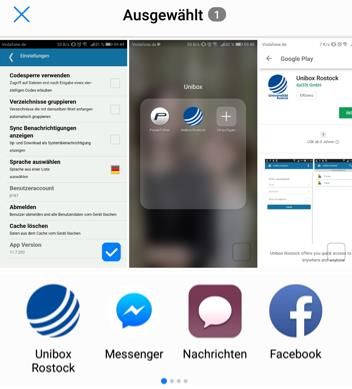
2.2. Installation on Linux
 1.   Download the Client under „Clients“ on the web interface „https://unibox.uni-
      rostock.de/download_client“.
 2.   Complete the installation of the package:

 3.   Then start the client and log in with your user account.

4. In the client, you have the possibility to make standard settings. By default, logging should
   enabled. If errors occur, these log files can contribute to faster problem solving.
5. Via the Linux file manager, you have the possibility to create and edit data.

                                                                                 8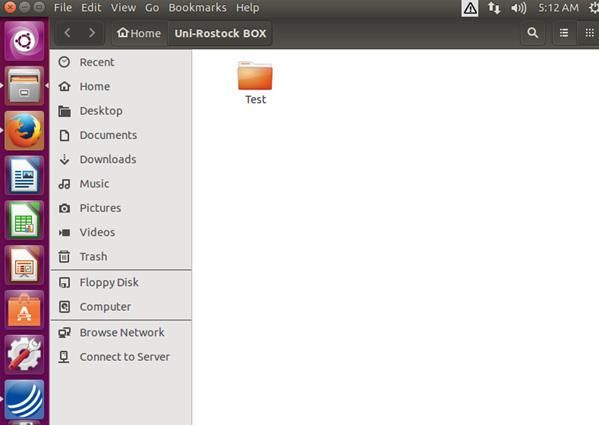
6. Now you can work with the client, store data, synchronize and work on common projects.

                                            7.
2.3. Installation on Mac OS X
1. Download the client under „Clients“ on the webinterface „https://unibox.uni-
   rostock.de/download_client“.
2. Run the setup.

3. Follow the installation instructions.

                                                                           9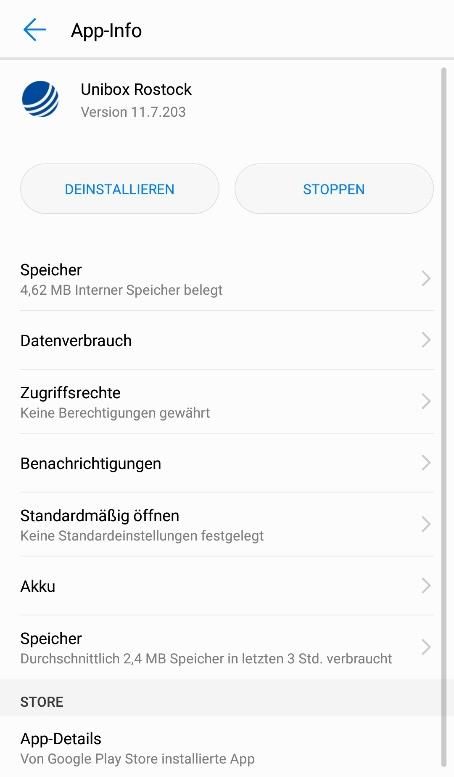
4. Install the software in the preselected directory or select another one.

                                                                              10
5. After successful installation, start the client.
6. Log in to the client with your user account.
7. In the client, you have the possibility to make standard settings. By default, logging should
enabled. If errors occur, these log files can contribute to faster problem solving.
8. The Finder (File Manager) allows you to create and edit data.
9. Now you can work with the client, store data, synchronize and work on common projects.
112.4. Installation on Android
1. Download the client „Unibox Rostock“ in the Google App Store or Play Store.
2. The installation of the clients starts automatic.
3. After successful installation, the app can executed.
4. Then start the client and log in with your user account.
125. In the app, you have the possibility to make standard settings.
6. The Android File Manager allows you to copy files to the Unibox. Select a file and choose
“Share”. The Unibox offered to you as a possibility and the file is stored there.
7. Now you can work with the client, store data, synchronize and work on common projects.
13Please note:
With Android 8, there are currently still difficulties in using the app. Until the problem is
solved by the software manufacturer, there is the following workaround.
Open "Settings" on your Android smartphone and go to the installed apps. Find the "Unibox
Rostock" app in this list and open the settings menu / app info. Select "Permissions" or
"Permissions" and enable access to the memory of your smartphone. Then the upload /
download and work with the mobile app should work.
142.5. Installation on iOS
The client is currently not available in the App Store. There will be an app in
the new design, expected from February 2019.
1. Download the client „Unibox“ in the Apple App Store.
2. The installation of the client starts automatically.
3. After successful installation, you can run the app.
4. Then start the client and log in with your user account.
5. In the app, you have the possibility to make standard settings.
156. Via the file manager, you have the possibility to copy files into the Unibox. Select a file and
choose “Share”. The Unibox offered to you as a possibility and the file is stored there.
7. Now you can work with the client, store data, synchronize and work on common projects.
163. Login
3.1. Web interface
3.1.1. User of the University of Rostock
To access your data via the web interface, you must log in there. To do this, you use your
university login data with the user name and the corresponding password. Open a web
browser and open the website: https://unibox.uni-rostock.de
After a successfully Login, you will be automatically forwarded to the Unibox and can use the
service.
3.1.2. External users
A user of the Univerity of Rostock has the possibility to invite external users to a folder. This
external user then works on the quota of the internal user and does not receive its own
quota. This external user works on the quota of the internal user and does not receive its
own quota. If a user of the university has invited an external user to Unibox, this one will
receive to emails. The first e-mail is used for account activation and the second e-mail
informs the user about which folder has been shared with him/her.
Before the user can accept the invitation to a folder, the account must be activated. To do
this, the recipient of the e-mail clicks on the link “Accounts activation” and follows the
instructions for registration. Subsequently, the external user can log on via the website:
https://unibox.uni-rostock.de with the self-set password.
17Activation E-Mail: E-Mail with folder sharing:
Registration of an external account:
183.2. Client
To access your data via the client, you must first start it and then log in there. To do this, you use
your university login data with the user name and corresponding password.
After successful login, the login window closed automatically and you can work with client and
access or synchronize your data.
194. Account Overview
4.1. Account settings
Under „My Account“ you have the opportunity to view your accounts information and to modify
some of the information. You get to your account information by clicking
on the -icon and selection „My Account“.
You will show four tabs for your account. The overview tab provides general user account
information, such as username, name, phone number, e-mail address and current quota usage.
In this view, you have the possibility to change the following information:
Changing the profile picture: Adding further e-mail addresses via manage next to the e-
mail:
In the tab „groups“ you can see the groups to which you have added:
20In this tab, the groups to which you are assigned are displayed and you can create and manage
groups. Information can be found under 5.5. Creating and use groups
In the „Orgainizations“ tab, you can see the organization to which you have been assigned.
However, this isn´t used at the University of Rostock, which is why this tab is empty.
In the „Devices“ tab, the devices are displays with which device, which software version you have
authenticated against the Unibox and when the last logon of this device took place.
215. Working with the web interface
5.1. Create a folder
Folders can used to structure the data. Invitations can generated for each folder. Thus, the access
rights for other people can be limited to certain areas. At the top level, at least one folder must
create to upload data. Invitations and permissions can only assigned to top-level folders.
New Folders can be created on the top level Home and as subfolders in existing folders via the
-icon. This followed by the assignment of a folder name and the folder is created.
5.2. Right Management
In the Unibox there is a rights administration at folder level as well as link release level.
If you would like to share a folder with one or more persons, you have the opportunity to assign
a corresponding right per user.
With the read right, the members of the folder can read but not
modify or delete the contents of the folder.
With the right to read and write, the members of the folder can
read, modify and delete the contents of the folder.
With the administration right, the members of the folder can read, modify, delete and share the
contents of the folder as well as add other users to this folder or delete the folder. This right
should only be distributed to some extent.
If you release a folder via link, two rights can be assigned for the link release.
With the read right users who have received this link can download
the contents of the folder or the file.
With the upload right, users who have received this link can
download the contents of the folder or file, as well as upload additional files to the folder.
5.3. Manage folder/file
5.3.1. Download
Through the web interface, files and folders can downloaded from the server. To do this,
mark the folders or files by selecting the checkbox of the folder. This checkbox appears as
soon as you move the mouse over the folder.
22After selecting all desired folders or files, you can download the folders using the download
icon .
If you select one or more folders for download, the folders will downloaded with all their
contents. If you select one or more files within a folder, only the selected files will
downloaded.
5.3.2. Upload
Files can be stored on the server via the web interface.
Navigate to the folder where you want to save new files. Click on the "+" - field and select
"Upload file" and then "Add file" to select the desired file (s) from the computer. Then click
on "Upload" to upload the file (s). After completing the upload, you can close the dialog box.
You also have the option of uploading entire directories. To do this, place the folder /
subfolder and click on the "+" field again and select "Upload file" and then "Add directory"
23to select the folder containing the desired file (s). All contained files will be added to the
upload dialog and can be uploaded.
Alternatively, you can drag and drop the file into the web interface.
Another way to upload the files is to drag the files to
uploaded to the folders. As you drag the file over a folder,
the line turns green and you can upload the file. This is then
loaded into the folder.
If it turns red, an upload is not possible. For example, this
case may occur if you try to drag a file within a folder to
another file to upload it. This is not possible.
5.3.3. Changes
File names and folder names ca be renamed via the web
interface. To do this, click on the Rename-Icon and
enter a new in the corresponding dialog box for the folder or
file.
245.3.4. Clear
Each Folder with its contents as well as individual files can deleted via the web interface via
the delete-symbol .
When using the desktop client at the same time, please note that the data you delete via the
web interface will also deleted by the automatic synchronization with the desktop clients on
the local computer!
5.3.5. Restore
Files that have been accidentally deleted can be restored via the website. So you are also
able to access previous versions of the files.
To restore files, go to the menu item Recycle Bin .
It contains the same folder structure as in folders as soon as you have deleted one or more
folders or files in the respective folders.
It contains the same folder structure as in Folders as soon as you have deleted one or more
folders or files in the respective folders.
Navigate to the respective folder from which the file is to restored. Select the appropriate file
or folder in it and click the Restore-icon to restore the deleted file.
This is followed by the Restore dialog, where you can see the version levels of the files and
decide which file to restore.
25Under the menu item Recycle Bin, the previous versions for selected or all folders can be
deleted. Ifo ne selects one or more folders, one can delete these and their contents by
means of the Purge-Symbol .
This followed by a dialog box to confirm the deletion.
Please note that this will permanently delete the previous versions and restore older
versions and deleted files is no longer possible.
5.3.6. Moving files
Within a folder, you have the option to cut the files form one folder at the file level and paste
them into another folder, thus moving them.
To do this, select one or more files and select the cut-symbol . Then navigate to the
folder where you want to move the file. In this folder you will be offered the paste-symbol
. This will insert the file into the folder and move the file.
Another possibilty, as far as the file it to be moved only to a folder level below, ist o drag the
file to the new folder.
This file will be moved to the subfolder.
5.3.7. Copy files
Within a folder, you have the option of copying files within the same folder at the file level.
To do this, select a file and select the copy-icon . This is followed by a dialog box in
which you can assign a new name for the copied file.
265.3.8. Leave folder/delete folder
If you have shared one or more folders with other users, you can adjust this share at any time by
removing the members from the share or adding more. If you delete the shared folder, it will also
be deleted for all other members.
If you have been invited by another user to a folder and thus only a member of a folder, you can
not delete the folder. You have the option to leave the folder. If you leave a folder, you no longer
have access to the folder and its contents. The folder will remain with the folder owner and the
other members.
If you have read and write access to a folder, you can delete the contents of the folder. These are
deleted then also with all other members and the owner of the folder.
5.4. Sharing folders/files
5.4.1. Sharing by adding members to folders
You can share folders and files with users of the University of Rostock and external users.
Click on the share-icon for the file or folder and add the email address of the user you
want to invite. You can also give the user a right to the folder or file. There is the possibility
that the user can read, read and write or administer the file or the contents of the folder. The
user is added via the „+“-symbol.
You can also register multiple users and collect the same rights for all. To do this, enter the e-
mail address of a user in the field and press "Enter", then enter the next e-mail address and
27press "Enter" again. Repeat this until all desired users have been entered. Then select the
permission and select the "+" icon to add the users.
5.4.2. Release via link
It is possible to provide the files or folders directly for download via a link release. To do this,
click on the share-icon and select the „Create link“ button. Then a link will created.
Furthermore, you have the option to assign rights: Users who have this link can read the
contents of the folder or upload something to the folder. Via the dialog window, you can
remove the link with “Remove”.
In addition, other settings for the link release via „Settings“ are possible. It can be an
expiration date, the maximum number of downloads, as well as a password set.
28The advantage of this is that the folders and files can be provided without registration.
Please note, however that the link can be passed on and it is not comprehensible who
downloads the data.
5.4.3. Make public
Another way to make files available to users is to make public. To do this, also click on the
share icon and select the button "Make public". Then a link will be created.
You can email the link created with it and the user has the option to select the files to be
downloaded and does not have to download all the documents contained in the folder. If
there are Word, Excel or PowerPoint documents in the folder, the user has the option of
displaying the file on the Web with OnlyOffice. The user receives only read rights and can not
make any changes to the documents.
29The advantage of the "make public" function is that the folders and files can be made
available without registration and individually downloaded at will. Please note, however, that
the link can be passed on and it is not comprehensible who downloads the data.
5.5. Administration of quota
All your deleted data will be moved to „Recycle Bin“. This does not delete a file directly and will
continue to occupy your quota. So that your memory is not occupied by old versions or deleted
files, you can delete these data under “versions”. Switch to the menu item Recycle Bin .
It contains the same folder structure as in Folders as soon as you have deleted one or more
folders or files in the respective folders.
Under the menu item Recycle Bin the previous verions or deleted data for selected or all folders
can be deleted. If one selects one or more folders, one can delete these and their contents by
means of the purge-symbol .
This is followed by dialog box to confirm the deletion.
30Please note that this will permanently delete the previous versions and restore older verions and
deleted files is no longer possbile.
315.6. Management of created link releases
As soon as you have released a file or a folder via link, these appear unter the menu item “Links“.
In this area, you have the possibility to manage and delete the link shares, as well as how often
the files were downloaded via the link. If you mark a link share, you can call up the link in your
web browser via the visit-icon . There you have the possibility to download the file or the
folder or to copy the link to the clipboard via the clipboard-icon in order to pass it on.
Using the settings-icon , you can edit link sharing and set the expiration date, the
maximum number of uploads, upload and set or change the password.
The link release can be permanently deleted by the delete-symbol . This will prevent
users who have the link from downloading the file or folder or uploading files to the share.
5.7. Create and use Groups
It is possible to create user groups that have access to the same folders. This feature helps you to
share many files with user groups.
To create a group, open the user account overview "My Accounts" and switch to the "Groups"
tab.
32Click the "Create group" button to open the group creation dialog.
Give a meaningful name to the group. Optionally, you can specify a description of the group.
Then switch to the "Folders" tab in the dialog box.
Here you can directly re-create a folder on which the group should have access or you specify an
already created folder. This will be suggested to you when typing the initial letters. Either choose
the suggested existing folder or select "Create new" to create a new folder.
33After you select or create the folders, they will be displayed in the "Folder" tab. Clicking on any of
these folders will open a drop down menu where you can customize the group's permissions for
these folders or remove the folder for that group's access.
Please note that currently only the input of user IDs is supported. Entering email addresses or
names is currently not supported. Furthermore, you can only add users to the group who already
have an account in the Unibox Rostock.
More information:
If you would like to add additional users to a group, open the user account overview, switch to
the "Groups" tab and select the group to be edited. The dialog box opens and you can add more
users in the "Members" tab.
If you want to share additional folders with this group, open the user account overview, switch to
the "Groups" tab and select the group to be edited. The dialog box opens and in the "Folder" tab
you can add further folders for this group.
Users who can access folders via group sharing can not leave the folder on their own, they must
be removed from the group by the group administrator.
34You can not add groups through the share dialog at the folder level. All group changes must
always be made through the user account overview.
5.8. Create an upload form
A feature is the creation of an upload form. This feature allows you to create your own web page
within the Unibox, which gives external users a way to upload files without having a user
account.
Navigate to a top-level folder that you want to use as the upload destination and click the Share-
icon and select Create Upload form.
Enter information about the upload form. Enter a title and a description. Optionally, you can
create a validity date up to which an upload is possible and provide an e-mail address.
After you have created the form, a link to the upload form appears in the share dialog. There you
can also change the expiration date or delete the upload form. Copy the link and send it to the
35users who should upload files there.
If the user opens the link you have sent, he will receive the following input mask. Specifying a
username and an e-mail address is required. Entering a password is optional. If a password is
entered, the created file link is protected with the password.
If the user subsequently clicks Upload, the user receives a dialog box for uploading the files. The
user has the option to upload directories or individual files by selecting "Add file" or "Add
directory" and uploading the files via "Upload".
36Subsequently, a subfolder of Max Mustermann has been created in your shared folder, in which
the files uploaded by him are located.
5.9. News
The News section gives you the option to see when the files and what type of file
have been uploaded, updated or deleted in the folders. Newly uploaded files are blue, updated
files orange and deleted files red.
5.10. Clients
In the Clients section, you can directly download the desktop clients and visit the
websites of the mobile apps.
375.11. View mode and sort option
5.11.1. Change view
In the web interface, there are various view options at the folder level. You can switch
between three different views using the view-icon .
List: This is the default view mode. This shows all subfolders and files in the current
directory and shows most information about the files and subfolders.
Grid: This view mode displays all icons next to each other and gives the name under each
object.
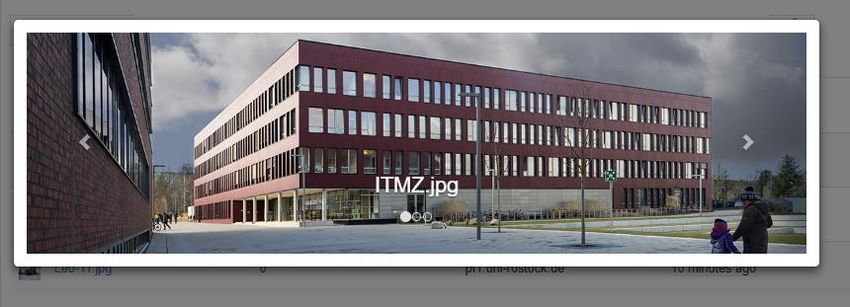
Gallery: This view only works for folders containing images. This view opens the images
in a slider.
385.11.2. Sorting options
The list of contents can be sorted by clicking on the name of the section to be sorted. Click
again to change the sort option. A small arrow indicates the direction in which the sort
option is being used.
5.12. Language
The web interface is displayed depending
on the web browser and the operating
system in the respective installation
language. If the display language of the
web browser is set to English, the web
interface of the Unibox will also be
displayed in English. The language can be
changed depending on the operating
system in the web browser settings. This
setting applies to all web pages that are
subsequently called.
396. Edit documents online together
At the University of Rostock Box, documents are stored in the cloud and are thus available
everywhere and at any time. Thanks to the integrated editor of OnlyOffice, it is possible to process
documents directly in the Unibox. Simply click on the relevant document (presentation, document or
table) and OnlyOffice will automatically start in the Unibox. Multiple users online from different
locations can edit the documents simultaneously. The changes are marked in different colors
depending on the user. The integrated comment and chat function also facilitates collaboration.
6.1. Web interface
By clicking on the document in the Unibox, this opens via OnlyOffice in the web browser. Here
the document can be edited together. The editor is built in the same way as other word
processing programs, such as Microsoft Office or Open Office. By default, the editor opens in the
"Home" tab. In this tab you will find all editing options, such as fonts, paragraph settings and
styles.
The File tab automatically open the „Download as …“ menu. This allows you to download the
document different formats.
The document can be saved and printed under the same menu item. In addition, settings can be
made. Furthermore, there is a help with useful information on handling OnlyOffice.
In the Insert tab, illustrations, comments, headers and footers can be inserted into the
document.
40In the Layout tab, general document settings for the layout, such as Size, margins, columns,
paragraphs, etc. are made.
In the References tab, the table of contents and footnotes can be created and updated, and links
can be created and customized.
In the Collaboration tab you can set the synchronization of the document for collaboration,
make comments, view changes, monitor, accept, reject, or edit.
In the Plugins tab various additional contents can be integrated, like e.g. Macros, clip art, OCR,
voice memos, icons, translator, youtube videos and embedded images.
In the column on the left side it is possible to comment on certain text passages, to respond to
existing comments or to talk in real time in the chat, for example to better vote on changes.
Comment on text passages :
The comments throughout the document are displayed in the left comments column. In the
document itself, the comments are displayed as a speech bubble. Via the comment column it is
possible to jump to the place of the comment within the document. Click on the comment and
you will get directly to the page where the comment is written.
41Entertainment in real time :
Within the Online Editor, the users of the document can chat with each other and thus make
arrangements and discussions. The chat history is deleted as soon as the document is closed.
Anyone who has access to this document can edit it online. In this case, a parallel work of
multiple users is possible. Each user is assigned a separate color, which clearly indicates which
user made which change. The other users have the opportunity to accept or undo these. To see
clearly what has been changed you can record the changes at the bottom under the button
"Track Changes".
While the document is being edited there are further options for the respective action on the
right side. If you write a text, for example, you can change the line spacing or adjust the
background color. If you create a table, you can adjust the table colors, change frame, adjust row
and column sizes.
There is also this option menu for pictures, headings, footers and headers, as well as diagrams. In
addition, advanced settings can be displayed for each menu, which opens a dialog box with
further options.
42Advanced settings:
If several users are working on a document, a number of users appears in the upper right corner.
It shows how many users are working on the document in parallel. If you click on the user icon
, the currently working users are displayed.
Toolbars can be switched on and off, the page size is adapted to the window and the settings are
opened via the icon„View Settings“ :
43It is possible to upload password-protected documents into the Unibox and to work together in
OnlyOffice online. Open the document via the Unibox, followed by the call for password entry
before displaying the content of the document in OnlyOffice. Enter here the password with
which the file has been protected. Then you can work with the document as usual.
447. Working with the desktop client
By default, the desktop client automatically synchronizes all changes at the same time as the Unibix
Server.
7.1. Notification window
In the notification window (System Tray) you will find an icon of the Unibox Client. This icon
shows the current status of the synchronization and you have a right mouse click on the icon a
menu.
By right clicking on the symbol, you have the following options:
- open the desktop client
- Open your folder in the web interface
- Open the Unibox folder on your local hard drive
- Pause/Stop all synchronization processes
- Look at the latest changes
- Open the settings of the client
- Let the client finish the synchronization and then shut
down the PC automatically
- Stop the client from synchronizing and then terminate the
client automatically
- Stop the client
When you start the client, you are prompted to log in. All you have to do is enter your username
and password. After starting, you will see the overall status in the notification window:
The circle with the check mark means the Unibox is fully synchonized.
The circle with the hourglass means that the Unibox is waiting to synchrnoize your folders,
e.g. when the client is waiting for a connection to the internet.
The circle with the rotation means that the Unibox is currently being synchronized.
The circle with the two bars (pause sign) means that the synchronization has been stopped.
The circle with the exclamation mark means that the Unibox requires your attention.
Expenses reasons are that you are not yet logged in, your hard disk is full, you have lost
permissions to a folder, or your storage quota has exceeded.
7.2. Settings in the desktop client
The desktop client can used in two different modes. By default, it will installed in “Beginner
Mode”. However, the “expert mode” can selected by the user.
7.2.1. Beginner Mode
After installation, the client runs in entry-level mode by default. In this mode, only the
synchronization status, the synchronized folders and the default settings can viewed.
45The following functions are possible in entry-level mode:
1. The upper part of the client shows the synchronization status, the time stamp of the last
synchronization check, and the name of the logged-in account.
2. By clicking on a folder from the client, it is called up in the local file manager. There, local
data can be copied, created, edited or deleted.
3. There are serveral buttons on the top right corner:
3.1. Web
This opens the website of the Unibox in the Internet browser and it is possible for
you to work directly on the web.
3.2. Explore
It opens the file manager on your PC and it is possible to edit, create and delete files.
3.3. Pause
The synchronization will pause until your start it again. During this time, no data is
synchronized from the server/web or other clients to you PC and no files from your
PC to the server/ web or other clients.
3.4. Preferences
This opens the settings menu. Further information on the settings will follow.
3.5. Create Folder
It is possible for you to create further folders via the client interface on your PC,
which are also synchronized. You can create the folder via the wizard or with the
classic file manager.
464. In the settings, you will find minimalistic settings.
It is possible for you to change the default
path for the folders. You can also log out of
the client or switch accounts if multiple
users are working with one client. Below
this, you will see the name of your PC and
you can set the language for the client. It is
also possible for you to set how many
backup versions and how long to keep your
folders and their contained files.
Underneath it is possible to specify that the
client start with Windows startup.
Furthermore, you can set the closing
behavior of the client. Here you select
whether the client should be terminated or
minimized when clicking on the Red Cross.
If it is minimized, it will continue running in
the background and continue to
synchronize your files. Finally, it is possible
for you to turn on the logging, which we
highly recommend, should it come to an
error case and check on new updates on or
off. If you deactivate this option, you have
the option at any time to update the client manually via the “Update” button.
477.2.2. Expert mode
After installation, the client runs in entry-level mode
by default. In order to switch to the „expert mode“
the advanced mode has to be activated in the
settings. Then the client has to restarted.
The following functions are possible in „expert mode“:
1. The upper part of the client shows the synchronization status, the time stamp of the last
synchronization check, and the name of the logged-in account.
2. Click on the folder icon to call it up in the local file manager. There, local data can be
copied, created, edited or deleted.
If you click on a folder name in the client, the display expands and the contents of the
folder are displayed. In addition, the details can displayed per file. There you can look at
the size of the file, the location, when and by which PC the file was last edited, the
versions of the file and the synchronization status.
There are also two more tabs „Members“ and „Settings“. Under “Members” the
members can be displayed with their permissions of the folder and further users can be
invited via the client.
Settings for the folder can made under „Settings“.
48Transmission modes can selected, you can decide whether the data should be
synchronized automatically, manually, once a day, when sharing/sending etc.
Furthermore, a separate transfer mode can be created with its own rules via the pen-
icon .
A separate name can assigned for this transfer mode. For easier configuration, the rules
can copied and adjusted from another transmission mode. Furthermore, it can selected
whether new and changed files as well as deleted files should be synchronized. You can
also set the interval or hour and day to check for changed or new files.
49Furthermore, the local folder path can changed in the settings, as well as the file flow can
be adjusted. Files with certain endings can excluded from synchronization. There are
already given some endings, which can be edited or deleted and added new endings.
Via “Stop Online Backup” the folder on the server/web can be deleted.
Via „Stop sync“ the synchronization for the folder is stopped. Furthermore, it can decided
whether the folder should be deleted locally.
3. On the left side you can see more information in the extended view for the respective
folders. It will be displayes when the last time the folder was synchronized. The
synchronization can be started again via the arrow . The Sync Status indicates if the
synchronization process for this folder is complete. Furthermore, the number of files, the
largest and the deleted files can be displayed. “Permissions” open the tab “Members” to
manage the rights of the folder.
504. Several buttons can be found on the upper right edge.
4.1. Web
This opens the website of the Unibox in the internet browser and it is possible for
you to work directly on the web.
4.2. Explore
It opens the file manager on you PC and it is possible to edit, create and delete files.
4.3. Pause
The synchronization will pause until you start it again. During this time, no data is
synchronized from the server / web or other clients to you PC and no files from your
PC to the server / web or other clients.
4.4. Preferences
This opens the settings menu. Further information on the settings will follow.
4.5. Logging
Current LOG-Inscriptions are displayed in the client and from here, it is possible to
open the folder in which the log-files are stored on the PC.
4.6. Transfers
In the transfer, overview, the download and upload transfers can be viewed up to the
last 30 days. The files, the synchronization status, the size, the folder in which the file
is located and from which client or server the file was synchronized are displayed.
4.7. Create Folder
It is possible for you to create further folders via the client interface on your PC,
which are also synchronized. You can create the folder via the wizard or with the
classis file manager.
5. In the settings, you have different settings. These are divided into several tabs.
5.1. General
It is possible to change the default path for the folder. Next, you can unsubscribe
from the customer or change the account, more users will work with a client. Below
this you will see the name of your PC and you can set the language for the client.
51It is also possible for you to set
how many backup versions and
how long to keep your folders
and their contained files.
Undermeath it is possible to
specify that the client start with
Window startup. Furthermore,
you can set the closing behavior
of the client. Here you select
whether the client should be
terminated or minimized when
clicking on the red cross. If it is
minimized, it will continue
running in the background and
continue to synchronize your
files. Finally, it is possible for
you to turn on the logging,
which we highly recommend,
should It come to an error case
and check on new updates on
or off. If you deactivate this
option, you have the option at
any time to update the client
manually via the “Update” button.
5.2. Advanced
The server URL specifies the server you
are connecting to. This should not
changed. Furthermore, you can check
the following options:
- By default, backup new folders to
the cloud
- Show hidden files in the internal file
browser
- Lock user interface at startup
525.3. Warnings & Notification
The following options can set by
ticking:
- Show duration of pause
- Show alerts when the cloud
space is exceeded
- Display warnings if no direct
connection is possible
- Display warnings if the
synchronization is still running
when the client exits
- Show warnings about possible
file name problems
- Display warnings when the
folder is out of sync
If this option is activated, a
period for the warning can be
set.
Furthermore, settings for the
desktop notifications can made. If the option for notification is enabled, the
transparency of the window color as well as the delay in seconds can specified.
5.4. Information
In the information, you will find details about the client version, as well as system
information. Furthermore, you will find links to the web interface (homepage) and
this documentation.
5.5. Expert Settings
In the expert settings, you can set or remove further options.
53- automatically detect new
folders in the folder base
path
- Allows synchronization of
folders outside of the base
path
- Enable conflict handling
- Automatically sync available
folders
- Enable ZIP-Compression
- Delta-Sync in the Internet
and/or in the LAN
(synchronization of
computers with each other in their own network)
- Multi-source Download on the Internet and/or LAN (Download from multiple
sources (server, clients)
- use the managed directory program icon
5.6. Network
Here you can configure network
settings. In the first step, it is possible
to specify the connections. It specifies
whether the data should transmitted
via the server, server and LAN or
server, LAN and internet. We only
recommend servers.
Furthermore, direct connections to
other PCs can enabled, which throttled
internet and LAN speed (if you only
have a slow internet connection). The
option “Automatically determine a
suitable port” can be
enabled/disabled. Under Network Interfaces, all interfaces or specific
interfaces can selected. Furthermore, certain LAN IPs can be
specified, edited and deleted. If necessary, the proxy server and port
as well as an authentication with user name and password can
specified in the proxy settings.
545.7. DynDNS
DynDNS is a paid service that allows
a dynamic IP address to act as a
static IP address. If you have
configured a DynDNS account on the
client in the past, using DynDNS
improves your connectivity. This
shortend the time the client goes
online. This makes it easy for your
device to found either on the
PowerFolder network or on a
privately invited device.
5.8. Plugins
Plugins show the activated and deactivated plugins. These can be configured and
de/activated here.
7.3. Download and Upload files
When the client is first started, the program creates a new folder namen “Unibox Rostock” just
below the user profile (default data path). It is, like any other, a folder on the disk. Here, the clien
automatically detects when new files are filed or existing files are changed and synchronizes
them. If you click on a folder in the client again this directly in the file manager of the PC opened
and you can change the files in it or add new ones.
55If another folder is also to synchronized outside the "Unibox Rostock" folder, this can be
done via the context menu. Open the context menu on the folder to be shared in the file
manager with a right mouse click and select "Unibox Rostock"> "Share folder".
This opens a configuration wizard for this folder. Here you can choose a directory, which is
already done in this case and if necessary set two hooks: "Backup online" and "Invite
Members". This allows you to specify that the folder should moved to the server and
whether you already want to invite users to this folder.
Click "Next" to configure the folder for sharing.
56If you have selected "Invite Members", a window will follow to send the invitations. Here you
can add the users via their e-mail address and assign rights for these users.
Then the invitations are sent to the invited users and the setup for the folder is complete.
57Then the folder appears in the client and can managed. For example, other users can invited
to this folder, settings can be made.
7.4. Working with the context menu
The following steps worked in expert mode.
7.4.1. Context menu of the Client
Via the context menu of the order in the client it is possible to jump faster to certain points
and to carry out further actions.
58With Explore, the folder can opened in the local file manager.
Show Contents changes to the content overview of the folder in the
client.
Recent Changes displays new or changed files in the folder.
With Mark files as read, all files are marked as read, so the folder and
the files it contains are no longer displayed as new or edited.
It is possible to jump directly to the invitation wizard via Invite and
other members to the folder.
Permissions jumps to the tab “Members” and displays the current
members and their permissions for the folder.
With Settings you jump directly to the folder settings.
With the help of „Move“ it is possible to move a folder on the PC
without undoing the synchronization. If you no longer
want to synchronize and / or delete a folder, this is
done via Stop sync. If you delete a folder, it will
remain in the client as a “gray” and empty folder. It
can then be permanently deleted from the client via
“Delete Folder” (the folder has already been deleted
locally). It is also possible to stop the online backup
via “Stop Online Backup”. Then the files are not
synced to the server and backed up.
59You can also read