Oracle Fusion Middleware - Using Oracle Data Transforms on Oracle Cloud Marketplace
←
→
Page content transcription
If your browser does not render page correctly, please read the page content below
Oracle® Fusion Middleware
Using Oracle Data Transforms on Oracle
Cloud Marketplace

   12.2.1.4.0
   F38495-02
   March 2021
Oracle Fusion Middleware Using Oracle Data Transforms on Oracle Cloud Marketplace, 12.2.1.4.0

F38495-02

Copyright © 2021, Oracle and/or its affiliates.

Primary Author: Oracle Corporation

This software and related documentation are provided under a license agreement containing restrictions on
use and disclosure and are protected by intellectual property laws. Except as expressly permitted in your
license agreement or allowed by law, you may not use, copy, reproduce, translate, broadcast, modify, license,
transmit, distribute, exhibit, perform, publish, or display any part, in any form, or by any means. Reverse
engineering, disassembly, or decompilation of this software, unless required by law for interoperability, is
prohibited.

The information contained herein is subject to change without notice and is not warranted to be error-free. If
you find any errors, please report them to us in writing.

If this is software or related documentation that is delivered to the U.S. Government or anyone licensing it on
behalf of the U.S. Government, then the following notice is applicable:

U.S. GOVERNMENT END USERS: Oracle programs (including any operating system, integrated software,
any programs embedded, installed or activated on delivered hardware, and modifications of such programs)
and Oracle computer documentation or other Oracle data delivered to or accessed by U.S. Government
end users are "commercial computer software" or "commercial computer software documentation" pursuant
to the applicable Federal Acquisition Regulation and agency-specific supplemental regulations. As such,
the use, reproduction, duplication, release, display, disclosure, modification, preparation of derivative works,
and/or adaptation of i) Oracle programs (including any operating system, integrated software, any programs
embedded, installed or activated on delivered hardware, and modifications of such programs), ii) Oracle
computer documentation and/or iii) other Oracle data, is subject to the rights and limitations specified in the
license contained in the applicable contract. The terms governing the U.S. Government’s use of Oracle cloud
services are defined by the applicable contract for such services. No other rights are granted to the U.S.
Government.

This software or hardware is developed for general use in a variety of information management applications.
It is not developed or intended for use in any inherently dangerous applications, including applications that
may create a risk of personal injury. If you use this software or hardware in dangerous applications, then you
shall be responsible to take all appropriate fail-safe, backup, redundancy, and other measures to ensure its
safe use. Oracle Corporation and its affiliates disclaim any liability for any damages caused by use of this
software or hardware in dangerous applications.

Oracle and Java are registered trademarks of Oracle and/or its affiliates. Other names may be trademarks of
their respective owners.

Intel and Intel Inside are trademarks or registered trademarks of Intel Corporation. All SPARC trademarks are
used under license and are trademarks or registered trademarks of SPARC International, Inc. AMD, Epyc,
and the AMD logo are trademarks or registered trademarks of Advanced Micro Devices. UNIX is a registered
trademark of The Open Group.

This software or hardware and documentation may provide access to or information about content, products,
and services from third parties. Oracle Corporation and its affiliates are not responsible for and expressly
disclaim all warranties of any kind with respect to third-party content, products, and services unless otherwise
set forth in an applicable agreement between you and Oracle. Oracle Corporation and its affiliates will not
be responsible for any loss, costs, or damages incurred due to your access to or use of third-party content,
products, or services, except as set forth in an applicable agreement between you and Oracle.
Contents
    Preface
    Audience                                                             v
    Documentation Accessibility                                          v
    Related Documents                                                    v
    Conventions                                                         vi

1   Using Oracle Data Transforms
    1.1     Introduction to Oracle Data Transforms                     1-1
    1.2     Introduction to Oracle Data Transforms Administrator       1-1
    1.3     Introduction to Oracle Data Transforms Repositories        1-2
    1.4     Introduction to Oracle Data Transforms Run-Time Agent      1-2

2   Working with Oracle Data Transforms
    2.1     Accessing Oracle Data Transforms                           2-1
    2.2     Working with Connections                                   2-2
          2.2.1   List of Supported Technologies                       2-3
    2.3     Working with Data Entities                                 2-3
    2.4     Working with Projects                                      2-5
          2.4.1   Get Started with Data Flows                          2-6
          2.4.2   About Data Flow Editor                               2-7
              2.4.2.1   Oracle Database Functions                      2-8
          2.4.3   Create a New Data Flow                               2-9
              2.4.3.1   Add Components                                2-10
              2.4.3.2   Map Data Columns                              2-11
              2.4.3.3   Creating Data Entities for Target Component   2-11
              2.4.3.4   Validate and Execute a Data Flow              2-12
          2.4.4   Introduction to Workflows                           2-13
          2.4.5   Create a New Workflow                               2-13
    2.5     Scheduling Data Flows or Workflows                        2-15
    2.6     Managing Jobs                                             2-17

                                                                        iii
2.7 Mapping Users 2-18
3 Administering Oracle Data Transforms
3.1 Accessing Oracle Data Transforms Administrator 3-1
3.2 Creating Master and Work Repositories 3-2
3.3 Connecting to Repository 3-3
3.4 Managing Users 3-3
3.5 Importing Repositories 3-5
3.6 Exporting Repositories 3-6
3.7 Enforcing Password Policies 3-6
3.8 Cleaning up Unused Authorizations 3-7
ivPreface
This guide helps you to work with Oracle Data Transforms on Oracle Cloud
Marketplace.
This preface contains the following topics:
• Audience
• Documentation Accessibility
• Related Documents
• Conventions
Audience
This document helps you to use Oracle Data Integrator on Oracle Cloud Marketplace.
Documentation Accessibility
For information about Oracle's commitment to accessibility, visit the
Oracle Accessibility Program website at http://www.oracle.com/pls/topic/lookup?
ctx=acc&id=docacc.
Access to Oracle Support
Oracle customers that have purchased support have access to electronic support
through My Oracle Support. For information, visit http://www.oracle.com/pls/topic/
lookup?ctx=acc&id=info or visit http://www.oracle.com/pls/topic/lookup?ctx=acc&id=trs
if you are hearing impaired.
Related Documents
For more information, see the following documents in Oracle Data Integrator Library:
• Release Notes for Oracle Data Integrator
• Understanding Oracle Data Integrator
• Developing Integration Projects with Oracle Data Integrator
• Installing and Configuring Oracle Data Integrator
• Upgrading Oracle Data Integrator
• Integrating Big Data with Oracle Data Integrator Guide
• Application Adapters Guide for Oracle Data Integrator
• Developing Knowledge Modules with Oracle Data Integrator
vPreface
• Connectivity and Knowledge Modules Guide for Oracle Data Integrator
Developer's Guide
• Oracle Data Integrator Tools Reference
• Data Services Java API Reference for Oracle Data Integrator
• Open Tools Java API Reference for Oracle Data Integrator
• Getting Started with SAP ABAP BW Adapter for Oracle Data Integrator
• Java API Reference for Oracle Data Integrator
• Getting Started with SAP ABAP ERP Adapter for Oracle Data Integrator
• Oracle Data Integrator 12c Online Help, which is available in ODI Studio through
the JDeveloper Help Center when you press F1 or from the main menu by
selecting Help, and then Search or Table of Contents.
Conventions
The following text conventions are used in this document:
Convention Meaning
boldface Boldface type indicates graphical user interface elements associated
with an action, or terms defined in text or the glossary.
italic Italic type indicates book titles, emphasis, or placeholder variables for
which you supply particular values.
monospace Monospace type indicates commands within a paragraph, URLs, code
in examples, text that appears on the screen, or text that you enter.
vi1
Using Oracle Data Transforms
This chapter introduces Oracle Data Transforms on Oracle Cloud Marketplace and its
concepts.
Note:
Oracle Data Transforms is available only when you select Data Integrator :
Web Edition from the ODI product listing on Oracle Cloud Marketplace. For
more details, see Selecting Your Product.
It contains the following sections:
• Introduction to Oracle Data Transforms
• Introduction to Oracle Data Transforms Administrator
• Introduction to Oracle Data Transforms Repositories
• Introduction to Oracle Data Transforms Run-Time Agent
1.1 Introduction to Oracle Data Transforms
Oracle Data Transforms allows you to design graphical data transformations in the
form of data flows and workflows. The data flows define how the data is moved and
transformed between different systems, while the workflows define the sequence in
which the data flows are executed.
Oracle Data Transforms provides an easy-to-use user interface to create your data
flows and workflows, without requiring you to write any code. You can drag and
drop the components, that is data entities and operators, such as Join, Split, and
Aggregate, on the design canvas of the Oracle Data Transforms user interface and
connect them to complete your data flows and workflows.
After your data flows and workflows are ready, you can execute them immediately
or schedule to execute them at a later time. On execution, Oracle Data Transforms
generates the code for you.
For detailed information on the terminologies associated with Oracle Data Transforms
and their respective functions, see Terminology Information.
1.2 Introduction to Oracle Data Transforms Administrator
Oracle Data Transforms Administrator allows you to prepare the components required
for designing all your data flows through Oracle Data Transforms interface.
Use Oracle Data Transforms Administrator to:
• Manage users, by granting privileges to enforce security.
1-1Chapter 1
Introduction to Oracle Data Transforms Repositories
• Manage Repository (Creating, importing and exporting Master and Work
Repositories)
For detailed information on the terminologies associated with Oracle Data Transforms
Administrator and their respective functions, see Terminology Information.
1.3 Introduction to Oracle Data Transforms Repositories
The Oracle Data Transforms Repository is composed of a master repository and
a work repository. Repositories are automatically setup at provisioning. Objects
developed or configured by the users are stored in one of these repository types.
There is usually only one master repository that stores the Security information,
Connection information, and versioned and archived objects. The work repository is
the one that contains actual developed objects.
1.4 Introduction to Oracle Data Transforms Run-Time Agent
Oracle Data Transforms run-time agent orchestrate the execution of jobs. For Oracle
Data Transforms the run time engine is ODI Agent and it is automatically setup on
your ODI Marketplace instance during provisioning. To know more about it, refer to
Managing ODI Setup.
1-22
Working with Oracle Data Transforms
This chapter guides you to connect and work with the Oracle Data Transforms.
It contains the following sections:
• Accessing Oracle Data Transforms
• Working with Connections
• Working with Data Entities
• Working with Projects
• Scheduling Data Flows or Workflows
• Managing Jobs
• Mapping Users
For detailed information on the terminologies associated with Oracle Data Transforms
and their respective functions, see Terminology Information.
2.1 Accessing Oracle Data Transforms
You can access Oracle Data Transforms interface on Oracle Cloud Marketplace by:
• Navigating to Autonomous Database Data Tools Page
For more details, refer to Accessing Oracle Data Transforms From Database
Actions page.
• Click the link in OCI Stack Details page available in the Application Information
tab.
• In a web browser that has network access to the ODI Instance, type in :9999/oracle-data-transforms/ in the toolbar and click Enter.
You are navigated to the login page.
In the Sign Into Oracle Data Integrator page, enter the following login credentials
and click Connect:
• Username - SUPERVISOR
• Password
– For ADB - Use the password that you provided during the ODI stack
provisioning.
– For MySQL - Execute the following command to get the password -
python manageCredentials.py read odiSupervisorPassword
The Oracle Data Transforms interface appears allowing you to perform the data
transformations.
2-1Chapter 2
Working with Connections
2.2 Working with Connections
Connections help you to connect the Data Transforms to various technologies on
Oracle Cloud Marketplace. To know about supported technologies, refer to the List of
Supported Technologies.
To create a new connection,
1. From the left pane of the Home page, click the Connections tab.
Connections page appears.
2. Click Create Connection.
Create Connection page slides in.
3. For Select Type,
• In the Name field, enter the name of the newly created connection
• Select the type of connection that you wish to create.
– Oracle - Allows you to configure any connection type for Oracle
technology
– Other - Allows you to configure any connection type for other technology:
4. After selecting the required technology, Click Next.
5. For Connection Details, provide the connection details for the selected
technology such as:
• Connection -
– JDBC URL
– User
– Password
• Advanced Options
– Array Fetch Size
– Batch Update Size
– Degree of Parallelism for Target
Note:
Connection Details are technology specific and the above options
vary based on the selected technology.
6. After proving all the required connection details, click Create.
The new connection is created.
7. Click Test Connection, to test the established connection.
The newly created connections are displayed in the Connections page.
2-2Chapter 2
Working with Data Entities
Click the Actions icon ( ) next to the selected connection to perform the following
operations:
• Select Edit, to edit the provided connection details.
• Select Test Connection, to test the created connection.
• Select Delete Schema, to delete schemas.
• Select Delete Connection, to delete the created connection.
You can also search for the required Connection to know its details based on the
following filters:
• Name of the Connection.
• Technology associated with the created Connection.
2.2.1 List of Supported Technologies
Below are the technologies supported for connecting to Data Transforms on Oracle
Cloud Marketplace:
1. Oracle Technology:
• Oracle
• Oracle BI Cloud Connector
• Oracle Sales Cloud
• Oracle NetSuite
• Oracle Marketing Cloud
• Oracle Service Cloud
• Oracle Analytics Cloud
• MySQL
2. Other Technology:
• Cassandra
• Hypersonic SQL
• IBM DB2 UDB
• Informix
• Microsoft SQL Server
• Salesforce.com
2.3 Working with Data Entities
A Data Entity is a tabular representation of a data structure. It includes Database
Tables or Files that can be used in a mapping as a source or target. They are
simply the metadata for sources and targets. They are used in creating data flows.
Data Entities are grouped into data models, which contain all declarative rules and
constraints.
2-3Chapter 2
Working with Data Entities
The easiest and most common way to create a Data Entity is by reverse-engineering
its structure from the technology (for example, Oracle or MySQL database). However,
you can create Data Entities for your newly created project in two other ways:
• Importing Data Entities
• Creating Data Entities
Importing Data Entities
To import existing Data Entities,
• From the left pane of the Home page, click the Data Entities tab.
Data Entities page appears.
• Click Import Data Entities, to import the existing data entities.
Import Data Entities page slides-in.
• Select the Connection followed by Schema and then finally select the Type of
Objects you want to import.
• Choose a Mask/filter if you don't want to import every object in the schema.
Depending on the Connection Type, you will be presented with further options for
importing.
• After selecting all the required details, click Start.
A Job is created and the corresponding Job ID is displayed for you to track the
session. Click the Job ID to view the details of the job.
Upon successful execution of the job, all the selected Data Entities are imported.
Click the Refresh icon present at the right corner of the Data Entities page, to
see the new imported Data Entities.
Creating Data Entities
Data entities should possess the corresponding objects in the source connection
to be used as a source in a data flow. Usually the reverse engineering process
makes sure that these objects are in coordination. However in some cases you can
manually create or update the Data Entities through Oracle Data Transforms interface.
Whenever you are creating or updating Data Entities always make sure to check if
both the definitions are in coordination with each other.
When you use a Data Entity as a target then it doesn't have to exist previously in the
target connection and can be created as a part of Data Flow execution.
To create a new Data Entity,
• From the left pane of the Home page, click the Data Entities tab.
Data Entities page appears.
• Click Create Data Entity, to create a new data entity.
Create Data Entity page appears.
• In the Name text box, enter the name of the new Data Entity that you are creating.
• From the Connection drop-down, select the required connection from which you
wish to add the newly created Data Entity.
• In the Schema drop-down, all schema corresponding to the selected connection
are listed in two groups.
– New Database Schema (ones that you've not imported from before) and
2-4Chapter 2
Working with Projects
– Existing Database Schema (ones that you've imported from before and are
potentially replacing data entities).
From the Schema drop-down, select the required schema.
Click the + icon to add columns. For each column, you can specify the following
parameters:
– Name
– Data Type
– Length
– Scale
– Not Null
• To define the table structure for the newly created Data Entity:
– Click the '+' icon. Double click on the cell to configure a value for Name and
Length fields.
– Click the 'x' icon, to delete a row.
– Click the Up and Down arrows to sort the table rows.
• Click Save.
The new Data Entity is created.
All the newly created or imported Data Entities along with their details are displayed in
the Data Entities page. The details include:
• Name of the Data Entity
• Connection for which the Data Entity was created
• Schema to which the Data Entity is associated
• Click the Actions icon ( ) next to the selected Data Entity to perform the
following operations:
– Select Edit, to edit the existing details.
– Select Preview, to preview the selected Data Entity.
– Select Delete, to delete the selected Data Entity.
• To delete the Data Entities in bulk, in the Data Entities page, select the check
boxes of the respective Data Entities and click Delete.
• You can also search for the required Data Entity to know its details based on the
following filters:
– Name of the Data Entity
– Connection for which the Data Entity was created
– Schema to which the Data Entity is associated
2.4 Working with Projects
A Project is the top-level container, which can include multiple folders to organize your
data flows or work flows into logical groups. Projects page displays all the existing
projects.
2-5Chapter 2
Working with Projects
You can perform the following operations of a Project folder:
• View Details
• Edit the name
• Delete
Creating a Project
To create a new project:
1. Click Create Project on the Projects page.
2. On the Create Project page, provide a project name.
3. Click Create.
After creating the project, you're redirected to the Projects page.
Viewing Project Details
To view project details:
1. On the Projects page, select a project and click View Details from the project's
Actions icon ( ) or select a project to open its details page.
2. It displays all the resources associated to the selected project. It includes details
such as Data Flow Name and Folder details for the selected project.
3. Click the Actions icon ( ) of the respective data flow to edit, rename, copy,
change folder, start or delete the required data flow of the selected project.
Deleting a Project
When you delete a project, you also delete the resources it contains. Once you delete
a project, it cannot be restored.
Note:
Be sure to review all contained resources before you delete the project.
To delete a project, on the Projects page, select Delete from the Actions icon ( )
for the project you want to delete or select a project to open its details page, and then
click Delete.
In the Delete Project dialog, click Delete to confirm the delete operation.
2.4.1 Get Started with Data Flows
Perform the following steps to access the Data flow editor where you can start creating
your data flows.
To start creating data flows:
• On the Projects page, click Create Data Flow.
Or
2-6Chapter 2
Working with Projects
• Select an existing project and on the Project Details page, click Create Data
Flow.
Note:
When you see a blank page while clicking Create Data Flow, clear your
browser cache and refresh the page to navigate to the Data Flow Editor.
The Data Flow Editor appears allowing you to create a new data flow. For more
information, see About Data Flow Editor.
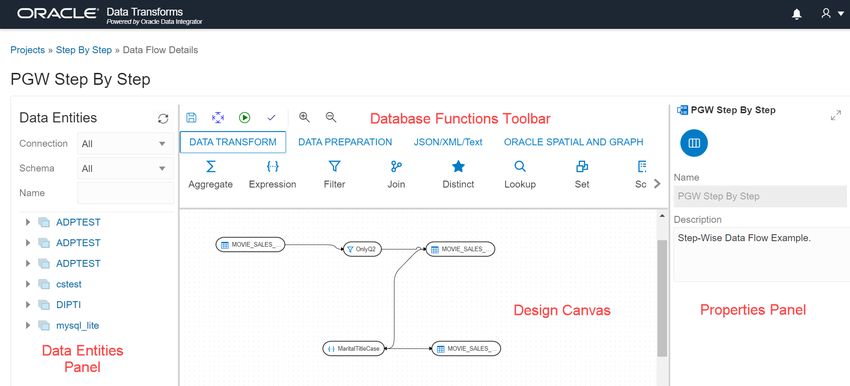
2.4.2 About Data Flow Editor
The Data flow editor is divided into four parts, the Data Entity Panel, the
Transformations Toolbar, the Design Canvas, and the Properties Panel.
Figure 2-1 Data Flow Editor
• Data Entities Panel: The data entity panel displays the Data Entities that are
available to use in your Data flows. The displayed list can be filtered using the
Connection, Schema and / or Name fields. The results are displayed in the below
tree nodes.
• Database Functions Toolbar: The Database Functions toolbar display the
database functions that can be used in your data flows. Just like Data Entities,
you can drag and drop the Database tools you want to use on the design canvas.
For more details, see Oracle Database Functions.
• Design Canvas: The design canvas is where you build your transformation logic.
After adding the Data Entities and Database Functions to the design canvas, you
can connect them in a logical order to complete your data flows.
• Properties Panel: The properties panel displays the properties of the selected
object on the design canvas. The Properties Panel is grouped into four Tabs.
General, Attributes, Column Mapping, and Options. Not all tabs are available
as they vary based on the selected object.
After designing the required data flow,
2-7Chapter 2
Working with Projects
• Click , to save the created/designed data flow.
• Click , to align the nodes of the designed data flow.
• Click , to execute the created data flow.
• Click , to validate the created data flow.
• Click , to maximize or minimise the created data flow diagram in the
design canvas.
2.4.2.1 Oracle Database Functions
Oracle Data Transforms supports the following components to perform various
database functions:
1. Data Transformation
It contains the following components:
• Aggregate
• Expression
• Filter
• Join
• Distinct
• Lookup
• Set
• Sort
• Split
• Subquery Filter
• Table Function
2. Data Preparation
It contains the following components:
• Data Cleanse
• Substitution
• Binning
• Lead
• Lag
• Replace
3. JSON/XML/Text
It contains the following components:
• REGEXP COUNT
• REGEXP INSTR
• REGEXP SUBSTR
2-8Chapter 2
Working with Projects
• REGEXP REPLACE
• Edit Distance Similarity
• Contains
4. Oracle Spatial and Graph
It contains the following components:
• Buffer Dim
• Buffer Tol
• Distance Dim
• Distance Tol
• Nearest
• Simplify
• Point
• Spatial Join
• Geocode Tools:
Note:
The following Geocode Tools work only in non-ADW environment.
– Geocode As Geometry
– Geocode
– Geocode Address
– Geocode All
– Geocode Address All
– Reverse Geocode
2.4.3 Create a New Data Flow
A data flow defines how the data is moved and transformed between different
systems.
To create a new data flow:
1. On the Projects page, click Create Data Flow.
Create Data Flow page appears:
2. In the Name field, enter a name for the new data flow.
3. Select Create New Project, if you wish to create new project folder for the newly
created data flow.
4. Else, click Add to Existing Projects, if you wish to add the newly created data
flow to an existing project folder.
5. If you have selected Create New Project for the previous option, in the Project
Name field, enter the name of the newly created project.
2-9Chapter 2
Working with Projects
6. Else, if you have selected Add to Existing Projects for the previous option, select
the required project from the Project Name drop-down arrow.
7. In the Description field, enter a description for the newly created data flow.
8. Click Create.
A new data flow is created.
If you have already selected a project and wish to create a new data flow for this
specific project, in the Data Flows page, click Create Data Flow.
Create Data Flow page appears, allowing you to provide the Name and Description
of the newly created data flow.
2.4.3.1 Add Components
To add components to your data flow:
1. In the Data Entities panel, use the Connection and Schema drop-downs to narrow
down the list of Data Entities. Data Entities are organized by Schema in the list.
You can narrow down the search further by entering the Name of the Data Entity.
2. Drag the required Data Entities that you want to use in the data flow and drop
them on the design canvas.
3. From the Transformations toolbar, drag the transformation component that you
want to use in the data flow and drop them on the design canvas.
4. Select an object on the design canvas, and drag the Connector icon ( ) next
to it to connect the components.
5. After saving the data flow, there may be a Transfer icon overlaid on one or more
of the component connections. This indicates that ODI has detected an additional
step and it is required to move the data between data servers. You can click on
this Icon to view properties associated with this step.
For example:
Figure 2-2 Add Components
2-10Chapter 2
Working with Projects
2.4.3.2 Map Data Columns
When you connect the source datastore with the target datastore, the column names
are automatically mapped by the column names. You have a choice to map the
columns by Position or by Name or map the columns manually using the Expression
Editor.
To map columns by Position or by Name:
1. Select the target Data Entity.
2. Click the arrow icon present on the top right corner to expand the Properties
Panel. This will give you more space to work with.
3. In the Properties Panel, click the Column Mapping icon ( ).
4. To map the columns by Position or by Name, from the Auto Map drop-down
menu, select By Position or By Name.
To map the columns manually:
1. From the Auto Map drop-down menu, select Clear to clear the existing mappings.
2. Drag and drop the attributes from the tree on the left to map with the Expression
column.
3. To edit an expression, click the Edit icon of the respective column. The
Expression Editor appears allowing you to perform the required changes (for
example, you can just add an expression-"UPPER" or open the Expression Editor
to edit the expression).
Note:
Use the expression editor only if you have complex expressions for a
particular column.
4. Click OK.
2.4.3.3 Creating Data Entities for Target Component
You can modify the data flow options that must be used for the target component
during the data flow execution.
To modify the data flow options:
1. Select the target component on the design canvas.
2. Click the Add Data Entity icon present on the top right corner of the target
component.
3. Add Data Entity page appears allowing you to configure the following details of
the target component:
General tab
• In the Name text box, enter the name of the newly created Data Entity.
• The Alias text box is auto-populated with the name of the newly created Data
Entity.
2-11Chapter 2
Working with Projects
• From the Connection Type drop-down, select the required connection from
which you wish to add the newly created Data Entity.
• It loads the server name coined at the time of connection creation. From the
Server drop-down, select the required server name from which you wish to
add the newly created Data Entity.
• From the Schema drop-down, select the required schema.
• Click Next.
Columns tab
It allows you to create, remove or edit the column definitions.
• Click the Add Columns icon, to add new columns to the newly created
Data Entity.
A new column is added to the displayed table.
• The table displays the following columns:
– Name
– Data Type - Click the cell to configure the required Data Type.
– Scale
– Length
– Actions - Click the cross icon to delete the created column.
• To delete the columns in bulk, select the columns and click the Delete icon.
• To search for the required column details, in the Search text box enter the
required column name and click enter. The details of the required column are
displayed.
• Click Next.
Preview Data Entity tab
It displays a preview of all the created columns and their configured details.
4. Click Save.
The new target Data Entity is created.
5. Expand the Properties Panel in the right pane to view the following settings of the
created components:
• General - Displays the Name of the component along with its Connection and
Schema details.
• Attributes - Displays the details of all the attributes associated to the
component.
• Column Mapping - Click Auto Map to map all the columns automatically.
• Preview - Click to have a preview of the component.
• Options - Change the options as appropriate.
2.4.3.4 Validate and Execute a Data Flow
After your data flow is ready, do the following:
2-12Chapter 2
Working with Projects
1. Click Save.
After saving, if data needs to be staged before transforming, Transfer button is
added to one or more links. You can click these buttons to set more options, if
available.
2. Click the Validate icon ( ) in the toolbar above the design canvas to validate the
data flow.
3. After a successful validation, click the Execute icon ( ) next to the Validate icon
to execute the data flow.
A message appears that displays the execution job ID and name that you can
monitor on the Jobs page. For more information, see Managing Jobs.
2.4.4 Introduction to Workflows
A workflow is made up of multiple data flows organized in a sequence in which
they must be executed. Each data flow is executed as a step. When you execute a
workflow, a data flow either succeeds or fails. Depending on whether the first data flow
succeeds or fails, you can choose the next data flow that must be executed.
Here is an example of a workflow:
In this example, the workflow performs the following actions:
1. Execute the "Weekly FDA feed" data flow .
2. If the "Weekly FDA feed" data flow execution is successful, execute the "Weekly
CDC alerts" data flow.
3. If the "Weekly CDC alerts"data flow execution is successful, execute the "Load
Medicare" data flow.
4. If any of the above data flow fails, then execute the "Audit_error_log" data flow.
2.4.5 Create a New Workflow
To create a new workflow for your project:
1. On the Home page, click the required Project title .
You are navigated to the Project Details page.
2. In the left pane, click Workflows.
2-13Chapter 2
Working with Projects
The Workflow page appears.
3. On the Workflow page, click Create Workflow.
The Create Workflow page appears.
4. In the Name field provide a name for the new workflow and click Create.
The new workflow is created and listed in the Workflow page with its Name and
Folder details.
5. Click the Workflow to configure the Workflow Details.
6. Select either the ok (green arrow) icon, the not ok (red arrow) or the ok/not ok
(black arrow) in the toolbar.
This defines the mode that subsequent links drawn on the canvas will be set to.
• ok (green) defines the success path.
• not ok (red) defines the failure path.
• ok/not ok (black) defines a path that is followed on success or failure.
7. Select the data flow and click the Connector icon ( ) next to it to connect it
with the next data flow.
8. After defining all the required Workflow details,
• Click , to save the created/designed workflow.
• Click , to align the nodes of the designed workflow.
• Click , to execute the created workflow.
• Select a single step in the canvas and click the Execute Step icon ( ), to
execute only the selected data flow or workflow.
You can monitor the execution status on the Jobs page. For more information,
see Managing Jobs.
• Click , to maximize or minimize the created workflow diagram in the
design canvas.
The newly created workflows get listed in the Project Details page. The
following details are displayed:
– Name of the Workflow
– Folder corresponding to the workflow - Default Folder
To view the details of a workflow, click the name of the workflow and you are
navigated to the Workflow Details page.
In the left pane, you can search for the required Data Flow or Workflow using the
Name filter. In the Name text box, enter the name of the required Data Flow or
Workflow.
Select a step in the canvas and check the Properties Panel available at the right
side of the design canvas to know the following properties of the selected step in a
created Data Flow or Workflow:
• Name
• Linked Object
2-14Chapter 2
Scheduling Data Flows or Workflows
Note:
You cannot edit this field.
• Step -
– First Step - Select the First Step check-box, to execute the selected step
as the first step for execution in a Data Flow or Workflow.
Note:
You can select only a single step as a first step for execution in a
Data Flow or Workflow.
• Number of attempts on Failure
• Time between attempts in seconds(s)
• Log steps in journal - Select any of the following options from the drop-down
box:
– Always
– Never
– Error
Clicking on each step displays properties like name,linked object(non
editable) ,step ,, ,
2.5 Scheduling Data Flows or Workflows
You can schedule Workflows and Data Flows to run at specified time interval. Each
schedule allows you to specify a start date and time, and execution frequency.
Note:
• If you are creating a schedule plan through Oracle Data Transforms, to
prevent from skipping schedules, set the browser timezone to match the
repository configured timezone.
• Repository configured timezone is available as a part of master
repository information and by default it is PST8PDT.
To schedule a data flow or a workflow:
1. In the left pane, click Schedules.
2. Click Create Schedule.
3. From the Resource drop-down menu, select Data Flow or Workflow as
appropriate.
4. From the Resource Name drop-down list, select a data flow or workflow that you
want to schedule.
2-15Chapter 2
Scheduling Data Flows or Workflows
5. From the Frequency drop-down list, select the time frame in which you wish to
execute the created schedule. You can schedule it On Startup, Simple, Daily,
Hourly, Weekly, Monthly or Yearly. Based on the selected frequency, Time field
appears allowing you to schedule the selected Data Flow or Workflow. For detailed
information refer to the below table:
Frequency Time Values
On Startup NIL
Simple Click Select Date Time icon next to Date
and Time field, to select the required date
and time in MM/DD/YY and HH:mm format.
Daily Click the clock icon next to Time field, to
select the required time in HH:mm format.
Hourly Click up and down arrows next to Time
field, to select the required time in
Minutes:Seconds format.
Weekly • Run Every parameter appears with
check-boxes for all the days of the
week.
• Click the clock icon next to Time field,to
select the required time in HH:mm
format.
Monthly (day of the month) • Select the required date from the
Monthly Date drop-down box.
• Click the clock icon next to Time field,to
select the required time in HH:mm
format.
Monthly (week day) • From the Monthly date drop down box
select the required value.
• From the Week day drop-down box,
select the required weekday in which
you wish to schedule the job.
Yearly • From the Month drop down box, select
the required month in which you wish to
schedule the job.
• From the Monthly date drop down box,
select the required date in which you
wish to schedule the job.
• Click the clock icon next to Time field,
to select the required time in HH:mm
format.
6. In the Number of Attempts on Failure text box, enter the required value or click
the up or down arrows next to the text box, to select the required value. This
value denotes the number of retry attempts that should happen after the schedule
failure.
7. Stop Execution After field denotes the time after which the schedule has to stop
after executing it. It can be in Hours, Minutes or Seconds. Select the value and
its unit.
8. Select the status of the scheduled Data Flow or Workflow from the Status options.
It can be Active, Inactive or Active for Period. Through Active for Period option
you can configure the exact time frame of the created schedule. It's Starting and
2-16Chapter 2
Managing Jobs
Ending Date with time, time interval in which you wish to run the schedule and
exceptions, if any.
9. After configuring the above details, click Save.
The created schedules get listed in the Schedules page along with the following
details:
• Resource
• Status
• Frequency
• Valid or Invalid
Click the Actions menu of the respective schedule to perform the following
operations:
• Click Edit to edit the details of the created schedule.
• Click Disable to disable the created schedule. The status of a schedule
becomes inactive when you disable it and gets displayed in the Scheduled
list. Select the schedule and click Enable, to enable it whenever required. You
can enable it again for a specific period, through Enable for Period option.
• Click Validate to validate the created schedule.
• Click Delete to delete the created schedule. Upon confirmation the created
schedule is deleted.
To schedule a data flow or a workflow specific to a project:
• Click the Project title displayed on the Projects page.
Project Details page appears.
• In the left pane, click Schedules.
Schedules page appears. It displays all the schedules pertaining to the selected
project.
Note:
This page is project specific and displays only the Data Flows and
Workflows pertaining to the selected project.
• To create a new schedule, click Create Schedule.
• Enter all the required details and click Save.
The new schedule is created and is added to the existing list of schedules for the
project.
2.6 Managing Jobs
On the Home page, click Jobs on the left pane to access the Jobs page.
The Jobs page by default, lists the execution job sessions that are running and
completed for the present day as Date parameter is set to Today by default. You can
click on any of the instance id from the list to see its details.
To create a new job,
2-17Chapter 2
Mapping Users
• Click Create Job.
The Create Job page slides-in.
• From the Resource Type drop-down, select the type of resource for which you
wish to create a new job. It can be - Data Flow, Workflow or Schema.
• All the resources associated with the selected Resource Type get listed in the
Resource field. From the Resource drop-down, select the required resource for
which you wish to create a new job.
• Click Create.
A new job is created and is added to the existing list of jobs in the Jobs page.
For each session, you can see the Job Session ID, Name, Status, Start Time and
End Time for each of the jobs that are executed. Click the Actions menu to View
Details of the jobs, Delete and Rerun the jobs, if required. If any of the steps failed,
you can click on them to see the error details.
To delete a job, select the check box of the respective job session and click Delete.
Upon confirmation the selected job gets deleted.
You can also search for the required job session to know its details based on filters
such as:
• Name - Name of the Job
• Status - Select the required session status from the list - All, Done, Error, Queued,
Running, Waiting and Warning.
• Date - Select the date in which the required job session was executed - All, Today,
Yesterday, Last Week, Last Month and Custom Range, which allows you to select
specific From and To dates.
To view the job sessions pertaining to a specific project:
• Click the Project tile displayed in the Projects page.
Project Details page appears.
• In the left pane, click Jobs.
Jobs page appears. It displays all the jobs and their details pertaining to the
selected project.
Note:
This page is project specific and displays only the jobs pertaining to the
selected project.
• To create a new job, click Create Job.
• Enter all the required details and click Create.
A new job is created and is added to the existing list of jobs for the project.
2.7 Mapping Users
The Administration tab of Oracle Data Transforms helps you to map the database user
(created during ODI provisioning) to Oracle Data Transforms User. The administrator
in Oracle Data Transforms is called the SUPERVISOR.
2-18Chapter 2
Mapping Users
By mapping the users, you can directly access the Oracle Data Transforms application
from Database Actions page. For more details, refer to Accessing Oracle Data
Transforms From Database Actions page.
For mapping the users,
1. In the left pane, click Administration.
A warning message appears.
2. Click Continue.
User Mapping screen appears.
3. In the Database URL text box, enter the Database URL created
during ADW instance creation, for example - https://u6dx8gx07phfkil-
db202003100909.adb.us-phoenix-1.oraclecloudapps.com/.
To get this URL,
• From OCI console, click the Hamburger icon and navigate to Autonomous
Database and select the autonomous database instance for which you
created the repository.
• Click the Service Console and navigate to Development → SQL Developer.
You can find the database URL here and copy it to the Database URL text
box.
4. Click the Add icon, to add a new column in the User Mapping table.
5. Double click the Database User column to create a user mapping for the required
Database User.
6. Double click the ODI User column and click the drop-down arrow to list all the ODI
users available for mapping in Oracle Data Transforms application.
7. From the ODI User drop-down select the required ODI user, to whom you wish to
map the newly added Database user.
8. Click Save.
A confirmation message regarding the user mapping update appears.
9. Click the Refresh icon next to the + icon, to see the newly created user
mapping column in the User Mapping table.
10. If you wish to delete the created user mapping, select the user and click the Action
icon next to the user and select Delete.
11. For deleting user mappings in bulk, select the respective user check-boxes and
click Delete.
Upon confirmation the selected user mappings are deleted.
You can search for the required user mapping from the User Mapping table, through
Name filter.
• Enter the name of the user mapping that you are looking for in the Name text box.
The respective user mapping column is displayed.
2-193
Administering Oracle Data Transforms
Before you begin using Oracle Data Transforms, you must perform the following
tasks. After completing these tasks, the connections, models, and datastores created
in Oracle Data Transforms Administrator are available for use in the Oracle Data
Transforms.
It contains the following sections:
• Accessing Oracle Data Transforms
• Creating Master and Work Repositories
• Connecting to Repository
• Managing Users
• Importing Repositories
• Exporting Repositories
• Enforcing Password Policies
• Cleaning up Unused Authorizations
For detailed information on the terminologies associated with Oracle Data Transforms
and their respective functions, see Terminology Information.
3.1 Accessing Oracle Data Transforms Administrator
To access the Oracle Data Transforms Administrator,
• Follow the steps listed in Connecting to ODI Compute Instance .
• From the Applications menu, navigate to Programming -> Oracle Data Transforms
Administrator.
• Or, double click the launch Oracle Data Transforms Administrator shortcut icon
available on your desktop.
• Or in your VNC, navigate to a terminal and launch the Oracle Data Transforms
Administrator using the following commands:
$ cd $MW_HOME/odi/studio/bin
$ ./odi -clean
Oracle Data Transforms Administrator is launched allowing you to manage various
aspects of your integration project.
Connect to the repository with already populated login credentials. The Login Name
value varies based on the selected repository. For ADB repository, the Login Name is
ODI_ADW_REPO and for MySQL Embedded repository it is ODISA_MYSQL.
3-1Chapter 3
Creating Master and Work Repositories
3.2 Creating Master and Work Repositories
Repositories is already created during provisioning. Apart from the repository which
is already created, if you wish to create a separate ODI Repository, follow the below
steps:
ODI Master and Work Repositories can be created using Repository Creation Utility.
1. Using Oracle Data Transforms Administrator -
Before creating the ODI repositories, you have to create a schema for these
repositories to work.
Follow the below commands to create a schema:
create user identified by ;
grant unlimited tablespace to WITH ADMIN OPTION;
grant CONNECT, RESOURCE to WITH ADMIN OPTION;
2. Using Repository Creation Utility -
Use the repository creation utility (rcu) to create the repositories, if you want to
setup J2EE agent/collocated agent.
Follow the below procedure to create repositories using the Repository Creation
Utility:
a. Find the repository creation utility executable available in the $MW_HOME/
oracle_common/bin directory in the Fusion Middleware home and launch rcu.
b. The first screen is just a welcome screen. Click Next.
c. Accept the default values and click Next.
d. Specify the database connection details. Once entered, you can see a dialog
box showing the progress of the three checks carried out on the database,
making sure that the connection is successful.
e. Select the repository components to install. Some are selected by default.
Make sure you select the Master and Work repository option. Click Next.
You can now see a dialog box showing the progress of the checks carried out
on the prerequisites for the components you selected
f. If all the prerequisite checks pass, then enter the password for the schema
users for the repositories. It's easiest to use the same passwords for all
schemas, however, make sure you choose the option that conforms to your
company security policy. Click Next.
g. Enter the password for the Supervisor user, what type the work repository is,
its name and the password for its user. Also specify the encryption algorithm.
Click Next.
h. Map the tablespaces. This is where you specify the name of the schema
owners, and the default and temporary tablespace names for each
component. You can accept the default names, or choose to specify your own.
Click Next.
i. The penultimate screen summarizes your selections, and from here, you
create the repositories. Click Create. Note that it takes several minutes to
create all the repositories.
3-2Chapter 3
Connecting to Repository
j. Click Close after you have reviewed the summary of the repositories just
created.
Once you have created a master repository and at least one work repository, you then
create a connection, log in to ODI, and connect to these repositories.
Refer to the tutorial, Oracle Data Integrator 12c - Creating and Connecting to ODI
Master and Work Repositories for detailed steps on how to create your master and
work repositories.
3.3 Connecting to Repository
Follow the steps to connect to Master and Work repositories in Oracle Data
Transforms Administrator:
Once you have a master repository and a work repository, you can create a connection
in Oracle Data Integrator.
1. Launch Oracle Data Transforms Administrator, and click Connect to Repository.
2. Enter Wallet Password if you are using the wallet. Enter the wallet password. Click
OK.
3. Click New in the Oracle Data Integrator Login window.
The Repository Connection Information dialog displays.
4. Enter a name for the Login.
Note:
From 12.2.1.4.200618 version of ODI Marketplace release, short url
with TNS_ADMIN is used in Oracle Data Transforms/Administrator login
field.
5. Enter Supervisor as the user, and the password for it. (Note, it's what you entered
when creating the repositories).
6. Enter the database connection details for the master repository.
7. Select the work repository.
8. Click Test Connection, to test the connection and upon successful test
connection, click OK.
Note:
To configure repository of the ODI Agent/ODI Apps, refer to Switching
Repositories of the ODI App Server.
Now you can log into ODI.
3.4 Managing Users
The Users tab of Oracle Data Transforms Administrator helps you to manage users of
the application.
3-3Chapter 3
Managing Users
The way in which you manage users depends, in part, on where the user is defined.
By default, a user corresponds to the login name used to connect to a repository and
is persisted in the internal repository of Oracle Data Integrator. However, if external
authentication is enabled for Oracle Data Integrator components:
• Users authenticated into Oracle Data Integrator are created and managed in an
external identity store, such as Oracle Internet Directory. You use the tools and
utilities provided with that store to create, update, and delete users.
• To let external users access Oracle Data Integrator, you can do any of the
following:
– Map the external user to an Oracle Data Integrator role.
– Map any of the enterprise roles to which this external user belongs to an
Oracle Data Integrator role.
– Register the external user in Oracle Data Integrator using the Security
Navigator as in prior releases.
Creating a New User
To create a user:
1. In the Users tab, expand the Users navigation tree.
2. Click New User icon in the toolbar of the Users tile.
3. In the Name field, enter a name for your user.
4. Provide the Initials for this user.
5. Do one of the following:
• If using internal authentication, click Enter the Password and provide a
password for this user.
• If using external authentication, click Retrieve GUID to associate the new user
with a user from the external identity store. The user name in Oracle Data
Integrator must match the user name in the identity store. If a match is found,
a Global Unique ID appears in the External GUID field.
6. From the File main menu, select Save.
The new user appears in the Users navigation tree. From the User editor, an ODI
supervisor user can disable other ODI user accounts including other supervisor
accounts. In the New user screen, Supervisor checkbox is selected and disabled by
default. Thus, all other profiles will be disabled.
WARNING:
At least one supervisor user account should be maintained at all times. If all
supervisor user accounts expire, contact Oracle Support.
Deleting a User from the Internal Repository
To delete a user that is defined in the internal repository of Oracle Data Integrator:
1. In the Users tab expand the Users navigation tree.
3-4Chapter 3
Importing Repositories
2. From the list of users, select the user that you want to delete.
3. Right-click and select Delete.
4. Click OK in the confirmation window.
The deleted user disappears from the list.
Viewing User Connection Information
To view user connection information:
1. From the Users toolbar menu, select Review User Activity.... The User
Connections dialog appears.
2. Enter the filter criteria to view relevant user connection information and click Filter.
User connections are displayed in the Connections section, based on the set filter
criteria.
3.5 Importing Repositories
At repository level you can export and import the master repository and the work
repositories.
The master repository export/import procedure allows you to transfer the whole
repository from one repository to another. It can be performed through the Users tab,
to import the exported objects in an existing repository, or while creating a new master
repository.
To import the exported master or work repository objects into an existing master or
work repository:
1. From the toolbar menu above Users tab, click the Users menu icon and select
Import.
2. In the Import Selection dialog, select Import the Master or Work Repository.
3. Click OK.
4. In the Import dialog:
• Select the Import Mode. Refer to Import Modes for more information.
• Select whether you want to import the files From a Folder or From a ZIP file.
• Enter the file import folder or zip file.
5. Click OK.
6. If prompted, enter the Export Key used when this object was exported. If you do
not enter an Export Key, any encrypted sensitive (cipher) data will be stripped from
the imported object. For more information about the Export Key, see: Export Keys.
The master or work repository contains now the objects you have imported.
3-5Chapter 3
Exporting Repositories
Note:
The import is not allowed if the source and target repositories have the same
Internal ID and have different repository timestamps. This can only happen
with 11g-compatible repositories, because 12c repositories have a unique
Global ID.
If the target 11g-compatible repository has the same Internal ID as the
source repository, you can renumber the repository. This operation should
be performed with caution. See About Internal Identifiers (IDs) for more
information on the risks, and how to renumber a repository is described in
Renumbering Repositories.
3.6 Exporting Repositories
The objects that are exported when exporting the master repository are objects,
methods, profiles, users, languages, versions (if option selected), solutions (if option
selected), open tools, password policies, entities, links, fields, lookups, technologies,
datatypes, datatypes conversions, logical agents, contexts and the child objects.
To export a master repository:
1. From the toolbar menu above Users tab, click the Users menu icon and select
Export.
2. In the Export Selection dialog, select Export the Master Repository.
3. Click OK.
4. In the Export Master Repository dialog, set the Export parameters as indicated
in Table 24-3.
The master repository and its topology and security settings are either exported
as .xml files directly into the directory, or as a zip file containing .xml files. If you
want to generate a zip file, you need to select Export to zip file and enter the
name of the zip file in the Zip File Name field.
5. Select Export versions, if you want to export all stored versions of objects that
are stored in the repository. You may wish to unselect this option in order to reduce
the size of the exported repository, and to avoid transferring irrelevant project
work.
6. Select Export solutions, if you want to export all stored solutions that are stored
in the repository. You may wish to unselect this option for similar reasons.
7. Click OK.
The export files are created in the specified export directory.
3.7 Enforcing Password Policies
The password policies consist of a set of rules applied to user passwords when using
internal authentication. This set of rules is applied when the password is defined or
modified by the user.
3-6Chapter 3
Cleaning up Unused Authorizations
To define the password policy:
1. From the toolbar menu above Users tab, click the Users menu icon and select
Password Policy...
The Password Policy dialog appears. This dialog displays a list of rules.
2. If you want your password to expire automatically, check Password are valid for
(days), and set a number of days after which passwords need to be modified.
3. Click Add a Policy. The Policy Definition dialog appears. A policy is a set of
conditions that are checked on passwords.
4. Set a Name and a Description for this new policy.
5. In the Rules section, add several conditions on the password text or length. You
can define, for example, a minimum length for the passwords.
6. From the Condition to match list, select whether you want the password to meet
at least one or all conditions
7. Click OK.
8. Add as many policies as necessary, and select Active for those of the rules that
you want to keep active. Only passwords that meet all the policies are considered
as valid for the current policy.
9. Click OK to update the password policy.
3.8 Cleaning up Unused Authorizations
Authorizations by object instance are stored in the master repository. However, if
objects are deleted from all work repositories, the authorization are not necessarily
deleted. You may wish to retain certain unused authorizations; for example, if they
refer to objects currently stored in an exported file or in a stored solution.
You should use the Security Clean-up Tool periodically to remove these unused
authorizations from the master repository. Unused authorizations are removed if they
refer to objects that do not exist in the master repository or in any work repository.
Note:
All work repositories attached to the master repository must be accessible so
that you can verify the existence of the objects in those repositories
To clean up unused authorizations:
1. From the toolbar menu above Users tab, click the Users menu icon and select
Clean Up Security Settings....
The Security Clean-up Tool dialog appears.
2. On the Cleanable tab, select Clean for the cleanable security settings you want
to remove. The security settings that cannot be removed are shown on the Non-
cleanable tab.
3. Click OK to clean up the selected security settings.
3-7You can also read