Web User Manual The Foodstuffs eXchange - Version 1.2
←
→
Page content transcription
If your browser does not render page correctly, please read the page content below
The Foodstuffs eXchange
Web User Manual
                              Version 1.2
              Last updated: January 2020
Version History

Revision   Date		       By			               Notes

   1.1 8 July 2019 Ana Connor Complete rewrite, published for new Foodstuffs
   							eXchange
   1.2 9 January 2020 Sandy Galland Adjusted image sizes to reduce file size for web
   							download
Contents

4			       1. Introduction

4				             1.1 Executive Summary

4                 1.2 Before you get started with Foodstuffs eXchange

5			       2. Getting started

5                 2.1 Logging in for the first time

5				2.2 Navigation

8			       3. Processing a purchase order

13			      4. Invoices

14                4.1 Generating an invoice from a confirmed order

15				            4.2 Generating an invoice/credit note from a blank form

18			      5. Products

19				            5.1 Creating a new product, or modifying an existing product

21				            5.2 Product type

21				            5.3 Packaging type

22				            5.4 Packaging units

23				            5.5 Pallet info

23				            5.6 Storage and handling

24				            5.7 List price

25				            5.8 Liquor information

25				            5.9 Ingredients and allergens

26				            5.10 Nutritional info

28				            5.11 Consumer information

30				            5.12 Your details

31				            5.12 Delete an existing product

31				            5.14 Create new product from an existing product

31				            5.15 Add a GTIN (barcode) to a product

32			      6. Document tracking

33				            6.1 Document tracking results

34			      7. Company admin

35			      8. Contacts

36			      9. Add or delete a new employee

37			      10. News

38			      11. Help

39			      12. Glossary
Web User Manual
                                                                          Version 1.2   Last update: January 2020

1. Introduction

1.1 Executive summary
   Foodstuffs has a trading relationship with more than 3,500 product suppliers. When you become an
   approved supplier, you join our community as part of New Zealand’s largest grocery organisation and
   can sell your products to any Foodstuffs store.
   We want working with Foodstuffs to be as simple as possible. We have developed Foodstuffs
   eXchange to be your portal to Foodstuffs. Here we combine eXchange transactions, product
   information, and contacts (formerly SRM) into one system that allows suppliers to process all
   transactions with Foodstuffs companies in one location. It manages everything from advance
   shipping notices to invoicing and contacts, products, relationship management, food safety and
   communications.
   In order for everything to flow smoothly, you must complete all steps required for each process. This
   manual provides an overview of using the Foodstuffs eXchange web portal, covering topics such as:
             • navigating the portal
             • processing purchase orders
             • sending invoices
             • tracking the documents you have sent and received
             • adding new products or amending the existing products you supply
             • contact details for your employees and Foodstuffs and store employees

1.2 Before you get started with Foodstuffs eXchange

   Foodstuffs eXchange login

   To use Foodstuffs eXchange, you must be a registered vendor. As part of the application process you
   will have been provided with a password to use with your registered email address when you log in. If
   you have any issues with logging into Foodstuffs eXchange please contact your local supplier support
   team whose details are on the final page of this user guide.

   Supporting documents
   Before we can set up your Foodstuffs eXchange account, we need to look at the documents you’ll be
   sending to Foodstuffs and to the customer. Please forward copies of the following documents to your
   local Foodstuffs supplier support team.

   A Priced Packing Slip:
         •     Each product line supplied must be priced, and an extended line price given
         •     The overall cost of the delivery must be included as a total figure
         •     Must NOT contain the word “Invoice” or have your GST number printed on it
         •     Must clearly reference the Purchase Order number

   An invoice:
     •         Must show the store code preceded by FM# e.g. FM#1234
     •         Must specify Foodstuffs as the Bill To Entity
     •         Must specify the store as the Deliver To Entity

  Page 4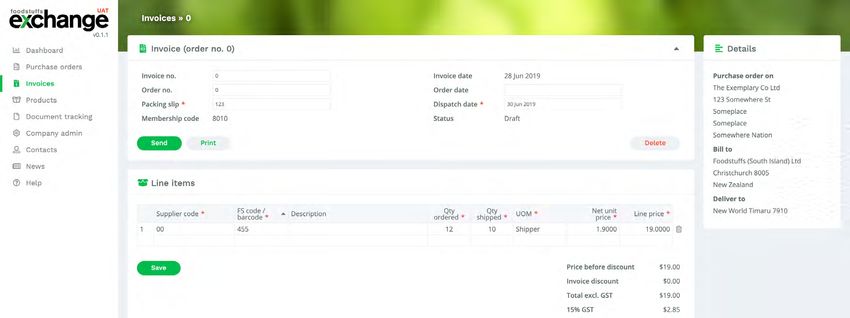
Web User Manual
                                                                         Version 1.2   Last update: January 2020

2. Getting started

2.1 Logging in for the first time
    Password Setup
      1.     Open your internet browser and visit
      		     portal.foodstuffs-exchange.co.nz
       2.         Type your email address into the login
                  field.
       3.         Click ‘Don’t remember your password?’.
       4.         Check your email address is correct on the next
       		         page, then click the link to send you a password
       		         reset.
       5.         Once you’ve set your password, go back to
       		         portal.foodstuffs-exchange.co.nz and login.

              The person in your business with admin rights must
      !       first activate your account. Once this is done, you will
              be able to set your password as described above.

    Still need help?
    Get in touch with your local E-Commerce supplier support teams:
          •       South Island email: ecommerce@foodstuffs-si.co.nz
          •       North Island email: supplierhelp@foodstuffs.co.nz
          •       Phone 0800 FSTUFFS (0800 3788337).

2.2 Navigation
    Once you have successfully logged in to the dashboard, you will be able to access the following
    functions through the web portal menu:

    Dashboard
    This is the home page for eXchange. It gives you a snapshot of your relationship with Foodstuffs and
    contains all of the functions you can use in the system.
    From anywhere in the system, you can return to the dashboard by clicking ‘dashboard’ in the top left
    corner.

              >

                                                                                                      Page 5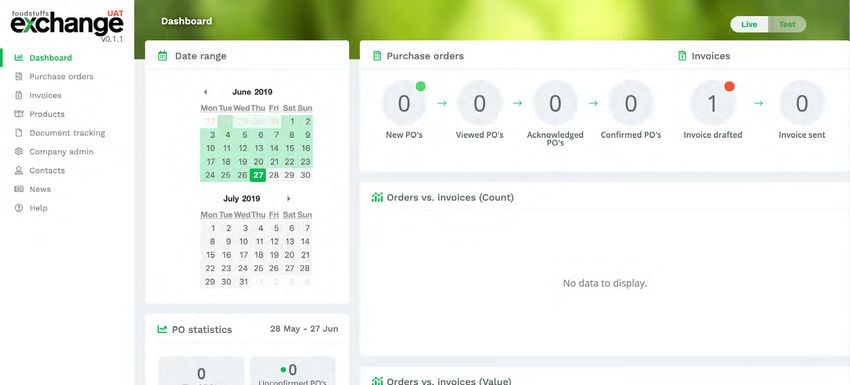
Web User Manual
                                                                      Version 1.2   Last update: January 2020

Purchase orders
This allows you to search and view your purchase orders including unactioned ones.

Invoices
This is the area to review and send invoices for fulfilled purchase orders.

Products
This will allow you to add, modify or delete the products that you supply.

Document tracking
This allows you to search the details and history of the progress of your documents through
Foodstuffs eXchange.

Company Admin
This shows your basic company details and allows you to edit your key contact for purchase orders.
You can also view your current settings for B2B ecommerce.

Contacts
This allows you to search contact details either by name or company. It has advanced options to help
refine your search allowing you to filter by Foodstuffs company or subsidiary e.g. Foodstuffs South
Island, business area e.g. marketing, and business category e.g. bakery.

News
This contains news items about recent or upcoming changes and events regarding Foodstuffs
eXchange.

Help

                                                             >
This contains instructional materials and manuals
to help you understand the different features and
functions of Foodstuffs eXchange.
     You will also see alerts showing you incomplete
     actions such as unconfirmed purchase orders,
     unsent invoices and failed documents. It’s
     important to promptly address draft or
     incomplete transactions in order to be paid
     correctly and on time.

Other icons...

         Magnifying glass icon
         This is the Smart Search function which allows
         you to search across the site by transaction
         number, contact name and company name

         Person icon
         Clicking on this icon will allow you to view your Foodstuffs eXchange user profile

         Company Icon
         Takes you to view your company profile in the Foodstuffs eXchange

         Arrow icon
         Log out of web portal

Page 6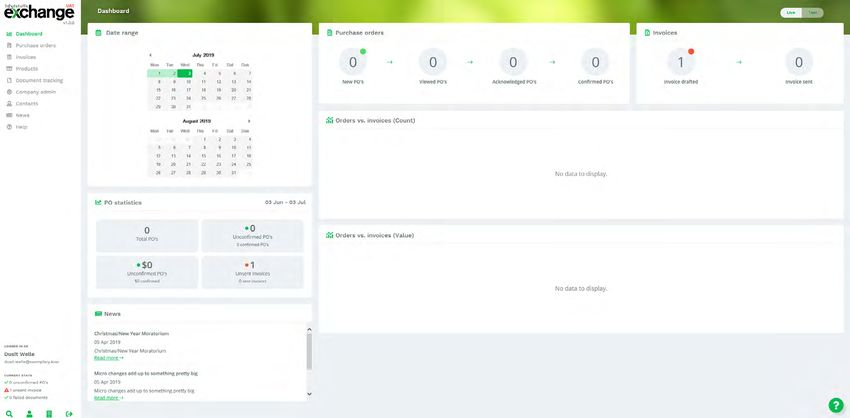
Web User Manual
                                                                     Version 1.2   Last update: January 2020

Dashboard navigation

      1
                                  2                                          3

                                  5

      4
                                  6

      7

                                                                                                8

     Date picker
 1   By default the dashboard view is based on your past 30 days of transactions. You can change
     this using the date selector.

     Purchase orders
 2   You can see how many orders are at each status during the selected date range. You should
     aim to confirm all your orders as soon as possible.

 3   Invoices
     This area will highlight how many invoices are drafted, ready to edit, and how many have been
     sent to Foodstuffs. Remember that draft invoices have not been received by Foodstuffs and so
     cannot be paid.

 4   PO Statistics
     This section will show you at a glance where you need to take action to ensure all your
     transactions are processed, and the value of your unconfirmed transactions.

 5   Orders vs. Invoices (Count)
     This graph shows the number of orders and invoices you have processed each day in the
     selected date range.

 6   Orders vs. invoices (Value)
     This graph shows the value of orders and invoices you have processed each day in the selected
     date range.

 7   News
     Current news headlines from Foodstuffs will be displayed here, click ‘read more’ for the full
     articles.

 8   Question mark icon
     Context sensitive help is available across the site, click the question mark to open a new tab
     with relevant help information.

                                                                                                    Page 7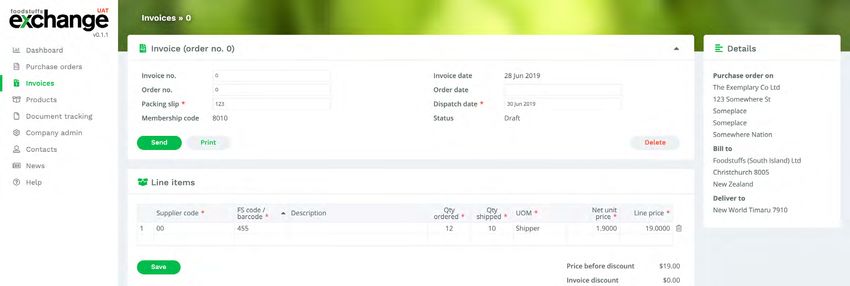
Web User Manual
                                                                         Version 1.2   Last update: January 2020

3. Processing a purchase order
    There are some steps you must finish to successfully process a purchase order (PO) including
    receiving it, right through to invoicing Foodstuffs.
      It’s important to ensure all of the information you enter is accurate.

    The purchase order (PO) page
    All of your PO documents are in one location and you can filter the view by:
        •      region (Foodstuffs company)
        •      banner (e.g. New World)
        •     order number
        •     store code
        •     date
        •     status
    You can also view your unconfirmed POs by clicking the alert icon in your menu.

>

    By default only current POs are displayed. If you want to view old orders from the past 90 days, select
    ‘include archived purchase orders.’

    Filter by results
    The results fields display the following information:

     Field                         Definition
     Order number                  The number generated by Foodstuffs to identify the purchase order
     Supplier                      Who is fulfilling the order
     Destination                   The Foodstuffs region to be billed for this order
     Store                         Which store will receive the order
     Status                        Which stage the order is currently at
     Due date                      When the order needs to be delivered by
     Order date                    When the order was placed

    Click on the PO you want to view from the list of received orders underneath the search form. Clicking
    a PO here will take you to a more detailed screen that allows you to review the full PO and the
    products that have been ordered, the requested delivery date, pricing, and customer details.

    Opening the purchase order will update the order status from “New” to “Viewed”.
    Page 8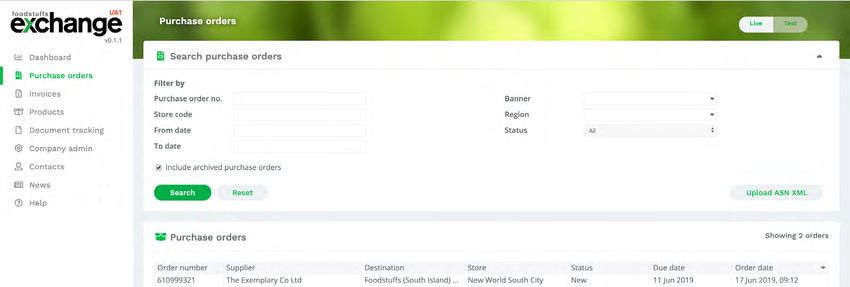
Web User Manual
                                                                            Version 1.2   Last update: January 2020

    Can you fill this PO ?

     1    YES - If you intend to supply at least one item, click

     2    No - If you cannot supply products for the order or if there is an issue with the order, contact
          the buyer to inform them. You can then click

>

               1                                                              2

     Glossary of terms

     Field                         Definition
     Department                    The instore department where this order was placed
     Buyer                         Who has issued the PO
     Email                         What the buyer’s email address is
     Phone                         What the buyer’s phone number is
     Fax                           What the buyer’s fax number is
     Bill to                       Who the order is being billed to (Foodstuffs company)
     Instructions                  Any specific information relating to the order e.g. if it is a daily order
     Order Status                  What stage the order is currently at
     Supplier                      Who is supplying the order
     Date ordered                  The date the order was placed
     Date due                      The date the order is due
     Deliver to                    Where the order is being delivered to

                                                                                                         Page 9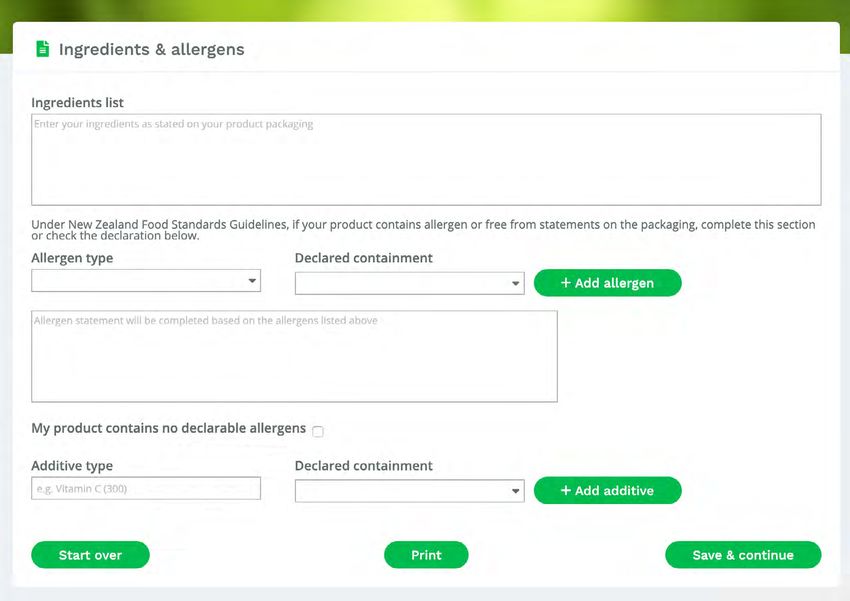
Web User Manual
                                                                    Version 1.2   Last update: January 2020

You can supply the order in part or full
If you are intending to supply part or all of the order, enter your supplier reference number, packing
slip number and dispatch date in the panel to the right and click save.

     If you are intending to undersupply the order
      •         Click into the send qty field marked with an asterisk and enter the quantity you are
     		         supplying
        •       Click save
       •        Please note you cannot edit the number to be greater than the order qty number to
     		         the left of the send qty column.

     Confirming delivery once picked
     Once the order has been picked, but before it is shipped, bring up the corresponding PO and click
     confirm delivery. This will automatically send an ASN to Foodstuffs, which will update our expected
     product quantities at our warehouse and store levels.

     If you are undersupplying the order, a prompt will appear on your screen asking you to either confirm
     your PO without splitting, to split the PO, or to cancel the action and return to the PO. As Foodstuffs
     does not accept back orders, you would normally complete the PO without splitting when you
     undersupply.

Page 10
Web User Manual
Version 1.2 Last update: January 2020
Glossary of Purchase Order Statuses
Status Definition Next steps
New The order has not been Click to view the order details.
actioned.
Viewed The order requires action If you intend to supply all or some of the order,
and you have seen it. An click acknowledge.
automatic message will be
sent to Foodstuffs letting us If there is a problem with the order or you are
know the order has made its unable to supply it, click reject.
way to you.
Acknowledged You have agreed to supply This stage is where you pick and pack the physical
part or all of the order and goods to be supplied. If you intend to undersupply
have confirmed the pricing you need to edit the Send quantity to match what
is correct. The order still you are supplying.
requires action.
Confirmed The order process has been Clicking confirm tells Foodstuffs you are supplying
completed and this PO will be all or part of the order. The ASN will automatically
archived overnight. be sent to Foodstuffs.
From here you can print a copy of the ASN or the
PO.
If approved for Web Invoices, the eXchange will
automatically generate a draft invoice for the order
to the buyer indicated in the bill to field. You must
have been approved by Foodstuffs for Web Invoices
Split You have confirmed Edit the delivery quantity field to indicate the
the order as being number of the products you can supply in a
undersupplied, but indicated subsequent delivery.
there will be a second
delivery. The order remains
open and requires action.
Archived The order was confirmed No further action is required and the PO will be
prior to midnight. archived automatically at midnight of that day.
The system will also archive unconfirmed orders
when they are more than 3 days past the delivery
due date. Foodstuffs can disable this e.g. for
import suppliers which may have significant
delivery delays.
Page 11Web User Manual
Version 1.2 Last update: January 2020
Upload XML file to ASN
To save time updating the send qty on your orders, you can upload an ASN in XML format.
Clicking the Upload ASN XML button will take you to a screen where you can select an
advanced shipping notice (ASN) to upload.
>
• To upload an XML file, click choose file and select the file you wish to upload from your
computer.
• Once the file has loaded, click upload.
• Verify file allows you to check the file you wish to upload. Any issues with your ASN will be
highlighted to you.
If you are printing a PO for your records, please do not use the PO as a delivery docket.
! The PO is the historical document created by the customer. If you have edited the send qty
data this will not show up here. After clicking confirm delivery, you will see the option to print
ASN. The printed ASN document will show your edited send qty data.
Glossary of terms
Panel Definition
Order status This summarises when the PO arrived to you, the date you confirmed
the order and the date the order was invoiced.
Invoice This displays an invoice number and packing slip, shows the total
price of the order and the status of the invoice e.g. draft or sent.
Dispatch details This shows the suppliers reference number, the number on the
packing slip and the date the order was dispatched.
Shipments This shows when the order was shipped, the number of items
shipped, the reference number if applicable and the packing slip
number if applicable.
Page 12Web User Manual
Version 1.2 Last update: January 2020
4. Invoices
!
To enable the invoicing function you must have approval from Foodstuffs.
Please get in touch with your regional supplier support contact for more information.
Contact details are on the back of this manual.
On the invoices page you can view your current invoices and a summary of the invoices you have sent
that day.
The invoices area allows you to generate invoices and credit notes for orders.
Once you have confirmed a PO, an invoice is automatically generated and will have a DRAFT status
next to it.
Sending a draft invoice
It is important to remember that a draft invoice will not be sent to Foodstuffs for payment.
For it to send - you must:
• check each field
• ensure the information is accurate
• finalise your invoice
• click send.
Page 13Web User Manual
Version 1.2 Last update: January 2020
4.1 Generating an invoice from a confirmed order
Ensure the purchase order has been confirmed (see section 3).
1. Click on Invoices from your eXchange dashboard and select the draft invoice that you are
editing.
2. You will need to enter the following data:
• Your invoice number
• Packing slip number
• Dispatch date if it is different from the one that has automatically been generated in
the field.
3. Foodstuffs eXchange automatically calculates the line price by multiplying the unit price by
the quantity that has been sent. Therefore, it is important to review each product line in the
line items field to check the quantity and unit pricing is correct.
If you need to amend any of the fields marked with a red asterisk, click on it and edit the
data.
Click save once you have finished making any changes.
Page 14Web User Manual
Version 1.2 Last update: January 2020
4. The details column on the right side of the screen will display the purchase order details,
billing and delivery information.
5. Once you are satisfied the invoice is accurate, click send.
The invoice date is always the date that you confirm the PO. It cannot be changed, the legal
! “tax invoice” is the document that is sent from the payee to the payer. The XML file created
by you in eXchange and sent to Foodstuffs is the legal tax document. This is the invoice that
should be referenced in your statement. Any invoice you may have created in your own
accounting system is not the legal document. To mitigate any discrepancy between your
system and what is sent from eXchange, make sure the eXchange invoice and your internal
invoice are created on the same day and match exactly.
If you need to check an invoice and send it later, you may create it and then save it for editing. In this
instance the invoice date remains the date that you generated the invoice not the date that you send
it.
Invoices must still be sent in a timely manner to avoid a payment delay!
4.2 Generating an invoice/credit note from a blank form
There may be times when an invoice cannot be created from an existing PO. Whether there was no
electronic PO to start with or you need to credit and re-invoice an incorrect invoice, you must create
the new document from scratch.
What you will need
1. Click invoices on the navigation bar to Having the right information on hand will speed
view the invoices page the process along and minimise mistakes.
2. Click on either generate an invoice or Have a copy of your internal invoice or sales order
or similar priced document that details:
generate a credit note
• the PO number
• your reference number
• delivery date
We also recommend creating a TXT file in Notepad
or similar, detailing all the product information,
including the product code, the product retail
barcode and description.
You can then copy and paste from this document
into the invoice to save keying errors – and a lot of
time!
Page 15Web User Manual
Version 1.2 Last update: January 2020
3. A box will appear where you need to:
• Select the Foodstuffs company being
invoiced
• Select the banner the invoice will be
categorised under, e.g. New World
• Select the store the delivery is to
• Confirm selections
4. Fill out the following fields in the invoice/credit note panel:
• Invoice number & PO Number or
• Credit note number & CNR/RPO (return purchase order) – only for generating a
credit note
• Packing slip
• Invoice/credit note date
• Order date
• Dispatch date
Line item details required
You need to enter the following details for each product that is being invoiced for in the line items
panel:
Field Definition
Supplier code Your short code for the product
FS code/barcode 13 digit GTIN barcode for the product
Description Long description of the product
Quantity ordered How many items were ordered
Quantity shipped How many items were shipped
UOM Unit of measure. Select from:
Retail unit
Inner
Shipper
Layer
Pallet
KG (only for products where the price is per kilogram and the amount
supplied is variable measure)
Net unit price The discounted price per unit excluding GST
Line price The totalled price column to appear on invoice
Page 16Web User Manual
Version 1.2 Last update: January 2020
Remember to regularly click save while creating an invoice/credit note.
If you need to delete a line item, click the rubbish bin icon next to Line price.
Once the invoice/credit note has been fully completed and if the information is correct, you can
click send.
If you need to continue working on the invoice/credit note, click save and you can return to it
! at any time by selecting it from the invoices page.
Saved invoices can be retrieved from the INVOICES page. They will appear in the current
invoices list with a status of “Draft”.
Tips:
The Invoices page also has a running total of the number and cumulative value of all
invoices sent that day.
A day is calculated from midnight to midnight NZST. It’s a useful double-check that
you’ve sent all the invoices that you’ve generated.
The Net Unit Price can handle up to 4 decimal places, so you can use this level of
precision to avoid rounding errors.
Page 17Web User Manual
Version 1.2 Last update: January 2020
5. Products
The Products part of eXchange is where all of the information we require about the products you are
selling is kept.
In Products you can:
• Create a new product
• Modify or change a product
• Delete an existing product
• Create new product from an existing product
• Add a GTIN (barcode) to a product
• Download a list of your products
>
When adding or modifying a product you need to provide the following information:
• Enter the Retail GTIN (barcode) for your product
• Or select My product is not barcoded
• Select the start/launch date for your product
Once you have selected the action you need to take, and have clicked continue, a new page
will appear. On the left side of your dashboard is a summary of the types of information you
must provide when creating or modifying a product. Each one can be clicked to take you to the
corresponding section.
If you send Product information via GS1 NPC you can view but not modify your product
! information in the Products area. All product updates need to be sent via the GS1 NPC.
Page 18Web User Manual
Version 1.2 Last update: January 2020
5.1 Creating a new product, or modifying an existing product
Follow the prompts in each field to tell us what we need to know about each product you are selling.
It’s important the details are totally accurate as we use this for consumer information and compliance
assurance.
Description
We need to know the essential details about your product to build an accurate snapshot of what it is
and how it is packaged. If you are modifying a product you will still need to check each field to ensure
you’ve communicated all changes.
To enter information into each field, click into each box and type the required details. The full
description is built from the details you enter in these fields.
1 2
1 2
3 3
Page 19Web User Manual
Version 1.1 Last update June 2019
Retail GTIN
(Barcode) for your product
1 Brand
The particular name the product is manufactured under (In example on previous page - Pams)
2 Sub-brand
If applicable, enter the subsidiary brand name affiliated with the main brand (In example on previous
page- Superfoods)
Functional name
Enter what the product actually is e.g. muesli
Variant
If your product comes in different flavours or varieties you will need to list each one e.g. if your
product was muesli and you produced it in strawberry, cranberry and almond flavours, you would
need to fill out a form for strawberry, a form for cranberry etc. Each variant must have a different
GTIN/barcode.
Multipack
Click yes or no to tell us if there are multiple items within one package, eg a 6 pack of yoghurt pottles.
Packaging type
What your product is sold in e.g. a box, a bottle, etc. Please note, this is only needed if you have similar
variants in different packaging such as a 330ml bottle and a 330ml can.
3 Net content
Enter the amount of consumable product the package contains as stated on your packaging.
Check the description that has been built is correct. If you need to change anything, you will need to
amend the information you have entered in the description fields. Once this is correct, enter the date
your new or modified product will be effective from and select your Barcode Verification Report.
You can then Save and Continue to go to the next screen, print the product record, or start over,
which will clear the form.
Page 20Web User Manual
Version 1.1 Last update June 2019
5.2 Product type
The next section you need to fill out is Product type. Here, you need to tell us whether your product is:
• A food or beverage for human consumption
• Considered an alcoholic beverage under NZ law
• Temperature controlled for storage and handling
• Variable weight (sold to Foodstuffs by weight)
• Classified as dangerous or hazardous under New Zealand legislation.
To tell us the Product type or class, start typing what your product is and select it from the dropdown
menu.
Select the country of origin and type in the Country of Origin statement as printed on your packaging
(e.g. “Made in New Zealand from local and imported product”). Click save & continue to confirm these
details.
5.3 Packaging type
Select the packaging type for your product, then click save & continue to go to the next screen. Most
products have a retail unit and a shipping carton.
!
Pay attention
to this
information
Page 21Web User Manual
Version 1.2 Last update: January 2020
Packaging type - variable weight
If your product type has variable weight, you will be shown a slightly different screen to complete.
5.4 Packaging units
You must give us the weights and dimensions for the retail unit of your product (the individual item),
the inner your product is shipped in (e.g. the box of 12 items) and the shipper (e.g. the crate of 24
inners). The columns will only display the relevant units according to your packaging type on the
previous screen.
Set your product on a flat and level surface and use a metal ruler to measure each point
! indicated on the box illustration. The width of a carton is always the shorter side. We apply
the GS1 measurement rules, available online at
www.gs1.org/docs/gdsn/3.1/GS1_Package_Measurement_Rules.pdf
Page 22Web User Manual
Version 1.2 Last update: January 2020
5.5 Pallet info
Products that are supplied to Foodstuffs Distribution Centres need to arrive on standard Chep pallets.
All pallets must comply with Foodstuffs maximum pallet height of 1.4m for ambient and 1.2m for
chilled and frozen. Foodstuffs maximum pallet weight is 1000kg.
Enter how many shippers there are per layer on the pallet, and how many layers there will be. Based
on the weights and dimensions entered in the packaging units section, we will automatically calculate
the number of shippers per pallet, the gross weight of the pallet and the height of the pallet.
If your product is not supplied on a standard pallet, for example if you only supply smaller quantities
directly to our retail stores, then you can select this at the top of the page. Pallet information is then
not required.
! Products without pallet information loaded cannot be accepted into our distribution
centres.
5.6 Storage and handling
To ensure correct storage we need to know:
The minimum shelf life, measured in days from the production date, of your product and its minimum
shelf life from the delivery date.
We also need to know what date type it is; an expiry date or a best before date. If the product needs
to be temperature controlled (e.g. frozen) you must tell us.
Page 23Web User Manual
Version 1.2 Last update: January 2020
Storage & handling - dangerous and hazardous goods
Enter your hazardous and dangerous goods information from your Material Safety Data Sheet.
5.7 List price
Usually the list price of your item will be given to us as the price per shipper or case. You must
indicate if the retail packaging of your product has a NZ Dollar retail price printed on it.
Page 24Web User Manual
Version 1.2 Last update: January 2020
5.8 Liquor information
If your product type is considered an alcoholic beverage under New Zealand law, then you will see this
page
You must complete the mandatory fields marked by an asterisk. If your wine is non-vintage, enter
1000 for the vintage year.
Click Save & Continue to proceed.
5.9 Ingredients and allergens
It is crucial the information in this section is entered fully and accurately. Our customers rely on this
data.
You must tell us your full and complete ingredient list for the product. Under New Zealand Food
Standards Guidelines, if your product contains allergen or free from statements on the packaging,
complete this section or check the declaration below to let us know if your product does not contain
any declarable allergens
If the product contains any allergens e.g. nuts, you must specify each one and then declare if your
product contains it or may contain it. Once you have added this, click the + Add allergen button. You
must repeat this for each allergen.
This step will also need to be completed for any additives your product contains.
Page 25Web User Manual
Version 1.2 Last update: January 2020
5.10 Nutritional information
If your product has a nutritional claim listed on the packaging, such as low fat, you need to list each
one in the Nutritional claim field.
You will then need to select the nutritional claim type and element from the next two dropdown
menus. You can start typing each one and then select from the list by clicking the arrow. For each
claim, you must click the + Add nutritional claim button and then add the next one.
If your product has a Health Star Rating panel on it, you need to select the rating (as declared on the
retail packaging) that it has and then indicate the levels of:
• Saturated fat
• Sugars
• Sodium
• Other declared nutrient e.g. fibre
Page 26Web User Manual
Version 1.2 Last update: January 2020
Nutritional information panel (NIP)
If your product is not required to have a Nutritional Information Panel on it, you can check the box and
click Save & Continue to move onto the next step.
If it does require a Nutritional Information Panel, you must tell us:
• How many servings per pack your product contains
• The serving size description e.g. one bowl of muesli
• The serving size and unit of measurement e.g. 30 grams of muesli per bowl
• The precision of the measurement e.g. that your measurement is approximate
If your product contains any additional nutrients, tell us what each of these are and how they have been
measured. For each additional nutrient, click the + Add additional nutrient button and then repeat for each
nutrient.
If your product claims to be certified as appropriate for specific diets, you must select each diet, e.g. vegan.
Tell us which agency has certified your product as suitable for the diet, and the certification number it has
been given. For each diet type, click the + Add diet type button to add it and repeat as necessary.
Click Save & continue when done.
Page 27Web User Manual
Version 1.2 Last update: January 2020
5.11 Consumer information
We also need to know the information about your product that you are giving to consumers to enable
them to store, use or prepare the product safely.
You must tell us the following information that is on your product:
• Consumer storage instructions
• Consumer usage instructions
• Preparation instructions
• Advisory message
If your product is irradiated you must click the check box next to that field. We also need to know if
your product has been genetically modified.
Once you have done this, add each preparation type and growing method by selecting it from
the dropdown menu. You can also type these in and select from the list that pops up. For each
preparation type or method you will need to click the + Add button and then enter the next one.
If your product is only available seasonally, click the check box to let us know.
Page 28Web User Manual
Version 1.2 Last update: January 2020
Marketing information
To enable us to accurately market your product you must give us the following information:
• Your target gender
• Target age
• Serving suggestion
• Marketing message
• Product features and benefits
• Labelling claims
• Online product description
• Full product description
Once this page has been completely and accurately filled out, click on save & continue to move on to the
next page.
Page 29Web User Manual
Version 1.2 Last update: January 2020
5.12 Your details
You will need to tell us your contact name, phone number and email address. Your supplier name and
NZBN number will automatically be filled out.
Once each icon on the left menu has turned into a green tick, you can submit your product to us for
review.
Any drafts that you have saved can also be selected from the top of the screen so you
! can continue working on them. To select a draft, click on the arrows icon at the end of the
selected drafts field and click the draft you wish to work on. You can then click Modify to
continue working on it, or click delete to remove it.
New draft products will be stored for 30 days from the last time you edited them. Any draft
product which has not been submitted within 30 days will be deleted from the Products
area.
Page 30Web User Manual
Version 1.2 Last update: January 2020
5.13 Delete an existing product
To delete an existing product, select the ‘Delete an existing product’ option in Product actions.
1
Enter the Retail GTIN (barcode) of the product you wish to delete.
Click into the end date for your product field and select the date that you will stop supplying it.
Click continue to submit this action. A message will pop up to prompt you to notify Foodstuffs
Procurement Coordinator (for Foodstuffs South Island) or your Category Manager (for Foodstuffs
North Island).
2
1 3
5.13 Create new product from an existing product
2 To create a new product from an existing product, for example, a new flavour in an existing range,
select ‘Create new from an existing product’. You will then need to enter the current barcode for
your product as well as the new barcode your new product will have. You will also need to enter
the launch date of your new product and add any additional or modified information. The form is
the same as for the new product, with dimensional information copied from the existent variant.
When you are creating or modifying a product, you will notice the overview panel on your left with
different icons that are either a red alert or green tick. A red alert icon means there is something
on the page that isn’t right or that something is missing. Once it has been completed or amended
successfully, it will turn into a green tick.
You cannot add a GTIN (barcode), or create a new product from an existing product from a draft that
already exists. Modify your existing draft or delete it to start again.
5.14 Add a GTIN (barcode) to a product
3 To add a barcode to a product, select the appropriate option in the product actions field. You will
be prompted to enter the current barcode for your product as well as the date you would like the
change to be effective from.
You will then see the packaging units page. Enter up to 10 retail GTINs to your existing product.
Page 31Web User Manual
Version 1.2 Last update: January 2020
6. Document tracking
Document tracking allows you to find all the documents sent and received in the Foodstuffs eX-
change during the past 90 days.
>
Using document tracking
Click document tracking on the navigation bar to view the document tracking page.
Select the Foodstuffs company using the drop down menu.
The supplier company will default to your company.
Distributors can also select the companies they represent from the drop down menu. This can be
specified by name or eXchange ID (EAN).
Specify a date range to search using the date picker in the from date and to date fields within 90 days
of the current date.
Select whether the document is a live or test file. Both are shown by default. A live file is one that
has been processed through eXchange for action by the receiver, e.g. Live invoice will be paid by
Foodstuffs.
A test file is one that has been sent to Foodstuffs or your own test system. We only use the test
channel when actively working with you to verify changes to your document processing.
Select your document type using the drop down menu, e.g. invoice or ASN. You may also choose to
search all documents.
You can also choose to specify a document number. POs, messages and ASNs are referenced by your
PO number. Invoices and credit notes are referenced by your invoice number.
To exclude successful documents, click in the checkbox to only show failed documents.
Click search for relevant documents to be displayed.
! If your search is broad, it could take a few seconds for results to display.
Your results will be displayed under the search documents fields. You can download your results by
clicking export as CSV. The data can then be imported into an Excel spreadsheet or similar program, to
make it easy to reconcile data obtained elsewhere. It’s useful for checking that every invoice you have
created has successfully been processed through eXchange.
Page 32Web User Manual
Version 1.2 Last update: January 2020
6.1 Document tracking results
Your document tracking results will be displayed in single lines. These can be expanded by clicking the
+ symbol in the left column.
Glossary - Document Tracking
Term Definition
Interchange list The final status of this transaction
Status Whether the document is a live file or a test file, and if it was
successful (green tick) or failed (red cross)
From Shows where the file originated
To Shows the destination of the file
Document no. The specific document number e.g. PO number or Invoice number
Date processed The date and time the document processed at the eXchange (NZST)
Document type What the document is e.g. a PO or ASN
Page 33Web User Manual
Version 1.2 Last update: January 2020
7. Company admin
When you click on the Company Admin tab from the dashboard, you will be presented with two
subpages of information.
The first subpage within the Company Admin tab is Details. This shows your basic company
information, distributor relationships, and allows you to view your current trading partners.
You can also maintain your email address for purchase order notifications and set a different email
for each Foodstuffs region in the fields provided. Simply tick the email new purchase order tab to
either enter or amend the email address(es) that you would like to send notifications to when a new
order is raised.
Click save to confirm the change.
>
View B2B settings
The other primary function of the Company Admin section on the eXchange is to allow you to view
your current settings for B2B ecommerce. Here you can view any documents being sent to, or being
received by, the Foodstuffs eXchange as well as connections and aliases. These B2B settings can
only be edited by Foodstuffs administrators.
Page 34Web User Manual
Version 1.2 Last update: January 2020
8. Contacts
This function allows you to search for Foodstuffs contacts, add new employees and update your user
and company profile details. Search for Foodstuffs and store personnel by name using the Employee
search type; search by Company name to find Foodstuffs companies and stores. These fields have a
fuzzy search function, so you can search for part of a company name and find results that match or
almost match the search term.
E.g. search for Albany to find Albany PAK’nSAVE.
If you are viewing your own company’s employees, you can click on a contact from the list displayed
and then you are able to view that user’s profile and if you have Admin rights for your company, you
can maintain their details accordingly.
You can use the Search Type selector to change your search between companies and employees.
If you click advanced options next to the search field, you can also refine your search by Foodstuffs
company, banner and subsidiary. Simply tick each field that applies in the pop-up screen and click
confirm selection.
>
Advanced search
allows you to
narrow down
and refine your
results.
E.g. New World in
South Island
Page 35Web User Manual
Version 1.2 Last update: January 2020
Maintain your own contact details
To maintain your own company profile, including your logo and key contact, click the
Company icon (left menu bar at the bottom). If you have Admin rights, you can update any
details as needed.
9. Add or delete a new employee
! You must have admin rights to add or delete employees.
Click the Company icon in the bottom left,
Then click View Employees.
At the bottom of the list you will see a button to add employee which appears as ‘create new’. Click
this and complete the fields provided as shown below:
>
>
Once you have filled your employee profile, click the Save button.
Page 36Web User Manual
Version 1.2 Last update: January 2020
Giving access to the exchange
At this stage, the employee contact will be created and searchable, but cannot login to the eXchange. If
you would like the employee to be able to login to the eXchange, ensure you have ticked “can login” on
the account screen.
Their login name will be their email address, and when you save this page, they will receive an email
with a link to activate their account.
You can also delete employees from the employee list screen by unchecking Active, and saving.
It’s important to keep your key personnel up to date as Foodstuffs uses this
! information to keep you updated about our business.
10. News
Make sure you regularly check the News section of Foodstuffs eXchange for all of the latest
information and updates about Foodstuffs
To view each post in full, click on read more.
>
To return to the News section, use the back button on your internet browser, or click News in the
dashboard on the left.
Page 37Web User Manual
Version 1.2 Last update: January 2020
11. Help
The help page is home to all of the information you need to use Foodstuffs eXchange. You can access
the instructions for how to navigate any of the site functions by clicking its name in the contents tab.
If you require further help, please get in touch with your local supplier support team:
• South Island email: ecommerce@foodstuffs-si.co.nz
• North Island email: supplierhelp@foodstuffs.co.nz
• Phone 0800 FSTUFFS (0800 3788337)
Page 38Web User Manual
Version 1.2 Last update: January 2020
12. Glossary
When using Foodstuffs eXchange, you may come across the occasional acronym or a word you may
not be familiar with. We’ve compiled a glossary to help you out.
Acronym/word Definition
ASN Advanced Shipping Notice, a transaction that advises Foodstuffs the
delivery quantity for each product line ordered.
B2B Business-to-business e-commerce, integrating transactions to your
back office system.
Banner The brands owned by Foodstuffs e.g. New World, PAK ‘n SAVE.
DFN Delivery Forecast Note, a transaction that advises Foodstuffs of an
expected delivery where a Purchase order has not been raised.
GTIN Global Trade Identification Number – the unique number under a
barcode.
PO Purchase Order.
INV Invoice or Credit Note.
MSG Order message, a transaction that updates the status of a Purchase
Order.
Shipper Also called a case, carton or outer. The standard logistical shipping
unit.
Inner A boxed or wrapped standard package of retail products that are
packaged inside a shipper. Often used for smaller items such as
toothbrushes.
Retail unit The product which is sold at retail.
Pallet Logistics unit containing a number of shippers.
Layer A single layer of cartons on a pallet.
Page 39Web User Manual
Version 1.2 Last update: January 2020
Still need help?
Get in touch with your local supplier support team:
• South Island email: ecommerce@foodstuffs-si.co.nz
• North Island email: supplierhelp@foodstuffs.co.nz
• Phone 0800 FSTUFFS (0800 3788337)
Page 40You can also read


