Installation Guide Multiple Application Platform Server - Evisions Help
←
→
Page content transcription
If your browser does not render page correctly, please read the page content below
Multiple Application Platform Server

                           Installation Guide
                                         Product version 6.6.3

                                       Last updated 4/11/2021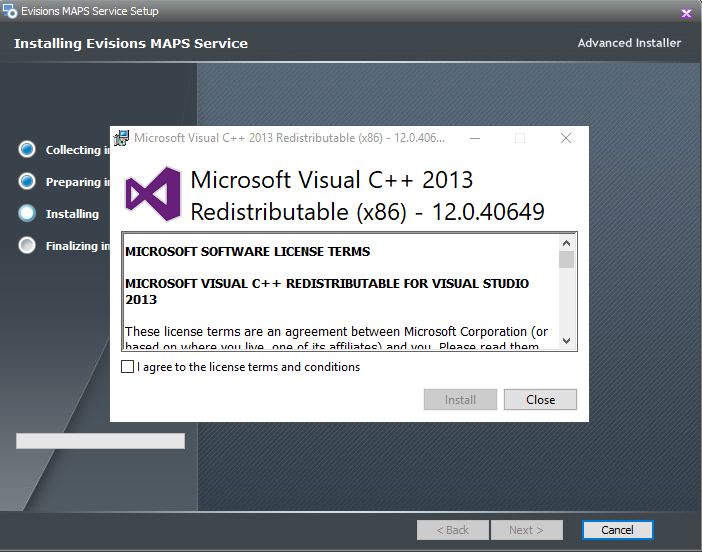
Table of Contents

   Introduction                                                                                4
      Overview of MAPS                                                                          4
        Key benefits                                                                            4
        Architecture                                                                            4

   Planning the Installation                                                                   6
      System Requirements                                                                       6
      Server Security                                                                           6
         Firewall Configuration                                                                 6
         Required Ports                                                                         6
         HTTP Secure (HTTPS)                                                                    6
      Installation Types                                                                        7
      Considerations for Installing the 64-bit Version of MAPS                                  7

   Standalone Installation                                                                     8

   Clustered Installation                                                                     10
      Installation Overview                                                                   11
      Hardware and Software Requirements                                                      11
        Migration Requirements                                                                11
      PostgreSQL Database Installation                                                        11
      MAPS Installation and Migration                                                         12
      Creating Additional MAPS Nodes                                                          17
      Load Balancer Configuration                                                             17
      Database Maintenance                                                                    19

   MAPS Configuration                                                                         21
      Launching the MAPS Config Application                                                   21
      Updating MAPS and the MAPS Applications                                                 23
        Updating Clustered Installations                                                      26
      Entering Your Software License                                                          29
      Creating Users                                                                          31
      Creating Data Connections                                                               34
         Configuring Driver Properties                                                        36
         Specifying the SQL Formatting                                                        39
         Authorizing the Connection                                                           39
      Adding Printers                                                                         40
      Adding Email Servers                                                                    42
        Email Server Configuration                                                            42
        Authorizing the Email Server                                                          44
        Testing the Email Server                                                              44
        Email Queue                                                                           45
      Authorizing Applications                                                                47

www.evisions.com                                                 Installation Guide   Page 2 of 53
                                                             Last Updated 4/11/2021
Adding an SSL Certificate                                        49

   Testing Application Installation                                    51

   Getting Help                                                        53

www.evisions.com                         Installation Guide    Page 3 of 53
                                      Last Updated 4/11/2021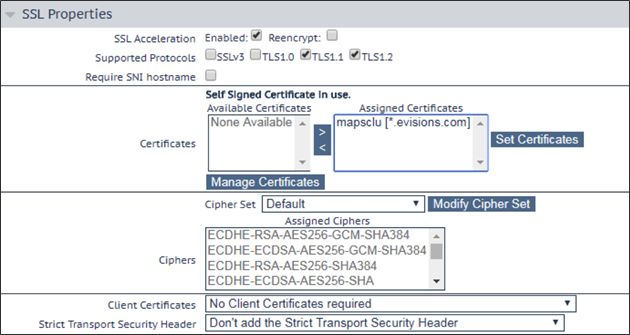
Introduction
This document provides quick-start installation instructions for the MAPS software to get your server up and running quickly. These instructions
only include the basic installation and configuration. You should refer to the MAPS Help for a full description of all functionality.

The instructions describe how to install, test, and configure MAPS for use in your environment. This document is NOT intended to be a training
guide. Once the software has been installed and you have verified proper functioning, we encourage you to take advantage of the various
training opportunities you may have purchased, or the free live and recorded training available on our training page.

You can find additional information such as the hardware/software requirements, OLE DB provider installation instructions, and other
documentation on our support website. If any problems arise in the installation of this software, please contact Evisions Support and we will be
glad to assist.

Overview of MAPS
MAPS stands for Multiple Application Platform Server, and is the server that deploys Evisions’ Higher Education suite of products. By creating
a web-based application server, Evisions is able to deploy all of its products via the web. This common server allows a single point of
administration for all Evisions Higher Education products.

Key benefits
    n   Web-deployed client software - no need to manually install applications on user’s computers.
    n   Central management of resources used by the products (database configuration, users, groups, printers and various security tasks).
    n   Does not require database drivers on users’ PCs - database calls are performed from the server, which sends results back to users.
    n   Highly secure - Uses AES encryption for all server to client communication. Web applications such as the launch page and Argos Web
        Viewer use the secure HTTPS protocol.
    n   Server-side email queuing and delivery.
    n   Server-side web deployment of saved reports.
    n   Single installation for all Evisions Higher Education products - easily install and configure your applications.

Architecture
The MAPS server software runs on a server at your institution and deploys the Higher Education applications, including Argos, FormFusion,
IntelleCheck, and the MAPS Config application. All applications are Microsoft Windows executable programs that are downloaded to users’ PCs
by MAPS. MAPS Config is used by your administrators to configure MAPS.

Application data such as FormFusion templates, Argos DataBlocks and reports, IntelleCheck data, etc. is stored on the server where MAPS is
installed. The server also stores MAPS configuration data—your users, groups, permissions, and other information.

Printing, email handling, and FTP access is done from the server, and not from the individual applications. MAPS also handles communication
with SQL-based data sources by using the OLE DB providers for each data source.

  Load Balancer

  A clustered installation of MAPS is required in order to use the load balancer.

www.evisions.com                                                  Installation Guide                                                    Page 4 of 53
                                                               Last Updated 4/11/2021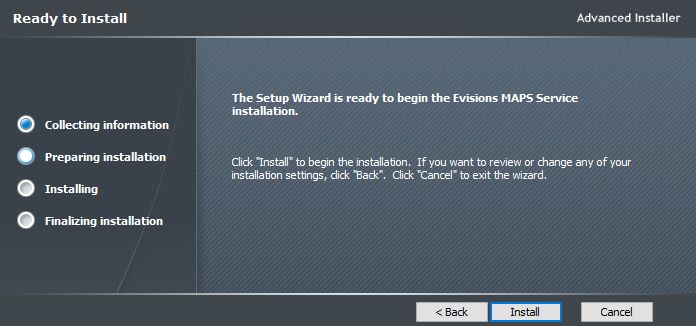
www.evisions.com      Installation Guide    Page 5 of 53
                   Last Updated 4/11/2021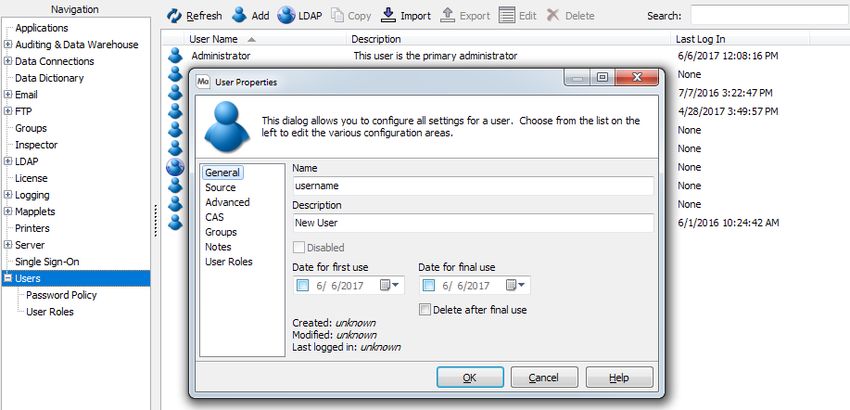
Planning the Installation
While MAPS can be installed on a server that is also running other software, this is not recommended. Throughout this guide, “Application
server” is defined as the server on which your enterprise application runs, and the “MAPS server” as the server on which MAPS runs.

System Requirements
Please review the MAPS Suite Hardware and Software Requirements and verify that your system meets or exceeds these specifications.

Server Security

Firewall Configuration
Evisions recommends that MAPS be installed and configured behind firewalls on a secure, private network. Clients who install MAPS in other
arrangements can introduce security vulnerabilities. The preferred configuration would have MAPS sharing a secure private network with your
data sources and your email and LDAP servers.

  Public vs. Private Networks

  Public and private networks both use TCP/IP for communications. However, a private network differs from a public network in that access to
  a private network is tightly controlled. Firewalls are used to ensure only selected computers (and users) may access a private network.

  Evisions recommends that MAPS be installed behind appropriate firewalls. While all communication to users is protected with encryption,
  communication between MAPS and other servers may not be.

Required Ports
Ports 8080 and 27467 must be opened through the firewall(s) to all users to access the software via the Internet (or other unsecured, public
networks). MAPS also communicates with the FormFusion mapplet through port 27468, which must be opened to use FormFusion. Since the
MAPS server software and FormFusion mapplet reside on the same computer, opening the port through a firewall may not be required (but the
port must be opened).

HTTP Secure (HTTPS)
MAPS supports using HTTPS with SSL security certificates to establish secure communications between the server and your users. While the
Evisions application clients communicate with the server using AES encryption, the eLauncher and the Argos Web Viewer run in a web browser
using the HTTP protocol. If you will be using the Argos Web Viewer, you must acquire an SSL certificate and then configure HTTPS on the server
where MAPS is installed (or on the load balancer, for clustered installations) to ensure secure communication between MAPS and users running
the Argos Web Viewer.

  The Evisions Support Site

  http://support.evisions.com contains a variety of valuable resources:

      n   HelpDesk to report technical issues or request assistance
      n   Training links to live and recorded online training
      n   Support resources, for documentation, release notes, and upgrade information
      n   Software downloads, including the MAPS software
      n   Forum, where clients share information about Evisions’ products

www.evisions.com                                                   Installation Guide                                                Page 6 of 53
                                                                Last Updated 4/11/2021
Installation Types
MAPS can be installed in two different configurations depending on your institution's needs:

     n   Standalone installations install MAPS on a single server with local SQLite databases created during the MAPS installation. This is a good
         choice for environments with a small or moderate number of users, test environments, and other situations where a high degree of
         redundancy is not required. If your institution uses IntelleCheck or FormFusion, these products can only be used on standalone
         MAPS servers.
     n   Clustered installations use three or more MAPS servers behind a load balancer, with a separately-installed PostgreSQL database shared by
         all MAPS servers. Institutions that have many users or run a large number of Argos reports may choose a clustered installation to improve
         performance, stability, and reliability in high-demand environments. At this time, Argos is the only Evisions product that is supported in a
         clustered environment, so if you also use FormFusion and IntelleCheck you will need a separate standalone MAPS server for these
         products.

  Clustering is an optional feature that can be added to your MAPS license. If you are interested in this option but are not yet licensed for it,
  please contact your Evisions account representative for more information.

Considerations for Installing the 64-bit Version of MAPS
MAPS 6.5 contains an update for 64-bit MAPS server technology. Supporting MAPS in a 64-bit environment provides improved memory for
handling a larger number of requests that are sent and processed by the service.

     n   64-bit MAPS Service and Config support 64-bit database drivers and printers.
     n   Applications clients (Argos, FormFusion, IntelleCheck) continue to be 32-bit.

Evisions provides installation and setup files for both 32-bit and 64-bit installations.

     n   For new installations, Evisions recommends installing the 64-bit version.
     n   If you already have a 32-bit version of MAPS installed, you should install the 64-bit MAPS files on a new server, and then migrate the data
         from your existing MAPS server to the new one. See Updating to 64-bit MAPS for more information.
     n   If you already have an earlier 32-bit version of MAPS installed and do not want to migrate to a new server at this time, update your
         existing server to the new 32-bit version of MAPS 6.5.

www.evisions.com                                                     Installation Guide                                                     Page 7 of 53
                                                                 Last Updated 4/11/2021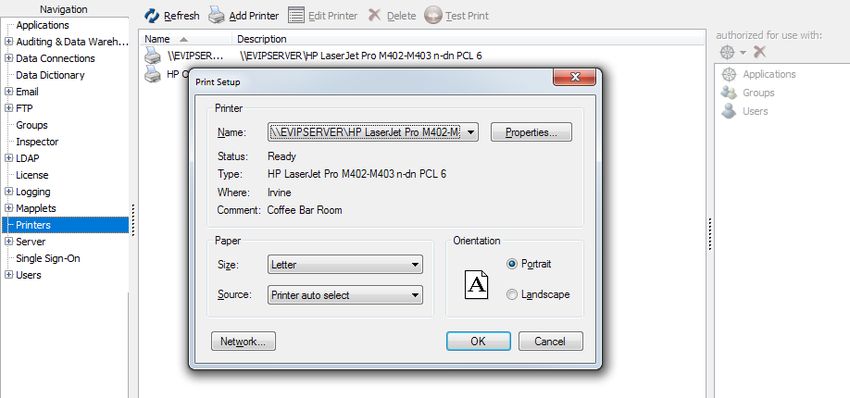
Standalone Installation
A standalone MAPS installation is the default installation type. All of the MAPS applications (Argos, FormFusion, and IntelleCheck) can be installed
in a standalone environment on a single MAPS server.

    1. Log in to the machine where you want to install MAPS (typically a server or virtual server). You can log in to the server directly or via a tool
       such as Remote Desktop. You must log in as a user who has administrative privileges in order to perform the installation.
    2. Download the MAPS software from the Evisions website and save it in a location where you can access it.
    3. Double-click on the installation file that you downloaded to start the installation.
    4. If your system does not already have the required version of Microsoft's Visual C++ redistributable package, you will need to install it
       before you can continue. Accept the license agreement, and then select Install to continue.

    5. When prompted, review and accept the Evisions license agreement and select Next.
    6. Specify the installation folder (the default is suggested) and select Next.
    7. When you get to the final screen, select Install to proceed.

www.evisions.com                                                   Installation Guide                                                       Page 8 of 53
                                                                Last Updated 4/11/2021
8. During the installation, the MAPS Database Configuration Wizard will appear, prompting you to choose an installation type. Choose
      the default value of Standalone installation, then select Next.

   9. Proceed through the remaining screens in the MAPS Database Configuration Wizard and the setup program.
  10. When the installation completes, the MAPS service should be running on the server.

www.evisions.com                                              Installation Guide                                              Page 9 of 53
                                                           Last Updated 4/11/2021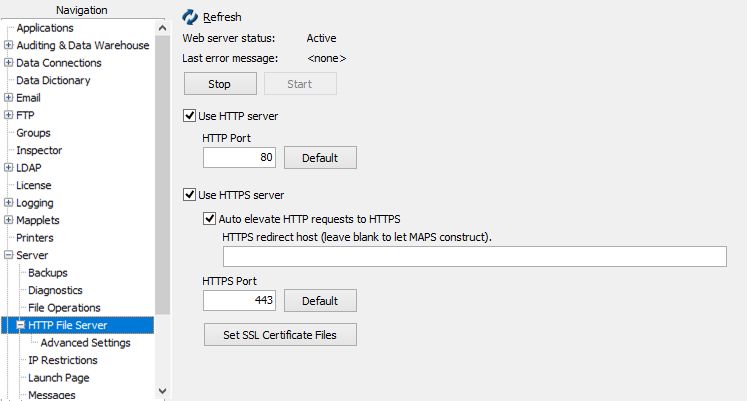
Clustered Installation
Clustering is an optional MAPS feature that allows you to run multiple MAPS servers simultaneously, using a single data source for all servers. This
provides several benefits:

     n   Ability to support larger numbers of users.
     n   Increased performance, particularly in high-usage environments.
     n   Redundancy in case of server failure.
     n   Ability to take individual servers offline for maintenance without impacting users.

At this time, clustering is only supported for Argos. If your institution also uses FormFusion or IntelleCheck, you will need a separate standalone
MAPS server for these products.

  If you are interested in a clustered installation but do not have this option included in your MAPS license, you can contact your Evisions
  account representative for more information.

A clustered installation requires several servers, including a database server and three or more MAPS servers. Virtual servers are fine for this
purpose. Each MAPS server node will connect to the database server, ensuring that all users have access to the same data in real time.

You will also need a load balancer or load balancing software to distribute traffic among the MAPS server nodes.

www.evisions.com                                                   Installation Guide                                                      Page 10 of 53
                                                                Last Updated 4/11/2021
Installation Overview
The steps involved in the installation are as follows:
1. Provision/acquire servers and load balancer.
2. Install PostgreSQL on the database server.
3. Install MAPS on one server node.
4. Migrate data from previous MAPS/Argos environment (optional).
5. Create additional MAPS server nodes.
6. Configure load balancer to distribute traffic to MAPS server nodes.
7. Configure MAPS as desired.
Hardware and Software Requirements
Refer to the MAPS Suite Hardware and Software Requirements for the minimum requirements for clustered installations, including specifications
for the MAPS server nodes and the PostgreSQL database server.
Migration Requirements
If you plan to migrate data from an existing standalone MAPS installation into a clustered environment, you will also need the following:
n Previous standalone MAPS installation at version 6.1 or higher. If you are running an older version, see the MAPS 6.1 Release Guide for
upgrade instructions.
n The MAPS service must be stopped on the old server prior to migration. Alternatively, you can make a copy of the MAPS Service directory
and use the copy to perform the migration. The old server will not be affected by the migration, but the database must not be modified by
running applications during the migration process.
PostgreSQL Database Installation
The PostgreSQL database is where the MAPS, Argos, and MAPS auditing data is stored. The PostgreSQL database should be located on a server
that is separate from the individual MAPS nodes, but is on the same network and is accessible from each node. All MAPS server nodes will connect
to this database.
Refer to www.postgresql.org to download and install PostgreSQL on your database server. The installation instructions are provided in their
documentation.
The database schemas and required users will be created during the MAPS installation.
Database Backups
For production environments, you will need to make arrangements for the PostgreSQL server to be backed up periodically, such as every
evening when usage is expected to be low. Note that MAPS is not able to perform database backups automatically as it does with standalone
installations, since the database is no longer local to the MAPS server.
Installing MAPS in Cloud Environments
If you are installing your MAPS servers in a hosted environment, the PostgreSQL database server should also be hosted in that environment.
Installing MAPS in other configurations may cause performance issues due to network delay between the database server and the
MAPS nodes.
www.evisions.com Installation Guide Page 11 of 53
Last Updated 4/11/2021MAPS Installation and Migration
1. Log in to the server that will become your first MAPS node. This should be a new server with no preexisting MAPS installation. You can log
in to the server directly or via a tool such as Remote Desktop. You must log in as a user who has administrative privileges in order
to perform the installation.
2. Download the MAPS software from the Evisions website and save it in a location where you can access it.
3. Right-click on the installation file that you downloaded and select Run as administrator. Note: The installation will fail later on if you do
not run it as an administrator.
4. If your system does not already have the required version of Microsoft's Visual C++ redistributable package, you will need to install it
before you can continue. Accept the license agreement, and then select Install to continue.
5. When prompted, review and accept the Evisions license agreement and select Next.
6. Specify the installation folder (the default is suggested) and select Next.
7. When you get to the final screen, select Install to proceed.
www.evisions.com Installation Guide Page 12 of 53
Last Updated 4/11/20218. The MAPS Database Configuration Wizard will be launched automatically as part of the installation process. When asked to choose your
installation type, select New clustered installation.
9. Enter the address of the PostgreSQL server that you configured in the previous step, along with the database name and the database
administrator credentials. If you configured PostgreSQL to use a non-default port, you can also change that here.
After entering the database information, select Test Connection. If everything was correct, a "Test connection succeeded!" message will
then be shown next to the Test Connection button. The test must be successful in order to proceed to the next step.
www.evisions.com Installation Guide Page 13 of 53
Last Updated 4/11/202110. On the Create Users screen, you are creating the database users who will own the schemas and tables for the MAPS, MAPS auditing,
and Argos databases. You can use the same user for all three databases, or create separate users.
Note: Some cloud environments such as Microsoft Azure may require you to use a fully qualified username, for example maps_
admin@servername.
11. On the Create Schemas screen, confirm or modify the names for the MAPS, MAPS Auditing, and Argos schemas, then select Next.
www.evisions.com Installation Guide Page 14 of 53
Last Updated 4/11/202112. The Run Script screen shows a preview of the database creation script that is about to run. If changes are needed, you can choose to edit
the script. When you have reviewed the script, select the Run Script button.
www.evisions.com Installation Guide Page 15 of 53
Last Updated 4/11/202113. On the Migrate Database screen, you have the option to migrate the SQLite databases from an existing standalone MAPS installation
(version 6.1 or higher ONLY) into the new clustered environment so that all your data, users, and configuration settings will be brought
over into the clustered environment. If you choose to migrate, enter the location of the MAPS Service directory from the old server. This
can be done using a local copy of the directory obtained ahead of time, or you can enter the UNC path to the directory on the original
server if you have access to it from your current location. The files in this directory will not be modified in any way, only imported into the
new environment.
Note that if you plan to migrate existing databases, you must do it before you begin using MAPS or Argos in the clustered environment.
You can do the migration now, or do it later by running the MapsDbConfig (32-bit)utility in the MAPS Service directory. This application
gives you several options for modifying the installation or migrating databases after the initial setup. A shortcut to this application is
created on the desktop as part of the installation process.
After selecting the directory to migrate from, select Start Migration. The Process Log area will update as the migration proceeds, and a
progress indicator will be shown at the bottom of the screen. When the migration finishes, you should review the log for any errors. If
necessary, use the Save Process Log button to save the log to a file. If you ran into any problems with the migration, this log file can
assist Evisions Support with troubleshooting.
When finished with the migration, select Next; or, if you choose not to migrate a previous environment, select Skip Migration.
Note: If your previous MAPS installation used the Cloud Connector, you will need to refresh the data for each connector (or wait for
it to be refreshed according to its configured refresh interval) before the connection will be usable in the clustered environment.
14. The database configuration and MAPS installation is now complete. Select Finish and Close Wizard to return to the setup program,
then select Finish.
www.evisions.com Installation Guide Page 16 of 53
Last Updated 4/11/2021Creating Additional MAPS Nodes
To create additional nodes for the cluster, you have two options:
n Clone the entire server, including the MAPS configuration.
n Run the installer on each additional MAPS server node, choosing the option to Add node to existing cluster.
Selecting this option prompts you to browse for the config.json file from the MAPS Service directory on the first server. This file contains
information about the PostgreSQL database that MAPS should connect to. You can browse for the file on the original server, or use a copy
located somewhere you can access from the new server. MAPS will read in this file and copy it into the Service directory on the new node during
the installation.
After specifying the config.json file, select Next, then Finish and Close Wizard to complete the installation.
Load Balancer Configuration
A clustered MAPS installation is required in order to use the load balancer. To install the load balancer, follow the instructions provided by your
vendor. Once it is installed, you will need to configure the settings required by MAPS. The screenshots in this guide were taken using Kemp Virtual
LoadMaster, which is the load balancer that Evisions uses to test. Please note that the options available to you will vary depending on the specific
load balancer you are using.
1. Set/enable extra ports 8080 and 27467, which are the default ports required by MAPS.
2. Modify the service type to use STARTTLS for SMTP.
3. Enable the option for server affinity/persistence (a.k.a. "sticky sessions"), which is required to support OLAP operations in the Argos Web
Viewer. With this enabled, new sessions will be routed according to the specified scheduling method, but returning connections will be
sent to the same server they used previously. Evisions has tested using a 10 minute persistence timeout, but you may adjust this if needed.
www.evisions.com Installation Guide Page 17 of 53
Last Updated 4/11/20214. Choose the desired scheduling method (for example, “round robin”).
5. Add an SSL certificate. Note: You will also need to add an SSL certificate in the MAPS Config.
6. Add each of the host MAPS servers to the load balancer.
www.evisions.com Installation Guide Page 18 of 53
Last Updated 4/11/20217. If desired, you may also configure the weight for individual hosts. Some scheduling methods (e.g., "weighted round robin") may use the
weight to prioritize servers that have more resources.
8. Enable the option for server affinity/persistence (a.k.a. "sticky sessions"), which is required to support OLAP operations in the Argos Web
Viewer. With this enabled, new sessions will be routed according to the specified scheduling method, but returning connections will be
sent to the same server they used previously.
Health Checking
To enable your load balancer to confirm the status of each MAPS server, you can configure the load balancer to use HTTP ping to verify that
the service is operational.
Database Maintenance
After installing MAPS, the MAPS Service folder contains an application called MapsDbConfig (32-bit) that can be used to modify the database
configuration for a clustered environment if changes are required.
Running the application presents you with options to change configuration details for the MAPS, Argos, and MAPS auditing databases. You can:
n Change configuration - Modify the database address, port, name, schema, and credentials.
n Create schema - Run or rerun the scripts that create the database schema.
n Migrate data - If you skipped the migration during the initial installation, you can migrate data from a previous standalone
MAPS installation using this option, as long as you have not yet begun to use the new MAPS installation.
www.evisions.com Installation Guide Page 19 of 53
Last Updated 4/11/2021n Run MAPS Installation Wizard again - Rerun the entire installation wizard, including the database configuration, schema creation,
and data migration.
Running the MapsDBConfig (32-bit) tool in a standalone environment will only display the option to run the MAPS Installation Wizard again.
Selecting this option will allow you to change installation types from standalone to clustered.
Database or Schema Changes Without Migration
If you change the MAPS database configuration from one PostgreSQL schema to another or from SQLite to PostgreSQL without migrating
data from a previous SQLite database, you may see the following error the next time you try to log in via the eLauncher:
There are no active versions of Configuration available. Please contact your system
administrator to resolve this issue.
To fix the problem, launch the MAPS Configuration executable from the Service\Applications\Configuration directory where you installed
MAPS. Read in your MAPS license file and then check for updates. This should prompt you to reinstall the Config application, after which it
should become available from the eLauncher.
www.evisions.com Installation Guide Page 20 of 53
Last Updated 4/11/2021MAPS Configuration
Launching the MAPS Config Application
Once MAPS is installed, you will need to configure the server to add users, data connections, email servers, and applications. Although you can
log in to the MAPS Config from any machine, some aspects of the configuration such as creating ADO data connections and installing printers
must be done from the server itself or from tools such as Remote Desktop.
Important!
When adding a data connection using ADO drivers, the drivers shown for the connection are those installed on the machine where you are
running the MAPS Config from. Similarly, when adding a printer, the printers shown are those installed on the local machine. Therefore, you
should always add or edit ADO data connections and printers from the machine where MAPS is installed. If you edit these items from a
different machine, the connections/printers may only work from that specific machine.
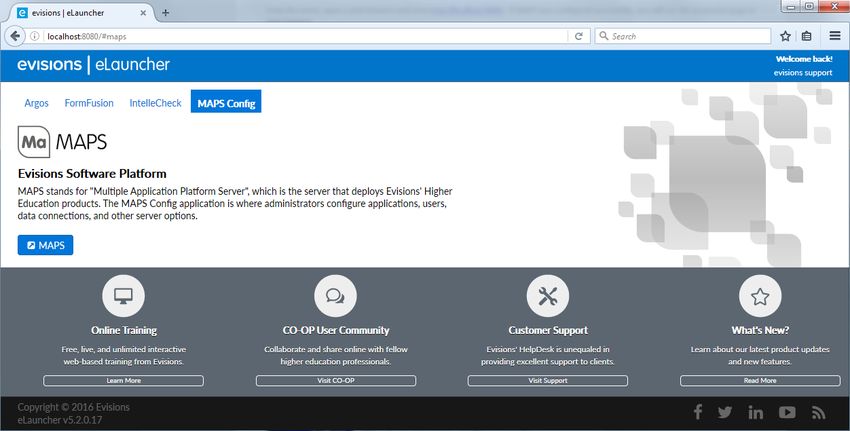
From the server, open a web browser and go to http://localhost:8080. If MAPS was configured successfully, you will see the eLauncher page in
your browser.
Go to the MAPS Config tab and click the blue MAPS button. You will be prompted to download and install the Evisions Application Launcher,
which is the software that downloads the MAPS Config to your machine. Follow the instructions in the installation wizard.
www.evisions.com Installation Guide Page 21 of 53
Last Updated 4/11/2021As part of the installation, you may be prompted to install the Microsoft .NET Framework, which is required to run the Application Launcher.
Once the Application Launcher is installed, you can now log in to MAPS. Click the MAPS button in the eLauncher again to proceed.
You will be prompted to enter an administrative username and password. Enter administrator as the username and Password as the password
(Password must be capitalized).
You can change the credentials for the default Administrator user after you have logged in, and/or create additional MAPS administrators. Only
users who have been assigned the Administrator user role are able to access the MAPS Config.
www.evisions.com Installation Guide Page 22 of 53
Last Updated 4/11/2021Secure Transmission of Login Credentials
When logging in to the eLauncher using HTTP protocol (the default), users are required to log in through the applications rather than into the
eLauncher. You have the option of enabling HTTPS in MAPS, which will allow users to log in once when they access the eLauncher instead of
logging in to each application individually. You will also need to configure HTTPS for your server if you will be using the Argos Web Viewer.
This ensures that login credentials and data are properly secured when logging in through the browser.
Refer to HTTP and HTTPS File Server for more information on configuring HTTPS.
What If MAPS Does Not Launch?
If you have another application that uses port 8080, this will prevent MAPS from launching. You will need to change the port number being
used by the other application temporarily so that you can launch MAPS. You can then tell MAPS to use a different port number.
After logging in, you will see the following message:
Initially MAPS is in demonstration mode, which allows you to provide the license file for the applications. Without entering the license, you will be
unable to install applications. Click OK to continue.
Updating MAPS and the MAPS Applications
The Check for Updates button at the bottom of MAPS Config will show you if there are any updates available for your MAPS products. It is a
good idea to check for updates immediately after installing MAPS, and again periodically whenever you want to ensure you are on the latest
version.
If updates are available, they will be shown in a list. Check the box next to the update(s) you want to apply. To view the release notes associated
with a particular update, select the Release Notes link to the right of the update. You should read the release notes prior to applying updates to
existing systems. For new installations, you should select all available updates immediately to ensure you are on the latest version.
www.evisions.com Installation Guide Page 23 of 53
Last Updated 4/11/2021Clustered Installations
Before you update a clustered installation, refer to the additional instructions at the end of this section. It is important that you follow the instructions for
backing up the data and database before starting the update.
Keep the Deactivate old versions option selected unless you want to keep the previous version until you have tested the new version. If more
than one application version is enabled, users will be prompted to choose a version when logging in. You can manage active versions on the
Applications screen.
When you are ready to proceed, select the Get Updates button. You will be prompted to confirm the updates you have selected, and to review
the product version matrix for compatibility:
www.evisions.com Installation Guide Page 24 of 53
Last Updated 4/11/2021Select Continue to download and apply the updates. Updates to the MAPS applications (MAPS Config, Argos, FormFusion, and IntelleCheck) will
be applied immediately. If the updates include an update to the MAPS service, you will be asked when to apply it, since users will be disconnected
from the system while the service restarts. For this reason, we recommend applying updates to the server at a time when users will not be on the
system, such as at night or on the weekend.
For initial installations or test environments, you can select Immediately to install the update now. You will be temporarily disconnected from the
server while the update is applied. MAPS will reconnect automatically in a few minutes after the update is complete.
For existing installations, you may want to apply MAPS service updates when all clients have disconnected or in [#] minutes. These options
can be useful if there are users on the system whose work you do not want to interrupt. If you specify a number of minutes to wait, users currently
logged in to a MAPS application (other than the Argos Web Viewer, which currently does not support system notifications) will be warned prior to
the service restart.
www.evisions.com Installation Guide Page 25 of 53
Last Updated 4/11/2021When the updates have finished, you should use the Check For Updates button again to check for additional updates. If your system is several
versions behind, you will need to proceed through each update sequentially. Continue checking for updates and applying them until no further
updates are available.
Important Notes:
n Updates should be verified in a test environment prior to applying them in production.
n MAPS does not automatically download or apply updates. MAPS will let you know when updates are available, and you can choose when
to apply them.
n If you are updating the MAPS service at the same time as one or more applications, the service update may be delayed until certain
database updates have finished. Database migrations may take longer if you have a very large number of Argos DataBlocks, FormFusion
templates, etc.
Updating Clustered Installations
In a clustered installation, each of the servers in the cluster must be updated to the same version.
Back Up the PostgreSQL Server
Before you begin to update MAPS or the MAPS applications in a clustered environment, you must manually back up the PostgresSQL database.
n If MAPS data is the only data in the PostgreSQL database, you can back up the entire database.
n If data other than MAPS data resides in the PostgreSQL database, back up only the schemas used by the mapplet, the applications, and
the license database.
Refer to the documentation provided with your database for additional information on backup and restore commands.
To back up the entire database, you can use the pg_dump command. For example:
rem Back up using pg_dump
:pg_dump
echo pg_dump...
pg_dump -U postgres -d %db% -f %filename%
www.evisions.com Installation Guide Page 26 of 53
Last Updated 4/11/2021rem createdb creates an empty schema. template0 is always an empty and unmodifiable database
:createdb
echo createdb...
createdb -U postgres -T template0 %newdb%
rem Load .sql file to new db
:load_sql
echo load sql file...
psql -U postgres -d %newdb% -f %filename%
rem Delete .sql file
del %filename%
To back up just the schema for the MAPS data, you can use a batch file like the following:
:backup
rem Backup schemas
for %%s in (%schemas%) do (
SET schema=%%s
SET filename=%APPDATA%\postgresql\%%s.sql
CALL :pg_dump
CALL :load_sql
CALL :delete_file
)
GOTO done
rem Back up using pg_dump
:pg_dump
echo pg_dump (%schema%)...
pg_dump -U postgres -d %db% -n %schema% -f "%filename%"
exit /B
rem Load .sql file to new db
:load_sql
echo load sql file (%schema%)...
psql -U postgres -d %newdb% -f "%filename%"
exit /B 0
rem Delete .sql file
:delete_file
echo filename: %filename%
IF "%savesql%"=="" (
DEL "%filename%"
)
exit /B 0
:done
exit /b %ERRORLEVEL%
It is critical that you have a backup of the PostgreSQL database before you apply the update, so that you can roll back if a problem is discovered
during testing. If you do run into any issues, contact Evisions Support for assistance.
www.evisions.com Installation Guide Page 27 of 53
Last Updated 4/11/2021Update the First Server
After you have your backup of the database, select one of the MAPS servers to update. It doesn't matter which one you select.
Use the Check for Updates button at the bottom of MAPS Config to display the available updates.
For this server, select all of the available updates from the list, including the License, if listed, and select the Get Updates button. Confirm that
you want to apply the update, and allow the updates to complete before continuing.
Update the Remaining Servers
For each of the remaining servers, use the Check for Updates button at the bottom of MAPS Config to display the available updates.
For these servers, you only need to update the MAPS Service. The other applications have already been updated. Confirm that you want to apply
the update, and allow the update to complete.
You can now proceed with testing the new version in your environment.
www.evisions.com Installation Guide Page 28 of 53
Last Updated 4/11/2021Entering Your Software License
Automatic License Updates
As of MAPS 6.6, your product licenses are automatically verified and updated daily. You should no longer need to manually import or update
the license files, but you may still do so if you wish.
The License screen is where you import the license file that was provided to you upon purchase of any of the MAPS applications. When you first
install MAPS, it is running in a limited demonstration mode. You will need to read in your license file before you can use your licensed product(s).
Use the Read From File button to browse for the license file that was provided when you purchased the software. MAPS will verify your license
and then prompt you to download and install any additional software included in your license.
If you want to install the application, select Yes to proceed. This process may take a few minutes, depending on the speed of your internet
connection. This dialog will appear for each product that is included in your license.
Once an application has been installed, selecting it on the License screen will show you the details pertaining to its license, such as the client
count, expiration date, and any optional modules that are included in your license. If your institution is licensed to run multiple MAPS nodes in a
clustered environment, your allowed node count will be shown in the Server information.
If you purchase additional applications or optional modules in the future, you can update your license by selecting Read From Web. You will
then be prompted to download and install any new products or modules. Alternatively, you can also get any available license updates by checking
for updates in MAPS.
www.evisions.com Installation Guide Page 29 of 53
Last Updated 4/11/2021Installing Applications in Clustered Environments
When installing MAPS and Argos in a clustered environment, you should select No if you are prompted to install applications that do not
support clustering, such as FormFusion and IntelleCheck. If your institution owns these products, you will need to install them on a separate
standalone MAPS server since they will not work correctly in a clustered environment.
www.evisions.com Installation Guide Page 30 of 53
Last Updated 4/11/2021Creating Users
Any individual who will be accessing a MAPS application must have a valid username and password to log in. The Users screen allows you to set
up and configure individual MAPS and LDAP users.
To get started, we recommend you add only a few test users. Go to the Users screen, then select the Add button at the top. The User Properties
dialog box will appear. Enter a name and description for the user in the General section.
On the Source screen, enter a password for the user. Retype the password to verify.
For each user, you may choose to check the options for Password never expires or User must change their password at the next logon if
desired.
On the Advanced screen, enter the user's email address.
www.evisions.com Installation Guide Page 31 of 53
Last Updated 4/11/2021On the User Roles screen, assign a role to this user from the list of available user roles. User roles allow you to specify the permissions for Argos
users and MAPS administrators. FormFusion and IntelleCheck do not currently support configuring user roles through MAPS.
In addition to the default roles, if needed you can also create your own custom user roles from a list of available operations.
Creating Groups
Groups are created in a similar manner. Select “Groups” in the navigation pane to go to the Groups page.
By default, all users are added to a group called “Everyone”. You can add any number of additional groups to MAPS. Groups can be useful
for assigning permissions to multiple users at once. You can also create groups based on LDAP group membership, avoiding the need to add
individual users to MAPS.
www.evisions.com Installation Guide Page 32 of 53
Last Updated 4/11/2021For more information on user configuration, refer to the Users section of the MAPS Help.
For special considerations related to setting up users and groups in a single sign-on environment, refer to the Single Sign-On section of the MAPS
Help, and Using Groups with Single Sign-On.
www.evisions.com Installation Guide Page 33 of 53
Last Updated 4/11/2021Creating Data Connections
Go to the Data Connections screen and select Add Group to create a group to keep your connections organized.
Connection Groups
Connection groups are logical groupings that help keep connections organized. You don’t need to use connection groups, but they make it
easier to authorize connections for use by an application, or to grant users and groups permissions to several connections at once.
Give your connection group a logical name. Select the connection group, then select Add Connection.
Select the type of database you want to connect to:
www.evisions.com Installation Guide Page 34 of 53
Last Updated 4/11/2021n ADO/OLE DB - Use an installed OLE DB provider to connect to the data source.
n Cloud Connector - Connect to an online third-party data source or web application via its API.
n Oracle - Use the native Oracle driver to connect to an Oracle database.
n Salesforce Connector - Use the optional Salesforce connector to connect to your Salesforce environment.
n SQL Server - Use the native SQL Server driver to connect to an MS SQL database.
Note: ADO/OLE DB connections MUST be created and edited from the server, either logged in directly or via a tool such as Remote Desktop.
If you create an ADO/OLE DB connection while logged in elsewhere, you will only see the drivers for your local system and the connection
may fail when attempting to use it from a machine that does not have those drivers installed.
The other connection types can be created or edited from any machine, since they are not dependent on local database drivers.
Choose the desired connection type, then select Next.
On the General tab of the Edit Data Connection dialog, enter the name that you wish users to see for this connection. You may also choose to
add some notes for the connection. The notes are only visible in MAPS.
www.evisions.com Installation Guide Page 35 of 53
Last Updated 4/11/2021Configuring Driver Properties
The Driver Properties screen is where you configure settings specific to the database driver you are using.
Oracle Native Driver
Enter the Oracle Home you wish to use, or leave it set to if your server has only one Oracle Home. The Service Name is the name of the
Oracle database you wish to use.
You can opt to specify a username and password at the connection level, or leave it blank depending on how you decide to configure your
user/group rules later on. The most basic method of connection is to enter a username and password here that all users who use this connection
will use to access the database.
www.evisions.com Installation Guide Page 36 of 53
Last Updated 4/11/2021SQL Server Native Driver
Enter the name of the server and database that you wish to use.
You can opt to specify a username and password at the connection level, or leave it blank depending on how you decide to configure your
user/group rules later on. The most basic method of connection is to enter a username and password here that all users who use this connection
will use to access the database.
ADO Driver
Click the ellipses on the right of the ADO Connection String field to generate the connection string.
On the Provider tab of the Data Link Properties dialog, select the OLE DB provider you wish to use.
www.evisions.com Installation Guide Page 37 of 53
Last Updated 4/11/2021If you do not see the required provider, ensure that it has been installed on the MAPS server and that you are running the MAPS Configuration
from the server itself. The providers shown here are those installed on the machine you are working on.
Note: If you are connecting to an Oracle database, we strongly recommend using the Oracle Provider for OLE DB and not the Microsoft OLE DB
Provider for Oracle, as there are some known issues with the Microsoft provider.
Select Next to continue.
The remainder of the configuration process will vary depending on which OLE DB provider you are using. In this case, the Oracle provider requires
that the database name (from the tnsnames.ora file on the MAPS server) be entered. Fill in the appropriate information for your connection type.
If you will be using the username and password defined in the connection string, check the Allow saving password box. Otherwise, you can
configure connection credentials on a per-user or per-group basis later on the User/Group Rules screen.
Test the connection by clicking the Test Connection button at the bottom of the Connection tab. This will verify that the connection string is
properly defined and that you have entered correct credentials for the database.
Select OK to save your settings.
Cloud Connector
If you are setting up a Cloud Connector to pull in third-party data, please refer to the Cloud Connector documentation for configuration details.
Salesforce Connector
If you are setting up a connection to a Salesforce environment, please refer to the Salesforce Connector documentation for configuration details.
www.evisions.com Installation Guide Page 38 of 53
Last Updated 4/11/2021Specifying the SQL Formatting
The SQL Formatting screen is where you specify the database format to use for communications via this data connection. You must select the
correct SQL formatting options in order for queries to execute correctly. These options are used when generating queries in the Argos Visual
Designer and for parsing queries in Argos and FormFusion.
You can choose from five predefined formats, define a custom SQL format, or let MAPS choose the correct format. When possible, you should
choose the exact format for your database. The predefined settings include ANSI SQL-92, Jet, Microsoft SQL Server, Oracle, and Unidata.
Authorizing the Connection
At this point you will need to authorize the data connection for use with one or more applications. Right-click anywhere in the Authorized for
use with pane on the right and select Add Application. Select the application(s) to authorize for this data connection.
www.evisions.com Installation Guide Page 39 of 53
Last Updated 4/11/2021Authorizing the Connection for Applications
You can authorize a data connection for use with an application on the Data Connections screen, or from the Applications screen. If you have
set up a connection group, you can authorize applications for the entire group at once.
For more information on data connection configuration, refer to the Data Connections section of the MAPS Help.
Adding Printers
In order to print from the MAPS applications, the printer(s) to be used must be added to MAPS and then authorized for use with specific
applications by specific users and/or groups. For example, if you have FormFusion installed for printing letters, you would add the appropriate
printers, but limit access to these printers to only the FormFusion application.
To add a printer, go to Printers in the Navigation pane, then select Add Printer. The Print Setup dialog will show you a list of all printers installed
on the machine. Select the appropriate printer from the dropdown, then click OK.
Notes:
n You must add printers from the MAPS server itself, or from a Remote Desktop connection to the server.
n You should log in to the server where MAPS is installed as the user the MAPS service is running as, and this user must have permissions to
use the printers you wish to add.
n The printer driver must be installed on your server or installed as a network printer and accessible to MAPS for it to appear in the Print
Setup dialog.
n At least one printer must be authorized for each MAPS application.
n MAPS requires a printer to be added to the server if one doesn’t already exist. It can be a dummy printer if no physical printers are
connected to the server. In either case at least one printer must be added to the server.
www.evisions.com Installation Guide Page 40 of 53
Last Updated 4/11/2021Configure Printers from the Server!
The printers that appear in the dialog are those that are available to the local system. In order for your printers to work correctly, you MUST
add printers from the machine where MAPS is installed, or via a Remote Desktop session to this machine.
You can now authorize the printer for use by individual applications, users, and groups. Right-click in the Authorized for use with pane on the
right (or use the dropdown menu) and choose Add Application, Add Group, or Add User. These options open a list of available users, groups,
or applications that can be authorized for use with the selected printer.
In this example, use of the HP Officejet 4630 printer is limited to the FormFusion application, and is available to all users (the “Everyone” group)
who use FormFusion. To restrict access to specific users or groups, authorize those users or groups individually instead of using the “Everyone”
group.
To verify that the printer was added to MAPS successfully, select the printer and then click the Test Print button at the top of the screen to send a
test page to the printer.
If you run into any problems adding your printers, refer to the Troubleshooting section of the MAPS Help.
www.evisions.com Installation Guide Page 41 of 53
Last Updated 4/11/2021Adding Email Servers
The Email -> Servers screen is where you identify the email server(s) to be used with MAPS applications. For example, FormFusion output can be
delivered via email. To use email in your applications, add your existing email server to MAPS by selecting Add Server at the top of the screen.
Email Server Configuration
The Email Server Properties dialog contains four screens:
General
Server Name: Enter an identifier for this email server. The name you specify here is how this mail server will be listed in the MAPS applications,
and does not need to match the actual mail server name.
Host (IP address): The IP or host name of the mail server.
Port: The default port for SMTP is port 25. If your mail server uses a different port, enter the port number here.
Advanced
Client Name: The domain name that appears in the header data of the emails sent from MAPS. If you leave this field blank, it shows the MAPS
server's domain name.
Maximum Emails Per Minute: Allows you to control the rate at which MAPS sends queued emails to your mail server. This can be useful when
sending out large-volume mass mailings.
www.evisions.com Installation Guide Page 42 of 53
Last Updated 4/11/2021Security
SMTP Security Level: The type of security used by the mail server. The available options are auto-detect, none, login, plain, DIGEST-MD5,
CRAM-MD5, and CRAM-SHA1. When in doubt, the preferred setup is to use (auto detect) to let MAPS determine the security settings of your mail
server.
Use TLS: Check this box if your mail server supports Transport Layer Security for email encryption. Some mail servers, such as Gmail's, require TLS.
MAPS 6.2 and higher support TLS versions 1.0 and up. Earlier versions of MAPS only support TLS 1.0.
User Name/Password: Enter the credentials for the mail account to use.
Logging
Logging: Check this box to enable email logging.
Log filename: By default, all log entries, including email logs, reside in the main MAPS log file. Alternatively, enter a path and filename if you
wish to store the email logs in a separate file. Using a separate log file helps to reduce the size of the MAPS logs and makes it easier to find the
specific information you need.
www.evisions.com Installation Guide Page 43 of 53
Last Updated 4/11/2021Authorizing the Email Server
You can now authorize the email server for use by individual applications, users, and groups. Right-click in the Authorized for use with pane on
the right (or use the dropdown menu) and choose Add Application, Add Group, or Add User. These options open a list of available users,
groups, or applications that can be authorized for use with the selected email server.
Testing the Email Server
To make sure the newly added email server works correctly, select the Test button at the top of the Email Servers screen. Enter some parameters
in the Test Email dialog, then select OK to send a test email.
If you are entering multiple email addresses in the To field, separate the addresses using commas.
www.evisions.com Installation Guide Page 44 of 53
Last Updated 4/11/2021Email Queue
The Email -> Queue screen allows you to keep track of emails sent by MAPS or any of MAPS applications that have email capability. If all emails
have been sent as intended, this list will be blank. MAPS will attempt to send an email four times. If it fails after the fourth try, the email will be
held in the queue. Depending on the application, you can have the application specify to have these emails returned to sender. Several MAPS
applications have the ability to queue an email to be sent at a later time. The date and time an email is scheduled to be sent is listed in the “Date to
Send” column.
The Emailing active checkbox at the bottom of the screen controls whether MAPS is currently attempting to send emails or not. Unchecking the
box will prevent any emails from being sent from any of the MAPS applications.
When an email is selected, clicking the Edit button brings up the Edit Email dialog shown below where you can override the date and time the
email will be sent, and edit the email address if needed. Checking the Hold checkbox will hold the email in the queue and not send it.
www.evisions.com Installation Guide Page 45 of 53
Last Updated 4/11/2021Click the Error tab to view the error that caused the email to be sent to the queue.
In cases where you have a large number of emails to edit, you can use Shift or Control to select multiple emails at once. Editing emails this way will
make the same changes to all of the selected emails.
If you want to configure notifications to alert you when emails from one or more applications are failing, you can do this on the Notifications
screen under the Server section of MAPS.
www.evisions.com Installation Guide Page 46 of 53
Last Updated 4/11/2021Authorizing Applications
The previous examples described how to authorize items (data connections, printers, and email servers) for use with applications or by users and
groups at the time the item was created. You can also create these authorizations from the Applications screen, which may be easier if you are
making a lot of changes.
Authorization
The process of identifying which users, groups, servers, printers, and data connections are allowed to use or be used by a given application.
If you have already performed the required authorizations, you can skip this section. If, however, you did not specify authorizations at the time
you created an item (printer, data connection, etc.), you can do it now from the Applications screen. In this example, we are authorizing items for
FormFusion.
Select the FormFusion application, then right-click in the Authorized for use with pane on the right (or use the dropdown). In this example, we
are choosing to authorize a user.
Select Add Userto bring up the list of users previously created. Select the users who should have access to the application, then click OK.
www.evisions.com Installation Guide Page 47 of 53
Last Updated 4/11/2021After adding users, the screen will appear similar to the following:
In a similar fashion, you may authorize existing data connections, email servers, users, groups, and printers for use with the applications.
www.evisions.com Installation Guide Page 48 of 53
Last Updated 4/11/2021Adding an SSL Certificate
MAPS hosts the eLauncher landing page and the Argos Web Viewer on an integrated web server, which can be configured to use either HTTP or
HTTPS depending on your institution's needs. Evisions highly recommends using HTTPS, which requires an SSL certificate for the server. Using
HTTPS will improve security, as well as allow you to use the eLauncher's single sign-on features. HTTPS is also required in order to use the Argos
Web Viewer.
Once you have obtained an SSL certificate, go to the HTTP File Server screen in MAPS and check the box to Use HTTPS Server.
Use the Set SSL Certificate Files button to browse for the certificate files.
Click the folder icons to browse for the SSL certificate, private key, and intermediate certificate (if any), then select OK.
www.evisions.com Installation Guide Page 49 of 53
Last Updated 4/11/2021Verify that you are able to log in using HTTPS. Instead of the default URL of http://localhost:8080, you will use https://localhost to access the
eLauncher. If you specify a port other than 443 for HTTPS, you will also need to include the port number in the URL.
Once you have confirmed that you are able to connect using HTTPS, you can enable the auto elevate HTTP requests to HTTPS feature. When
this box is checked, users can type in a shorter HTTP URL and MAPS will automatically convert it to HTTPS.
Important!
Do not check the option to auto-elevate HTTP requests to HTTPS until you have tested logging in using HTTPS and have confirmed that you
are able to launch MAPS. If there is a problem with the certificate files, you may not be able to connect through the eLauncher and will need
to run MAPS Config manually to correct the problem.
For more detailed information on configuring the HTTP/HTTPS file server, refer to the HTTP File Server page in the MAPS Help.
www.evisions.com Installation Guide Page 50 of 53
Last Updated 4/11/2021You can also read