OPEN-AIR LABORATORIES FOR NATURE BASED SOLUTIONS TO MANAGE HYDRO-METEO RISKS OPERANDUM GEOIKP DEPLOYMENT AND FULLY FUNCTIONAL (USER GUIDE)
←
→
Page content transcription
If your browser does not render page correctly, please read the page content below
Ref. Ares(2019)6327812 - 12/10/2019

       OPEn-air laboRAtories for Nature baseD
       solUtions to Manage hydro-meteo risks

   OPERANDUM GeoIKP deployment and fully
          functional (user guide)
Deliverable information
Deliverable no.:                    7.13
Work package no.:                   7
Document version:                   V.2
Document Preparation Date:          23.09.2019
Responsibility:                     KAJO

       This project has received funding from the European Union’s Horizon 2020 research
       and innovation programme under grant agreement No 776848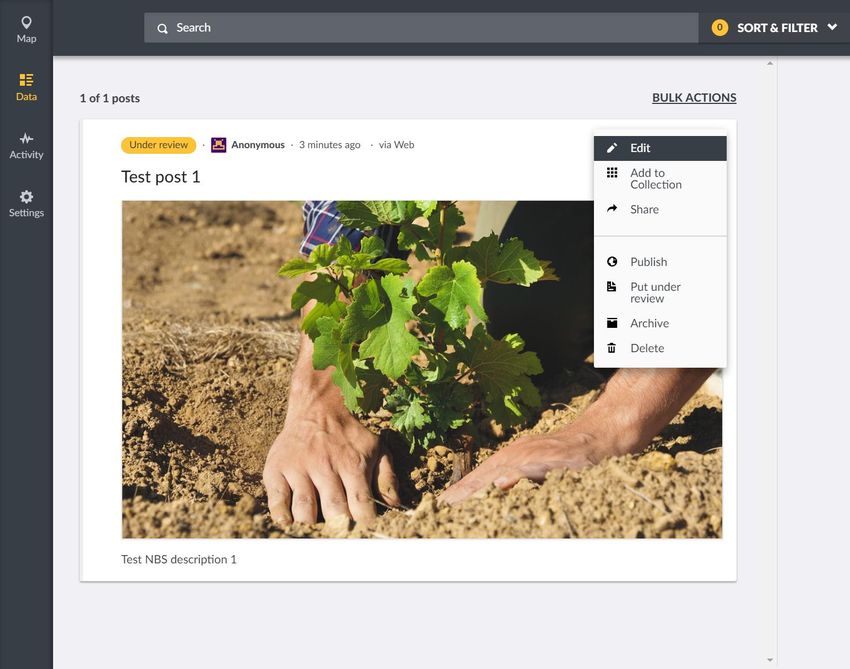
Project information
Project acronym and name:               OPERANDUM - OPEn-air laboRAtories for Nature baseD
                                        solUtions to Manage hydro-meteo risks
EC Grant Agreement no.:                 776848
Project coordinator:                    UNIBO
Project start date:                     01.07.2018
Duration:                               48 months
Document Information & Version Management
Document title:           OPERANDUM GeoIKP deployment and fully functional (user guide)
Document type:            User guide for the GeoIKP
Main author(s):           Sasa VRANIC (KAJO), Milan KALAS (KAJO), Laura Sandra LEO
                          (UNIBO), Tommaso SABBATINI (KAJO)
Contributor(s):
Reviewed by:              Federico PORCÙ (UNIBO); Thomas ZIEHER (OEAW)
Approved by:
Version       Date        Modified by               Comments
V.0           09.09.2019  Sasa VRANIC               Initial version
V.1           16.09.2019  Federico PORCÙ            Review of the content and compliance
                                                    with scope as from the DoW
V.1           16.09.2019  Thomas ZIEHER             Review of the content and compliance
                                                    with scope as from the DoW
V.2           23.09.2019  Sasa VRANIC               Comments from reviewers addressed

Short Description
This deliverable coincides with the establishment of the web portal dedicated to demonstrate NBS
for various types of users. The present document represents a practical mini-guide to help the user
navigating the portal. The mini-guide is based upon the current state of deployment of GeoIKP
(September, 2019) and will be replaced in the future by the official GeoIKP user-guide and video
tutorials.

Dissemination level
PU                        Public                                                           X
CO                        Confidential, only for Members of the Consortium,
                          including the EU Commission Services

This deliverable contains original unpublished work except where clearly indicated otherwise.
Acknowledgement of previously published material and of the work of others has been made
through appropriate citation, quotation or both. The publication reflects the author’s views.
The European Commission is not liable for any use that may be made of the information
contained therein.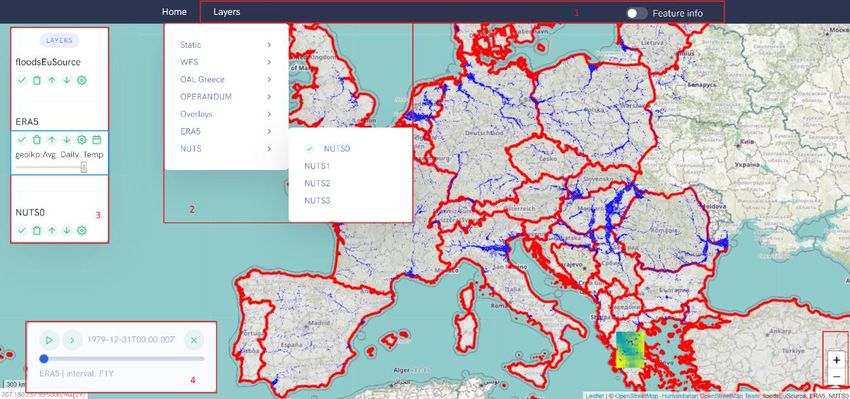
GA no.: 776848

Table of contents

TABLE OF CONTENTS .................................................................................................................................... 3
LIST OF FIGURES .......................................................................................................................................... 4
LIST OF ACRONYMS AND ABBREVIATIONS ........................................................................................................ 5
IPR: INTELLECTUAL PROPERTY RIGHTS ............................................................................................................ 6
EXECUTIVE SUMMARY .................................................................................................................................. 7
1 INTRODUCTION ......................................................................................................................................... 8
2 WEBGIS................................................................................................................................................ 10
  2.1 Introduction............................................................................................................................................... 10

  2.2 User guide ................................................................................................................................................. 10
        2.2.1        Home page ................................................................................................................................... 10
        2.2.2        Register/login............................................................................................................................... 12
        2.2.3        NBS explorer ................................................................................................................................ 14
        2.2.4        OAL explorer ................................................................................................................................ 15
        2.2.5        Map view ..................................................................................................................................... 16
        2.2.6        Policy and permitting path view .................................................................................................. 18
        2.2.7        NBS toolkit view ........................................................................................................................... 18
3 NBS CROWDSOURCING APPLICATION ......................................................................................................... 20
  3.1 Basic concepts ........................................................................................................................................... 20

  3.2 Web application user guide....................................................................................................................... 21
        3.2.1        Adding a new NBS case study ...................................................................................................... 21
        3.2.2        Editing existing NBS case study.................................................................................................... 22
  3.3 Mobile application user guide ................................................................................................................... 22
4 DATA MANAGEMENT PLATFORM (CKAN) .................................................................................................. 25
  4.1 Basic concepts ........................................................................................................................................... 25
        4.1.1        Datasets and resources ................................................................................................................ 25
        4.1.2        Users, organizations and authorization ....................................................................................... 25
        4.1.3        Groups ......................................................................................................................................... 25
  4.2 User guide ................................................................................................................................................. 25
        4.2.1        Register login ............................................................................................................................... 25
        4.2.2        Adding a new dataset .................................................................................................................. 26
        4.2.3        Editing existing dataset ................................................................................................................ 30
        4.2.4        Groups ......................................................................................................................................... 31
        4.2.5        Creating an organization .............................................................................................................. 32
        4.2.6        Finding data ................................................................................................................................. 33
ANNEX A. OPERANDUM DMP – LIST OF METADATA ELEMENTS ..................................................................... 35

D7.13 | OPERANDUM GeoIKP deployment and fully functional (user guide)                                                                            3 / 36
GA no.: 776848

List of Figures
List of Figures

Figure 1: Topological connection of GeoIKP modules and components (source: OPERANDUM
           Deliverable 7.9) ................................................................................................................. 9
Figure 2: OPERANDUM GeoIKP home page ......................................................................................... 11
Figure 3: OPERANDUM GeoIKP home page - additional content visible when user scrolls down the
            page ................................................................................................................................. 12
Figure 4: OPERANDUM GeoIKP sign in window (preliminary version) ................................................ 13
Figure 5: OPERANDUM GeoIKP sign up window (preliminary version) ............................................... 13
Figure 6: GeoIKP NBS explorer ............................................................................................................. 14
Figure 7: GeoIKP NBS explorer - filtered NBS case studies .................................................................. 15
Figure 8: GeoIKP OAL explorer ............................................................................................................. 16
Figure 9: GeoIKP Map view .................................................................................................................. 17
Figure 10: GeoIKP Map view - OAL overlaid with other layers ............................................................ 17
Figure 11: GeoIKP Policy and permitting path view............................................................................. 18
Figure 12: GeoIKP NBS toolkit view (visualization based on Risk Data Hub Graphics) ........................ 19
Figure 13: NBS crowdsourcing application – map view of NBS case studies ....................................... 20
Figure 14: NBS crowdsourcing application – data view ....................................................................... 21
Figure 15: NBS crowdsourcing application - adding a new NBS case study ........................................ 22
Figure 16: NBS crowdsourcing application – editing existing NBS case study ..................................... 22
Figure 17: NBS crowdsourcing mobile application .............................................................................. 24
Figure 18: CKAN – Register for an account .......................................................................................... 26
Figure 19: CKAN – Login window ......................................................................................................... 26
Figure 20: CKAN – add a new dataset (insert metadata) ..................................................................... 28
Figure 21: CKAN – add a new dataset (add data) ................................................................................ 29
Figure 22: CKAN – edit existing dataset ............................................................................................... 31
Figure 23: CKAN groups ....................................................................................................................... 32
Figure 24: CKAN – create an organization ........................................................................................... 33
Figure 25: CKAN – search for a dataset ............................................................................................... 34

D7.13 | OPERANDUM GeoIKP deployment and fully functional (user guide)                                                            4 / 36
GA no.: 776848

List of Acronyms and Abbreviations
CA:    Consortium Agreement
CO:    Confidential
DoA:   Description of Action, referring to the Annex I of the Grant agreement
DMP: Data Management Platform
DRR:   Disaster Risk Reduction
EC:    European Commission
EO:    Earth Observation
EP:    Exploitation Plan
GA:    Grant Agreement
IM:    Innovation Manager
IP:    Intellectual Property
IPR:   Intellectual Property Rights
KER:   Key Exploitable Result
LCA:   Life Cycle Analysis
NBS:   Nature Based Solutions
OAL:   Open Air Laboratory
PU:    Public
SDGs: Sustainable Development Goals
TRL:   Technology Readiness Level
QA:    Quality Assurance
WP:    Work Package

D7.13 | OPERANDUM GeoIKP deployment and fully functional (user guide)             5 / 36
GA no.: 776848

IPR: Intellectual Property Rights
No IPR issues related to this report.

D7.13 | OPERANDUM GeoIKP deployment and fully functional (user guide)     6 / 36
GA no.: 776848

Executive summary
This deliverable coincides with the establishment of the OPERANDUM online platform, named Geospatial
Information Knowledge Platform (GeoIKP). GeoIKP is a web application providing information, data and
assessment tools on Nature Based Solutions (NBS).

The web application is accessible at the following web address: http://207.180.237.99:9000/.

The present document represents a practical mini-guide to help the user navigating the portal. It is based
upon the current state of deployment of GeoIKP (September, 2019) and will be replaced in the future by
the official GeoIKP user-guide and video tutorials.

D7.13 | OPERANDUM GeoIKP deployment and fully functional (user guide)                  7 / 36

GA no.: 776848

1 Introduction
GeoIKP stands for Geospatial Information Knowledge Platform. It is a web application providing
information, data and assessment tools on Nature Based Solutions (NBS) and facilitating tools for their
exploitation and market uptake. It has been developed within OPERANDUM project
(https://www.operandum-project.eu/), funded by European Union’s Horizon 2020 research and
innovation programme under grant agreement No 776848. The platform serves as data storage and geo-
portal of NBS. It displays, implements and integrates the innovative, science-based results of OPERANDUM
on NBS addressing hydro-meteorological hazards under current and future climate conditions.

The web application is accessible at the following web address: http://207.180.237.99:9000/. It is
composed of three modules (Figure 1):

    ●   WebGIS,
    ●   Data Management Platform (DMP) and
    ●   NBS crowdsourcing application.

Currently, each module has its own registration/login functionality but after the public release one of the
first efforts will be integration of login/registration functionalities. After the integration, WebGIS module
will be the main access point to all modules and users will be able to access all other modules.

The wider context and the architecture of GeoIKP is explained in Deliverable 7.9. This deliverable consists
in the release of the platform itself. However, it has been coupled with a short user-guide providing a user-
friendly introduction of GeoIKP functionalities. This is done here for each of the three modules.

D7.13 | OPERANDUM GeoIKP deployment and fully functional (user guide)                     8 / 36
GA no.: 776848

Figure 1: Topological connection of GeoIKP modules and components (source: OPERANDUM Deliverable 7.9)
For the WebGIS module, the user guide is in the form of an explanation of the implemented functionalities
since the order of using functionalities is not strictly defined. For the other two modules the order of
actions is important, therefore the user guide is more detailed including instructions on the type of
information to be included and the order in which each information must be entered.

D7.13 | OPERANDUM GeoIKP deployment and fully functional (user guide)                  9 / 36
GA no.: 776848

2 WebGIS

2.1 Introduction
The WebGIS module has multiple views and the layout and the amount of presented information depends
on the user profile. It is an entry point to all modules of GeoIKP. The WebGIS module has the following
views:

   ●   Home page,
   ●   NBS explorer,
   ●   OAL explorer,
   ●   Map view,
   ●   Policy and permitting path view,
   ●   NBS toolkit view.

2.2 User guide
   2.2.1   Home page
The main landing (home) page of the WebGIS represents also the main landing page of GeoIKP (Figure 2).
The red rectangle marked with the number 1 represents the main menu which provides the links to all
views of the WebGIS module. Also, on the same menu one can find the ‘sign in’ button which redirects
users to the ‘sign in’ window. The red rectangle marked with number 2 shows the “Links” menu: from
here, the user can access the other two modules of GeoIKP (NBS crowdsourcing application and Data
Management Platform (DMP)) and the home page of the OPERANDUM project.

D7.13 | OPERANDUM GeoIKP deployment and fully functional (user guide)                10 / 36
GA no.: 776848

Figure 2: OPERANDUM GeoIKP home page
The home page is designed to provide a description of all GeoIKP modules and to give instructions for using
GeoIKP (user guide, tutorial) (Figure 3). By signing in, users are granted access to a larger set of
functionalities, such as saving a layer layout in a map view, adding datasets to GeoIKP, and having
personalized views based on their profile (the last functionality is not yet implemented).

The homepage also offers a direct link to the detailed user guide (tutorial) of GeoIKP, which describes the
various functionalities of GeoIKP and how to use them. For users interested in learning more about GeoIKP,
but without detailed explanation of every functionality, it will be possible to watch a short movie with the
presentation of the most prominent functionalities (Figure 3).

D7.13 | OPERANDUM GeoIKP deployment and fully functional (user guide)                    11 / 36
GA no.: 776848

Figure 3: OPERANDUM GeoIKP home page - additional content visible when user scrolls down the page

    2.2.2   Register/login
The Sign-in window shows the fields where to enter the email address and password for registered users
(Figure 4). New users can register by simply clicking on the “Sign up” link which will open the sign-up
window (Figure 5).

D7.13 | OPERANDUM GeoIKP deployment and fully functional (user guide)                   12 / 36
GA no.: 776848 Figure 4: OPERANDUM GeoIKP sign in window (preliminary version) To register in GeoIKP the user has to enter an email address, desired password, organization and preferable area of interest. The latter will enable tailored views and presentation of information according to the user profile. Figure 5: OPERANDUM GeoIKP sign up window (preliminary version) D7.13 | OPERANDUM GeoIKP deployment and fully functional (user guide) 13 / 36
GA no.: 776848

    2.2.3   NBS explorer
The NBS explorer is primarily designed as a catalogue of existing NBS solutions which are being collected
within OPERANDUM (Figure 6). The NBS explorer view is composed of two main parts: map (marked with
number 4 in lower right bottom) and filtering tab (red rectangle marked with the number 3). Besides these
two main parts, it has three more generic parts: breadcrumbs (red rectangle marked with number 1 which
shows the current location of the user within the hierarchy of WebGIS views, general description of the
view (red rectangle marked with the number 2), and on top there is a blue navigation bar which currently
shows only the text “GeoIKP” (a link to the homepage). The default map view shows all NBS case studies
available in the OPERANDUM geo-catalogue. Using the filtering tab user can filter NBS case studies by
selecting one or more NBS parameters.

Figure 6: GeoIKP NBS explorer
Figure 7 shows the result of filtering by hazard. The selected value (hazard = Drought) is shown on top of
the filtering tab (red rectangle marked with the number 1). By clicking on certain NBS parameter a
submenu is unfolded with all values for that NBS parameter (red rectangle marked with the number 2).
The user can combine multiple filters. In that case, the result is returned as an intersection of all selected
NBS categories.

The user has also the possibility to learn more about a specific NBS case study. By clicking on a given NBS
visualized in the map, a pop-up window will display information about the NBS.

D7.13 | OPERANDUM GeoIKP deployment and fully functional (user guide)                      14 / 36
GA no.: 776848
Figure 7: GeoIKP NBS explorer - filtered NBS case studies
2.2.4 OAL explorer
Similarly to the NBS explorer, the OAL explorer provides access to information related to the Open Air
Laboratories (OALs) of the OPERANDUM project (Figure 8). The OAL explorer is divided into three main
parts: the OAL menu (red rectangle marked with the number 2), which enables the navigation within the
OAL explorer between different OALs. The information panel (red rectangle marked with the number 3)
shows information about the selected OAL: name, contact person, description, indicators – for now only
land use indicators are available. The top part of the OAL explorer is common to all views. It contains a top
navigation bar, breadcrumbs and the description of the view (red rectangle marked with the number 1).
D7.13 | OPERANDUM GeoIKP deployment and fully functional (user guide) 15 / 36GA no.: 776848
Figure 8: GeoIKP OAL explorer
2.2.5 Map view
The Map view is designed in a very simple and minimalistic manner in order to provide as much space as
possible to show the map, which is where the user is going to perform all actions and queries (Figure 9).
The map view is divided into two main parts: (1) the navigational/tool bar which has a link to the home
page, the menu “Layers” that contains all layers that can be added to the map, and feature info control
that enables retrieving information from Open Geospatial Consortium (OGC) Web Map Services (WMS)
services, (2) the map, that shows the content in a graphical manner and has tools that enable analysis and
visualization of geospatial data.
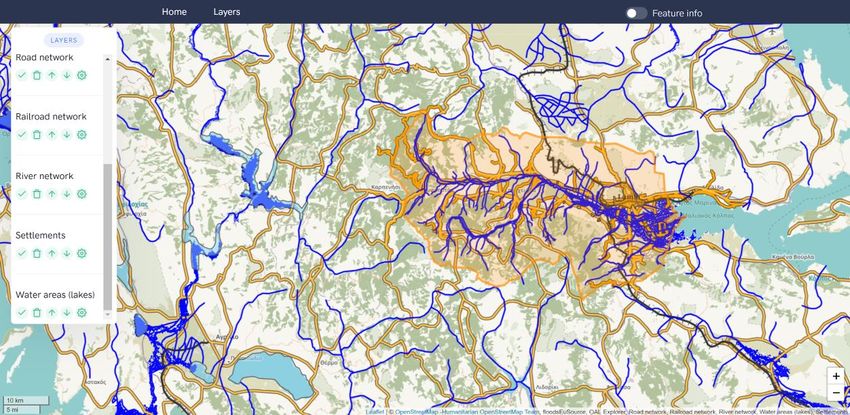
D7.13 | OPERANDUM GeoIKP deployment and fully functional (user guide) 16 / 36GA no.: 776848 Figure 9: GeoIKP Map view Once the layer is added to the map, it is displayed in the layer switcher (red rectangle marked with the number 3) and it is checked in the layers menu (red rectangle marked with the number 2). For each layer displayed in the layer switcher, a number of tools and actions is available: switching on/off (tick icon), remove from layer switcher (recycle bin icon), change the order of layers in the map (arrows up/down), settings (gear wheel icon) – unfolds the slider for changing the opacity of the layer. If a layer has a time dimension a calendar icon is shown (e.g. ERA5 layer in Figure 9). By clicking on this icon the user activates the time slider to move through time within that layer. When the user activates the time slider, it is shown in the lower left corner of the map (red rectangle marked with the number 4). The time slider allows user to select time epoch and/or to press the “play” button to go from the oldest time epoch to the latest. For layers having the time dimension, the oldest time epoch is shown in the default view. Figure 10: GeoIKP Map view - OAL overlaid with other layers In the bottom right corner there are controls to zoom in/out the map view but this can also be done with the mouse wheel. The map has standard map functionalities such as panning (moving on the map), zoom in/out. When retrieving information about the NBS or OAL visualized on the map (after adding the NBS D7.13 | OPERANDUM GeoIKP deployment and fully functional (user guide) 17 / 36
GA no.: 776848

and OAL layers available in the list), more detailed information are shown via the standard WMS
GetFeatureInfo operation. Alternatively, the user can click on a given NBS or OAL to visualize the basic
information along with a link to the NBS/OAL explorer.

Figure 10 shows another example of the GeoIKP map view. In this case, several layers have been added by
the user and overlaid with the OAL boundary (in this specific case OAL Greece). These layers are: road
network (light brown lines), railroad network (black lines), river network (blue lines).

    2.2.6   Policy and permitting path view
The policy and the permitting path view (Figure 11) is primarily designed to assist the users to get a better
overview about the existing policies regulating the NBS in a systematic way. This view is loading
information directly from the data management platform, meaning that all legislative or permitting
documents inserted into the platform are enriched with informative tags.

Figure 11: GeoIKP Policy and permitting path view

    2.2.7   NBS toolkit view
The NBS Toolkit view (Figure 12) is designed to guide users through some analytical functionalities which
should provide some initial assessment of the possible NBS installation in the user’s defined area. Based
on the user’s defined location (point, polygon), the system will automatically compute some basic
indicators e.g. population count, land use types and corresponding areas, critical infrastructure in place
etc. The system will also provide information about present hazards and associated risks. Information

D7.13 | OPERANDUM GeoIKP deployment and fully functional (user guide)                     18 / 36
GA no.: 776848 about the hazards and risk is currently taken from the Risk Data Hub designed and managed by DG Joint Research Centre of the European Commission. Once local data, or data about the hazards and risks for the future horizons considering climate change will become available, those will also be included in the system and used in the analysis. Figure 12: GeoIKP NBS toolkit view (visualization based on Risk Data Hub Graphics) D7.13 | OPERANDUM GeoIKP deployment and fully functional (user guide) 19 / 36
GA no.: 776848

      3 NBS crowdsourcing application
The NBS crowdsourcing application is using an existing solution for crowdsourcing called Ushahidi.
Ushahidi has a possibility to be configured to receive information manually inserted by the users via web
interface or mobile application. There is also the API interface which allows to control the content (reports,
surveys, users) programmatically. The Ushahidi platform is configured to display NBS case studies in either
mapping or tabular view within the platform itself, or there is an API interface to retrieve data in a GeoJSON
data format.

3.1       Basic concepts
A “post” represents a single entry in the platform. In the OPERANDUM case this is an NBS case study. In
other deployments it could represent a hazard/risk report, a violation of freedom report, depending on
the domain that is exploiting Ushahidi. Posts can be collected manually by inserting information via web
interface or mobile application, but can be collected as well via email, SMS, social networks such as Twitter.

A “survey” represents a group of posts. Surveys can be configured based on the user needs. For now, there
is only one group of posts in the NBS crowdsourcing application: “OPERANDUM NBS”. But it can be
configured in a different manner as well. One can configure multiple surveys within the same application.
For instance, custom surveys for NBS related to floods, droughts, etc. or creating surveys to differentiate
rural NBS and urban NBS.

Figure 13: NBS crowdsourcing application – map view of NBS case studies
The web application provides three basic modes to visualize and manage data:

      ●   Map view (Figure 13) is designed to show the reports at the global scale. The mapping window can
          be configured with different background maps, different zoom level and user defined
          preconfigured report filters (e.g. time range, source, location).
      ●   Data view (Figure 14) allows users to view posts in tabular view, perform bulk operations on the
          reports and/or edit single post (edit, send to specific collection, publish, put under review, etc.)

D7.13 | OPERANDUM GeoIKP deployment and fully functional (user guide)                      20 / 36
GA no.: 776848
● Activity view is designed to give a summary of how users are contributing to different surveys over
time. This is particularly useful to monitor user engagement.
Figure 14: NBS crowdsourcing application – data view
3.2 Web application user guide
3.2.1 Adding a new NBS case study
Submitting new post action can be done by both registered or anonymous users (depending on the
configuration of the survey) by clicking the “Plus” sign on the main view (Figure 15). The screen that opens
when clicking on the “Plus” sign guides the user through submission. Obligatory fields are marked with a
red asterisk. The user can add a picture either stored on the device or creating a new one using a camera
(mobile device). The geographic position is automatically detected from the device (GPS or IP address) and
can be corrected manually.
D7.13 | OPERANDUM GeoIKP deployment and fully functional (user guide) 21 / 36GA no.: 776848
Figure 15: NBS crowdsourcing application - adding a new NBS case study
3.2.2 Editing existing NBS case study
In the data view the user can edit posts he/she added. The administrator can edit any post. By clicking edit
in the menu shown on Figure 14, on the right side of the window, a new window opens showing the values
previously inserted in each field (Figure 16). The user can change any of the attributes and if the user has
the role of administrator, he/she can change the status of the post, for instance, from the status “under
review” to “published”. In the data view it is also possible to delete or archive the post, or to put under
review an already published post.
Figure 16: NBS crowdsourcing application – editing existing NBS case study
3.3 Mobile application user guide
The Ushahidi mobile application (Figure 17) can be used to view posts that are publicly available or to add
a new post. The user can add a new NBS case study simply by turning on a mobile application, taking a
photo of the NBS case study and entering additional information. The mobile application can be connected
D7.13 | OPERANDUM GeoIKP deployment and fully functional (user guide) 22 / 36GA no.: 776848
to multiple Ushahidi instances. An Ushahidi instance is added via URL that is used to access it via the web
application. Specifically to add an OPERANDUM Ushahidi instance the user has to enter the following URL:
http://crowd-geoikp.kajoservices.com/.
Once the Ushahidi instance is added, the login screen appears. After the user logs in, she/he can choose
the survey to which she/he is contributing. Depending on the chosen survey, the layout of the screen is
set. The set of attributes is the same on the mobile and the web application since the data are retrieved
via the same API. In case of storing the NBS case study, the data is stored via the same API in both mobile
and web application.
(a) login screen (b) adding NBS (map) (c) adding NBS (photo)
D7.13 | OPERANDUM GeoIKP deployment and fully functional (user guide) 23 / 36GA no.: 776848
(d) adding NBS (hazard) (e) adding NBS (intervention) (f) map view
Figure 17: NBS crowdsourcing mobile application
D7.13 | OPERANDUM GeoIKP deployment and fully functional (user guide) 24 / 36GA no.: 776848
4 Data Management Platform (CKAN)
The OPERANDUM Data Management Platform (DMP) is primarily designed to organize, publish and share
data between the project partners, but also with the outside world. The platform is based on open source
CKAN system. CKAN publishes data in units called datasets. Each dataset contains the metadata and
number of associated resources, which hold the data itself.
4.1 Basic concepts
4.1.1 Datasets and resources
For OPERANDUM CKAN purposes, data are published in units called “datasets”. A dataset is a parcel of
data - for example, it could be the crime statistics for a region, the spending figures for a government
department, or temperature readings from various weather stations. When users search for data, the
search will result in one (or a list of) individual datasets. The resource can be a file (e.g. csv, excel, pdf, xml)
or a link to a resource on the web (link to a file). A dataset can contain any number of resources. For
example, different resources might contain the data for different years.
In OPERANDUM we introduced a quite complex system of the metadata records which will help in
assessing the data adequacy. It is up to the data publisher to decide which metadata are filled in, but we
strongly encourage to fill in all metadata records. The full list of metadata is in the Annex A.
4.1.2 Users, organizations and authorization
OPERANDUM CKAN users are assigned to an organization and each dataset is owned by an organization.
An organization’s administrator can add individual users to it, with different roles depending on the level
of authorization needed. A user in an organization can create a dataset owned by that organization.
The dataset uploaded by a user is initially private, and visible only to other users in the same organization.
The authorized user can publish the dataset to different audiences by defining the sharing policy (public,
project only).
4.1.3 Groups
CKAN groups can be used to create and manage collections of datasets. This could be to catalogue datasets
for a project or team, or on a theme, or as a very simple way to help people find and search published
datasets from certain project or a team.
4.2 User guide
4.2.1 Register login
To create a user ID, one can use the “Register” link at the top of any page. OPERANDUM CKAN will ask for
the following (Figure 18):
● Username – a username can contain only letters, numbers, - and _ characters. For example,
“operandumuser” or “operandum_user123”.
● Full name – to be displayed on the user profile
● E-mail address – this will not be visible to other users
D7.13 | OPERANDUM GeoIKP deployment and fully functional (user guide) 25 / 36GA no.: 776848
● Password – the same password has to be entered in both boxes (password and confirm)
Figure 18: CKAN – Register for an account
To login, the user has to fill in the username and password (Figure 19).
Figure 19: CKAN – Login window
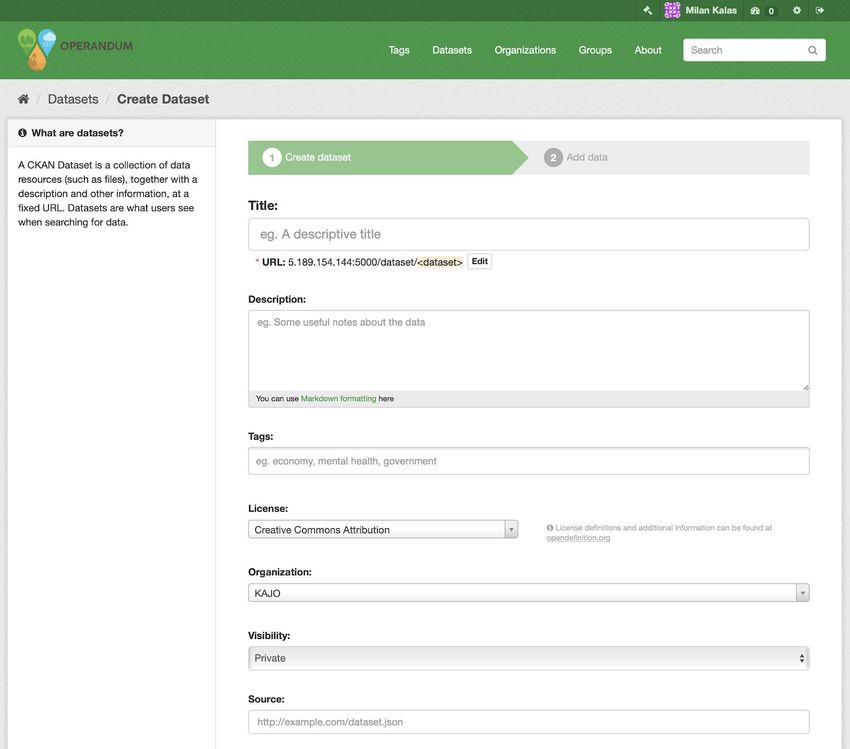
4.2.2 Adding a new dataset
A new dataset can be inserted by either clicking the Datasets link at the top of any page or under the
organization page (in case of registered user) and selecting “Add Dataset” button (above the search box).
D7.13 | OPERANDUM GeoIKP deployment and fully functional (user guide) 26 / 36GA no.: 776848
1. OPERANDUM CKAN will ask for the following information about data. (The full list of metadata is
in Annex A) (Figure 20):
a. Title – this will be unique across CKAN, so it should be brief but specific. E.g. “UK
population density by region” is better than “Population figures”.
b. Description – User can add a longer description of the dataset here, including information
such as where the data is from and any information that people will need to know when
using the data.
c. Tags – here the user may add tags that will help people find the data and link it with other
related data. Examples could be “population”, “crime”, “East Anglia”. Hit the key
between tags. If the user enters a tag incorrectly, it can be deleted by clicking the delete
button (x sign right next to the tag) to remove it before saving the dataset.
d. License – it is important to include license information so that people know how they can
use the data. This field should be a drop-down box. If the user needs to use a license not
on the list, he/she can contact the administrator.
e. Organization - If the user is a member of any organization, this drop-down will enable to
choose which one should own the dataset. The user needs to make sure the default
chosen is the correct one before proceeding. (Probably most users will be in only one
organization. If this is the case, OPERANDUM CKAN will set the user’s organization by
default and the user does not need to do anything.)
D7.13 | OPERANDUM GeoIKP deployment and fully functional (user guide) 27 / 36GA no.: 776848
Figure 20: CKAN – add a new dataset (insert metadata)
2. After filling the information on this page, the user can select “Next: Add Data” button, or
alternatively select “Cancel” to discard the information filled in.
3. OPERANDUM CKAN will display the “Add data” screen (Figure 21). This is where the user will add
one or more “resources” which contain the data for this dataset. The user has to choose a file or
link for a data resource and select the appropriate choice at the top of the screen:
D7.13 | OPERANDUM GeoIKP deployment and fully functional (user guide) 28 / 36GA no.: 776848
Figure 21: CKAN – add a new dataset (add data)
a. If the user is giving OPERANDUM CKAN a link to the data, like
http://example.com/mydata.csv, then he/she needs to select “Link to a file” or “Link to an
API”. If the user doesn’t know what an API is, it can be skipped to select “Link to a file”.
b. If the data to be added to OPERANDUM CKAN is in a file on the computer, “Upload a file”
should be selected. OPERANDUM CKAN will show a file browser to select the file.
4. Add the other information on the page. OPERANDUM CKAN does not require this information, but
it is good practice to add it:
a. Name – a name for this resource, e.g. “Population density 2011, CSV”. Different resources
in the dataset should have different names. The name of the resource is part of the URL
and URL should be unique. In case that user uploads a resource with the same name which
already exists in the database, CKAN is automatically adding a unique id to the name of
the resource's URL (the resource name remains unchanged).
b. Description – a short description of the resource.
c. Format – the file format of the resource, e.g. CSV (comma-separated values), XLS, JSON,
PDF, etc.
5. If the user has more resources (files or links) to add to the dataset, he/she can select the “Save &
add another” button.
D7.13 | OPERANDUM GeoIKP deployment and fully functional (user guide) 29 / 36GA no.: 776848
6. OPERANDUM CKAN displays the “Additional data” screen:
a. Visibility – a Public dataset is public and can be seen by any user of the site. A Private
dataset can only be seen by members of the organization owning the dataset and will not
show up in searches by other users.
b. Author – The name of the person or organization responsible for producing the data.
c. Author e-mail – an e-mail address for the author, to which queries about the data should
be sent.
d. Maintainer / maintainer e-mail – If necessary, details for a second person responsible for
the data.
e. Custom fields – If the user wants the dataset to have another field, he/she can add the
field name and value here. E.g. “Year of publication”. Note that if there is an extra field
that is needed for a large number of datasets, the administrator can be contacted about
changing the default schema and dataset forms.
7. At the end the user needs to select the ‘Finish’ button in order to save all entered information.
OPERANDUM CKAN creates the dataset and shows the result.
4.2.3 Editing existing dataset
The user can edit the dataset he/she has created, or any dataset owned by an organization that he/she is
a member of (Figure 22). In order to edit existing datasets, one has to do the following:
1. Go to the dataset’s page. The user can find it by entering the title in the search box on any page.
2. Select the “Manage” button, which is above the dataset title.
3. OPERANDUM CKAN displays the “Edit dataset” screen. The user can edit any of the fields (Title,
Description, Dataset, etc), change the visibility (Private/Public), and add or delete tags or custom
fields. For details of these fields, see Annex A.
4. When the user has finished, he/she can select the “Update dataset” button to save changes.
D7.13 | OPERANDUM GeoIKP deployment and fully functional (user guide) 30 / 36GA no.: 776848
Figure 22: CKAN – edit existing dataset
4.2.4 Groups
Each dataset can be linked to one or more specific groups. A good example is when the dataset contains
data about Atmosphere for OAL Greece and thus the dataset should be assigned to those groups. If the
group does not exist, it can be created by selecting the “Add group” button (Figure 23).
D7.13 | OPERANDUM GeoIKP deployment and fully functional (user guide) 31 / 36GA no.: 776848
Figure 23: CKAN groups
4.2.5 Creating an organization
CKAN is configured so that each dataset is owned by one organization. Each organization includes certain
users, who can modify its datasets and create new ones. Different levels of access privileges within an
organization can be given to users, e.g. some users might be able to edit datasets but not create new ones,
or to create datasets but not publish them. Each organization has a home page, where users can find some
information about the organization and search within its datasets. This allows different data publishing
departments, bodies, etc to control their own publishing policies.
To create an organization (Figure 24):
1. Select the “Organizations” link at the top of any page.
2. Select the “Add Organization” button below the search box.
3. OPERANDUM CKAN displays the “Create an Organization” page.
4. Enter a name for the organization, and, optionally, a description and image URL for the
organization’s home page.
5. Select the “Create Organization” button. CKAN creates the organization and displays its home
page. Initially, of course, the organization has no datasets.
D7.13 | OPERANDUM GeoIKP deployment and fully functional (user guide) 32 / 36GA no.: 776848
Figure 24: CKAN – create an organization
4.2.6 Finding data
To find datasets in OPERANDUM CKAN, one can type any combination of search words (e.g. “health”,
“transport”, etc) in the search box on any page. OPERANDUM CKAN displays the first page of results for
the search (Figure 25). The user can:
● View more pages of results,
● Repeat the search, altering some terms,
● Restrict the search to datasets with particular tags, data formats, etc using the filters in the left-
hand column.
If there is a large number of results, the filters can be very helpful, since they can be combined, by
selectively adding and removing them, in order to modify and repeat the search with existing filters still in
place.
D7.13 | OPERANDUM GeoIKP deployment and fully functional (user guide) 33 / 36GA no.: 776848 Figure 25: CKAN – search for a dataset D7.13 | OPERANDUM GeoIKP deployment and fully functional (user guide) 34 / 36
GA no.: 776848

Annex A. OPERANDUM DMP – List of metadata elements
CKAN metadata

   ●   Title – unique title of the dataset
   ●   Description – longer description of the dataset
   ●   Tags – tags help people to find data and link it to other related data
   ●   License – license information provides the information on how to use the data
   ●   Organization – populated automatically if the user is a member of one organization. In case user
       is a member of multiple organization he/she can select the organization.
   ●   Visibility – visibility of dataset. By default it is private, but it can be set to public
   ●   Source – in case the dataset is acquired from a certain web address here the URL can be provided
       to the dataset
   ●   Version – datasets can be versioned (e.g. periodical observation of level of a river)
   ●   Author – the person who created the dataset
   ●   Author Email – author’s email
   ●   Maintainer – the user who added a dataset to CKAN
   ●   Maintainer Email – maintainer’s email

OPERANDUM metadata – used for classification of datasets

   ●   Main data type – possible values: vector, raster, other
   ●   Vector data type – in case previously selected vector data type, here we refine the vector data
       type. Possible values: NBS, OAL, Gauges, Administrative boundaries
   ●   Admin boundaries type – in case previously selected administrative boundaries. Possible values:
       Continents, NUTS0, NUTS1, NUTS2, NUTS3, LAU
   ●   Raster data type – in case previously selected raster data type. Possible values: Climate
       projections, Re-analysis, satellite observations, variable domain, spatial coverage, temporal
       coverage
   ●   Climate projections type – in case previously selected climate projections raster data type. Possible
       values: seasonal forecasts, Sectional climate indices
   ●   Variable domain type – Possible values: atmosphere (composition), atmosphere (surface),
       atmosphere (upper air), Land (biosphere), Land (cryosphere), Land (hydrology), Ocean (physics)
   ●   Spatial coverage type – Possible values: Europe, Global, Regional, Local
   ●   Temporal coverage type – Possible values: Future, Present, Past
   ●   Other data type – Documents, building diaries, permitting path

OPERANDUM metrics – used for assessment of data adequacy

   ●   Horizontal spatial coverage – horizontal coverage extent of the dataset expressed in square
       kilometres
   ●   Vertical spatial coverage – vertical coverage extent of the dataset expressed in meters
   ●   Temporal coverage – temporal coverage extent of the dataset expressed in days
   ●   Horizontal resolution – averaged horizontal resolution or equivalent value for the given scale of
       the dataset
   ●   Vertical resolution – average vertical sampling and description of specific vertical sampling schema
       of the dataset (100 words max)
   ●   Temporal resolution – temporal sampling interval of the dataset
   ●   Thematic accuracy – thematic accuracy expressed in the percentage and the description of error
       concept for the dataset

D7.13 | OPERANDUM GeoIKP deployment and fully functional (user guide)                    35 / 36
GA no.: 776848
● Temporal validity – Max elapsed time between last input data records update and NBS creation
date
D7.13 | OPERANDUM GeoIKP deployment and fully functional (user guide) 36 / 36This project has received funding from the European Union’s Horizon 2020 research and innovation programme under grant agreement No 776848
You can also read