SQL Developer User Manual - Version 2.2.0 Copyright Jan Borchers 2000-2006 All rights reserved.
←
→
Page content transcription
If your browser does not render page correctly, please read the page content below
SQL Developer
User Manual

Version 2.2.0

Copyright © Jan Borchers 2000-2006
All rights reserved.
SQL Developer User Manual

Table Of Contents
1 Preface .................................................................................................................................4
2 Getting Started ....................................................................................................................5
  2.1 License Registration.......................................................................................................5
  2.2 Configuring Database Drivers ........................................................................................5
  2.3 Establishing Connections ...............................................................................................6
3 Desktop ................................................................................................................................7
  3.1 Main Menu......................................................................................................................8
     3.1.1 File...........................................................................................................................8
     3.1.2 Edit ..........................................................................................................................9
     3.1.3 Extras ....................................................................................................................10
     3.1.4 Window..................................................................................................................10
     3.1.5 Help .......................................................................................................................10
  3.2 Tool Bar........................................................................................................................11
  3.3 MDI Window Area ........................................................................................................11
  3.4 Output Window.............................................................................................................11
4 Database Navigator...........................................................................................................12
  4.1 Objects .........................................................................................................................13
  4.2 Commands ...................................................................................................................14
     4.2.1 Quick Browse ........................................................................................................15
     4.2.2 Extended Quick Browse ........................................................................................15
5 Connection Dialog.............................................................................................................16
  5.1 Basic Connector ...........................................................................................................17
  5.2 Port Scanner ................................................................................................................17
  5.3 Oracle Connector .........................................................................................................18
  5.4 Microsoft SQL Server Connector .................................................................................18
  5.5 IBM DB2 Connector .....................................................................................................19
  5.6 Firebird Connector........................................................................................................19
  5.7 ODBC Connector .........................................................................................................19
6 SQL Editors........................................................................................................................20
  6.1 Statement Editor...........................................................................................................21
     6.1.1 BLOB Viewer .........................................................................................................21
     6.1.2 CLOB Viewer.........................................................................................................22
     6.1.3 Commands (Editor) ...............................................................................................22
     6.1.4 Commands (Result Set) ........................................................................................23
  6.2 Script Editor..................................................................................................................24
     6.2.1 Commands ............................................................................................................24
  6.3 Stored Program Editor..................................................................................................26
     6.3.1 Commands ............................................................................................................26
7 Bookmarks.........................................................................................................................27
     7.1.1 Commands ............................................................................................................27
8 Diagram Editor...................................................................................................................29
  8.1 Components .................................................................................................................29
     8.1.1 Object list...............................................................................................................29
     8.1.2 Overview................................................................................................................29
     8.1.3 Diagram view.........................................................................................................29
  8.2 Commands ...................................................................................................................30
     8.2.1 Import objects ........................................................................................................31
9 Database Info.....................................................................................................................32
10 Settings ............................................................................................................................33
  10.1 General.......................................................................................................................33
     10.1.1 Connection ..........................................................................................................33
     10.1.2 Bookmarks...........................................................................................................33

                                                                                                                                     2/44
SQL Developer User Manual

     10.1.3 Misc .....................................................................................................................33
  10.2 Display........................................................................................................................33
     10.2.1 Desktop ...............................................................................................................33
  10.3 Appearance ................................................................................................................34
     10.3.1 Look and Feel......................................................................................................34
     10.3.2 Preview................................................................................................................34
  10.4 Editor ..........................................................................................................................34
     10.4.1 Font .....................................................................................................................34
     10.4.2 Caret....................................................................................................................34
     10.4.3 Options ................................................................................................................34
     10.4.4 Display.................................................................................................................34
  10.5 Drivers ........................................................................................................................35
  10.6 Plugins........................................................................................................................35
11 Tip of the day ...................................................................................................................36
12 Extensions .......................................................................................................................37
  12.1 Standard extensions...................................................................................................37
     12.1.1 Catalog/Schema Comparison..............................................................................37
     12.1.2 Dissolve dependencies........................................................................................38
  12.2 Microsoft SQL Server extensions ...............................................................................39
     12.2.1 Show Plan ...........................................................................................................39
     12.2.2 Processes............................................................................................................39
     12.2.3 Monitor.................................................................................................................40
     12.2.4 Remote command shell.......................................................................................40
  12.3 MySQL extensions .....................................................................................................41
     12.3.1 Processes............................................................................................................41
  12.4 Oracle extensions.......................................................................................................42
     12.4.1 Explain Plan.........................................................................................................42
     12.4.2 Jobs .....................................................................................................................42
     12.4.3 Oracle Text ..........................................................................................................43
     12.4.4 Recycle Bin..........................................................................................................43
     12.4.5 Sessions ..............................................................................................................44
     12.4.6 Monitor.................................................................................................................44

                                                                                                                                   3/44
SQL Developer User Manual

1 Preface
SQL Developer is a powerful SQL client for querying and administration of databases. The
application has been completely implemented in Java and therefore runs on any platform
supporting a Java Runtime Environment (Version 1.4 or higher).
In principal SQL Developer supports any database providing a JDBC driver. With the JDBC-
ODBC-bridge driver from Sun you are can also connect to data sources via the ODBC driver.

SQL Developer homepage
http://sqldeveloper.solyp.com/

Windows und Windows NT are trademarks or registered trademarks of Microsoft Corporation. Sun, Sun Microsystems, Java,
JDK and Solaris are trademarks or registered trademarks of Sun Microsystems, Inc. All other trademarks or registered
trademarks are property of their respective owners.

                                                                                                               4/44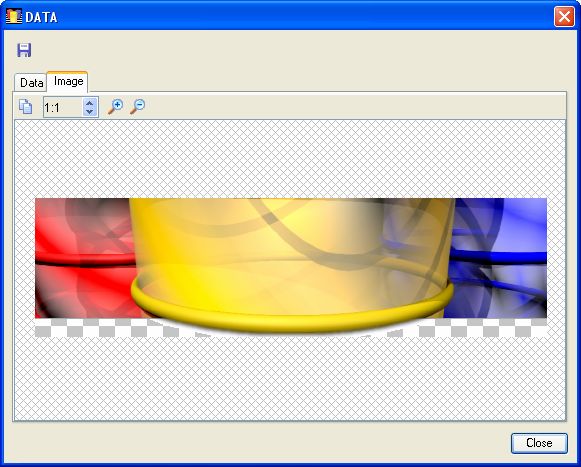
SQL Developer User Manual

2 Getting Started
This chapter describes how to get started with SQL Developer and what you should do
before the first use.

2.1 License Registration
Right after having started SQL Developer the first time you
should register your license in the license dialog. Only with a
registered license you can use all functions of SQL Developer.
First save your SQL Developer license to your computer. To
avoid unauthorized access to your license you should copy the
license to your personal user directory.
Select the License item in the Help menu to open the
registration dialog.
Copy your license key and paste it into the License key field in
the lower half of the dialog. After this confirm with OK.
SQL Developer is registered now and all functions are
available.

2.2 Configuring Database Drivers
To access a database SQL Developer must have a suitable JDBC driver installed. Usually
JDBC drivers for a database can be downloaded from the internet site of the database
vendor for free. In most cases the driver files have the extender JAR (Java Archive) or ZIP
(mainly older drivers).
Select the Settings item from the Extras menu.
Click on the Drivers tab.
This tab shows all drivers currently available.
With the Add button you can open the file
selection dialog for driver files. Select the
previously downloaded driver and confirm with
OK.
Now the driver is shown in the tree and can be
used.

                                                                                      5/44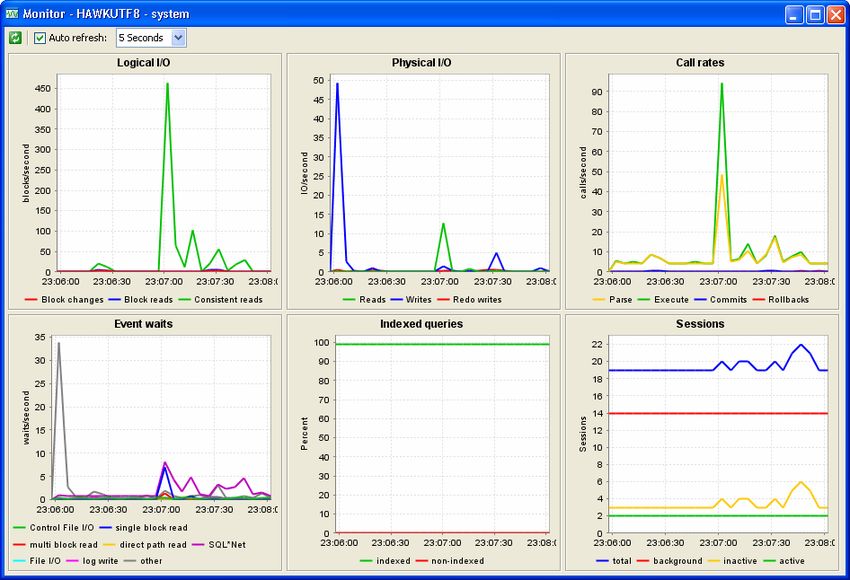
SQL Developer User Manual

2.3 Establishing Connections
Select the Open connection item from the File menu. The connection dialog shows all
available connectors arranged in tabs.
The Basic connector provides the most flexible
way to establish a database connection. At
least you need to specify a driver (class) name
and a URL. Details on both parameters can be
found in the vendor's driver manual.
All other tabs contain specialized connectors for
various databases. Use the Info button to check
if the driver required for a specialized connector
is already available. You can edit the Driver
Settings directly from the connection dialog to
add missing drivers.
Click the OK button to confirm the settings for
the current tab and to establish a new database
connection.

                                                                               6/44
SQL Developer User Manual
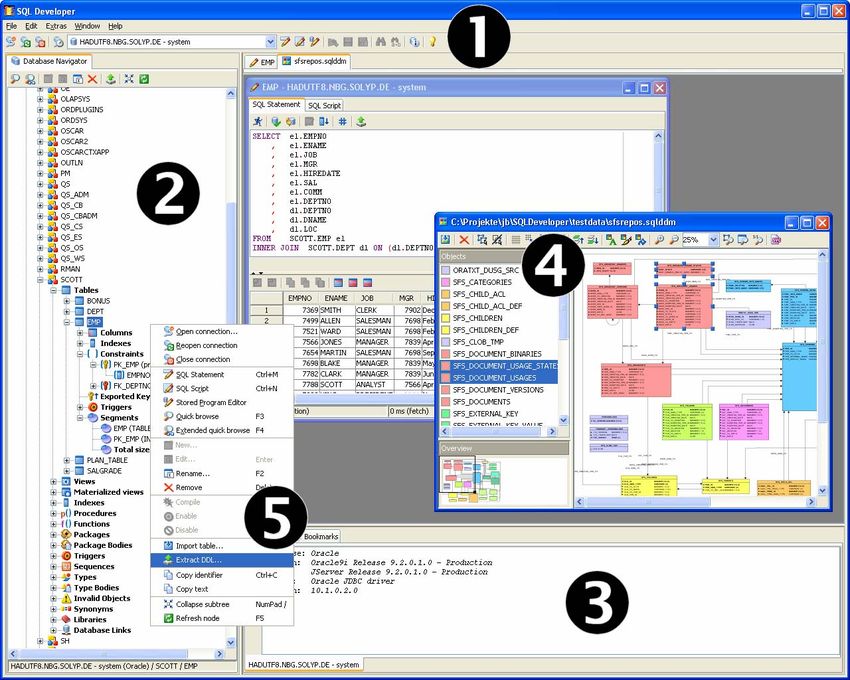
3 Desktop
The desktop of the application consists of the following components:
1. Main menu and tool bar
2. Database Navigator
3. Output window and Bookmarks
4. MDI (Multiple Document Interface) window area
5. Context menus
Some components (Database Navigator, output window and bookmarks) can be individually
positioned on the desktop by the user. Click on the tab of the component to move and drag
the component to its new target position.
7/44SQL Developer User Manual
3.1 Main Menu
The main menu is located at the upper border of the application window. The submenus and
menu items of the main menu are described below.
3.1.1 File
Open connection... Opens the connection dialog.
Reopen connection Closes the currently selected connection and opens it
again. With this function you can reactivate aborted
connections (e.g. aborted by time out).
Close connection Closes the currently selected connection.
Recently opened Shows a list of the most recently opened connections.
connections
Open... Reads a file into the active editor window. This function
gets available after an editor window has been opened
for a connection.
Save Writes the content of the active editor window to a file.
This function is available after an editor window has
been titled with a filename (after an Open or Save as
operation).
Save as... Writes the content of the active editor window to a file
with a new filename. This function gets available after an
editor window has been opened for a connection.
New diagram Opens a new Diagram Editor.
Open diagram... Opens a diagram file.
Save diagram Writes the current diagram to a file. This function is
available after an editor window has been titled with a
filename (after an Open diagram or Save diagram as
operation).
Save diagram as... Writes the current diagram to a file with a new filename.
Print... Prints the content of the active window.
Exit Exits the application. All open connections are closed
automatically.
8/44SQL Developer User Manual
3.1.2 Edit
SQL Statement Opens a new editor window for single SQL statements
on the current connection.
SQL Script Opens a new editor window for SQL scripts on the
current connection.
Stored Program Editor Opens a new editor window for stored procedures on the
current connection.
Find... Opens the Find dialog.
Replace... Opens the Replace dialog.
Go to line... Jumps to the specified line in the active editor window.
Toggle comment Comments or uncomments the selected lines of an SQL
statement.
Convert to upper case Converts the selected text range to upper case
characters.
Example: foo_bar » FOO_BAR
Convert to lower case Converts the selected text range to lower case
characters.
Example: FOO_BAR » foo_bar
Convert to mixed case Converts SQL identifier within the selected text range to
identifier mixed case identifiers.
Example: FOO_BAR » fooBar
Convert to upper case Converts mixed case identifier within the selected text
identifier range to SQL identifiers.
Example: fooBar » FOO_BAR
Enclose in quotes Encloses the complete or the selected text range in
quotes.
Remove enclosing quotes Removes the quotes from the complete or the selected
text range.
Char map Opens the char map for input of special Unicode
characters.
Encoding Displays and allows the change of the text encoding for
the active editor window. The encoding is determined
automatically when opening a file. The selected
encoding is used for all save operations.
9/44SQL Developer User Manual
3.1.3 Extras
Database info... Opens the Database info dialog.
Catalog/Schema Opens the standard extension for Catalog/Schema
Comparison... Comparison.
Dissolve dependencies... Opens the standard extension for Dissolving
dependencies.
At this position SQL Developer provides access to all
vendor specific extensions.
Settings... Opens the Settings dialog.
3.1.4 Window
Cascade Arranges all windows (excluding the navigator and
output window) on the desktop by overlapping them.
Tile vertical Arranges all windows (excluding the navigator and
output window) on the desktop as tiles in a vertical
orientation.
Tile horizontal Arranges all windows (excluding the navigator and
output window) on the desktop as tiles in a horizontal
orientation.
Close all Closes all windows (excluding the navigator and output
window).
At this position you find a list of all open windows.
3.1.5 Help
Tip of the day... Shows the Tip of the day.
License... Opens the license dialog to register SQL Developer.
Search for updates Connects to the Internet and searches for updates of
SQL Developer.
SQL Developer Homepage Opens a web browser and navigates to the SQL
Developer homepage.
About SQL Developer... Shows general information about SQL Developer.
10/44SQL Developer User Manual
3.2 Tool Bar
The tool bar is located below the main menu and provides access to a number of important
functions.
Within the tool bar you find a dropdown list showing all open database connections. You can
switch to another connection than the current simply by selecting an entry from the list. The
list automatically switches if a connection is selected indirectly by the database navigator or
an editor window. Opening a new editor window always connects to the database shown as
the current connection in the list.
3.3 MDI Window Area
All SQL editors and non-modal windows are displayed in the MDI (Multiple Document
Interface) window area.
The window area itself is not movable within the desktop but you can arrange other movable
components (Database Navigator, output window etc.) around.
The window bar is shown automatically at the upper border when a window has been
opened. Each new window is displayed in the bar in its own tab. Click on the tabs to switch
between the windows. The window bar display (shown or hidden) can be configured in the
settings dialog.
3.4 Output Window
The output window provides a tab for each database connection. If a connection produces
output (e.g. when executing a SQL script or if an error occurs) it is shown in the output
window tab for that connection.
The component can be moved within the desktop by using the tab on the upper border.
Use the tool bar or the context menu (right mouse button) to clear the protocol or to save it to
a file.
11/44SQL Developer User Manual
4 Database Navigator
The database navigator shows all connected databases in
a tree view and provides access to single database objects
like tables, views and users. Grouping tree nodes are
rendered bold (Tables, Views etc.). Which database
objects are available in detail depends on the connected
database.
The component can be moved within the desktop by using
the tab on the upper border.
Use the tool bar of the window to call often used functions
for the database navigator. You can access the complete
set of functions via the context menu (right mouse button).
At the bottom border a status bar shows the currently
selected path in the tree.
12/44SQL Developer User Manual
4.1 Objects
The following objects are a part of the database objects supported by SQL Developer. The
actual number of objects depends on the connected database.
Databases (Root)
Schema
Catalog
User
User group
Table
Temporary table
View
Materialized view / Snapshot
Table / View column
Table column with primary key
Table column with foreign key
Table column with primary and foreign key
Index
Index column
Function
Procedure
Synonym
Constraint
Primary key constraint
Foreign key constraint
Unique key constraint
Check constraint
Trigger
Sequence / Generator
Library
Tablespace
Package / Module
Type
Role
Invalid object
Privilege
Dependencies
13/44SQL Developer User Manual
4.2 Commands
Open connection... Opens the connection dialog.
Reopen connection Closes the currently selected connection and opens it
again. With this function you can reactivate aborted
connections (e.g. aborted by time out).
Close connection Closes the currently selected connection.
SQL Statement Opens a new editor window for single SQL statements
on the current connection.
SQL Script Opens a new editor window for SQL scripts on the
current connection.
Stored Program Editor Opens a new editor window for stored procedures on the
current connection.
Quick browse Opens a new editor window for single SQL statements
on the current connection and presets the input area
with a SELECT statement for the selected table or view.
Extended quick browse Opens a dialog for the fast creation of joined queries on
tables.
New... Creates a new database object as a child of the selected
object type.
Edit... Modifies the selected database object.
Rename... Modifies the name of the selected database object.
Remove Removes the selected database objects.
At this position SQL Developer provides access to
database specific extensions (where applicable).
Extract DDL... Creates a DDL script for all selected database objects.
Copy identifier Copies the physical identifiers of the selected database
objects to the clipboard.
Copy text Copies the identifiers of the selected database objects
(as shown in the database navigator) to the clipboard.
Collapse subtree Collapses the subtree of the selected database object on
all levels.
Refresh node Refreshes all children of the selected tree node.
14/44SQL Developer User Manual
4.2.1 Quick Browse
This function is used for the quick creation of simple SQL queries.
Select a table or a view from the database navigator and perform the function to open a new
editor window for single SQL statements. The function initializes the text input area with a
SELECT statement for the selected relation. You can execute the query as usual..
4.2.2 Extended Quick Browse
The extended quick browse function provides a simple way to create joined queries on
tables.
Select a table from the database navigator and perform the function to open the query
builder dialog.
The tree view on the left side shows the foreign key relations between the tables. The root
node represents the initially selected table. The children of a node are those tables joined to
the parent node by foreign key relations.
Subsidiary table entries are displayed with their table name followed by the foreign key name
joining the table with the parent node. A symbol with a yellow key indicates that a foreign key
is defined by the parent node, referencing the primary key of the child node (parent:child =
n:1). A red key indicates that a foreign key is defined by the child node table and references
the primary key of the parent node (parent:child = 1:n).
All checked tables are included in the SELECT clause of the statement to create. You can
determine the table columns to be included on the right side. By default all columns of a
checked table are selected.
When you confirm with OK, a new editor window for SQL statements is opened and the text
input area is initialized with the generated SELECT statement.
15/44SQL Developer User Manual
5 Connection Dialog
The connection dialog is accessible through the
File menu and the Open connection command.
For each new connection SQL Developer
creates a profile that is displayed in the
dropdown list in the upper part of the dialog.
When the user selects a stored profile the
connector described by the profile gets selected
and its fields are preset.
To create a new connection select a suitable
connector first. All available connectors are
displayed as tabs. Except for the Basic
connector the required drivers for a connector
are predefined.
Press the Info button to show the information about the driver (name, driver class, vendor,
URL and status). If a required driver for the selected connector is not available this is shown
by the status field.
You can add missing drivers directly from the connection dialog. Use the Driver Settings
button to add a new driver. The opening dialog shows the Drivers tab of the Settings dialog.
After you have specified the parameters for the selected connector you can create a new
connection by pressing the OK button.
16/44SQL Developer User Manual
5.1 Basic Connector
The Basic connector is a universal connector creating connections with any JDBC driver. All
other connectors are specialized connectors for certain databases.
Note: If a specialized connector exists for your
database you should prefer that connector because its
configuration will be much easier.
To create a connection with the Basic connector you
have to specify at least a driver and a URL. You can
get both parameters from the driver documentation of
the vendor. Both fields are editable dropdown lists
providing preconfigured values you can use for various
popular databases.
The parameters for user and password are required for the most databases also. For this
reason they are displayed as two additional fields.
The name field is optional and enables you to enter a profile name manually. If the field is left
empty SQL Developer automatically generates a name for the connection.
In the arguments table you can define additional
connection parameters as name/value pairs. The table
expands automatically when entering a name in the
first column. To remove a name/value pair just delete
the name in the first column of the desired entry.
Some drivers provide information about their supported
arguments. Press the Supported arguments button to
show them in the Arguments dialog and to copy
selected arguments to the table.
5.2 Port Scanner
With the Port Scanner you can determine if a Server is accessible
through one or more ports.
Use the Scanner e.g. if you are not sure if the Oracle database
server you want to connect to communicates on port 1521 or
2483.
Open the scanner dialog with the Port Scanner button. Type the
name of the IP address of the database server in the Host field.
Specify the port range to scan with the Start Port and the End Port
fields. For most of the connectors the current configuration (host
name/address and port) is used to preset the fields when the
dialog opens. A port can be specified with its Number or
alternatively with an Alias. In the alias list you find a collection of
ports of major databases.
Press the Scan button to start the scan. The scanner tests the
complete port range and shows for each port if its accessibility state and the response time.
17/44SQL Developer User Manual
5.3 Oracle Connector
The Oracle connector supports connecting the server by specifying Host (name or IP-
address), Port and SID or a Net Service definition from a TNS Names file.
To use Net Service definitions you must specify a TNS
Names file providing the definitions. Usually the file is
installed together with an Oracle server or Oracle client
in a subfolder of the Oracle Home directory in the path
/network/admin.
In any case you must specify the user (name of the
Oracle schema) and the password. With the field
Connect as you can choose if the user acts as a
Standard user, as Operator (SYSOPER) or as DBA (SYSDBA). The last two options are only
applicable for the SYS user.
The name field is optional and enables you to enter a profile name manually. If the field is left
empty SQL Developer automatically generates a name for the connection.
For the driver type to be used you can choose between the Thin driver (recommended) and
the OCI driver. The Thin driver does not require any special client installation, the OCI driver
is only available if you have an Oracle client installed.
5.4 Microsoft SQL Server Connector
The Microsoft SQL Server connector uses the JDBC-
ODBC-Bridge driver. To establish connections you
need the Microsoft SQL Server ODBC driver to be
installed on your computer.
With the fields Host (name or IP-address), Port
(default port is 1433) and Database (name of the
catalog) you define the connection parameters.
The connector supports two different Drivers: The
ODBC/JDBC bridge driver and the platform independent jTDS driver.
The fields User and Password define the authentication parameters.
18/44SQL Developer User Manual
5.5 IBM DB2 Connector
Use the fields Database, Host (name or IP-address) and Port to address the server you
want to create a connection with.
The connector for IBM DB2 databases uses two different
driver types to create connections: The network driver
and the application driver. Press the Info button in the
connection dialog to test if the required is available.
The fields User and Password define the authentication
parameters.
5.6 Firebird Connector
The Firebird connector has been developed for Firebird
Version 1.5. With the fields Host (name or IP-address)
and Port you address the server you want to establish a
connection to. Use the Database field to specify the
physical name of the database to open or an alias name
known by the server.
The fields User and Password define the authentication
parameters.
5.7 ODBC Connector
The ODBC connector has been invented for Windows systems to works with databases
using the ODBC interface (Open Database Connectivity).
Windows manages its data source names (DSN) in a text file named odbc.ini in the Windows
directory. These names are used to create ODBC
connections by name. Before the first use of this
connector specify the path of that file for your system in
the ODBC.ini field. SQL Developer automatically extracts
all registered data source names and shows them in the
DSN field.
To create a connection select the desired entry in the
DSN field. Optionally you can also input a data source
name manually.
The fields User and Password define the authentication parameters.
19/44SQL Developer User Manual
6 SQL Editors
SQL Developer supports three kinds of SQL editors. Statement, script and procedure editors.
Each editor window has its own connection, its own transaction and can perform Commit and
Rollback commands.
An editor window always uses the current adapter shown in the dropdown list in the tool bar
to create its connection. After opening the editor you can use the Open menu item to load the
content of a file into the editor. The filename is automatically used for the editor's window
title.
There are two ways to save the content of an editor window:
• If the content has been loaded from a file or has already been saved to a file, use the
Save command from the File menu.
• Select the Save as command from the File menu if you have created a new content
from the scratch or if you want to store the content with a new filename.
Above the input area of each editor window you find a tool bar providing all commands for
that editor. You can also use the context menu (right mouse button) to access these
commands.
Note: When closing an editor window a rollback is performed automatically on the
connection. All uncommitted changes will be discarded.
Each editor supports an undo and a redo function. The undo function can be accessed by
pressing Ctrl + Z, press Ctrl + Y to redo text changes.
20/44SQL Developer User Manual
6.1 Statement Editor
The Statement Editor is used to execute a single statement. The content of the editor window
is sent to the database at once.
The result is visualized as a table in the lower part of the editor window. Each table cell
displays a single value from the result set. Because of their size, LOBs (Large OBjects) are
displayed partially or as a link. CLOBs (Character LOBs) and BLOBs (Binary LOBs) are
shown with their type name and size only. To view the content of such an object select its
table cell an click the arrow symbol shown within the cell.
6.1.1 BLOB Viewer
The BLOB viewer displays any kind of binary data in a combined hexadecimal and ASCII
view. Use the Save button from the tool bar to save the BLOB to your local computer.
If the current BLOB is a picture, you can view it by changing to the Image tab. The supported
formats are JPEG, GIF and PNG. For BLOBs with different format no picture is shown.
BLOB viewer with hexadecimal and image view
21/44SQL Developer User Manual
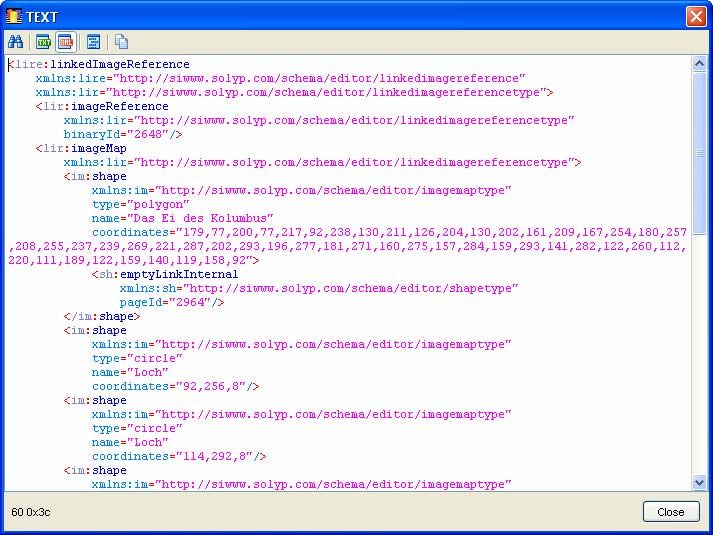
6.1.2 CLOB Viewer
The CLOB viewer displays textual content and supports unformatted text and XML. If the
current text is XML encoded, the viewer automatically changes to the XML view mode with
syntax highlighting. You can format a XML content for easier reading by using the function
from the tool bar.
CLOB viewer with XML syntax highlighting
6.1.3 Commands (Editor)
Execute Executes the statement.
Commit Sends a COMMIT command to the database and
confirms all pending changes.
Rollback Sends a ROLLBACK command to the database and
discards all pending changes.
Fetch all Usually SQL Developer reads the result set of a query in
blocks on demand. If this button is pressed, all rows
returned by the executed statement are fetched at once.
COUNT(*) Retrieves the number of rows the current statement
would affect.
Export data Exports the data returned by a SELECT statements to
the clipboard or to a file.
Copy bookmark Creates a new bookmark from the current statement and
copies it to the clipboard.
22/44SQL Developer User Manual
6.1.4 Commands (Result Set)
Copy Copies the selected cells of the table to the clipboard.
Copy column names Copies the names of the selected table columns to the
clipboard.
Copy WHERE clause Creates a WHERE clause from the selected cells of the
table and copies it to the clipboard.
Adjust column width Adjusts all table columns to match the preferred width of
based on header the cells in the table header.
Adjust column width Adjusts all table columns to match the preferred width of
based on header/data the cells in the table header and body.
Adjust column width Adjusts all table columns to match the preferred width of
based on data the cells in the table body.
23/44SQL Developer User Manual
6.2 Script Editor
The Script Editor is used to execute scripts consisting of one or more statements. When
executing a script the content of the editor window is being parsed and sent to the database
as single statements. The result of each statement is shown in the output window.
You can use three different symbols to separate statements in a script:
• Using the keyword GO. Place the keyword at the beginning of a new line.
• The semicolon (;). The terminator must be placed after a statement at the end of a
line. Note: The processing of this symbol must be activated in the tool bar. The
processing is turned off by default.
• The slash (/). The terminator must be placed at the beginning of a new line. Note:
The processing of this symbol must be activated in the tool bar. The processing is
turned on by default.
6.2.1 Commands
Skip to start Places the text caret at the start of the script.
Skip back Moves the text caret to the start of the previous
statement.
Execute Executes the script beginning with the current statement
up to the last statement.
Single step Executes the statement at the current text caret position
only.
Skip next Moves the text caret to the start of the next statement.
Skip to end Places the text caret at the end of the script.
Enable semicolon (;) Turns the processing of the semicolon terminator on or
terminator off. Processing is turned off by default.
Enable slash (/) Turns the processing of the slash terminator on or off.
terminator Processing is turned on by default.
24/44SQL Developer User Manual
Enable output echo Turns the output echo on or off. If activated each
statement is shown in the output window before it is sent
to the database for execution.
Commit Sends the COMMIT command to the database and
confirms all pending changes.
Rollback Sends the ROLLBACK command to the database and
discards all pending changes.
25/44SQL Developer User Manual
6.3 Stored Program Editor
The Stored Program Editor is used to edit stored procedures. To compile a procedure the
complete content of the editor window is sent to the database as one block.
6.3.1 Commands
Compile Compiles the procedure.
26/44SQL Developer User Manual
7 Bookmarks
With the bookmarks component you easily manage
frequently used queries and statements.
The component can be moved within the desktop by using
the tab on the upper border.
The component is divided into the tree view with all
existing bookmarks and the detail view for a single
bookmark.
Underneath the favorites folder you can manage your own
bookmarks and folders.
The history folder always shows the latest executed
queries and statements. With the copy and paste functions
you can move bookmarks from the history to your
favorites.
Select a bookmark to show all its information in the detail
view:
The name is also used for displaying the bookmark in the tree. For this reason the name
should be as precise and short as possible to identify the bookmark. The description is
optional. The modification date is managed automatically by the application and is only
displayed underneath the history. In the lower part of the detail view you see the actual SQL
statement of the bookmark.
Except for the modification date you can modify all fields in the detail view. To apply your
changes press the button at the bottom.
To execute the SQL statement of a bookmark copy the statement from the detail view to the
clipboard and paste it into an opened SQL editor. Alternatively you can directly drag the
bookmark from the tree view into a SQL editor.
7.1.1 Commands
New bookmark Creates a new bookmark underneath the selected folder.
New folder Creates a new folder underneath the selected folder.
Rename Renames the selected node (bookmark or folder).
Cut Moves the selected node (bookmark or folder) to the
clipboard.
Copy Copies the selected node (bookmark or folder) to the
clipboard.
Paste Pastes a bookmark or a folder from the clipboard.
Delete Deletes the selected bookmark or the selected folder
including all contained bookmarks and subsidiary folders.
Move up Moves the selected node (bookmark or folder) within its
siblings up by one position.
Move down Moves the selected node (bookmark or folder) within its
27/44SQL Developer User Manual
siblings down by one position.
Split view vertically Arranges the tree view in the upper and the detail view in
the lower half.
Split view horizontally Arranges the tree view in the left and the detail view in
the right half.
Show bookmarks only Hides the detail view and shows the tree view only.
28/44SQL Developer User Manual
8 Diagram Editor
With the diagram editor you can visualize database catalogs and schemas. Predominantly
the diagram editor is intended to support reverse engineering of existing databases.
Use the File menu to create a new diagram or to open or save an existing.
8.1 Components
8.1.1 Object list
The object list shows all diagram objects in ascending alphabetically order. For easy
recognition of an object its background color is displayed on the left of each list entry.
References between the diagram objects are not shown by this list.
Select one or more objects from the list to perform a function on them. The list selection is
always synchronized with the selection of the diagram view.
8.1.2 Overview
The overview displays the diagram from the bird's view and shows the visible region of the
diagram view with a marker frame. You can use the mouse to modify the frame's size and
position to control the zoom factor an the visible region of the diagram.
8.1.3 Diagram view
The diagram view shows the diagram objects graphically. Select one or more objects from
the view to perform a function on them. The selection is always synchronized with the
29/44SQL Developer User Manual
selection of the object list. A selected object is displayed with a dashed selection border and
multiple selection handles.
To select multiple objects click on the background of the diagram view with the mouse and
hold down the mouse button. By dragging the mouse cursor you span a rubber band you can
use to include the objects to select. When you release the mouse button, the objects inside
the rubber band bounds get selected.
Hold down the Shift key during selection to add new objects to the existing selection. Hold
down the Ctrl key to invert the selection state. Selected objects will be deselected and vice
versa.
To move an object, click inside the object's bounds, hold the mouse button and drag the
mouse cursor.
To change the size of an object, click on a selection handle of the object and drag it to the
desired position.
You can add additional vertexes to a connector line between two objects e.g. to create right-
angled connectors. Hold down the Shift key and right-click on the line where the new vertex
should be added. An existing vertex can also be removed by right-clicking its selection
handle.
8.2 Commands
Import objects... Imports tables and views into the current diagram.
Delete Removes the selected objects from the diagram.
Select all Selects all objects in the diagram.
Invert selection Inverts the selection state of all objects..
Grid on/off Toggles the grid display.
Snap to grid Toggles the snap to grid behavior..
Preferred size Changes the size of all selected objects to their preferred
size.
Automatic layout Automatically applies a layout to all diagram objects.
To front Moves all selected objects into the foreground.
To back Moves all selected objects into the background.
Align shapes Aligns the positions of all selected shapes against each
other.
Foreground color Changes the foreground color of all selected objects.
Line color Changes the line color of all selected objects
Background color Changes the background color of all selected objects
Zoom in Increases the zoom factor of the view.
Zoom out Decreases the zoom factor of the view.
30/44SQL Developer User Manual
Sets the zoom factor to the specified percentage value.
Allowed values range from 1% to 1000%.
Fit to selection Zooms the area of selected objects.
Fit to window Changes the zoom factor that all objects fit into the visible
region of the view.
Zoom 1:1 Sets the zoom factor to 1.
Export as SVG Exports the diagram to file in SVG (Scalable Vector
Graphics) format.
Export as PNG Exports the diagram to file in PNG (Portable Network
Graphics) format.
8.2.1 Import objects
This function imports tables and views (including their
bidirectional references) into the current diagram.
If there is no open database connection yet, at first the
connection dialog will be displayed where you can select a
connection profile or create a new one.
Next, the dialog for importing objects is shown. Select a
database and a catalog/schema as the source containing
the objects to import.
After source selection all tables and views available for
import are shown in the lower part of the dialog. If an
objects with the same name already exists in the diagram
its entry is displayed in bold style. Now select all objects to
be import and confirm with OK. If you select objects that
already exist in the diagram these objects will be updated
but keep their position, size and style.
31/44SQL Developer User Manual
9 Database Info
The Database Info dialog shows information about the currently selected database
connection like connection parameters, structure, keywords etc.
32/44SQL Developer User Manual
10 Settings
With the settings dialog you can configure all important application parameters. The dialog is
accessible through the Extras menu and the Settings command.
10.1 General
10.1.1 Connection
Here you can specify a global time limit used by a
driver when connecting to a database or
executing queries. Whenever a value is set to
zero the defaults of the driver are used for the
respective parameter.
Note: The settings of the time limit parameters
are supported by a few drivers only.
10.1.2 Bookmarks
With the history size option you define the
maximum number of bookmarks in the history list.
If the list’s size exceeds this value the oldest
entry will be removed when a new bookmark gets
inserted.
10.1.3 Misc
Use the option execution of selected text range in
SQL statement editor to control whether a selected text range can be executed (provided
that a selection exists) instead of the whole text. If this option is deactivated, statements are
always executed completely, no matter whether a selection exists or not.
Select the Show the tip of the day option to display the tip of the day window on application
start.
10.2 Display
10.2.1 Desktop
Use this component to configure the desktop. The visibility of the windows bar (below the tool
bar) can be controlled with the show windows bar option. Changes applied to this setting only
take effect after a restart of SQL Developer. The show window contents while dragging
option determines whether a window within the application's desktop is drawn continuously
when being dragged. Use the scrollable desktop option to show horizontal and vertical scroll
bars at the right and bottom border of the desktop whenever a child window exceeds the
bounds of the desktop.
33/44SQL Developer User Manual
10.3 Appearance
10.3.1 Look and Feel
The Look and Feel denotes the look and the
behavior of the user interface. Here you can
select the look and feel SQL Developer should
use. The System Look and Feel looks like the
actual user interface of your operating system
and is used by default.
Some Look and Feels also support to decorate
title bars and borders of windows with the look
and feel's style (e.g. the Metal Look and Feel).
Note: This option requires a restart of the
application to take effect.
10.3.2 Preview
The preview provides a collection of controls that
are changing their look according to the currently
selected Look and Feel.
10.4 Editor
10.4.1 Font
Here you can configure the family name and size
of the font to be used in editor windows.
10.4.2 Caret
You can select between three different shapes for
the text caret (insertion mark in text editors):
Vertical line, horizontal line or hollow.
10.4.3 Options
When the automatic indent option is selected the
text caret is placed with the same indent as the
line before after performing a carriage return. To
insert blank characters instead of a tab character,
activate the insert tab as spaces option. Activate
the support drag and drop option to enable text
copy and move operations with the mouse.
10.4.4 Display
An example statement shows the current color scheme used for syntax highlighting in editor
windows. Select a syntax element from the dropdown list and press the attached button to
change the color for a certain element.
34/44SQL Developer User Manual
10.5 Drivers
The Drivers tab shows a tree with all registered
driver libraries SQL Developer can use for
establishing connections to a database. Each
entry on the first tree level shows a library name
and its file path. The child entries on the second
level show information about the driver classes
provided by the library.
When establishing a connection the tree is
searched from top down for the required driver.
You can modify the loading priority of a driver by
moving its entry using the Up and Down buttons.
If a driver library can not be accessed (e.g.
because the file has been removed) the library
icon is marked with a little red symbol.
Note: If you replace a driver library with a new
version there can occur problems loading the new
driver. In this case you should restart SQL
Developer to ensure that the new driver will be
loaded instead of the old one.
10.6 Plugins
The Plugins tab shows all currently loaded
auxiliary modules from the plugins folder in the
SQL Developer installation directory.
35/44SQL Developer User Manual
11 Tip of the day
After the first start of SQL Developer a dialog opens
automatically showing various tips explaining how to work with
SQL Developer. Press the Next Tip button to change to the
next tip.
You can open the dialog manually through the Help menu and
the Tip of the day command.
Use the Settings dialog to activate or deactivate the automatic
display on application start.
36/44SQL Developer User Manual
12 Extensions
SQL Developer comes with various extensions providing general functions and vendor
specific functions. The extensions are accessible through the Extras menu.
12.1 Standard extensions
12.1.1 Catalog/Schema Comparison
With this extension you can compare the table and
view structure of two catalogs or schemas. The
comparison always compares a left and a right side.
For each side select an adapter and a catalog or
schema.
Use the options panel to control the properties to
compare.
Press Start to begin with the comparison. The result
will be displayed as a detailed text report.
37/44SQL Developer User Manual
12.1.2 Dissolve dependencies
This extension retrieves the relational dependencies
between tables and views of a catalog or schema.
The use cases for this function include the initial data
loading into or the complete data removal from the
tables of a database without relational constraint
violations.
Select the adapter and catalog or schema to examine
as the source.
After selecting a source all accessible tables and views
are displayed in the objects list. Now you can select the
objects to analyze their dependencies for.
Press the Next button to start the analysis. A popup
window informs about the progress.
The result will displayed in multiple variants:
The Identifiers tab shows a list of all involved objects.
Depending on the selected sort option dependent
objects are either placed on the top (delete semantics)
or at the bottom (insert semantics) of the list.
The Delete Script tab shows a complete SQL script to
delete all data from the tables selected for the analysis.
For execution copy the script to the clipboard and
paste it to a new or an existing editor script window.
38/44SQL Developer User Manual
12.2 Microsoft SQL Server extensions
12.2.1 Show Plan
With the Show Plan extension you can analyze the
execution plan of a query. Paste the statement to
analyze from the clipboard into the SQL editor in the
upper part of the dialog. You can also load a
statement from a file using the Open function.
Use the Execute button from the tool bar to analyze
the statement. The Execution plan will be displayed
in a tree in the lower part of the dialog.
12.2.2 Processes
This extension shows all processes running on the database for the currently selected
adapter.
Use the Details button to show the last executed SQL command for the selected process.
With the Kill process button you can
terminate the selected processes. The
Refresh button re-reads all information
of all processes.
Use the Filter field to select a filter
criterion and specify a filter pattern in
the like field. The filter works case
insensitive and supports the wildcard
character %. Press the Enter key or the
Refresh button to activate the filter.
You can sort the table according to the
values of a column by clicking the
column's header with the mouse.
Another click on the same column
header reverses the order.
39/44SQL Developer User Manual
12.2.3 Monitor
The Monitor extension provides a graphical user interface for the internal SQL Server
monitor function. If the auto refresh option is checked, new measured values are recorded
repeatedly after the selected period (5 seconds to 10 minutes) has elapsed.
Note: The extension uses the SQL Server function sp_monitor. Members of the server role
sysadmin have the permission to execute this function by default.
12.2.4 Remote command shell
This extension emulates a command shell on the database server. The shell works
synchronously. The command control does not return until an executed command has
finished. Key input as wanted by some commands is being ignored.
Note: The extension uses the SQL
Server function xp_cmdshell. Members
of the server role sysadmin have the
permission to execute this function by
default.
40/44SQL Developer User Manual
12.3 MySQL extensions
12.3.1 Processes
This extension shows all processes running on the database for the currently selected
adapter.
Use the Details button to show the last
executed SQL command for the
selected process. With the Kill process
button you can terminate the selected
processes. The Refresh button re-reads
all information of all processes.
You can sort the table according to the
values of a column by clicking the
column's header with the mouse.
Another click on the same column
header reverses the order.
41/44SQL Developer User Manual
12.4 Oracle extensions
12.4.1 Explain Plan
With the Explain Plan extension you can analyze the execution plan of a query. Paste the
statement to analyze from the clipboard into the SQL editor in the upper part of the dialog.
You can also load a statement from a file using the Open function.
You can specify an optional ID for the statement to execute. In this case the query will be
stored with the ID in the plan table, otherwise it will be stored as an anonymous query.
To build an execution plan
you need a plan table.
Please ensure that a plan
table exists before the first
attempt to build a plan. If
no such plan table exists
you can create one by
using the Create button.
Use the Execute button
from the tool bar to analyze
the statement. The
Execution plan will be
displayed in a tree table in
the lower part of the dialog.
12.4.2 Jobs
The Jobs extension shows all jobs of the current user. If your user account has appropriate
permissions you can also show all All Jobs of the database instance.
Press the Run button to run the selected
job directly. Use the Activate and
Deactivate buttons to start and stop a
selected job. With the Extract DDL
button you can generate a creation
script for the selected jobs. The Refresh
button re-reads all information of all
jobs.
Use the Filter field to select a filter
criterion and specify a filter pattern in
the like field. The filter works case
insensitive and supports the wildcard
character %. Press the Enter key or the
Refresh button to activate the filter.
You can sort the table according to the
values of a column by clicking the column's header with the mouse. Another click on the
same column header reverses the order.
42/44SQL Developer User Manual
12.4.3 Oracle Text
This extension shows information about Oracle Text (a part of Oracle interMedia).
On the left side a tree shows all
schemas that are visible to the current
user and are using Oracle Text. The
child nodes of each schema node show
detailed information about indexes,
sections, stop word lists and
preferences. For indexes there are
additional functions available for
synchronization, optimization and
recreation.
The Refresh button re-reads all
information in the tree.
12.4.4 Recycle Bin
Since Oracle 10g database objects can be deleted by moving them to the recycle bin. With
this extension you get access to the recycle bin of the current user or all users if you have
sufficient privileges.
43/44SQL Developer User Manual
12.4.5 Sessions
This extension shows all sessions running on the database for the currently selected
adapter.
Use the Details button to show the last executed SQL command for the selected session.
With the Kill session button you can terminate the selected sessions. The Refresh button re-
reads all information of all sessions.
Use the Filter field to select a filter
criterion and specify a filter pattern in
the like field. The filter works case
insensitive and supports the wildcard
character %. Press the Enter key or the
Refresh button to activate the filter.
You can sort the table according to the
values of a column by clicking the
column's header with the mouse.
Another click on the same column
header reverses the order.
12.4.6 Monitor
With the Monitor extension you can monitor important values of an Oracle database instance
periodically. If the auto refresh option is checked, new measured values are recorded
repeatedly after the selected period (5 seconds to 10 minutes) has elapsed.
Note: Usually you need DBA privileges to access the system views required for monitoring.
44/44You can also read