Avid | Edit On Demand - Setup and User's Guide April 2021
←
→
Page content transcription
If your browser does not render page correctly, please read the page content below
Avid | Edit On Demand®
            Setup and User’s Guide
V

                        April 2021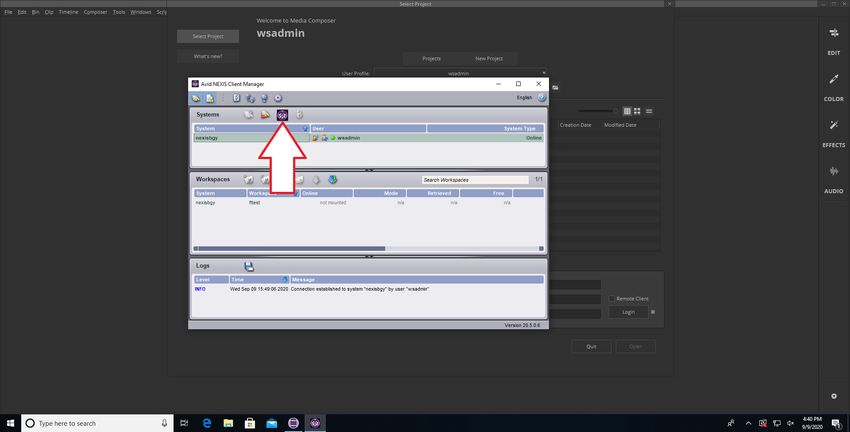
Legal Notices
Product specifications are subject to change without notice and do not represent a commitment on the part of Avid Technology, Inc.

This product is subject to the terms and conditions of a software license agreement provided with the software. The product may only be used in
accordance with the license agreement.

This guide is protected by copyright. This guide is for your personal use and may not be reproduced or distributed, in whole or in part, without
permission of Avid. Reasonable care has been taken in preparing this guide; however, it may contain omissions, technical inaccuracies, or typographical
errors. Avid Technology, Inc. disclaims liability for all losses incurred through the use of this document. Product specifications are subject to change
without notice.

© 2021 Avid Technology, Inc. All rights reserved.

Attn. Government User(s). Restricted Rights Legend
U.S. GOVERNMENT RESTRICTED RIGHTS. This Software and its documentation are “commercial computer software” or “commercial computer
software documentation.” In the event that such Software or documentation is acquired by or on behalf of a unit or agency of the U.S. Government, all
rights with respect to this Software and documentation are subject to the terms of the License Agreement, pursuant to FAR §12.212(a) and/or DFARS
§227.7202-1(a), as applicable.

Trademarks
Avid, the Avid Logo, Avid Everywhere, Avid DNXHD, Avid DNXHR, Avid NEXIS, Avid NEXIS | Cloudspaces, AirSpeed, Eleven, EUCON, Interplay,
iNEWS, ISIS, Mbox, MediaCentral, Media Composer, NewsCutter, Pro Tools, ProSet and RealSet, Maestro, PlayMaker, Sibelius, Symphony, and all
related product names and logos, are registered or unregistered trademarks of Avid Technology, Inc. in the United States and/or other countries. The
Interplay name is used with the permission of the Interplay Entertainment Corp. which bears no responsibility for Avid products. All other trademarks
are the property of their respective owners. For a full list of Avid trademarks, see: http://www.avid.com/US/about-avid/legal-notices/trademarks.

Avid | Edit On Demand Setup and User’s Guide • Revised 4/14/21 • This document is distributed by Avid in online
(electronic) form only, and is not available for purchase in printed form.

                                                                         ii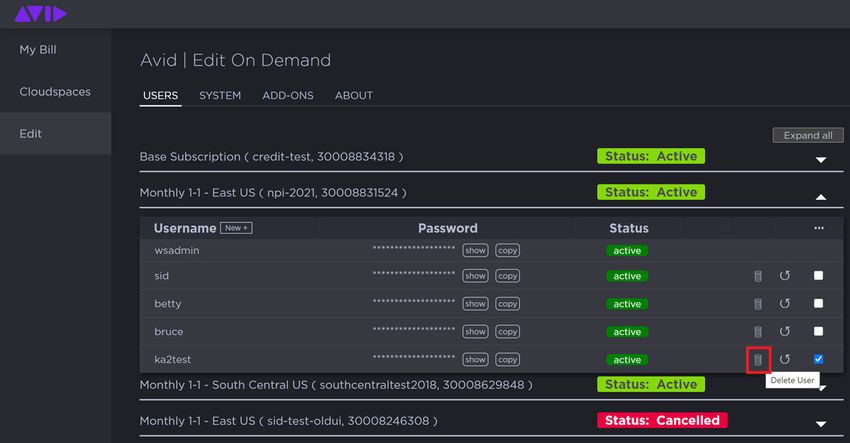
Contents

        Using This Guide. . . . . . . . . . . . . . . . . . . . . . . . . . . . . . . . . . . . . . . . . . . . . . . . . . . . . . . . . . . . . . . . . iv
        Who Should Use This Guide . . . . . . . . . . . . . . . . . . . . . . . . . . . . . . . . . . . . . . . . . . . . . . . . . . . . . . . . . . . . . . . . . . . . iv
        Symbols and Conventions . . . . . . . . . . . . . . . . . . . . . . . . . . . . . . . . . . . . . . . . . . . . . . . . . . . . . . . . . . . . . . . . . . . . . iv
        If You Need Help . . . . . . . . . . . . . . . . . . . . . . . . . . . . . . . . . . . . . . . . . . . . . . . . . . . . . . . . . . . . . . . . . . . . . . . . . . . . . v
        Accessing the Online Documentation . . . . . . . . . . . . . . . . . . . . . . . . . . . . . . . . . . . . . . . . . . . . . . . . . . . . . . . . . . . . v
        Avid Training Services . . . . . . . . . . . . . . . . . . . . . . . . . . . . . . . . . . . . . . . . . . . . . . . . . . . . . . . . . . . . . . . . . . . . . . . . . v
Chapter 1        Deploying an Avid | Edit On Demand System . . . . . . . . . . . . . . . . . . . . . . . . . . . . . . . . . . . . . . . . . 1
        Purchasing and Registering the Product . . . . . . . . . . . . . . . . . . . . . . . . . . . . . . . . . . . . . . . . . . . . . . . . . . . . . . . . . . . 1
        Creating a New Subscription . . . . . . . . . . . . . . . . . . . . . . . . . . . . . . . . . . . . . . . . . . . . . . . . . . . . . . . . . . . . . . . . . . . 3
        Creating User Accounts . . . . . . . . . . . . . . . . . . . . . . . . . . . . . . . . . . . . . . . . . . . . . . . . . . . . . . . . . . . . . . . . . . . . . . . 6
        Changing User Passwords . . . . . . . . . . . . . . . . . . . . . . . . . . . . . . . . . . . . . . . . . . . . . . . . . . . . . . . . . . . . . . . . . . . . . 7
        Deleting a User Account . . . . . . . . . . . . . . . . . . . . . . . . . . . . . . . . . . . . . . . . . . . . . . . . . . . . . . . . . . . . . . . . . . . . . . . 9
        Distributing “Getting Started” Information to Users . . . . . . . . . . . . . . . . . . . . . . . . . . . . . . . . . . . . . . . . . . . . . . . . 10
        Extending an Existing Subscription . . . . . . . . . . . . . . . . . . . . . . . . . . . . . . . . . . . . . . . . . . . . . . . . . . . . . . . . . . . . . 10
        Managing Users and Workspaces . . . . . . . . . . . . . . . . . . . . . . . . . . . . . . . . . . . . . . . . . . . . . . . . . . . . . . . . . . . . . . . 14
        Performance Information . . . . . . . . . . . . . . . . . . . . . . . . . . . . . . . . . . . . . . . . . . . . . . . . . . . . . . . . . . . . . . . . . . . . . . 17
Chapter 2        Using Avid | Edit On Demand . . . . . . . . . . . . . . . . . . . . . . . . . . . . . . . . . . . . . . . . . . . . . . . . . . . . . 18
        Configuring Access to Avid | Edit On Demand. . . . . . . . . . . . . . . . . . . . . . . . . . . . . . . . . . . . . . . . . . . . . . . . . . . . . . 18
        Uploading Media Files. . . . . . . . . . . . . . . . . . . . . . . . . . . . . . . . . . . . . . . . . . . . . . . . . . . . . . . . . . . . . . . . . . . . . . . . 20
        Verifying the Local Host Information . . . . . . . . . . . . . . . . . . . . . . . . . . . . . . . . . . . . . . . . . . . . . . . . . . . . . . . . . . . . . 21
        Editing with a Media Composer Workstation . . . . . . . . . . . . . . . . . . . . . . . . . . . . . . . . . . . . . . . . . . . . . . . . . . . . . . 21
        Using HotFolder for Automated File Transfers . . . . . . . . . . . . . . . . . . . . . . . . . . . . . . . . . . . . . . . . . . . . . . . . . . . . . 25
Chapter 3         Avid | Edit On Demand System Security . . . . . . . . . . . . . . . . . . . . . . . . . . . . . . . . . . . . . . . . . . . . 29
        PCoIP Security. . . . . . . . . . . . . . . . . . . . . . . . . . . . . . . . . . . . . . . . . . . . . . . . . . . . . . . . . . . . . . . . . . . . . . . . . . . . . . 29
        Data Security . . . . . . . . . . . . . . . . . . . . . . . . . . . . . . . . . . . . . . . . . . . . . . . . . . . . . . . . . . . . . . . . . . . . . . . . . . . . . . 29
        Cloud Security. . . . . . . . . . . . . . . . . . . . . . . . . . . . . . . . . . . . . . . . . . . . . . . . . . . . . . . . . . . . . . . . . . . . . . . . . . . . . . 30
        Port Usage . . . . . . . . . . . . . . . . . . . . . . . . . . . . . . . . . . . . . . . . . . . . . . . . . . . . . . . . . . . . . . . . . . . . . . . . . . . . . . . . . 30

                                                                                  iii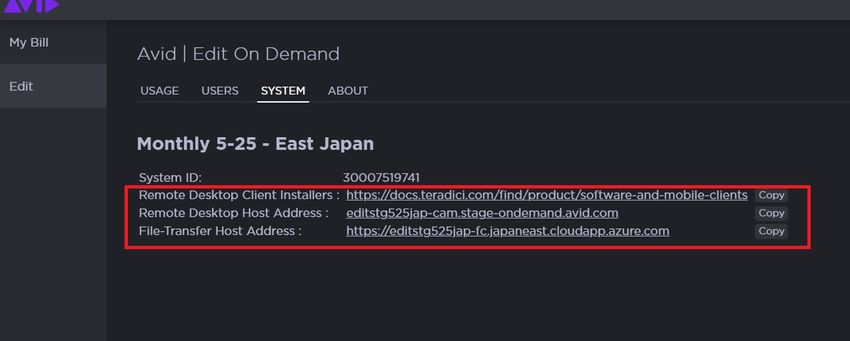
Using This Guide

     Avid | Edit On Demand provides a cloud-based editing environment using Media Composer
     workstation instances backed by Avid NEXIS | Cloud Storage. This guide describes how to
     set up and use the system.

Who Should Use This Guide
     This guide is intended for administrators and users (editors) of an Avid | Edit On Demand
     system.

Symbols and Conventions
     Avid documentation uses the following symbols and conventions:

     Symbol or Convention     Meaning or Action

                              A note provides important related information, reminders,
     n                        recommendations, and strong suggestions.

                              A caution means that a specific action you take could cause harm to
     c                        your computer or cause you to lose data.

                              A warning describes an action that could cause you physical harm.
     w                        Follow the guidelines in this document or on the unit itself when
                              handling electrical equipment.

                              A user tip provides a helpful hint that can aid users in getting the most
     g                        from their system.

                              A shortcut shows the user keyboard or mouse shortcuts for a procedure
         s                    or command.

     >                        This symbol indicates menu commands (and subcommands) in the
                              order you select them. For example, File > Import means to open the File
                              menu and then select the Import command.

                              This symbol indicates a single-step procedure. Multiple arrows in a list
                              indicate that you perform one of the actions listed.

     (Windows), (Windows      This text indicates that the information applies only to the specified
     only), (Macintosh), or   operating system, either Windows or Macintosh OS X.
     (Macintosh only)

     Bold font                Bold font is primarily used in task instructions to identify user interface
                              items and keyboard sequences.

     Italic font              Italic font is used to emphasize certain words and to indicate variables.

     Courier Bold font        Courier Bold font identifies text that you type.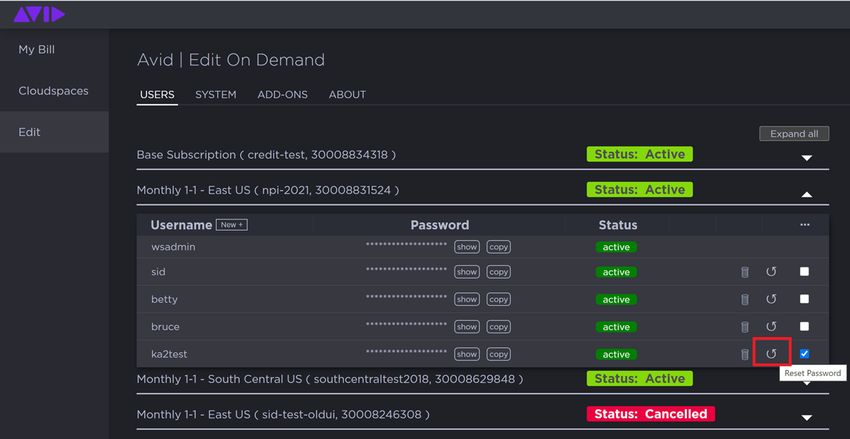
If You Need Help

     Symbol or Convention       Meaning or Action

     Ctrl+key or mouse action   Press and hold the first key while you press the last key or perform the
                                mouse action. For example, Command+Option+C or Ctrl+drag.

     | (pipe character)         The pipe character is used in some Avid product names, such as
                                Interplay | Production. In this document, the pipe is used in product
                                names when they are in headings or at their first use in text.

If You Need Help
     If you are having trouble using your Avid product:
      1. Retry the action, carefully following the instructions given for that task in this guide. It
         is especially important to check each step of your workflow.
      2. Check the latest information that might have become available after the
         documentation was published.
         Always check online for the most up-to-date release notes or ReadMe because the
         online version is updated whenever new information becomes available. To view the
         online versions, visit the Knowledge Base at www.avid.com/support.
      3. Check the documentation that came with your Avid application or your hardware for
         maintenance or hardware-related issues.
      4. Visit the online Knowledge Base at www.avid.com/support. Online services are
         available 24 hours per day, 7 days per week. Search this online Knowledge Base to find
         answers, to view error messages, to access troubleshooting tips, to download
         upgrades, and to read or join online message-board discussions.

Accessing the Online Documentation
     The Avid online documentation contains all the product documentation in PDF format. You
     can access the documentation from the Knowledge Base site specific to your release.
     Download and install Acrobat Reader before you access the PDF documentation.

Avid Training Services
     Avid makes lifelong learning, career advancement, and personal development easy and
     convenient. Avid understands that the knowledge you need to differentiate yourself is
     always changing, and Avid continually updates course content and offers new training
     delivery methods that accommodate your pressured and competitive work environment.

     For information on courses/schedules, training centers, certifications, courseware, and
     books, please visit www.avid.com/support and follow the Training links, or call Avid Sales
     at 800-949-AVID (800-949-2843).

                                                     v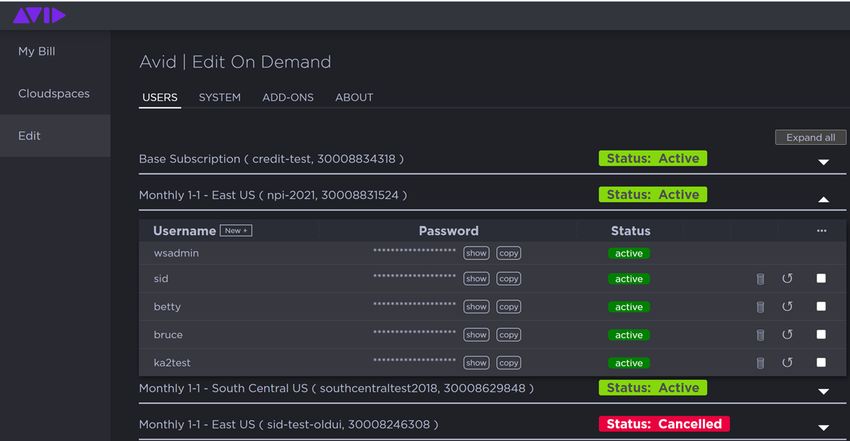
1 Deploying an Avid | Edit On Demand System

      Avid | Edit On Demand is a service that does not require investing in additional on-premises
      infrastructure—ideal for short-term projects that you need to staff on short notice (within a
      few hours). It supports virtual Media Composer seats working with Avid NEXIS | Cloud
      Storage, accessed through Teradici® Cloud Access Manager (CAM).

      Users (editors) install the Teradici PCoIP client software to access the Media Composer
      workstations, and upload and download files in the cloud from anywhere, through a
      secure Internet connection provided by FileCatalyst® Transfer Agent.

      With FileCatalyst HotFolder access, included in your subscription, users can configure
      automatic file transfers on a schedule that suits their needs.

      As an administrator, you can monitor usage over time to manage your subscription
      resources, and you can manage Workspaces and users.

  n   In the context of an Avid | Edit On Demand deployment, the person who redeems the code
      is considered the administrator, and is then responsible for managing users and other
      administrative tasks.

      The overall process of configuring and managing an Avid | Edit On Demand system
      consists of:
      •     Purchasing the product and receiving a redemption code
      •     Redeeming the code and registering the product
      •     Using the credits provided by the redemption code to create a new subscription or add
            more resources to an existing one
      •     Creating user accounts and passwords for the editors who will use Avid | Edit On
            Demand
      •     Distributing the system information and passwords to the users
      •     Monitoring system usage

Purchasing and Registering the Product
      When you purchase the product, you receive a redemption code for a specific number of
      Service Credits for subscriptions, edit seats and hours, storage, and data egress. By
      applying the credits in your account you can determine the length of the subscription and
      the configuration of services over its duration. You can use all your credits at once or over
      time, to extend the length of your subscription or add more users or storage.

      Credits are specific to a geographic region.

      To register Avid | Edit On Demand:
          1. Purchase Service Credits from Avid and receive a redemption code.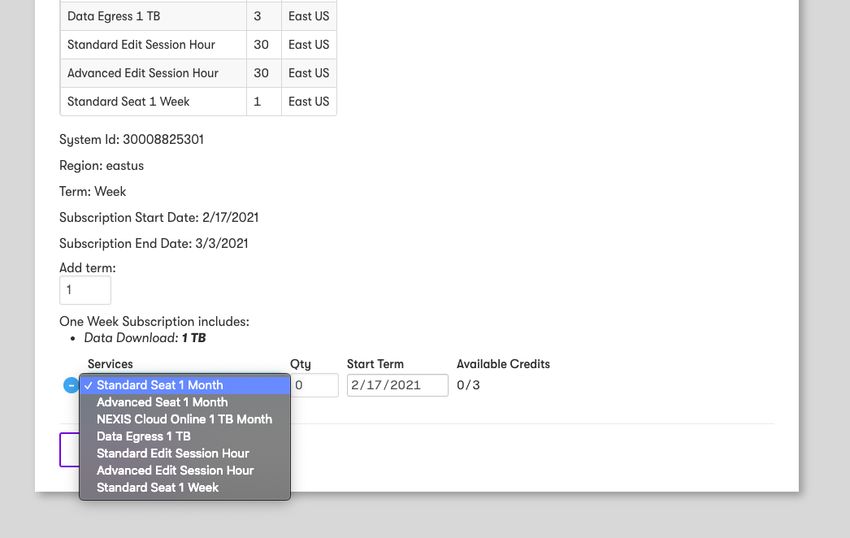
Purchasing and Registering the Product

2. Log in to your Avid Master Account (or create one).
3. Click “Register Software with Code.”

4. Validate your account (new users only).

5. Enter the redemption code and click Register product.

                                             2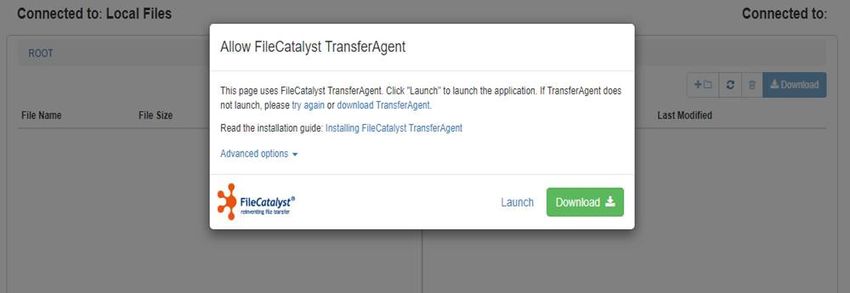
Creating a New Subscription

Creating a New Subscription
     After you redeem your code, your account contains credits that you use to create a new
     subscription or extend an existing one.

     Every subscription requires the following information:
     •     Choice of geographic region where the Media Composer and Cloud storage will be
           deployed. (Applies only if you purchased redemption codes for multiple regions.)
           Choose a region that is closest to or equidistant from all the editors using the
           subscription.
     •     Choice of term: weekly or monthly
     •     Subscription start date: from the current date to one month in the future
     •     Choice of editing seat types: Standard or Advanced (Standard provides six cores and
           hyper-threading; Advanced provides 12 cores)
     •     (Optional) Additional storage, seats, or time (more weeks or months)
     •     Choice of Media Composer version (all editors in a given subscription use the same
           version)
     •     Unique prefix to apply to the endpoints for your solution (choose a name that identifies
           the subscription to you and your users)

     To create a new subscription:
         1. Review your credits and click Use credits to apply them.

                                                    3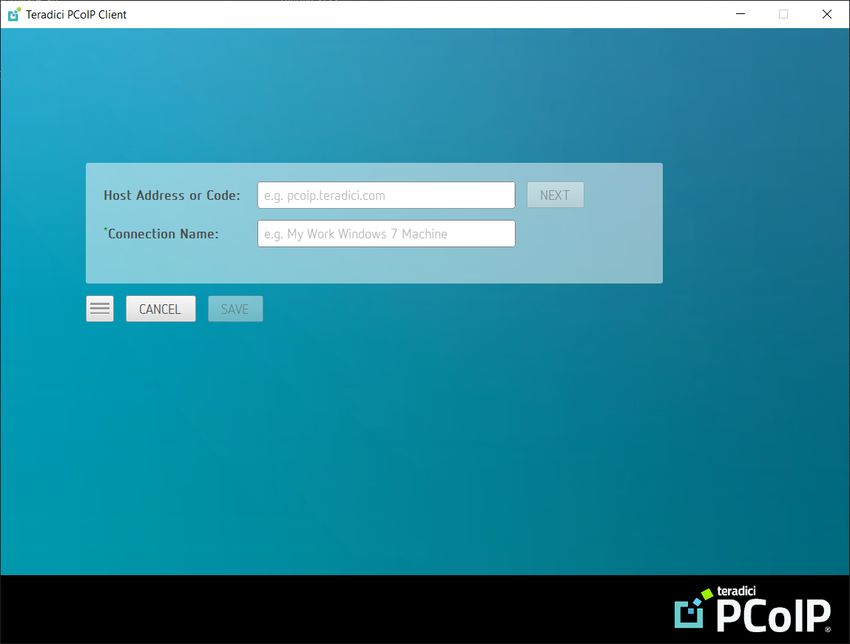
Creating a New Subscription

2. Select the region where the new subscription will be deployed.

3. Select a term for the subscription (weekly or monthly).
4. Select a start date for the new subscription, between the current date and one month
   in the future.

                                           4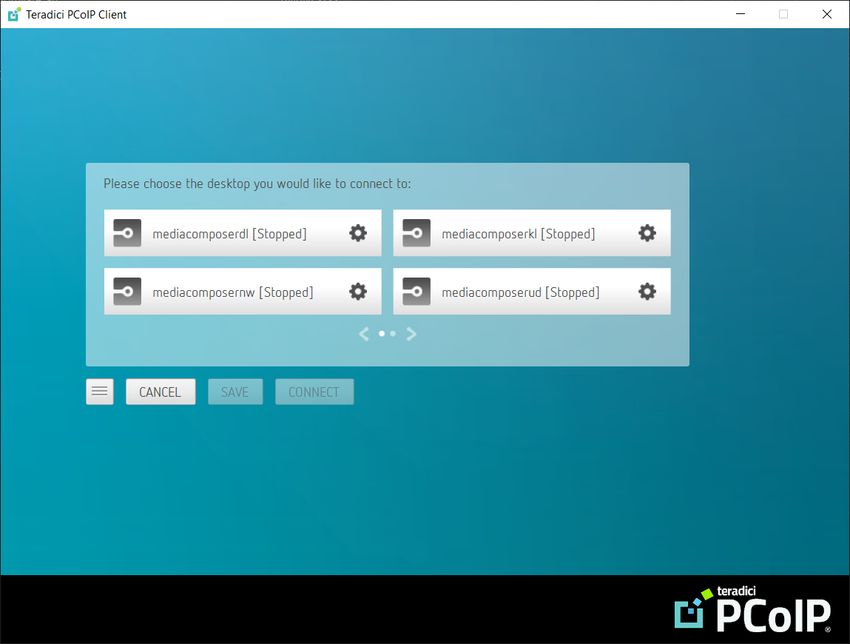
Creating a New Subscription

5. Every subscription (weekly or monthly) includes 1TB of data egress. You can optionally
   add more storage, more editing seats, or data egress by typing in the number of
   credits you want to apply to each additional service.
6. Click the blue plus sign to display additional weeks or months for the subscription, and
   continue to enter the number of credits you want to apply to each additional term. As
   you enter credits, the Available Credits decrease to show you the remaining balance.
 7. Click Next.

8. Choose a Media Composer version to deploy. (Available versions are subject to
   change.) The selected version will apply to all Media Composer instances in your
   subscription.
 9. Assign a prefix to your deployment that is meaningful for your project.
   The prefix will be appended to the connection endpoints of your solution and also acts
   as a unique identifier for your subscription (if you have multiple subscriptions). Your
   users will use these links to access the Media Composer workstations (within the PCoIP
   client) and the file transfer (File Catalyst) web application. For example, with a prefix
   of KLANews10, the links are named as follows:
   -   Teradici PCoIP CAM server—KLANews10-cam.ondemand.avid.com
   -   File Catalyst web URL—KLANews10-fc.ondemand.avid.com
10. Click Next.

11. Confirm the subscription information, and click the box to accept the terms and
    conditions, then click Activate Product.
   If the subscription start date is today, your deployment is started. (Deployments take
   2-4 hours to be created; for start dates in the future, the deployment process begins at
   midnight UTC time so that it is ready when your editors start their day.) You will receive
   email when the deployment is successfully completed. At that time your new

                                            5
Creating User Accounts
subscription is shown on the Products page under the “Edit On Demand Subscription”
tab. You can add more credits to the subscription at any time by clicking the Use
credits button.
12. For new deployments, create accounts for the editors who will use Avid | Edit On
Demand; see “Creating User Accounts” on page 6.
Creating User Accounts
Create a user account for each editor who will access and use Avid | Edit On Demand.
These accounts are automatically created on the Avid NEXIS | Cloud Storage system as
well.
To create user accounts:
1. In the Avid On Demand Portal, click the Edit tab.
2. Click Users.
3. Open the drop-down menu for your subscription.
4. Next to Username, click New+.
6Changing User Passwords
n By default, an account called “wsadmin” already exists for every new deployment, for
managing Workspaces on the Avid NEXIS system (see “Managing Users and Workspaces”
on page 14).
5. Enter a user name that starts with a letter, contains only letters, numbers, and dots,
and ends with a letter. If you enter a name that is restricted (such as “Avid” or
“guest”), an error is displayed.
6. Click +Add another user to add more users.
7. After adding all the users, click Submit.
It can take a while before the new users are created. The Status displays “processing”
until the user accounts become active.
8. When you see the new users, click Show to display their temporary password. You
must securely inform each user of their user name and temporary password.
Changing User Passwords
You can change the password for any user, including the wsadmin account. The new
password is created automatically; you cannot specify the new password.
To change a user password:
1. Log in to your Avid Master Account and go to the Avid | Edit On Demand Portal.
2. Click Edit.
7Changing User Passwords
3. Click Users.
4. Select your subscription (if more than one is listed). The Users list opens.
5. Select the user whose password you want to change and click Reset Password.
Optionally, click Show to see the current password.
6. In the confirmation dialog box, click Yes to continue.
8Deleting a User Account
7. In the next dialog box, click Proceed. (If you selected the wrong user, click the X in the
upper right corner to quit.)
The new password is created. If you are displaying the password value, you see the
new one when it is ready.
8. Securely inform the user of the new password.
Deleting a User Account
If a user account is no longer needed, you can delete it. (You cannot delete the default
wsadmin account.)
To delete a user account:
1. Log in to your Avid Master Account and go to the Avid | Edit On Demand Portal.
2. Click Users.
3. Select your subscription (if more than one is listed). The Users list opens.
4. Select the user you want to delete and click Delete User.
9Distributing “Getting Started” Information to Users
5. In the confirmation dialog box, click Yes to continue.
6. In the next dialog box, click Proceed. (If you selected the wrong user, click the X in the
upper right corner to quit.)
The user is deleted.
Distributing “Getting Started” Information to Users
After you configure the Avid | Edit On Demand instance, securely let the target users know
how to access it.
Include the following information:
• Link to download the latest Cloud Access Software client installers from Teradici
• Link to the remote desktop host address which is used to connect the PCoIP Clients to
CAM
• Link to the host address for the file transfer agent (FileCatalyst)
Extending an Existing Subscription
You can use any remaining credits or purchase additional credits to add more time, editing
seats, or storage to an existing subscription.
10Extending an Existing Subscription
Keep in mind the following:
• If your subscription lapses, all the associated resources for your subscription are
frozen and you will not have access to the account until you renew.
• If you apply a subscription credit at any point prior to your termination date the
subscription will extend from the date your current subscription is set to expire.
• If you enter the subscription credit after the subscription has lapsed and your
subscription is “frozen” it will take a few hours to start up all the resources again. Your
subscription will extend from the date your subscription went into the “frozen state.”
• If your subscription is nearing expiration or has lapsed accidentally, contact Avid Sales
or your reseller as soon as possible to purchase more credits to extend or reinstate
your subscription.
• If you apply credits to future time periods (the next consecutive week or month), the
currently provisioned Media Composer seats are extended into the next subscription
term. In the PCoIP client, users will see the same Media Composer names.
• If you add fewer seat credits to a subsequent term than what you have in the current
term, the excess seats are deleted according to which was most recently provisioned.
For example, if you have five seats in January and apply credits for only three seats in
February, two seats are deleted. You cannot specify which seats are removed.
• If you have not applied credits for the next term, the current Media Composer seats
are deleted, and new ones provisioned, when you apply credits to a future time period.
In the PCoIP client, users will see new Media Composer names.
To add credits to an existing subscription:
1. Log in to your Avid Master Account and click View My Products.
2. On the Edit On Demand Subscription page, click Use credits.
3. In the dialog box, click Update an existing subscription, then click Confirm.
11Extending an Existing Subscription
4. The system IDs for all of your current subscriptions are displayed. Select the system ID
for the subscription you want to extend, then click Confirm.
5. Your available credits are listed. Make sure the system ID and the start and end dates
match the subscription you are extending.
6. To add more time to the subscription, in the Add term field enter the number of credits
you want to use. Each credit extends the length of the subscription by one week or one
month, depending on the current subscription term.
7. Optionally, click the blue plus icon to add more resources to the subscription.
12Extending an Existing Subscription
8. From the list, select the resource you want to add.
9. Enter the number of credits you want to use for the additional resource, and enter the
date you want the resource to become available, then click Next. As you enter credits,
the number of Available Credits decreases.
10. Confirm the information, click the box to accept the terms and conditions, and click
Activate Product.
11. (Optional) Verify the updates by clicking the Edit On Demand Subscription tab, which
displays the new expiration date or resource, depending on what you added.
13Managing Users and Workspaces
Managing Users and Workspaces
As administrator, you can add and modify Workspaces and configure the EOD users that
can access them. You connect as a special user named “wsadmin” to the Avid NEXIS
Management Console through the Client Manager running on a client VM. Once
connected, you can create and resize Workspaces and allow or deny users access to
specific Workspaces.
n Use the wsadmin account only to log into the Management Console to manage users and
Workspaces, not for editing or file transfers. The wsadmin account does not have access
to FileCatalyst.
Connecting to the Avid NEXIS Management Console
To manage Workspaces and users, you connect to the Avid NEXIS Management Console
as a special kind of user called a workspace administrator.
To log into the Management Console:
1. Log into a cloud VM system via PCoiP with the user name wsadmin and the temporary
password listed in the Users tab of your Avid On Demand portal.
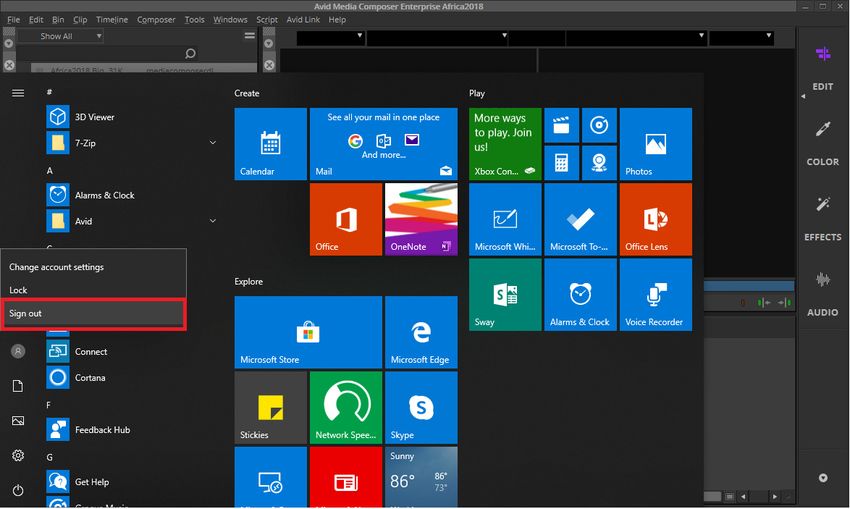
2. When prompted, change the password for the wsadmin account.
3. In the taskbar, show the hidden icons. Identify and click the Avid NEXIS Client Manager
icon to maximize the interface.
4. Select the Avid NEXIS system and click the Management Console icon.
14Managing Users and Workspaces
The Avid NEXIS Management Console login screen is displayed.
5. Log into the Avid NEXIS system with the user wsadmin and the new password.
The workspace administrator can see only a subset of the full functionality available to
the main administrator of an Avid NEXIS system.
Creating or Modifying a Workspace
You can modify some properties of the default Cloud workspace, and create additional
Workspaces for your EOD users.
n The steps provided in this guide assume some familiarity with the Avid NEXIS Management
Console. For full details on the Management Console, including more information about
the procedures included here, see the Avid NEXIS Administration Guide, available on the
Avid NEXIS Documentation Knowlege Base.
To modify or create a Workspace:
1. In the Management Console, click Storage > Workspaces.
You can see the default Cloud workspace, named avidworkspace, which is created
automatically as part of your deployment. Initially, all the EOD users have access
privileges to this Workspace. (By default, this workspace uses all the allocated space
in the Storage Group, but you can delete the Workspace or decrease its size to free up
space in the storage group for additional workspaces. See the Avid NEXIS
Administration Guide for how to decrease a Workspace.)
2. Click Add. The Workspace Edit page is displayed.
15Managing Users and Workspaces
3. In the Attributes panel, enter a name for the new Workspace, and (optionally) specify
its size (by default, a new Workspace is 214.75GB).
4. In the User Access panel (if you cannot see it, scroll down or close the Attributes panel),
select one or more users who can access the new Workspace, and select the kind of
access you want them to have (Read, Read-Write, or None) by clicking the respective
icon.
Make sure to give the default user account, filetransfer_service_user, access to
n all new Workspaces, in addition to the appropriate EOD users.
5. Click Save.
Changing User Access to a Workspace
You can change the access permissions for any EOD user for any Workspace, on a per-
Workspace basis. That is, you select the Workspace, then apply the relevant access type
to the appropriate users.
About Default Workspace Access and the Default File Transfer User Account
By default, all EOD users have access to the default Workspace, avidworkspace. You can
change their access to None (or delete the Workspace) if no one will use it.
In addition, make sure to give the default user account, filetransfer_service_user,
access to all Workspaces you create, so your EOD users can copy files into and out of
Workspaces using FileCatalyst.
To change user access privileges for a Workspace:
1. In the Management Console, click Workspaces.
2. Double-click the Workspace you want to change.
The Workspace Edit page is displayed, showing the Capacity Tracker, Attributes
panel, and User Access panel for the Workspace. You can close the Capacity Tracker
and Attributes panels to make the User Access panel more visible, or scroll down.
3. In the User Access panel, select the users whose access you want to change, then click
the type of access you want them to have, and click Save.
If you are changing the access type for multiple users, do them in separate operations
depending on the type of access you want them to have. For example, select all the
users who will have Read-Only access, click the Read-Only icon, and click Save, then
select all the users who will have Read-Write access, select the Read-Write icon, and
click Save.
16Performance Information
Performance Information
The performance your editors can expect depends on the latency to the region where your
Avid | Edit On Demand system is deployed and the type of editing they are doing.
Latency and bandwidth figures are for general guidance and your experience may vary
due to screen resolution, pixel activity, and network conditions.
Latency to Azure Region a PCoIP Responsiveness
250ms Not tested
a. Avid recommends latency < 60 ms for an optimal editing experience, though many users are satisfied
with performance at higher latencies. Azure Speed Test 2.0 (https://azurespeedtest.azurewebsites.net/)
is a useful tool for estimating latency.
Media Composer Activity a Bandwidth Required per Screen
Idle/low activity 0.5 - 2 Mbps
Basic editing 10-20 Mbps
Full screen playback Up to 85 Mbps
a. Avid recommends > 20 Mbps per screen for optimal performance.
172 Using Avid | Edit On Demand
Avid | Edit On Demand is a service that provides access to a virtual instance of Media
Composer, which you use to edit media files in collaboration with other editors on your
project.
Configuring Access to Avid | Edit On Demand
Your administrator will provide you with the following information:
• Remote desktop host address
• Link to install the Teradici PCoIP client (to connect to the virtual Media Composer
workstations)
• Link to access the file transfer application (FileCatalyst) to move media files to and
from the Avid | Edit On Demand system. Your FileCatalyst license also includes the
HotFolder application, which allows users to configure and schedule automatic file
transfers.
• Your user name and temporary credentials
c Make sure to install the PCoIP client and change your temporary password before
connecting to the FileCatalyst web application, as it does not have a way for you to
change your password.
To configure your Avid | Edit On Demand environment:
1. Download and install the Teradici PCoIP client from the following link:
https://docs.teradici.com/find/product/software-and-mobile-clients
2. Launch the client. By default you are prompted to create a new connection, as follows:Configuring Access to Avid | Edit On Demand
a. Enter the remote desktop host address provided by your administrator; for
example: https://-cam.ondemand.avid.com
b. Enter a connection name of your choice, then click Save, then click Next.
The connection name is unique to you, and is what you see when you start the
PCoIP client and use to connect to your Avid | Edit On Demand system.
c. Log in with the user name and temporary password that was created for you by
the administrator. You will be prompted to change your password after you log in
the first time.
19Uploading Media Files
Uploading Media Files
To edit media with Avid | Edit On Demand, upload the media files to the shared
Avid NEXIS | Cloud Storage workspace. When your changes are made you can download
the edited files to local storage.
By configuring FileCatalyst HotFolder access, the Avid NEXIS | Cloud Storage workspace
can be configured to automatically transfer files on a schedule, or when media files are
created or changed.
To upload and download media files:
1. Access the file transfer web application on your local system from the URL provided by
your administrator, with a name in the format: https://-
fc.ondemand.avid.com.
2. The first time you go to that URL on a given machine you are asked to allow the
TransferAgent to be downloaded and installed. Click Download, then click Launch.
You download the application only the first time you access that URL. The next time
you access the web application on the same machine, you launch the application.
3. Log in using the same user name (provided by your administrator) and the new
password that you set when connecting for the first time in the PCoIP client. Use the
default value in the TransferAgent port field, then click Confirm.
4. The TransferAgent launches in a browser window.
20Verifying the Local Host Information
- The transfer target folder is linked to the following folder on the Avid NEXIS
Workspace: \File-Transfers\
n Bookmark the TransferAgent URL in the browser so you can return to it easily for additional
file transfers.
5. Start uploading files from your local drives. When finished, close the browser.
Verifying the Local Host Information
Local systems running the FileCatalyst transfer agent must be able to resolve the name
localhost.filecatalyst.net to the IP address 127.0.0.1. This mapping is designed to
provide a trusted, secure connection to the local Transfer Agent service. For systems that
cannot resolve localhost.filecatalyst.net, you can work around the issue by
manually creating an entry in your local DNS service, or by adding a line to the hosts file
on your local machine.
Editing with a Media Composer Workstation
After you have configured the PCoIP client and uploaded media files, you are ready to
start editing.
Avid suggests the following:
• The first person to work on a project (or an administrator) creates an “Avid Projects”
folder in the Avid NEXIS Workspace for all users to store their projects.
• The first person to work on a project (or an administrator) creates an “Avid Users”
folder in the Avid NEXIS Workspace for all users to export their user settings to.
• Within the Avid Users folder, each user (or an administrator) creates a folder as the
target for their exported Media Composer user settings.
21Editing with a Media Composer Workstation
n You might not be able to use the same Media Composer workstation each time you
connect. Therefore, make sure all data needed for your project, including your user
settings for a Media Composer session, is stored in the Avid NEXIS Workspace so you can
access it from any available Media Composer system. In any given session, export your
Media Composer user settings to the Workspace so you can import them to another Media
Composer workstation the next time.
To edit files in Media Composer through Avid | Edit On Demand:
1. Launch the PCoIP client on your desktop, if you are not already logged in.
2. Select your previously created connection.
3. Enter your user name and password, then click Login.
22Editing with a Media Composer Workstation
4. Media Composer workstations are displayed, with one of the following statuses:
- Ready—Available to connect, no current user session
- In Session—In use by another user
- Starting—Starting up (by another user)
- Stopping—Turning off (by another user)
- Stopped—Available to connect. Might take a few minutes to start.
- UNKNOWN—In a corrupted state. Contact Avid customer support.
5. Choose an available Media Composer workstation with a status of Ready or Stopped
and click Connect.
n Depending on how your Edit On Demand administrator manages the subscription, you
might see the same Media Composer instance names or different ones from week to week
or month to month, depending on your subscription term.
23Editing with a Media Composer Workstation
c Do not click Save after selecting a Media Composer workstation. Saving a particular
Media Composer instance links your connection to that Media Composer only, and you
will not see any other instances when connecting in the future. If you click Save by
mistake, the next time you start the PCoIP client, you can delete the saved connection and
recreate it.
6. When connected, you see the desktop of the PCoIP client.
7. Start Media Composer.
8. Navigate to the Z:/ drive to find your media folder, which will be in the following
format: Z:/Workspace_name/File-Transfers//.
9. Edit media using the Media Composer workstation. For more information, including
how to import media into bins, see the Media Composer Documentation KB site. Click
the link for the appropriate Media Composer version.
g The C:/ drive on the Media Composer VM is not optimized for intensive disk I/O tasks (such
as zipping or unzipping archives). Avid recommends using an Avid NEXIS Workspace for all
file storage purposes, as they are optimized for performance. Alternatively, use the D:/
drive on the VM; the D:/ drive is a very high performance local drive, but do not store data
on this drive. All data left on the D:/ drive is deleted when you stop the VM.
10. When finished using Media Composer, sign off from Windows. This closes (stops) the
Media Composer session and closes the PCoIP session.
24Using HotFolder for Automated File Transfers
c Do not close the PCoIP client without signing out of the session. If you close the PCoIP
client while the Media Composer workstation is still running, the session becomes
inaccessible to other users. In addition, higher usage data (and costs) will result.
Using HotFolder for Automated File Transfers
About HotFolder
FileCatalyst HotFolder is an application that helps you manage and automate file
transfers. Using a HotFolder, you can automate transfers of only new or changed files, and
set up scheduled transfer intervals.
HotFolder can be configured on the client from which you run Avid | Edit On Demand, or on
a separate server.
For detailed information, see FileCatalyst HotFolder Quickstart.
You can configure the FileCatalyst HotFolder application to transfer automatically at
specified intervals, and you can control the files that are transfered (such as only new or
changed files).
Transferring Media
In the Task settings, exclude the “Creating” folder in any media directories to avoid
copying partial or in-process files or causing file locks that will interfere with the writes.
c Be careful of HotFolder options that delete or overwrite files to avoid data loss!
Working with Projects
c Do not attempt automatic syncing of projects or bins to avoid bin lock issues and
overwriting data.
Use copies of projects or bins to work from, rather than syncing projects or bins.
25Using HotFolder for Automated File Transfers
Configuring HotFolder—Tips and Examples
The following tips and examples apply only to using HotFolder with Avid | Edit On Demand,
and do not attempt to describe all available HotFolder features and functions.
Set Connection Options
Avid recommends using the defaults on the Set Connection Options dialog (see following
figure), but you can adjust the Aggressiveness slider to a value that fits your use case.
Make sure to read the guidelines for Aggressiveness and proceed with caution.
Transfer Options
Avid recommends keeping or enabling the following options in the Transfer Options dialog.
26Using HotFolder for Automated File Transfers
• “Keep file modification timestamp.” This preserves the file’s original modified time,
instead of applying the time the file was transferred. This is especially helpful in
workflows that require syncing media in both directions, to prevent the file from being
continually re-transferred.
• “Transfer files with temporary name” with either a temporary prefix or suffix. This can
help avoid confusion of someone is browsing for media, allowing them to easily tell if a
file is still being transferred or is available for use.
• Multi-Client. This is especially useful for workflows that involve many small files
(several hundred MB) rather than mostly large files (several GB or larger).
The Multi-client options applies to each task. If five tasks are configured to run
simultaneously, and all tasks have 10 client connections, then HotFolder will execute
50 simultaneous connections. This might overwhelm the server, or decrease
performance (or both), since all connections share the same bandwidth.
Consider your use case to decide how to size the number of client connections:
- If you have mostly large files, leave this option disabled or use a small number of
connections (2-5). Large files are more likely to saturate the network, so using this option
with a higher value won't be beneficial.
- If you have mostly small files, consider increasing the client connection count to 5-10 or
more. Avid recommends you keep the total number of simultaneous client connections
under 30 to prevent overloading the service.
- Consider using "Enable Auto Archiving of small files" which automatically zips small files
at the source and unzips them at the destination.
27Using HotFolder for Automated File Transfers
Define File Set
In the Define File Set dialog (see following figure), make sure to choose the appropriate
Avid NEXIS Workspace and directory on the FileCatalyst server for uploads and
downloads.
Use the “File Filters” option to exclude files and folders from being transferred.
For example, when working with Avid MediaFiles folders, enter the phrase “Creating” and
enable “Filter directories” to avoid transferring files being actively written by Media
Composer or other applications.
Use the “Transfer cache” option to prevent files from being transferred multiple times.
283 Avid | Edit On Demand System Security
Avid | Edit On Demand service implements the following practices for data security.
PCoIP Security
Your users (editors) install the Teradici PCoIP client software to access the Media
Composer workstations. To maintain system and data security:
• All PCoIP components use security certificates to ensure a trusted, end-to-end
Transport Layer Security (TLS) connection for TCP communications.
• The PCoIP UDP protocol is encrypted with industry-standard secure AES-256
encryption.
• The security gateway of the cloud access connector ensures secure PCoIP traffic flow
between external and internal networks.
• The PCoIP protocol is host-rendered and no data ever leaves the remote workstation,
except encrypted pixels.
Data Security
Users upload and download files in the cloud from anywhere, through a secure Internet
connection provided by FileCatalyst® Transfer Agent, which implements the following
security practices:
• TCP Control channel (used for authentication and negotiating transfers) is established
using SSL.
• When a transfer is initiated by a client, UDP ports are negotiated and exchanged over
this secure TCP connection.
• Data transfers are AES encrypted. The AES key is shared over the SSL connection and
a new key is issues for each new file. Each individual packet payload is encrypted
using the AES key.
All files uploaded through FileCatalyst are stored in an Avid NEXIS | Cloud Storage
Online storage system. The Avid NEXIS is not visible to the public Internet. It can be
reached only by other virtual machines in the deployment's resource group.Cloud Security
Cloud Security
The cloud infrastructure in which Avid | Edit On Demand operates implements the following
security practices:
• Each customer's service is deployed in its own dedicated resource group with no
communication across resource groups from different deployments.
• Edit VMs have no public network exposure. The only external traffic allowed is via the
Teradici Cloud Access Manager encrypted PCoIP connection.
• All backend VMs are protected from public network exposure.
Port Usage
The following ports are used to enable file transfers and remote access to Media
Composer VMs.
FileCatalyst Outbound (client to server):
• TCP 443 (HTTPS)
• TCP 990 (Control port)
• TCP 8000-8999 (TCP data ports)
• UDP 8000-8999 (UDP data ports for file transfers)
Teradici Outbound (client to server):
• TCP 443 (HTTPS/Control)
• TCP 60443 (alternate Control port)
• TCP & UDP 4172 (PCoIP session)
Teradici Inbound (server to client):
• TCP & UDP 4172 (PCoIP session)
30You can also read