Nuance CDE One Coder Training End User Guide v2.5 May 2021 - cloudfront.net
←
→
Page content transcription
If your browser does not render page correctly, please read the page content below
Coder Training End User Guide
                                                        Version 2.5
                                                         May 2021

Nuance CDE One
Coder Training End User Guide v2.5
May 2021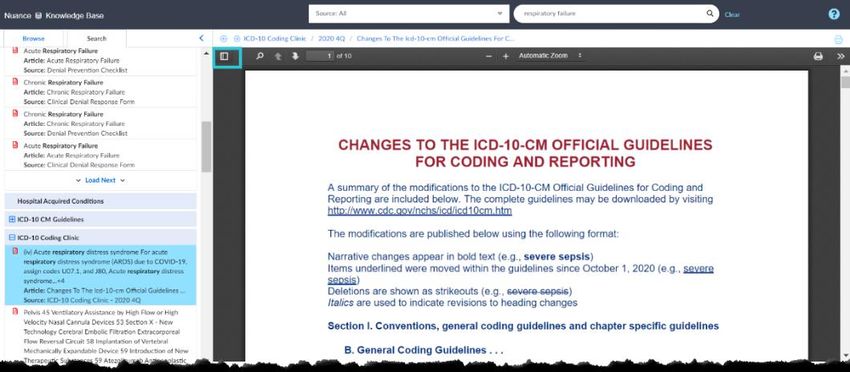
Trademarks
Nuance®, the Nuance logo, CDE, CDE One, Enterprise Express®, PowerScribe®, PowerConnect™, and
PowerMic™ are trademarks or registered trademarks of Nuance Communications, Inc. and/or its
subsidiaries in the United States and/or other countries.
Other names and trademarks referenced herein are trademarks or registered trademarks of their
respective owners.

Copyright Notice
This publication is copyrighted, and all rights are reserved by Nuance Communications, Inc. No part
of this publication may be reproduced, transmitted, transcribed, stored in a retrieval system, or
translated into any language or computer language, in any form or by any means, electronic,
mechanical, magnetic, optical, chemical, manual, or otherwise, without the prior written permission
of Nuance Communications, Inc., 1 Wayside Rd., Burlington, MA 01803.
Copyright © 2002-2020 Nuance Communications, Inc. All rights reserved.

Disclaimer
This document is provided "AS IS" WITHOUT WARRANTY OF ANY KIND, EITHER EXPRESSED OR
IMPLIED, INCLUDING, BUT NOT LIMITED TO, THE IMPLIED WARRANTIES OF MERCHANTABILITY,
FITNESS FOR A PARTICULAR PURPOSE, OR NON-INFRINGEMENT. Nuance shall not under any
circumstances be liable to any person for any special, incidental, indirect or consequential damages,
including, without limitation, damages resulting from use of OR RELIANCE ON the INFORMATION
presented, loss of profits or revenues or costs of replacement goods, even if informed in advance of
the possibility of such damages.
Every effort has been made to ensure the accuracy of the information presented. However, Nuance
assumes no responsibility for the accuracy of the information. Product information is subject to
change without notice. Changes, if any, will be incorporated in new editions of this publication.
Nuance may make improvements and/or changes in the products and/or the programs described in
this publication at any time without notice. Mention of non-Nuance products or services is for
information purposes only and constitutes neither an endorsement nor a recommendation.
Nuance Communications
One Wayside Road
Burlington, MA 01803
www.nuance.com/healthcare

-
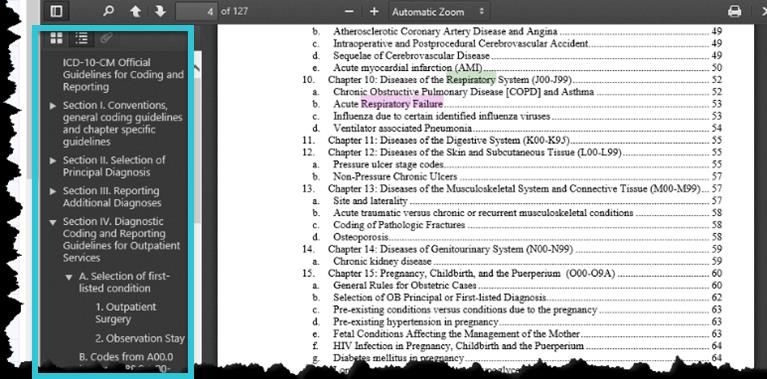
TABLE OF CONTENTS
Introduction: What is Clinical Documentation Excellence? ............................. iii

Chapter 1 – The CDE User Interface ................................................... 1
Getting Help ..................................................................................................... 2
Help menu ........................................................................................................ 3

Chapter 2 – The CDE Knowledge Base ............................................... 5
Proven Methodologies: Knowledge Base ........................................................ 7

Chapter 3 - The CDE One Prioritized Worklist ................................... 9
Benefits of the CDE One Worklist .................................................................... 9

Chapter 4 – Viewing Encounters ...................................................... 13
CDE Worksheet .............................................................................................. 13
CDS Assistant and Document Viewer ............................................................. 13
Review ............................................................................................................ 15
Clarifications .................................................................................................. 16
Reconciliation ................................................................................................. 17

Chapter 5 – Notifications and Messaging ........................................ 19
Appendix .......................................................................................... 25

© 2020 Nuance Communications, Inc. All rights reserved.                                                              i
CDE One Coder Facilitator Guide                                                                May 2021
Version 2.5

Introduction: What is Clinical Documentation Excellence?
Nuance Clinical Documentation Excellence (CDE) is a cloud-based, automated CDI program,
encompassing two parts: CDE One and CDE One with Workflow
CDE One is the AI-powered worklist prioritization and analytics functionality that helps impact
quality and optimize CDS productivity. CDE One includes
•      Triage worklist
•      Encounter prioritization
•      Clinical Language Understanding (CLU) engine suggested diagnoses
•      EHR Document viewing within the software (based on configuration)

CDE One with Workflow includes:
       •      CDI workflow and clarification management for adult and pediatric encounters
       •      Interactive notes between CDS and Coder within the encounter and worklist view
       •      Clinical Language and Index code search flexibility
       •      Decision Trees - robust clinical documentation improvement strategies
       •      Knowledge Base with searchable Coding References
       •      MS/APR DRG capabilities with SOI/ROM calculation
       •      Program analytics

Related Documentation
For supplemental information, see the following document(s):
       •      CDE One Quick Reference Guide

© 2020 Nuance Communications, Inc. All rights reserved.                                              iii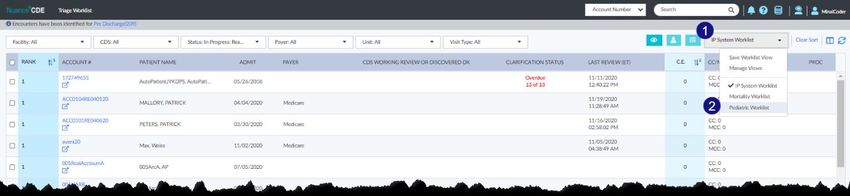
CDE One Coder Training End User Guide                                                        MAY 2021
Version 2.5
                                                                                                            1
CHAPTER 1 – THE CDE USER INTERFACE
Upon successful login, you will land on your worklist. Outlined below are some general navigation
features to help you easily use the dashboard.

1. Quick Search Type: The quick search dropdown menu allows you to quickly find a patient
   encounter in your system. The following quick search options are available: Account number,
   MRN (Medical Record Number), and Patient name.
2. Quick Search Value: Select a quick search type and enter your search parameter. Note: This is a
   “contains” search, so it will find any value that contains what you are searching for. Press enter
   or    to return your results.

3. Resources: Use these icons               to access Notifications, CDE Help, the CDE Knowledge
   Base or CDE Live Chat (depending on your permissions)
4. Logged in user: Displays the username that is currently logged into the system
5. Filter Bar: Click the down arrow on a filter that you want to apply to your worklist. One, many or
   all values can be selected, and multiple filters can be applied at a given time. You can filter by
   Facility, CDS, Status, Payer, Unit or Visit Type. Note: By default, the worklist is filtered by the
   following encounter statuses: In Progress, Ready to Reconcile, Review Complete, Untouched.
6. Columns: The worklist is made up of multiple columns of information based on patient
   admission information or AI-enabled documentation improvement indicators. Each column
   header contains hover text explaining what the column contains. The values in the columns also
   have hover text providing further details about that value.
7. Pre-Discharge Worklist: CDE One queues up encounters on this list to let you know that
   encounters need to be reviewed as a priority and that they are time sensitive. Use this worklist
   as a Priority Review follow-up list.

© 2020 Nuance Communications, Inc. All rights reserved.   CDE One Coder End User Guide 2.5              1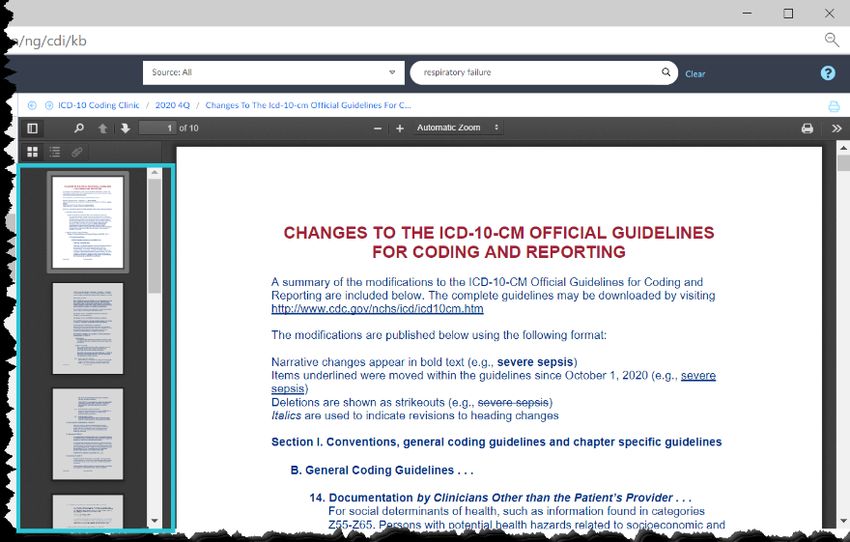
CDE One Coder Training End User Guide                                                                    MAY 2021

1       Version 2.5

    Getting Help
    Live Chat
    To help support training and ease use of CDE One/CDE Triage, Nuance offers real-time access to
    experts within the solutions through Live Chat. There are two categories of assistance.
    During implementation and training of your CDS team:
    •    Training connects you with an expert who can assist you with CDE One/CDE Triage solution
         features and functions.

    Post implementation:

    •    Training connects you with an expert who can assist you with CDE One/CDE Triage solution
         features and functions.
    •    Support connects you with an expert who can assist you with technical issues.

    Accessing Live Chat

    1. Click the Live Chat icon in the top right-hand corner of the Nuance CDE screen
    2. Access help through the drop-down menu. During implementation, only Training will be
       available. If no agents are currently available, there is an X next to the drop-down menu item
       and the menu item is disabled

    3. Select the desired available category for assistance
    4. Your chat will begin in a separate pop-up window

    5. To save the chat conversation at any time, click Save Chat in the upper left corner. To end your
       chat session, click End Chat in the upper right corner to close the window

    2                                  CDE One Coder End User Guide 2.5   © 2020 Nuance Communications, Inc. All rights reserved.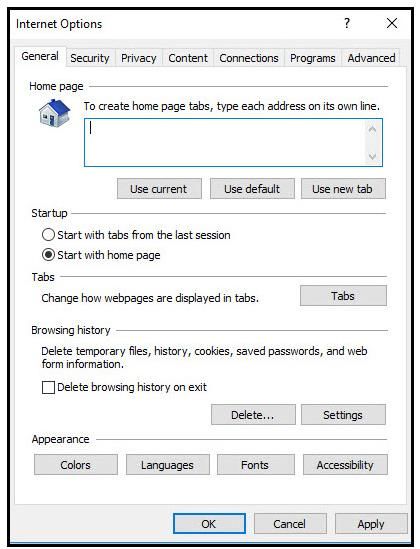
CDE One Coder Training End User Guide                                                                    MAY 2021
Version 2.5
                                                                                                                            1
Help menu
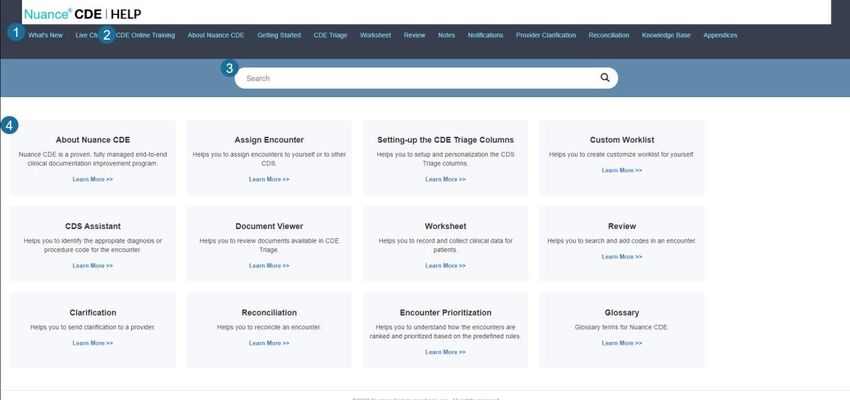
When you need more information on a topic, use the CDE help system. To open help, click the Help
link  below your name in the upper-right corner of the page. This will open up a new window in
your browser. Here, you’ll be able to get the answers you need quickly, either via                    the quick links
in the navigation bar,   by opening CDE Online Training,   via the search function or                        by
opening one of the “Learn More” boxes, which answer your Frequently Asked questions.
To exit the Help section, click the X in the tab for this web page

CDE Online Training
In the help section, you have access to online training modules to help you make the most of CDE
One. We have embedded a series of interactive eLearning modules that are beneficial for anyone
just getting started with CDE or for an existing CDS that needs a refresher on the system, the
workflow, or any of the different features and functions of the application.
Training includes a What’s New video archive, eLearning modules that incorporate best practices,
practice scenarios and FAQs to help you with all aspects of the CDE application and the workflow,
plus Resources to accompany the training.

Accessing Training
1. Click the Help icon                         on the CDE navigation bar
2. Select CDE Online Training from either the Help navigation bar or the link on the Help page
3. Click a training link to open your desired training module or resource

© 2020 Nuance Communications, Inc. All rights reserved.            CDE One Coder End User Guide 2.5                     3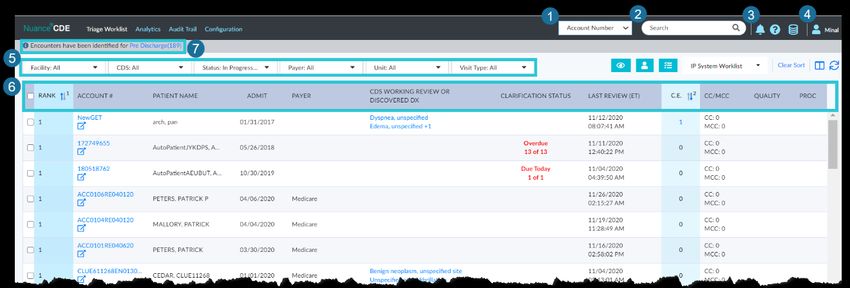
CDE One Coder Training End User Guide                                                                    MAY 2021

1       Version 2.5

    4                                  CDE One Coder End User Guide 2.5   © 2020 Nuance Communications, Inc. All rights reserved.
CDE One Coder Training End User Guide MAY 2021
Version 2.5
2
CHAPTER 2 – THE CDE KNOWLEDGE BASE
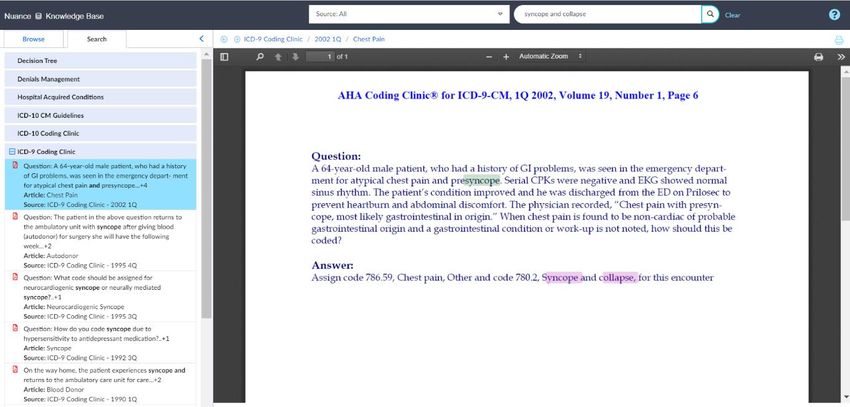
The Nuance Knowledge Base has been incorporated into the CDE navigation bar. Just click the
Knowledge Base icon to launch. Use the Knowledge Base to browse ICD-10 Guidelines and
Coding Clinics while working in an encounter or independently of your review.
Note: The CDE Knowledge Base opens in a separate window which can be moved to suit your
workflow.
The Knowledge Base includes the following resources:
• Decision Trees
• Denials Management
• Hospital Acquired Conditions
• ICD-10 CM Guidelines
• ICD-10 Coding Clinics
• ICD-9 Coding Clinics
• ICD-10 Coding Clinical Indicators
• ICD 10 PCS Definitions and Keys
• ICD-10 PCS Guidelines
• ICD-10 PCS Reference Manual
• MS-DRG Changes
• Patient Safety Indicators (AHRQ) – Adult
• Patient Safety Indicators (AHRQ) – Pediatric
© 2020 Nuance Communications, Inc. All rights reserved. CDE One Coder End User Guide 2.5 5CDE One Coder Training End User Guide MAY 2021
2 Version 2.5
Where you have the ability to view by page or outline view, a green dot indicates this option:
Page view:
Outline view:
6 CDE One Coder End User Guide 2.5 © 2020 Nuance Communications, Inc. All rights reserved.CDE One Coder Training End User Guide MAY 2021
Version 2.5
2
Proven Methodologies: Knowledge Base
• Browse resources while working in an encounter
• Use the keyword search and filter by source to narrow your query
• Use Ctrl-F to search within a PDF
• Use quotation marks (“ ”) around term for an exact match
• Search using a minimum of 3 characters (required)
• Use full code to search for clinical indicators
© 2020 Nuance Communications, Inc. All rights reserved. CDE One Coder End User Guide 2.5 7CDE One Coder Training End User Guide MAY 2021
2 Version 2.5
8 CDE One Coder End User Guide 2.5 © 2020 Nuance Communications, Inc. All rights reserved.CDE One Coder Training End User Guide MAY 2021
Version 2.5
3
CHAPTER 3 - THE CDE ONE PRIORITIZED WORKLIST
Benefits of the CDE One Worklist
The CDE One Worklist is your home base for working encounters. Encounters are prioritized so you
can see which to review first, and the Pre-Discharge Worklist queues up encounters to let you know
that encounters need to be reviewed as a priority and that they are time-sensitive.
We also understand that you may want to customize your worklist and save it for reuse. Worklist
customization allows you to organize your worklist, so it best suits your workflow, whether that
means changing the columns displayed, reordering the columns, or saving different views for
different times of the day.
CDE One’s worklist columns are Artificial Intelligence-enabled and prioritized based on this AI
technology. Explain: why prioritization is important.
In this lesson, we'll look at these steps:
• Pre-Discharge Worklist
• Assigning encounters
• Prioritizing encounters and managing exclusions
• Customizing your worklist
• Launching the CDS Assistant
• Mortality Worklist
Coder Worklist View
Coders have the ability to view, but not edit, the entire encounter. This gives you access to all the
screens in an encounter with a read-only view, giving you visibility into the encounter at any time
during the encounter or after discharge, which enables you to begin your work earlier and more
completely.
The first screen you see when you log in is the Triage Worklist.
© 2020 Nuance Communications, Inc. All rights reserved. CDE One Coder End User Guide 2.5 9CDE One Coder Training End User Guide MAY 2021
3 Version 2.5
Pre-Discharge Worklist
This worklist pulls out the most important encounters to their own standalone worklist. CDE One
queues up encounters on this list using Artificial Intelligence to let you know that encounters need
to be reviewed as a priority and that they are time sensitive. Use this Pre-Discharge Worklist as a
Priority Review follow-up list.
CDE One looks at all of your encounters and reassigns to the Pre-Discharge List those meeting very
specific criteria, so you can identify, without a doubt, which encounters to look at first. Only cases
that satisfy these stringent criteria will be placed on the Pre-Discharge Worklist:
LOS is within 24 hours of GMLOS and
• Outstanding impact clarification (CC/MCC/PDX) or
• The encounter is a Target DRG (Working Review) or
• The encounter is a Target Diagnosis (Working Review-PDX) or
• The encounter is an at-risk diagnosis (Working Review-PDX or any other position) or
procedure excision debridement (Primary Procedure or any other position)
The Pre-Discharge Worklist is designed to be checked at various points throughout the day. It
updates as soon as cases meet its strict criteria.
Simply follow these steps to incorporate the Pre-Discharge Worklist into your review workflow:
1. Check the Pre-Discharge Worklist first
2. Do follow-up reviews on any encounters in the Pre-Discharge Worklist
3. Return to your current worklist and proceed with your standard workflow or CDI process
Note: The Pre-Discharge Worklist is disabled by default. It can be enabled in the Configuration
Directory by your Facility Admin.
10 CDE One Coder End User Guide 2.5 © 2020 Nuance Communications, Inc. All rights reserved.CDE One Coder Training End User Guide MAY 2021
Version 2.5
3
Key Columns
Column Name Description
DRG Column You will see suggested DRGs on your worklist in the DRG column. If the
CLU engine has suggested a Principal Diagnosis, the suggested DRG
appears in blue hyperlink. Hover your mouse over the suggestion to see
the DRG alongside the suggested principal diagnosis.
Admit Service Column This worklist column shows who at present is responsible for the
patient (e.g., Cardiology or Emergency). This may help you assign or
identify cases for special reviews or flag cases for your team’s initiatives
with different service lines.
Notes Column This is a quick way for you to preview the latest notes on an encounter
on your worklist screen. The Notes column displays the first 15
characters of the most recent note on the encounter. When you hover
over the Notes hyperlink, a tooltip pops up with the details of the note
Clarification Status When you hover over an overdue clarification notification, a tool tip will
Column show you the details of what is due:
Overdue and Due Today statuses display in Red
Due in 1 day and Responded statuses display in Black
Closed displays in Gray
GMLOS Column This column displays the value from Working Review and/or Possible
Review is now available to be added to your worklist. In the worklist
view, both Working and/or Possible GMLOS will display. This worklist
column is sortable.
Discharge Status In case your facility wants to monitor by discharge status, a new column
Column called Discharge Status has been added. This helps you with a quick
visual of the patient’s status without leaving the worklist.
When you hover over the discharge status, the tooltip displays the full
description of the discharge status.
Patient Safety Indicators (PSI) Flag
Quality measures are becoming increasingly more important to a hospital's reimbursement, and
more onus is being placed on the CDS to identify opportunities that help improve their hospital's
quality scores. To address this need, we've enhanced CDE to include in-workflow Patient Safety
Indicators and alert resolution functionality.
If there's a code that is considered quality-related, you will see a flag on the Worklist, in the Quality
column. Click the flag to go directly into the CDS Assistant and view the Quality Alert and
documentation in the record.
© 2020 Nuance Communications, Inc. All rights reserved. CDE One Coder End User Guide 2.5 11CDE One Coder Training End User Guide MAY 2021
3 Version 2.5
The Pediatric Worklist
We added a standalone Pediatric worklist, which separates out Pediatric encounters from adult
population encounters and helps a CDS review PDIs and focus on SOI and ROM. There is also a
separate set of worklist prioritization rules for Pediatric encounters. If your CDSs review Pediatric
and Adult patients separately, you may want to look at Pediatric encounters on the Pediatric
worklist. By default, all encounters are on the default worklist, so this will depend on the Facility's
configuration and workflow. You will see this separate Pediatric worklist in your Worklist drop-down
menu.
Accessing the Pediatric Worklist:
1. Open the Worklist View dropdown menu
2. Select Pediatric Worklist
Mortality Worklist
To help you evaluate your expired patients, a dedicated mortality worklist has been created. Use
this dedicated worklist to identify cases and begin a mortality review of deceased patients in which
missed evidence or documentation could support/indicate a higher risk of mortality.
When a patient expires, the case populates in the Mortality Worklist for review. Capturing severity
of illness and risk of mortality in an expired patient is important, and an encounter with SOI or ROM
of 1 or 2 would need review. This worklist will include all inpatient deceased patients, based on your
facility’s configuration, but not without an admit date.
Default columns: Patient Name, Discharge Date, LOS, Payer, Final Coded DRG, Working or
Discovered DX, Clari Status, SOI, ROM, CC/MCC, Quality, Procedure
Default sort: Primary = Discharge Date; Secondary = LOS
12 CDE One Coder End User Guide 2.5 © 2020 Nuance Communications, Inc. All rights reserved.CDE One Coder Training End User Guide MAY 2021
Version 2.5
4
CHAPTER 4 – VIEWING ENCOUNTERS
Coders have the ability to view, but not edit, the entire encounter. This gives you access to all the
screens in an encounter with a read-only view, giving you visibility into the encounter at any time
during the encounter or after discharge, which enables you to begin your work earlier and more
completely.
CDE Worksheet
On the Worksheet, you can view notes a CDS may have made during their review of CDE One's
Clinical Language Understanding (CLU) suggestions and the patient chart.
CDS Assistant and Document Viewer
Note: Depending on your configuration, there may not be a data feed from your EHR to the CDS
Assistant. If this is blank, there is no data feed.
Open CDS Assistant to review CDE-suggested codes that the CDS has evaluated as part of the
encounter review. By default, the CDS Assistant view opens when you click the CDS Assistant icon.
Click Document Viewer to switch to the Document Viewer to see all the documents imported for the
CLU engine and CDS review. In this view you can review the H&P, Consultations, progress notes,
Radiology, etc. Note: documents displayed in Document Viewer varies based on facility
configuration.
© 2020 Nuance Communications, Inc. All rights reserved. CDE One Coder End User Guide 2.5 13CDE One Coder Training End User Guide MAY 2021
4 Version 2.5
Sorting in the Document Viewer
It has been noticed that long-stay encounters have many documents to sort through in a review. To
help expedite reviews and optimize your workflow, we have added the ability to change the sort
order of documents in the Document Viewer in each section. With one click, you can sort records by
newest or oldest.
Click the Newest/Oldest toggle at the top of the Document Viewer to arrange the documents in
chronological order (Newest to Oldest or Oldest to Newest), depending on your preference. Click
again to reverse the order.
14 CDE One Coder End User Guide 2.5 © 2020 Nuance Communications, Inc. All rights reserved.CDE One Coder Training End User Guide MAY 2021
Version 2.5
4
Preliminary Status Indicator
When viewing documents in the document viewer, a visual indicator appears showing that the
document is in PRELIMINARY (draft) status.
A document in Preliminary Status has not been completed/signed by the physician, so the
documentation cannot be used until it is. However, it gives you an early insight into where the
encounter (via the documentation) is going. This visual indicator helps improve readability within
the Document Viewer and gives you a clear understanding of the status of the documents you are
reviewing.
HC and HR Indicators
The HCC and Rx HCC flags added in the CDS Assistant helps you distinguish the type of diagnosis
code that CDE's engine has identified. The new flags are as follows:
HC: A Hierarchical Condition Category (HCC) code has been identified
HR: A Prescription Drug Hierarchical Condition Category (RxHCC) code has been identified
Review
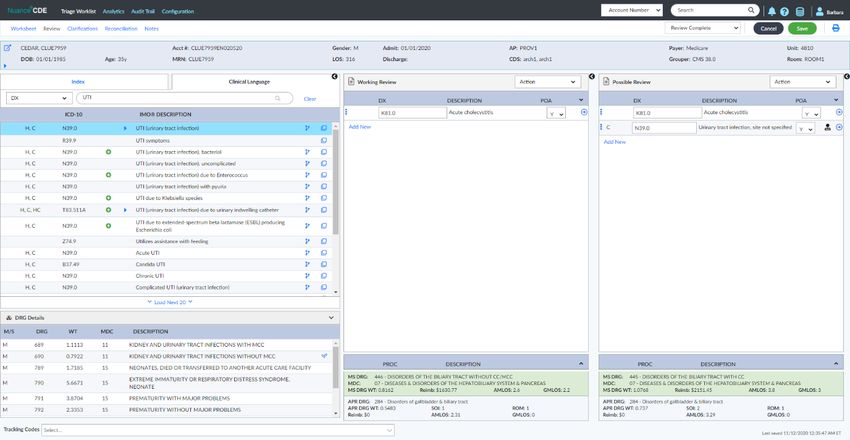
On the Review page, use the Index Code Search functionality to look at codes the CDS moved to
Working or Possible Review. You can also link to the Knowledge Base from here as well, and
research any of the codes in Working and/or Possible Review.
What can a Coder do on the Review page?
© 2020 Nuance Communications, Inc. All rights reserved. CDE One Coder End User Guide 2.5 15CDE One Coder Training End User Guide MAY 2021
4 Version 2.5
1. Do a DX or Procedure index code search
2. Begin the index code search by entering a DX or PROC description
3. Click this icon to search the Knowledge Base for the selected code
4. Click this icon to review Code Level Notes for the selected code
5. Search the Knowledge Base for any code a CDS may have added to the Working or Possible
Review
Index Code Search
In the Coder view, you have access to the Index Code Search functionality to look up Diagnosis or
Procedure codes. Start with the base term/root operation and drill down to the specificity from
there.
Clarifications
Here, you can read the clarifications screen and the response for each clarification instance. This is
helpful for you to see provider response and date of the response to view it in the record.
16 CDE One Coder End User Guide 2.5 © 2020 Nuance Communications, Inc. All rights reserved.CDE One Coder Training End User Guide MAY 2021
Version 2.5
4
Reconciliation
Review the Reconciliation screen when there is a mismatch between the Coder and CDS. The CDS
will place the encounter on "Reconciliation Hold" status until the question regarding the diagnosis,
PDx, etc. is resolved. In some instances, the CDS will need to make adjustments to the Reconciliation
Assessment to accurately reflect the impact.
© 2020 Nuance Communications, Inc. All rights reserved. CDE One Coder End User Guide 2.5 17CDE One Coder Training End User Guide MAY 2021
4 Version 2.5
18 CDE One Coder End User Guide 2.5 © 2020 Nuance Communications, Inc. All rights reserved.CDE One Coder Training End User Guide MAY 2021
Version 2.5
5
CHAPTER 5 – NOTIFICATIONS AND MESSAGING
Notification Alerts
CDS-to-Coder notes, Coder-to-CDS notes, Coder-to-Coder notes and clarification responses (if
enabled) are now all part of the CDE Notifications functionality, and the notes reside within
encounters, rather than an individual CDS or Coder's account. You can access notifications from your
Worklist or at any point within your workflow.
If you send or respond to a note you become a “watcher” on that encounter, that means you will
receive all notifications for that encounter.
1. When you are within an encounter, you will see new notifications display as a badge with a
number on the notification icon
• The number indicates how many new notifications you have
2. Click the notification icon to open the notifications pop out panel
3. All your current notifications are shown in the notifications panel
• Click to open the notifications panel
• Click again to close the panel
Note: New notifications are displayed in bold
© 2020 Nuance Communications, Inc. All rights reserved. CDE One Coder End User Guide 2.5 19CDE One Coder Training End User Guide MAY 2021
5 Version 2.5
Filtering your notifications
Depending on your CDE configuration, you can filter your notifications to see just Notes or
Clarification Response, or to see All Read or All Unread notifications...you can select one or more
filters at a time.
Note: you will only see filtering options for the types of notifications available (e.g., if you have no
Clarification Responses or your facility is not configured to see these, you will not see this as a
filtering option)
Follow/Unfollow Notifications
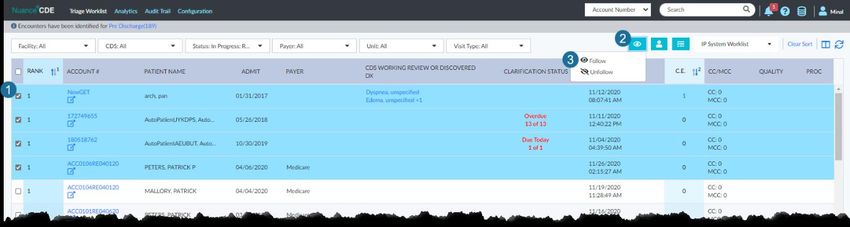
Now, you can follow or unfollow an encounter. When you follow an encounter, you will be added as
a “watcher” and receive notifications on the selected accounts.
Since notes are attached to encounters, and not to individual CDSs or Coders, this enhancement
gives you notifications on your worklist when there is a note or clarification response on any
encounter you choose, not only those to which you’re assigned. It is also valuable to CDI Managers,
as they can watch encounters for an individual CDS or unit.
To follow an encounter:
1. Select the encounter(s) you wish to follow.
2. Open the Follow drop-down menu.
3. Click Follow (a "success" notification appears when you have followed accounts)
Note: use the same steps to Unfollow encounter(s)
20 CDE One Coder End User Guide 2.5 © 2020 Nuance Communications, Inc. All rights reserved.CDE One Coder Training End User Guide MAY 2021
Version 2.5
5
Sending Notes
The CDS and Coder note system works hand-in-hand with the Notifications functionality. This
enables CDS to CDS, Coder to Coder, CDS to Coder, or Coder to CDS communication about a specific
encounter. This helps create a communication channel on a specific encounter, without the need to
use the worksheet for notes. Coders and CDSs can use this tool to discuss clarifications or to provide
status on a reconciliation hold encounter, for example.
Note Type
CDE – Coding: Use this for CDS-to-Coder communication
Coding – CDE: Use this for Coder-to-CDS communication
Coding – Coding: This is used for Coder-to-Coder communication regarding a specific encounter, and
will appear in the Notes section for the encounter, however a Coder to Coder note can only be
initiated by a coder
IMPORTANT NOTE: These are NOT notes between individual CDSs and/or Coders, rather the notes
follow the encounter, so that any CDS, Coder, or CDI Manager who works on an encounter can read
the message trail for that encounter.
Creating a New Note
1. Click Notes in the navigation bar on any encounter to navigate to the Notes page
2. Click Add New
3. Enter a Subject
4. Select a Note Type
5. Draft your Message
6. Click Discard Draft to trash a note prior to sending
7. Click Send
© 2020 Nuance Communications, Inc. All rights reserved. CDE One Coder End User Guide 2.5 21CDE One Coder Training End User Guide MAY 2021
5 Version 2.5
Note: Notes cannot be deleted after sending. They become part of the message trail for an
encounter.
What happens once a note is sent?
Once a note is sent, it appears on the CDS or Coder notifications list for that encounter and they
become “watchers” to those notes. This means they will get notifications on their Worklist vs.
having to go into a specific encounter to see any notes.
Once a note is received, the CDS or Coder can reply to the note, and that will be added to the
communication thread… you (the sender) will receive a notification on your Worklist once they’ve
replied.
Important: Notes follow an encounter, so even if the CDS assignment changes, the note stays with
the case. Remember, notes are sent/received at the encounter level and tied to the user's role (CDE
or Coding) and not to the individual CDS or Coder.
Proven Methodologies
• Use notes for communicating coverage details, clarification updates (e.g., a provider isn’t
responding because they are on leave), or any other item you want to communicate CDS to
CDS or CDS to Coding about the encounter.
• Use the Worksheet for documenting details about the review of the case
22 CDE One Coder End User Guide 2.5 © 2020 Nuance Communications, Inc. All rights reserved.CDE One Coder Training End User Guide MAY 2021
Version 2.5
5
Scenarios: Notifications and Messaging
Scenario 1: Identify new alerts on your worklist
1. Open your Triage Worklist
Observe: how many new alerts are indicated or or
Scenario 2: You want to check your notifications from the Worklist
8. Click
Observe: which alerts are unread?
9. Click an alert to read
Observe: Notes section opens
Scenario 3: Create a CDE-Coding note because you are waiting for a provider to respond to a
clarification
1. From the encounter, click
Observe: Notes section opens
2. Click
3. Enter a Subject
4. Select CDE – Coding from the Type drop-down menu
5. Type your note in the Message section
6. Click
Observe: New note appears on the left side of the screen, in the Notes section
Scenario 4: You are going on leave and want to create a note for the covering CDS
1. From the encounter, click
Observe: Notes section opens
2. Click
3. Enter a Subject
4. Select CDE – CDE from the Type drop-down menu
5. Type your note in the Message section
6. Click
Observe: New note appears on the left side of the screen, in the Notes section
© 2020 Nuance Communications, Inc. All rights reserved. CDE One Coder End User Guide 2.5 23CDE One Coder Training End User Guide MAY 2021
5 Version 2.5
Scenario 5: The Coder has left you a message on a DRG mismatch and you want to reply
1. Click to open the Notifications panel
2. Select a note from the list
Observe: Notes page opens
3. In the Notes section, select the note to which you want to reply
4. Type your reply in the Message section
5. Click
Observe: displays and your reply appears in the message thread
Frequently Asked Questions
Do I need all these sections in the Worksheet?
No. We recommend a consistent set of sections, but the screen is customizable.
How does this apply to my daily workflow?
Once you set up your Worksheet, you can then use the sections to help guide your workflow.
Where do labs go?
You can use the diagnostic section or create a section to collect notes on labs.
What happens if I remove a section with text in it?
You will lose that text if you don't copy the note to a different section before removing it.
How do notes impact Analytics?
If a Coder sends, receives, or responds to a note, it will NOT impact analytics at all.
For the CDS:
• Adding a note does not count towards an initial review
• Adding a note does count towards a re-review.
Can I send a note to a specific CDS or Coder using the CDE Notes functionality?
No. Notes follow an encounter, are sent/received at the encounter level, and are tied to a user's role
(CDE or Coding) and not to the individual CDS or Coder. If you want to send a personal note to a CDS
or Coder, use email or other internal messaging system.
24 CDE One Coder End User Guide 2.5 © 2020 Nuance Communications, Inc. All rights reserved.CDE One Coder Training End User Guide MAY 2021
Version 2.5
APPENDIX
Configuring your Browser
Nuance CDE uses Microsoft Internet Explorer as its Web browser. For the application to function
properly, you need to configure your browser to display the correct font size, use the proper
settings, and get updated pages every time it connects to the server.
Note: Make sure you are not signed into the Nuance CDE application when configuring the browser.
Internet Explorer Settings
1. Start Internet Explorer.
2. Configure the Internet options as follows:
a. Select Tools > Internet Options.
b. On the General tab, in the Temporary Internet Files or Browsing History section,
click Settings.
3. On the Temporary Internet Files tab, from the Check for newer versions of stored pages section,
select one of the following radio buttons as necessary:
a. Every time I visit the page
b. Every time I start Internet Explorer
c. Automatically
Note: Do not select the Never radio button.
© 2020 Nuance Communications, Inc. All rights reserved. CDE One Coder End User Guide 2.5 25CDE One Coder Training End User Guide MAY 2021
Version 2.5
Figure 1: Temporary Internet Files Tab
4. Click OK to close the Settings window and apply the change.
5. Click OK to close the Internet Options window.
6. Configure the text size by selecting View > Text Size > Medium.
7. Configure the encoding by selecting View > Encoding > Auto-Select.
8. Restart your browser to apply all settings.
Note: The use of supplemental browser toolbars such as Yahoo! Companion or Google is not
recommended with CDE. You should remove or disable these toolbars when using CDE.
Security Settings
Make sure that the Nuance CDE server is added as a trusted site, so that these settings apply only to
Nuance CDE and do not affect other Internet/Intranet applications.
Follow the steps below to add CDE as a trusted site:
1. Click Tools in the Internet Explorer toolbar
2. Select Internet options from the menu
3. Click the Security tab
4. Click
5. On the Security tab, click
6. Add your CDE URL to Trusted Sites
a. Make sure your CDE URL is listed. If not, add it (Note: it will look something like
MyHealthcareOrg.nuancecdi.com)
b. Make sure “Require server verification…” is unchecked
26 CDE One Coder End User Guide 2.5 © 2020 Nuance Communications, Inc. All rights reserved.CDE One Coder Training End User Guide MAY 2021
Version 2.5
7. Add the following URLs to Trusted Sites
a. https://app.powerbi.com/ (used for accessing CDE Analytics)
b. https://dc.services.visualstudio.com/ (used for accessing application insight)
c. https://az416426.vo.msecnd.net (used for accessing CDE Analytics)
d. https://*.analysis.windows.net/ (used for accessing CDE Analytics)
e. https://nuancehdp.auth0.com (used for central authentication)
Disabling the Clipboard pop-up
The first time you use CDE One, you may see an IE message.
To disable this alert:
1. Click Tools in the Internet Explorer toolbar
2. Select Internet options from the menu
3. Click the Security tab
4. Click
5. Click
6. From the Scripting section, select Enable for Allow Programmatic Clipboard Access
© 2020 Nuance Communications, Inc. All rights reserved. CDE One Coder End User Guide 2.5 27CDE One Coder Training End User Guide MAY 2021
Version 2.5
Google Chrome Settings
Nuance CDE One is compatible with the Google Chrome browser. The minimum supported Version
for Google Chrome is Version 83.0.4103.97 (Official Build) (64-bit).
To see your current Google Chrome version: Click the three-dot icon ⋮ in the top-right corner of your
browser window and click Help > About Google Chrome.
To update Google Chrome to the latest version:
1. On your computer, open Google Chrome
1. At the top-right corner, click ⋮
2. Click Update Google Chrome
Note: if you do not see this option, you are on the latest version
3. Click Relaunch
Note: The browser saves your opened tabs and windows and reopens them automatically when it
restarts. Your incognito windows won't reopen when Chrome restarts. If you would prefer not to
restart straight away, click Not now. The next time you restart your browser, the update gets
applied.
To allow pop-ups:
1. On your computer, open Chrome
2. At the top right, click ⋮ and then click Settings
3. Under Privacy and security, click Site Settings
4. Click Pop-ups and redirects
5. At the top, turn the setting to Allowed
Proven Methodology
• Use Internet Explorer, as it is the browser of choice
• Disable/remove browser toolbar add-ons
28 CDE One Coder End User Guide 2.5 © 2020 Nuance Communications, Inc. All rights reserved.CDE One Coder Training End User Guide MAY 2021 Version 2.5 • Do not share your password or write it down • Choose a password that you can remember Frequently Asked Questions Who do I call if I forget my password? Contact your facility administrator who can reset your login ID and create a temporary password. You will be prompted to change the temporary password the next time you login. Who do I call if I can't connect to CDE One with the URL? Contact your facility administrator to troubleshoot. Buttons/features are not displaying or working as they should. Why is this happening? First, try re-launching the application. Then, try opening CDE One in a different browser. For example, if you are using Chrome, try using Internet Explorer © 2020 Nuance Communications, Inc. All rights reserved. CDE One Coder End User Guide 2.5 29
You can also read


