SASKTEL INTEGRATED BUSINESS COMMUNICATIONS (IBC)
←
→
Page content transcription
If your browser does not render page correctly, please read the page content below
SASKTEL

             INTEGRATED BUSINESS

             COMMUNICATIONS (IBC)

                ADMINISTRATOR USER GUIDE

March 2021
Version 6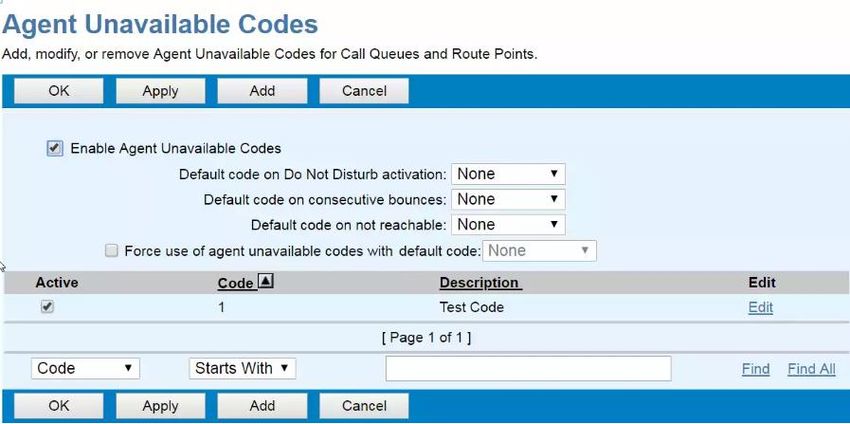
TABLE OF CONTENTS
ABOUT IBC ADMINISTRATOR WEB PORTAL ........................................................................................... 4
IBC HIERARCHY .......................................................................................................................................... 5
    Searching for Groups and Users........................................................................................................... 5
    Resetting User Password ...................................................................................................................... 5
    Adding an Administrator ........................................................................................................................ 6
    Editing and Deleting Administrators ...................................................................................................... 6
   Creating, Assigning Users and Group Services to a Department............................................................. 7
     Create a department within an Enterprise: ........................................................................................... 7
     Create a department within a group: ..................................................................................................... 7
     Assign Users and/Group Services ........................................................................................................ 7
     Assign a Group Service to a Department: ............................................................................................ 8
   Changing A User’s Profile ......................................................................................................................... 8
SCHEDULING ............................................................................................................................................... 9
ANNOUNCEMENT REPOSITORY ............................................................................................................. 10
   Setting up the Announcement Repository .............................................................................................. 11
MUSIC ON HOLD ....................................................................................................................................... 12
AUTO ATTENDANT .................................................................................................................................... 13
   Configuring Auto Attendant Settings ....................................................................................................... 13
     Configure Auto Attendant – Profile...................................................................................................... 14
     Configure Auto Attendant - Menus and Greetings .............................................................................. 15
     Configure Auto Attendant – Dialing Menu ........................................................................................... 15
     Configure Auto Attendant – Creating Submenus ................................................................................ 16
HUNT GROUP ............................................................................................................................................ 17
   Hunt Group Settings – Profile ................................................................................................................. 18
   Hunt Group Settings – Call Distribution Policies ..................................................................................... 19
   Hunt Group Settings – Call Forwarding .................................................................................................. 20
   Hunt Group Settings – Call forwarding Not Reachable .......................................................................... 21
   Hunt Group Settings – Calling Line ID .................................................................................................... 21
   Hunt Group Settings – Adding/Removing Users .................................................................................... 22
   Hunt Group Settings – Call Forwarding Busy ......................................................................................... 22
   Hunt Group Settings – Selective Call Forwarding .................................................................................. 23
   Hunt Group Settings – Priority Alert ........................................................................................................ 24
   Hunt Group Settings – Selective Call Accept/Reject .............................................................................. 25
     Selective Call Acceptance ................................................................................................................... 25
     Selective Call Rejection ...................................................................................................................... 26
   Hunt Group Settings – Voice Mail ........................................................................................................... 28
CALL QUEUE ............................................................................................................................................. 28
   Call Queue – Profile ................................................................................................................................ 29
   Call Queue – Agent Unavailability Codes ............................................................................................... 31
   Call Queue – Assigning Agents .............................................................................................................. 32

SaskTel IBC Administrator User Guide                                                                                                                      2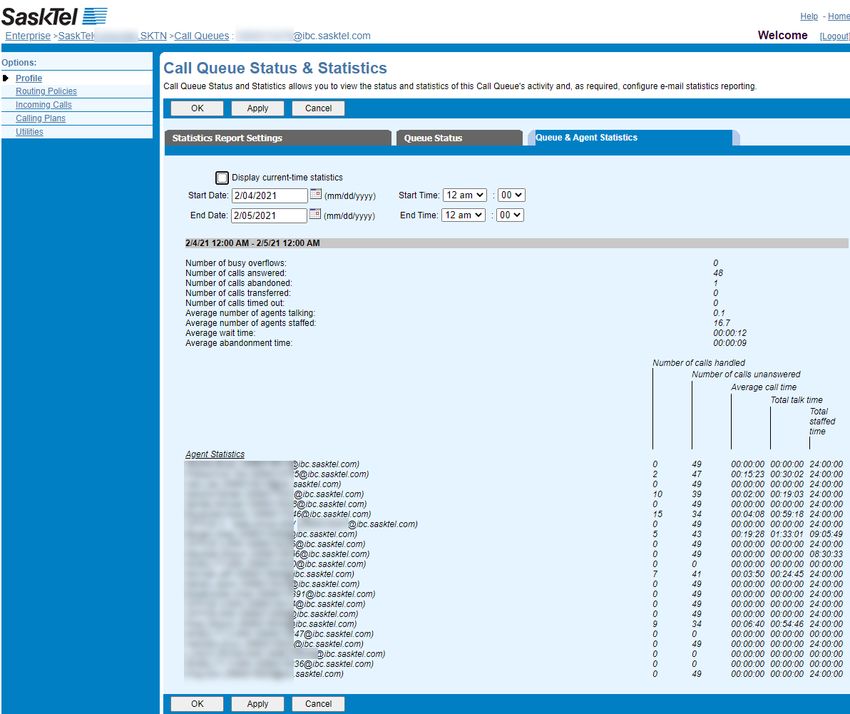
Call Queue – Status and Statistics ......................................................................................................... 33
     Call Queue Status and Statistics – Statistics Reporting Settings ....................................................... 33
     Example of Agent Statistics in cvs file format delivered to an email address ..................................... 35
     Call Queue Status and Statistics – Queue Status .............................................................................. 36
     Call Queue Status and Statistics – Queue & Agent Statistics ............................................................ 37
   Call Queue – Supervisors ....................................................................................................................... 37
   Call Queue – Thresholds ........................................................................................................................ 38
   Call Queue – Announcements ................................................................................................................ 40
     Call Queue Announcements – Entrance Message ............................................................................. 40
     Call Queue Announcements – Estimated Wait Message ................................................................... 41
     Call Queue Announcements – Comfort Message............................................................................... 42
     Call Queue Announcements – Music on Hold for Queued Calls ........................................................ 42
   Call Queue – Distinctive Ringing ............................................................................................................ 42
   Call Queue – Bounced Calls ................................................................................................................... 42
   Call Queue – Overflow ............................................................................................................................ 43
   Call Queue – Stranded Calls .................................................................................................................. 44
   Call Queue – Stranded Calls - Unavailable ............................................................................................ 45
   Call Queue – Call Forwarding Busy ........................................................................................................ 46
   Call Queue – Selective Call Forwarding ................................................................................................. 46
   Call Queue – Priority Alert....................................................................................................................... 46
   Call Queue – Selective Call Accept/Reject ............................................................................................. 46
     Selective Call Acceptance ................................................................................................................... 46
     Selective Call Rejection ...................................................................................................................... 46
   Call Queue – Voice Mail.......................................................................................................................... 47
VIRTUAL ON-NET ENTERPRISE EXTENSIONS (GROUP SPEED DIAL) ............................................... 47
ADDING COMMON DIRECTORIES TO THE DESKTOP PHONES .......................................................... 48
CALLING PLANS ........................................................................................................................................ 49
EXTENSION DIALING ................................................................................................................................ 50
CALLER ID AND LOCATION CODES ........................................................................................................ 51
MANAGE GROUP PAGING SETTINGS .................................................................................................... 54
CALL PARK GROUPS ................................................................................................................................ 55
   Adding Call Park Group and Settings ..................................................................................................... 55
CALL PICKUP GROUPS ............................................................................................................................ 57
AUDIO CONFERENCING ........................................................................................................................... 58
   Adding hosts to the Enterprise Audio Conference Bridge at a group level: ............................................ 58
   Configuring Audio Conference Ports at the Group Level ........................................................................ 61

SaskTel IBC Administrator User Guide                                                                                                                   3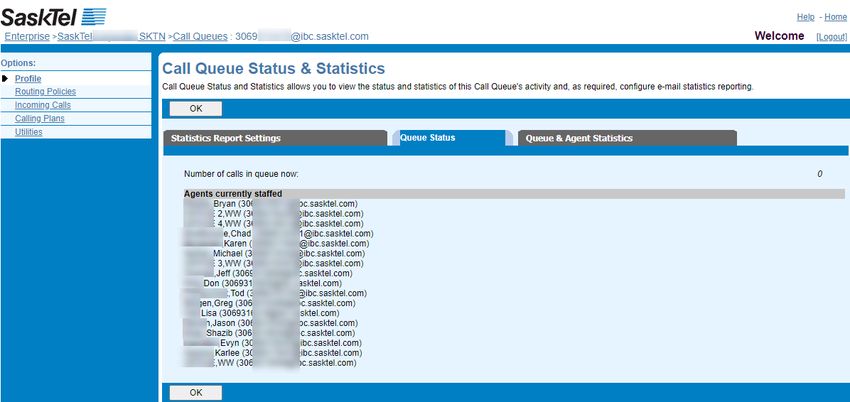
ABOUT IBC ADMINISTRATOR WEB PORTAL
This document provides an overview of the SaskTel IBC Administrator portal. The portal enables site
Administrators to manage and configure features and settings within the SaskTel IBC service from a web
browser from any location. More detailed information about features can be found in the IBC Feature
Guide at sasktel.com/ibsupport.
IBC Administrator Web Portal: Sign In and Navigation
  1. Go to: https://ibcportal.sasktel.com.
  2. Enter your Administrator User ID and Password, provided to you in the email from SaskTel.
     NOTE: It is recommended to reset your temporary password, immediately upon login for the first
     time.
  3. Click Login.

  4. Upon login, you will be routed to the Enterprise profile page.

SaskTel IBC Administrator User Guide                                                                     4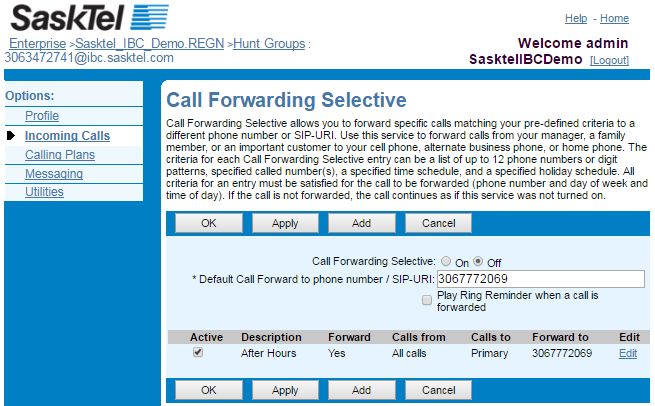
IBC HIERARCHY
There are four main levels of access to the SaskTel Administrator Web Portal:

         Enterprise > Group > Department > End User

    •   Enterprise level – An Enterprise Administrator can modify settings at the Enterprise, group, and
        end user levels. They also have full privileges at the group level to support Group/Department
        Administrators as well as end users.
        NOTE: By default, you will receive Enterprise level access.
    •   Group level – Groups are set up to represent individual cities or towns. As an Enterprise
        Administrator, you can create and assign people as Group Administrators. Group Administrators
        can modify settings at the group level, such as Auto Attendants, Hunt Groups, and Call Queues,
        and modify features and services that are assigned to any users within their group, city, or town.
        Group Administrators cannot change the user’s group but can change most of the user’s profile
        information, such as name, Calling Line Identification (CLID), title, email, and address.
    •   Department level – Departments are optional and can be set up to represent sub-groups of
        users within a group. Department Administrators can modify settings at the department level,
        such as Auto Attendants, Hunt Groups, and Call Queues if the feature is assigned to the
        department. Features and services that are assigned to any users within the department can also
        be modified. Department Administrators cannot change the user’s department but can change
        most of the user’s profile information, such as name, CLID phone number when enabled by a
        Group Administrator, title, email, and address.
    •   End User level – An end user is any employee with a TN and an IBC package. End users can
        log in to the IBC Web Portal and can only modify their own settings at an individual level.

Searching for Groups and Users

  1. Click Groups.
  2. Click Search to view the list of all groups.
  3. To see users, either:
     a) Select the group to which the user is assigned, then click Users.
     b) Or, click Users from the Enterprise level to view all users across all groups.
     NOTE: Features such as Auto Attendants, Hunt Groups, and Call Queues are group level features,
     which means you will need to first select the group they are assigned to before modifying the
     service.

Resetting User Password
As an Administrator, you can reset users’ IBC User
Web Access passwords. To reset the Enterprise
Administrator password, please contact SaskTel
Support at 1.844.SASKTEL.
  1. From the group profile page,
     click Users.
  2. Use the filters or click Search to
     view all users.
  3. Select the user by clicking anywhere
     in that row.
  4. Click Passwords.
  5. Select Set Web Access Password.
  6. Enter the new password and re-enter
     to confirm.
  7. Click OK.

SaskTel IBC Administrator User Guide                                                                     5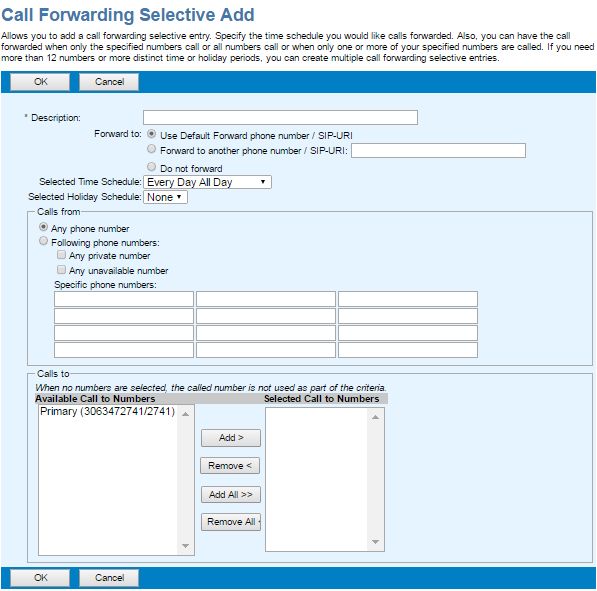
8. Notify the user of the new password.

     NOTE: The User ID and Password used to access the IBC User Web Portal is the same as that
     used to log in to all IBC Clients.

Adding an Administrator

As an Enterprise Administrator, you can add, edit, and delete all Group and Department Administrators.

To add a new Administrator to a group:

  1. From the Enterprise level,
      click Groups.
  2. Select the group to assign
      the Administrator to.
  3. Click Search to display a list
      of all the group IDs within the
      Enterprise.
  4. Click on the group ID from
      the list that you wish to add
      an Administrator to.
  5. Click Administrators.
  6. Click Add.
  7. Enter the Administrator ID.
  8. Enter the Last Name
      followed by
      the First Name of the Admin.
  9. Enter an Initial Password and
      re-enter to confirm.
  10. Based on the type of the
      Administrator, select Group
      or Department.
  11. Click OK to save.

Editing and Deleting Administrators

To edit or delete an existing Group and Department Administrator:

  1. Select the Administrator to modify.

  2. To delete, click Delete, then click OK.
  3. To edit, for example, to change the group or department Administrator’s password: Select the
     Administrator to modify.
     NOTE: To change the Enterprise Administrator’s password, please contact SaskTel Support at
     1.844.SASKTEL (1.844.727.5835).
  4. Enter the new password.
  5. Re-enter to confirm.

SaskTel IBC Administrator User Guide                                                                     6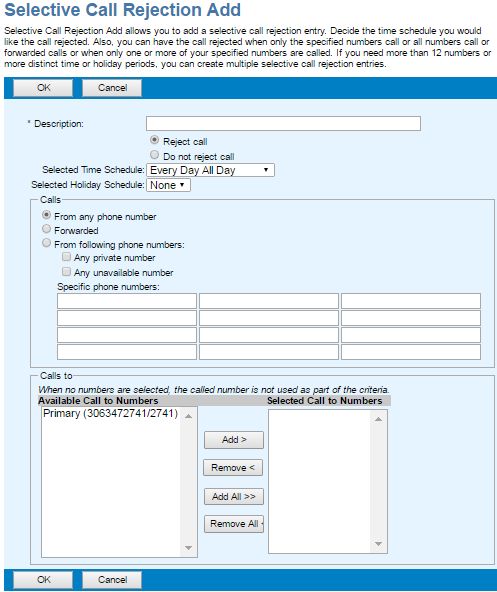
6. Click OK to save.

Creating, Assigning Users and Group Services to a Department
Managing the users in very large enterprises is enhanced by placing the users into departments.
   • Departments may be created either at the enterprise level or within a group.
   • Departments belong to the enterprise or group in which they were created.
   • A hierarchy of departments is supported in such a way that a parent department can have
       multiple sub-departments.
   • A department created within a group can extend an enterprise department or another department
       within the same group.
   • A department created within an enterprise cannot extend departments created at the group level.
   • A Group Administrator can extend the enterprise department hierarchy, but cannot create
       departments at the enterprise level.
   • All the departments that belong to a group must have a unique name within that group. Similarly,
       all the departments created at the enterprise level must have a unique name within the
       enterprise. However, it is possible to have duplicate department names in different groups or a
       department at the enterprise level, with the same name as a department at the group level.
   • Users created within a group may be assigned to any department created at the enterprise level
       or departments created within the same group. In this way, departments can span across multiple
       geographic locations. However, users cannot belong to a department that belongs exclusively to
       another group.
   • It is not possible to create Department Administrators for departments defined at the enterprise
       level.

Create a department within an Enterprise:
   1. From the group profile page, click Departments.
   2. Click Add.
   3. Enter a name for the Department.
   4. Optionally, select which Parent Department it will belong under.
   5. Click OK to save and return to the previous page.

Create a department within a group:
   6. From the group profile page, click Departments.
   7. Click Add.
   8. Enter a name for the Department.
   9. Optionally, select which Parent Department it will belong under.
   10. Enter the Department Calling Line ID Name.
        NOTE: Note that this Calling Line Name and Number ID is dependent on the Call Processing
        Policy set for the Group or the User, “Use Group/Department phone number for Calling Line
        Identity” must be selected.
   11. Enter the Department Calling Line ID Number from the drop-down options.
   12. Click OK to save and return to the previous page

Assign Users and/Group Services
Once a Department has been added, Users and/or Group Services can be assigned.

    1. From the profile page for the User, select which Department the User is to be assigned to from
       the drop down menu.

SaskTel IBC Administrator User Guide                                                                    7
2. Click Apply to save your changes and OK to return to the previous page.

Assign a Group Service to a Department:
    1. From the group profile page, click Services.
    2. Select the Group Service you wish to assign.
    3. From the profile page of the Group Service, select which Department the Group Service is to be
        assigned to from the drop down menu.

    4. Click Apply to save your changes and OK to return to the previous page.

Changing A User’s Profile
Often users can change in a workplace, from replacing an employee entirely to updating their last name
or temporary time zone. These changes can be done from the user’s profile page. A user’s profile can be
updated by the Enterprise, Group, or Department Administrator if the user is assigned to the same level
as the Administrator.

As an Administrator, you can modify:
    • Last or First Name; if an employee is replaced or has a name change.
    • Calling Line ID Last and First Name; if a calling line ID needs to be unique to that user as

SaskTel IBC Administrator User Guide                                                                      8
opposed to having the Group Calling Line ID displayed.
• Calling Line ID Phone Number; if a calling line ID needs to be unique to that user as opposed to
having the Group Calling Line ID displayed. For example, configure this to display a toll-free
number.
• Name Dialing Last and First Name; used for the Auto Attendant name dialing feature.
• Department; assign a user to specific department.
NOTE: This can only be done by an Enterprise or Group Administrator.
• Additional Information
o Email and mobile; if configured will display in the user’s profile on the Desktop and Mobile
clients directories.
Once changes are entered onto the profile page, click Apply. Changes will immediately update both
client directories. If IBC users have a specific contact added to My Contacts in the clients, they will have
to use the import function or delete and re-add for the changes to take effect.
SCHEDULING
Schedules are used to route incoming calls based on day of the week, time of the day, and holidays. Once
created at enterprise or group level they can be assigned to Group Services; Auto Attendants, Call
Queues, and Hunt Groups. Users can also use them for routing calls on user level features, such as
Selective Call Acceptance, Selective Call Rejection, Call Me Anywhere, and Call Notify. Schedules are
classified as either Time Schedules or Holiday Schedules. Schedules made at the enterprise level can be
used by any group or any user within the enterprise. If schedules are made at the group level, they can
only be used by that group or users within that group.
To create a Time or Holiday Schedule:
1. From the enterprise or group profile page, click Schedules.
2. Click Add.
3. Enter a name for the schedule, for example, Business Hours/ Holiday Hours
4. Select the Time or Holiday option.
5. Click OK.
6. Click on any text on the row to edit the schedule.
7. Click Add to create a new event (each schedule is comprised of defined events).
SaskTel IBC Administrator User Guide 98. Enter a name for the event.
9. Enter the events Start and end time.
10. Assign a recurrence pattern and range.
11. Click OK to save the event.
NOTE: To create an afterhours schedule that will route calls differently than how they are routed
during the day, two separate events will need to be created. For example, 5:01 PM – 11:59 PM &
12:00 AM – 7:59 AM.
NOTE: For holidays that are not based on a calendar date, you will need to enter a new holiday
schedule each year. Selecting the yearly option will not guarantee the correct date for the holiday
year after year.
ANNOUNCEMENT REPOSITORY
Many of the services and features in the IBC system require greetings and announcements. The group
level Announcement Repository is used to make those announcements easy. Each group has 1 GB of
space available for announcements.
SaskTel IBC Administrator User Guide 10The Announcement Repository provides:
• A single place to save and upload all announcement files per group.
• The ability to share the same announcement among multiple services. For example, if you have
three Call Queues and prefer the same comfort greeting on all queues, you could save the comfort
greeting here and easily assign it to all three queues.
• The ability to modify an announcement with another file while the announcement is being used by
services.
• The ability to keep an announcement on the system without it being used by a service.
• The ability to retrieve custom media files from the announcement repository.
Once the announcements have been stored in the repository at the group level, they can be assigned to
the following services:
• Auto Attendant Greetings for Business Hours, After Hours, or Holidays
• Call Queue Messages
• Group level Music on Hold
NOTE: Announcements can be stored at the group level or group service (for example, Call
Queue) level. If an announcement is uploaded at the group service level it will not be available at
the group level Announcement Repository. However, if an announcement is uploaded to the
group level, it will be available at each group service level.
Setting up the Announcement Repository
1. To add files to the Announcement Repository from the group level, click Announcement
Repository.
SaskTel IBC Administrator User Guide 112. To add a file, click Add.
3. Enter the name of the file.
4. Click Browse and search for your file on your computer.
5. Click Open.
6. Click OK to save.
For information on how to record audio files and format requirements, refer to Recording IBC Audio Files
Guide on sasktel.com/ibcsupport.
MUSIC ON HOLD
Each group can be assigned a unique Music on Hold file and is configured with the default music file. This
is the music that callers will hear when a user places them on hold. An external source for Music on Hold is
not an available feature.
To update Music on Hold for a group:
1. From the group profile page, click Services on the left panel.
2. Click Music on Hold.
3. Click Edit to modify the settings.
4. From the General Settings tab, you can enable or disable Music on Hold for callers that are held,
callers that are parked, or callers that are camped on another user’s line.
5. Check the boxes next to the feature options you wish to enable.
6. The default music file is the system defined music. To upload a custom file, click Custom Music
File.
7. Click the drop-down menu to see the list of available files.
8. Make your selection and click Apply to save your changes.
SaskTel IBC Administrator User Guide 12Additionally, you can apply different settings for internal calls that are held.
1. Click the Internal Calls Settings tab.
2. To use a different music file for internal calls that are placed on hold, select Use Alternative
Source for Internal Calls.
3. Select the custom option and click the drop-down menu to see the list of available files.
4. Make your selection and click Apply to save your changes.
AUTO ATTENDANT
Auto Attendants are used to route calls to various destinations, such as employees within your company,
specific groups of employees, voice mail, or other outside numbers, without the assistance of an operator
or receptionist. It also provides callers with your company greetings and dial menu options. An Auto
Attendant can handle 294 calls at once.
The Auto Attendant has three modes: Business Hours, After Hours, and Holidays
Configuring Auto Attendant Settings
1. From the group profile page, click Services on the left panel.
2. Click Auto Attendant.
3. All attendants assigned to your account are displayed here.
SaskTel IBC Administrator User Guide 134. Click on any Auto Attendant to make modifications.
Configure Auto Attendant – Profile
1. From the Audio Attendant’s profile page, click Profile.
2. Confirm the Time zone.
3. Select the dialing options: Enterprise, Group, or Department.
a) If Enterprise is selected, callers that reach the Auto Attendant can dial the extension for any
user within your company, regardless of office location.
NOTE: This setting is not recommended if your users have overlapping extension numbers
across locations.
b) If Group is selected, callers will only be able to dial extensions for users within that specific
office location.
c) If Department is selected, callers will only be able to dial extensions of users within that
specific department.
4. Set up your dial by name preferences. The options for Enterprise, Department, and Users apply as
previously discussed.
5. Select if the caller should enter the First Name followed by the Last Name or either combination.
NOTE: Only applies when using the optional Name dialing in your Auto Attendant menu.
6. Set the number of seconds that a caller can be inactive before their call is routed to the operator.
SaskTel IBC Administrator User Guide 147. Enter the number of seconds and note that the operator destination is configured in the dialing
menu setup.
8. Click Apply to save and OK to return to the previous menu.
Configure Auto Attendant - Menus and Greetings
Greetings that have been saved to the group level Announcement Repository can be assigned to Auto
Attendants. If you have not uploaded a greeting, callers will hear the default greeting.
To assign a greeting for After Hours, Business Hours, and Holidays:
1. From the Audio Attendant’s profile page, click Menus on the left panel.
2. Choose the menu that you would like to change.
3. Select the Personal Greeting option.
4. Select your announcement file from the drop-down.
Check the box to Enable first-level extension dialing during the Auto Attendant Greeting for
Business Hours. If this feature is enabled, callers can dial the extension of the party they wish to
reach without selecting a menu item first.
5. Click Apply to save your changes.
NOTE: If you are configuring your Afterhours or Holiday menu, you will see the Business hours or
Holidays dropdown. Choose a schedule to enable these menus.
Configure Auto Attendant – Dialing Menu
Dialing menu determines what action the Auto Attendant will take when an incoming caller chooses a
number or symbol on the keypad.
The keypad characters that can be configured include numbers 0-9, *, and #.
SaskTel IBC Administrator User Guide 15To configure a keypad number for the Auto Attendant Business Hours Menu:
1. Enter a description for the chosen keypad.
2. Select an action from the dropdown menu.
a) Transfer with Prompt – This selection transfers callers to the extension entered in the Phone
Number field, however an audio prompt announcing the transfer to destination is played first.
b) Transfer without Prompt – This selection transfers callers directly to the extension entered in
the Phone Number field without playing an announcement before transfer.
NOTE: If you want to transfer directly to a voice mailbox, enter *98 followed by the extension
of the mailbox you wish to reach. If you have the optional voice mailbox on your Auto
Attendant, you can enter *98 followed by the Auto Attendant extension. (Applies to a and b).
c) Transfer to Operator – This selection will redirect callers to a configured operator, who will
receive all calls that time out if the caller does not choose an option from the Auto Attendant.
d) Transfer to Submenu – This will route callers to a predefined Submenu. A Submenu must be
set up prior to setting up the Auto Attendant menu. See Creating Submenus.
e) Name Dialing – This action permits callers to dial by recipient name, using the letters on the
keypad. The first and last name that the system is searching for is determined by the name
that has been entered in the User’s Profile page under name dialing settings.
f) Extension Dialing – This action permits callers to dial by recipient extension, using the
numbers on the keypad.
g) Transfer to Mailbox – This selection prompts the caller for an extension, then transfers the
call directly to the voice mail of that extension.
NOTE: Use *98 option to transfer the call to the voice mail of that extension.
h) Play Announcement – Plays a recorded message then returns to the current Auto Attendant
menu.
i) Repeat Menu – If selected, this action will repeat the greeting and menu options.
j) Exit Menu – This action allows callers to exit the menu system. This will terminate the call.
3. Enter the destination to which the call should be transferred.
NOTE: This does not apply if the Dial by Name, Dial by Extension, Repeat Menu, or Exit Menu
options are selected.
4. Click Apply.
Configure Auto Attendant – Creating Submenus
Submenus are used to route callers to another set of options. You can add up to 150 submenus.
To create a Submenu:
SaskTel IBC Administrator User Guide 161. From the profile page of Auto Attendant, click Submenus.
2. Click Add.
3. Enter a Submenu ID.
4. Choose the default or personal greeting to be played to callers when they are routed to this
Submenu.
5. Optionally, select Enable extension dialing at any time.
6. Determine what action the Auto Attendant will take when an incoming caller chooses a number or
symbol on the keypad.
7. To configure a keypad number for the Auto Attendant Submenu, enter a description.
8. Select an option from the dropdown menu.
9. When finished configuring your Submenu, click OK to save.
NOTE: When you’re setting up your main Business/After Hours/Holiday menu, you can use the
Transfer to Submenu option and click on the Configure Submenu link to reach this Submenu.
HUNT GROUP
Hunt Groups help to ensure all inbound calls are answered by the proper personnel or routed to a voice
mailbox for later response. This is done by assigning a phone number to a group of employees, so that
incoming calls are:
SaskTel IBC Administrator User Guide 17• Routed directly to that group in a pre-determined (or random) pattern, or
• Routed by the Auto Attendant to be answered by one of the selected group members, and
• Depending on the set-up and call distribution policies, incoming calls will hunt for an available
group member.
As an Administrator, you can modify:
• Profile information
• Time Zone
• No Answer settings
• Call Distribution Policy settings
• Not Reachable Settings
• Calling Line ID settings
• Users assigned to receive calls from the Hunt Group
Hunt Group Settings – Profile
1. From group profile page, click Services on the left panel.
2. Click Hunt Group.
3. Select the Hunt Group to modify by clicking on any text in the row.
4. Click Profile to update the Profile information:
a) Name
b) Time Zone
c) Call Distribution Policy
d) Call Forwarding Settings
e) User Assignments
SaskTel IBC Administrator User Guide 18Hunt Group Settings – Call Distribution Policies
• The Circular option will route calls to users based on the order of the users and will always start
with the user following the last user that received a Hunt Group call.
• The Regular option will route calls based on the order of the users, always starting with the user
on the top of the list.
SaskTel IBC Administrator User Guide 19• Simultaneous will ring all user’s phones at the same time.
NOTE: If the Simultaneous Ring option is selected and more than one call is placed to the Hunt
Group at the same time, all users in the Hunt Group would be considered busy. Therefore, callers
will hear a busy tone or will be routed to the no-answer treatment configured in the Hunt Group
Profile until one of the calls is answered. When Simultaneous Ring is configured, each line (or
user) in the Hunt Group will count toward your IBC concurrent call limit of your IBC Access.
• Uniform will ring the Hunt Group user’s phone that has been idle in the Hunt Group the longest.
• The Weighted Call Distribution option will ring users based on pre-set weight assignments. If this
option is selected, you must assign the weights to the users.
Hunt Group Settings – Call Forwarding
1. To designate a forward to destination for callers in the event none of the Hunt Group members
answer their phones, under No Answer Settings check this box.
NOTE: Each ring is approximately 6 seconds. For example, 30 seconds will give 5 rings to the
caller.
2. Enter the forward to destination.
SaskTel IBC Administrator User Guide 20• This can be any 10-digit number or an internal extension.
• To forward to a user’s voice mailbox enter *98 followed by the extension of the user.
NOTE: Users can forward unanswered calls to the extension of another Hunt Group, an Auto
Attendant, a voice mailbox, a user, or even an external number.
Hunt Group Settings – Call forwarding Not Reachable
Not reachable settings apply to the Hunt Group when none of the phones in the Hunt Group are registered
to the network. This could be a result of a network outage or power outage at the locations. A common Not
Reachable Forwarding location would be an external number or cell phone number.
To enable this feature:
1. Click Enable Call Forwarding Not Reachable.
2. Enter the forward to destination.
Hunt Group Settings – Calling Line ID
Calling Line ID can be used to identify incoming Hunt Group calls by displaying the Hunt Group Calling
Line ID first then the Caller’s Name/Number Display. This feature is useful if users are a part of many
Hunt Groups, it will help them to identify which Hunt Group the Caller is calling. This feature does not
affect your outgoing calls.
To use a custom Calling Line ID:
1. Under Calling line ID Settings, select Customize the CLID for this Hunt Group.
2. Optionally, select to Include the Hunt Group Name in the CLID.
NOTE: There is limited space on the user’s desktop phone for displaying this information. Unless
the Hunt Group name is short, it is not recommended to also include the name.
SaskTel IBC Administrator User Guide 21If Include the Hunt Group Name in the CLID option is not selected, the Caller’s name will be displayed
instead of the Hunt Group name.
Hunt Group Settings – Adding/Removing Users
1. Use the filters to search, or to view all available users click the Search button.
2. To add a user, select the user and click Add.
3. To select multiple users at a time, press and hold Ctrl on your keyboard and make multiple
selections then click Add.
4. To reorder the users, select the user and use the Move Up or Move Down buttons. The order of
the users is important for the Regular and Circular Distribution Policy options. Both policies will
route calls based on the order of user listed here.
5. Click Apply to save and OK to save and return to the previous page.
Hunt Group Settings – Call Forwarding Busy
The Call Forwarding Busy service can also be used with the Hunt Group to forward Hunt Group calls if all
SaskTel IBC Administrator User Guide 22users in the Hunt Group are on the phone and calls need to be forwarded to a destination other than the
Hunt Group’s voice mail (if you subscribe to Voice Mail on the Hunt Group).
To configure Call Forwarding Busy for the Hunt Group:
1. From the Incoming Calls page, click Call Forwarding Busy.
2. Enter the number to forward calls to, or to forward directly to a user’s voice mail, enter *98 followed
by the extension of their voice mailbox.
3. Click Apply to save.
4. Click OK to save and return to previous page.
Hunt Group Settings – Selective Call Forwarding
This service allows a Hunt Group to forward calls from phone numbers that match a set of defined
selective criteria to a different phone number during a defined time or holiday schedule.
NOTE: The Selective Call Forwarding service is also called Call Forwarding Selective.
To configure Selective Call Forwarding
1. From the Incoming Calls main page, click Call Forwarding Selective.
2. Enter the Default Forward phone number / SIP-URI.
3. Click Apply.
SaskTel IBC Administrator User Guide 234. Click Add.
5. In the Call Forwarding, Selective Add window, enter a description.
6. Optionally, you can select to Use Default Forward phone number / SIP-URI, Forward to
another phone number / SIP-URI, or Do not forward.
7. Select a Time or a Holiday schedule. It is not recommended to configure both schedules in one
instance.
8. Under the Calls from section, select either from Any phone number or from a specified list of
phone numbers.
9. Under Calls to section, select the numbers you want to call to and click Add.
10. Click OK to save and return to the previous page.
Hunt Group Settings – Priority Alert
To configure Priority Alert, which is a service that will play a unique ring tone to the user when they receive
a call from the Hunt Group:
1. From the Incoming Calls main page, click Priority Alert.
2. Click Add and enter the description.
SaskTel IBC Administrator User Guide 243. Select the Use priority alert option.
4. To create this alert for all Hunt Group calls regardless of day or time, select the Everyday All Day
option.
5. Next, select Following phone numbers.
6. In the Specific phone numbers area, enter a * to enable Priority Alert for all calls.
7. Click OK to save and return to the previous page.
8. Click Apply to save.
NOTE: Priority Alert can be applied to multiple Hunt Groups but the ringtone will be the same for
any that has Priority Alert enabled.
Hunt Group Settings – Selective Call Accept/Reject
This service enables a Hunt Group to accept or reject calls selectively, based on configurable conditions.
Calls that do not meet the specified conditions are provided a treatment. It is not recommended to use
both features at once. Incoming calls to the Hunt Group will ignore Selective Call Accept/Reject
configured at the user level. The feature must be active and configured at the Hunt group level and the
user level to provide the same treatment for incoming calls to a Hunt Group User.
Selective Call Acceptance
This service allows you to receive only calls that meet your pre-defined criteria. The criteria for each
Selective Acceptance entry can be a list of up to 12 phone numbers or digit patterns, specified called
number(s), a specified time schedule, and a specified holiday schedule.
To configure Selective Call Acceptance:
1. From the Incoming Calls main page, click Selective Acceptance.
2. Click Add.
3. In the Selective Call Acceptance Add window, enter a description.
4. Optionally, you can select to reject or to not reject calls.
5. Select a Time or a Holiday schedule.
6. Under the Calls from section, select either from Any phone number or from a specified list of
phone numbers.
SaskTel IBC Administrator User Guide 257. Under Calls to section, select the numbers you want to call to and click Add.
8. Click OK to save and return to the previous page.
Selective Call Rejection
This service allows you to reject calls that meet your pre-defined criteria. These callers will be given an
announcement that the Hunt Group has chosen not to accept calls from the caller. Use this feature to
prevent nuisance calls.
To configure Selective Call Rejection:
1. From the Incoming Calls main page, click Selective Rejection.
2. Click Add.
SaskTel IBC Administrator User Guide 263. In the Selective Call Rejection Add window, enter a description.
4. Optionally, you can select to reject or to not reject calls.
5. Select a Time or a Holiday schedule.
6. Under the Calls section, select either from Any phone number, a forwarded number, or from a
specified list of phone numbers.
7. Under Calls to section, select the numbers you want to call to and click Add.
8. Click OK to save and return to the previous page.
SaskTel IBC Administrator User Guide 27Hunt Group Settings – Voice Mail
Optionally, you can subscribe to a unique Voice Mailbox for your Hunt Group. If you have subscribed to
this service, then by default callers will reach this Voice Mailbox if all users are on the phone and no one is
answering.
To change the default settings:
1. From the Hunt Group profile page, click Messaging on the left panel.
2. Click Voice Mail.
3. Select Send All Calls to Voice Mail.
NOTE: This means that the callers will NOT be routed to your Hunt Group users, they will be
routed directly to voice mail.
4. Or, select Send Busy Calls to Voice Mail, if you want to send calls to voice mail when all users in
the Hunt Group are busy or have “Do Not Disturb” enabled.
5. Select Send Unanswered Calls to Voice Mail if you want to send calls that Hunt Group users are
unable to answer, because they are away from their phones to voice mail.
NOTES:
• The Call Forward Busy and the No Answer Forwarding settings will override the Messaging
settings, if enabled.
• The Voice Mailbox on a Group Service, such as a Call Queue or a Hunt Group, will not deliver
a Message Waiting Indicator to a user’s desktop phone when there is a new message waiting.
To be alerted of messages left on this mailbox, you will need to configure Voice Mail to
Email/Text settings for this mailbox in the SaskTel Voice Mail Portal.
CALL QUEUE
Call Queues temporarily hold calls in the cloud when all users assigned to receive calls from the Queue
are unavailable. Queued calls are routed to an available agent when he/she is no longer on an active call.
SaskTel IBC Administrator User Guide 28IBC provides a two-tiered call queue offering allowing businesses to choose the solution that best suits
their needs. This section will walk through the functionality of a Call Queue - Standard, and not all the
features will be applicable to a Call Queue - Basic.
As an Administrator, you can:
• Modify the Call Queue Profile including Time Zones (see list under Hunt Groups)
• Set up the Call Queue Announcement Repository
• Assign Greetings and Announcements
• Configure Call Routing Options and Overflow settings
• Assign Supervisors
• Configure Agent Profile Thresholds
• View and schedule basic statistics and reporting
Call Queue – Profile
To modify the profile information, queue limits, and count distribution policy assigned to the Call Queue,
from the group profile page:
1. Click Call Queue on the left panel.
2. Then Call Queues.
3. Select the call queue to modify.
4. Click Profile.
SaskTel IBC Administrator User Guide 29NOTE: Options highlighted in yellow are only available with a Call Queue - Standard.
5. Modify the name of the Queue.
6. Confirm Time Zone.
7. Select the Call Distribution Policy (Group Policy) you wish to assign. (These are the same policies
that are available for configuration on a Hunt Group)
8. Enter the number of queued calls that you want to have in a queue at any given time.
When this number is reached, the Call Queue will follow the overflow policies defined in the
overflow settings (the maximum is 50). With a Basic Call Queue, the maximum is 25.
9. The Play ringing when offering call box enables the calling party to hear ringing when the call
has left the queue and is ringing in the agent’s device. When disabled, the caller will continue to
hear music on hold until the agent answers the call.
10. Enter the preferred escape digit option. This is the digit the caller presses to manually escape from
the queue. The default is zero, but it can be configured to any number.
NOTES:
• If you use the system default message for entrance and comfort greeting, then you will need
to leave this digit as zero because the default greeting assumes you’ve use the zero digit.
• Callers that escape will be routed to the Call Queue’s busy treatment destination, which may
be the call forward busy destination or voice messaging if you have subscribed to a mailbox
for your Call Queues.
• You need to configure one of these services for the Call Queue if you want to use this option.
Otherwise, the caller will hear a busy signal.
11. The setting Allow agents to join Call Queuing is designed to either allow or restrict the agents
from joining the Call Queue from their IBC User Web Portal. When disabled, only the Administrator
can change their joint setting. When enabled, the agent can join or unjoin from their IBC User Web
Portal.
12. Check Allow Call Waiting on agents to enable call waiting for the Call Queue users.
NOTE: This will allow a user that is already on a call to be sent a queued call on a next available
key on their set if that user has the Multi-Key Call Waiting service assigned. If no users in the Call
Queue have the Multi-Key Call Waiting service assigned, then this option will have no effect.
13. Select Enable calls to agents in wrap-up to allow agents to receive calls in wrap-up state.
SaskTel IBC Administrator User Guide 3014. Enter the duration of time and select Enable maximum ACD wrap-up timer to limit agent wrap-
up time.
15. Use Automatically set agent state to “X” after call to enable and set the agent state after a call.
Choose from Available, Unavailable, and Wrap-up. If Unavailable state is chosen, the unavailable
code can also be chosen from the drop-down list.
16. Click Apply and OK to save and return to the previous page.
Call Queue – Agent Unavailability Codes
Agent unavailable codes are configurable attributes that are applied when an agent becomes unavailable.
Agents may select a reason for changing their agent (ACD) states to Unavailable (for example, on lunch,
in the bathroom, taking a coffee break or a personal break). IBC Administrators can use this data to better
understand the performance of their agents.
1. Click Call Queue on the left panel.
2. Then, Agent Unavailable Codes above the available Call Queues.
3. Click Add.
SaskTel IBC Administrator User Guide 314. Enter a Code and Description.
5. Click OK to save and return to the previous page.
6. Select Enable Agent Unavailable Codes to enable(disable) the active codes.
7. Optionally, select default code to on Do Not Disturb activation, on consecutive bounces or on not
reachable.
8. Optionally, select Force use of agent unavailable codes with default code and select default
code. This code will be used as default value if unavailable.
9. Click Apply and OK to return to previous page
Call Queue – Assigning Agents
To add, remove or change the order of agents in a queue
1. Click Agents.
2. Click Search. This will list all the users that have a Call Queue user license assigned to them.
Since Call Queues can include users from anywhere in the Enterprise, this allows you to build a
Call Queue that includes users that span multiple physical sites or offices.
3. Select the agents you want to add, then click Add.
NOTE: Agents with a Standard Call Queue license can be assigned to both a Basic and a
Standard Call Queue. Agents with a Basic Call Queue license can only be assigned to a Basic
Call Queue.
4. To remove agents, select the agent to remove and click Remove.
5. To reorder the users, select the user and use the Move Up or Move Down buttons.
NOTE: The order of the users is important for the Regular and Circular Distribution Policy
options. Both policies will route calls based on the order of user listed here.
6. Click OK to save and return to the previous page.
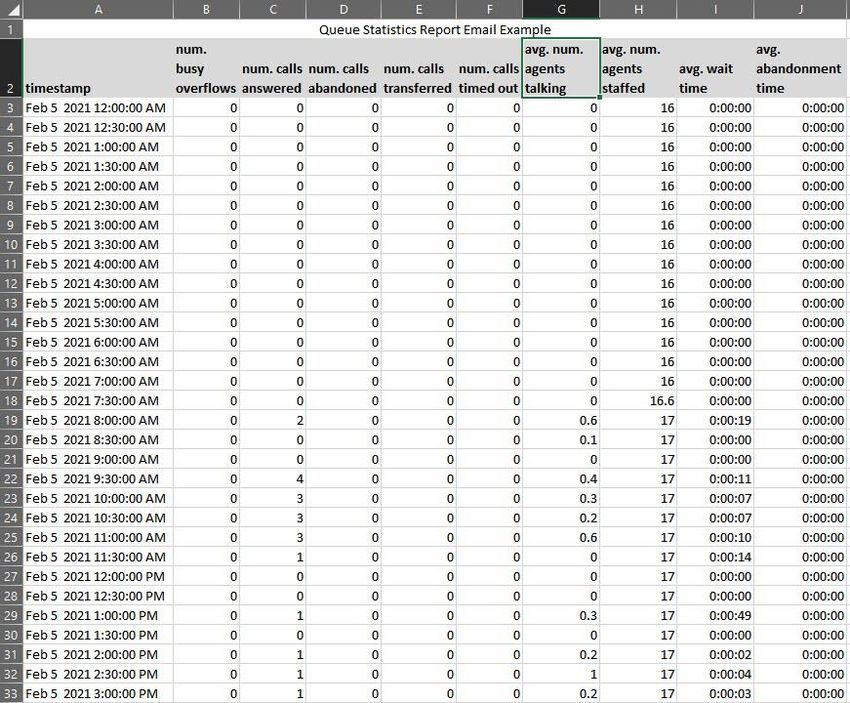
SaskTel IBC Administrator User Guide 32Call Queue – Status and Statistics For the Call Queue – Standard, basic status and statistics that provide the most critical performance indicators are available via the IBC Web Portal for less demanding environments. The statistics can be viewed by the Administrators, on a per-call-queue basis, by specifying the start and end time of the period for which statistics are requested. Alternatively, a reporting function can be enabled such that e-mail reports are sent on a daily basis. These reports provide statistics with a granularity as small as 30 minutes. The statistics are collected on the server and kept for a minimum of 48 hours. Call Queue Status and Statistics – Statistics Reporting Settings Schedule a daily report (.csv file format) delivered to up to two email addresses. The sampling interval can have one of the following values: 30, or 60 minutes. A statistics report is generated at the end of each day using the time zone of the Call Queue instance as the time reference. FROM: CallQueueStats_NoReply@sasktel.com TO: SUBJECT: BODY: Report generated on: For: Group name: Department name: On Application Server: The following table shows the queue statistics. These statistics are listed in the order in which they are displayed in a statistics report as well as on the IBC Web Portal. STATISTIC DESCRIPTION Number of busy This is the number of calls that came in after the queue limit was exceeded. Such overflows calls are likely forwarded to voice mail. SaskTel IBC Administrator User Guide 33
Number of calls
                      This is the total number of calls answered handled by an agent.
answered

Number of calls       This is the total number of calls for which the caller has hung up or selected to leave
abandoned             a message before an agent became available.

Number of calls
                      This is the total number of calls that are transferred out of the Call Queue.
transferred

Number of calls       This is the total number of calls that remain unanswered and that are forwarded out
timed out             of the Call Queue upon timeout.

Average number of This is the average number of agents who were in the talking state during the period
agents talking    for this Call Queue instance.

                  This is the average number of agents staffed during the period for this Call Queue
Average number of
                  instance. An agent who has joined the Call Queue campaign and who is not in the
agents staffed
                  sign-out state is considered as staffed.

                      This is the average amount of time that callers spend waiting for the next available
Average wait time
                      agent to answer the call.

Average               This is the average time that callers spend waiting for an agent before hanging up or
abandonment time      selecting the option to leave a message.

Example of Queue Statistics in cvs file format delivered to an email address

SaskTel IBC Administrator User Guide                                                                         34
The following table shows the agent statistics. Agent statistics are available on a per-queue basis. If an
agent is assigned to multiple queues, then agent statistics are independently maintained and provided for
each queue. These statistics are listed in the order in which they are displayed in the files in a statistics
report as well as on the IBC Web Portal.
STATISTIC DESCRIPTION
Number of calls This is the total number of calls that the agent has handled. This statistic accounts for all
handled Call Queue calls that are released by the agent during the specified period.
Number of calls This is the total number of calls extended to the agent that are not answered (for any
unanswered reason other than because the agent is busy). Note that for a single call to a Call Queue
instance, an agent may be rung multiple times as the call can be placed in the queue and
presented to the agent again. Therefore, this statistic may be incremented more than
once for a given call to the Call Queue instance.
Average call This is the average time that an agent spends on calls from the Call Queue instance. This
time statistic accounts for all Call Queue calls that are released or transferred by the agent
during the specified period. If the agent transfers a call (for example, to another queue),
then the call time only accounts for the time spent on the call by the agent prior to the call
transfer.
Total talk time The amount of time that the agent was busy handling calls for this Call Queue instance.
Total staffed The amount of time that the agent has joined the Call Queue instance and was not in the
time sign-out state.
Example of Agent Statistics in cvs file format delivered to an email address
SaskTel IBC Administrator User Guide 35Call Queue Status and Statistics – Queue Status Shows the number of calls in a queue at given time, along with the number of agents currently staffed in the queue. SaskTel IBC Administrator User Guide 36
Call Queue Status and Statistics – Queue & Agent Statistics

Select a time within a 48-hour period; start and end date, as well as a start and end time to view Queue
and Agent Statistics. The two tables above describe the queue and agent statistics that will show in this
tab.

Call Queue – Supervisors
An IBC user can be assigned to be a supervisor for a Call Queue - Standard and is assigned to supervise
a specific list of agents. Any user in the group or enterprise can be assigned to be a supervisor of a Call
Queue. No Call Queue user license is required for a supervisor.

A supervisor does not have any access to any status or statistics of agents or queues unless they have
Administration, Group or Department Administration rights to the Call Queue. The Administrator must first
assign the call queue to a group/department and create a Department/Group Administrator.
The designated call queue Administrator can sign into the web portal using the Department/Group
Administrator credentials, as opposed to their personal credentials. As a Department/Group administrator,
the user can access and manage only the services that are within that department/group.

In this Supervisor role, the user can easily be accessed by agents for an escalation. Agents can escalate
a call to a predetermined supervisor assigned by the Administrator by dialing *18. The current call is
placed on hold and a call is placed to the supervisor.

SaskTel IBC Administrator User Guide                                                                        37
To assign Supervisors to a Call Queue:
    1. From the group profile page, click Supervisors.
    2. Click Search to view a list of available Supervisors.

    3. Select the users to add then, click Apply to save.
    4. Click on the Assign Agents tab.
    5. Select the Supervisor you wish to assign agents to from the drop down.
    6. Click Search to view a list of available agents.
    7. Select the users to add then, click Apply to save and OK to return to the previous page.

Call Queue – Thresholds
Call Queue - Standard have the option of setting “Yellow” and “Red” threshold values for a set of queue-
related statistics. When these thresholds are crossed (increasing or decreasing severity), the severity is
rendered and an e-mail may be generated and sent to e-mail addresses configured.

To configure call queue threshold email notification:

    1. From the group profile page, click on Thresholds.
    2. Select the Call Queue Thresholds to On.

SaskTel IBC Administrator User Guide                                                                     38
You can also read