DT MAX T1 DT MAX T1 - USER GUIDE - Thomson Reuters Canada
←
→
Page content transcription
If your browser does not render page correctly, please read the page content below
DT MAX T1 DT MAX T1 - USER GUIDE
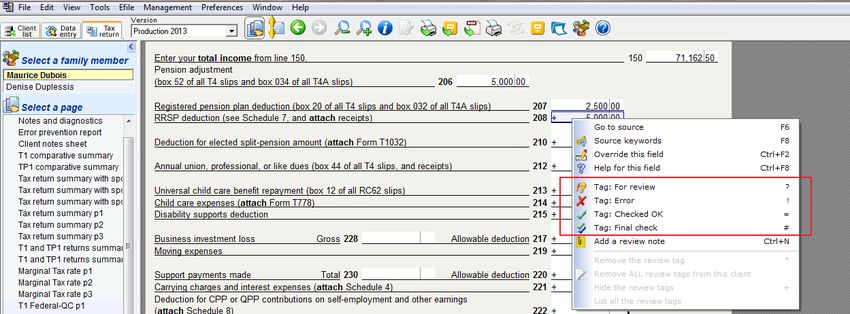
TABLE OF CONTENTS

DT Max T1 - User Guide                               1
About this document                                  4

DT Max Basics                                        5
Splash screen                                        5

Client List                                          8
Personalizing the Client List                        9
Sorting the Client List                             10
Adding a new client to the Client List              11
Finding clients within the Client List              13
Increasing/Decreasing Font in the Client List       13

Data Entry                                          14
Adding keywords in the Data Entry                   14
Error and Warning messages                          20
Keyword Groups                                      21
Keyword explanation (functionality)                 22
Adding/Toggling between family members              24
Dependant Data Entry requirement                    25

Tax Return screen                                   25
Page Index                                          25
QuickTrack feature                                  28
Printing the tax return                             30

Preferences Menu                                    33
Identification                                      33
User’s Defaults                                     35
Forms Manager                                       37

                                                2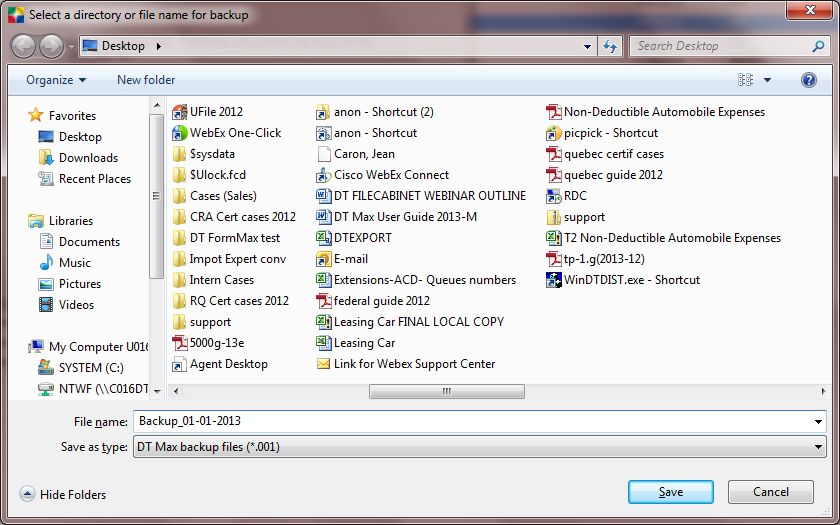
DT Max Advanced features                 41

Client List                              41

Filtering the Client List                41

Extracting and merging clients           49

Cloning (coupling/uncoupling)            51

Printing/Exporting the Client List       55

Backup/Restore your Client List          59

Renumbering Clients                      62

Data Entry                               63

Plans (Tax Planning)                     63

Right-hand side display                  68

Review Tags                              74

T1 Adjustment Request                    77

Tax Return                               81

Review Tags                              81

PDF                                      84

Preferences Menu                         87

Security System                          87

Synchronization of the preferences       92

Archiving and PDF                        95

Billing                                  97

                                     3
ABOUT THIS DOCUMENT

This document is intended for any user of DT Max, be it a beginner or advanced user. In this guide, we will cover the
multitude of features offered by DT Max and present in its three screens.
On DT Max’s first screen, the Client List, we will view how to effectively personalize and sort your client list in order
to access specific clients with ease and speed.
On DT Max’s second screen, the Data Entry, we will discuss the concept of using keywords to enter your clients’ tax
information. We will delve into the various tools provided by DT Max to enter as well as to search for these keywords.
On DT Max’s third screen, the Tax Return, we will discuss the different forms that are generated as well as the many
review tools available such as field tags and the QuickSource feature.
Finally, we will cover the proper setup and configuration of the Preferences menu which will include the Identification,
User’s defaults, and Forms Manager sections amongst many others.

                                                             4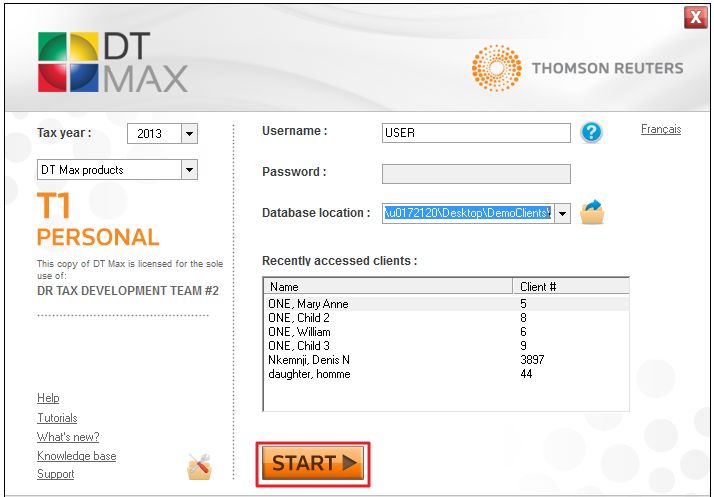
DT MAX BASICS
In the following paragraphs, we will see the basic features of DT Max.
SPLASH SCREEN
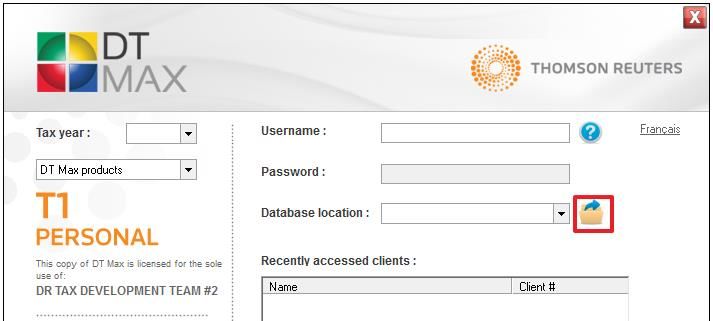
When you open DT Max, the first screen that will be presented to you is the Splash Screen.
You must first select a folder that will house the files of your Client Database. You may select your Database
location by clicking the browse icon.
5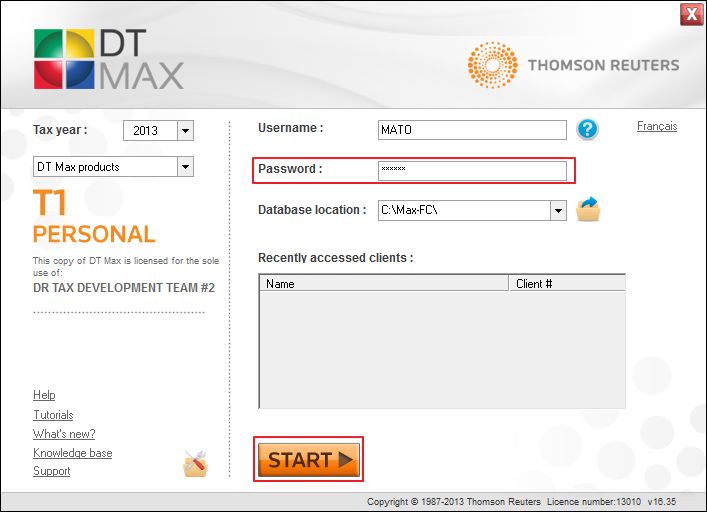
You may now enter a Username or Accountant ID. A user Password may also be added. We will discuss user
privileges and passwords in the Security System chapter.

Next, select the DT Max product you wish to load. In this case, we will select T1.

Select the Tax year you wish to access by choosing the appropriate year from the scroll-down menu. Once in the
program, you will still have the option to rapidly change taxation years without having to restart DT Max.

                                                          6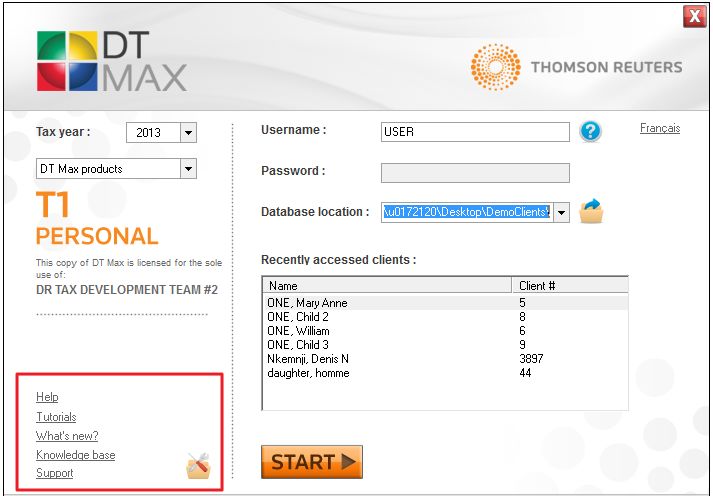
Recently accessed clients will also be listed on this screen. You may access them directly by double-clicking the
desired client. DT Max will load the Client List screen with the selected client highlighted.

The Splash Screen also provides many useful links such as the knowledge base, online video tutorials, and the
DT Max support page.

                                                        7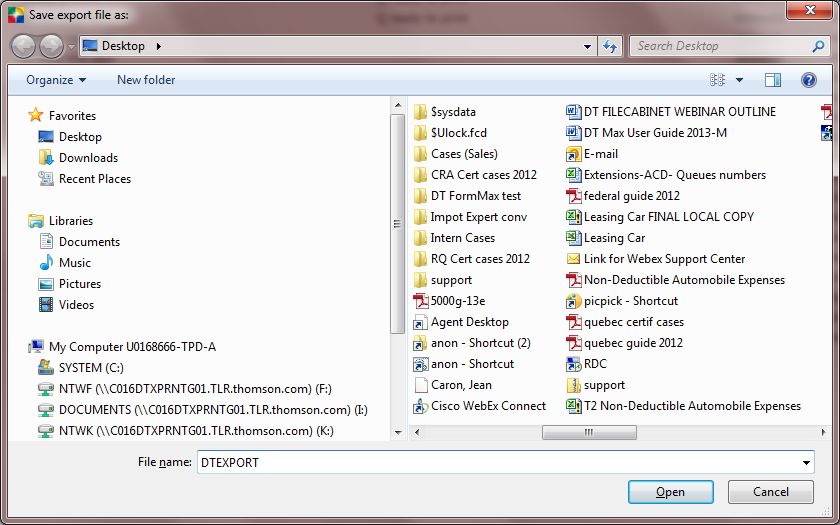
Once you have entered all the relevant information, run DT Max by clicking on Start.

                                                        8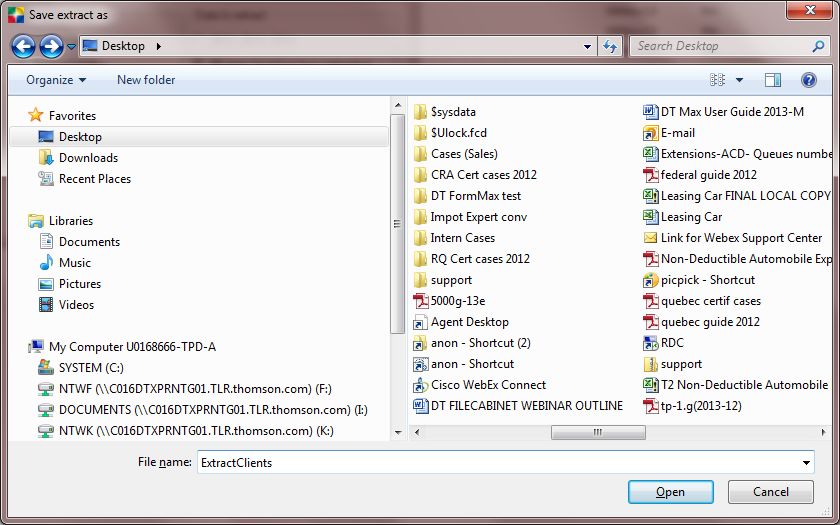
CLIENT LIST
When you Start DT Max, the first screen you will enter is the Client List. The Client List displays all the client files
that are currently being processed as well as the client files that have been carried forward from one year to the
next.
Certain basic information of every client’s file is displayed directly in the Client List. It is not necessary to enter the
client’s individual file in order to have access to this information. For example, you can view the client’s name,
social insurance number (SIN), phone number, birth date, processing status, etc.

Personalizing the Client List
In order to personalize the Client List, go to the Preferences Menu, and select Client List Settings.

You can also customize the Client List by clicking on the Customize Client List icon.

                                                              9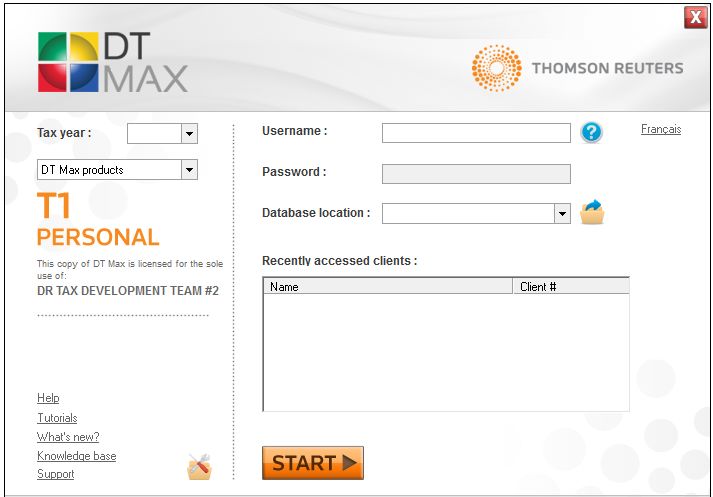
The new window Columns to show in client list - T1 will appear, allowing you to select the information you want
to add or remove from the Client List.

By ticking a box next to any item in this window, DT Max will add that information as a column in your Client List.

Sorting the Client List
By default, DT Max will sort your clients into family groups.

                                                           10
The first name in bold is the Family Head. The Family Head is the first person you create within a family group.
The individuals indented to the right represent the Dependants within this family group. The last individual (if
applicable) within a family group is the Spouse.
To sort your client list by individuals, simply click on the Name tab. The symbol “-” will become an arrow, indicating
that the Client List has been sorted by individuals.
To sort your Client List in numerical order, click on the Client # tab. The symbol “-” will become an arrow, indicating
that the Client List has been sorted by client numbers.
To return to the default sorting of your Client List, family groups, simply click on the Family icon. When the icon is
framed, it means you have returned to the family group sorting.
Adding a new client to the Client List
In order to add a new client to your Client List, simply click on the New Client icon. You can also add a new client
by pressing F3 on your keyboard.
11A new window will appear. First, you must indicate whether you are starting a new family or adding a family
member to an existing family in your Client List.
Next, you can change the client number that is automatically assigned to your new Family Head within the New
client number section.
DT Max allows you the option of using a Data Entry tool called the SmartStart client profile. More details on this
tool will be provided in the Data Entry portion of this document.
12Finding clients within the Client List
To find clients that are already in your Client List, go to the Find client box, located at the top right of your screen.
In the Search by drop-down menu, choose the type of search you want to perform. You can search your clients by
Name, Client number, SIN, or Phone number.
Increasing/Decreasing Font in the Client List
To increase the font within your Client List, click on the Zoom in icon. You can also hold CTRL and press “+” on
your keyboard.
To decrease the font within your Client List, click on the Zoom out icon. You can also hold CTRL and press “-”.on
your keyboard.
13DATA ENTRY
Once you have created a new Family Head, you will enter the Data Entry screen. The Data Entry screen is where
all tax information is entered for your client’s tax return. You must enter this information using Keywords. Each
keyword represents a question DT Max is asking you on your client’s file. In order to complete your client’s tax
return, you must “answer” the questions the program is asking you through the keywords.
Adding keywords in the Data Entry
There are 3 ways of adding keywords within your client’s Data Entry.
SmartStart Client Profile
To access the SmartStart Client Profile, you can click on the SmartStart client profile icon, or press ALT+F3.
A new window will appear, allowing you to pick sections that are relevant to your client’s tax return.
All keywords that are located within the Data Entry screen are grouped into the SmartStart sections. Simply select
the sections that are relevant to your client’s tax return, and DT Max will add the appropriate keywords for you.
14When selecting a section on the left-side menu, DT Max will show you the keywords that belong within that section
on the right.
After making your selections, you can save those selections as default for the whole family, namely any upcoming
Family Heads, Spouses or Dependants.
Click on Continue, and DT Max will now add the sections you have selected into your client’s Data Entry.
Expand the sections by simply clicking on the “+” symbol to the left of the section header. Then, enter the
information accordingly using the appropriate keyword.
Manual entry of keywords
To manually enter keywords into the Data Entry, simply click on the Add keyword icon, or press F11.
A new window appears allowing you to enter a keyword directly.
15There are several types of keywords you can enter. You can enter a slip number directly as a keyword. For
example, if you enter T5, DT Max will take you to keyword T-SLIP. Select the T5 slip from the drop-down menu.
You can enter form numbers directly as a keyword. For example, you can enter T2125 as your keyword, and DT
Max will add the keyword BUSINESS.
16You can enter a schedule number directly as a keyword. For example, you can enter S11, short for Schedule 11 as
your keyword; DT Max will add the keyword TUITION-EDU, which is the main keyword for tuition amounts.
You can enter broad descriptions as keywords. For example, you can enter RENTAL as your keyword, and DT
Max will add the keyword BUSINESS. From the drop-down menu, select “T776 - Rental”.
You can also enter specific line numbers from the tax return and Schedule 1. For example, you can enter F364,
which represents line 364 of Schedule 1, as a keyword, and DT Max will add the keyword PUBLIC-PASSES, which
is the appropriate keyword to claim the public transit amount.
The same applies for Quebec residents. Simply replace the “F” letter with a “Q”, then enter the line number of the
tax return as a keyword. For example, Q381.
17Keyword help index
To access the Keyword Help Index, click on the Keyword help index icon, or press F8.
A new window will appear, allowing you to search your keyword through several methods.
When you click on the Topic tab, DT Max presents you with various topics or subjects that you can choose from in
order to locate the keyword you need. Once you find the topic that corresponds to your client’s situation, select it,
and DT Max will provide you with a list of keywords that you can use. Double-click on the keyword you need, and
DT Max will add it to the client’s Data Entry.
18When you click on the Jacket tab, DT Max displays all the line numbers that are located on the tax return for both
the Federal and Quebec returns, including Federal Schedule 1. Click on a specific line number, and DT Max will
present to you a list of keywords you can use to enter an amount on that specific line. Double-click on the keyword
you need, and DT Max will add it to the client’s Data Entry.
When you click on the Form tab, DT Max displays all the forms used to calculate the tax return, including those for
the Quebec tax return. Select a specific form from the list, and DT Max will present you with a list of keywords you
can use to enter information on that specific form in the client’s tax return. Double-click on the keyword you need,
and DT Max will add it to the client’s Data Entry.
19Error and warning messages
In order to view any errors or warnings you may have in your client’s file, click on the Error and warning
messages icon.
A new window appears, displaying the messages notifying you of required entries that are missing in the client’s file
or errors made in the Data Entry.
Error messages that are indicated in red prevent you from calculating and viewing the client’s tax return.
20Error messages that are in yellow are warnings that do not prevent you from calculating your client’s tax return.
However, these messages might prevent you from EFiling the client’s tax return.
In order to correct an error message, simply double-click on the message itself, and DT Max will direct you to the
keyword that you have to complete or correct.
Keyword Groups
Most keywords entered within DT Max are part of what is called a keyword group. The keyword group starts with
a keyword that is in bold, which is called the Main keyword of the group. It is delineated by a bracket to the left of
the keyword group.
To the left of the Main keyword, you will see the Expand icon. Click on this icon to expand or close a specific
keyword group.
Expanding a keyword group allows you to see the secondary keywords within the group.
A keyword group has been expanded when the bracket delineating the group is jagged.
When completing a keyword group, you must always complete the main keyword of the group before
completing the secondary keywords. If you do not follow this rule, DT Max will generate an error message that
will prevent you from calculating or recalculating the return (first element of the group cannot be blank).
21Keyword explanation (functionality)
When encountering a confusing keyword, there are several ways of finding out the functionality of the keyword.
Hover your cursor over a specific keyword, and DT Max will give you a brief description of this keyword underneath
the cursor.
If you are already on the keyword (highlighted in yellow), look at the bottom task bar of the program. DT Max will
give you a brief description of the functionality of the keyword.
22A more detailed way of finding out the functionality of a specific keyword is to right-click on the keyword, and select
Help for this keyword. You can also press CTRL+F8 on your keyword.
A new window will appear, giving a more detailed explanation on the functionality of the keyword and, if relevant,
links to the corresponding government documentation.
23Adding/Toggling between family members
The quickest way of adding family members in a family group is to click on the Open family member’s file icon.
A new window will appear. Click on Add new family member.
The Add a family member window appears, allowing you to choose what type of family member you want to add
to the family group. You can choose between Spouse and Dependant. On the right-hand side of the window, DT
Max indicates the Family head’s name and, if applicable, the Spouse’s name of the family you are currently in.
Once you have chosen the type of family member you want to add, click OK.
Once all the family members’ files have been created, you can toggle between their files or Data Entry screens by
clicking on the Open family member’s file icon. Their names will be listed in the window that appears. Simply
choose the name of the family member, and DT Max will load the Data Entry screen of that individual.
24Dependant Data Entry requirement
In DT Max’s Data Entry system, a file must be created for a dependant. Within this file, all pertinent information that
comes from the dependant must be entered in the dependant’s file. For example, child care, tuition, medical
expenses and other amounts that can be claimed in a Family Head or Spouse’s file on behalf of the dependant,
must be entered in the dependant’s file. DT Max will automatically transfer these amounts to the Family Head or
Spouse from the dependant’s Data Entry.
TAX RETURN SCREEN
Once you have completed the Data Entry of your client and you have cleared all the error and warning messages,
you are now ready to view the tax return. DT Max will produce the entire tax return based on the information you
have entered in the Data Entry. Simply click on the Tax Return tab to view the tax return. You can also go to the
Tools menu, and select Recalculate current client, or press ALT+F9.
Page Index
On the left-hand side of the screen, you will see a menu with the names of the family members on top and a list of
forms below. By clicking on each family member’s name, you can see their calculated tax return with all relevant
forms below.
25By clicking on a form, DT Max will display the completed form on the right-hand side of the screen.
The forms listed in the Page Index are colour-coded.
Forms that are displayed in grey are in-house forms. These are not official government forms. These are forms
created by DT Max to give you additional information on your client’s return. These include summaries and other
calculations that are not found on the tax return, such as GST calculations and Child Tax Benefit estimates.
26Forms that are shown in blue are the reproduction of the official Federal forms. These forms are completed by DT
Max based on the information entered in the client’s Data entry section. They include the tax return, schedules, and
other relevant forms.
Forms that are shown in pink are the reproduction of the official Provincial forms, including the Quebec tax
return. These forms are completed by DT Max based on the information entered in the client’s Data entry section.
27QuickTrack feature
DT Max offers a sourcing feature called QuickTrack, which allows you to "source" amounts appearing on the tax
return by clicking through to the applicable schedules and forms -- and ultimately the original keyword entry.
In order to “source” a specific amount on a form to its origin, simply double-click on the amount or right-click it and
select Go to source. DT Max will take you to the source form where the amount was calculated.
In order to see the source keywords to use for a specific field that is currently blank, simply double-click on the
empty field or right-click the field and select Source keywords.
.
A new window will appear with a list of keywords you can use in order to enter an amount within this particular field.
Choose the appropriate keyword and select Add to data. DT Max will take you back into the Data Entry to the
specific keyword that you have selected.
28Through QuickTrack, you can also view the Federal and Provincial general guides for specific line numbers of the
tax return, Schedule 1, and other provincial tax forms (428-Forms for the rest of Canada, TP-1 for Quebec). Right-
click on any field of the relevant form and select Help for this field.
A new window will appear to show the guide for that specific line number.
You can also perform field overrides directly on the specific fields using QuickTrack. Simply right-click on the field,
and select Override this field. A new window will appear, allowing you to enter an amount within that field without
using the Data Entry.
Disclaimer: We strongly discourage the use of field overrides. They can cause calculation errors, and
render your client’s tax return ineligible for EFile. Please contact our support department before using any
field overrides.
29Printing the tax return
Once you have verified the tax return, you are now ready to print. In order to print the entire return or perform what
is called Production printing, click on the Production printing icon.
A new window appears, with several options to choose from.
By default, you will be under the Print job setup tab. On the left-hand side, under Step 1, choose the clients you
want to print. Your choices are Current client, Current family or Marked clients.
30Below, choose which versions of the tax return you want to print: the Production or the Plans (Plans will be
discussed in a later chapter)
On the right, under Step 2, choose which copies to print. You can print all destinations from the Forms Manager or
select the specific ones you want to print (Forms Manager will be discussed in a later chapter).
You may also choose to print a selection of pages rather than doing a full production printing. To print selected
pages only, click the Select pages to print icon.
31In the Forms printing window, select the appropriate printer and number of copies to print in the Printer section.
In the Select pages section, all relevant forms for your client will be listed. Select the page(s) you wish to print and
click Print.
Tip: You may select the pages one at a time by holding down CRTL on your keyboard and clicking on the required
pages from the list.
32PREFERENCES MENU
The Preferences menu is the place where you can set up DT Max to perform automatic tasks for you. In the DT
Max Basics section, we will see the items you should set up at the beginning of every year before starting any files.
Identification
The Identification section is the place where you will enter your identification information as a tax preparer. DT
Max will automatically complete the relevant authorization forms for all your clients in the Client List.
In order to set this up, go to the Preferences menu and select Identification.
Under the first tab, Main name and address, enter the identification information of your firm.
33Under the second tab, Alternate Address, enter an alternate address you can use for certain tax returns. To
activate this address in a personal tax return, use the keyword FIRM-ADDRESS, and select Alternative address
in the client’s Data Entry.
Under the third tab, Identification numbers, enter all of your pertinent identification numbers that identifies your
tax preparation practice. At the bottom left corner of the window, enter the relevant ID numbers needed for the
T1013. Click Save once you are done.
34User’s Defaults
The User’s Defaults section is the place where you can choose defaults for all your clients. Through this section,
you can have DT Max automatically complete certain areas of your clients’ tax returns. Moreover, you can set up
technical defaults as well, such as your range of client numbers and a verification system.
In order to access this section, go to the Preferences menu, and select User’s Defaults.
The first tab is the Client information tab. Under this tab, you can select the default province of residence, city,
and language of correspondence for all new clients added to your Client List. You can also set up a SIN validation
requirement for your Client List to avoid duplicate clients.
35Under the Tax calculations tab, indicate how you want DT Max to handle the instalment payment calculation and
if you want the program to automatically convert U.S. income earned into Canadian currency.
Under the Tax Return tab, you can set up fields that DT Max will automatically fill out in the client’s tax return. You
can also set up your default settings for the authorization forms generated within your client’s tax return. You can
set the limit of consent and the level of authorization you want for all your clients.
36Under the Miscellaneous tab, you can set up other preferences such as the range of client numbers, verification
requirements (discussed later on), company logo on the client letter, and enabling sorting.
Once you have gone through all the tabs, click Save at the bottom of the window, and DT Max will apply this setup
to all your clients.
Forms Manager
The Forms Manager is the place where you determine what forms will print when you print your client’s tax return
through Production Printing.
To access the Forms Manager, go to the Preferences menu and select Forms Manager.
37You will now see a list of forms on the left-hand side of the window as well as columns. Each column represents a
Destination. In other words, the forms that are printed under a particular column are “destined” for the place
indicated in the column header, for example, the client copy.
There are 4 different options to choose from when editing the Forms Manager. The options are: Do not Print,
Print if required (paper), Print if required (paper or EFile), and Print if data exists.
Under the Federal CRA and Quebec RQ Destinations, choosing Print if required (paper) for a specific form
means that the form will print IF it is required AND you are paper-filing the client’s tax return.
Choosing Print if required (paper or EFile) for a specific form means that the form will print IF it is required
regardless if you are EFiling or paper-filing your client’s tax return.
Under every other Destination, choosing Print if required (paper) or Print if required (paper or EFile) will
perform the same task whether you are EFiling or paper filing.
If you choose Print if data exists for a specific form, DT Max will print the form not only if it is required to make a
complete tax return, but also if it contains any information that may be useful in understanding or verifying the
return. This applies to all Destinations.
38In order to edit the Forms Manager, simply right click at the intersection of the form and the Destination, and
choose amongst the 4 different options.
Tip: A quick way of editing the Forms Manager is to cancel the printing of all the forms within a Destination and
then select the forms you wish to print.
In order to do this, click on the Destination header. Once clicked, the entire column will be highlighted in yellow.
Right-click in the highlighted area, and select Do not print.
39Now, pick the forms you would like to print by right-clicking at the intersection of the form and the Destination, and
choose amongst the 4 different options.
Once you have completed the editing of the Forms Manager, click on Save. DT Max will now apply your setup to
all your clients’ returns within the Client List.
It is strongly recommended that you print your Forms Manager setup after you have completed the editing. This
allows you to have a backup copy of the setup you have performed.
In order to print your Forms Manager setup, click on Print this list.
If you make mistakes editing your Forms Manager, you can always return to DT Max’s default setup.
In order to reset your Forms Manager, click on Reset.
A new window appears. Select Reset to DT Max defaults, then click OK.
40DT MAX ADVANCED FEATURES
Now that we have seen some basic features of DT Max, we will see some more advanced features of the program.
We will break up these features amongst DT Max’s three screens and the Preferences menu.
CLIENT LIST
Filtering the Client List
DT Max allows you to filter your Client List in order to find specific clients that meet certain criteria. For example,
you can find your clients that have an EFile error in their file, clients for which you used a specific keyword in their
Data Entries, etc. These filters are customizable to suit your needs.
In order to set up filters in DT Max, within the Client list screen, go to the Tools menu and select Filter the client
list.
A new window appears, allowing you to choose amongst available or spare filters. Choose one of the spare filters
to customize and click Edit filter.
41A new window appears, with several customization options to choose from. As a first step, you should always
change the name of the filter according to what you are trying to find.
You can use one or several filters in combination when filtering your Client List.
Accountant Code
You can filter your Client List by the Accountant code, or User ID, that is assigned to a specific client. Remove the
asterisk and enter the Accountant code or User ID.
Processing Status of Client
You can filter your Client list based on the Processing status currently assigned to your client’s file. The
Processing status indicates to you the point you have reached in the completion of your client’s tax return. For
example, it will indicate if you have errors in the data entry, if your client’s file is eligible for EFile, etc.
In order to activate the processing status filters, click on Change processing status filters.
A new window will appear, allowing you to select several processing statuses for filtering. You can select up to 5
processing statuses at the same time.
42The processing statuses you have chosen will appear in the Processing status of client section.
Tip: Your best option when filtering through processing statuses is to only choose one processing status at a time.
This will render more precise results when filtering.
Days since last activity
You can filter your Client list based on the days since you have edited your clients’ files. Simply enter a range of
number of days, for example from 0 to 30 days, to see which clients you have worked on during the last month.
Client birthdays
You can filter your Client List using the birth dates of your clients. Enter the date in the following format:
dd/mm/yyyy. Enter the range of client birthdates you want to filter.
43Keywords
You can filter your Client list based on the keywords you have entered in the Data entry. For example, you can
enter TUITION-EDU, and DT Max will find the clients that have tuition amounts in their Data entry. You can search
up to 4 keywords in one filter
Tip: Your best option when filtering using keywords is to only enter one keyword at a time. This will render more
precise results when filtering.
You can also perform reverse filtering with the Keywords section. Simply add an exclamation mark “!” at the front
of the keyword you enter within this section, and DT Max will exclude the clients that have this keyword in their
Data Entry.
Calculated Tax Data
You can filter your Client List based on amounts calculated in the client’s tax return. For example, you can find
clients that have an amount on a specific line of the tax return.
In order to do so, you must first get the Field Codes on the tax return. To view the Field Codes, go to the View
menu and select View or print blank forms.
44A new window will appear, allowing you to pick any form that DT Max produces and view it on the screen in blank
format.
Select the form on which you want to filter a specific field, and click Display.
Find the field or line you wish to apply a filter to, then go back to the View menu and select Show fields on tax
return.
45You will notice that field codes will appear within every line of the form you are viewing. You can now either mark
down the particular field code you need for use within a filter or you can print the form with the field codes showing
and archive these pages for future reference when filtering.
Once you have the field code you need, go back to the Client list, then go to the Tools menu, and select Filter the
client list.
46Choose one of the spare filters to customize and click Edit filter.
Go to the Calculated tax data section, and enter the field code you are searching for in the proper format. The
field code you will enter is the same as the one you noted when you viewed the fields on the blank forms.
47The field codes have to be entered in a specific format. You must also specify what precisely you are looking for within a particular field. For example, for a specific field, you have to specify whether the condition you want is that the field is equal to zero, or a field is within a specific range. When entering the field code, you must start with the percentage symbol “%”. For example, if the field you marked down and you want to filter on was F32:162, it must be entered as such: %F32:162 Having specified the field code, you must now specify the condition, i.e., what are you looking for within this field. To specify the condition, you must use mathematical symbols such as: > Greater than < Smaller than = Equal to >= Greater than or equal to 0 You can specify any amount within the condition. You can also use any of the mathematical symbols mentioned above. You can also search two field codes at the same time. In order to filter your client list based on one field code or another, you filter would be entered as follows: (%F32:162>0) %OR (%F32:1620) %AND (%F32:162
Extracting and merging clients
Extracting and merging clients is the process of exporting or importing existing client files in your Client List.

Extracting Clients
As a first step, you must select which clients you want to extract. To choose a client to extract, simply click on their
name in the Client List. If you want to select several clients, press the Space bar on the names of the clients you
wish to extract. An arrow will appear next to each selected name, which will be highlighted in yellow in the Client
List.

Once you have selected the clients to extract, go to the Tools menu and select Extract.

                                                            49
A new window will appear, allowing you to choose from several options.
In the Clients to extract section, choose which clients you want to extract from the Client List.
In the Data to extract section, select which years you want to extract.
In the bottom portion of the window, you can name and choose the path for which you want to save your extract.
Click on the Browse button, and choose the path you want to save the extract through Windows Explorer.
50Merging Clients
In order to merge a client in your Client List, go to the Tools menu and select Merge.
Windows Explorer will appear, allowing you to locate the client you wish to merge. Select the file and click Open.
A new window will appear. In the Action section, select whether you want to “use the save levels” of the files or
force the merge.
Note: If the Client Number of the file you are trying to merge is already used in the Client List, DT Max will not allow
you to merge the file. You will have to renumber the client file that is currently in your Client List. See the relevant
section below for instructions on how to renumber a client file.
Cloning (coupling/uncoupling)
Cloning is the process by which you can couple and uncouple family members.
Coupling
You can couple individuals together using the Cloning feature. You can couple 2 individuals who were recently
married or became common-law spouses, or a dependant that is entering a family group.
Before going through the process of coupling individuals together, you must go to the Family Head’s file and take
note of their Client Number. The Client Number is the information you need in order to couple individuals together
through cloning. For a recently married or common-law couple, you must choose who will become the Family
Head.
51Once you have the Family Head’s Client Number, select the file you wish to “clone” by clicking on their name in the
Client List. They should appear highlighted in blue in your Client List.
Once you have selected the client to clone, go to the Tools menu, and select Clone family members.
A new window will appear, allowing you to choose from several options.
In the Family members to clone section, select the individuals you wish to clone. In the majority of cases, your
default option will be Current individual only.
52Within the same section, make sure that the box next to Make cloned family members inactive in original
family is ticked.
Warning: The cloning procedure does not actually move the file you are cloning into a new family group. It makes
a copy of the original file and puts the copy in the other family group. The original file will have a processing status
of “inactive” and will be greyed out. The carryforwards will be in the new “cloned” file. However, the historical
returns and information will not follow. DO NOT DELETE the original file that is now inactive in your Client List. This
file contains all the historical information for your client.
In the Where to add clones section, tick Add to an existing family, and enter the Client Number of the Family
Head you took note of earlier.
If you are adding a dependant to an existing family group, tick the box next to Add to this family as a dependant.
If you are adding a spouse to a family head, leave this box empty.
53Click OK at the bottom of this window
Now you will see the individual merged with the Family Head within the same family group.
Uncoupling
You can also uncouple family members from within a family group using the Cloning feature. You can separate a
married/common-law couple or remove a dependant that is no longer in a particular household.
Select the file you wish to “clone” by clicking on their name in the Client List. They should appear highlighted in
blue in your Client List. When you are separating a couple, always choose the Spouse of the family group to clone,
never the Family Head.
In order to uncouple members of a family group, go to the Tools menu and select Clone family members.
In the Family members to clone section, select the individuals you wish to clone. In the majority of cases, your
default option will be Current individual only.
Within the same section, make sure that the box next to Make cloned family members inactive in original
family is ticked.
54Warning: The cloning procedure does not actually move the file you are cloning into a new family group. It makes
a copy of the original file and puts the copy in the other family group. The original file will have a processing status
of “inactive” and will be greyed out. The carryforwards will be in the new “cloned” file. However, the historical
returns and information will not follow. DO NOT DELETE the original file that is now inactive in your Client list. This
file contains all the historical information for your client.
In the Where to add clones section, tick Add to a new family.
Click OK at the bottom of this window.
You will now notice that the individual you have cloned will display Inactive as a processing status. A new Family
Head file gets created with a new Client Number for the same client.
Printing/Exporting the Client List
DT Max allows you to print your Client List with the basic information of each of your client’s files.
DT Max also allows you to export your Client List to other programs such as Excel, Word, or Outlook.
In order to print or export your Client List, go to the File menu, select Print, then select Client list.
55You can also click on the printer icon located at the top task bar of the Client List.
In the Select Clients section, choose which clients you want to print or export.
In the Destination section, select whether you want to print or export your Client List.
If you choose to print, DT Max will print the Client List with the information you have chosen to display when you
personalized your Client List (see the section Personalizing the Client List above).
56If you choose to Export to file, you can now select which information you want to export to Excel, Word, or
Outlook. To choose the information you want to export, click on Select Data to Export.
Tip: Your best option when exporting the Client List is to choose Export to file – comma delimited.
57A new window appears, allowing you to choose what information you want to export. Tick the appropriate boxes
and click OK.
In Name of file receiving the exported data, click on Browse. Windows Explorer will appear, allowing you to
choose the path of the export file and to name the file.
The format DT Max use for the export file is “.CSV”, which is compatible with most Microsoft Office applications
such as Word, Excel, and Outlook.
You can load this file directly using Microsoft Excel. The export file will have all the information you have selected
to export.
58You can also use the export file as an address book for Microsoft Outlook. As a first step, make sure to choose the
appropriate information for an address book such as e-mail, address, and phone number when selecting the data
to export (see above). Once this is done, create the export file and then import the export file directly into Microsoft
Outlook.
Back up/Restore your Client List
DT Max offers a quick and efficient way to backup and restore your client files from the Client List. Not only does
DT Max back up your client files, but it will also back up your Preferences menu settings.
Tip: It is strongly recommended that you back up your client files at regular intervals. During the tax season, we
recommend that you back up the Client List at the end of every day.
Backup
To back up your client files from the Client List, go to the Tools menu, select Backup, then Backup.
In the window that appears, choose the years and setup files you wish to back up. You can use CTRL + click to
select which years and setup files you wish to back up.
Click Next once you have made the appropriate selections.
Tip: It is strongly recommended that you backup all years and settings.
59DT Max will now prompt you to save your backup file in a particular location. Click Browse.
Window Explorer will appear, allowing you to choose the location you want to save the backup file.
You can rename the backup file to the name you wish. We recommend that you put the date you are backing up in
the name of the file.
Note: DO NOT change the name of the extension given to the backup file.
60Restore
To restore a backup file, go to the Tools menu, select Restore, then Restore.
Tip: Make sure no other user is currently in the program when performing this task in a network database.
DT Max will restart and a new window will appear prompting you to choose the backup file you have already saved.
Click on Browse, and locate the specific backup file you wish to restore using Windows Explorer.
Disclaimer: When restoring a Client List, DT Max will override and replace the existing Client List, including all
your Preferences. Make sure that the backup file is up to date.
61Renumbering Clients
DT Max automatically assigns numbers to every client file you create in the Client List. This number is usually
shown to the left of the client’s name. The Client Number is important in order to avoid duplicate files within your
Client List (see Extracting and Merging Clients section above).
To change the Client Number of an existing client in your Client List, you must select the client for which you wish
to change the Client Number. They should appear highlighted in blue in your Client List. If you wish to change the
client numbers of several clients, press the Space bar on the names of the clients you wish to renumber. A yellow
highlight will cover their names in the Client List.
Once you have selected your clients, go to the Tools menu, select Advanced Utilities, then select Renumber
Client.
A new window appears, allowing you to renumber your clients.
In the Batch Selection section, choose the clients for which you wish to change the Client Number.
62In the New number for this client section, enter the client number you want for your client. If you have chosen any
other option except Current Client in the Batch Selection section, DT Max will ask for a range of Client Numbers.
Click OK.
DATA ENTRY
Plans (Tax Planning)
The Plans within DT Max represent a unique tool of the Data Entry that allows you to try out different tax scenarios
without altering the client’s original file. DT Max will create up to six full tax returns within your client’s file that are
distinct from your client’s original file. No need to create dummy files.
You can try several different tax planning scenarios such as RRSP contributions, pension income splitting,
donations, etc. Once you have created the scenario, DT Max will produce a comparative summary between these
plans. You can also produce alternative returns, such as a rights and things or a bankruptcy return, using the
Plans.
Creating a Plan
To create a Plan within the client’s Data Entry, click on the Production drop-down menu.
DT Max now offers you six plans, indicated with the letters A to F. Choose the first plan offered, Plan A (blank).
63A new window appears, allowing you to choose from several options:
Keep Blank: Choose this option if you want to produce a new return. This is the option to choose when you are
producing alternative tax returns such as a rights and things return for a deceased individual or bankruptcy return.
Copy from previous year’s production: Choose this option if you are trying a tax planning scenario for which the
income levels are almost identical from one year to the next. In this case, DT Max will bring over the Data Entry you
made for this client from the prior year into the Plan.
Copy from Production: Choose this option if you want to try a tax planning scenario for the current year. For
example, you want try a hypothetical RRSP contribution in the client’s current year file. In this case, DT Max will
bring over the Data Entry you have already entered from the client’s current year original file (Production) into the
Plan.
Copy from next year’s production: Choose this option if you are in a prior year and want to bring over the Data
Entry of the following year for comparative purposes. In this case, DT Max will bring over the Data Entry you made
for this client from the following year into the Plan of the prior year.
The most common scenario for which you will use plans is the current year tax scenario (Copy from Production
option). The rest of the Plans chapter will show you how to use the Plans with this scenario.
Once you have chosen Copy from Production, click OK.
64Now you are in the Data Entry, which looks identical to your Production. However, the Production drop-down
menu is now called Plan A. You can start making changes to your client’s tax return with the Plan.
Naming your Plan
The next step after creating your Plan is to name it.
In order to name a Plan, add the keyword PLANTITLE. Enter the name of the Plan in the appropriate box.
65Once you calculate the Plan, DT Max will rename the plan as per your entry within the keyword PLANTITLE.
Editing the Plan
You can edit the Data Entry of a Plan in the same way as you edit the Production or original file. All the Data Entry
features are available in a Plan.
Planning Summary
Once you have completed editing the Data Entry of the Plan and calculate the Plan, DT Max will produce a
Planning Summary in the Page Index of the Tax Return Screen.
66The Planning Summary gives you a line-by-line comparative between all the plans you create. At the top of the
Planning Summary, you will see the result of each plan side by side.
The Planning Summary will only show the comparative between the Plans; the Production return is not included.
Tip: When creating Plans for current year tax planning purposes, you should not make any changes to your Plan
A. Simply copy the Production to Plan A, name it, and go on to Plan B to make your changes.
Printing Plans
You can use Production printing when printing a Plan.
To print the entire tax return in a Plan, while in the Tax Return Screen, click on the Production Printing icon.
67In the Print Job Setup window, under the Which versions section, select Other versions. Now select the
appropriate Plan. Click Print.
Disclaimer: Although you can print a Plan using Production Printing, no bar code will print from a Plan. Moreover,
you cannot EFile a Plan.
Right-hand side display
The Right-hand side display is a unique feature to DT Max which allows you to have real-time comparatives while
you are completing your client’s Data Entry. For example, you can view the entries you made in the previous year
on the right-hand side of the Data Entry.
Not only can you view comparative information, you can also bring over information from the right-hand side to your
client’s Data Entry (see pertinent section below).
68Previous year
The first option you can choose from the Right-hand side display is the previous year. Click on the drop-down
menu, and select the previous year.
Now all the client’s prior year Data Entry is displayed in the right-hand side of the screen.
All prior year amounts will match up side by side with the current year amounts as long as the description entered
for the slip or business statement is the same from one year to the next.
69Carryforwards from the previous year
You can display the carryforward amounts from the previous year on the right-hand side. Simply select
Carryforwards from XXXX on the right-hand side display drop-down menu.
Tip: This option is particularly useful if you accidentally lose the carryforwards within your client’s Data Entry. You
can always recover them using this option.
70Spouse
You can also view the Data Entry of the spouse side-by-side with the family head by simply selecting Spouse in
the drop-down menu.
71Other Client
You can also choose to display any other client located in the Client List on the right-hand side. The only
information you need is the Client Number of the client you wish to display on the right.
Go to the right-hand side drop-down menu, and select Other Client.
A new window appears. Enter the client number of the client you wish to display on the right. Then choose which
version of the file you want to see and which year. Click OK.
Now you can see side-by-side the Data Entry of your client with the “other client” displayed on the right.
Tip: This option can be particularly handy when you have 2 business partners that are not spouses. Once you
have completed the business statement of the first partner, you can choose this partner as the “other client” on the
right-hand side of the second partner, and copy over the statement (see pertinent section below).
72Plans
You can display the Data Entry you performed in a specific Plan on the right-hand side. Click on the right-hand side
drop-down menu and select the specific Plan you wish to display.
Copy data from right to left
For any option you choose on the Right-hand side display feature, you can copy selected data from the right-hand
side to the left.
To copy data for entire keyword groups, click on the Main keyword of the group for which you want to copy data
that is located to the left.
Then, press F5 to highlight the group.
73Once the keyword group has been highlighted, right-click in the highlighted area and select Copy to left-hand
side.
You can also use the shortcut keys ALT+C.
You can also copy individual keywords from the right-hand side to the left.
To highlight a specific keyword for which you want to copy the data from the right-hand side, simply CTRL + Click
on the keyword itself. Then copy over the data from right to left using the process mentioned above.
Review Tags
The Review Tags feature allows you to tag a specific keyword entry when you are working in the Data Entry
screen. To place a review tag, simply right-click the relevant keyword entry. A new window will appear. Select Tag
Keyword “For review”.
74An exclamation and interrogation mark symbol will appear beside the entry.
Once a Review Tag is inputted, DT Max will add a review note in the Error and warning messages section. To
view these review notes, click on the Error and warning messages icon.
In this new window, you will be able to view the list of error and warning messages as well as the review tags.
75To jump to the review tag in the Data Entry, select the message and click Go to keyword.
The keyword will be highlighted in your client`s Data Entry.
“Checked OK” Keyword Tag
The “Checked OK” keyword tag allows you to remove a “For review” tag or dismiss a warning message indicated
in the Error and warning messages section. To input the “Checked OK” keyword tag, in your client’s data entry,
right-click the relevant keyword entry. A new window appears. Select Tag Keyword “Checked OK”.
76A checkmark symbol will now appear beside the entry.
The entry was tagged “For review”: By tagging the entry “Checked OK”, DT Max removes the corresponding
warning message that appeared in the Error and warning messages section as well as marking the entry with a
checkmark.
The entry is “inconsistent”: In the Error and warning messages section, DT Max generates a warning when an
amount seems inconsistent in respect to other relevant entries. DT Max will then suggest the expected amount for
that entry. By tagging the entry “Checked OK”, you can confirm the original amount entered and effectively dismiss
the warning message. This warning message will no longer appear in the Error and warning messages section.
Only the contribution amounts for QPP/CPP, EI, and QPIP are affected by this feature.
T1 Adjustment Request
In the tax year, if you wish to make changes to an income tax return that was already filed, you will need to
complete T1 or TP1 adjustment request.
In the Tax return tab of the client’s file, click on the Status information icon.
Add a check mark under the statement “As-filed snapshot” in order to preserve the original tax return. DT Max will
provide a backup date in the Federal and Quebec column.
Then, click OK.
77Note: The backup copy of the As-filed version for the federal and Quebec return will be under the menu Version.
Click on Production YYYY to complete the adjustment.
Return to the data entry screen and make the necessary changes on the client's file.
After making the changes in the tax return, go to DT Max menu and click on Tools, Recalculate current client to
calculate the new changes in the tax return.
Go back to the Data Entry screen and add the keyword T1- Adjust.
In the drop-down menu of the keyword group, select Federal T1 (T1-ADJ) and specify the year for the amended
return.
78Use the keyword DT-ImportFedDiff to indicate whether DT Max should automatically compare the changes
brought to the T1 federal return with the federal "As-filed" snapshot copy for the selected tax year.
DT Max will automatically import for each modified line the amounts claimed on the "As-filed" snapshot as well as
the new modified amounts on the adjusted return.
In the drop-down menu keyword Address, specify the address to use in the T1-ADJ.
If the address is different than the tax return, you will need to complete the Keywords Street, City, Province,
Postcode.
79Specify if you authorized a person or firm to make the request on your behalf in the keyword Info-Authorize.
Make sure to indicate the telephone number to be used on the form.
An explanation of the adjustment will be necessary under the keyword Details. Double click on the detail keyword
to open the text box. When the explanation is complete, click on Save.
The T1 adjustment form will be available in the tax return tab. You will need to print the form as well as all the
related form of the adjustment.
Note: For Quebec TP1, please add the keyword T1-Adjust in the data entry tab. In the drop-down menu of the
keyword group, choose Québec TP1 (TP-1.R) and complete the keywords of the section.
80TAX RETURN
Review Tags
DT Max’s review tags feature allows you to directly tag a field on the tax return for further review. To access this
feature, simply right-click the field you wish to tag. You will have a selection of four different tags to choose from.
Similarly to the tagging tool available in the Data Entry screen, DT Max allows you to tag a field either “For review”
or “Checked OK”. The utilities of these tags were explained in the previous section.
In the Tax Return screen, two additional review tags are available for use.
When tagging a field as “Error”, DT Max will highlight the field in red and input an X symbol in the navigator section
to the left of the screen to indicate that an error is present and must be verified before the final production of the tax
return.
Once the error tag has been verified, you may right-click the field and select Tag: Final check.
81DT Max will now highlight the field in green and input a double checkmark symbol in the navigator.
In addition to the review tags, DT Max also allows you to attach notes to specific fields on the tax return. To add a
note, right-click the desired field and select Add a review note.
A new window will appear allowing you to enter a review note of up to maximum of 400 characters. Once you have
entered the note, click Save.
82A yellow note page symbol will appear in the navigator indicating that a review note is present.
Once one or more review notes are no longer required, you may choose to remove them individually or all at once.
To remove an individual review note, right-click the corresponding field and select Edit the review note.
From the Field Review Note window, select Remove this note.
83To delete all the review notes and tags at once, right-click any field and select Remove ALL review tags from this
client.
PDF
DT Max’s PDF function allows you to save selected pages of the tax return as PDF files. These files can be
archived or even sent in an e-mail directly through DT Max.
To access this feature, once on the Tax Return screen, click the PDF icon located on the toolbar.
In the new window, add a tick the box next to Save as a PDF file.
84Click on the yellow folder to save to PDF file.
Three additional options are also available. You may choose to Open the file in Acrobat® when created, to
Protect the file with a password, and to Include field review tags in the saved PDF file.
85In order to send the PDF files directly as an e-mail, simply tick the box next to Email directly and enter the relevant
information in the section below.
The Select pages section allows you to make a selection of which pages you would like to save to PDF or send
directly by e-mail. DT Max will only list the relevant pages with regards to your client.
Tip: You may choose to select the pages one at a time by holding down CRTL on your keyboard and clicking the
corresponding pages from the list.
86You can also read