Integrating OneXafe and UDP - Arcserve
←
→
Page content transcription
If your browser does not render page correctly, please read the page content below
White Paper

Integrating
OneXafe and UDP

                  Integrating OneXafe and UDP /   1
White Paper

Legal Notice
This Documentation, which includes embedded help systems and electronically distributed materials, (hereinafter
referred to as the “Documentation”) is for your informational purposes only and is subject to change or
withdrawal by Arcserve at any time. This Documentation is proprietary information of Arcserve and may not be
copied, transferred, reproduced, disclosed, modified or duplicated, in whole or in part, without the prior written
consent of Arcserve.

If you are a licensed user of the software product(s) addressed in the Documentation, you may print or otherwise
make available a reasonable number of copies of the Documentation for internal use by you and your
employees in connection with that software, provided that all Arcserve copyright notices and legends are
affixed to each reproduced copy.

The right to print or otherwise make available copies of the Documentation is limited to the period during
which the applicable license for such software remains in full force and effect. Should the license terminate for
any reason, it is your responsibility to certify in writing to Arcserve that all copies and partial copies of the Documentation
have been returned to Arcserve or destroyed.

TO THE EXTENT PERMITTED BY APPLICABLE LAW, ARCSERVE PROVIDES THIS DOCUMENTATION “AS IS”
WITHOUT WARRANTY OF ANY KIND, INCLUDING WITHOUT LIMITATION, ANY IMPLIED WARRANTIES OF
MERCHANTABILITY, FITNESS FOR A PARTICULAR PURPOSE, OR NONINFRINGEMENT. IN NO EVENT WILL
ARCSERVE BE LIABLE TO YOU OR ANY THIRD PARTY FOR ANY LOSS OR DAMAGE, DIRECT OR INDIRECT, FROM
THE USE OF THIS DOCUMENTATION, INCLUDING WITHOUT LIMITATION, LOST PROFITS, LOST INVESTMENT,
BUSINESS INTERRUPTION, GOODWILL, OR LOST DATA, EVEN IF ARCSERVE IS EXPRESSLY ADVISED IN ADVANCE
OF THE POSSIBILITY OF SUCH LOSS OR DAMAGE.

The use of any software product referenced in the Documentation is governed by the applicable license agreement
and such license agreement is not modified in any way by the terms of this notice.

The manufacturer of this Documentation is Arcserve.

Provided with “Restricted Rights.” Use, duplication or disclosure by the United States Government is subject to
the restrictions set forth in FAR Sections 12.212, 52.227-14, and 52.227-19(c)(1) - (2) and DFARS Section
252.227-7014(b)(3), as applicable, or their successors.

© 2021, Arcserve, including its affiliates and subsidiaries. All rights reserved. Any third party trademarks or
copyrights are the property of their respective owners.

                                                                                                        Integrating OneXafe and UDP /   2
White Paper

Contact Arcserve Support
The Arcserve Support team offers a rich set of resources for resolving your technical issues and provides easy access to important
product information.

Contact Support

With Arcserve Support:
• You can get in direct touch with the same library of information that is shared internally by our Arcserve Support experts.
    This site provides you with access to our knowledge-base (KB) documents. From here you easily search for and find the
    product-related KB articles that contains the field-tested solutions for many top issues and common problems.

•   You can use our Live Chat link to instantly launch a real-time conversation between you and the Arcserve Support team.
    With Live Chat, you can get immediate answers to your concerns and questions, while still maintaining access to the product.

•   You can participate in the Arcserve Global User Community to ask and answer questions, share tips and tricks, discuss
    the best practices and participate in conversations with your peers.

•   You can open a support ticket. By opening a support ticket online, you can expect a callback from one of our experts
    in the product area you are inquiring about.

•   You can access other helpful resources appropriate for your Arcserve product.

                                                                                                   Integrating OneXafe and UDP   /   3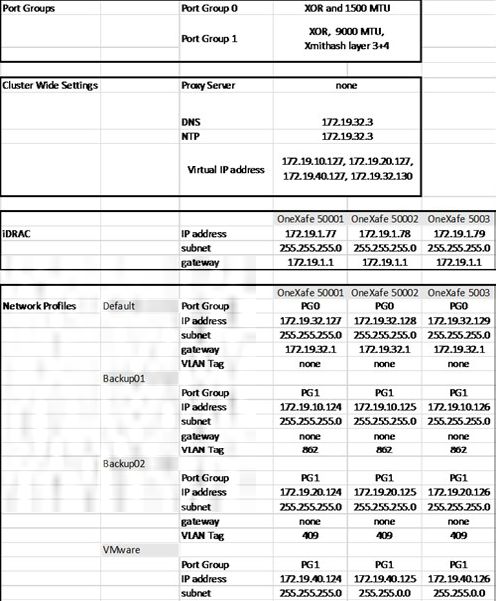
White Paper

Contents
Chapter 1: Overview .................................................................................................................................................4

Chapter 2: OneXafe Configuration .........................................................................................................................4

Configure Network .....................................................................................................................................................5

Configure iDRAC for OneXafe Cluster .........................................................................................................................5

How to Properly Configure OneXafe Networking and Port Groups ..........................................................................6

Configuring VLAN Tagging ..........................................................................................................................................8

Management (default) - Port Group 0 ........................................................................................................................9

Data - Port Group 1 ...................................................................................................................................................10

(Optional)Cluster - Port Group 2 – Advanced Networking ......................................................................................10

Create Single Node or Multi Node Cluster ...............................................................................................................11

Register OneXafe to OneSystem account ................................................................................................................16

Configure Virtual IP of OneXafe Cluster ...................................................................................................................19

Chapter 3: Configuring UDP and OneXafe to Achieve Immutable Storage for Backups ...............................20

Create SMB Shares on OneXafe Storage System .....................................................................................................20

Create UDP Dedupe Datastore .................................................................................................................................22

Add a Data Store .......................................................................................................................................................23

Recover from a Ransomware Attack ........................................................................................................................26

Required Credentials during Recovery ....................................................................................................................27

Promote a OneXafe Snapshot to a New Share ........................................................................................................27

Import Dedupe Datastore to UDP ............................................................................................................................28

Known Limitations ...................................................................................................................................................30

                                                                                                                                   Integrating OneXafe and UDP          /    4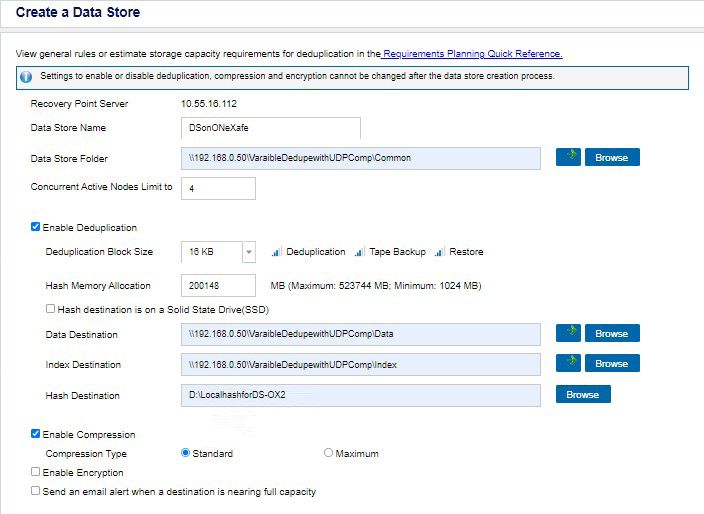
White Paper

Chapter 1: Overview
Arcserve UDP (UDP) is a comprehensive solution to protect complex IT environments. The solution protects your data residing in various
types of nodes such as Windows, Linux, and virtual machines on VMware ESX servers, Microsoft Hyper-V servers or Nutanix AHV servers.
You can back up data to either a local machine or a recovery point server. A recovery point server is a central server where backups from
multiple sources are stored.

OneXafe, with its patented distributed object store, prevents any form of overwriting. Furthermore, OneXafe performs powerful inline
deduplication on continuous snapshots, which reduces the data footprint. OneXafe’s scale-out architecture expands storage seamlessly.
To enable this option, add one drive at a time or multiple nodes within a cluster without any configuration changes to the application.

This document contains information about the integration of UDP and OneXafe, which makes the UDP backup recovery point data im-
mutable. For instance, if a cyber-criminal deletes the UDP recovery point data by a ransomware attack, OneXafe’s immutable snapshot
feature can come to the rescue and provide options to recover the lost data. An immutable snapshot is a copy of your data that cannot
be overwritten or deleted by ransomware or users.

OneXafe Continuous Data Protection (CDP) performs continuous snapshots every 90 seconds for the first hour. Subsequently, it performs
hourly, daily, and monthly snapshots. Snapshots help to recover data as close to a ransomware attack. Generally, the ransomware attack
can corrupt the primary files but the snapshots are completely unaffected. OneXafe also provide options for easy recovery – recover
individual files, folder or complete network share.

Chapter 2: OneXafe Configuration
This section provides information about how to configure OneXafe cluster.

To configure OneXafe Cluster, do the following:
        1. Set up network configuration
        2. Create a single node or multi-node (up to 3 nodes) cluster
        3. Register the cluster in the OneSystem account (User Management and Storage Management) using Share Creation.
        4. Set virtual IP for the OneXafe Cluster

This document applies to the following or newer versions of UDP and OneXafe:

       • UDP version 8.0 or newer: Build 5628 for all the UDP components, which includes UDP Console, Recovery Point Server,
        and UDP agents.

  • OneXafe Cluster
		 • Models: OneXafe 4412, 4417, 5410
		 • Software Version:3.2.3 Cabernet Sauvignon or newer

                                                                                                         Integrating OneXafe and UDP   /   5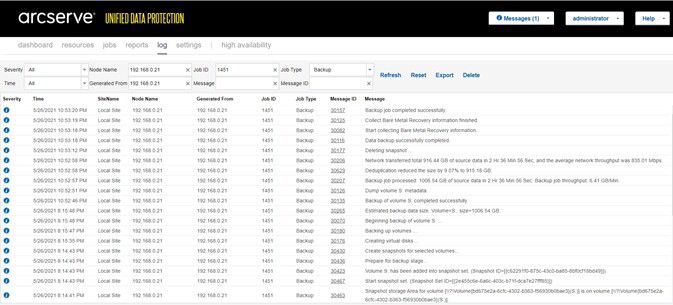
White Paper

Configure Network
This section contains information on how to configure OneXafe Network.

To configure network, log into OneXafe Web Console and go to the Configuration > Network tab. Make sure you have different network
profiles as shown in the below illustration.

Note: We recommend the following:
       • For a system with four network ports, create two network profiles: Management and Data.
       • For a system with six network ports, create three network profiles: Management, data, and Cluster.
       • 10GbE networking

Configure iDRAC for OneXafe Cluster
By default, when a network cable is connected to the iDRAC port, it acquires a DHCP address. The default iDRAC login details are:
       • User name: admin
       • Password: config

For OneXafe deployed on a network without a DHCP server, admins can now set a static IP address for iDRAC. See the example below.

       The last # show lan command is used to verify the setting.

       oneblox50001(config) ipmi oneblox50001(config-ipmi) help
       Documented commands (type help ):
       ========================================
       apply exit help lan logout reset show
       Undocumented commands:
       ======================
       end
       oneblox50001(config-ipmi) help lan

       Manage the IPMI lan interface and provide access to configuration parameters.

       These setting will not be applied until the configuration is saved.
       Usage:
       lan
       lan dhcp
       lan static   [] lan vlan

       Examples:
       - configure a static ip network and no gateway lan static inet 10.0.0.0 255.0.0.0

       See Also:
       apply

       oneblox50001(config-ipmi) lan static 172.19.1.77 255.255.255.0
       oneblox50001(config-ipmi) apply
       oneblox50001(config-ipmi) show lan

                                                                                                         Integrating OneXafe and UDP   /   6
White Paper

How to Properly Configure OneXafe Networking and Port Groups
The following network configuration diagram includes a 3-node cluster, two port groups, and iDRAC. It also contains network
redundancy to multiple switches. In this example, the 10GbE switches are stackable and the ports are configured in LAG.

The following example contains the OneXafe cluster-wide settings, iDRAC, multiple VLAN IP address, configuration details, and the con-
figuration of PG1 through the web console.

                                                                                                       Integrating OneXafe and UDP   /   7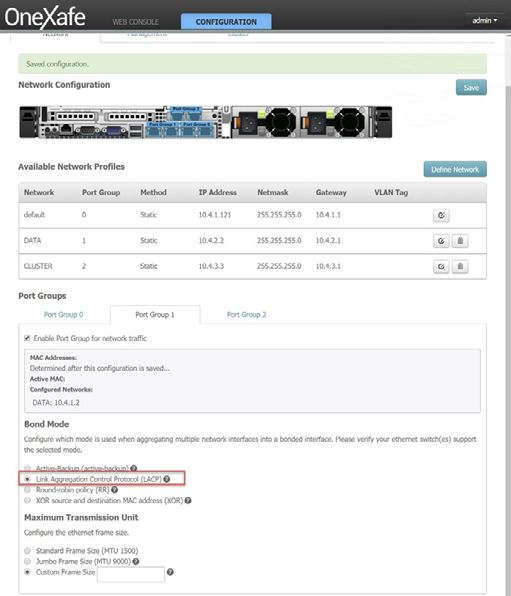
White Paper

Example: OneXafe 3 node cluster Deployment Networking Configuration for 10GbE network
This example includes the following details:
        • 10GbE network
        • PG0 (XOR), PG1 (XOR)
        • VLAN tagging

In this Backup/Recovery and VMware example, one VLAN is routable to a gateway for OneSystem access while other VLANs are
not routable.

With the exconsole, the xmithash policy on PG1 can be set to layer3+4. By default, it is layer2+3 and will show as blank in the exconsole.
All other port group settings can be done through the web console so the illustration is only for the xmithash policy setting.

        oneblox50001(config-network)
        oneblox50001(config-network) portgroup
        Portgroup Enable Mtu Bondmode Xmithash
        0 true 1500 active-backup
        1 false 1500 active-backup
        2 false 1500 active-backup
        oneblox50001(config-network) portgroup xmithash 1 layer3+4
        Portgroup Enable Mtu Bondmode Xmithash
        0 true 1500 active-backup
        1 false 1500 active-backup layer2+3 (current)
        layer3+4 (pending)
        2 false 1500 active-backup
        oneblox50001(config-network) apply
        oneblox50001(config-network) portgroup
        Portgroup Enable Mtu Bondmode Xmithash
        0 true 1500 active-backup
        1 false 1500 active-backup layer3+4
        2 false 1500 active-backup
        oneblox50001(config-network)

Note: The above example provides the required switch port configuration for the different hash algorithms.

The following example is a network configuration diagram for a 3 node cluster, two-port groups, and iDRAC. There is network redun-
dancy to multiple switches (except for iDRAC). In this example, the 10GbE switches are not stackable; hence the switches do not support
LACP across multiple switches. In that case, select XOR as we recommend it as the next best option. However, LACP is the preferred bond
mode.

The following example includes OneXafe cluster-wide settings, iDRAC, multiple VLAN IP address, configuration details, and the configura-
tion of PG1 through the web console.
Note: To move a network profile to a different port group, select the edit icon, and then select the desired port group. You don’t have to

                                                                                                          Integrating OneXafe and UDP   /   8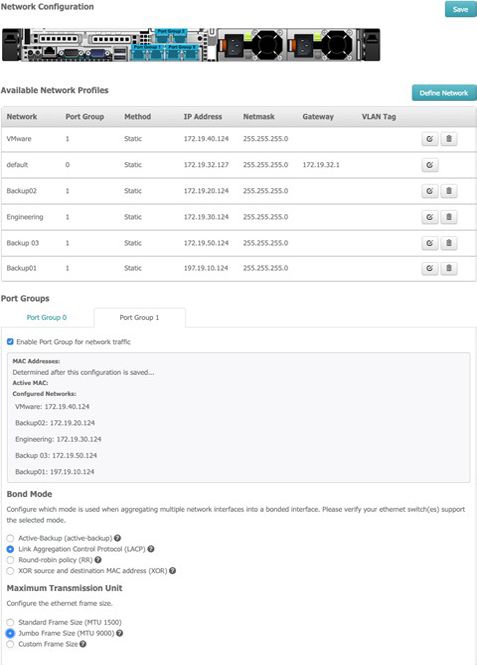
White Paper

delete and create a new network profile. The following image shows how Backup02 has been edited from Port Group 1 to Port Group 2.

For more information, watch the video: Configuring Network Port Groups with OneBlox Exconsole.

Configuring VLAN Tagging
With the OneXafe web console (and exconsole commands), admins may assign VLAN tags (tagging Ethernet packets with a value for
routing purposes) to a network profile. VLAN tags are not required and many organizations opt to use portbased VLANs to route multiple
subnets over the same switch ports.

When removing the VLAN tag from an existing network profile through exconsole or web console, set the VLAN tag value to ‘0’. Then click
save (web console) or apply (exconsole).

                                                                                                       Integrating OneXafe and UDP   /   9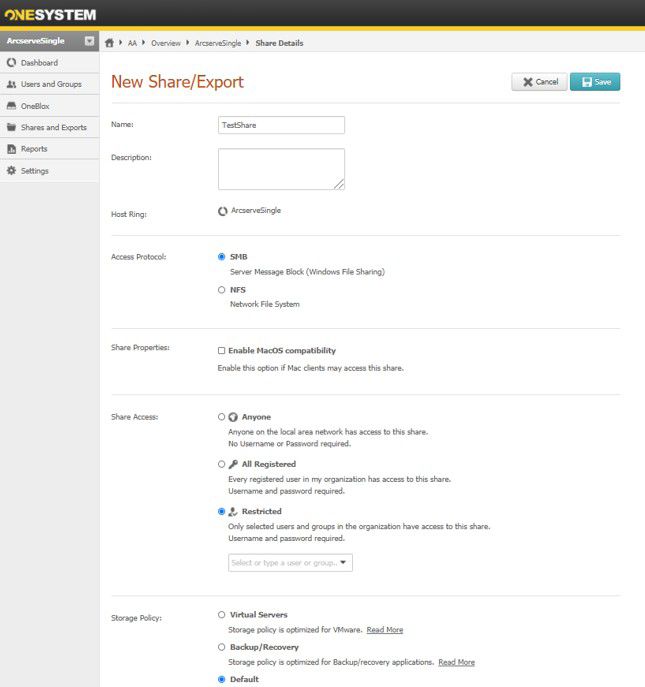
White Paper

Example:
       • Miraki port based VLAN tagging
       • Cisco Nexus 5000 Configuration Guide

There are three networks that need to be configured and port groups that needs to be enabled in the recommended configuration:
       1. Management (default) - Port Group 0
       2. Data - Port Group 1
       3. (Optional)Cluster - Port Group 2 – Advanced Networking

Management (default) - Port Group 0
Primary use - Used to communicate with OneSystem
       • Does not require high-speed connections - 1GbE will suffice Static
       • IP is highly recommended
       • Path MTU discovery works on the connection up to OneSystem

                                                                                                    Integrating OneXafe and UDP /   10
White Paper
Data - Port Group 1
Primary use - Used to communicate with the client network and ingestion (e.g. SMB shares, NFS exports)
• For optimal performance, ensure LACP is configured Static IP is highly recommended
• MTU should match your switch topology - typically 1500
• Communication to the cluster will happen via the VIP (Virtual IP) that is configured in this network - Communicating to
the cluster through the VIP is done over SMB or NFS.
• Register the VIP to the domain as an FQDN
• Once data is ingested, the cluster operation goes through the cluster network. Ensure the Cluster Network has equal
or greater bandwidth than the Data Network.
• For example, if 20GB coming in the data side, ideally there would be 20GB to go out the cluster side, too.
• In addition, there is a data placement protocol for puts/writing out the blocks into the distributed object storage.
(Optional) Cluster - Port Group 2 – Advanced Networking
Primary use - Used for all intra-cluster communication functions.
• For optimal performance, ensure LACP is configured.
• The cluster network is auto-configured during the cluster configuration as IPv6 and is auto-discovered. Assuming that
the cluster network is in the same switch domains and can see each node.
• The LAN doesn’t run a protocol, only the endpoints – in this case the OneXafe nodes. The LAN can carry both IPv4 and IPv6
traffic. The nodes in the cluster use IPv6 to auto-config and communicate between the nodes.
• The cluster configuration also includes IPv6 - SLAC (Stateless Link Auto Config).
• Ensure that neighborhood discovery is enabled on all switches in the environment.
• Cluster communication across tunnels is not supported.
• Required communication protocols are:
• Multicast (same switch fabric), our cluster must exist within the same multicast domain.
• The cluster side needs to translate using two different protocols. HA protocol (management, keep a VIP alive, etc.)
and a multicast protocol, VRRP (Virtual Route Redundancy Protocol).
• In addition to the multicast protocol, point-to-point unicast traffic over TCP is done over SSDP.
Integrating OneXafe and UDP / 11White Paper
• The most common misconfigurations are issues related to multicast and TCP flow control - ensure both protocols are
enabled on all ports connected to a OneXafe.
• Improperly configured TCP flow control can starve a node - ensure proper configuration of TCP flow control to
mitigate risk.
• Ideal configuration must consist of a cluster switch that is dedicated to the cluster traffic.
For recommended network configurations, see the following:
• How To: Properly Configure OneXafe Networking and Port Groups
• Common Tasks - Networking
Create Single Node or Multi Node Cluster
Follow these steps:
1. From the OneXafe iDRAC Console, get the IP to access OneXafe
Web Console. You can perform cluster configuration and
networking from the OneXafe Web Console.
Integrating OneXafe and UDP / 12White Paper
2. To open OneXafe WebConsole, go to http://. The Home page opens.
3. Click the Configuration tab, and then enter your login details.
• Default Username: admin
• Default Password: config
Note: If you have logged in for the first time, you are prompted to modify the password.
4. To create a new cluster with the selected OneXafe nodes, go to the
Configuration > Cluster tab, and then do the following:
a. View and select the OneXafe nodes as needed.
b. For Drive Failure Protection, select the drives as needed.
c. To enable Encryption At Rest, click the Enable data encryption at rest protection check box. Optionally, you can
enable Encryption at Rest even when creating cluster.
d. Click the Create Cluster button.
Integrating OneXafe and UDP / 13White Paper
The following table outlines the fault domain protection of drives and nodes within a cluster:
OneBlox 4312 1 Drive Failure 1 Node Failure 2 Drives Failure 2 Node Failure
and 4400 Clusters
1 node cluster Yes No Yes No
(Default)
2 node cluster Yes Yes Yes No
(read/write depending (Default)
on which node fails)
3 node cluster Yes Yes Yes No
(Default)
4 node cluster Yes Yes Yes Yes
(Default) (read/write)
5 and greater Yes Yes Yes Yes
node cluster (Default) (read/write)
The cluster creation is initiated.
Note: We recommend that you stay in the page till the cluster gets created. If you try to navigate away from the screen or make
additional changes, the following message gets displayed.
Integrating OneXafe and UDP / 14White Paper
Create Single Node or Multi Node Cluster
The cluster is created and ready for use.
The status is updated in the Web Console tab.
Integrating OneXafe and UDP / 15White Paper
5. To join a second node to the Cluster, log into the second node Web Console following the steps 1 and 2, and then navigate
to Configuration > Cluster.
6. Under the Join Existing Cluster section, click the Join button to add another node to the cluster.
7. To add a third node to the Cluster, follow steps 5 and 6.
Integrating OneXafe and UDP / 16White Paper
Register OneXafe to OneSystem account
Follow these steps:
1. Log into OneXafe Web Console, and then go to the Configuration > Management tab.
2. Copy and paste the OneSystem URL (https://onesystem.exablox.com) in the new window of a browser.
3. Click the Register button, provide the details, and then click Register.
After you register, you will receive an email notification. To confirm your account and reset your password,
click the link given in the email.
Integrating OneXafe and UDP / 17White Paper
Your new password is created.
4. Using the new password, log into OneSystem.
5. On the Overview page, click Actions > Register New Rings. The Discover OneBlox screen opens.
Integrating OneXafe and UDP / 18White Paper
6. To discover OneBlox, click the Get Started button.
7. To get the OneBlox discovered, select one of the following options:
• Discover OneBlox: Discovers OneBlox automatically.
• I need to find my OneBlox by IP address: Allows you to discover OneBlox using an IP address. In the External IP
Address box, type the IP address and click Next.
8. To pair OneBlox with OneSystem, retrieve the passcode and enter it in the text box. To retrieve the passcode,
click the Exablox image.
Integrating OneXafe and UDP / 19White Paper
9. After you type the passcode, click the Register button.
OneBlox is now paired with Onesystem.
Note: For more information about OneXafe, see StorageCraft OneXafe User Guide.
Configure Virtual IP of OneXafe Cluster
Follow these steps:
1. Log into the OneSystem account.
2. From the overview page, click on the corresponding OneXafe Cluster Ring.
3. To navigate to the Ring settings, click on the Settings pane.
4. Click the Edit button that is next to Virtual IP settings, assign a static IP, and then click the Save button.
Note: For more information about OneXafe, see StorageCraft OneXafe User Guide.
Integrating OneXafe and UDP / 20White Paper
Chapter 3: Configuring UDP and OneXafe to Achieve
Immutable Storage for Backups
This section provides information about how to configure UDP and OneXafe to make UDP recovery point data immutable and the steps
to be followed for data recovery in case of ransomware attacks.
OneXafe File System is based on an Immutable Object Store where objects are written only once and never modified. Hence, the objects
are never over-written “in place” unlike many file systems.
Any client modification to file system data always results in new objects, even if they are existing objects that are being modified. Each
object is also encrypted and protected by cryptographic hashes and form a Merkle tree (like a block-chain). The data of the object is
always validated when read back to ensure immutability. Snapshots involve simply noting down the root hash of the tree and can be
taken instantaneously. So snapshots are the view of the file system at the instant when that snapshot is taken. It freezes the file system
and as the underlying objects pointed by snapshots are “immutable” and cannot be changed, the snapshot inherits this “immutability.”
It cannot be changed or modified by an external source.
Snapshots make the objects, thus making the File System available, which allows it to go back to specific points in time, easily guaran-
teeing the immutability of objects and, therefore, the underlying data.
• Create SMB Shares on OneXafe Storage System
• Recover from a Ransomware Attack
• Required Credentials during Recovery
• Promote a OneXafe Snapshot to a New Share
• Import Dedupe Datastore to UDP
• Known Limitations
Create SMB Shares on OneXafe Storage System
This section provides information about how to create SMB shares on OneXafe Storage System.
Follow these steps:
1. Log into the OneSystem account that manages the OneXafe system.
2. On the Overview page, click on the corresponding ring.
Integrating OneXafe and UDP / 21White Paper
The Dashboard page for the selected ring opens.
3. To create users with different permission levels that are specific to OneSystem, click User and Groups. You can use
the same users for the OneXafe Share access permissions.
Note: By default, all the users in the Active Directory (AD) have access to the OneXafe shares. Hence, we recommend to follow
Microsoft Best Practices for Securing Active Directory.
Restricted to AD, users will have the access policy applied to all SMB shares within the OneXafe cluster. This will create a share
that is read/write accessible to all registered AD Users in your organization. Now any Domain Admin or Delegated AD Admin
may change the permissions or ACLs within the share as desired (see “Active Directory Users and Computers”).
If OneXafe is only used as a backup target and not for general file sharing purposes, we recommend that you do not join
the OneXafe system with Active Directory (AD). Apply this measure to add more separation for your data protection
infrastructure in case the Active Directory is compromised.
Delegate admins, users, and/or groups may be added to the share if desired. This will give explicit AD ACL control to the
members listed.
Integrating OneXafe and UDP / 22White Paper
4. Click Shares and Exports, and the click the Add button.
5. On the New Share/Export screen, for Access Protocol, select SMB.
6. To provide the read-write access to a specific user, for Share Access, select Restricted, and then select or type a user or
group as needed.
Create UDP Dedupe Datastore
Before you perform the steps given in this section, log into the UDP Console, and then make sure to do the following.
• For Deduplication Block Size, select 64 KB, and then provide a local folder path for Hash path.
• Make sure all the remaining paths for the Dedupe datastore such as Datastore Folder, Data Destination and Index
Destination reside on OneXafe Cluster.
• Make sure to provide the share path using OneXafe Cluster Virtual IP. The virtual IP of OneXafe Cluster is independent of a
ny node ip of the cluster and make the share high available.
Integrating OneXafe and UDP / 23White Paper
Add a Data Store
To create a destination, the recovery point server needs data stores. The data store specifies where the backup data is stored. You can
add multiple data stores to an RPS.
Follow these steps:
1. Click the resources tab.
2. From the left pane, navigate to Destinations and click Recovery Point Servers. The Destinations: Recovery Point Servers
page is displayed.
3. Perform one of the following actions:
• Right-click a recovery point server.
• Select a recovery point server, and from the center pane, click the Actions drop-down list.
A list of options is displayed.
4. Click Add a Data Store.
The Create a Data Store page is displayed with the name of the specified recovery point server.
5. Specify the following fields and click Save.
Recovery Point Server
Defines the recovery point server where the data store is created. The recovery point server is already added by default.
Data Store Name
Defines the name of the data store.
Data Store Folder
Defines the location of the folder where the data store is created. Click Browse to select the destination folder.
Concurrent Active Nodes Limit to
Specifies the maximum concurrent jobs on the data store.
Default Value: 4
Refers to a value from 1 to 9999. The value indicates the number of jobs that can concurrently run. If the running jobs meet
the number, another job is placed in to the queue and job can only start when one of the running job completes. The
completed job could mean a finished, canceled, or a failed job.
Integrating OneXafe and UDP / 24White Paper
The number applies to the Job Types but not to the Server nodes. For example, number 5 indicates that five backup jobs
are running. Any job scheduled after five backup jobs waits in the queue, but you can submit another job such as File
System Catalog.
If the value is more than 16 or 32, messages are displayed to warn about the increased demand on hardware.
Note: Limit to number only impacts the replication outbound job, not the replication inbound job. Limit to number does
not impact the Restore or BMR jobs. Such jobs are not placed in a queue.
Enable Deduplication
Specifies that deduplication is enabled for this data store. Arcserve UDP supports both types of deduplication: Source-side
deduplication and Global deduplication. Source-side deduplication prevents duplicate data blocks to move across network
from a particular agent. Global deduplication eliminates duplicate data across all client machines based on the volume
cluster level.
Deduplication Block Size
Defines the deduplication block size. The options are 4 KB, 8 KB, 16 KB, 32 KB, and 64 KB. The deduplication block size also
impacts the Deduplication capacity estimation. For example, if you change the default 16 KB to 32 KB, the Deduplication
capacity estimations double. Increasing the deduplication block size can decrease the deduplication percentage.
Hash Memory Allocation
Specifies the amount of physical memory that you allocate to keep hashes. This field is pre-filled with a default value.
The default value is based on the following calculation:
If the physical memory of the RPS is smaller than 4 GB (or is identical to 4 GB), the default value of Hash Memory
Allocation is identical to the physical memory of the RPS.
If the physical memory of the RPS is greater than 4 GB, Arcserve UDP calculates the available free memory at this time.
Assume that the available free memory is X GB at present. Arcserve UDP further checks the following conditions:
• If (X * 80%) > = 4 GB, the default value of Hash Memory Allocation is (X * 80%).
•If (X * 80%) < 4 GB, the default value of Hash Memory Allocation is 4 GB.
Example: Consider the RPS has 32 GB of physical memory. Assume that operating system and other applications use
4 GB memory while creating the data store. So, the available free memory at this time is 28 GB. Then, the default value
of Hash Memory Allocation is 22.4 GB (22.4 GB = 28 GB * 80%).
Hash Destination is on a Solid State Drive (SSD)
Specifies if the hash folder is on a solid state drive.
Note : Configure the hash destination on local SSD, if the Hash destination is on a Solid State Drive(SSD) option is enabled.
Data Destination
Defines the data destination folder to save the actual unique data blocks. Use the largest disk to store data as that contains
the original data blocks of source.
Note
: The Data Destination path should be a blank folder.
Index Destination
Defines the index destination folder to store the index files. Choose a different disk to improve the deduplication processing.
Note: The Index Destination path should be a blank folder.
Integrating OneXafe and UDP / 25White Paper
Hash Destination
Defines the path to store the hash database. Arcserve UDP uses the SHA1 algorithm to generate the hash for source data.
The hash values are managed by the hash database. Selecting a high speed Solid State Drive (SSD) increases the
deduplication capacity and requires a lower memory allocation. For better hash performance, we recommend to
format the SSD volume as NTFS file system with 4KB volume cluster size.
Note
: The Hash Destination path should be an empty folder.
Note: You cannot specify the same path for the following four folders: Data Store folder, Data Destination, Index Destination,
and Hash Destination.
Enable Compression
Specifies that the data compression settings are enabled.
Compression Type
Specifies whether to use the standard or maximum compression type.
Compression is often selected to decrease the usage of the disk space, but also has an inverse impact on your backup speed
due to the increased CPU usage. Based on your requirement, you can select one of the three available options.
Note: For more information, see Compression Type.
Enable Encryption
Specifies that encryption settings are enabled. When you select this option, you must specify and confirm the
encryption password.
Data encryption is the translation of data into a form that is unintelligible without a deciphering mechanism. The Arcserve
UDP solution uses secure, AES (Advanced Encryption Standard) encryption algorithms to achieve maximum security and
privacy of your data. For data stores, encryption or No encryption is supported. For Encryption, only AES-256 is available.
A password is not required when you are attempting to restore to the computer from which the backup was performed.
However, when you attempt to restore to a different computer, a password is required. By default, only for the first login
password is required. To enter password even after the first login, the administrator needs to manually stop Arcserve
UDP Agent Explorer Extension Service.
Send an email alert when a destination is nearing full capacity
Selecting this option configures the data store to send email alert. RPS sends out email alerts to recipients when data store
destination folder is nearing full capacity.
Configure Email
This button appears only when you enable the option of Send an email alert when a destination is nearing full
capacity. The button helps you provide as email ID to receive alerts. Click the Configure Email button to load global
email alert settings from Console>Settings>Email and Alert configuration. If global Email settings is not available,
clicking the Configure Email button opens Email settings dialog to set email details.
The data store is created and gets displayed on the center pane. Click the data store to view the details in the right pane.
Integrating OneXafe and UDP / 26White Paper
Recover from a Ransomware Attack
In case of a ransomware attack or any breach on the Arcserve UDP Recovery Point Server, there may be a backup recovery point
data loss. Hence, we recommend you to perform the following:
• A fresh installation of Windows.
• Create a new password
• A fresh installation of UDP.
• Identify the valid snapshot, and then promote the snapshot as a new share.
To identify valid snapshots, do the following:
1. Identify the right time from Arcserve UDP activity log
a. Log into the UDP console, and then click All nodes.
b. Select the node that has backups scheduled to destinations residing on OneXafe SMB share.
c. On the right panel, click the specific backup job.
Make a note of the job completion time for any successful UDP backup job.
2. Identify the right snapshot in the OneXafe UI based on the UDP job completion time.
Integrating OneXafe and UDP / 27White Paper
To retrieve a list of the snapshot, do the following:
1. Log into the OneXafe console, and then run the following commands:.
Share
Snapshot list
2. Pick the OneXafe snapshot that was created after the last successful backup on UDP side.
Required Credentials during Recovery
Make sure to keep credentials for the following ready in case of recovery:
• OneXafe iDRAC
• OneXafe Local admin account (command line)
• OneSystem admin account (for management)
• Onesystem user account ( for RPS datastore access)
• UDP system- Windows admin and IPMI
• UDP RPS datastore encryption password (if used)
• UDP Plan passwords (if used)
Promote a OneXafe Snapshot to a New Share
To promote a OneXafe snapshot to a new share, use the following commands:
oneblox43005(config-share) enable
oneblox43005(config-share) snapshot list
oneblox43005(config-share) snapshot promote
oneblox43005(config-share) update -writeable
oneblox43005(config-share) disable
Integrating OneXafe and UDP / 28White Paper
Import Dedupe Datastore to UDP
This section provides information about how to import a dedupe datastore to UDP.
Follow these steps:
1. Log into the UDP console.
2. From the resources tab, under Destinations, click Recovery Point Servers.
3. From the Actions drop-down list, select Import Data Store.
The Import a Data Store page opens.
4. To select the Data Store Folder path, click the Browse button and select the path, and then click Next.
5. In the Import a Data Store screen, based on the Share folder name path, map the relevant Data Destination and
Index Destination paths.
Integrating OneXafe and UDP / 29White Paper
6. For Hash, provide an empty folder path, and then click Save. The data store gets imported in the Restore Only mode.
Note: You can perform restores of any required files and folders in the Restore only mode.
7. To regenerate the Dedupe Datastore Hash data, from the command line, navigate to C:\Program Files\Arcserve\Unified Data
Protection\Engine\BIN on the UDP Recovery Point Server and run as_gddmgr.exe, and then use the following command:
as_gddmgr.exe -Scan RebuildHash -NewHashPath
8. After the Hash generation is complete, you can start the data store and modify the existing plan to point to the new data store.
You can use this new data store to continue to write for future backups.
If you import the new share to the same UDP server where the old data store resides, the following error message is displayed.
We recommend that you import the data store on a new server or fully delete the old data store from UDP as the authentication
is already compromised.
Integrating OneXafe and UDP/ 30White Paper
Known Limitations
• For OneXafe, the snapshots are promoted as new shares with the same user permissions as the original share. During the
promotion of the snapshot, you cannot provide different authentication.
After the share is created using the OneSystem login, you can modify the permissions for the new share.
• Navigating the OneXafe Share from the Windows explorer and changing it to the UDP Recovery Point Server view fails when
the destination resides on the OneXafe share.
• During maintenance activity or for some other reason, if any of the nodes in the OneXafe Cluster is shutdown the active
UDP backup job might fail with the following error:
An error has occurred from deduplication Data role on server 192.168.0.14. Error message = [The operations for this file
(create, close, read, write) failed.]. You might experience the same behavior when the OneXafe node is Powered ON back.
The next scheduled backup job will not have any impact because of this operation.
Copyright © 2021 Arcserve (USA), LLC and its affiliates and subsidiaries. All rights reserved. All trademarks, trade names, service marks and logos referenced herein belong to their respective owners. This document is
for your informational purposes only. Arcserve assumes no responsibility for the accuracy or completeness of the information. To the extent permitted by applicable law, Arcserve provides this document “as is” without
warranty of any kind, including, without limitation, any implied warranties of merchantability, fitness for a particular purpose, or non-infringement. In no event will Arcserve be liable for any loss or damage, direct or
indirect, from the use of this document, including, without limitation, lost profits, business interruption, goodwill or lost data, even if Arcserve is expressly advised in advance of the possibility of such damage. AD210071You can also read