CTM DCIGATE FOR .NET USER GUIDE - FEBRUARY27, 2020 - DTCC Learning
←
→
Page content transcription
If your browser does not render page correctly, please read the page content below

CTM™

DCIGATE FOR .NET USER GUIDE

FEBRUARY 27, 2020
Copyright© 2020 The Depository Trust & Clearing Corporation ("DTCC"). All rights reserved.
This work (including, without limitation, all text, images, logos, compilation and design) is proprietary and protected by copyright, and
is for the exclusive use of users authorized by DTCC. If this work is received from DTCC in any electronic medium, authorized users of
this work are granted a limited, non-exclusive, non-transferable, non-sublicensable and freely revocable license to make
reproductions and transmissions necessary for downloading and storage of this work on the users' computers and to print one or
more paper copies from the electronic version for their own use. Other than to this limited extent, no part of this work (including any
paper copies thereof or print versions thereof) may be printed, copied, altered, modified, posted, reproduced, displayed, published,
sold, licensed, used or distributed (including by transmission) in any form or by any means, or stored in any information storage and
retrieval system, without DTCC's prior written permission.

“DTCC” is the brand name under which certain affiliates of The Depository Trust & Clearing Corporation provide services in particular
geographic areas. The Depository Trust & Clearing Corporation does not provide services to clients. Each of The Depository Trust &
Clearing Corporation’s affiliates is a legally separate and independent entity, and each is subject to the laws and regulations of the
particular country in which it operates. Please see www.dtcc.com for more information on the legal structure of The Depository Trust &
Clearing Corporation and its related entities.

All product or service names are the property of their respective owners.

Publication Date: February 27, 2020
Publication Code: CT845
Service: CTM
Title: DCIGate for .NET User Guide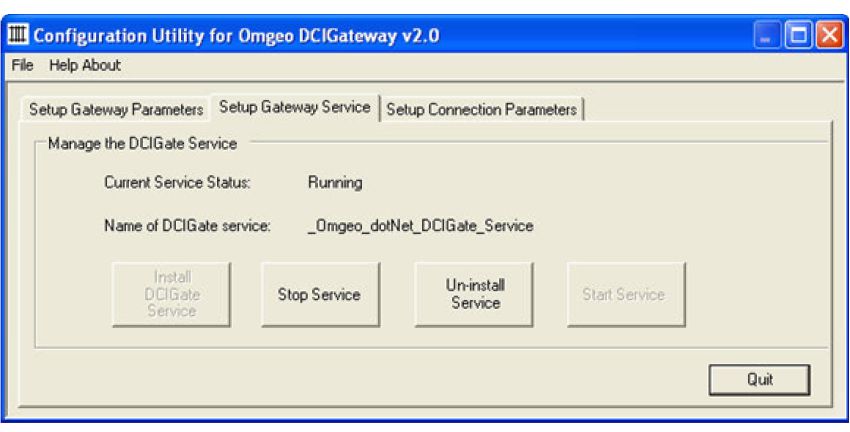
CONTENTS
Contents                                          3

Preface                                           5
   Audience                                       5
   Changes in This Version of the Document        5
   Related Documents and Training                 5
   Questions?                                     5

1. Requirements and Architecture                  6
   Introduction                                   6
   System Requirements                            6
     Example Platform Configurations              6
     Hardware Requirements                        7
     Performance Standards                        7
     Compiling and Running Your Connectivity      7
       UNIX Environment                           7
       Windows Environment                        7
   Business Architecture                          7
       DCIGate Applications                       8
       Client Application                         8
   Data Flow                                      8
       Working Folders Used By DCIGate            9
       Synchronization                            9

2. Installing DCIGate                             10
   Introduction                                   10
   Prerequisites                                  10
   Deleting Folders from Previous Installations   10
   Installing DCIGate Components                  10
     Turning On Message Queuing                   10
       Windows 10                                 11
       Windows Server 2016                        11
   Upgrading to DCI Gateway 4.0                   11
     Additional Steps                             11
       Path Update                                11
       Configuration File Compatibility           12
     Verify Successful Update                     12
   DCIGate Runtime Permissions                    12

3. Configuration Utility                          14
   Introduction                                   14
   Setup Gateway Parameters Tab                   14
   Setup Connection Parameters Tab                15
   Output Formatting Tab                          16
     Special Character Entry                      16
     Setup Gateway Service Tab                    17

4. Status Information                             18
   Introduction                                   18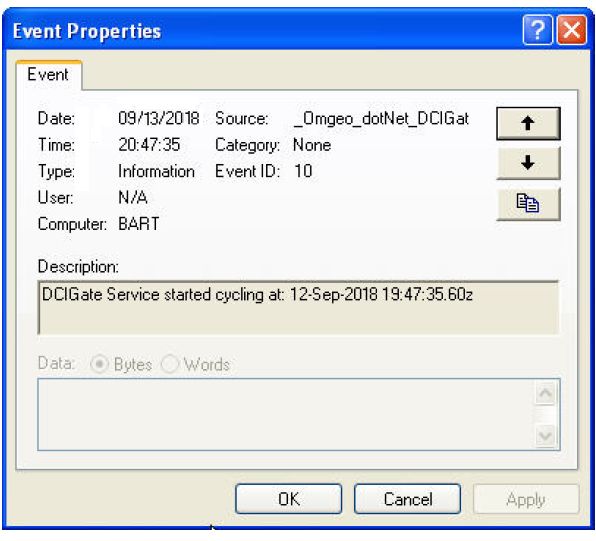
Types of Status Messages                                         18
  Communicating Status Information                                 18
  Status Display                                                   18
  Logging                                                          19
   Application Event Logging                                       19
   Text File Logging                                               20
   Email Logging                                                   21

5. Uninstalling DCIGate                                            22
  Introduction                                                     22
  Uninstalling the DCIGate Application                             22

A. For Programmers and System Administrators                       23
  Introduction                                                     23
  Formatting XML                                                   23
  Access Permissions                                               23
  Log Files                                                        23
  Communication Protocol                                           24
  Message Queuing                                                  24
  Installing and Uninstalling Multiple DCIGate Instances           24
  Role of the config.xml.txt File                                  25
  Changing Configuration Parameters On the Fly                     25
  DCIGate Error Recovery                                           25
  Alternative Methods of Implementing Live and Test Environments   26
PREFACE
This document describes the DCIGate message exchange interface between a client application and the CTM™ service.

Audience
This document is intended for programmers, network operational staff, and system architects in the CTM community that use
DCIGate.

Changes in This Version of the Document
This version of the document includes the following two sections from Chapter 1, which were inadvertently omitted in the last
version:
l   Business Architecture
l   Data Flow

Related Documents and Training
For related documents and training in the DTCC Learning Center, go to Supporting US Trades.

Questions?
The DTCC Client Center provides general assistance and technical help. Visit www.dtcc.com/client-center to:
l   Enter a service request or check the status of an existing service request
l   Search the knowledge base
l   Obtain contact information

Preface                                                                                                                         5
1. REQUIREMENTS AND ARCHITECTURE

Introduction
This chapter outlines the minimum system and hardware requirements to install the following DCIGate components:
l   DCIGate service
l   Configuration utility
l   Status Viewer monitoring application
Additionally, DCIGate requires a client application to interface with the service. DTCC does not provide this application in the
DCIGate package.

Important
DTCC requires all client systems to be compliant with Transport Layer Security (TLS) version 1.2. This requires clients to upgrade
their direct Java API implementations to Java 1.8 and .NET API implementations to version 4.0 or later.

System Requirements
DTCC has tested DCIGate on the operating systems listed in System Requirements. See that document for specific versions
and releases of peripheral software in this section.
The DCIGate interface to the user client application is based on a data file exchange for system environment flexibility. The
client application does not have a platform requirement to function with DCIGate. However, the DCIGate service requires the
following:
l   Installation on a .NET Framework server or PC.
l   Access to the application messaging files that the host application exchanges with DCIGate.
l   Communication with CTM using a direct connection or the Internet. A test system can use a dial-up internet connection if
    necessary. An internet connection is also required to download any of the following to the target system:
    o   DCIGate installation software (contact your DTCC representative)
    o   Latest operating system service packs and .NET Framework updates
    o   Windows Message Queuing (MSMQ) component
    o   .NET Framework components

Example Platform Configurations
Table 1.1 shows possible system platform configurations compatible with a DCIGate installation. The client application does
not require installation on the same server as DCIGate.

Table 1.1 Example Platform Configurations for DCIGate, Client Application, and Messaging Files
DCIGate                    Client Application                                  Messaging Files
.NET framework server      UNIX or Linux system                                Mapped to UNIX or Linux system using SAMBA
.NET framework server      Windows-based server (not using .NET framework)     Mapped using native Windows drive mapping
.NET framework server      Same server                                         Same server

Requirements and Architecture                                                                                                        6
DCIGate for .NET User Guide Hardware Requirements The following factors determine minimum hardware requirements: l Hardware requirements for the target operating system l Other applications running on the target system that affect performance l CPU performance metrics Performance Standards The following performance metrics assume that the DCIGate components and client application are all installed on the same system (as shown in Table 1.1). In this configuration, resource use varies widely depending on the client application: l DCIGate service idle (no messages exchanged): CPU resource use is between 0% and 2%. l DCIGate processing messages: CPU resource use is between 4% and 10%. DTCC has tested by using the demo example application supplied with the installation. That application continuously requests message exchange with DTCC and consumes between 2% and 5% of CPU resources. Clicking the Fast button on the demo example application keeps DCIGate continuously busy, and CPU consumption increases to approximately 30%. Compiling and Running Your Connectivity Once you have set the CLASSPATH environment variable, compile your application and then run it. For both operations, you must include CLASSPATH in the command line. UNIX Environment To compile your application in a UNIX environment, enter: javac other-arguments -classpath $CLASSPATH client-ap-class When your application compiles without errors, run the application by entering: java other-arguments -classpath $CLASSPATH client-ap-class Windows Environment To compile your application in a Windows environment, enter: javac other-arguments -classpath %CLASSPATH% client-ap-class When your application compiles without errors, run it by entering: java other-arguments -classpath %CLASSPATH% client-ap-class Business Architecture The business architecture of the system is three-tier. The client application creates specific files in a folder that DCIGate service can detect and use as a signal to transmit to CTM. DCIGate communicates the data in these files to the CTM service using the Internet or a direct connection. Client-side communication in this architecture is based on writing and retrieving information from an input file and an output file, respectively. Files are designed so that data cannot be accidentally overwritten. Requirements and Architecture 7
DCIGate for .NET User Guide

DCIGate Applications
The standard DCIGate installation contains three programs:
l   An example application, which tests connectivity and cycling.
l   The Status Viewer shows the status of DCIGate in real time.
l   The Configuration utility installs, uninstalls, starts, stops, and sets gateway parameters for the DCIGate service.

Client Application
A client application is required to exchange XML data files with DCIGate for processing to CTM. The out-of-the-box (developer)
installation provides a demonstration application to test the environment before deploying a permanent application for this
function. The demonstration application builds and processes trade inquiries through DCIGate to the CTM test system.

Data Flow
The DCIGate data flow process relies on files in specific folders for bi-directional processing with CTM. The Inbox contains
files for processing by the service, and the Outbox contains files for processing by the client. The paths for Inbox and Outbox
are configurable using the Configuration Utility. Mapped network drives on another server can provide the actual directory
paths. Data flow requires an internet connection or a leased line to communicate with CTM.
Figure 1.1 shows a complete data exchange between the client application and CTM using DCIGate.

Figure 1.1 DCIGate Data Flow

Table 1.2 describes the steps illustrated in Figure 1.1.

Table 1.2 DCIGate Flow Steps
Step      Description
1         The client application creates an input.dat file containing trade information in the Inbox folder. When the data is ready for submission to CTM, the
          client application creates the input.go file in the Inbox folder.
2         DCIGate recognizes the input.go file and processes the input.dat file to send to CTM.
3         CTM responds to the input.dat file contents. DCIGate creates output.dat and output.go files in the Outbox folder from the response. DCIGate also
          removes the input.dat and input.go files in this step.
4         The client application checks for the presence of an output.go file. If the file is present, the application processes the output.dat file for response
          data.
5         The client application removes the output.dat and output.go files. DCIGate returns to step 1 and checks for the presence of an input.go file.

Requirements and Architecture                                                                                                                                       8
DCIGate for .NET User Guide
Table 1.3 describes the files used in the DCIGate data flow process.
Table 1.3 DCIGate Data Folders and Files
Folder Files Description
Inbox input.dat A client-created file containing one or more XML document sections.
input.go A client-created semaphore file indicating that the input.dat file is ready for processing to CTM.
Outbox output.dat A DCIGate-created file containing CTM responses to the input.dat file.
output.go A DCIGate-created semaphore file indicating that all response messages have been received from CTM.
Note
While DCIGate is running, the files in the Inbox and Outbox shown in Figure 1.1 cannot be used by any other programs than the
client application.
Working Folders Used By DCIGate
DCIGate uses working files contained in the Split Files folder within both the Inbox and Outbox folders. These files are
individual XML request and response messages and are not part of the client application work flow. The client application does
not delete or manage these files.
Synchronization
Synchronization between the client application and DCIGate depends on the client application following the message exchange
protocol. If synchronization fails, incomplete and/or duplicate information can be sent to the CTM service.
To maintain synchronization, the client application ensures that:
l It does not overwrite input.dat while an input.go file exists.
l It removes first the output.dat file and then the output.go file after the data has been processed.
Requirements and Architecture 92. INSTALLING DCIGATE Introduction This chapter covers the procedures to install, configure, and uninstall a single instance of DCIGate. To install multiple instances, see Appendix A, For Programmers and System Administrators. Prerequisites Before installing any DCIGate software on a target system, review the System Requirements and sure the following required software is installed: l A working connection to the CTM host system. This connection can be a leased line connection or over the internet. l An installation target that has the latest service packs and critical updates. l A working internet connection to download and/or install .NET Framework. l Windows Message Queuing (MSMQ) component compatible with your Windows OS. Deleting Folders from Previous Installations If you have a prior installation of DCIGate, follow these steps: 1. Stop the DCIGate service and remove the software from Windows using Programs and Features in the Control Panel. 2. Delete the folders from the previous installation. Installing DCIGate Components Install DCIGate with the following steps: 1. Log on to the target system as an Administrator. 2. Ensure that MSMQ is installed and turned on at the target system. See Turning On Message Queuing. 3. Run the setup.exe program from your DCIGate installation source. Depending on your operating system and security settings, a warning can appear that the publisher of the software is not verified. Ensure that the DCIGate installation software has come directly from install the software. 4. The installer provides fields to enter the User Name and Organization. The same panel also allows you to change user accessibility to the software. DTCC recommends using the default setting All Users. 5. The installer provides a panel to change the target location of the folders from the default. Change this location if necessary. 6. Continue the installation by selecting the Next or Install buttons as appropriate. 7. Select the Windows Update check box contact your system administrator to download any .NET Framework service pack updates. Turning On Message Queuing Depending on your environment, follow either the Windows 10 or Windows Server 2016 steps to turn on Message Queueing. Installing DCIGate 10
DCIGate for .NET User Guide

Windows 10
1. In the Control Panel go to Programs and Features and select Turn Windows Features on and off.
2. Expand Microsoft Message Queue (MSMQ) Server and then expand Microsoft Message Queue (MSMQ) Server Core.
3. Select the check boxes for the following Message Queuing features to install then hit okay:
     o   MSMQ Active Directory Domain Services Integration (for computers joined to a Domain)
     o   MSMQ HTTP Support

Windows Server 2016
1. In the Server Manager under Add Roles and Features, select Installation Type, Role-based or feature-based
   installation followed by Features.
2. Expand Message Queuing and then select Message Queuing Server and Directory Service Integration.
3. Click HTTP Support followed by Next and then Install.

Upgrading to DCI Gateway 4.0
To begin the 4.0 upgrade, first submit a request for the DCI Gateway 4.0 installation file using the ITP Support link on the DTCC
Contact Center.
Then, follow these steps:
1. Install the .NET Framework v 4.7.1 from https://dotnet.microsoft.com/download/dotnet-framework/net471.
2. Create a backup copy of the current DCI Configuration to reference after the installation by doing one of the following:
     o   Make a backup copy of the config.xml.txt located in your installation path to reference your current configuration. The
         default path is C:\Program Files (x86)\Omgeo_DCIGate.
     o   Take a screen capture of each tab in the Configuration Utility screen.
3. Run the Configuration Utility to uninstall the _DCIGateService
4. Uninstall the original DCIGate installation from Windows using Programs & Features from the Control Panel (for older
   versions of Windows, it is Add/Remove Programs).
5. Run the CTMDCIGatedotNET40 Standard Install.msi and follow the instructions in the “Installing DCIGate” section.
6. Run the Configuration Utility and recreate your settings based on the values from the backup in step 2. See Configuration
   File Compatibility.

Additional Steps
The default installation for the upgrade is C:\Program Files (x86)\CTM_DCIGate.

Path Update
To run your application, change one of the following paths:
l   Change the install directory to C:\Program Files (x86)\Omgeo_DCIGate.
l   Update your OMS to point to the C:\Program Files (x86)\CTM_DCIGate for the inbox and outbox.

Installing DCIGate                                                                                                                 11
DCIGate for .NET User Guide Configuration File Compatibility The previous 3.0 config.xml.txt is not compatible with 4.0 due to a change in the password encryption keys, which results in the error below. If you receive the error: 1. Delete the config.xml.txt. 2. Recreate your settings using the Configuration Utility from step 3 in Upgrading to DCI Gateway 4.0 above. Verify Successful Update To verify the installation was successful, go to the DCI Gateway Help > About screen, which displays the new version. DCIGate Runtime Permissions The DCIGate application installs and runs as a standard Windows Service (setup is detailed in Chapter 3, Configuration Utility). When you open Windows Services and double-click the DCIGate service, note that it is installed and run as a Local System account by default. Figure 2.1 DCIGate Local System Account Installing DCIGate 12
DCIGate for .NET User Guide

To change the runtime permissions, perform one of the following tasks:
l    Grant the Everyone Windows Security Group with Full Control of the DCIGate installation folder and subfolders. In the
     DCIGate service’s properties Log on as section, select the Local System Account radio button.
    OR
l    If you are not using the Local System Account, then the user or service account must have administrative privileges to
     run the DCIGate service.

Installing DCIGate                                                                                                             13
3. CONFIGURATION UTILITY
Introduction
This chapter describes the Configuration Utility which allows you to:
l Configure DCIGate fields
l Install, start, stop, and uninstall the DCIGate service
The Configuration Utility contains the following tabs to set up the following:
l Gateway Parameters—Gateway processing
l Gateway Service—DCIGate service controls
l Connection Parameters—CTM Host connection
l Output Formatting—Output XML format
Setup Gateway Parameters Tab
Table 3.1 describes Setup Gateway Parameters tab fields.
Table 3.1 Gateway Parameters
Field Description
Log File Path The location of the transaction and debug log file. The default location is the \Logs folder in the root installation directory. Log
files names have the format YYYY-MM-DD-NNNNNN.txt, where N is an incrementing sequence number. Log files are not
rotated. The site administrator archives and deletes old logs. The Max Log size (K) field controls the maximum size of each
log file.
Max Log Size (KB) Defines the maximum size of each log file. The installation default is 512KB. DCIGate creates a log file when the current log
file reaches the maximum size.
Trace Output to Log Select to include trace debugging information in the log file output. The default is unchecked (not included). You use this
function to resolve problems in message exchange between the client application and DCIGate. Do not use this function in a
live environment. DCIGate can generate many files in a short time.
Warn on Message Retry Select to have DCIGate issue warnings that a retry has occurred during a message exchange with the CTM host. If you
select this field, DCIGate sends the warning to the Log file Event Application Log. When you check Send Emails, DCIGate
sends email notifications.
The Status Viewer statistics panel also shows the retry count information.
The default is unselected. Select this parameter when testing the client application.
Include XML data in Log file Select to include request and response XML messages in the log file. If you select the API Trace is also selected, then the
XML request and response messages appear twice in the log.
Warn on Email Errors Select to issue a warning if an email message fails to send. The warning appears in the following locations:
l Log file
l Event Application log
The Status Viewer message panel also shows warning messages. The default is unselected. Typically set this field to true
when testing the application and email.
Inbox Path Defines the DCIGate Inbox path. The default is \inbox in the root installation directory. If the path does not exist when the
DCIGate service runs for the first time, DCIGate automatically creates the path. If the Inbox and Outbox folders are on
another machine, configure the DCIGate service using an CTM user account. See Appendix A, For Programmers and
System Administrators.
Configuration Utility 14DCIGate for .NET User Guide
Table 3.1 Gateway Parameters (continued)
Field Description
Outbox Path Defines the DCIGate Outbox path. The default is \outbox in the root installation directory. If the path does not exist when the
DCIGate service runs for the first time, DCIGate automatically creates the path. If the Inbox and Outbox folders are on
another machine, configure the DCIGate service using an CTM user account. See Appendix A, For Programmers and
System Administrators.
Service Name Defines the DCIGate service name as it appears in Windows Services. The value is configurable because DCIGate can run
multiple instances on the target system. Enter a unique Service Name for each instance.
Unique ID for this Gateway Defines a unique gateway ID corresponding to a gateway instance in the target system or organization. When DCIGate
sends a trade message to the CTM host changing the host state, it requires a unique message ID. This message must be
unique across all CTM participants for the lifetime of the CTM service. The unique ID is generated in part from the Unique ID
parameter value. For multiple instances of the gateway on the target system or the organization, enter a Unique ID
parameter for each instance. DCIGate forms the unique ID as follows:
l Unique ID parameter value
l DCIGate service Process ID
l Network card MAC address
l Current Time in ticks
Email Recipients Defines a list of recipients to receive DCIGate advisory emails. Separate each recipient with a semicolon (;).
Email From Defines the email address appearing in the From field of DCIGate advisory emails. If multiple gateways are in use, you can
customize this value for each DCIGate instance.
Email SMTP Server Defines the SMTP server URI or IP Address at the client site.
Send Emails Select to email DCIGate warnings and other status information to the recipients. The default is unselected.
Setup Connection Parameters Tab
Table 3.2 describes the Setup Connection Parameters fields.
Table 3.2 Connection Parameters
Field Description
Protocol Value for the CTM. Do not change.
Host The CTM system host name.
Port Value for the CTM. Do not change.
Login Path Value for the CTM. Do not change.
Submit Path Value for the CTM. Do not change.
Echo Path Value for the CTM. Do not change.
User Name The DTCC-defined user name for access to CTM.
Password The DTCC-defined password for access to CTM. DTCC encrypts passwords during login and does not display or save
them in any configuration or log files. By default, asterisks display instead of the password characters. See Appendix A,
For Programmers and System Administrators for configuration instructions to display password characters rather than
asterisks.
Proxy Host, Proxy Port, Proxy Proxy server settings as appropriate to your communications setup. If Proxy User Name and Proxy Password are not
User Name, and Proxy required, leave these values blank.
Password
Circuit Timeout The time, in seconds, that DCIGate waits to exchange a message with the CTM host. Typical values, depending upon
connection reliability to the CTM host is 10-60 seconds. The installation default is 10 seconds.
Idle Timeout The DCIGate authentication frequency, in minutes, with the CTM host. The CTM host times out if no messages are
exchanged within 15 minutes, and rejects any message exchange after that period. To prevent this happening, the default
value is 10 minutes. If the time between message exchanges exceeds 10 minutes, DCIGate automatically logs in before
exchanging messages.
Configuration Utility 15DCIGate for .NET User Guide
Table 3.2 Connection Parameters (continued)
Field Description
API Trace On/Off Select to include full details of the communication between DCIGate and the CTM host in the log file output. Use to
diagnose connection problems as this function generates large amounts of log data. The default is unselected.
Submit Retry Count The number of messages resends that DCIGate attempts with the CTM host. The default is 5 messages. Set this value
higher as necessary to compensate for connection integrity. If the resend count exceeds the parameter, the service stops
and sends a fatal error to the Log file and the Event Application Log. If the Send Emails check box is selected, DCIGate
also sends an email notification.
The Status Viewer statistics panel also shows the number of retries since starting the service.
Output Formatting Tab
The Output Formatting tab fields format the response XML file (output.dat). The default setting provides no output formatting.
Third-party software used to process the output.dat requires specific formatting to process the XML.
Formatting is divided into five functional areas:
l Characters inserted at the top of the output.dat file. These characters appear at the beginning of the output.dat file before the
XML data.
l Characters inserted between multiple XML responses.
l Characters appended at the end of output.dat after the XML data.
l LF (line feed) characters processed in the XML message.
Table 3.3 describes the Output Formatting tab fields.
Table 3.3 Output Formatting
Field Description
Characters to insert at the top of output.dat Enter characters to appear before the XML content in the output.dat file in the text box as normal
text. Any control characters follow in hex format [0xZZ].
For example, to display the character sequence TOPOFXML and then a Carriage return and Line
Characters to insert between XML responses feed, enter the following:
TOPOFXML[0x0d][0x0a]
Characters to append at bottom of output.dat
Deselect the check box “use above characters” to turn off formatting but retain the characters in
the text box.
Process the LF characters in the Host Response XML Select processing options for the response XML data from CTM. By default, the CTM host uses
tabs and the LF (linefeed [0x0a]) character to optimize the response XML data. The LF characters
are processed according to these selections:
l No changes to the standard optimization
l Replaces LF character with CR (carriage return 0x0d) character
l Replaces LF character with CRLF sequences
l Removes all LF characters
Special Character Entry
Enter most characters by typing or pasting copied text directly into the text field. Enter control characters in the form [0xZZ].
There are two special cases:
l The “[“ character is entered as a hex sequence (0x5b) by right-clicking on the text box and selecting the option Insert “[“
Character as Hex.
l Enter spaces at the beginning and end of the text sequence as hex characters (0x20). They can also be entered
automatically by selecting the appropriate option on the right-click menu on the text box.
Configuration Utility 16DCIGate for .NET User Guide Setup Gateway Service Tab This section describes the functions available under the Setup Gateway Service tab. The screen display shows the current state of the DCIGate service. You can infer these states by observing the button availability (grayed-out buttons are unavailable). For example, if the current state is not installed, the Install DCIGate Service button is active. Clicking Install DCIGate Service installs and begins running the service. If the status is stopped, the Start Service and the Un-install Service buttons are active. Figure 3.1 shows an example of the DCIGate service installed and running. Figure 3.1 Setup Gateway Service Tab Table 3.4 lists button availability and the corresponding service states. Table 3.4 Gateway Service DCIGate Service State Active Button Not Installed Install DCIGate Service Installed Un-install Service Running Stop Service Stopped Start Service Configuration Utility 17
4. STATUS INFORMATION

Introduction
This chapter describes status information and DCIGate functions.

Types of Status Messages
DCIGate produces three main types of status messages described in Table 4.1.

Table 4.1 DCIGate Status Messages
Field                 Description
Information           Describes general progress information. For example, DCIGate service has started or stopped.
Warning (two types)   1. DCIGate detects a communications problem during message exchange with CTM. Once DCIGate reaches the maximum
                           number of retries, as defined in the Configuration Utility, it generates a fatal error event.
                      2. DCIGate detects the keyword “invalid” in the XML response from the CTM host. One possible reason is that CTM is processing
                           a duplicate TradeDetail. The following actions can produce a duplicate TradeDetail:
                           o   DCIGate sends the TradeDetail request to CTM and stops before it can remove the input.dat file from the Inbox. If DCIGate
                               encounters a permanent communication problem with the CTM host, it stops.
                           o   DCIGate resubmits the input.dat file to CTM after a communication problem resolves and the service restarts.

                      This type of event is not a critical business issue because the CTM does not process the second trade detail. However, the client
                      application must manage this situation when the XML response returns in the file output.dat.
Fatal Error           Fatal errors are logged in the Application Event log with a brief description of the problem. The log file entry contains a more
                      comprehensive description of the problem. The most likely fatal errors in DCIGate are:
                      l   Message retries to the CTM host system exceed the configured maximum retry limit.
                      l   An invalid Path or file name is in one of the DCIGate parameters.
                      l   Inbox and Outbox files or folders disappear when using mapped network drives.

Communicating Status Information
DCIGate communicates status information through the following methods:
l   Real Time Status Display (The Status Viewer)
l   Application Event Logging (The Event Log)
l   Text File logging
l   Email

Status Display
The Status Viewer is an optional program supplied as part of the DCIGate package. It is one of the Start Menu shortcut entries.
This program utilizes the MSMQ component to output status, information, warning, and error messages on a message queue,
which outputs to the Status Viewer screen. If the Status Viewer is not running, messages are kept in the queue for ten minutes
before removal.

Status Information                                                                                                                                        18
DCIGate for .NET User Guide
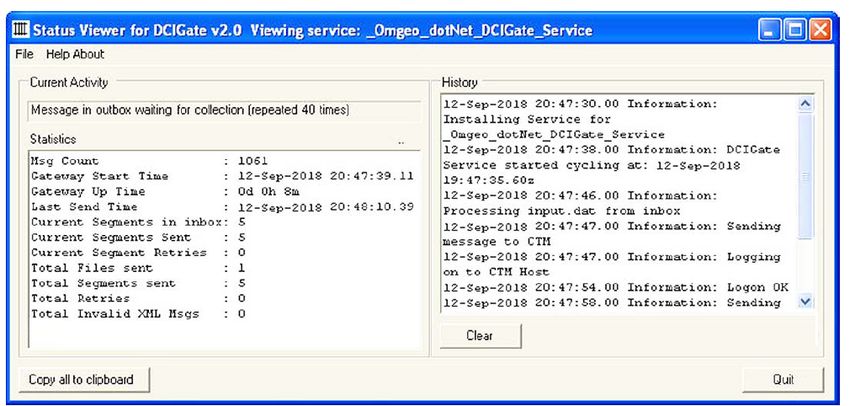
Figure 4.1 shows an example of the DCIGate service installed and running.
Figure 4.1 DCIGate Status Viewer
Table 4.2 describes the display fields on the Status Viewer screen.
Table 4.2 Status Viewer Screen Fields
Field Description
Current Activity The current state of the DCIGate service.
History The most recent 1000 Current Activity messages received.
Statistics The DCIGate statistics since starting the service. These statistics are:
l Msg Count (Message Count)—The number of messages in the Status Viewer. It is not unusual to see these messages
incrementing several times a second.
l Gateway Start Time—The service start time.
l Gateway Up Time—The time in days, hours, and minutes since the DCIGate service was started.
l Last Send Time—The last time that DCIGate exchanged messages with the CTM system.
l Current Segments in Inbox—The number of individual XML messages that the application created in the current file
input.dat.
l Current Segments Sent—The number of individual XML messages from the current input.dat that have been exchanged
with CTM.
l Current Segment Retries—The number of retry attempts made to send the current XML message out of the input.dat file.
l Total Files Sent—The number of input.dat files that DCIGate has processed since started.
l Total Segments Sent—The number of individual XML messages sent from the processed input.dat files since startup.
l Total Retries—The total number of individual XML message retries that have taken place since service started.
l Total Invalid XML Msgs—The total number of XML messages containing the keyword “invalid” received from the CTM
system.
Copy all to Clipboard A function that copies the onscreen information to the clipboard for pasting to Notepad or another application. Useful to compile
DCIGate usage statistics or to debug a client application.
Logging
DCIGate includes three types of logging:
l Application Event Logging
l Text File Logging
l Email Logging
Application Event Logging
DCIGate messages in the Application Event Log are the most reliable as the method least prone to fail.
Status Information 19DCIGate for .NET User Guide The Application Event Log entry types are as described in Table 4.3. Log entry Source values are set to the name of the DCIGate Service Name configuration parameter to distinguish between multiple DCIGate installations on one server. Table 4.3 Application Events Event Type Event ID Description Information 0 Message from Service Control Manager stating that DCIGate has been started or stopped successfully. Information 10 DCIGate has started and is beginning normal processing of Inbox and Outbox files. Information 20 DCIGate has stopped. Information 30 Other general progress information. Information 40 Comfort message issued every 24 hours at midnight local time. Warning 100 DCIGate has issued a warning message. A brief description is contained in the event text. Information 200 Trace output information when the Configuration parameter Trace On is checked. Error 999 DCIGate service has encountered a fatal error and stopped. Figure 4.2 shows individual event properties from the application event log. Figure 4.2 Event Properties The Description field informs you that the service began the Inbox and Outbox cycling process. The Event ID is 10 which signifies the service has started normal processing (see Table 4.3). Text File Logging DCIGate logs transaction and debug information in text format. The default installation location is /Logs in the root installation directory. The Configuration Utility controls the information logged and file behavior. The following DCIGate configuration settings can be captured in the log text file: l Retry attempts l Maximum size before a new file creates l Trace debugging information l Request and response XML l Email message failure For more information, see Chapter 3, Configuration Utility. Status Information 20
DCIGate for .NET User Guide
Email Logging
DCIGate can send email messages to specified recipients. Use the DCIGate Configuration Utility to maintain email
parameters.
Select the Send Email Messages check box in the DCIGate Configuration utility to send emails to the recipients.
Define the format of a DCIGate email to allow recipients to set up message rules for the incoming messages:
l Recipient List—as defined in the configuration parameters
l Subject:
The format of the subject message allows easy inbox filtering with email clients. The format is a text string as follows:
DCIGATE
[EventID:nnn]
[service name as defined in the configuration parameters]
Where EventID is the numeric code as described in Application Event Loggingand nnn is the value of the EventID (see
Table 4.3). The value has a leading space.
Message Body: Description of the issue
Incorrect email configurations or communication problems prevent the DCIGate service from sending the emails out to the
recipients. Select Warn on Email Errors in the Configuration Utility, to generate a Warning entry of ID 100 describing the
problem.
It is not advised to use email as the primary notification method for DCIGate status. Some reasons are:
l Communications errors and SMTP server errors disrupt the flow of emails.
l Messages do not always reach the intended recipients in a timely manner.
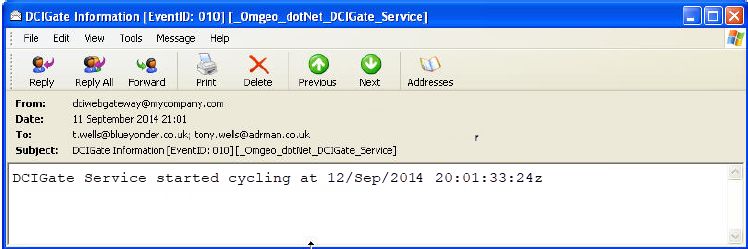
Figure 4.2 shows individual event properties from the application event log.
Figure 4.3 Example Email Status Message
In this example, DCIGate generates and sends the email when the service starts normal Inbox and Outbox processing. The
Event ID is 10, indicating that the service has started normal processing (see Table 4.3).
Status Information 215. UNINSTALLING DCIGATE
Introduction
This chapter describes the steps to uninstall a single instance of DCIGate. To uninstall multiple instances, see Appendix A, For
Programmers and System Administrators.
Uninstalling the DCIGate Application
To uninstall the DCIGate application from a Windows-based system, follow these steps:
1. Select the Configuration Utility from the Start menu. Use the Configuration Utility to uninstall the DCIGate NT service.
2. Uninstall the original DCIGate installation from Windows using Programs & Features from the Control Panel.
3. Delete the root install folder manually. The uninstaller does not delete the root install folder because extra files and folders
have been created. If you have used default installation folder names, the paths are shown in Figure 5.1 (depending on the
installation environment).
Figure 5.1 Status Viewer Screen—Uninstall
Uninstalling DCIGate 22A. FOR PROGRAMMERS AND SYSTEM ADMINISTRATORS
Introduction
This section covers issues and techniques for programmers and system administrators implementing DCIGate.
Formatting XML
DCIGate expects the XML format of the input.dat file to conform as follows:
l The input.dat file can contain multiple XML instances.
l Each instance is a complete and valid CTM request message.
l LF (line feed), CR (carriage return), or CRLF sequences can separate messages, or no control characters at all.
l Any EOF characters are stripped out before submission to the CTM system, but do not stop DCIGate from processing the
file.
l The input.dat file can be of zero length. In this case, DCIGate does not pass the message to CTM, but creates a zero length
output.dat file for processing by the client application.
The Configuration Utility provides considerable flexibility in output.dat file format
Access Permissions
When run for the first time, the Configuration Utility creates three important folders and sets their access permissions:
l Log
l Outbox
l Inbox
The folder paths are defined as parameters using the Configuration Utility. The access permissions to these folders are set
when the Configuration Utility is exited. Default access permissions for these folders are:
l The group Everyone has full control
l Full control applies to all subfolders and files
These access permissions allow non-administrators to launch the application and grants full access to these folders. If these
access permissions conflict with your firm's security administration policies, follow these steps before modifying them:
1. Open the enquiry_xml.txt file in the DCIGate installation directory (C:\Program Files\Omgeo_DCIGate by default).
2. Set the NoACLChecking value to true. This setting prevents the configuration program from changing any values in the
Access Control List.
Log Files
Log files are not rotated. The site administrator deletes or archives old logs. The Max Log size (K) parameter controls the
maximum size of each log file. Change this setting by using the Configuration Utility. When using the default parameters, the
log files grows at the rate of between 5KB and 20KB per day.
For Programmers and System Administrators 23DCIGate for .NET User Guide Factors that cause intensive log output include: l Trace is selected. l API Trace is selected. l Frequent message retries occur. Communication Protocol In DCIGate, the method of communication with CTM is with HTTPS (SSL) on port 443. These settings are the same as a web browser using HTTPS. If using a proxy server, ensure that it supports HTTPS. Use the Configuration Utility to enter the proxy URI or IP address and the proxy port. DCIGate also supports Proxy Authentication. Use the Configuration Utility to enter values for the Proxy User ID and Proxy Password. Message Queuing The DCIGate service communicates status updates to the Status Viewer with the Private Message Queue on the local system. The DCIGate service is the message source and the sink is the Status Viewer. DCIGate requires that you open and read messages within 10 minutes of receipt. If the messages are not opened and read within ten minutes of receipt, the messages move into the dead-letter queue. This time limit prevents large message queues when the Status Viewer is not operating. The Configuration Utility creates the DCIGate Message queues when the DCIGate service is installed. One queue is created per DCIGate service. To keep queues separate, the DCIGate queue name is made up in part from the DCIGate service name for each DCIGate service that is installed. Use the Computer Management Windows to view private message queues. When the Configuration Utility is used to uninstall a DCIGate service, the queue is deleted. If the Status Viewer is in use when the message queue is deleted, the Status Viewer notes this situation with messages in the History panel. Installing and Uninstalling Multiple DCIGate Instances More than one DCIGate installation can exist on a target machine in the case of standard and developer installations. These two out of the box installations do not conflict. In manually installed multiple DCIGate instances, ensure that the Inbox, Outbox, and log folders are separate for each DCIGate service. Ensure that the service names and Unique Msg IDs are also different. The Configuration Parameters control these settings. The DCIGate installation allows one installation of each type (standard installation and the developers’ installation) from the standard setup.exe installer on a single target. This limitation ensures that only one DCIGate service for each installation type uses installation default settings. To create multiple instances of DCIGate, perform the following steps: 1. Identify the multiple installation type. 2. Install the first gateway, noting the path to the root installation folder. Use the Configuration Utility to set the Service Name and Unique message ID to appropriate values. For example, use DCIGate_01 for the Service Name and MyCoUniqueID_01 for the Unique ID. 3. Copy the contents of the root installation folder to a new folder, and name it appropriately. For example DCIGate_02. For Programmers and System Administrators 24
DCIGate for .NET User Guide

4. Run the Configuration Utility from the new folder and modify the Service Name and Unique ID for the second service.
5. Ensure that the Log, Inbox, and Outbox paths are separate for each folder using the configuration utility from each folder.

To uninstall the multiple instances, perform the following steps:
1.   Launch the Configuration Utility
2.   Navigate to the Setup Gateway Service tab and uninstall the service for each DCIGate folder.
3.   Delete all DCIGate folders that are copies of the original installation.
4.   Uninstall the original DCIGate installation using Programs & Features in the Windows Control Panel.
The uninstaller does not remove the root install folder because extra files and folders have been created in the root. Delete the
folder manually.

Role of the config.xml.txt File
The config.xml.txt file is an ini file that contains DCIGate configuration parameters. This file resides in the same directory as
the DCIGate service, the Configuration Utility, and the Status Viewer. If this file is missing, then DCIGate creates a
configuration file with default values to enable message exchange with the CTM test system.
Use the DCIGate Configuration Utility to maintain the configuration parameters, with some exceptions.

Table A.1 Editable Parameters in the config.xml.txt File
Parameter                          Format                           Description
StandardGatewayCycleIntervalMS     l   Min=10                       The time period, in milliseconds, that DCIGate checks the Inbox for files. A smaller
                                                                    value checks the Inbox more frequently, but increases CPU resource use.
                                   l   Max=6000
                                   l   Default=500 (0.5 seconds)
RetryGatewayCycleIntervalMS        l   Min=10                       The time, in milliseconds, that DCIGate waits before resending a message to
                                                                    CTM. A smaller value resends a failed message more frequently.
                                   l   Max=60000
                                   l   Default=10000 (10 seconds)
DateFormat                         DD/MM/YYYY HH:MM:SS.ff           The format in which the date and time appears in the Status Viewer and in log
                                                                    files.
                                                                    Arrange the order to reflect the day, month, year, hours, minutes, and seconds.
                                                                    The value appends with .ff

Changing Configuration Parameters On the Fly
When idle, the DCIGate service checks the modified date and time of the config.xml.txt file for changes. If so, it reloads the
parameters. This functionality changes low impact parameters such as logging options. Stop the DCIGate service before
changing more consequential parameters such as the service name.
Restart the service after changing these parameters.

DCIGate Error Recovery
It is important that DCIGate recovers from unexpected errors as it exchanges financial messages with CTM.
DCIGate logs error information and attempts to reprocess the input file (see Chapter 4, Status Information). The Application
Event log contains a message explaining the error. If the reason cannot easily be determined, then contact the Client Service
Center for troubleshooting assistance. This process can be aided by turning on the Trace logging and communication API
logging functions in the Configuration Utility.

For Programmers and System Administrators                                                                                                             25
DCIGate for .NET User Guide Alternative Methods of Implementing Live and Test Environments Typically only one live environment and one test environment are required, and multiple DCIGate systems installed on one target system are not necessary. Instead, one system can be installed but configuration parameters can switch between live and test by modifying the ini file config.xml.txt. Typically the main differences between live and test ini files are the locations of the Inbox and Outbox folders, log files, and tracing options. The following describes the setting up configurations for a live and a test system: 1. Use the Configuration Utility to set up the configuration for the first time as the test configuration. Quit the Utility and then rename the configuration file config.xml.txt to a different name. 2. Run the Configuration Utility again to set up the configuration for the live environment and save For Programmers and System Administrators 26
FOR MORE INFORMATION
Email DTCC Learning at:
DTCCLearning@dtcc.com

or visit us on the web at:
www.dtcclearning.com
You can also read