USER GUIDE Fios Extender - Model E3200 - Verizon
←
→
Page content transcription
If your browser does not render page correctly, please read the page content below
Fios
Extender
USER
GUIDE

Model E3200   ©2021 Verizon
CONTENTS

01 /                            03 /
INTRODUCTION                    WI-FI SETTINGS
1.0 Package Contents       6    3.0 Overview           29
1.1 System Requirements 6       3.1 Primary Network    29
1.2 Features               6    3.2 Guest Network      33
1.3 Getting to Know Your        3.3 IoT Network        34
    Fios Extender          7
                                3.4 Wi-Fi Protected
                                    Setup              35

02 /                            3.5 Channel Settings   38
CONNECTING YOUR FIOS
EXTENDER
2.0 Setting up Your Fios        04 /
    Extender             17     CONFIGURING ADVANCED
                                SETTINGS
2.1 Main Screen            19
                                4.0 Using Advanced
                                    Settings           43
                                4.1 Reboot             44
                                4.2 Users              45
                                4.3 Factory Default    46
                                4.4 System Logging     47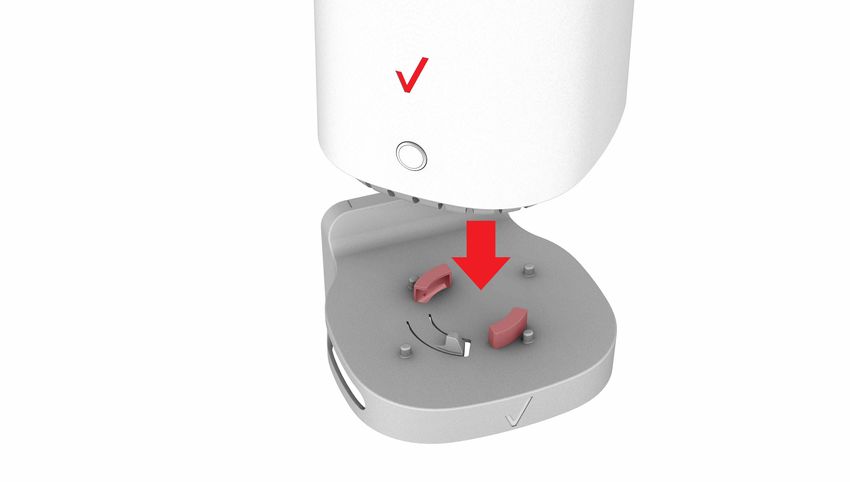
TABLE OF CONTENTS

                                                                              3

05 /                               07 /
TROUBLESHOOTING                    NOTICES
5.0 Troubleshooting                7.0 Regulatory Compliance
    Tips                 54            Notices             71
5.1 Frequently Asked
    Questions            61

06 /
SPECIFICATIONS
6.0 General
    Specifications       66
6.1 LED Indicators       67
6.2 Environmental
    Parameters           67

                       verizon.com/fios   |   ©2021 Verizon. All Rights Reserved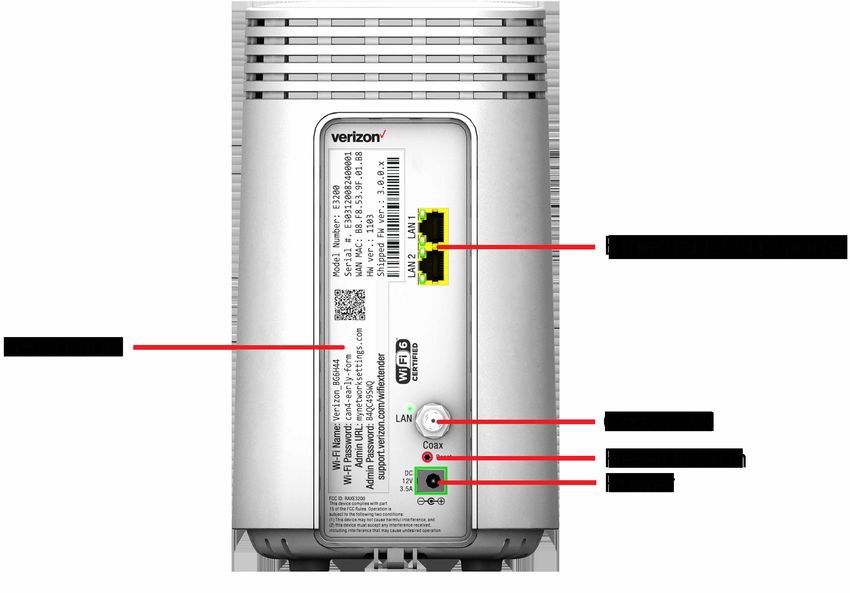
01 /
INTRODUCTION

      1.0   Package Contents
      1.1   System Requirements
      1.2   Features
      1.3   Getting to Know Your
            Fios Extender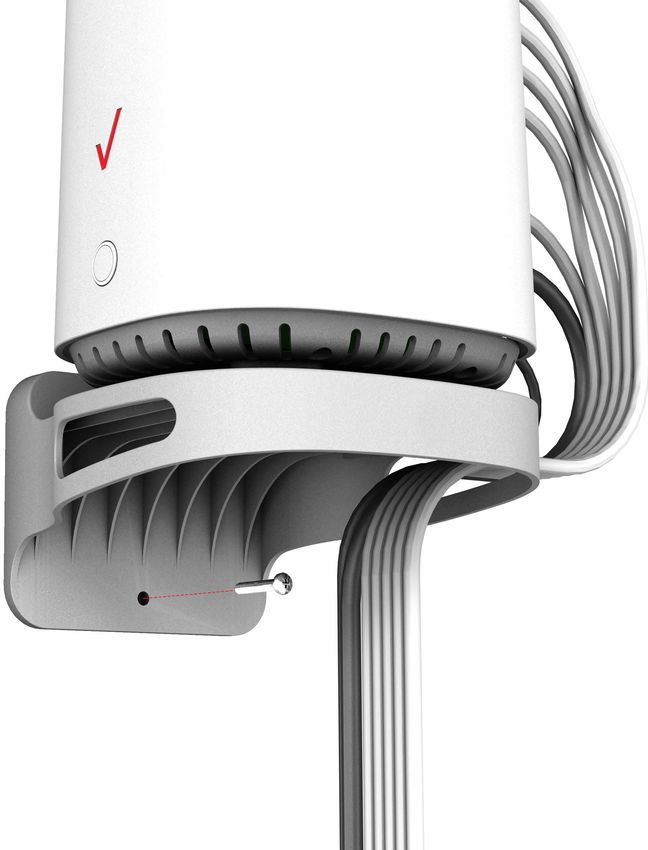
01 / INTRODUCTION

                                                                      5

Fios Extender lets you transmit and
distribute digital entertainment and
information to multiple devices in your
home/office.

Your Extender supports networking
using coaxial cables, Ethernet, or Wi-Fi,
making it one of the most versatile and
powerful Wi-Fi extenders available.

               verizon.com/fios   |   ©2021 Verizon. All Rights Reserved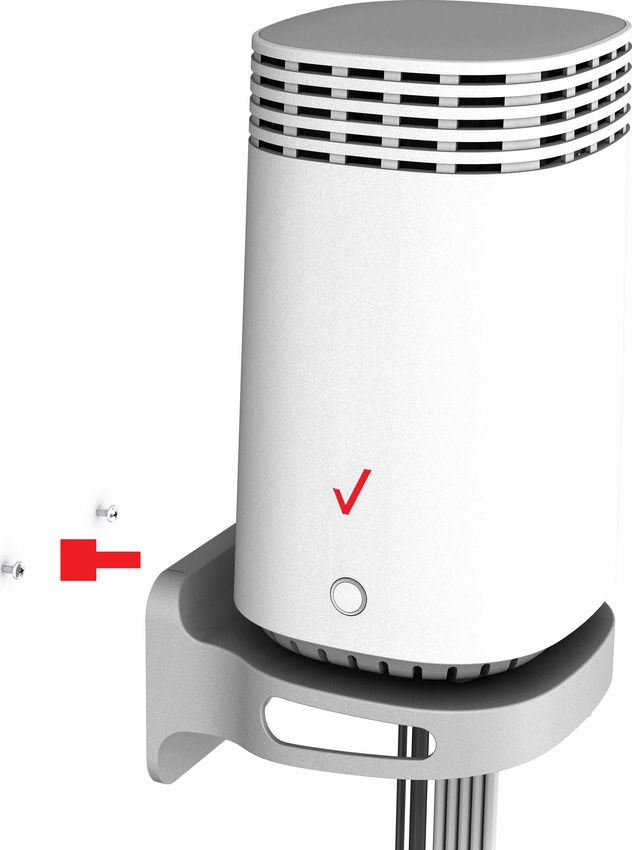
PACKAGE
GETTING TO
        CONTENTS,
           KNOW YOUR
                  SYSTEM
REQUIREMENTS
Fios ExtenderAND FEATURES

1.0/ PACKAGE CONTENTS
Your package contains:
•   Fios Extender
•   Power adapter

1.1/ SYSTEM REQUIREMENTS
System and software requirements are:
•   A computer or other network device supporting Wi-Fi or wired
    Ethernet
•   A web browser, such as Chrome™, Firefox®, Internet Explorer 8®
    or higher, or Safari® 5.1 or higher

1.2/ FEATURES
Your Fios Extender features include:
•   Support for multiple networking standards, including
    –   LAN – 802.11 a/b/g/n/ac/ax, Gigabit Ethernet and MoCA 2.5
        interfaces
•   Integrated wired networking with 2-port Ethernet switch and
    Coax (MoCA LAN)
    –   Ethernet supports speeds up to 1000 Mbps
    –   MoCA 2.5 LAN enabled to support speeds up to 2500 Mbps
        over coaxial cable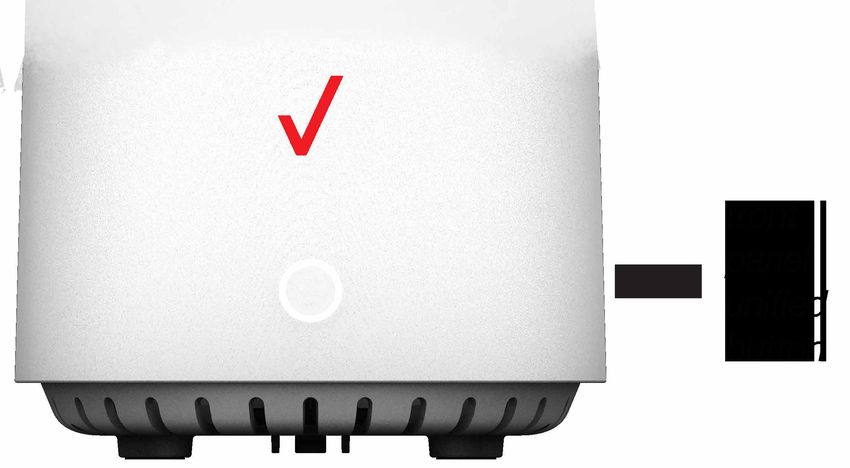
01 / INTRODUCTION

                                                                                  7

•   Self-organizing Network (SON) offers seamless roaming, band
    steering, and AP steering to improve the performance of your
    Wi-Fi network
•   Integrated Wi-Fi networking with 802.11a/b/g/n/ac/ax access
    point featuring:
    –   Backward compatible to 802.11a/b/g/n/ac
    –   2.4 GHz 11ax 4x4
    –   Two 5 GHz 11ax 4x4
•   Enterprise-level security, including:
    –   Advanced Wi-Fi protection featuring WPA2 & WPA3 Modes
        and MAC address filtering
    –   Wi-Fi Multimedia (WMM) for Wi-Fi QoS (quality-of-service)
•   Secure remote management using HTTPS

1.3/ GETTING TO KNOW YOUR Fios Extender
1.3a/ FRONT PANEL
The front panel’s unified button allows
quick access to the Wi-Fi Protected
Setup (WPS) feature and pairing mode.
The Status LED will be on white and
solid when your Fios Extender is
turned on, connected to the internet,
and functioning normally.

                           verizon.com/fios   |   ©2021 Verizon. All Rights Reserved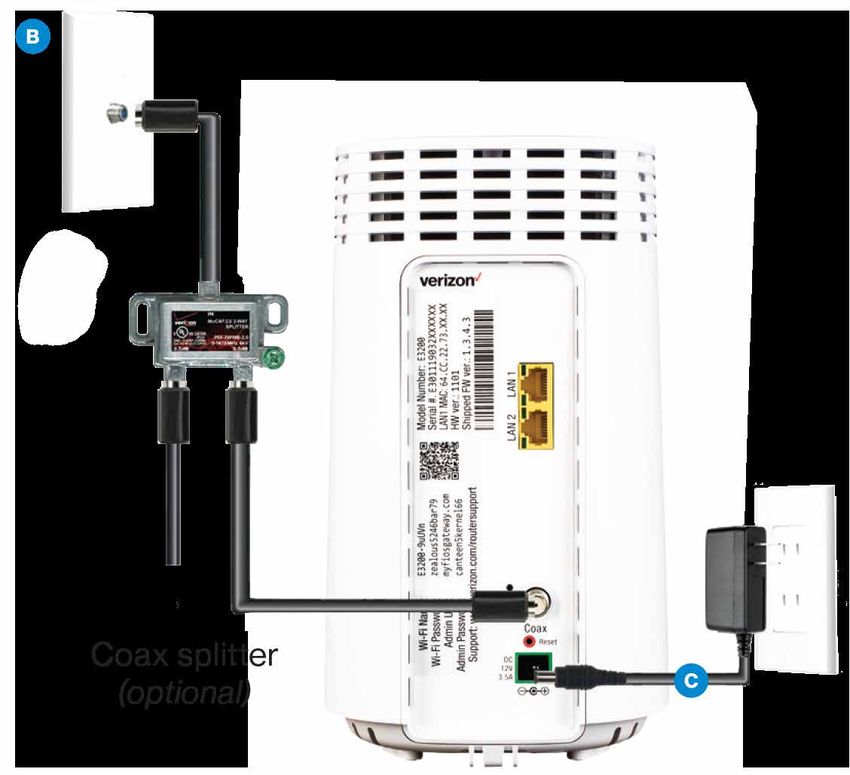
GETTING TO KNOW YOUR
Fios Extender

Status LED
Condition Status    LED Color   Fios Extender
Normal              WHITE       Normal operation (solid)
                                Fios Extender is booting (fast blink)
                    BLUE        Pairing mode (slow blink)
                                Pairing successful (solid)
                    GREEN       Wi-Fi has been turned off (solid)
Issue(s)            YELLOW      No internet connection (solid)
                                Extender is too far from the Router. Poor
                                backhaul signal (slow blink)
                                Extender is too close to the Router. Poor
                                Wi-Fi coverage (fast blink)
                    RED         Hardware/System failure detected (solid)
                                Overheating (fast blink)
                                Pairing Failure (slow blink)
Power               OFF         Power off

Please refer to section 5.0 for details on the rear LEDs.
1.3b/ REAR PANEL
The rear panel of your Fios Extender has a label that contains
important information about your device, including the default
settings for the Fios Extender’s Wi-Fi network name (SSID), Wi-Fi
password (WPA2 key), local URL for accessing the Fios Extender’s
administrative pages, and administrator password. The label also
contains a QR code that you can scan with your smartphone,
tablet, or other camera-equipped Wi-Fi device to allow you to
automatically connect your device to your Wi-Fi network without
typing in a password (requires a QR code reading app with support
for Wi-Fi QR codes).
01 / INTRODUCTION

                                                                                9

The rear panel has three ports; F-type coax and Ethernet LAN
[two]. The rear panel also includes a DC power jack and a reset
button.

                         verizon.com/fios   |   ©2021 Verizon. All Rights Reserved
GETTING TO KNOW YOUR
Fios Extender

•   Ethernet LAN - connects devices to your Fios Extender using
    Ethernet cables to join the local area network (LAN). The two
    Ethernet LAN ports are 10/100/1000 Mbps auto-sensing and
    can be used with either straight-through or crossover Ethernet
    cables.
•   Coax LAN - connects your Fios Extender to the LAN and/or to
    other MoCA devices using a coaxial cable.
•   Reset Button - allows you to reset your Fios Extender to
    the factory default settings. To perform a soft reboot, press
    and hold the button for at least three seconds. To reset your
    Fios Extender to the factory default settings, press and hold the
    button for at least ten seconds.
•   Power - connects your Fios Extender to an electrical wall outlet
    using the supplied power adapter.
    Warning: The included power adapter is for home use only,
    supporting voltages from 105-125 voltage in AC. Do not use in
    environments with greater than 125 voltage in AC.

1.3c/ MOUNTING THE Fios Extender TO A WALL
For optimum performance, the Fios Extender is designed to stand
in a vertical upright position. Verizon does not recommend wall
mounting the Fios Extender. However, if you wish to mount your
Fios Extender, you can purchase a wall mount bracket from the
Verizon Fios Accessories Store at verizon.com/home/accessories/
networking-wifi
01 / INTRODUCTION
11
To mount your Fios Extender to a wall:
1. You may use the wall-mount template sheet for positioning
the Fios Extender.
2. Mark the mounting holes using the template sheet as shown
below.
3. Drive two screws into the wall. Leave the screws extended
about 0.2 inches from the wall.
4. Verify the screws are positioned correctly by placing the wall
bracket on the screws. Then remove the wall bracket from
the wall.
verizon.com/fios | ©2021 Verizon. All Rights ReservedGETTING TO KNOW YOUR
Fios Extender
5. There are two mounting slots located on the bottom of
the Fios Extender. It allows you to securely attach your
Extender to the wall. Align the slots with the wall mount
bracket.
6. Attach the Extender to the wall mount bracket through an
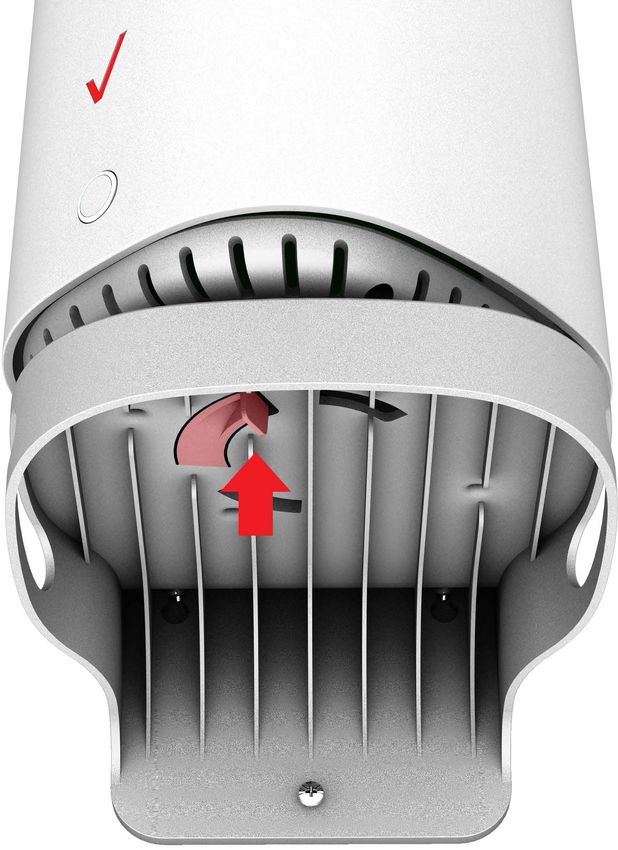
easy twist and lock action.01 / INTRODUCTION
13
7. Align the wall mount bracket with the attached Extender to
the screws, then slide the bracket down until it locks in place.
8. To secure the bracket, place one screw into the small hole of
the bracket and tighten the screw into your wall.
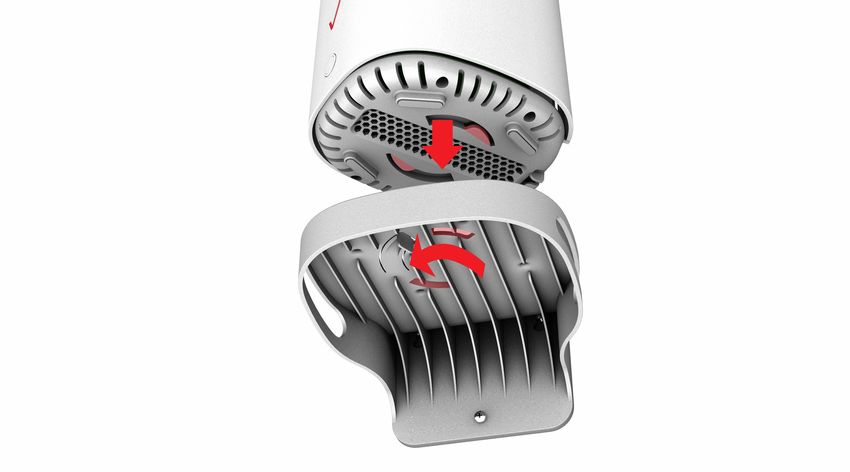
verizon.com/fios | ©2021 Verizon. All Rights ReservedGETTING TO KNOW YOUR Fios Extender Note: To release the lock, twist the Fios Extender counter- clockwise and press down on the small clip on the bottom of the bracket.
02 /
CONNECTING YOUR
Fios Extender

      2.0 Setting up Your Fios Extender
      2.1   Main Screen
02 / CONNECTING YOUR
Fios Extender
16
Connecting your Fios Extender and
accessing its web-based User Interface
(UI) are both simple procedures.
Accessing the UI may vary slightly,
depending on your device’s operating
system and web browser.
verizon.com/fios | ©2021 Verizon. All Rights ReservedSETTING UP YOUR Fios Extender
2.0/ SETTING UP YOUR Fios Extender
Note: Using a wired backhaul, the Fios Extender can be placed at
a location distant from the Fios Router, and positioned for optimum
coverage. Using Wi-Fi backhaul, performance can be slower and
the distance from the Router will be determined by the reach of
Wi-Fi from the Fios Router, the materials in the home, and
neighboring Wi-Fi traffic. Wi-Fi backhaul is effective and
convenient for Wi-Fi configuration, but based on Wi-Fi interference
characteristics, does not perform as well as a wired connection.
2.0a/ WIRED INSTALLATION
A. Connect the Fios Router to a coax outlet. (If the coax outlet
is already in use, use the coax splitter included in the box.)
B. Connect the Fios Extender to a coax outlet - ideally in an
area with spotty Wi-Fi coverage.
C. Connect the power cords to the Router and Extender then
to an electrical outlet.02 / CONNECTING YOUR
Fios Extender
18
D. After 10 minutes, the light on the Extender should turn solid
white, indicating the connection is complete.
Note: If home is wired for Ethernet, follow same steps as above
using an Ethernet cable instead of a coax cable.
2.0b/ WI-FI INSTALLATION
1. Place the Fios Extender directly next to the Fios Router.
2. Take the Ethernet cable from the packaging and connect
one end to the yellow port on the Router and the other end
to the yellow port on the Extender.
3. Connect the power cord to your extender then to an
electrical outlet.
verizon.com/fios | ©2021 Verizon. All Rights ReservedSETTING UP YOUR Fios Extender
4. After 10 minutes, the light on the Extender should turn solid
white, indicating the connection is complete.
5. Unplug and move the Extender to an area between the
Router and an area with spotty Wi-Fi coverage. Once the
Extender is plugged in, the light should turn solid white
again within a few minutes.
You’re all set! Your devices will automatically connect to your Wi-Fi
network, there is nothing more to do.
Note: The Fios Extender has a Wi-Fi Name/Password that is
different from the Fios Router. When the Extender connects to the
Router via Coax, Ethernet, or Wi-Fi, the Extender is assigned the
Wi-Fi Name/Password of the Router. At this time, the Extender
doesn’t have the ability to use the Wi-Fi Name/Password on the
rear label and only uses the same Wi-Fi Name/Password as the
Router.
2.1/ MAIN SCREEN
2.1a/ Login Primary Option
1. Open a web browser on the device connected to your
Fios Extender network.
2. In the browser address field (URL), enter the Extender’s IP
address found in the UI of the Fios Router, then press the
Enter key on your keyboard.02 / CONNECTING YOUR
Fios Extender
20
Note: The IP address of the Fios Extender was assigned by the Fios
Router if the Extender connects to the Router.
3. Enter the password that is printed next to the Admin
Password on the label on the rear of your Fios Extender.
Note: The rear label of the Fios Extender has an admin password
that is different from that of the Fios Router. When the Extender
connects to the Router via Coax, Ethernet, or Wi-Fi, the extender is
assigned the admin password of the Router. At this time, the admin
password on the rear label of the Fios Extender should be ignored.
verizon.com/fios | ©2021 Verizon. All Rights ReservedMain Screen
2.1b/ Login Alternative Option
1. Open a web browser on the device directly connected to
your Fios Extender.
2. In the browser address field (URL), enter the IP address
192.168.1.254
3. Enter the password that is printed next to the Admin
Password on the label on the rear of your Fios Extender.
When you log into your Fios Extender, the main screen displays
a dashboard as well as a navigation menu to Wi-Fi, Status, and
Advanced settings.02 / CONNECTING YOUR
Fios Extender
22
2.1c/ MENU
Information about the main menu options can be found in the
following chapters:
• Status - this chapter
• Wi-Fi - Chapter 3
• Advanced - Chapter 4
2.1d/ STATUS
Wi-Fi Status
Use the Wi-Fi status feature to view the status for either 2.4 GHz or
5 GHz of your Extender’s Wi-Fi network.
You can view the security settings, such as SSID, WPA security
key, Wi-Fi MAC address, and the number of associated clients
connected to your Wi-Fi network.
verizon.com/fios | ©2021 Verizon. All Rights ReservedMain Screen
02 / CONNECTING YOUR
                                                                Fios Extender

                                                                                24

To view the Wi-Fi security settings:
   1.   Select Status from the left pane.
   2.   Click Wi-Fi Status to view the Wi-Fi settings of your
        Fios Extender.

General
This section displays information such as the device name and
model, firmware and hardware versions as well as the MAC Address
and IP information of your Extender.

                           verizon.com/fios   |   ©2021 Verizon. All Rights Reserved
Main Screen
To view:
1. Select Status from the left pane.
2. Click General to view the device information and network
settings of your Fios Extender.
Open Source Software
To view:
1. Select Status from the left pane.
2. Click Open Source Software to view the information.
This product includes software made available under open source
licenses. Additional information about that software, applicable
licenses, and downloadable copies of source code, is available at:
https://verizon.com/opensource/02 / CONNECTING YOUR
Fios Extender
26
All open source software contained in this product is distributed
WITHOUT ANY WARRANTY. All such software is subject to the
copyrights of the authors and to the terms of the applicable
licenses included in the download.
This information is provided for those who wish to edit or otherwise
change such programs. You do not need a copy of any of such open
source software source code to install or operate the device.
CONNECTING A WI-FI DEVICE USING WPS
For instructions on how to connect devices to Wi-Fi using WPS,
refer to section 3.4 “Wi-Fi Protected Setup” on page 35.
verizon.com/fios | ©2021 Verizon. All Rights Reserved03 /
WI-FI SETTINGS
3.0 Overview
3.1 Primary Network
3.2 Guest Network
3.3 IoT Network
3.4 Wi-Fi Protected Setup
3.5 Channel Settings03 / WI-FI SETTINGS
28
Wi-Fi networking enables you to free
yourself from wires, making your devices
more accessible and easier to use.
You can create a Wi-Fi network,
including accessing and configuring
Wi-Fi security options.
verizon.com/fios | ©2021 Verizon. All Rights ReservedOverview 3.0/ OVERVIEW Your Fios Extender provides you with Wi-Fi connectivity using the 802.11a, b, g, n, ac or ax standards. These are the most common Wi-Fi standards. 802.11b has a maximum data rate of 11 Mbps, 802.11a, and 802.11g have a maximum data rate of 54 Mbps, 802.11n has a maximum data rate of 600 Mbps, 802.11ac has a maximum data rate of 1.73 Gbps, and 802.11ax has a maximum data rate of 4.8 Gbps. 802.11b and g standards operate in the 2.4 GHz range. 802.11ac operates in the 5 GHz range. 802.11n and ax operate in both the 2.4 GHz and 5 GHz ranges. Note: 802.11a, 802.11b, and 802.11g are legacy modes and are not recommended. Even one such device connected to the network will slow your entire Wi-Fi network. 3.1/ PRIMARY NETWORK You can view the security settings for either 2.4 GHz or 5 GHz of your Wi-Fi network. Self-Organizing Network (SON) Wi-Fi Enabled - allows for smart roaming to provide reliable Wi-Fi network with full signal strength in all areas.
03 / WI-FI SETTINGS

                                                                               30

To view the Wi-Fi security settings:
   1.   Select Wi-Fi from the left pane and then click Primary
        Network.
        Network
   2.   To view the Wi-Fi security, click the setup  button.

                          verizon.com/fios   |   ©2021 Verizon. All Rights Reserved
Primary Network
Comment: We recommend using the default settings unless
otherwise directed.
• Broadcast
Enable or disable the Extender from broadcasting the Wi-Fi name
to client devices.
• Device Access List
Enter Wi-Fi client MAC addresses to either allow or block them
from accessing your Wi-Fi network.
To view Wi-Fi MAC authentication: Click on Edit List.
List
– Allow access to all devices – allows the listed devices to
access the Wi-Fi network.
Warning: This will block Wi-Fi network access for all devices not
in the list. Only devices in the list will be able to connect to the
Wi-Fi network.
– Deny access to all devices – denies access to the listed
devices. All other Wi-Fi devices will be able to access the
Wi-Fi network if they use the correct Wi-Fi password.
• Group key - updates the WPA shared key.
• Wi-Fi QoS (WMM) - improves the quality of service (QoS) for
voice, video, and audio streaming over Wi-Fi by prioritizing these
data streams.03 / WI-FI SETTINGS
32
• WMM Power Save - improves battery life on mobile Wi-Fi
devices such as smart phones and tablets by fine-tuning power
consumption.
• 802.11 Mode
From the 802.11 Mode section, you can view the Wi-Fi access
to your network of the 2.4 GHz and 5 GHz Wi-Fi communication
standard (mode) best suited or compatible with the devices you
allow access to your Wi-Fi network.
The Wi-Fi mode:
– Compatibility – This is the default mode setting on 5 GHz,
providing a good balance of performance and interoperability
with existing Wi-Fi devices. 802.11a,n,ac and ax devices can
connect.
– Legacy – This is the default mode setting on 2.4 GHz,
providing broad connection support for old and new Wi-Fi
devices. Only 802.11b,g and n devices can connect.
– 802.11n is available on both 2.4 GHz and 5 GHz frequencies.
– Connecting 802.11a or b devices will cause your Wi-Fi
network to slow on that radio and is not recommended.
– When all changes are complete, click Save Changes to save
the changes.
• Transmit Power – adjusts the power of the Wi-Fi signal.
verizon.com/fios | ©2021 Verizon. All Rights ReservedGuest Network
3.2/ GUEST NETWORK
The Guest Network is designed to provide internet connectivity
to your guests but restricts access to your primary network and
shared files. The primary network and the guest network are
separated from each other through firewalls. Guest Wi-Fi can be
managed using the Fios Router’s web interface. If you want to
enable/disable your Guest Wi-Fi or to change the Guest Wi-Fi
SSID (Name) or Password
Password, please log into the Fios Router’s web
interface for management.
To view Guest Network settings:
Select Wi-Fi from the left pane and then click Guest Network.
Network03 / WI-FI SETTINGS
34
3.3/ IOT NETWORK
The IoT Ne
Nettwork is designed to provide an easier setup experience
for your Internet of Things (IoT) devices which benefit from
connecting to the 2.4 Ghz band while keeping your Primary
Network settings unchanged. IoT devices and Primary devices can
communicate unrestricted. IoT Wi-Fi can be managed using the Fios
Router’s web interface. If you want to enable/disable your IoT
Wi-Fi or to change the IoT Wi-Fi SSID (Name) or Passw
assword
ord, please
log into the Fios Router’s web interface for management.
To view IoT Network Settings:
Select Wi-Fi from the left pane and then click IoT Network.
Network
verizon.com/fios | ©2021 Verizon. All Rights ReservedWi-Fi Protected Setup
3.4/ WI-FI PROTECTED SETUP
Wi-Fi Protected Setup (WPS) is an easier way for many devices
to set up a secure Wi-Fi network connection. Instead of manually
entering passwords or multiple keys on each Wi-Fi client,
such as a laptop, printer, or external hard drive, your Fios Extender
creates a secure Wi-Fi network.
In most cases, this only requires the pressing of two buttons – one
on your Fios Extender and one on the Wi-Fi client. This could be
either a built-in button or one on a compatible Wi-Fi adapter/card,
or a virtual button in software. Once completed, this allows Wi-Fi
clients to join your Wi-Fi network.
To initialize the WPS process, you can either press and hold the
unified button located on the front of your Fios Extender for more
than two seconds or use the UI and press the on-screen button.
You can easily add Wi-Fi devices to your Wi-Fi network using the
WPS option if your Wi-Fi device supports the WPS feature.
To access WPS using the user interface:
1. From the main menu, select Wi-Fi settings, then select Wi-Fi
Protected Setup (WPS).03 / WI-FI SETTINGS
36
2. Use one of the following methods:
• If your Wi-Fi client device has a WPS button, press the
unified button on your router for more than two seconds,
then click the start WPS button in the Option 1 to start the
WPS registration process.
• If your client device has a WPS PIN, locate the PIN printed
on the client’s label or in the client documentation. Enter
the PIN number in the Enter PIN field. The Client WPS PIN
field is located in the Option 2 on the user interface.
• Click Register
Register.
• Alternatively, you can enter the router’s PIN shown on this
screen into the WPS user interface of your device, if this
PIN mode is supported by your Wi-Fi device.
verizon.com/fios | ©2021 Verizon. All Rights ReservedWi-Fi Protected Setup
3. After pressing the unified button (WPS) on your
Fios Extender, you have two minutes to press the WPS
button on the client device before the WPS session times
out.
When the unified button (WPS) on your Fios Extender is
pressed, the Status LED on the front of your Fios Extender
begins flashing blue. The flashing continues until WPS
pairing to the client device completes successfully. At this
time, the Status LED turns solid blue.
If WPS fails to establish a connection to a Wi-Fi client device
within two minutes, the Status LED on your Fios Extender
flashes red for two minutes to indicate the WPS pairing
process was unsuccessful. After flashing red, the light
returns to solid white to indicate that Wi-Fi is on.
Note: Wi-Fi Protected Setup (WPS) cannot be used if WPA3
security is enabled or SSID broadcast is disabled or if MAC
address authentication is enabled with an empty white list.03 / WI-FI SETTINGS
38
3.5/ CHANNEL SETTINGS
You can configure the channel settings for either 2.4 GHz or
5 GHz of your Wi-Fi network.
To view and configure the channel settings:
1. Select Channel Settings in the Wi-Fi section.
2. Click on Settings on the top right-hand side of the Channel
Settings page to configure the channel scan settings:
verizon.com/fios | ©2021 Verizon. All Rights ReservedChannel Settings
• Select the Keep my channel selection during power cycle
check box to save your channel selection when your
Fios Extender is rebooted.
• Enable DFS channels during channel scan:
scan DFS channels
are enabled by default during channel scans.
3. Click Perform Scan to perform channel availability scan for
the Fios Extender accommodating the best radio channel
and providing the best Wi-Fi performance.
4. On the Channel Settings page for either 2.4 GHz or 5 GHz,
the following information displays and can be configured:
• Channel Score - displays a network congestion score
of one to ten in each Wi-Fi channel. It can be used to
determine which channels to use or to avoid. Higher
score indicates less congestion in a channel.
• Channel Analysis - scans and displays channel
bandwidth and signal strength of available APs.
• Channel - this is the radio channel used by the Wi-Fi
router and its clients to communicate with each other.
The channel must be the same on the router and all of its
Wi-Fi clients. Select the channel you want the Wi-Fi radio
to use to communicate, or accept the default (Auto)
Auto)
channel selection. Then the router will automatically
assign itself a radio channel.
• Width - displays the Wi-Fi channel currently in use on
each band. Users can select from available channels.03 / WI-FI SETTINGS
40
To view the channel settings history:
1. Select Channel Settings in the Wi-Fi section.
2. Click on History to display the channel settings history.
verizon.com/fios | ©2021 Verizon. All Rights Reserved04 /
CONFIGURING
ADVANCED
SETTINGS
4.0 Using Advanced Settings
4.1 Reboot
4.2 Users
4.3 Factory Default
4.4 System Logging04 / CONFIGURING
ADVANCED SETTINGS
42
Advanced settings cover a wide range
of sophisticated configurations for your
Fios Extender’s security and system
logs.
verizon.com/fios | ©2021 Verizon. All Rights ReservedUsing Advanced Settings
Caution: Many of the settings described in this section should only
be configured by experienced network technicians. Changes could
adversely affect the operation of your Fios Extender and local
network.
4.0/ USING ADVANCED SETTINGS
You can access the following advanced settings:
• Reboot - restarts your Fios Extender.
• Users - sets the password for administrator access.
• Factory Default - resets your Fios Extender to its default
settings.
• System Logging
– System Log - view the most recent activity of your
Fios Extender.
– Advanced Log - view a summary of the monitored data
collected for Fios Extender.
– DHCP Log - view a list of all DHCP clients connected to
your Fios Router.
– BHM Log - view a summary of the monitored backhaul
modes of Fios Extender.04 / CONFIGURING
ADVANCED SETTINGS
44
4.1/ REBOOT
You can reboot your Fios Extender using the Reboot feature. Refer
to 1.3b/ REAR PANEL for power reset button option.
To reboot your Fios Extender using the user interface:
1. Select Advanced from the left pane and then click Reboot
Reboot.
2. Click Reboot Device button on the screen. Your Extender will
reboot. This may take up to a minute.
3. To access your Fios Extender user interface, refresh your
web browser.
4. After the front panel Status LED turns solid white, you will
automatically be sent to the web browser login page.
verizon.com/fios | ©2021 Verizon. All Rights ReservedUsers 4.2/ USERS The Fios Extender clones the Users password of the Fios Router. Use the login password of the Fios Router for managing your Extender settings. If you want to change your password, please log in the Fios Router’s web interface and go to Advanced/Utilities/ Users page to make changes. To view the Users password: Select Users in the Advanced section.
04 / CONFIGURING
                                                           ADVANCED SETTINGS

                                                                               46

4.3/ FACTORY DEFAULT
You can restore the configuration settings to the factory default
settings for your Fios Extender. Restoring the default settings
erases the current configuration, including user defined settings and
network connections.
To restore your Fios Extender’s factory default settings:
   1.   Select Factory Default in the Advanced section.

   2.   Click Restore Factory Default button. The factory default
        settings are applied and your Fios Extender restarts. Once
        complete, the Login page for the First Time Easy Setup
        Wizard displays.

                          verizon.com/fios   |   ©2021 Verizon. All Rights Reserved
System Logging
4.4/ SYSTEM LOGGING
4.4a/ System Log
System Log provides a view of the most recent activity of your
Fios Extender.
To view the system log:
1. Select System Logging in the Advanced section.
2. To view logged events for a specific timeframe, click the
Options button.04 / CONFIGURING
ADVANCED SETTINGS
48
3. To refresh the page, click Refresh
Refresh.
4. To delete the log information, click Clear
Clear.
5. To save the log information, click Save
Save.
verizon.com/fios | ©2021 Verizon. All Rights ReservedSystem Logging
4.4b/ Advanced Log
You can view a summary of the monitored data collected for your
Fios Extender.
To view your Fios Extender’s full system status and traffic
monitoring data:
1. Select System Logging in the Advanced section.
2. Click on the Advanced Log from the top of the System
Logging page.
3. To view logged events for a specific timeframe, click the
Options button.
4. To refresh the page, click Refresh
Refresh.
5. To delete the log information, click Clear
Clear.
6. To save the log information, click Save
Save.04 / CONFIGURING
ADVANCED SETTINGS
50
4.4c/ DHCP Log
You can view a list of the connected DHCP clients on your network.
To view a list of the connected DHCP clients status:
1. Select System Logging in the Advanced section.
2. Click on the DHCP Log from the top of the System Logging
page.
3. To view logged events for a specific timeframe, click the
Options button.
4. To refresh the page, click Refresh
Refresh.
5. To delete the log information, click Clear
Clear.
6. To save the log information, click Save
Save.
verizon.com/fios | ©2021 Verizon. All Rights ReservedSystem Logging
4.4d/ BHM Log
You can view a summary of the BHM (backhaul modes: Ethernet,
coax and Wi-Fi) status of your Fios Extender.
To view the backhaul modes log:
1. Select System Logging in the Advanced section.
2. Click on the BHM Log from the top of the System Logging
page.
3. To view logged events for a specific timeframe, click the
Options button.
4. To refresh the page, click Refresh
Refresh.
5. To delete the log information, click Clear
Clear.
6. To save the log information, click Save
Save.05 /
TROUBLE
SHOOTING
5.0 Troubleshooting Tips
5.1 Frequently Asked Questions05 / TROUBLESHOOTING
53
This chapter lists solutions for issues
that may be encountered while using
your Fios Extender as well as frequently
asked questions.
Although the majority of the
Fios Extender’s LAN and internet
connectivity is automatic and
transparent, if an issue does occur
accessing the internet (e.g. complete
loss of connectivity, inability to access
services, etc.), you may need to take
additional steps to resolve the problem.
verizon.com/fios | ©2021 Verizon. All Rights ReservedTroubleshooting Tips
Note: The advanced settings should only be configured by
experienced network technicians to avoid adversely affecting the
operation of your Fios Extender and your local network.
5.0/ TROUBLESHOOTING TIPS
5.0a/ IF YOU ARE UNABLE TO CONNECT TO THE INTERNET:
• The first thing to check is whether your Fios Extender is
powered on and is connected to the Fios Router. Check the
Status LED on the front of the Fios Extender. Be sure to refer to
the “1.3a/ FRONT PANEL” on page 7 to determine status of
the Fios Extender. Check the WAN cable (Ethernet or coaxial)
connecting your Fios Router to the internet to make sure it is
properly connected on both ends.
• If the prior tips do not resolve your connection issue, try
restarting (rebooting) the Fios Extender by manually pressing
the ‘red’ reset button on the rear panel of the Fios Extender for
2-4 seconds (the Status LED should go off) to begin rebooting
your Fios Extender. Your Fios Extender will begin rebooting and
will return to service in 3 - 5 minutes depending on your network
connection. Check Status LED and if it is solid white, try again
to access the internet.
• If rebooting your Fios Extender does not resolve your
connection issue, try power cycling the Extender by unplugging
the power cable from the adapter or the wall and wait 2
minutes. During the 2 min. wait period, also power cycle the
network device (e.g. the computer, tablet, etc.) and then plug
the power cable back into the Fios Extender. After 3-5 minutes,
recheck the Status LED and try again to access the internet.05 / TROUBLESHOOTING
55
5.0b/ IF YOU ARE UNABLE TO CONNECT TO YOUR
Fios Extender USING WI-FI:
• Be sure your Wi-Fi device is within range of your Fios Extender;
move it closer to see if your connection improves.
• Check your network device’s Wi-Fi settings to be sure your
device’s Wi-Fi is on (enabled) and that you have the correct Wi-Fi
network and password (if using a Wi-Fi password) as configured
on your Fios Extender.
• Be sure you are connecting to the correct Wi-Fi network; check
to be sure you are using your Fios Extender’s SSID. In some
cases, if using a Wi-Fi password, you may need to enter the
Wi-Fi password into your network device again to be sure your
device accepts the password.
• Check to be sure you are running the latest software for your
network device.
• Try turning your network device’s Wi-Fi off and on, and try to
connect.
• If you have made any changes in your network settings and
turning your network device’s Wi-Fi off and on does not help, try
to restart your network device.
• You may need to turn the Wi-Fi settings from on to off, and back
to on again and apply the changes.
• If you are still unable to access your Fios Extender, you may
need to try connecting to the Extender using another network
device. If the issue goes away with another network device, the
issue is likely with that individual network device’s configuration.
verizon.com/fios | ©2021 Verizon. All Rights ReservedTroubleshooting Tips
5.0c/ ACCESSING YOUR Fios Extender IF YOU ARE
LOCKED OUT
• If your Fios Extender connection is lost while making
configuration changes, a setting that locks access to your
Fios Extender’s UI may have inadvertently been activated.
The common ways to lock access to your Fios Extender are:
• Scheduler - If a schedule has been created that applies to the
computer over the connection being used, your Fios Extender
will not be accessible during the times set in the schedule.
• Access Control - If the access control setting for the computer
is set to block the computer, access to your Fios Extender is
denied.
To gain access, restore the default settings to your Extender.
5.0d/ RESTORING YOUR Fios Extender’S DEFAULT
SETTINGS
There are two ways to restore your Fios Extender’s default
settings. It is important to note that after performing either
procedure, all previously saved settings on your Fios Extender will
be lost.
• Using the tip of a ballpoint pen or pencil, press and hold the
Reset button on the back of your Fios Extender for at least ten
seconds.05 / TROUBLESHOOTING
57
• Access the UI and navigate to the Advanced Settings page.
Select Factory Default option. Click the Restore Default Settings
button. For additional details, refer to the section 4.3/ Factory
Default section of this guide.
Note: If you reset or reboot your Fios Extender, you may also need
to disconnect your Fios Extender’s power supply for a few minutes
(3 or more) and then reconnect the power cable. However, in order
to provide full synchronization to the coaxial network, disconnecting
and reconnecting the power may be required.
5.0e/ LAN CONNECTION FAILURE
To troubleshoot a LAN connection failure:
• Verify your Fios Extender is properly installed, LAN connections
are correct, and that the Fios Extender and communicating
network devices are all powered on.
• Confirm that the computer and Fios Extender are both on the
same network segment.
If unsure, let the computer get the IP address automatically by
initiating the DHCP function, then verify the computer is using an IP
address within the default range of 192.168.1.2 through 192.168.1.254.
If the computer is not using an IP address within the correct IP
range, it will not connect to your Fios Extender.
• Verify the subnet mask address is set to 255.255.255.0.
verizon.com/fios | ©2021 Verizon. All Rights ReservedTroubleshooting Tips
5.0f/ TIMEOUT ERROR OCCURS WHEN ENTERING THE URL OR
IP ADDRESS
Verify the following:
• All computers are working properly.
• IP settings are correct.
• Fios Extender is on and connected properly.
For connections experiencing lag or a slow response:
• Check for other devices on the network utilizing large portions
of the bandwidth and if possible temporarily stop their current
utilization and recheck the connection.
• If lag still exists, clear the cache on the computer and if
still needed, unplug the Ethernet cable or disable the Wi-Fi
connection to the computer experiencing the slow connection
and then reconnect or enable the Wi-Fi connection and try the
connection again.
In rare cases you may also need to:
• Unplug the Ethernet cable to Fios Extender and restart the
Fios Extender, wait 1-2 mins. and insert the Ethernet cable
again.
• Under limited circumstances you may use a port forwarding
configuration on the Fios Router, based on the application
you are using (refer to Verizon’s support online help for more
details).05 / TROUBLESHOOTING
59
5.0g/ FRONT UNIFIED BUTTON
The front panel’s Unified Button allows quick access to the
Wi-Fi Protected Setup (WPS) feature and handset paging/pairing
mode. In addition, the Unified Button provides a visual display of
the Fios Extender’s current condition. Refer to the chart below for
details.
Condition Status LED Color Fios Extender
Normal WHITE Normal operation (solid)
Router is booting. (fast blink)
BLUE Pairing mode (slow blink)
Pairing successful (solid)
GREEN Wi-Fi has been turned off. (solid)
Issue(s) YELLOW No internet connection (solid)
Extender is too far from the Router. Poor
backhaul signal (slow blink)
Extender is too close to the Router. Poor
Wi-Fi coverage (fast blink)
RED Hardware/System failure detected (solid)
Overheating (fast blink)
Pairing Failure (slow blink)
Power OFF Power off
verizon.com/fios | ©2021 Verizon. All Rights ReservedTroubleshooting Tips
5.0h/ REAR LIGHTED INDICATORS
Flash Speed
• Slow flash – Two times per second
• Fast flash – Four times per second
LAN Ethernet – Upper LED
• Unlit – Indicates no 1 Gbps link
• Solid green – Indicates 1 Gbps link
• Fast flash green – Indicates LAN activity. The traffic can be in
either direction.
LAN Ethernet – Lower LED
• Unlit – Indicates no 10/100/1000 Mbps link
• Solid green – Indicates 10/100/1000 Mbps link
LAN Coax
• Unlit – Indicates no MoCA network connection to the device
• Solid green – Indicates network link05 / TROUBLESHOOTING
61
5.1/ FREQUENTLY ASKED QUESTIONS
5.1a/ I’VE RUN OUT OF ETHERNET PORTS ON MY
Fios Extender. HOW DO I ADD MORE COMPUTERS OR
DEVICES?
Plugging in an Ethernet hub or switch expands the number of ports
on your Fios Extender.
• Run a straight-through Ethernet cable from the Uplink port of the
new hub to the Fios Extender.
Use a crossover cable if there is no Uplink port/switch on your hub,
to connect to the Fios Extender.
• Remove an existing device from the yellow Ethernet port on your
Fios Extender and use that port.
5.1b/ IS THE WI-FI OPTION ON BY DEFAULT ON MY
Fios Extender?
Yes, your Fios Extender’s Wi-Fi option is activated out of the box.
5.1c/ IS THE WI-FI SECURITY ON BY DEFAULT WHEN THE WI-FI
OPTION IS ACTIVATED?
Yes, with the unique WPA2 (Wi-Fi Protected Access II) key that is
printed on the sticker on the rear panel of your Fios Extender.
verizon.com/fios | ©2021 Verizon. All Rights ReservedFrequently Asked Questions
5.1d/ ARE MY Fios Extender’S ETHERNET PORTS AUTO-
SENSING?
Yes. Either a straight-through or crossover Ethernet cable can
be used.
5.1e/ CAN I USE AN OLDER WI-FI DEVICE TO CONNECT TO MY
Fios Extender?
Yes, your Fios Extender can interface with 802.11a, b, g, n, ac or
ax devices. Your Fios Extender also can be setup to handle only
n Wi-Fi cards, g Wi-Fi cards, b Wi-Fi cards, or any combination
of the three.
5.1f/ CAN MY WI-FI SIGNAL PASS THROUGH FLOORS, WALLS,
AND GLASS?
The physical environment surrounding your Fios Extender can
have a varying effect on signal strength and quality. The denser
the object, such as a concrete wall compared to a plaster wall,
the greater the interference. Concrete or metal reinforced
structures experience a higher degree of signal loss than those
made of wood, plaster, or glass.05 / TROUBLESHOOTING
63
5.1g/ HOW DO I LOCATE THE IP ADDRESS THAT MY COMPUTER
IS USING?
In Windows 7 or Windows 10, click the Windows button and
select Control Panel, then click View Network Status and Tasks.
In the next window, click Local Area Connection. In the Local
Area Network Connection Status window, click Details.
On Mac OS X, open System Preferences and click the Network
icon. The IP address displays near the top of the screen.
5.1h/ I USED DHCP TO CONFIGURE MY NETWORK. DO I
NEED TO RESTART MY COMPUTER TO REFRESH MY IP
ADDRESS?
No. In Windows 7, Windows 10 and OSX, unplug the Ethernet
cable or Wi-Fi card, then plug it back in.
5.1i/ I CANNOT ACCESS MY Fios Extender UI. WHAT
SHOULD I DO?
If you cannot access the UI, verify the computer connected
to your Fios Extender is set up to dynamically receive an IP
address.
verizon.com/fios | ©2021 Verizon. All Rights Reserved06 /
SPECIFICATIONS
6.0 General Specifications
6.1 LED Indicators
6.2 Environmental Parameters06 / SPECIFICATIONS
65
The specifications for your
Fios Extender are as follows.
This includes standards, cabling types
and environmental parameters.
verizon.com/fios | ©2021 Verizon. All Rights ReservedGeneral Specifications
Note: The specifications listed in this chapter are subject to change
without notice.
6.0/ GENERAL SPECIFICATIONS
Model Number: E3200
Standards: IEEE 802.3x, 802.3u
IEEE 802.11a/b/g/n/ac/ax
IP: IP versions 4 and 6
MoCA LAN: 1125 – 1675 MHz
2500 Mbps
Speed: Wired LAN Ethernet:
10/100/1000 Mbps auto-sensing
Cabling Type: Ethernet 10BaseT: UTP/STP
Category 3 or 5
Ethernet 100BaseT: UTP/STP
Category 5
Ethernet 1000BaseT: UTP/STP
Category 5e
Firewall: ICSA certified06 / SPECIFICATIONS
67
6.1/ LED INDICATORS
Front Panel: Unified Button
Rear Panel: LAN Coax and LAN Ethernet [2]
6.2/ ENVIRONMENTAL PARAMETERS
DIMENSIONS AND WEIGHT
Fios Extender (unit only):
Size: 5.32” wide x 9.27” high x 5.94”
deep
Weight: 2.50 lbs / 1.138 kg
Complete System (inc. packaging):
Size: 12.24” wide x 6.26” high x 7.09”
deep
Weight: 4.00 lbs ~ 4.05 lbs / 1.81 kg ~
1.83 kg
Power: External, 12V, 3.5A
Screws (optional): PH TP+N: 0.157” x 0.984”
Anchor PE: 0.197” x 0.984”
verizon.com/fios | ©2021 Verizon. All Rights ReservedEnvironmental Parameters Certifications: FCC, UL 60950-1 Operating Temperature: 5° C to 40° C (41° F to 104° F) Storage Temperature: -5° C to 50° C (23° F to 122° F) Operating Humidity: 5% to 85% Storage Humidity: 5% to 93% (non-condensing)
07 /
NOTICES

      7.0 Regulatory Compliance Notices
07 / NOTICES
70
This chapter lists various compliance
and modification notices, as well as the
NEBS requirements and GPL.
verizon.com/fios | ©2021 Verizon. All Rights ReservedRegulatory Compliance Notices
7.0/ REGULATORY COMPLIANCE NOTICES
7.0a/ Class B Equipment
This equipment has been tested and found to comply with the
limits for a Class B digital device, pursuant to Part 15 of the FCC
Rules. These limits are designed to provide reasonable protection
against harmful interference in a residential installation. This
equipment generates, uses and can radiate radio frequency energy
and, if not installed and used in accordance with the instructions,
may cause harmful interference to radio communications. However,
there is no guarantee that interference will not occur in a particular
installation. If this equipment does cause harmful interference to
radio or television reception, which can be determined by turning
the equipment off and on, the user is encouraged to try to correct
the interference by one of the following measures:
– Reorient or relocate the receiving antenna.
– Increase the separation between the equipment and
receiver.
– Connect the equipment into an outlet on a circuit different
from that to which the receiver is connected.
– Consult the dealer or an experienced radio/TV technician
for help.07 / NOTICES
72
This device complies with Part 15 of the FCC Rules. Operation is
subject to the following two conditions:
(1) This device may not cause harmful interference, and
(2) This device must accept any interference received, including
interference that may cause undesired operation.
FCC Caution: Any changes or modifications not expressly approved
by the party responsible for compliance could void the user’s
authority to operate this equipment.
RF Exposure:
This equipment complies with FCC radiation exposure limits set
forth for an uncontrolled environment. This equipment should be
installed and operated with minimum distance 31 cm between the
radiator & your body.
This transmitter must not be co-located or operating in conjunction
with any other antenna or transmitter.
2.4GHz operation of this product in the U.S.A. is firmware-limited to
channels 1 through 11.
This device is restricted for indoor use.
verizon.com/fios | ©2021 Verizon. All Rights ReservedRegulatory Compliance Notices
7.0b/ Safety Warning:
1. The circuit of cable distribution system under consideration
is TNV-1 circuit.
2. The common sides or earthed side of the circuit are
connected to the screen of the coaxial cable through an
antenna connector of tuner and to all accessible parts and
circuits (SELV, LCC and accessible metal parts).
3. The screen of the coaxial cable is intended to be connected
to earth in the building installation.
7.0c/ Alerte de sécurité:
1. Le circuit de distribution par câble considéré est le circuit
TNV-1.
2. Les côtés communs ou côté terre du circuit sont connectés
à l’écran du câble coaxial via un connecteur d’antenne du
syntoniseur et à toutes les parties et circuits accessibles
(SELV, LCC et parties métalliques accessibles).
3. L’écran du câble coaxial est destiné à être mis à la terre
dans l’installation du bâtiment.
The cable distribution system should be grounded (earthed)
in accordance with ANSI/NFPA 70, the National Electrical
Code (NEC), in particular Section 820.93, Grounding of Outer
Conductive Shield of a Coaxial Cable.
Le système de distribution par câble doit être mis à la terre
conformément à ANSI / NFPA 70, Code national de l’électricité
(NEC), en particulier à la section 820.93, Mise à la terre du
blindage conducteur extérieur d’un câble coaxial.07 / NOTICES
74
7.0d/ NEBS (Network Equipment Building System) Statement
An external SPD is intended to be used with G3100/E3200.
WARNING: The intra-building ports of the equipment or
subassembly is suitable for connection to intra-building or
unexposed wiring or cabling only. The intra-building port(s) of the
equipment or subassembly MUST NOT be metallically connected to
interfaces that connect to the OSP or its wiring. These interfaces
are designed for use as intra-building interfaces only (Type 4 ports
as described in GR-1089) and require isolation from the exposed
OSP cabling. The addition of Primary Protectors is not sufficient
protection in order to connect these interfaces metallically to OSP
wiring.
verizon.com/fios | ©2021 Verizon. All Rights ReservedRegulatory Compliance Notices Caution: The Fios Extender must be installed inside the home. The Extender is not designed for exterior installation. 7.0e/ GENERAL PUBLIC LICENSE This product contains certain software that is covered by open source licensing requirements. Copies of the licenses and a downloadable copy of the source code for the open source software that is used in this product are available on the following website: http://verizon.com/opensource/ All open source software contained in this product is distributed WITHOUT ANY WARRANTY. All such software is subject to the copyrights of the authors and to the terms of the applicable licenses included in the download. You may also obtain a copy of the source code for the open source software used in this product for a period of three years after your receipt of the product by sending a check for $10, payable to VERIZON, to the address below: Verizon One Verizon Way Basking Ridge, NJ 07920 Attn: Legal, Open Source Requests Note: This information is provided for those who wish to edit or otherwise change such programs. You do not need a copy of any of such open source software source code to install or operate the device.
You can also read