UMOBILITY USER GUIDE APPLE IPHONE / IPOD TOUCH
←
→
Page content transcription
If your browser does not render page correctly, please read the page content below
uMobility User Guide
Apple iPhone / iPod Touch
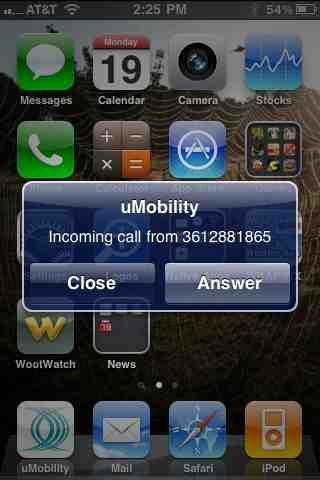
Table of Contents
Introduction _____________________________________________ 3!
  How to Use this Guide ..................................................................................3!
  Device Requirements ....................................................................................4!

Getting Started with uMobility ______________________________ 6!
  Configuring uMobility.....................................................................................6!
  In Call Options.............................................................................................18!
  Moving Calls Between Networks (Handoff).................................................20!

Advanced Options With uMobility __________________________ 24!
  Transfer a Call With uMobility .....................................................................24!
  Add Call With uMobility ...............................................................................28!
  Manual Configuration ..................................................................................31!
  Uninstalling uMobility ..................................................................................37!
  Log Settings ................................................................................................38!
  Configuring iPhone to Work with a Wi-Fi Network ......................................38!

         Title: uMobility User’s Guide – Apple iPhoneTM, iPod TouchTM and iPadTM 4.0
         Confidential              ! 2003-2010 DSM Telecom, Inc.            Page 2 of 38
Introduction
uMobility was designed to enhance the mobile experience by bringing features and functionalities
from office or residential services right to the smart phone. uMobility enables the user to:
    •   Answer the office or home phone (depending on the type of uMobility service) from the
        smart phone – anytime, anywhere
    •   Make calls from the smart phone that uses the office or home’s default number
    •   Enjoy greatly improved cell phone coverage inside the office or home
    •   Never miss an important call again while away from the desk or home
    •   Talk on the smart phone and not use any cellular network minutes when in a Wi-Fi
        hotspot
    •   Access work or home voice mail from the smart phone
    •   Stop juggling between the cell phone and the office phone or home phone

How to Use this Guide

This guide assists with the installation of uMobility on the smart phone in order to get started
using uMobility as quickly as possible.
•   To install uMobility, skip to the next section, Installing uMobility on the Apple iPhone
•   If uMobility is already installed on the smart phone and Wi-Fi has not been configured – skip
    to section 2, Configuring uMobility to Work with a Wi-Fi Network.
•   If uMobility is already installed on the smart phone and Wi-Fi has been configured – skip to
    section 3, Using uMobility, to learn how to use uMobility.
•   Section 4, Other uMobility Options, explains how to access the contacts and call logs from
    uMobility and how to exit uMobility.

         Title: uMobility User’s Guide – Apple iPhoneTM, iPod TouchTM and iPadTM 4.0
         Confidential              ! 2003-2010 DSM Telecom, Inc.            Page 3 of 38
Installing uMobility on The Apple Device
In the current release uMobility is installed on device using either the iTunes application software
from Apple or by accessing that same App Store directly from the device’s application for that
purpose.
In order to download the uMobility application, the user must have a valid account for the Apple
App Store.

Device Requirements

    •   The iPhone is supported with OS version 4.x.
    •   The iPhone 3G is supported with OS version 4.0 or higher.
    •   The iPhone 3G S is supported with OS version 4.0 or higher.
    •   The iPhone 4 is supported with iOS4 or higher.
    •   The iPod Touch must be at least a 2nd generation device (audio port for
        microphone) and have OS version 4.0 or higher.
    •   The iPad is supported with OS 3.2 or higher.

Downloading uMobility using a Computer

    1. Launch the iTunes application from the computer (Mac or PC).
    2. Enter in a valid username and password when logging in to the App Store.
    3. Search for the company name uMobility” in order to locate the uMobility
       application on the App Store.
    4. Select the uMobility application from the list and then click Download.
    5. The uMobility application will begin the downloading process after the user’s
       credentials have been validated. If asked for the username and password again,
       enter that information now.
    6. When the download is completed, the uMobility application will then be available
       to load onto the iPhone using the iTunes application.
    7. Connect the iPhone to the computer using the supplied cable.
    8. Synchronize the iPhone with the computer using the instructions provided by
       Apple. Please note that the user will need to select the uMobility application from
       the Applications list in order for uMobilty to be moved to the iPhone.
    9. When the Sync process is completed, the iPhone’s screen will blank for an
       interval while the Sync process completes. When the screen refreshes, the
       uMobility application is ready for configuration.

         Title: uMobility User’s Guide – Apple iPhoneTM, iPod TouchTM and iPadTM 4.0
         Confidential              ! 2003-2010 DSM Telecom, Inc.            Page 4 of 38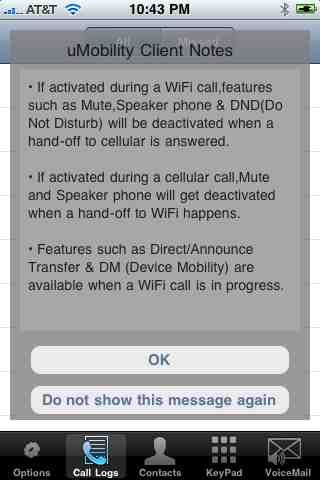
When an upgrade for the uMobility application becomes available, repeat these steps and
if asked, confirm by tapping Yes to replace the application already in place in the iTunes
library. The next time the end user syncs the iPhone, the updated uMobility client will be
loaded onto the iPhone device.

Downloading uMobility using the Apple Product

   1. Be sure that the iPhone’s battery is fully charged before beginning the installation,
       or plug the iPhone into a USB or electrical outlet to ensure the Apple device does
       not run out of battery during the installation.
   2. Launch the App Store application on the Apple device from the main screen
       (Jump Screen).
   3. Press the Search button in the upper right-hand corner of the screen.
   4. Tap the Search window to bring up the keyboard.
   5. Clear the Search window if any text remains from previous searches.
   6. Enter “Varaha Systems” or “uMobility” and tap Search in order to locate the
       uMobility application.
   7. Tap the application listed on the screen.
   8. Tap to change the icon to Install.
   9. Enter the Username and Password for the App Store account associated with the
       iPhone.
   10. Click OK.
   11. The application will begin downloading once the Username and Password
       credentials are confirmed.
   12. The user name return to the main screen – the uMobility icon will be displayed on
       the main screen along with a download progress. When the download is
       complete, the progress bar will disappear.

When an upgrade for the uMobility application becomes available, repeat these steps and
if asked, confirm by tapping Yes to replace the application already in place on the device.
This updated will occur via the Wi-Fi or cellular data network depending upon where the
device is at the time of the confirmed upgrade.

Regardless of the method chosen, uMobility is now installed on the Apple device. Please
proceed to the next Chapter to configure the uMobility application.

Note: the user will need to register the client with DSM Telecom at least once after a
new installation is completed before using the enterprise dialing over cellular feature.
Please complete the set-up instructions in the next chapter to accomplish this
requirement.

        Title: uMobility User’s Guide – Apple iPhoneTM, iPod TouchTM and iPadTM 4.0
        Confidential              ! 2003-2010 DSM Telecom, Inc.            Page 5 of 38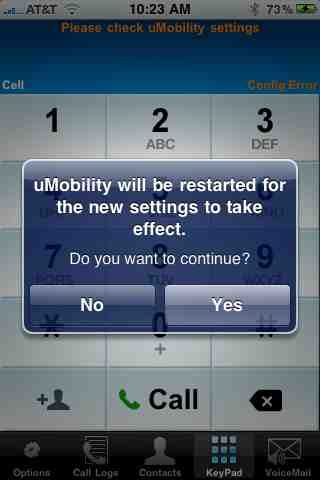
Getting Started with uMobility

Configuring uMobility

With uMobility client software version 4.0, there are two methods for configuration of
the client software after installation is completed from the steps in the previous section.
The first involves an Over The Air (OTA) SMS or email message, which is described in
this section. OTA downloads all the necessary configuration files needed to get the
uMobility service up and running. It is by far the easiest configuration method and
therefore the preferred method to get started with uMobility. The second configuration
merthod involves using the Settings screens from the device itself. For more information
on this appraoch, refer to the Advanced Options section of this document.

Over the Air (OTA)

                                 DSM Telecom will send either a SMS message or email
                                 message to the Apple device. This message will contain a
                                 link to the OTA file needed by the uMobility client to
                                 complete the configuration needed to make the software
                                 fully operational.

        Title: uMobility User’s Guide – Apple iPhoneTM, iPod TouchTM and iPadTM 4.0
        Confidential              ! 2003-2010 DSM Telecom, Inc.            Page 6 of 38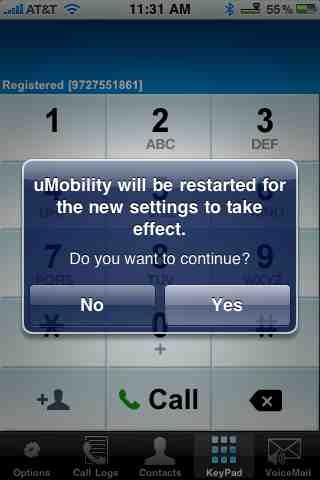
When the message is received, tap to read the message,
then highlight and tap to select the link (URL) contained
the message body.

                                 This action will cause the device to request the OTA
                                 process to begin, loading a data file that contains the user
                                 name, password and related network information needed
                                 by uMobility.

        Title: uMobility User’s Guide – Apple iPhoneTM, iPod TouchTM and iPadTM 4.0
        Confidential              ! 2003-2010 DSM Telecom, Inc.            Page 7 of 38
The next screen will advise the user that the configuration
                                information has been downloaded and is now being
                                processed by the uMobility client application.

                                      The uMobility client
                                      will be brought to
                                      the foreground and
                                      begin incorporating
                                      the newly
                                      downloaded
                                      configuraiton
                                      information. If the
                                      client software
                                      already has
                                      configuration
                                      information (e.g.,
                                      you are applying an
                                      upgrade or refresh),
                                      the message on the
                                      left will be display
                                      (tap Yes to contine).

The uMobility client has the ability to store up to three profiles (phone numbers with
related settings). The screen will bring a pop-up asking the user to select either Work,

        Title: uMobility User’s Guide – Apple iPhoneTM, iPod TouchTM and iPadTM 4.0
        Confidential              ! 2003-2010 DSM Telecom, Inc.            Page 8 of 38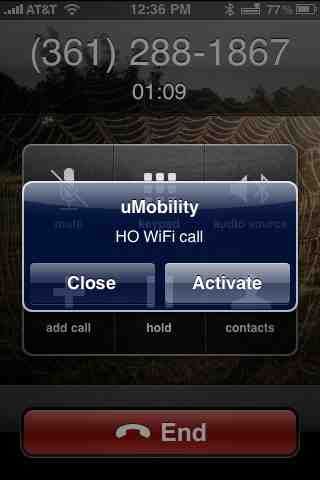
Home, or Other to store the configuration in process. Tap on the desired selection to
complete the storage of the configuration information under that Profile category.

Once the configuration processing is completed, the uMobility application will load into
memory and the uMobility dialer will appear in the screen. The client will then being the
registration process (see progress messages in the upper left-hand portion of the screen).

                                    If this is the first time that the uMobility client has been
                                    configured, the application will advise the user that the
                                    application needs to be restarted in order for the newly
                                    acquired configuration information to be activated.
                                    Click The uMobility client application will advise the
                                    user that the application needs to be restarted in order
                                    for the newly acquired configuration information to be
                                    activated. Click Yes to allow the application to exit
                                    and auto restart.

                                    When completed, the uMobility client is ready to take

and make the user’s calls.

If the user attempts to launch the uMobility application
prior to receiving and storing the configuration
parameters from the OTA process, or if there is an
error that has occurred during the download process
(or something is incorrect in the parameters) the user
will see a Config Error message on the screen with the
admonition to Please check uMobility Settings (see
screen shot). If this message occurs, please contact
DSM Telecom. Usually this condition can be correct
with a refresh of the configuration settings (aka
something may have caused the configuration
download to corrupt the settings file).

        Title: uMobility User’s Guide – Apple iPhoneTM, iPod TouchTM and iPadTM 4.0
        Confidential              ! 2003-2010 DSM Telecom, Inc.            Page 9 of 38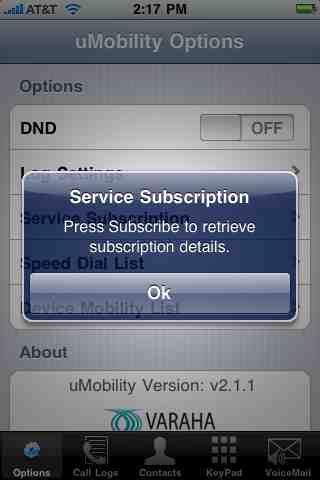
Getting to Know the uMobility Client Application
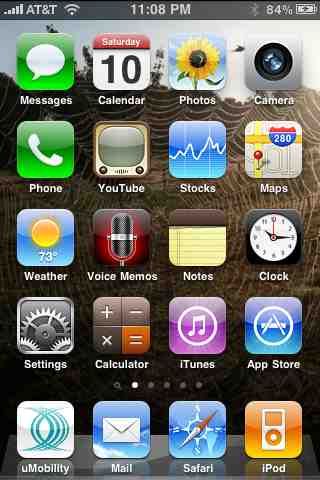
To access the uMobility application, go to the
device’s Jump Screen. Selecting the uMobility icon
will launch the application.
Title: uMobility User’s Guide – Apple iPhoneTM, iPod TouchTM and iPadTM 4.0
Confidential ! 2003-2010 DSM Telecom, Inc. Page 10 of 38Once the application has completed launching, the following screen will appear.
Network Display Area
information
message
Network
connectivity:
1) Registered,
2) Enterprise
or 3) Cell
Dialpad
pad
Panel Menu
Each of the application areas are described below:
• Display Area – used by uMobility to provide information about the network
connection status of the iPhone
• Network Connectivity Area – relates information on the network that could be
used by the application when the next phone call is placed on the device.
Registered means uMobility has
found a Wi-Fi zone or if turned on
a cellular data connection and has
used that interface to register back
to the network provider or enterprise. Depending upon the installation, the uMobility
phone number will display along with the Registered notification.
Enterprise means that a cellular
data network has been found and
is being used to register the
uMobility client with the network
provider. Depending upon the
installation, the uMobility phone number will display along with the Enterprise
notification.
Title: uMobility User’s Guide – Apple iPhoneTM, iPod TouchTM and iPadTM 4.0
Confidential ! 2003-2010 DSM Telecom, Inc. Page 11 of 38Cell lets the user know that no data
network is available (Wi-Fi or 3G)
and that calls will be placed
exclusively using the cellular
network and no Enterprise MWI information will be received. Note – this message
will not appear when using the iPod Touch.
• Dial Pad – 10-digit keypad to enter in phone numbers or interact with IVR and
ACD requests (e.g., calling in to a conference service and being asked to enter the
meeting ID).
• Panel Menu – choices available to the user for additional functionality.
The following section will outline the features
provided by the choices housed in the Panel menu
above.
The left-most selection (Options) takes the user to the
uMobility Options menu. There are several areas of
interest on this menu.
The first is Buddy List which allows the user to
access their preferences for the Presence application
within the uMobility client software. For more
information on this application, please refer to the
User’s Guide for uMobility Presence.
The next is DND (Do Not Disturb). When turned
OFF, DND takes no action. When turned ON, DND
will instruct the uMC that the user does not wish to be
disturbed and all inbound calls to the user’s uMobility
number will be sent to the appropriate voicemail system.
Log Settings are further described in the Advanced section of this User Guide.
Title: uMobility User’s Guide – Apple iPhoneTM, iPod TouchTM and iPadTM 4.0
Confidential ! 2003-2010 DSM Telecom, Inc. Page 12 of 38The Service Subscription provides the user with the
ability to manage their monthly subscription to the
uMobility service. This allows the user to opt in for the
next month’s service
if that is how DSM
Telecom has
arranged for use of
the uMobility client
software.
If the Service
Subscription
information is not yet
known to the client
software, the
message screen on
the left will be displayed. Otherwise, the
screenshot on the right will be shown (this
example shows a user who has an Unlimited
Subscription provided for their service).
Speed Dial List allows the user to store up to 10
speed dial numbers. Tapping on one of the entry
fields brings up the iPhone’s keyboard. Next, tap
the .?123 button in the lower left-hand side to
change the keyboard to enable numeric typing. If
the user wants to add a Speed Dial entry from the
Contacts on the device, tap the Contacts button in
the upper right-hand side of the screen. This
action will bring up the Contacts list – scroll and
tap to find the desired contact, tap that choice
which brings up the contact’s information and tap
again on the phone number for that contact that is
desired as a Speed Dial entry. The user is then
returned to the Speed Dial List menu with the
phone number requested inserted in the appropriate
entry point.
Title: uMobility User’s Guide – Apple iPhoneTM, iPod TouchTM and iPadTM 4.0
Confidential ! 2003-2010 DSM Telecom, Inc. Page 13 of 38To use the Speed Dial function, select the KeyPad choice from the
Options menu bar to bring up the dialing pad. Enter the number of the
Speed Dial (e.g., 3) entry and the tap Call. The Speed Dial entry is
converted to the full number and the call is placed according to the
user’s instructions.
Device Mobility List is a unique feature on the
uMobility client. This feature allows the user to
move a call from the iPhone to another number
(device) that the user’s service can contact. An
example would be someone coming home, on a
uMobility call on their iPhone and they want to
move the call without redialing to the phone in the
kitchen. The user could engage the Device
Mobility feature from the uMobility client by
pressing the Move button on the feature pad while
in an active call.
Select the number from the Device Mobility List
to begin the process of moving the call from the
iPhone to the requested device/number. Once an
entry has been selected, the message Moving Call
will appear on the bottom of the screen. The
requested device will then ring with an incoming
call. When the user answers that device, the call
will cease to be heard on the iPhone and the
conversation can continued on the new device.
If the user wishes to retrieve the call and place it
back on the iPhone (say in the example the user
wants to leave the house but take the call with them), tap on the Retrieve Call icon
that appears at the top of the uMobility client. The call will cease to be heard on the
2nd device and the called party will again be heard on the iPhone using the uMobility
client.
Preferred Call Routing (PCR) is a feature that allows the user to state per phone
number how the uMobility client should process the call, specifically which
personality to use in placing the call (aka either use the uMobility number or the
native cell phone number) and in turn which network to use to place the call. For
example, if a user has free mobile to mobile calling to their spouse, it makes
economic sense to have all calls to the spouse’s cellular phone placed using the native
cell phone number over the cellular number.
Title: uMobility User’s Guide – Apple iPhoneTM, iPod TouchTM and iPadTM 4.0
Confidential ! 2003-2010 DSM Telecom, Inc. Page 14 of 38To add a phone number to the PCR list, tap the grayed entry area to
bring up the keyboard. Tap the .?123 in the
lower left-hand corner to change the keyboard
from alpha to numeric. After entering the desired
digits, Tap the Done button in the lower right-
hand corner. The keyboard will then disappear,
allowing the user to Tap the Add button, upon
which the uMobility client screen will ask the
user to select this personality to use for this
phone number under all circumstances. Tap the
correct choice (uMobility, Cellular or Cancel)
to complete the transaction.
PCR can be Enabled (On), Disabled (Off) or
Remove on Call. Any of these three options can
be selected by tapping on the respective screen
area. Enabled will engage the instructions in the
user’s PCR list for all calls. Disabled will ignore
those same instructions while Disabled is
highlighted. Remove on Call will delete the respective PCR entry when that number
is called the next time by the user.
Moving back to the Panel Menu along the bottom, Call Logs displays a list of All or
Missed call activity. This list can be cleared by press the Clear button in the upper
right-hand corner of the menu. Note that only dialed and received numbers from the
uMobility application will be shown in this list.
Contacts takes the user to the Contacts list on the iPhone.
Keypad brings the KeyPad back to the main screen.
Pressing Voicemail automatically dials out to the preprogrammed
voice mailbox of the iPhone. If a new voicemail indication is received
from the uMC then this is displayed with an icon
• Network Error Message – If the uMobility client encounters a network problem
while registering with the network presently available, any descriptive error
messages will be briefly displayed in this area. As soon as the host network or
user resolves the issue, the
error message will be
removed.
Title: uMobility User’s Guide – Apple iPhoneTM, iPod TouchTM and iPadTM 4.0
Confidential ! 2003-2010 DSM Telecom, Inc. Page 15 of 38Making a Call With uMobility
In order to originate a call, the user needs to dial
the desired number using the keypad and then tap
on the Call Button. In the case where the ‘Always
Prompt’ option has been selected, the user will
next be presented with an option of routing the
call via the uMobility personality or the Cellular
personality.
Once the personality is selected (either by
configuration or menu choice as in the example
above), the call is request is placed with the
provider’s network. At that time the uMobility
client screen is changed to the one on the right-
hand side, noting the phone number called and
text below highlighting the call’s progress (in the
picture case, “Calling”). Tapping the red End
Call button at the bottom of the screen will end
the current call, whether in process (e.g., set-up)
or progress (e.g., connected).
Receiving a Call with uMobility
With the introduction of Apple’s iOS4 operating system, the iPhone now allows
background processing, which is a way of saying the iPhone can keep several programs
open at the same time even if only one is displayed at a time. uMobility is able to take
advantage of this new capability, which means that the way an incoming phone call has
several options depending upon what the iPhone is doing at the time.
Receiving a Call in Sleep Mode
There are a number of ways the iPhone can be put in Sleep Mode, from allowing the
Auto-Lock feature to engage the Sleep Mode (See Settings->General->Auto-Lock) to
pressing the power button on top of the device and hearing a “click” sound. Regardless
Title: uMobility User’s Guide – Apple iPhoneTM, iPod TouchTM and iPadTM 4.0
Confidential ! 2003-2010 DSM Telecom, Inc. Page 16 of 38of the method used, the iPhone is rendered in Sleep
Mode to save battery, inhibit “wallet dialing” and the
like.
When the iPhone has a blank screen and an inbound
call to the uMobility number is received, the screen
will light up, showing a uMobility message with
information about the incoming call. To answer the
call, swipe a finger across the “slide to answer”
message at the bottom of the screen. The phone will
leave Sleep Mode and the mid-call dialing menu will
be displayed, providing the uMobility access to the
various Mute, Hold, Transfer, etc. features supported
by DSM Telecom.
Receiving a Call While Using the iPhone
If the uMobility user is working on the iPhone and an
incoming call is received, the following message is
displayed about the call to the uMobility number and
that message is displayed on top of the active
application, informing the user of the call and
providing a way to ignore the call (Close) or answer
the call (Answer). If the call is ignored (Close), the
phone will continue to ring until the call is intercepted
by the voice mail system. If the call is answered
(Answer), the uMobility user is presented with the
mid-call dialing menu in order to see the inbound
CallerID, invoke other features (e.g., Mute, Transfer)
as well as see the call time for the active call.
Title: uMobility User’s Guide – Apple iPhoneTM, iPod TouchTM and iPadTM 4.0
Confidential ! 2003-2010 DSM Telecom, Inc. Page 17 of 38Receiving a Call While Connected to Wi-Fi
When receiving a call on the uMobility client while
registered in a Wi-Fi network and the uMobility client
is in the foreground, the following screen is
presented. Note the audio level indication, showing
the volume level presently selected for the currently
engaged audio source. Use the Apple device’s
volume buttons to raise or lower the audio source’s
volume during the active call. This setting will be
remembered by the device for the next active call for
that audio source (e.g., speaker phone).
Any of the In Call options mentioned in the next
section become available to the user after the call is
answered.
Note - If the uMobility user is not in a Wi-Fi network,
the native dialer will take the call unless the Voice
over 3G option is turned On via the uMobility
settings.
In Call Options
Once a call has been connected while connected to a
Wi-Fi network (inbound or outbound), the in-call
menu (referred to as the 9-square as there are nine
feature buttons in the mid-call menu) allows the user
to engage a number of in call options, such as put the
call on mute, hold, activate the loudspeaker or access
the keypad for sending DTMF tones. The user can
also access the volume hard keys or the silence ringer
of the phone. Each button works as an on/off switch
for the particular feature. Tapping once engages the
feature (e.g., puts the call on Mute); tapping again
unMutes the call. Note – Mute is a global setting on
the iPhone, meaning if a call is muted and a second
call come in, it will be muted upon answering.
Title: uMobility User’s Guide – Apple iPhoneTM, iPod TouchTM and iPadTM 4.0
Confidential ! 2003-2010 DSM Telecom, Inc. Page 18 of 38Simply Tap the Mute square to begin the second conversation.
The following identifies each in call options and gives a brief description on its operation.
Please note that specific functions of some of these in call capabilities are dependent
upon the type of call manger engaged.
Announce Transfer – this allows the user to transfer an active call to a third party. This
in call capability can be used when the iPhone user wishes to announce the transfer to the
3rd party before leaving the call.
Move – this feature engages Device Mobility and is described in detail in the previous
section.
Blind Transfer – this allows the user to transfer an active call without speaking to the 3rd
party.
Mute – this key mutes the call, turning off the device’s microphone until deactivated.
Keypad – this selection brings up the 10-digit keypad for the user.
Audio Source – tapping the Audio Source button allows the user to select which of the
available audio sources (e.g., Speaker, iPhone, Bluetooth headset) to use during the active
call. The audio source can be changed as many times as desired during the active call.
Note – when using the speaker phone choice it is strongly encouraged that Echo
Cancellation be turned On (see Settings -> uMobility -> (Desired) Profile ->Advanced
Settings to engage this feature).
Add Call - tapping this selection allows the user to put the first call on Hold, bringing up
the uMobility dialer to make a 2nd call (Note – if the user has selected Always Ask in the
uMobility settings, Add Call will still default to the uMobility dialer for the second call).
Engaging this feature brings up the call capability, Swap (allowing the user to move from
the first call to the second and back again). Swap can be used as many times as necessary
to accomplish the objective. See Advanced Options for more information on this
feature’s operation.
Hold – tapping this selection allows the user to place the call on hold so that another
action can be taken (e.g., placing a 2nd call to consult with another party, then return to
the first call to address the issue). See Add Call for additional information.
DND – Do Not Disturb will tell the uMC to send all incoming calls directed to the
uMobility number directly to the enterprise voicemail system.
Title: uMobility User’s Guide – Apple iPhoneTM, iPod TouchTM and iPadTM 4.0
Confidential ! 2003-2010 DSM Telecom, Inc. Page 19 of 38Moving Calls Between Networks (Handoff)
The uMobility solution has the ability to move active calls from Wi-Fi to cellular
networks as well as from cellular to Wi-Fi networks. This section will describe each of
these unique activities along with screen shots experienced during the process to give the
user an understanding of this functionality.
Wi-Fi to Cellular
In this example, the uMobility user has registered the
client through a Wi-Fi network and is presently on
an active call with the home. Since the client is in an
active call, the in call options menu appears on the
screen (9-square displayed).
If the uMobility solution determines for whatever
reason that the Wi-Fi network’s performance is no
longer sufficient to support the call (e.g., the user is
leaving the
building and
the resulting
call quality
begins to
suffer),
uMobility will
have created a
“make before
break” call to the cell phone number of the
uMobility-enabled device. The result of this
behind-the-scenes activity is an inbound call that
appears on the iPhone’s screen. An example screen
shot is provided here (see right) – NOTE – the
calling number of this inbound call will show the
number of the user’s PBX or the actual number of
the user. This number presented will help the
iPhone user to know this call is actually a hand-off
and to answer the call to change the active network.
The user should press the Answer button provided to move the call from the Wi-Fi
network over to the cellular network. NOTE – if the user presses the Decline button at
this time, the call will remain on the Wi-Fi network, the uMobility client application will
Title: uMobility User’s Guide – Apple iPhoneTM, iPod TouchTM and iPadTM 4.0
Confidential ! 2003-2010 DSM Telecom, Inc. Page 20 of 38reappear and the uMobility service will attempt to use the Wi-Fi network for as long as
possible given current network conditions. Also note that if the user Declines the
inbound call, but remains in the active call, uMobility may try again to move the call over
to the cellular network as described.
The call is now being carried by the cellular network.
If the user comes back in to a valid Wi-Fi network,
uMobility (still running in the background thanks to
the additional capabilities of iOS4) will recognize the
additional network availability and provide the prompt
to engage the process to move the active call from the
cellular network back to the Wi-Fi network.
Click on Activate to
bring uMobility up the
uMobility application.
Upon tapping
uMobility, the screen
changes into the one of
the immediate right,
which is the uMobility
client with a new green
status and information
bar on top. If the user desires to return the call’s interface
control back to the
native dialer, tapping
anywhere on the green
bar will remove the
uMobility client and
return the native
iPhone dialer to the
foreground. If the
client has been able to confirm that the Wi-Fi network
is capable of accepting a voice call, the time from the
HO WiFi call notification and the actual hand-off may
not allow the user any time at all to tap Activate. In
either case, the call resumes on the new Wi-Fi
network.
With the uMobility client now in the foreground, the
reader will notice that the screen shot example shows
the uMobility client is Registered. This means the
Title: uMobility User’s Guide – Apple iPhoneTM, iPod TouchTM and iPadTM 4.0
Confidential ! 2003-2010 DSM Telecom, Inc. Page 21 of 38client has found a valid Wi-Fi network, has received an IP address and has communicated
back to the network-based uMC of its present location and situation. The uMC will then
work with the client to see if the Wi-Fi network’s performance is sufficient to provide
voice grade quality of service and allow the active call to be moved from the cellular
network to the available Wi-Fi network.
If the Wi-Fi network is determined to be able to support the active call with a sufficient
quality of service, the green bar disappears and the entire uMobility client application
screen returns to the foreground. The reader will notice that the call timer (top center of
the screen right under the called party’s name) has returned and starts counting from
00:00. This occurs because this Wi-Fi-based call is a new call, having been handed the
connection from the cellular network. As a new call, the timer begins afresh for the
user’s information.
Cellular to Wi-Fi
When a uMobility call is placed while in a cellular
network, the native cellular dialer is called up and
used to place the call. If, however, the uMobility
user moves within range of a qualified Wi-Fi
network, the client software will register with the
network and offer the ability to move the call to the
Wi-Fi network.
The user taps the
Active button to
bring the
uMobility
application into
the foreground of
the device. Once
that is
accomplished,
the uMobility
dial pad appears, along with a green information ribbon
across the top of the screen (see screen shot on the
right). If the user touches this green ribbon, the native
dialer will return to the foreground and allow the user
to end the call if desired.
Title: uMobility User’s Guide – Apple iPhoneTM, iPod TouchTM and iPadTM 4.0
Confidential ! 2003-2010 DSM Telecom, Inc. Page 22 of 38If no action is taken, the user will be able to watch the registration process come to
conclusion (Registered). At that time, the uMobility client will test the Wi-Fi network for
its readiness for voice communications. If the communication between the client and the
uMobility Controller in the network agree, the call will be moved over to the Wi-Fi
network.
Title: uMobility User’s Guide – Apple iPhoneTM, iPod TouchTM and iPadTM 4.0
Confidential ! 2003-2010 DSM Telecom, Inc. Page 23 of 38Advanced Options With uMobility
Transfer a Call With uMobility
The uMobility client application provides the user with the ability to transfer a call to
another number. This section outlines the steps necessary to engage this feature. The
Announce Transfer and Blind Transfer work the same (depending upon the Call Manager
in the service path) from the iPhone’s perspective. The difference is that Announce
Transfer allows the iPhone user to speak to the 3rd party before completing the transfer,
Blind Transfer does not..
Once a call has been connected (either inbound or
outbound), the in-call menu allows the user to transfer
an active call to a third party of the user’s choosing.
Tapping the Announce or Blind Transfer icon
provides the user with the screen to transfer the call.
Press Blind
Transfer
Title: uMobility User’s Guide – Apple iPhoneTM, iPod TouchTM and iPadTM 4.0
Confidential ! 2003-2010 DSM Telecom, Inc. Page 24 of 38Dial the third party number
The uMobility user now has the Transfer screen
displayed on the device (notice the change in color
and the presentation of the dial pad). From this
screen, the user can now dial the desired third party’s
number to which to transfer the call.
To engage the outbound dialing, the user then taps the
Transfer icon at the bottom of the keypad.
Press Transfer to dial
Title: uMobility User’s Guide – Apple iPhoneTM, iPod TouchTM and iPadTM 4.0
Confidential ! 2003-2010 DSM Telecom, Inc. Page 25 of 38After the user taps the Transfer icon, the screen
changes the one to the immediate left, notifying the
user that the transfer request is being processed.
Processing Request is displayed
Call Disconnected is
displayed after the
Transfer is completed
.
When Transfer is done, the first user will be disconnected.
Title: uMobility User’s Guide – Apple iPhoneTM, iPod TouchTM and iPadTM 4.0
Confidential ! 2003-2010 DSM Telecom, Inc. Page 26 of 38.
Upon completion, the uMobility dial pad is
returned to the screen and the call has been
transferred to its desired destination.
Title: uMobility User’s Guide – Apple iPhoneTM, iPod TouchTM and iPadTM 4.0
Confidential ! 2003-2010 DSM Telecom, Inc. Page 27 of 38Add Call With uMobility
Once a call has been connected (inbound or outbound), the in-call menu allows the user
to Add Call. This action will place the first call on Hold and allow the uMobility user to
consult with a second caller, ending that call and returning to the first call.
Tap the Add Call icon will display the menu screen
that allows the user to create another call, engaging
two separate conversations with the same device.
From this screen, the user is able to enter in the dialed
digits of the additional called party that the user
wishes to call.
The user taps the key pad to enter in the phone number
of the desired party.
Tap Add Call
Dial new number
Title: uMobility User’s Guide – Apple iPhoneTM, iPod TouchTM and iPadTM 4.0
Confidential ! 2003-2010 DSM Telecom, Inc. Page 28 of 38The screen updates, showing the user the message icon Calling which is displayed in the
upper right-hand corner. The first active called party is placed on Hold (see screen shot
below).
Press Swap
The requested call to Added Call number is
completed. Both calls are active, the first on Hold, the
second active (hence the counter increments the
passing seconds as reflected in the screen shot to the
left). To connect to the first called party tap Swap.
Title: uMobility User’s Guide – Apple iPhoneTM, iPod TouchTM and iPadTM 4.0
Confidential ! 2003-2010 DSM Telecom, Inc. Page 29 of 38The line is now connected to the original called party and the second user is placed on
Hold. The top of menu displayed on the device is updated to reflect the current status of
each call, as identified by the number of the party (in the screen shot below, extension
8112 and 8114 are both represented by active calls).
To talk to the second user press Swap.
First User is the
active call
The second user has
been placed on Hold
Press Swap to move
between active calls
Title: uMobility User’s Guide – Apple iPhoneTM, iPod TouchTM and iPadTM 4.0
Confidential ! 2003-2010 DSM Telecom, Inc. Page 30 of 38Manual Configuration
The uMobility client settings can be reached by
selecting the Settings icon on the Jump Screen (home
screen). Depending upon the user’s device, the
uMobility settings icon will appear at the very bottom
of the available list.
Tapping on the uMobility icon from the Settings
menu will reveal three profiles shown in the screen
shot to the right.
Each of these profiles contains the necessary settings
to enable uMobility to register under these profile or
“personality” settings. Said another way, the use of
Profiles allows the uMobility application to be easily
configured with a Work number, a Home number and
an “Other” number as a 3rd choice. The following
section will outline the settings within the Home
profile. Note the Work and Other profile store the
same settings information for their respective phone
numbers.
Title: uMobility User’s Guide – Apple iPhoneTM, iPod TouchTM and iPadTM 4.0
Confidential ! 2003-2010 DSM Telecom, Inc. Page 31 of 38The Home Profile contains four sections of
information needed for uMobility to function
properly. Normally, these items are provided by the
OTA (Over the Air) provisioning process. NOTE – if
required to provisioning a Profile manually, take care
to make correct entries in each of these sections as
uMobility will not function correctly without correct
settings.
The first section in the Home Profile is the Account
itself. DSM Telecom will provide the information
needed for this an all sections in the Work Profile.
Under Server Address, enter the provided Account
settings as demonstrated in the screenshot on the right
hand side. If the server SIP port is different than the
standard 5060 port number then enter the server
address as “IP Address:[Port]”.
User ID. Authentication Name and Password are the credentials that will be used by
the iPhone’s uMobility client to register with the network and provide the uMobility
service. The Display Name is local to the application itself. The Server Address and
Domain are references to the network location of the uMobility Controller (uMC)
managed by the carrier operator or enterprise system administrator.
Title: uMobility User’s Guide – Apple iPhoneTM, iPod TouchTM and iPadTM 4.0
Confidential ! 2003-2010 DSM Telecom, Inc. Page 32 of 38Next, scroll down until the entire General section is
visible on the device’s screen. The information
requested in the General Settings tab should be
entered as demonstrated in screenshot to the left.
Cell Number should be entered without ‘+’ and is the
cell phone number of the iPhone device (Note – no
entry for the iPod Touch or iPad is needed here as
these devices do not have cellular voice network
capabilities). The uMC Pilot number is the phone
number of the uMobility Controller run by the
network operator.
The Select Network provides three options for the
behavior of the application:
• Always prompt – every time a phone number
is dialed, uMobility will ask whether to use the
uMobility or the cell phone personality
(CNAM, CLID).
• uMobility – each and every call placed from the iPhone will use the uMobility
calling name (CNAM) and line ID (CLID)
• Cellular – each and every call placed from the iPhone will use the cellular calling
name and line ID.
Signaling over 3G allows the iPhone to use the data channel of the iPhone’s cellular
service plan to send and receive signaling information related to the service. The most
notable user experience while this setting is turned On will be visibility to voice mail
messages in the Enterprise voice mail system even though the device is not connected to
a Wi-Fi network.
VoIP over 3G allows the user to complete voice calls using the data network provided by
the cellular operator. It should be noted that the data network is not necessarily designed
for voice communications and may give sub-standard call performance. If this is the
case, turning this setting to OFF will prohibit the uMobility client from placing calls in
this manner.
Title: uMobility User’s Guide – Apple iPhoneTM, iPod TouchTM and iPadTM 4.0
Confidential ! 2003-2010 DSM Telecom, Inc. Page 33 of 38The next section, Enterprise Voicemail Settings,
contains the settings necessary to enable easy
access to the enterprise voicemail server. Tap to
enter in the phone number of the voicemail system
in the field Enterprise Voicemail # 9024426060.
If the user desires, the password for the account
can be entered in the field entitled Voicemail
Password.
The last section in the Home Profile stores the
settings to access the cellular voicemail box.
Enter these settings as desired.
Advanced
Settings –
Tapping Advanced Settings will provide the user
with another menu layer that provides for a number of
additional options in configuring the uMobility
application.
Echo Cancellation – The iPhone’s cellular
application contains an ability to cancel out echo that
is introduced while talking on the phone. This echo is
created by the speaker while playing sounds (e.g.,
voice conversation), which in turn causes the glass to
vibrate on the touch screen. This combination of
events occurs when on a Wi-Fi call as well, but the
native echo cancellation capabilities are not available
during a Wi-Fi based service. Therefore, echo
cancellation capabilities have been added to the
uMobility client. When this capability is turned On,
the uMobility client will clean up the echo introduced by the device (a combination of
acoustic and hybrid echo) will provide a much clearer voice conversation to be enjoyed
by those on the active call.
Keep Alive Time (Sec) – This setting should only be changed under the advice of DSM
Telecom. This setting determines how often a keep alive message is sent to the uMC.
Keep Alive messages are used in IP communications to maintain communications contact
between two network elements.
Title: uMobility User’s Guide – Apple iPhoneTM, iPod TouchTM and iPadTM 4.0
Confidential ! 2003-2010 DSM Telecom, Inc. Page 34 of 38Keep Alive Type - The default of this setting is UDP
(User Data Packet). The alternative is SIP OPTION. This
setting should not be changed by the user unless instructed
to by DSM Telecom. This setting determines what type
of protocol is used by the client to communicate Keep
Alive messages to the uMC.
Notifications – This setting determines whether the user
will received APNS (Apple Push Notification Service)
messages before or after a network handoff. On means
APNS messages will be received by the client and
displayed on the screen for the user’s action. Off means
APNS notifications will not be sent to the client. Please
note – if Notifications are turned off but the handoff
feature is turned on, handoffs will occur as determined by
the current network conditions, but the APNS
notifications will not be displayed and since the uMobility client will not be in the
foreground, subsequent handoffs will not occur.
uMobility Client Note – This note will appear the
first time the uMobility application is launched. If the
user taps OK after reading the message, that message
will reappear every time the client application is
launched. If the user taps Do not show this message
again, the setting slider in the Advanced Settings will
be set to Off and the message will not reappear until
the setting slider is turned back to the On position.
Signaling Transport refers to the signaling method to
be used by the uMobility client (UDP and TCP).
When completed, tap the Home Profile icon in the upper left-hand side of the screen to
return to the previous menu, and then tap uMobility again in the upper left-hand side of
Title: uMobility User’s Guide – Apple iPhoneTM, iPod TouchTM and iPadTM 4.0
Confidential ! 2003-2010 DSM Telecom, Inc. Page 35 of 38the screen to return to the uMobility settings main menu as seen in the screen shot on the
left below.
To switch between profiles, tap Select Profile to gain access to the Select Profile
window as shown by the screen shot on the right below. Tap the desired profile to
activate, which will place a check-mark next to the selected Profile. The Profile with the
check-mark will be the used by the uMobility client application the next time it is run
from the Jump Screen.
Title: uMobility User’s Guide – Apple iPhoneTM, iPod TouchTM and iPadTM 4.0
Confidential ! 2003-2010 DSM Telecom, Inc. Page 36 of 38Uninstalling uMobility
To uninstall uMobility from the iPhone, complete the following steps:
1. Press the Home button to return to the main screen.
2. Scroll through the main menu pages until the uMobility icon is seen.
3. Tap and Hold the uMobility icon until it starts to quiver.
4. Tap the red X on the upper left-hand side of the uMobility icon.
5. Select Yes to confirm the deletion of the application.
To uninstall uMobility from the computer through iTunes (PC or Mac), complete the
following steps:
1. Launch iTunes
2. Plus the iPhone into the computer
3. Once iTunes recognizes the iPhone, select the iPhone from the menu list on the
left-hand side of the screen
4. Click on the Applications tab
5. Left click on the uMobility application
6. Scroll to delete and click to select
7. Confirm the deletion of the uMobility application
8. Click on the Summary tab to return to the main report on the attached iPhone
9. Click on Sync in the lower right-hand side of the screen.
10. The application will be removed from the iPhone when the sync process
completes.
Title: uMobility User’s Guide – Apple iPhoneTM, iPod TouchTM and iPadTM 4.0
Confidential ! 2003-2010 DSM Telecom, Inc. Page 37 of 38Log Settings
Log Settings allows the uMobility client software to
collect information about the network, user actions,
network responses and the like. These logs are
collected on the device and can then be forwarded
by the client to the FTP (File Transfer Protocol)
server of DSM Telecom. These logs are used in
assisting the technical support staff in
troubleshooting issues with the service or software.
This section of the uMobility client should not be
used unless instructed to do so by the technical
support staff.
Configuring iPhone to Work with a Wi-Fi Network
The iPhone is predisposed to work with any available Wi-Fi network that it can find.
This section will quickly review the available options. For more information, please
consult the iPhone User’s Guide provided with the iPhone.
Select the Settings icon from the home screen on the iPhone. The next screen that
appears will offer up all of the general settings categories for the device. Tapping Wi-Fi
opens up the Wi-Fi Networks settings menu. This menu allows the user to see all
available information for the currently available Wi-Fi network by tapping on the entries
under Choose a Network…
Title: uMobility User’s Guide – Apple iPhoneTM, iPod TouchTM and iPadTM 4.0
Confidential ! 2003-2010 DSM Telecom, Inc. Page 38 of 38You can also read