Getting Started Guide - AN INTRODUCTION TO QUICKBOOKS ONLINE - Intuit
←
→
Page content transcription
If your browser does not render page correctly, please read the page content below
AN INTRODUCTION TO QUICKBOOKS ONLINE

Getting Started Guide
Copyright

Copyright 2015 Intuit Ltd.
All rights reserved.

Intuit Australia
Intuit Australia is a company registered in Australia - ABN 28 163 072 704.

Trademarks

©2015 Intuit Inc. All rights reserved. Intuit the Intuit logo, Lacerte, ProAdvisor,
ProSeries and QuickBooks, among others, are trademarks or registered trademarks of
Intuit Inc. in the United States and other countries. Other parties’ marks are the
property of their respective owners.

Version: 2.0

Notice to Readers

The publications distributed by Intuit, Inc. are intended to assist accounting
professionals in their practices by providing current and accurate information. However,
no assurance is given that the information is comprehensive in its coverage or that it is
suitable in dealing with a client’s particular situation. Accordingly, the information
provided should not be relied upon as a substitute for independent research. Intuit, Inc.
does not render any accounting, legal, or other professional advice nor does it have any
responsibility for updating or revising any information presented herein. Intuit, Inc.
cannot warrant that the material contained herein will continue to be accurate nor that it
is completely free of errors when published. Readers should verify statements before
relying on them.
Getting Started Guide                                                                                Table of Contents

TABLE OF CONTENTS
Introduction to QuickBooks Online .................................................................... 3

Case Study ......................................................................................................... 4

Setting up QuickBooks Online ............................................................................ 5

Navigating QuickBooks Online ......................................................................... 11

Take the QuickBooks Online Tour .......................................................................... 11

Take the QuickBooks Online ipad/iphone Tour......................................................... 14

Company Setup ................................................................................................ 18

Company Settings ............................................................................................... 18

Manage Users ..................................................................................................... 19

Multiple Currencies .............................................................................................. 22

Importing Your Data ........................................................................................ 23

Customers .......................................................................................................... 24

Suppliers ............................................................................................................ 26

Chart of Accounts ................................................................................................ 26

Products/Services................................................................................................ 26

Downloading Transactions: Linking your Bank Accounts .................................. 28

Linking your Bank Accounts or Credit Cards for Automatic Bank Feeds ....................... 29

Importing your Bank Transactions ......................................................................... 31

Setting up Bank Rules.......................................................................................... 32

Creating and managing Quotes ........................................................................ 34

Creating Quotes .................................................................................................. 34

Creating and Sending Quotes on a ipad/iphone ....................................................... 35

Creating and Managing Invoices ...................................................................... 37

Creating Invoices ................................................................................................ 37

Managing Invoices............................................................................................... 38

Creating Invoices on a ipad/iphone ........................................................................ 39

Customising Invoices ........................................................................................... 40

                                                                                                                        1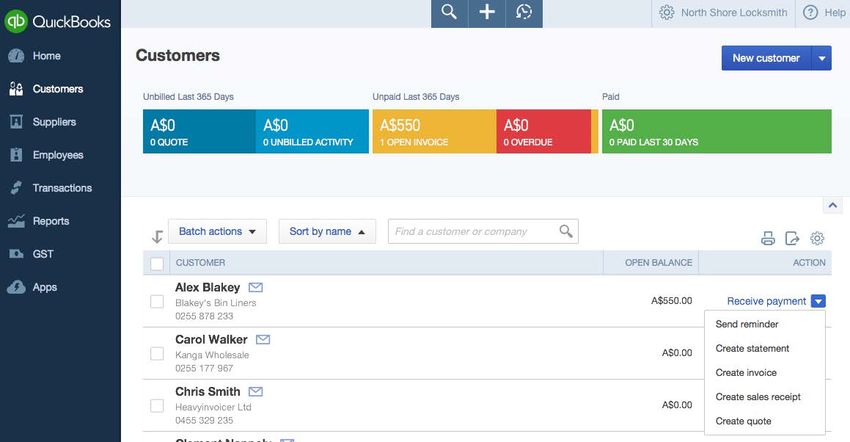
Getting Started Guide                                                                                   Table of Contents

Receiving Payment ........................................................................................... 42

Accept payments with PayPal app .................................................................... 44

Before installing the PayPal App you need to .......................................................... 44

Install the PayPal App .......................................................................................... 45

Configure the PayPal App ..................................................................................... 47

Manage the PayPal App settings ............................................................................ 51

Sending an invoice and receiving payment ............................................................. 51

What your Customer sees .................................................................................... 54

Expense and Transfer entries ................................................................................ 56

Reconciling the PayPal Bank account ..................................................................... 57

Organise and Track Expenses ........................................................................... 59

Expense Transactions .......................................................................................... 59

Bills ................................................................................................................... 61

Other Types of Supplier Related Transactions ......................................................... 61

Capturing Expenses on a ipad/iphone .................................................................... 62

Managing Bills .................................................................................................... 63

Running Reports .............................................................................................. 65

Profit & Loss / Balance Sheet ................................................................................ 65

Automated Reports.............................................................................................. 65

Customising Reports ............................................................................................ 67

Run reports on a ipad/iphone................................................................................ 69

Audit Log .......................................................................................................... 70

QuickBooks Online Payroll ............................................................................... 71

Getting Support ................................................................................................ 81

Providing Feedback .......................................................................................... 82

                                                                                                                           2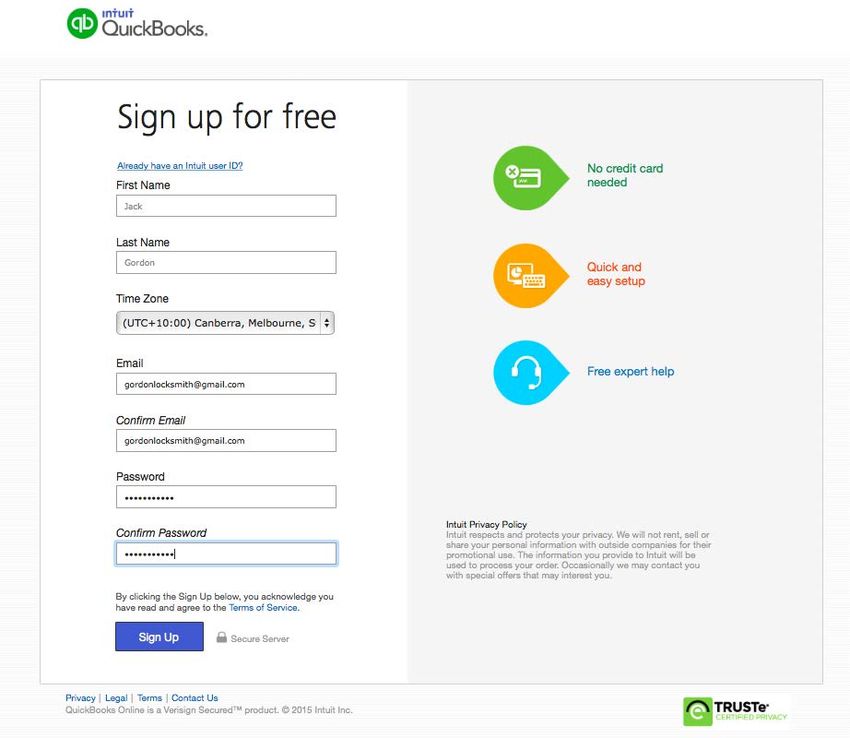
Getting Started Guide                                                              Company Setup

INTRODUCTION TO QUICKBOOKS ONLINE

QuickBooks Online is easy to use software designed for small business accounting. It lets your
business track all of your income, expenses, and inventory. It automatically tracks your GST
and lets you manage your business payroll.

QuickBooks Online Accountant offers a new way of supporting and managing your business and
may change the way that you run your consulting, bookkeeping or accounting practice.
QuickBooks Online Accountant lets you easily work with and manage your business using
QuickBooks Online.

QuickBooks Online is cloud-based software.

    •   Secure - hosted securely by Intuit using bank level security
    •   Accessibility - anywhere, anytime access using an internet connection.
    •   Data entry automation – get data into QuickBooks automatically using awesome
        features
    •   Unlimited Accountant Access – easy to connect with your accountant
    •   Mobile – businesses can access QuickBooks Online using their iOS or Android devices.
        No more being tied to the desktop, enter data when and where you are
    •   No Desktop files – no desktop files are required so no backups are required

Other training resources can be found here:

Videos: https://www.youtube.com/user/QuickBooksAustralia

FAQs: http://www.intuit.com.au/quickbooks-online/faq/

                                                                                                 3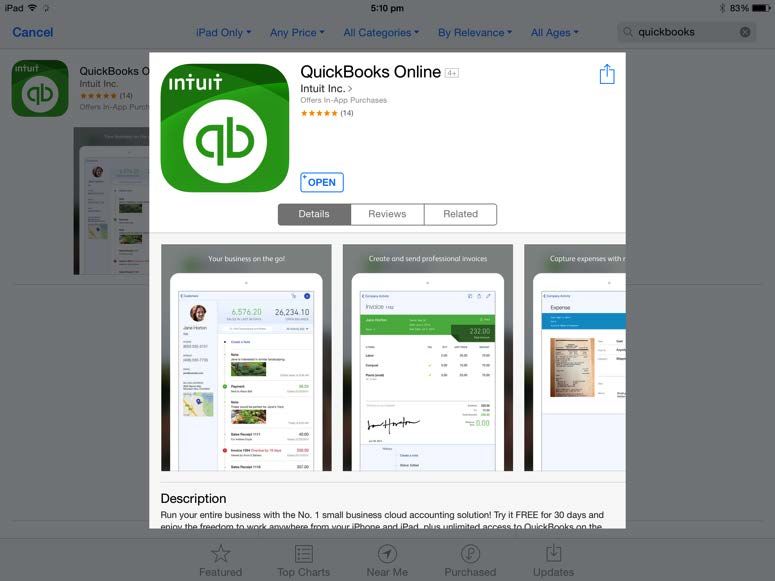
Getting Started Guide                                                               Company Setup

CASE STUDY
Introduction

This story is about a new small business called North Shore Locksmith

                                    Jack Gordon, owner of North Shore Locksmith is a
                                    Locksmith by trade. Jack has been working as an
                                    apprentice contractor for 5 years and loves his job as a
                                    locksmith.

                                    He has always dreamed of starting his own business. His
                                    mates and family have given him lots of encouragement to
                                    get out on his own and start their new business.

                                    After months of planning, Jack has decided that now is the
                                    right time to start his new business. Jack has done his
                                    research and there aren’t many locksmiths providing
                                    services in the North Shore. It is a great place to start a
                                    business.

                                    Jack is going to purchase a few assets like a professional
                                    Ryobi drilling machine, drill sets, padlock tools, key blanks,
                                    etc.

After a reference from his bookkeeper Jack decided to sign-up to QuickBooks Online to keep on
top of his books. To keep costs low, Jack will run the company on his own until he feels
comfortable hiring his first subcontractor.

To get started Jack is visiting his bookkeeper to help him get setup to manage his own books.

                                                                                                4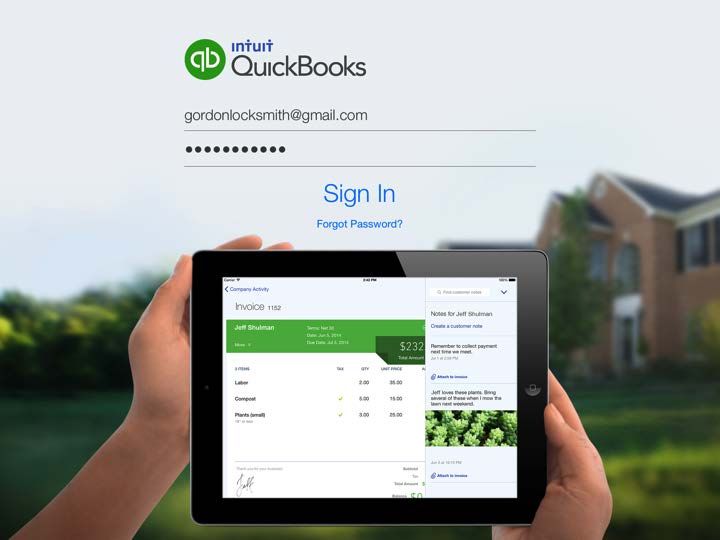
Getting Started Guide                                                                Company Setup

SETTING UP QUICKBOOKS ONLINE
QuickBooks Online is easy to setup and get going. It is so simple that you can have a business
file setup in less than 20 minutes.

There are several important steps to follow to make sure that you are setting up business files
efficiently and accurately.

Objectives

After completing this chapter you should be able to:

    •   Setup a business file
    •   Setup basic settings
    •   Setup basic accounts
    •   Import list information

Company File Setup

There are several important steps to setup your company file. Getting setup correctly will also
help you and your Bookkeeper or Accountant stay compliant with GST and payroll taxes.

The day has finally arrived for Jack to start his new business, North Shore Locksmith. There is a
lot to do, like setting up his business, leasing equipment and getting his systems setup to
handle his new customers.

Subscribing to QuickBooks Online

In order to use QuickBooks Online your business or you must subscribe to the software. Your
business can subscribe by visiting intuit.com.au and signing up for a free trial. Your accountant
can setup a business file from the QuickBooks Online Accountant.

Setup your Business File

You can setup QuickBooks Online for your business with the free trial.

    1. Visit intuit.com.au
    2. Click Free Trial option
    3. Enter your details and click Sign-up

                                                                                                    5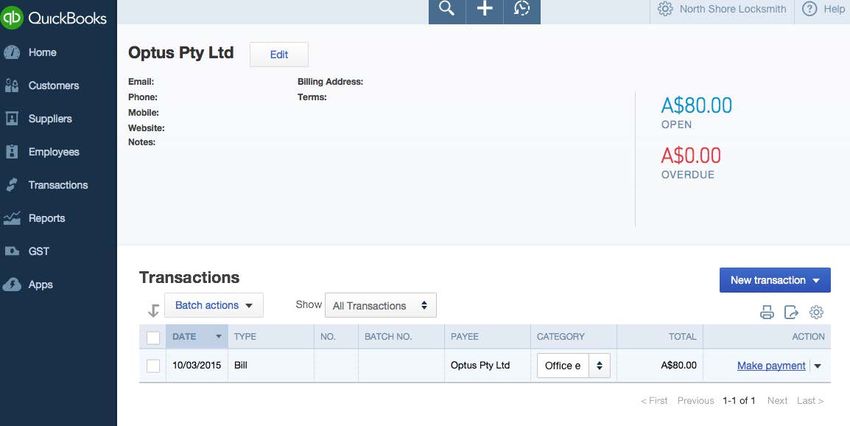
Getting Started Guide                                                       Company Setup

    4. Enter your business information as listed below.
          o Enter the company information including Company Name, Address and contact
              information
          o Click Save and Next.

                                                                                        6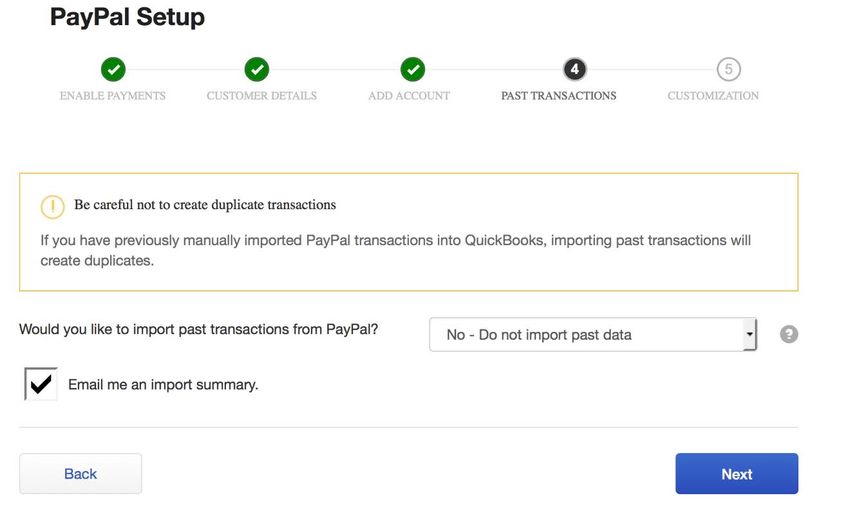
Getting Started Guide                                                                   Company Setup

    5. In the Set Up QuickBooks step, QuickBooks Online asks for more information about your
       business company. It compares your business’s business type with other companies
       using QuickBooks Online and optimizes the setup for you.

        Jack is a locksmith so you can enter Locksmith

            •    In the Your Industry field, enter Locksmith. A long list of industry types appear
            •    Choose Locksmith Services

                                                                                                     7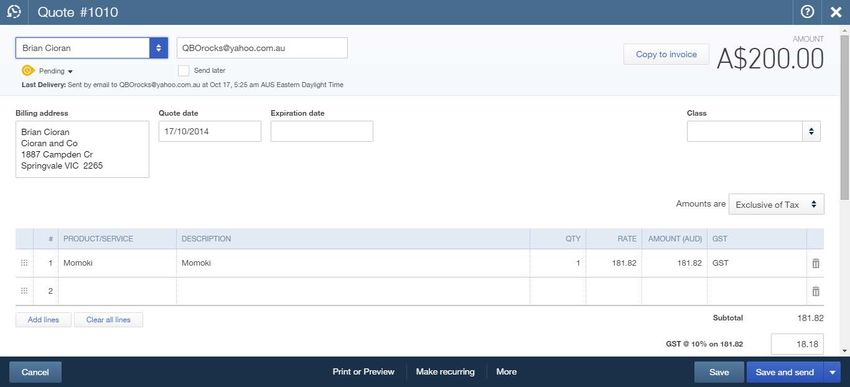
Getting Started Guide                                                                Company Setup

    6. The next field lets you tell QuickBooks Online what your business sells. QuickBooks
       Online can track the sale of products, services and other types of sales. Jack plans to sell
       products and services so select “products and services” option.

    7. The next step is to choose the Company Type. North Shore Locksmith will be setup as a
       sole trader. This is not a required field, but you can choose the type of organization that
       you are setting up.

    8. The next step is a question that asks; Do you want to import from QuickBooks for
       Windows or MYOB? North Shore Locksmith is a start-up business so they do not need to
       import data from another source.

                                                                                                 8
Getting Started Guide Company Setup
9. The last step is to tell QuickBooks Online about your business’s preferred payment methods.
Select all the methods that apply. North Shore Locksmith will accept several different payment
methods. Select Cash, Cheque, Credit card/debit card, Bank Transfer and PayPal.
10. Click Save and Next.
9Getting Started Guide Company Setup
QuickBooks Online completes the basic setup of your business’s QuickBooks Online company
file. The results of the setup are displayed in a graph. The graph displays information about
businesses like yours using QuickBooks Online. In the right hand column of the Set Up
QuickBooks window, you see a list of features and transactions that QuickBooks Online has
enabled for your business.
North Shore Locksmith is now setup! This completes the basic setup.
11. Click Save and next to complete the setup and go to the Home window.
10Getting Started Guide Company Setup
NAVIGATING QUICKBOOKS ONLINE
QuickBooks Online (QBO) has been designed to be intuitive, fast and simple to use. The ‘click
and go’ navigation makes it easy for you to find what you need quickly so you spend less time
doing your books and more time doing what you love. The user interface is simple and unified
across all products and contains fewer secondary menus, which results in fewer clicks to find
the desired information or functions.
NOTE: QuickBooks Online works best in a Chrome browser, but it also works with
Internet Explorer 10, Safari 6 or Firefox. It’s useful to bookmark your login page and
memorize your login username so it’s easy to login anytime on your same computer, tablet
or laptop device.
TAKE THE QUICKBOOKS ONLINE TOUR
Sign into QuickBooks Online at intuit.com.au.
Enter your QuickBooks Online User ID and password and select Sign In.
11Getting Started Guide Company Setup
The Home Page displays a summary of key information and provides links to quick tips to
help you get the most out of QuickBooks Online.
The Company setting is located in the top right corner of your QuickBooks Online screen,
and is accessed by clicking on the gears icon.
To access the Help function, click on the question mark next to the company menu in the
top right corner.
12Getting Started Guide Company Setup
The Global Navigation in the center of the screen gives you quick access to:
• Search – Use this feature to quickly look up QuickBooks Online transactions by
transaction number, date, or dollar amount. The Advanced Search feature allows you
to combine your search terms.
• Quick Create – Use this feature to quickly access the four key transaction types.
Clicking on Show More expands the list to include all the available transactions.
• Recent Transactions – Use this feature to display a list of your recently recorded
transactions, each of which can be opened by clicking on the selection.
13Getting Started Guide Company Setup
The left-hand navigation bar provides access to your lists and all primary transactions.
Home – Home Page
Customers – Use this to create, import, edit and delete
customers, Customer Money Bar shows the flow of money into the
business
Suppliers – Use this to create, import, edit and delete Suppliers,
Supplier Money Bar shows you flow of money out of the business.
Employees – Use this to create, edit and delete employees. You
can also activate payroll from here
Transactions – This is a shortcut to the following: banking, sales,
expenses and Chat of Accounts
Reports – This menu has four options: Recommended, Frequently
Run, My Custom Reports and All Reports
GST – From the GST Centre, you can activate your GST tracking,
create new taxes and tax groups, complete a BAS, view related
reports, tax rates and record GST payments
Apps – Access featured applications and add-ons to QuickBooks
Online from this page.
TAKE THE QUICKBOOKS ONLINE IPAD/IPHONE TOUR
QuickBooks Online works with iPhone, iPad, and Android devices; you can have access to your
business information, customers or suppliers wherever you have mobile access.
MANAGE YOUR BUSINESS ANYWHERE
• Create and send professional invoices and quotes.
• Snap photos of your receipts and organise daily expenses as you go.
• Convert a quote to an invoice in seconds.
• Attach photos and notes to quotes, invoices, customers, and transactions.
• Receive overdue invoice notifications so you always know who owes you money.
• Track payments and record sales.
• Profit & Loss and Balance Sheet reports show how your business is doing.
• Customise tax rates for your business
14Getting Started Guide Company Setup
1. You can download the free QuickBooks Online mobile app (specific to iPhone, iPad, or
Android) from the iTunes store or Google Play. You can then simply login using your
QuickBooks Online username and password.
2. Use your QuickBooks Online login credentials to sign-in to the app
3. The navigation on the iPad app is similar to QBO on the browser. There is a left and right
hand side panel of options available by selecting the menu and plus buttons on the top
left and right hand side of the screens respectively. For the iPhone the plus sign is at the
bottom of the screen.
15Getting Started Guide Company Setup
Left hand side panel on iPad:
Right hand side panel on iPad:
16Getting Started Guide Company Setup
Left hand side panel on iPhone Right hand side panel on iPhone
17Getting Started Guide Company Setup
COMPANY SETUP
The Company Settings feature is designed to allow you to customize QuickBooks Online to your
specific business requirements and uses.
It’s important to define your Company Settings before you enter or upload transactions, so that
your entries are uniform. Your settings can always be modified or changed based on your needs
after the initial setup is completed.
NOTE: The features and screen captures shown here are those available in QuickBooks
Online Plus. Some features are not available in QuickBooks Online Simple Start or
Essentials.
COMPANY SETTINGS
Company Settings are accessed by selecting the gear icon or company name in the top right
corner of the screen.
18Getting Started Guide Company Setup
You can edit any of the company settings by clicking on the option and making your change.
Once complete, click Done to update your information.
MANAGE USERS
You can give other users access to QuickBooks Online by selecting Manage Users in the Your
Company section of the Company menu.
19Getting Started Guide Company Setup
To set up new users, select New in the upper right side of the screen. You will be asked to
enter the name and email address. When you create a new user, you can restrict or expand
access as follows:
An email invitation with a link to your company file is sent automatically to anyone who you
invite. New users must accept the invitation to gain access to your company file.
20Getting Started Guide Company Setup
QuickBooks Online users can invite up to two accounting professionals (for example, a
bookkeeper and an accountant) to access their QuickBooks Online data for free, in all versions
of QBO (SimpleStart, Essentials or Plus).
To invite your accountant and/or bookkeeper to have access to your QBO data:
Select Manage Users in the Company menu.
Select Invite Accountant at the bottom of the screen.
Enter the accounting professional’s name and email address. This action will generate an
email invitation, which includes a unique link to accept and gain access to your QuickBooks
Online data using QBO Accountant.
21Getting Started Guide Company Setup
MULTIPLE CURRENCIES
If you do business with foreign suppliers and/or customers, QuickBooks Online can be set up for
multiple currencies. Simply select Currency Centre from the Settings section of the
Company menu.
This will open the Currency Centre. If you would like to activate multi-currency, click the Set up
currencies button. When multicurrency is enabled, any foreign-denominated transaction will
track three values: foreign currency amount, exchange rate, and the equivalent amount
denominated in the home currency, Australian dollars.
QuickBooks Online tracks fluctuating exchange rates, and it also calculates exchange gains and
losses automatically.
22Getting Started Guide Creating and Managing Invoices
IMPORTING YOUR DATA
If you are currently using QuickBooks desktop or another accounting software program, go to
www.intuit.com.au for the latest information on conversion options.
To import a data file:
Go to the Company Gear Icon
Under the Tools heading
Select Import Data.
Then select the type of data you would like to import.
23Getting Started Guide Creating and Managing Invoices
CUSTOMERS
TIP! To save time and insure your data is imported correctly and requires minimal clean-
up, be sure to preview and reformat your data file to match the sample data file (see the
Download a sample file hyperlink).
To import your customer’s data:
Select Customers.
Choose File and browse to select your customer .xls or .csv import file.
Find and highlight the source import file, select Open or double-click on the import file
name to select it.
Once the import file is chosen, select Continue.
Review the fields (columns from import file) to ensure they are matched correctly with
QuickBooks Online fields for Customers.
24Getting Started Guide Creating and Managing Invoices
Note the green checkmark next to fields that QuickBooks Online has matched up with or
mapped to the import file’s columns. If necessary, change the mapping of any field, and
select Continue.
Make any desired or required (signified in red, if any) corrections to the information in the
preview screen and then select the button to Import the records.
NOTE: An Import Summary confirms the number of imported customers.
25Getting Started Guide Creating and Managing Invoices
SUPPLIERS
To import your supplier data into your QuickBooks Online company file, follow the same process
as above. Remember to select Suppliers when specifying the type of data and then pre-format
and select your Supplier xls or csv file accordingly.
CHART OF ACCOUNTS
To import your Chart of Accounts data into your QuickBooks Online company file, follow the
same process as above. Remember to select Chart of Accounts when specifying the type of
data and then pre-format and select your Chart of Accounts .xlsx or .csv file accordingly.
NOTE: It is important to import the Chart of Accounts data before importing the
Product/Services data to insure your Product/Services data falls into the correct accounts and
will minimize the need to reclassify or reassign your data after importing.
PRODUCTS/SERVICES
Products and Services are generally imported last, and as noted above, they can only be
imported after the Chart of Accounts is set up. Please contact you Pro Advisor to set-up your
Chart of Accounts.
The procedure for importing Products and Services is similar to that of importing Customers and
Suppliers.
Again, match the fields and make any required changes to the mapping, click Continue.
26Getting Started Guide Creating and Managing Invoices
Make any desired or required (in red) changes and import the records.
As with all imported lists, the Import Summary confirms the number of imported products
and services.
27Getting Started Guide Creating and Managing Invoices
DOWNLOADING TRANSACTIONS:
LINKING YOUR BANK ACCOUNTS
You can save time and reduce errors by downloading your transactions directly from your bank
and credit card accounts from a secure online connection.
Once you have established a secure connection with your bank your transactions will
automatically transfer or “feed” to your QuickBooks Online Company file. Alternatively you can
elect to import your bank transactions manually, by downloading the data from your bank or
credit card and then uploading the data files to your QuickBooks Online account.
If you have set up automatic bank feeds, transactions are securely imported into the
Downloaded Transactions feature automatically.
Once these transactions have been imported, QuickBooks Online will instruct you to do the
following:
• Automatically match these imported transactions with a transaction you have already
recorded
• Record as a new transaction by allocating it to an account and a payee’s name
• Recall how you managed a similar transaction previously. It will suggest to allocate it to the
same account and payee again
28Getting Started Guide Creating and Managing Invoices
LINKING YOUR BANK ACCOUNTS OR CREDIT CARDS
FOR AUTOMATIC BANK FEEDS
1. From the left-hand navigation bar select Transactions, then Banking.
2. Locate your financial institution by selecting it from the list or by typing its name and
clicking Find.
3. Enter your user name and password to enable QuickBooks Online to automatically download
your account transactions directly into your QuickBooks Online account.
NOTE: If your bank or financial institution is not listed or if you prefer not to have your
bank account linked, you may also download your transactions from your bank in a csv
format and then upload them into QuickBooks Online manually.
29Getting Started Guide Creating and Managing Invoices
4. Once connected, tick the bank accounts you want to connect to QuickBooks Online then
choose the Account type from the QuickBooks Account drop down list provided.
5. Click on Connect to download the transactions
6. Once your transactions are securely downloaded, click “I’m done, let’s go”.
30Getting Started Guide Creating and Managing Invoices
IMPORTING YOUR BANK TRANSACTIONS
An alternative to linking your bank accounts is to import bank transactions you have
downloaded from your online banking system.
1. To do this, select Transactions then Banking and File Upload.
Browse to locate the file to upload. Select Next.
From the drop-down list of accounts in QuickBooks Online, select the appropriate bank
account to which the file’s transactions are to be compared and uploaded and choose
Save.
A message will appear indicating that your bank data has been saved.
Click Finish.
31Getting Started Guide Creating and Managing Invoices
SETTING UP BANK RULES
Bank Rules allows greater control of bank transactions as they are added to the QBO Company.
Bank Rules can be defined via Money In or Money Out and the bank account the transaction it
relates to (if you have more than one bank account). The transactions can be identified using
separate conditions using Description, Bank Text, or Amount using the logic of Contains, Is
Exactly or Doesn’t contain. You can add up to five separate conditions allowing you to drill
down in identifying specific types of transactions.
Once the Bank Rule has identified the transaction you are able to allocate the Payee, Categorize
it, apply a tax code, or apply a class and/or Location. In addition you can add a memo to the
transaction.
Create a new Bank Rule
1. Once in the Transaction Banking screen click on the upside down arrow next to Update.
Select Manage Bank Rule
2. In the new window click on the box in the top right called New Rule
3. Enter a rule name, call it OfficeWorks
4. Select if this is for Money In or Money Out transactions, set it as Money Out
5. Select the banks account the rule will relate to, choose NAB Business Banking
6. Select the appropriate conditions to meet the rule. Set as Description Contains
Officeworks
7. Then select the appropriate actions. Set Payee as Officeworks, Category as Office
Supplies, and Tax Code as GST on Non Capital. At this stage you do have the option to
split the transaction if you wish.
8. Optionally choose a Location and/or Memo. Set memo to read “Added via Officeworks
Bank Rules”
How to Match Transactions
In the New Transactions section you will find all the downloaded or imported Transactions. To
accept a Matched transaction click on the Match button at the end of the row under the Action
column.
You can also Split a transaction to allocate it against multiple categories.
32Getting Started Guide Creating and Managing Invoices
How to Add Transactions
In the New Transactions section you will find all the downloaded or imported Transactions. To
add a transaction click on the transaction which will allow you to allocate the type of transaction,
the customer or supplier, the category, GST, the class, or the location, as well as add a memo to
the transaction
How to accept multiple transactions in batches
To accept multiple transactions at the same time select the transactions you wish to action (either
select individual transaction by clicking the tick box at the left, or select the tick box at the top to
select all transactions), and then under batch actions select Accept Selected.
Other batch actions include:
o Exclude Select – Transactions will be excluded and not imported into
QuickBooks online.
o Modify Selected – Allows you to modify multiple transactions all at once.
33Getting Started Guide Creating and Managing Invoices
CREATING AND MANAGING QUOTES
Quotes are easy to create and customise in QuickBooks Online. Before you create your first
quote, double check your company is set up to account for GST, quantities, custom transactions
and multi-currency.
CREATING QUOTES
Quotes can be easily accessed from the Create or Quick Create menu.
To create an invoice:
1. Go to the Quick Create at the top of the QuickBooks Online screen or via the left-hand
navigation panel.
2. In the Quick Create window, select Quote.
Complete the on-screen quote, including selecting a customer, with the desired date, quote
number, whether amounts are tax inclusive/exclusive/out of scope of GST, Products and
Services of your choosing, the quantity, description and rate for each.
34Getting Started Guide Creating and Managing Invoices
Add more lines, if needed. Complete any other desired fields, such as the Discount or add a
message to be displayed on the quote.
If necessary, attach a document or any file by clicking on Attachments in the bottom left
corner of the form. This can be used to store related documents for future references. Files
sizes can go up to 25MB each.
Select Save and Send to email your customer their quote, click Save and Close to simply
save the quote and return to the homepage or select Save and New to save the quote and
create a new one.
Once the customer agrees to your quote use the “copy to invoice” feature to convert the
quote into an invoice. See highlighted cell in the above image.
CREATING AND SENDING QUOTES ON A IPAD/IPHONE
1. To create an quotes on an iPad/iPhone tap the plus sign and select quotes
2. Choose the customer, enter the relevant details for the quote and send the quote on the
spot to your customer via email
35Getting Started Guide Creating and Managing Invoices
36Getting Started Guide Creating and Managing Invoices
CREATING AND MANAGING INVOICES
CREATING INVOICES
Invoices can be easily accessed from the Create or Quick Create menu.
To create an invoice:
Go to the Quick Create at the top of the QuickBooks Online screen or via the left-hand
navigation panel.
In the Quick Create window, select Invoice.
Complete the on-screen invoice, including selecting a customer, with the desired date,
invoice number, whether amounts are tax inclusive/exclusive/out of scope of GST, Products
and Services of your choosing, the quantity, description and rate of each, and the GST code.
Add more lines, if needed. Complete any other desired fields, such as the Discount or
add a message to be displayed on the invoice.
37Getting Started Guide Creating and Managing Invoices
If necessary, attach a document or any file by clicking on Attachments in the bottom
left corner of the form. This can be used to store related documents for future
references. Files sizes can go up to 25MB each.
Select Save and Send to email your customer their invoice, click Save and Close to
simply save the invoice and return to the homepage or select Save and New to save
the invoice and create a new one.
MANAGING INVOICES
Open invoices can be found using the Search and Recent Transactions functions, as well
as by running reports, but most often will be found in the Customer Centre by selecting
Customers from the left-hand navigation bar.
In the Customer Centre, choose Open Invoices from the Money bar to locate the
customer you wish to record the payment for. QuickBooks Online will always offer the next
logical step for this type of transaction. In this case, it is suggesting for you to receive
payment for that customer. Choose Receive payment.
Alternatively, the original invoice can be opened by clicking on the hyperlink in the listing, and
then Receive payment can be selected at the top of the invoice.
Invoices, whether open or paid, can also be found by selecting Transactions Sales from the
left-hand navigation bar.
38Getting Started Guide Creating and Managing Invoices
CREATING INVOICES ON A IPAD/IPHONE
To create an invoice on an iPad/iPhone tap the plus sign and select invoice
Choose the customer, enter the relevant details for the invoice and send the invoice on
the spot to your customer via email
39Getting Started Guide Creating and Managing Invoices
CUSTOMISING INVOICES
You can customise your invoices to look how you want them including adding a logo, editing the
font and more. This can be done by going to the Company Gears Icon Company Settings
Sales Customise Customise Look and Feel.
40Getting Started Guide Creating and Managing Invoices
You can choose a template and accent colour, upload your logo, and specify columns, header,
footer and more. This same customization window can be accessed at the bottom of an invoice
by selecting Customise at the bottom of the invoice form.
Tip: To copy invoices or creating recurring invoices use the functions at the bottom of an
existing invoice.
41Getting Started Guide Organise and Track Expenses
RECEIVING PAYMENT
To receive a payment:
Go to the Quick Create at the top of the QuickBooks Online screen or via the left-
hand navigation panel.
In the Quick Create window, select Receive Payment.
On the receive payment screen start by selecting the customer name
Then complete the payment method field, reference no. (if any), Deposit to (bank
account) and select the invoices you are receiving payment towards
Complete the full or partial payment amounts in the Payment fields
If necessary, attach a document or any file by clicking on Attachments in the bottom
left corner of the form. This can be used to store related documents for future
references. Files sizes can go up to 25MB each.
Click on the Print option at the bottom of the “Receive Payment” page to print the
payment to send a hard copy of the payment receipt. Seen images below.
Click “Save and Send” to send over email.
The other option to receive payment is by selecting the customer from the left navigation
bar and click on the “Open Invoices” on the money bar.
Select the invoice you have received payment for and click on “receive payment”
42Getting Started Guide Organise and Track Expenses
43Getting Started Guide Organise and Track Expenses
ACCEPT PAYMENTS WITH PAYPAL APP
Intuit QuickBooks Online is enabling businesses to accept online invoice payments from their
customers in an easy and convenient way by partnering with PayPal Australia Pty Ltd.
Not only will the app allow for the processing of online payments, it will automatically import
the data from the linked PayPal account into the QuickBooks Online file.
What this means is that the PayPal app will REPLACE the need for using bank feeds connected
to a PayPal account. If bank feeds for PayPal are already turned on, then prior to connecting up
the PayPal App, the bank feeds need to be disabled. This will avoid any duplication of entries.
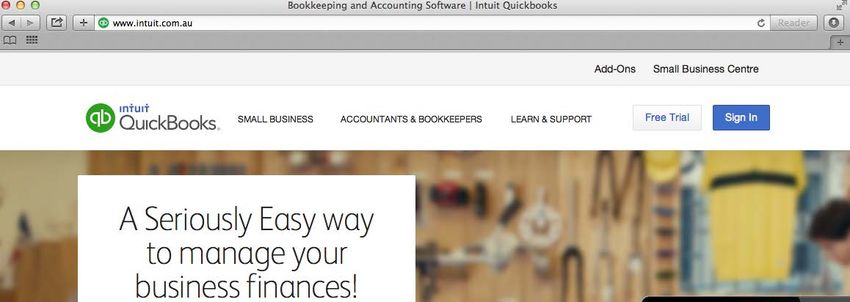
The app can be accessed by going to the Intuit App website, apps.com
Be sure to select the Regional setting as Australia, then search for PayPal. Click on the PayPal
link.
The video link under ‘About’ provides a great overview of the app setup process and
capabilities.
BEFORE INSTALLING THE PAYPAL APP YOU NEED TO
• Have access as administrator to the QuickBooks Online file
• A PayPal business account.
A personal account can be connected, but must be upgraded to PayPal Premier or
Business in order to enable online invoice payments.
• To disable any existing PayPal bank feeds.
NOTE: 1) Only one PayPal account can be connected up to one QuickBooks Online file at a time.
2) If bank feeds are reconnected to PayPal, then the app sync process will stop as a
precaution against duplications.
44Getting Started Guide Organise and Track Expenses
INSTALL THE PAYPAL APP
1. Once in the PayPal section of apps.com, Click Get App Now
2. When prompted click on Sign In to QuickBooks Online using your existing credentials.
3. If there are multiple files connected to the QBO login, the business to which the app is to
be installed in needs to be selected. A business with only the one file will be automatically
transferred through to Step 4.
45Getting Started Guide Organise and Track Expenses
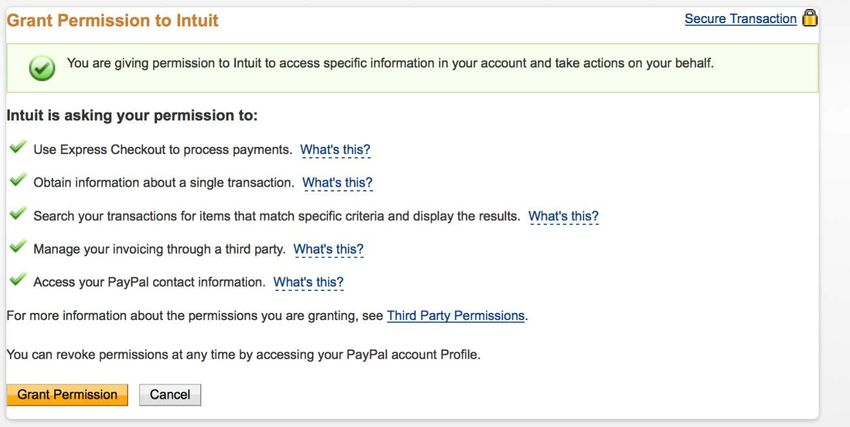
4. Click Authorize to allow the Accept Payments with PayPal App to integrate with the
selected QuickBooks Online company file.
5. Log into your PayPal account in order to give permission to the Accept Payments with
PayPal App to integrate with your PayPal account.
46Getting Started Guide Organise and Track Expenses
6. Click Grant Permission to allow Intuit and PayPal to work together.
CONFIGURE THE PAYPAL APP
Now that the app is installed and connected to the required QuickBooks Online file, the setup
process needs to be completed.
There are 5 simple steps to follow.
47Getting Started Guide Organise and Track Expenses
1. Enable Customer Payments - Select Yes to allow customers to pay the invoice by Visa,
MasterCard, American Express or their own PayPal account.
2. Import Customer Details - Select Yes to import in customer details from PayPal.
Select No to not import in any Customer details.
3. PayPal Bank setup in QuickBooks - PayPal will create a default Bank type account in the
Chart of Accounts called PayPal Bank. This account can be used or if there is an existing
PayPal account already in the Chart of Accounts, this can be selected from the drop down list.
48Getting Started Guide Organise and Track Expenses
4. Importing in past data - Up to 18 months of past data transactions can be imported in at
this time. However, if there is an existing PayPal account in the file, and this account has
already been reconciled, then select No – Do not import past data in order to avoid
duplications.
5. Account selection for transaction imports - Three accounts can be configured
1) Sales Transactions
2) PayPal fees
3) GST coding on Sales
PayPal creates the accounts PayPal Income and PayPal Fees by default.
Sales Transactions – when the PayPal account is used not only for accepting customer
payments, but also for other income activity, the PayPal sales will be imported to QuickBooks
Online as Sales Receipts with line detail. The income received is processed against the PayPal
Income account.
49Getting Started Guide Organise and Track Expenses
PayPal Fees – PayPal fees are extracted out of the income received and are entered in
QuickBooks Online as an expense. By default they will associate with the PayPal fees account
and be processed as GST-free.
GST coding on Sales – The GST code selected as default will determine the GST coding on
Sales receipt entries.
Once satisfied with the account configuration, Continue to review.
Take a moment to review the preference selection prior to making the final acceptance.
50Getting Started Guide Organise and Track Expenses
Click Connect to finish setting up the app.
The Accept Payments with PayPal app is now set up.
Transactions will be imported from your PayPal account into your QuickBooks Online account.
If Invoice Payments has been enabled then you will now also be able to send invoices with a
Pay Now button.
MANAGE THE PAYPAL APP SETTINGS
The Accept Payments with PayPal App can be configured at any time by selecting the Apps tab
in your Company file and clicking on the My Apps tab
SENDING AN INVOICE AND RECEIVING PAYMENT
To ensure that invoices are enabled to be sent as Online Invoices, check that the Company
Settings are configured correctly.
Company Settings> Sales> Online Delivery
Make sure Online Delivery is selected under Email options for invoices.
51Getting Started Guide Organise and Track Expenses
To create a Payments enabled invoice, open an existing invoice or create a new invoice.
The invoice now displays with an additional field for Online Payment.
In order to send an invoice with the Pay now feature, the PayPal checkbox must be selected.
Invoices can be sent without the Pay now option, simply by unselecting the checkbox.
52Getting Started Guide Organise and Track Expenses
Complete the invoice and click Save and Send
Then Send and Close to send the invoice.
The Send email screen allows another chance to modify the online payment selection, if
needed.
53Getting Started Guide Organise and Track Expenses
WHAT YOUR CUSTOMER SEES
Your customer will receive an email with a link to view their online invoice.
Clicking on View Invoice will open the invoice in a web browser. The invoice can also be
opened on any mobile device. Once opened, a Pay now button is available.
54Getting Started Guide Organise and Track Expenses
Clicking on the Pay now button will go to a new
screen where the Customer will be asked to select to
either pay with a card or to sign into their PayPal
account.
All payments are processed with total security.
55Getting Started Guide Organise and Track Expenses
EXPENSE AND TRANSFER ENTRIES
Expenses – If the PayPal account is used to pay for other Expense transactions, these
transactions are also imported into QuickBooks Online. As the system does not know what the
expense is for, each expense entry is posted to a default expense account – PayPal
Uncategorised Expense.
NOTE: These expenses will need to be manually edited to show the correct expense
categorisation.
The expense entry will be added to the PayPal Bank account as an expense transaction.
Transfers – When money is transferred out of PayPal to the nominated PayPal transfer
account the bank deposit entry will be show up in the bank feeds as a deposit from PayPal.
To process this entry, select Transfer and select the PayPal Bank Account.
Create a Bank Rule to process future deposits received from PayPal.
56Getting Started Guide Organise and Track Expenses
RECONCILING THE PAYPAL BANK ACCOUNT
When the customer pays the online invoice, a payment will be created in QuickBooks Online,
deducting the amount of the payment against the outstanding balance of the invoice.
The app will post any updates to your QuickBooks Online account automatically. The payment
update can occur within 15 minutes of payment being received.
Initially, the payment will register against the Undeposited Funds account. However, this
will automatically change to the preferred account based on the app settings, PayPal Bank
by default.
The Reference no. field will be updated with the PayPal transaction ID.
57Getting Started Guide Organise and Track Expenses
A list of payments made using online invoicing, can be reviewed under Transactions > Sales list.
Click the settings cog and enable the Source Column. Payments made through online
invoicing will have a source of EInvoice, and a Payment Method of PayPal.
The payment and the PayPal fee will both show in the PayPal Bank account as separate line
entries.
58Getting Started Guide Organise and Track Expenses
ORGANISE AND TRACK EXPENSES
EXPENSE TRANSACTIONS
To enter an expense transaction, select Quick Create (then select Show More to see
all options), and then under Suppliers select Expense.
In the Expense window itself, select the account the expense was paid from such as
petty cash, a bank account or credit card account.
Complete the detail of the expense transaction including the payee, the reference
number, the date, whether the amounts are tax inclusive/exclusive/out of the scope of
GST, etc.
Define the expense by allocating it to the relevant account (if using general ledger
accounts) and/or item details (if using products and services, which are in turn linked to
general ledger accounts).
Any additional fields such as a Memo can be completed, and you can also choose to add
an Attachment (copy of the expense) for this expense. Click Save and Close or Save
and New.
59Getting Started Guide Organise and Track Expenses
If necessary, attach a document or any file by clicking on Attachments in the bottom
left corner of the form. This can be used to store related documents for future
references. Files sizes can go up to 25MB each.
The Expense transaction can also be accessed from the Transactions menu in the left-hand
navigation bar, by selecting the Expense submenu and then selecting Create New Expense
in the top right corner.
60Getting Started Guide Organise and Track Expenses
BILLS
Bills, available in QuickBooks Online Essentials and Plus, can be accessed in the Quick Create
menu, under Suppliers. This is the quickest route to accessing bills, but they can also be
accessed via the left-hand navigation bar from the Suppliers tab or the Transactions tab in
the Expense submenu.
OTHER TYPES OF SUPPLIER RELATED TRANSACTIONS
Supplier Credit, Credit Card Credit, and Purchase Order can be accessed in the Suppliers
section of the Quick Create menu. Purchase orders are also accessible from the Transactions
Expense tab of the left-hand navigation bar by selecting Create New at the top right and
then selecting Purchase Order.
61Getting Started Guide Organise and Track Expenses
CAPTURING EXPENSES ON A IPAD/IPHONE
1. To create an expense on an iPad/iPhone tap the plus sign and select expense
2. If you have an printed invoice handy take a photo of it and attach it to the expense so
need to keep hard copies
3. Enter the relevant details for the expense and save
62Getting Started Guide Organise and Track Expenses
MANAGING BILLS
Open bills can be found by using the Search and Recent Transactions functions, as well
as by running reports, but most often will be found in the Supplier Centre by selecting
Suppliers from the left-hand navigation bar.
In the Supplier Centre, select the unpaid section of the Money bar and then Make
payment for that supplier.
Or, the original bill can be opened by clicking on the hyperlink in the listing, and then
Make payment can be selected at the top of the bill.
Bills, whether open or paid, can also be found by selecting Transactions Expenses from the
left-hand navigation bar.
63Getting Started Guide Organise and Track Expenses
Tip: To copy expenses or creating recurring expenses use the
functions at the bottom of an existing invoice. See above.
64Getting Started Guide Going Mobile
RUNNING REPORTS
To access Reports, click on Reports in the left-hand navigation bar.
Scroll your mouse over each report’s listing to view a sample preview of the layout.
You can run the report immediately by clicking on it or you can customise it first before the
report initially appears by clicking on the customise link.
You can also search for a particular report by typing any part of the report name in the Search
field.
PROFIT & LOSS / BALANCE SHEET
The two most frequently produced reports are the Profit & Loss and Balance Sheet. They are
found at the top of the Recommended and All Reports sections of the Report Centre. Any
reports you run regularly will be listed in the Frequently Run section for easy access.
AUTOMATED REPORTS
Using QuickBooks Online, you can have reports automatically sent by email to yourself and
others at regular times (e.g. 1st of the month).
Any customised reports can be saved as part of a Report Group.
65Getting Started Guide Going Mobile
A Report Group can contain one or more reports. Highlighting the Report Group in My
Custom Reports and selecting Edit will open the Report Group Settings window for this group,
where the email settings are created.
66Getting Started Guide Going Mobile
Here, the recipient(s) are specified, along with the subject line and the text of the email. The
report(s) can be set to be attached as Excel files, and the schedule of the email of the reports
can be set as well. The recipients do not have to be QuickBooks Online users and QuickBooks
Online does not even have to be running for these reports to be sent on schedule.
CUSTOMISING REPORTS
You can customise a report, even when it is already on the screen, by selecting Customise in
the top left corner of the report.
Depending on the specific report, a number of areas are available to customise. These are
grouped into key areas including: general, rows/columns, lists/numbers, and header/footer.
67Getting Started Guide Going Mobile
After customising a specific report, select Run Report to display it with your changes.
Your reports can be displayed on screen, printed, emailed and even exported to Excel.
Selecting Email will send the report to the recipient(s) you specify, with a subject line and a
note. The report will appear both as an attachment and in the body of the email.
Exporting reports to Excel lets you make further modifications if desired. Reports exported to
Excel are provided with the relevant formulas.
You can save your customised report by selecting Save Customisations at the top of the
report. Your report will be saved in the My Custom Reports section of the Report Centre,
making it easy to access in the future.
68Getting Started Guide Going Mobile
RUN REPORTS ON A IPAD/IPHONE
Keep a finger on the pulse of your business with running reports from your iPhone/iPad. Select
reports option from your left hand side navigation menu to run the P&L report.
69Getting Started Guide Going Mobile
AUDIT LOG
The audit log feature allows you to keep a track of all activity – transactions, logons, changes to
settings, anything that is done within QBO.
1. Click on the company settings tab and select Audit Log under the Tools section
2. The audit log captures the date of activity, user, event, name of customer/supplier, date of
the transaction like a payment, amount and a full history of what occurred giving you full
visibility of your account
70Getting Started Guide Getting Support
QUICKBOOKS ONLINE PAYROLL
One of the most useful features in QBO is payroll. Our payroll application is a fully featured
payroll solution and powered by KeyPay who are one of our ecosystem partners. Payroll is easy
to use and also offers employees a self-service portal to download payslips, change their details
and apply for leave. KeyPay also is SuperStream compliant and automates quarterly super
payments.
To setup payroll
1. In the Navigation pane on the left hand side click Employees.
2. Towards the top right of the screen click on Turn on Payroll
3. Fill out the mandatory fields
a. Name (leave as what is pre-populated)
b. ABN
c. Contact Name
d. Contact Email Address (leave as what is pre-populated)
e. Standard Hours per day
f. How often do you process pay rums?
N.B. The Standard Hours Per day is used help predict leave liability and to report on leave
liability, it is also used when employees apply for leave.
71Getting Started Guide Getting Support
4. Also choose whether to allow my employees to edit their details through the
self-service portal.
Setup Employees
Once you have setup Payroll the next step is to setup the employees. There are two options you
can setup the employees individually or do a bulk upload via a CSV files.
To setup a Single Employee
1. To setup a Single Employee on the main payroll screen click on Add Employee
72Getting Started Guide Getting Support
2. Enter the Tax File Number, click Next
3. In the New Employee Details screen you must enter
a. Start Date
b. First Name
c. Surname
d. Date of Birth
e. Residential Address
f. Residential Suburb
g. Postal Details (if different from Residential Details.)
Click Next
4. When on Tax File Declaration screen select the Employment Type as Full Time.
Click Next
N.B. From the information provided in the Tax File Declaration QBO Payroll will determine the
tax scale. Whilst QBO Payroll does not automatically lodge the payroll declaration for you; you
can download a Tax File Declaration report and then upload it to the ATO ECI interface. For the
report to be successful you must leave the Date Reported To ATO field empty.
73Getting Started Guide Getting Support
5. On the Pay Run defaults screen you must set
a. The employee is paid
b. Update the following to the Leave Allowance Template
i. Primary Pay Category (Permanent Ordinary Hours)
ii. Pay Schedule
iii. Primary Location
iv. Notification
Click Next
6. The next screen Locations allows you to setup cost centers to track hours against
different parts of the business. N.B. There is no correlation between Locations in
Quickbooks Online and Locations in QBO Payroll at the moment.
7. Journal entries that are transferred between QBO Payroll and Quickbooks Online do
identify QBO Payroll locations allowing allocation to the correct Location or Class in
Quickbooks Online.
74Getting Started Guide Getting Support
8. The Bank Accounts screen allows you to enter the employee’s bank account details.
You can also split the amount between multiple bank accounts based upon
percentage or fixed amounts.
9. Choose the superannuation fund the employee wishes to pay their superannuation
into, and enter their member fund. Superannuation Fund details can be searched for
by ABN, SPIN or SMSF. You can choose to pay between multiple superannuation
funds based on percentage or fixed amount.
75Getting Started Guide Getting Support
10. If you wish to allow the employee to use the self-service portal click on the Enable Self
Service, enter the employee email address. An account will be created for the employee
and an email sent to them with the details of setting up the password and how to access
the Self Service Portal.
76Getting Started Guide Getting Support
Setup a Pay Run
Once you have setup QBO Payroll and employees, you are ready to create a Pay Run. A Pay Run
only needs to be configured once; it will then automatically run each period as configured.
1. From the main payroll screen click on New Pay Run
2. On the Pay Run screen select the Pay Schedule, enter the date for the Pay Period
Ending and the Date pay run will be paid. Click Create.
77Getting Started Guide Getting Support
3. The next screen will then show you a summary of the pay run including, all employees in
that run, their earnings, tax, and superannuation figures.
4. By clicking on the individual employee line you can expand the details. Here you can see
Leave Accrued and add Notes For This PayRun. In addition by clicking on the Actions
button you can make numerous adjustments, such as Add Earnings, Take Leave, Adjust
PAYG, Adjust Leave and Exclude from pay run.
78Getting Started Guide Getting Support
5. Once you have completed any adjustments you can hide the full details of the employee
by clicking on the summary line at the top. Before you complete the pay run look for any
warnings. To see the details of the warning click on it.
6. In this scenario there is a warning regarding ABA files. QBO Payroll will not automatically
pay your employees, but it can create an ABA that you can upload to your bank to pay
multiple employees at the same time. To setup ABA file click on the warning about ABA
details have not been provided for this business, then click on Fix This. On the ABA Details
screen click on Add.
7. Fill out the required details and click Save. Check for any other warnings and deal with
them appropriately. QBO Payroll will automatically inform you of situations such as when
an employee has requested more leave than they are entitled to.
79You can also read


