Moneris iCT250 Reference Guide
←
→
Page content transcription
If your browser does not render page correctly, please read the page content below

Moneris® iCT250
Reference Guide

                  03/19
Need help?
Web: moneris.com/support-iCT250
    Toll-free: 1-866-319-7450

   Record your Moneris merchant ID here:

  ____________________________________
Contents
Setting Up Your Terminal ..............................................................................................4
  Before you get started ................................................................................................................................5
  Hardware setup..........................................................................................................................................7
    What to do next ................................................................................................................................................11
  Configuring the password for manual card entry protection for the first time ............................................ 12
    What to do next ................................................................................................................................................13
  Communications setup .............................................................................................................................14
    Using dynamic IP ..............................................................................................................................................14
    Using static IP ...................................................................................................................................................14
    Using dial ..........................................................................................................................................................16
    Using dial backup (optional) .............................................................................................................................16
    Setting a dial prefix ...........................................................................................................................................16
    Communications troubleshooting ....................................................................................................................17
  Initialization and logon .............................................................................................................................19
  Additional options ....................................................................................................................................20
    Enabling the external PINpad (if attached) ......................................................................................................20
    Printing the contactless logo on contactless transaction receipts ...................................................................21
    Enabling Tip Entry, Cashback, or Invoice Number ............................................................................................21
    Changing printer options ..................................................................................................................................21
    Changing the terminal language.......................................................................................................................22
    Enabling loyalty and gift cards ..........................................................................................................................22
         Enabling tip entry (gift cards) ....................................................................................................................................... 22
  Enroll in Merchant Direct® ........................................................................................................................23

Using Your Terminal ...................................................................................................24
  Moneris iCT250 ........................................................................................................................................25
   Terminal keys and hardware ............................................................................................................................26
  Optional external PINpad .........................................................................................................................27
    General guidelines for the iPP320 PINpad .......................................................................................................27
  Card types ................................................................................................................................................28
    Magnetic stripe card .........................................................................................................................................28
    Chip card ...........................................................................................................................................................28
    Contactless card ...............................................................................................................................................28
  Cardholder verification .............................................................................................................................29
    Cardholder verification methods (CVM) ..........................................................................................................29
    Cardholder verification limit.............................................................................................................................29
  Card entry options....................................................................................................................................30
    Insert: Chip cards ..............................................................................................................................................30

Moneris® iCT250 Reference Guide                                                                                                                                                  1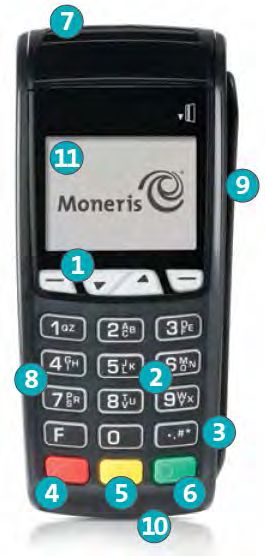
Wave/Tap: Contactless cards ...........................................................................................................................30
Contactless Transaction Limit (CTL) .............................................................................................................................. 31
Swipe: Magnetic stripe cards ...........................................................................................................................31
Manual card entry ............................................................................................................................................31
Transactions .............................................................................................................................................33
General guidelines ............................................................................................................................................33
Admin code shortcuts.......................................................................................................................................33
Purchase [100] ..................................................................................................................................................34
Partially approved Purchase .............................................................................................................................34
Processing single instance card not present transactions................................................................................34
Refund [101] / VOID–Purchase [106] / VOID–Refund [107] ............................................................................35
Pre-Authorization [102] ....................................................................................................................................35
Cheque Authorization [105] .............................................................................................................................35
Advice using Sequence Number [103] / Force Post [103] ................................................................................36
Advice List [109] ...............................................................................................................................................36
Balance Inquiry [110] ........................................................................................................................................37
Prompts without tip entry ................................................................................................................................37
Merchant prompts: Purchases/Pre-Auths/Refunds/Voids ........................................................................................... 37
Merchant prompts: Cheque Authorizations ................................................................................................................. 39
Merchant prompts: Advices/Force Posts ..................................................................................................................... 40
Customer prompts: On the terminal ............................................................................................................................ 43
Customer prompts: On the PINpad .............................................................................................................................. 44
Prompts with tip entry .....................................................................................................................................45
Merchant prompts: Purchase with tip enabled ............................................................................................................ 45
Customer prompts on the terminal: Purchase with tip entry enabled......................................................................... 47
Customer prompts on the PINpad: Purchase with tip enabled .................................................................................... 49
Receipts ...................................................................................................................................................52
Signing credit card receipts ..............................................................................................................................52
Reprinting receipts ...........................................................................................................................................52
Card masking ....................................................................................................................................................52
Contactless transactions...................................................................................................................................53
Receipt samples ................................................................................................................................................53
Pre-Auth receipt sample ............................................................................................................................................... 53
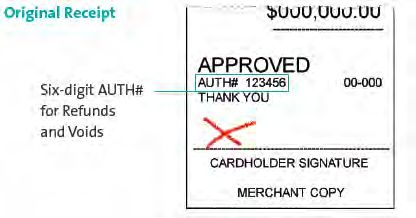
Original receipt sample ................................................................................................................................................. 53
Partial Approval receipt sample.................................................................................................................................... 54
Reports ....................................................................................................................................................55
Masking on reports...........................................................................................................................................55
Reprint merchant receipt [66] ..........................................................................................................................55
Clerk subtotals report [82] ...............................................................................................................................55
Current batch totals report [99] .......................................................................................................................56
Merchant sub-totals report [95].......................................................................................................................56
Pre-auth list [62] ...............................................................................................................................................56
Balance inquiry report [94]...............................................................................................................................56
Configuration report [16] .................................................................................................................................57
Tip totals report [96] ........................................................................................................................................57
Moneris® iCT250 Reference Guide 2
Admin functions .......................................................................................................................................58
    Logon [02] .........................................................................................................................................................58
    Logoff [03] ........................................................................................................................................................58
    Re-initialization [01] .........................................................................................................................................58
  End-of-day process ...................................................................................................................................59
    Merchant close .................................................................................................................................................59
    System close .....................................................................................................................................................60
  Troubleshooting .......................................................................................................................................61
    Error messages .................................................................................................................................................61
    Equipment issues ..............................................................................................................................................65

Merchant Support ......................................................................................................67

Moneris® iCT250 Reference Guide                                                                                                                                         3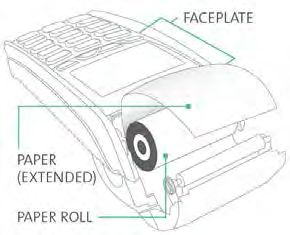
Setting Up Your Terminal

Setting Up
Your
Terminal
In this section, we go over everything you need to
know to set up your Moneris iCT250.
You can also view our setup videos online at
moneris.com/support-iCT250.

Moneris® iCT250 Reference Guide                      4
Before you get started
1. Please confirm that you received all the necessary items in your Welcome Kit.

   1
    If you are setting up the terminal to work as a semi-integrated device with your electronic cash register (ECR), please
   note that the iPP320 PINpad is not supported (i.e., a semi-integrated terminal cannot be used in conjunction with an
   attached iPP320 PINpad).
2. If your terminal will communicate with the Moneris host over high-speed Ethernet, review the Moneris IP
   Readiness Checklist (available at moneris.com/checklist) to ensure that your Ethernet service is ready to
   support your terminal.
3. Make sure you have the following information:

Moneris® iCT250 Reference Guide                                                                                               5
Your 13-digit Moneris Merchant ID (found in your “Important information” email).
Settlement responsibility (found in your Welcome Email): System Close (Moneris closes your batch at
the end of each day) or Merchant Close (you are responsible for closing your batch at the end of each
day).
Optional features e.g. gift cards, loyalty cards, Ernex Terminal ID (found in your Moneris Gift & Loyalty
Welcome letter).
If any of the above required elements are missing, please call Moneris Customer Care toll-free at
1-866-319-7450.
4. Do one of the following:
If you are setting up a standalone terminal (with or without an external iPP320 PINpad): Proceed to
Hardware setup on page 7.
If you are setting up a semi-integrated terminal to work with your electronic cash register (ECR): Refer
to the Moneris iCT250 Semi-Integrated Reference Guide available at moneris.com/support-iCT250, and
follow the instructions in the “Important: Read first” section of that guide.
Moneris® iCT250 Reference Guide 6
Hardware setup
Follow these instructions to set up your terminal hardware. If your location does not have Ethernet networking,
skip to step 2 to setup a dial connection.

 1.    Hi-Speed Ethernet setup

 a. Plug one end of the Ethernet cable into the Magic Box port
    labelled ETH.

 b. Plug the other end of the Ethernet cable into the
    router/switch/hub/internal wiring — whatever is applicable
    to the high-speed Internet service at your location. (If
    necessary, please refer to the Moneris IP Readiness
    Checklist available at moneris.com/checklist.)
      Recommendation: Set up dial backup as well (follow the
      Dial backup instructions on page 16) so that the terminal
      can use dial backup if your Internet service is temporarily
      unavailable.

Moneris® iCT250 Reference Guide                                                                               7
2. Dial / Dial Backup setup (optional)
a. Plug one end of the dial cable into the Magic Box port labelled
“ IN”.
b. Plug the other end of the dial cable into an analog phone jack.
Recommendation: Use a dedicated phone line for the terminal.
Sharing the line with another device (e.g., a fax machine) can
cause communication problems.
c. Do one of the following:
If you ordered an external PINpad, go to step 3, “Connect the external iPP320 PINpad” below.
If you did not order an external PINpad, go directly to step 4, “Connect the two-part power
supply cable” on page 10.
3. Connect the external iPP320 PINpad (optional)
a. Turn the PINpad over so that the back panel is facing you.
b. Plug the PINpad cable into the USB port on the PINpad
(raise the latch).
c. Fold the latch down and press to secure the cable.
d. Turn the terminal over so that the back panel is facing you.
Locate the two corner latches.
Moneris® iCT250 Reference Guide 83. Connect the external iPP320 PINpad (optional)
e. Grip the latches simultaneously, and then pull back to raise
the back panel.
f. Detach the panel completely.
g. If a three-pronged rubber stopper is attached, go to step h.
If there is no stopper, go to step i.
h. Grip the stopper, and pull back until it tears off completely
(or use scissors to carefully snip it off).
i. Plug the PINpad cable into the port labelled USB HOST in
the terminal compartment.
j. Position the PINpad cable so that it sits securely in the
middle groove at the top of the terminal.
k. Position the back panel so that its upper two corner tabs
are slotted into the openings at the top of the terminal.
l. Close the back panel until it snaps shut. (The PINpad cable
should be secured as it passes through the middle opening
between the closed panel and the terminal.)
m. Go to step 4 on page 10.
Moneris® iCT250 Reference Guide 94. Connect the two-part power supply cable
a. Insert the plug connector into the adaptor box to form
the complete power cable.
b. Insert the power cable's barrel connector into the Magic
Box's circular port labelled with the power symbol .
c. Plug the other end of the power cable into a power source. The terminal (and external iPP320
PINpad if attached) will power on.
Recommendations: Always plug the power cable into the power source last to avoid power
surges. Use a power bar equipped with surge protection if possible. Do not use the power cable
from your existing terminal, as it may damage your new terminal.
Important: You must use the exact power adaptor and cables provided by Moneris to work
with the Moneris iCT250 terminal. Failure to do so may affect the operability of, or cause
damage to, the equipment.
d. Wait for the terminal to display TERMINAL SETUP
REQUIRED.
If you attached an external PINpad, wait for it to
display the CPX version screen as shown here.
e. Go to step 5, “Remove the protective film” below.
5. Remove the protective film (if applicable)
a. If your iCT250 terminal has a protective film covering the display screen, peel the film off.
Hint: Peel from the top right to the bottom left corner.
b. If you have the optional iPP320 PIN Pad, and there is a protective film covering the display screen,
peel the film off as described above.
c. Go to step 6 “Install the paper roll” on page 11.
Moneris® iCT250 Reference Guide 106. Install the paper roll
a. Lift the printer latch up, and then pull back to open the lid and
expose the paper well.
b. Insert the paper roll into the paper well with the loose end
unrolling from the bottom of the roll towards the front of the
terminal.
c. Unroll enough paper to extend at least one inch (2.5 cm) past
the faceplate.
d. Close the lid, and press down to snap it back into place so that
the extended paper is pressed securely between the closed lid
and the top of the faceplate.
Note: The paper should unroll back over the top of the printer,
not unroll over the faceplate.
Note: To advance the paper from the printer when the lid is
closed, you must press and hold down the yellow key when
the terminal is powered on. DO NOT attempt to manually
advance the paper by pulling it as this will damage the printer.
What to do next
Your hardware setup is complete. The next step is to configure the terminal’s manual card entry password.
Proceed to Configuring the password for manual card entry protection for the first time on page 12 for
instructions.
Note: If you are configuring a terminal that has already been set up and initialized, the flow will be different.
Refer to the iCT250 Operating Manual in WebHelp format at moneris.com/support-iCT250 and search for the
topic entitled ‘Password Protection for Manual Card Entry’. This topic explains the various configuration options
depending on your scenario.
Moneris® iCT250 Reference Guide 11Configuring the password for manual card entry protection
for the first time
Working in tandem with a password, the MANUAL CARD ENTRY? parameter protects the manual entry of card
information on the terminal keypad. To set up a password and enable manual card entry, follow these steps.
1. Decide on your password:
It must be 5 to 10 numbers.
You cannot use more than two consecutive numbers in a row such as 12345 or 98765, or repeating
numbers such as 22233.
You will have 60 seconds to enter it.
2. From the TERMINAL SETUP REQUIRED screen, press the green key.
The MAN ENT PSWD screen appears.
3. At the ENTER NEW 5-10 DIGIT PASSWORD prompt, key in the password you decided on in step 1, and press
the green key.
Note: You have 60 seconds to enter the password.
The RE-ENTER NEW PASSWORD prompt appears.
4. Key in the password again and press the green key.
The message PASSWORD SET UP SUCCESSFULLY appears briefly on the terminal, followed by the TERMINAL
SETUP REQUIRED prompt.
5. Determine whether or not your business will accept manually entered card data on the terminal:
If you want to enable your staff and customers to manually enter card data on the terminal, proceed to
step 6.
If you want to prevent manual card entry on the terminal, this particular setup process is complete.
Proceed to the What to do next section on page 13.
6. At the TERMINAL SETUP REQUIRED prompt, press the Admin key twice, key in 08, then press the green
key.
The GENERAL PARAMETERS menu appears.
7. Scroll down to MANUAL ENTRY and press the green key.
The ENTER MAN ENT PASSWORD prompt appears.
8. Key in the password that you created in steps 3 and 4, then press the green key.
9. In the MANUAL CARD ENTRY screen, scroll down to highlight ON, then press the green key.
The GENERAL PARAMETERS menu appears again.
10. Press the red key multiple times to return to the TERMINAL SETUP REQUIRED prompt.
There are further configuration for mail/telephone orders (card not present) transactions. Refer to the iCT250
Operating Manual in WebHelp format at moneris.com/support-iCT250 and search for the topic entitled
‘Enabling Mail Order/Telephone Order Entry’.
Moneris® iCT250 Reference Guide 12What to do next
The next step is to configure the terminal and the external PINpad, if applicable. Choose one of the options
below.
If you are setting up the terminal to work as:
a standalone device with an external PINpad, proceed to Enabling the external PINpad on page 20;
a standalone device without an external PINpad, proceed to Communications setup on page 14;
a semi-integrated device with your ECR, refer back to the Moneris iCT250 Semi-Integrated Reference Guide,
and continue the applicable overview setup procedure beginning at step 3, “Enable Semi-Integrated mode
on the terminal...”.
Moneris® iCT250 Reference Guide 13Communications setup
Your terminal must be configured to communicate with the Moneris host.
1. Do one of the following based on your requirements:
If you are using dynamic IP as default, proceed to Using dynamic IP below.
If you are using static IP as default, proceed to Using static IP on page 14.
If you are using dial as default, proceed to Using dial on page 16.
If you are using dial as backup, proceed to Using dial as backup on page 16.
Tips for moving through the menus
Press the key to answer "yes" to any questions or to scroll down.
Press the key to answer "no" or to scroll up.
Press the green key to select a menu item or finish entering information and move on to the next step.
Using dynamic IP
The terminal is already configured for dynamic IP communications.
1. Do one of the following:
If you are using dial backup and need to enter a prefix (e.g., 9) to connect to an outside line, proceed to
Setting a dial prefix on page 16.
If you are not using dial backup, or you are but do not need to enter a prefix, proceed to Initialization
and logon on page 19.
Using static IP
Contact your Internet Service Provider (ISP) to gather the following information:
the terminal’s IP address;
Mask ID;
Gateway address;
DNS addresses.
Note: If you are configuring the terminal to work as a semi-integrated device with your ECR, you will also need
to know the port number that the ECR is configured to use to communicate with the terminal.
1. Press the Admin key twice, key in 13, and press the green key.
2. Press the green key to select TERMINAL SETUP.
3. Press the green key to select TERMINAL TYPE.
4. Scroll up to STATIC and press the green key.
Moneris® iCT250 Reference Guide 145. When the TERMINAL SETUP menu appears, enter the static IP information as follows:
Note: To enter a decimal point, press the 0 (zero) key and then press the Admin key.
a. Scroll down to TERMINAL ADDR and press the green key. Then key in the terminal’s IP address and
press the green key.
b. Scroll down to MASK ID, and press the green key. Then key in the terminal’s Mask ID and press the
green key.
c. Scroll down to GATEWAY, and press the green key. Then key in the terminal's Gateway address and
press the green key.
d. Do one of the following:
If you are setting up a standalone terminal (with or without an external PINpad): Skip this step, and
go directly to step 6.
If you are setting up the terminal to work as a semi-integrated device with your ECR: Scroll down to
PORT NUMBER and press the green key. Then key in the port number that the ECR is using to
communicate with the terminal and press the green key.
6. Press the red key once to return to the ETHERNET SETUP menu.
7. Enter the terminal's DNS address information:
a. Scroll down to DNS SETUP and press the green key.
b. Scroll down to PRIM ADDRESS and press the green key. Key in the terminal's Primary DNS Address
and press the green key.
c. Scroll down to SEC ADDRESS and press the green key. Key in the terminal's Secondary DNS Address
and press the green key.
8. Press the red key twice.
The REBOOT TERMINAL message appears, and then the terminal reboots.
9. When the terminal displays TERMINAL SETUP REQUIRED or REINITIALIZATION REQUIRED, go to the next
step.
10. Press the Admin key twice, key in 13, and press the green key.
11. When the ETHERNET SETUP menu appears, press the red key once.
12. When the terminal displays TCP HOST CONNECTION OK PRESS OK, press the green key.
If TCP CONNECTION FAILED or HOST CONNECTION FAILED appears, see page 17 for troubleshooting.
13. When the terminal displays TERMINAL SETUP REQUIRED or REINITIALIZATION REQUIRED, do one of the
following:
If you are using dial backup and need to enter a prefix (e.g., 9) to connect to an outside line, proceed to
Using dial backup on page 16.
If you are not using dial backup, or you are but do not need to enter a prefix, proceed to Initialization
and logon on page 19.
Moneris® iCT250 Reference Guide 15Using dial
To set up dial as your default method of communicating with the Moneris host, follow these steps.
1. Press the Admin key twice, key in 08 and press the green key.
2. Press the green key to select COMMS TYPE.
3. Scroll up to DIAL and press the green key.
4. When the GENERAL PARAMETERS menu appears, press the red key two times.
The TERMINAL SETUP REQUIRED or REINITIALIZATION REQUIRED message appears.
5. Do one of the following:
If you need to enter a prefix (e.g., 9) to connect to an outside line, follow the steps under Setting a
dial prefix on this page.
If you do not need to enter a prefix, proceed directly to Initialization and logon on page 19.
Using dial backup (optional)
If you do not need to enter a prefix (e.g., 9) to connect to an outside line, proceed directly to Initialization and
logon on page 19. If you do need to enter a prefix to connect to an outside line, follow the steps under Setting a
dial prefix (directly below).
Setting a dial prefix
1. Press the Admin key twice, key in 15, and press the green key.
2. Press the green key to select PREFIX.
3. Key in the prefix number (e.g. 9), and press the green key.
4. Press the red key twice.
When the terminal displays TERMINAL SETUP REQUIRED or REINITIALIZATION REQUIRED, proceed to
Initialization and logon on page 19.
Moneris® iCT250 Reference Guide 16Communications troubleshooting
Error message Solution
HOST CONNECTION The terminal cannot establish a connection to the Moneris host.
FAILED If the terminal is configured for IP:
or 1. Press the green key to return to the TERMINAL SETUP
REQUIRED screen.
TCP CONNECTION
FAILED 2. Confirm that the Ethernet cable is securely plugged into the
ETH port located on the Magic Box. Refer to Hi-Speed Ethernet
setup on page 7.
3. Confirm that the router and hub/switch (if any) are functioning
(refer to the Moneris IP Readiness Checklist at
moneris.com/checklist to confirm that your firewall rules have
been updated).
4. Confirm that the network is functioning.
Public Internet: Contact your ISP (Internet service provider)
for assistance.
Corporate WAN: Call your corporate help desk to confirm
that the corporate WAN is functioning properly.
5. Once you have confirmed that your network is functioning:
Press the Admin key twice, key in 11, and press the green
key.
6. When the HOST SETUP menu appears, press the red key
once.
7. Do one of the following depending on what appears:
If TCP HOST CONNECTION OK PRESS OK appears, press the
green key. Go to step 8.
If the TCP CONNECTION FAILED error recurs (static IP
configuration only):
a. Press the Admin key twice, key in 13, and press the
green key.
b. Press the green key to select TERMINAL SETUP.
c. Re-enter the static IP values. Go back to Using static IP
(page 14), and continue at step 7.
Table continues on the next page.
Moneris® iCT250 Reference Guide 17Error message Solution
8. Do one of the following:
If you are using dial backup and need to enter a prefix (e.g.,
9) to connect to an outside line, proceed to Setting a dial
prefix on page 16.
If you are not using dial backup, or you are but do not need
to enter a prefix, proceed to Initialization and logon on
page 19.
If the terminal is configured for dial:
1. Press the green key to return to the TERMINAL SETUP
REQUIRED screen.
2. Confirm that the dial cable is securely plugged into the
“ IN” port located on the Magic Box.
3. Confirm that the COMM TYPE is set to DIAL. Refer to Using dial
on page 16.
4. If the terminal must use a prefix to dial out, ensure that the dial
PREFIX parameter has been configured correctly. Refer to
Setting a dial prefix on page 16.
5. Proceed to Initialization and logon on page 19.
Moneris® iCT250 Reference Guide 18Initialization and logon
Before processing any transactions, you must initialize your terminal with the Moneris host and logon.
1. Do one of the following:
• If you are setting up a standalone terminal (with or without an external PINpad): Go directly to step 2.
• If you are setting up a semi-integrated terminal to work with your ECR: Refer back to your Moneris
iCT250 Semi-Integrated Reference Guide, and continue the applicable overview setup procedure
beginning at step 5 ("Configure the terminal-to-ECR communications parameters…”).
2. Press the Admin key twice, key in 01 and press the green key.
3. When MERCHANT ID appears, key in your current 13-digit merchant ID and press the green key.
4. When PHONE NUMBER appears, key in the number as follows and press the green key.
If your merchant ID begins with: Key in:
00301 1 888 699 7299
00302 1 888 358 8602
00304 1 888 332 8433
5. Wait while the terminal communicates with the Moneris host. Over the next few moments, the screen will
display SENDING, RECEIVING, and PROCESSING.
• If SWIPE ADMIN CARD appears, swipe one of the white POS Admin cards (provided with your new
terminal).
6. Wait while the terminal communicates with the Moneris host to log on.
7. If the initialization and logon are successful, the terminal screen should display one of the following READY
screens (which will always display when your terminal is ready to be used):
Standalone terminal:
PURCHASE ENTER AMOUNT appears on the terminal. (If an external PINpad is attached,
“WELCOME/BONJOUR” appears on the PINpad.)
Semi-integrated terminal:
WELCOME/BONJOUR appears on the terminal.
8. If you need to advance the paper from the printer, you must press and hold down the yellow key when
the terminal is powered on.
Note: Once the paper roll is installed and the printer lid is closed, DO NOT attempt to manually advance the
paper by pulling it as this will damage the printer.
9. Your terminal is ready to process transactions.
Moneris® iCT250 Reference Guide 19Additional options
There are several options that you can choose to enable on your terminal to enhance its functionality.
Note: All instructions in this section begin at the terminal’s READY screen.
Enabling the external PINpad (if attached)
Important: If you are setting up your terminal as a semi-integrated device to work with your ECR, do not
follow these steps to enable an external PINpad. The PINpad option is not supported in Semi-Integrated
mode.
1. Unplug the terminal’s power cable from the power source and then replug it to restart the hardware.
2. On the PINpad, do the following:
a. As soon as the PINpad displays the CPX version screen, press the green
key within 3 seconds.
b. When the PIN/CARD BEEP screen appears, go to the next step.
Note: If this screen does not appear, repeat step 1.
c. Press the key until the COM PORT screen appears.
d. Press the yellow key until USB-9600 appears.
e. Press the green key to select USB-9600.
f. When the PINpad displays the CPX version screen, go to the next step.
3. On the terminal, do the following:
a. Press the Admin key twice, key in 08, and press the green key.
b. Scroll up to EXT PINPAD and press the green key.
c. When ENABLE EXTERNAL PINPAD? appears, press the key (YES).
4. Wait for the PINpad to display WELCOME/BONJOUR.
5. When the terminal displays TERMINAL SETUP REQUIRED, proceed to Communications setup on page 14.
Moneris® iCT250 Reference Guide 20Printing the contactless logo on contactless transaction receipts
When this feature is enabled, the contactless logo will be printed on all contactless transaction receipts.
1. Press the Admin key twice, key in 08, and press the green key.
2. Scroll up to CTLS LOGO and press the green key.
3. Scroll to ENABLE and press the green key.
4. Press the red key twice to return to the READY screen.
Enabling Tip Entry, Cashback, or Invoice Number
1. Press the Admin key twice, key in 08, and press the green key.
2. Use the key to scroll down to the option that you want to enable (e.g. TIP ENTRY, CASH BACK, or
INVOICE NUMBER) and press the green key.
If you are enabling tip entry, follow these additional steps:
a. Scroll to a tip entry type (TIP BY AMOUNT, TIP BY PERCENT, or TIP BY $ AND %) and press the green
key.
b. Press the red key once, and then go to step 4.
3. Enable the option by pressing the key (YES).
4. Press the red key twice to return to the READY screen.
Note: To change the default values for the tip and cash back options, or to enable enhanced tip prompting,
refer to the iCT250 Operating Manual in WebHelp format at moneris.com/support-iCT250.
Changing printer options
The printer is set up to automatically print the second receipt 10 seconds after it prints the first receipt.
Note: If you don’t want to wait, simply press the green key to print the second receipt immediately.
To change this setting:
1. Press the Admin key twice, key in 14, and press the green key.
2. Scroll down to PRINT DELAY and press the green key.
3. Key in the number of seconds that the printer should wait before automatically printing the second receipt
and press the green key.
Note: If you key in 99, the printer will always wait until the green key is pressed before printing the
second receipt.
4. Press the green key to return to the PRINTER CFG menu.
5. Press the red key twice to return to the READY screen.
Note: Shop for point-of-sale supplies and paper online at shop.moneris.com.
Moneris® iCT250 Reference Guide 21Changing the terminal language
1. Press the Admin key twice, key in 04, and press the green key.
2. Scroll to a language and press the green key to select it.
3. Press the red key twice to return to the READY screen.
Enabling loyalty and gift cards
Didn’t order a loyalty program and gift cards but would like to find out more? Please call us at 1-866-319-7450.
1. Press the Admin key twice, key in 310, and press the green key.
2. Press the green key to select ENABLE ERNEX.
3. Press the key to select YES.
4. Press the green key to select INITIALIZATION.
5. Key in the Ernex Terminal ID and press the green key.
6. Wait while the terminal communicates with the Moneris host.
If CLEAR TERMINAL STORAGE? appears, press the key to select YES.
The READY screen appears.
7. Your terminal is ready to process loyalty card and gift card transactions. For instructions on performing:
gift card transactions, refer to the Moneris iCT250 Gift Card Program Reference Guide.
loyalty card transactions, refer to the Moneris iCT250 Loyalty Programs Reference Guide.
Enabling tip entry (gift cards)
1. Press the Admin key twice, key in 310, and press the green key.
2. Scroll down to TIP ENTRY and press the green key.
3. Press the key to select YES.
4. Press the red key to return to the READY screen.
Note: To change the default values for tip entry, or to enable enhanced tip prompting for gift cards, refer to the
iCT250 Operating Manual in WebHelp format at moneris.com/support-iCT250.
Moneris® iCT250 Reference Guide 22Enroll in Merchant Direct® Merchant Direct is the Moneris online tool for accessing all of your merchant reports, including end-of-day reports. To sign up for Merchant Direct, follow these steps. Note: If you have already enrolled for Merchant Direct, you do not have to enroll again. 1. Go to moneris.com. 2. In the top right area of the screen, click Login and select Merchant Direct. 3. Click Online Enrolment. 4. Fill in the fields in the online form to complete your enrolment. Moneris® iCT250 Reference Guide 23
Using Your Terminal

Using
Your
Terminal
In this section, we go over everything you need to
know to use your Moneris iCT250, including how to
perform transactions and end-of-day processes.

Moneris® iCT250 Reference Guide                      24
Moneris iCT250
Use this handheld, all-in-one terminal and PINpad to process transactions at the point of sale (POS).
When prompted, you (and sometimes your customer) will key in information on the terminal. If your customer is
required to key in information, pass the handheld to the customer. When the customer has finished keying in
the information, retrieve the terminal and complete the transaction.

Moneris® iCT250 Reference Guide                                                                           25
Terminal keys and hardware
1 Function keys
Move through the menu items on the display.
Select the option displayed above the key: e.g. if YES displays above the key, press that key to select
YES. If displays above the key, press that key to scroll up.
To select an item, scroll through the list until the item is highlighted (e.g. LOGON vs. LOGON ), and then
press the green key.
2 Alpha-numeric keys
Key in numbers, letters, and Admin (with the Admin key).
3 Admin key
Go to the MAIN MENU from the READY screen.
Select letters and Admin (with alphanumeric keys).
4 Red Cancel key
Cancel a transaction.
Move back one menu at a time.
5 Yellow Correct key/Paper feed key
Clear displayed data one character at a time.
Press key (hold down) to advance the receipt paper in the printer.
6 Green OK key
Accept displayed data.
Submit data.
Select highlighted menu item.
7 Printer
To advance receipt paper, see label 5 above.
8 Keypad
9 Magnetic stripe reader
10 Chip reader
11 Display screen/Contactless reader (internal)
Note: If the terminal’s back light dims (keys lose their bright glow), press any key. The keys function even if
the back light is dimmed.
Moneris® iCT250 Reference Guide 26Optional external PINpad
If an optional Moneris iPP320 external PINpad is connected to the iCT250 terminal and your merchant account is
configured for it, the customer uses the PINpad to input transaction information when prompted.
General guidelines for the iPP320 PINpad
When the CONTINUE ON PINPAD prompt appears on the iCT250 terminal, pass the iPP320 PINpad to your
customer.
The customer follows the prompts on the PINpad.
For contactless transactions, the TAP CARD prompt always appears on the PINpad.
Keep the terminal in front of you to complete the transaction.
The PINpad displays WELCOME/BONJOUR while in its idle state.
1 Display screen/Contactless reader (internal)
2 Magnetic stripe reader
3 Chip reader
Moneris® iCT250 Reference Guide 27Card types
The Moneris iCT250 supports the following card types and formats. These card types are not mutually exclusive.
A single card can include a magnetic stripe, a chip, and contactless functionality.
Magnetic stripe card
A card with a magnetic stripe
The card is swiped on the magnetic stripe reader
Chip card
A card with a chip
The card is inserted into the chip card reader
Contactless card
In this guide, the term “contactless card” includes:
a card with contactless functionality; supported card brands including: Visa®, Mastercard®, American
Express®, Discover®, and Interac®
a mobile device, such as a smartphone, tablet, or smartwatch
other contactless-enabled items such a key fob or a mobile tag
The card is tapped on the contactless reader.
All contactless card formats and any related software are the responsibility of the cardholder (e.g.,
downloading a digital app from their financial institution).
Cardholders with a mobile device (e.g., smartphone) are responsible for loading their card information into
their digital wallet.
Moneris® iCT250 Reference Guide 28Cardholder verification
Cardholder verification methods (CVM)
Many transactions require cardholder verification. This means your customer must provide proof that they are
the valid cardholder by performing one of the cardholder verification methods below. The terminal will prompt
your customer (or you) for the appropriate CVM.
When verification is required, follow these general guidelines:
for a transaction where a card is swiped, the cardholder signs the merchant copy of the receipt.
for a transaction where a card is inserted, the cardholder enters their PIN on the terminal (or on the external
PINpad if applicable). In some cases, the cardholder may need to sign the merchant copy of the receipt.
for a transaction where a card is tapped, the cardholder signs the merchant copy of the receipt.
for a transaction where a mobile device is tapped, the cardholder enters their passcode on their mobile
device. If the cardholder has already entered their passcode, they will not be prompted again during the
transaction.
Cardholder verification limit
This is the maximum dollar amount for performing a tapped credit transaction without cardholder
verification.
To determine the cardholder verification limit for a card, print a Configuration Report (see instructions on
page 57). Look near the end of the report for the CVM LIMITS section, then look under each card type for
the DOMESTIC CVM LIMIT.
If the final transaction amount is greater than the limit specified (in the case of Visa, equal to or greater
than) then the cardholder must perform one of the cardholder verification methods outlined in the
Cardholder verification methods section above.
In most cases, this limit does not apply to:
Credit transactions where the card is swiped or inserted
Interac Debit transactions where the card is swiped or inserted
These transactions require cardholder verification regardless of the transaction amount.
Moneris® iCT250 Reference Guide 29Card entry options
Insert: Chip cards
1. SWIPE OR INSERT CARD or SWIPE/INSERT/TAPCARD displays on the
terminal or external PINpad if attached.
2. Either you or the customer inserts the card into the device’s chip reader.
Note: Unless the device prompts otherwise, do not swipe a chip card
even if the card has a magnetic stripe.
3. The customer may be prompted to key in a PIN.
4. The chip card must remain inserted until the REMOVE CARD prompt
displays.
Wave/Tap: Contactless cards
1. SWIPE/INSERT/TAP CARD displays on the terminal or external PINpad if
attached.
2. The customer taps their card over the icon that appears on the
display screen.
Note: The customer does not need to enter a PIN on the terminal or
external PINpad. However, if the customer is using a mobile device, they
may be directed to enter a passcode on their smartphone or tablet.
3. Note the following:
Your merchant account must be configured for contactless
functionality.
Only Purchases, Refunds, and Balance Inquiries can be processed using a contactless card.
The transaction amount must be equal to or less than the maximum Contactless Transaction Limit set
for the card (see Contactless Transaction Limit on page 31).
The card must be within 0.5 in. (1.3 cm) of the screen, but it does not have to touch it.
The card must be tapped or waved by itself (the customer cannot leave the card in their wallet and wave
it in front of the screen).
Moneris® iCT250 Reference Guide 30Contactless Transaction Limit (CTL)
For each card type, there is a limit on the dollar value that can be processed as a contactless transaction.
Credit Cards (and some Debit cards): To determine the CTL for a card, print a Configuration Report (see
instructions on page 57). Look near the end of the report for the CVM LIMITS section, then look under each
card type for the DOMESTIC TXN LIMIT. If this limit shows a value of ‘9999’, then there is no contactless
limit.
Note: If a contactless credit card is tapped for an amount that exceeds its maximum CTL, the terminal or
PINpad will display CONTACTLESS TRANSACTION LIMIT EXCEEDED (see message on page 62).
Mobile Devices: For Mastercard, look for the MC-M TXN LIMIT. If this limit shows a value of ‘9999’, then
there is no contactless limit for Mastercard on mobile devices. For all other cards, use the DOMESTIC TXN
LIMIT as specified above.
Interac Flash Cards: The maximum CTL is determined by the card and does not appear on any report.
Note: If an Interac Flash card is tapped for an amount that exceeds its maximum CTL, the terminal or
PINpad will display TAP FAILED PLEASE INSERT OR SWIPE CARD (see message on page 64).
Swipe: Magnetic stripe cards
1. SWIPE CARD or SWIPE OR INSERT CARD or SWIPE/INSERT/TAP CARD displays
on the terminal or external PINpad if attached.
2. Swipe the card on the device’s magnetic stripe reader.
Note: If the card has a chip and the terminal or external PINpad (if
attached) is enabled to read chip cards, the card must be inserted into the
chip reader.
Manual card entry
If all available card entry methods fail, you may manually enter the card number for credit cards and some chip
debit cards.
Note: A manual card entry password must be configured, and manual card entry must be enabled on the
terminal for this card entry method to work. Refer to Configuring the password for manual card entry protection
for the first time on page 12 for more information.
1. The SWIPE CARD or SWIPE OR INSERT CARD or SWIPE/INSERT/TAP CARD prompt displays on the terminal or
external PINpad if attached.
2. Key in the card number on the terminal and press the green key.
If the ENTER LAST 4 DIGITS prompt appears, key in the card’s last four digits and press the green
key.
3. At the ENTER EXPIRY DATE [MMYY] prompt, key in the card’s expiry date (MMYY) on the terminal and press
the green key.
Moneris® iCT250 Reference Guide 314. When the ENTER MAN ENT PASSWORD prompt appears, key in your manual entry password and press the
green key.
If TAKE MANUAL IMPRINT OF CARD AND PRESS OK appears, take a manual imprint of the card and press
the green key.
Moneris® iCT250 Reference Guide 32Transactions
All instructions in this section begin at the READY screen. To access the READY screen from any other screen,
press the red key repeatedly until the READY screen appears.
General guidelines
1. If the terminal is configured to use Ethernet, ensure that the Ethernet icon (at the top of the terminal
display screen) is coloured green.
2. Determine the transaction to be processed (e.g., Purchase or Refund).
3. Establish the means of payment (credit or debit).
4. Enter the card data on the terminal or external PINpad if attached (see pages 30 - 31).
5. Follow the prompts* (see pages 34 -49).
6. Process receipts (see pages 52-54).
*Prompts may vary depending on variables such as terminal setup, merchant setup, and card type.
Note: Some debit cards may display Cashback, Account Selection, and/or PIN prompts after the device has
been returned to you; hand the device back to the customer to respond to these prompts.
Admin code shortcuts
To bypass scrolling through menus to select a transaction, use the Admin codes to jump directly to a transaction.
Admin codes can be found in this section in square brackets beside the transaction name (e.g. Logon [02] means
the Admin code for logging on is 02).
To use an Admin code:
1. Press the Admin key until ENTER ADMIN CODE appears.
2. Key in the Admin code and press the green key.
The transaction appears.
To print a list of all Admin codes:
1. Press the Admin key until ENTER ADMIN CODE appears.
2. Key in 40 and press the green key.
The list is printed.
Moneris® iCT250 Reference Guide 33Purchase [100]
Credit or debit purchase of goods or services.
1. If PURCHASE is the default, key in a Purchase amount. (If PURCHASE is not the default: Press the Admin
key, select TRANSACTIONS, select PURCHASE, and then key in a Purchase amount.)
2. Press the green key.
3. Follow the merchant prompts:
If tip entry is disabled, follow the merchant prompts table on page 37.
If tip entry is enabled, follow the merchant prompts table on page 45.
Partially approved Purchase
A Partial Approval of a purchase transaction occurs when a cardholder pays for a purchase with a pre-paid credit
card, but the value on the pre-paid card is less than the purchase amount.
The amount on the pre-paid card is approved, i.e. part of the total purchase amount is approved. Prompts are
displayed indicating how much of the purchase amount is still owed (e.g. AMOUNT DUE $5.00). That amount can
then be paid by another tender type, e.g. a credit or debit card.
Processing single instance card not present transactions
Use the iCT250 terminal to process credit card transactions when the cardholder is not present i.e. taking orders
over the telephone or via mail order. Follow the directions below to process a single instance card not present
transaction.
Note: A manual card entry password must be configured, and manual card entry must be enabled on the
terminal in order to process card not present transactions. Refer to Configuring the password for manual card
entry protection for the first time on page 12 for more information. MAIL/TEL ORDER TRANSACTIONS must also
be enabled on the terminal. Refer to the iCT250 Operating Manual in WebHelp format at moneris.com/support-
iCT250 and search for the topic entitled ‘Enabling Mail Order/Telephone Order Entry’.)
Important: Please note that many of the safeguards against fraud are not applicable to card not present
transactions and thus they expose you to higher fraud and chargeback risk. If you are not prepared to assume
this increased chargeback risk or if you are suspicious of a card not present transaction, please do not proceed
with the transaction.
1. Begin the Purchase transaction by following the Purchase steps 1 & 2 listed above.
2. At the SWIPE CARD or SWIPE OR INSERT CARD or SWIPE/INSERT/TAP CARD prompt, key in the card number
and press the green key.
3. At the ENTER EXPIRY DATE [MMYY] prompt, key in the card’s expiry date in MM/YY format and press the
green key.
4. At the ENTER MAN ENT PASSWORD prompt, key in the manual card entry password and press the green
key.
5. At the CARD PRESENT/CARD NOT PRESENT prompt, press the key to scroll down and select CARD NOT
PRESENT, then press the green key.
Moneris® iCT250 Reference Guide 346. At the SINGLE RECURRING INSTALLMENT OTHER prompt, press the green key to select SINGLE.
Note: For information on processing recurring, installment, or other card not present transactions, please
refer to the iCT250 Operating Manual available in Webhelp format at moneris.com/support-iCT250.
7. At the VALIDATION CODE: prompt, enter the card’s three-or-four digit CVV value and press the green
key. Proceed to step 9.
If no CVV is present, or is unreadable, press the green key to bypass the prompt. Proceed to step 8.
8. At the CODE PRESENT? prompt, do one of the following:
If there is no CVV value on the card, press the key (NO). Proceed to step 9.
If there is a CVV value but it is unreadable, press the key (XREAD). Proceed to step 9.
9. Follow the remaining merchant prompts:
If tip entry is disabled, follow the merchant prompts table on page 37.
If tip entry is enabled, follow the merchant prompts table on page 45.
Refund [101] / VOID–Purchase [106] / VOID–Refund [107]
A Refund credits a customer’s account. A Void cancels the original Purchase or Refund.
Note: Credit card Voids must be processed in the same batch as the original transaction.
1. Press the Admin key, select TRANSACTIONS, and then select the transaction (REFUND, or VOID-
PURCHASE, or VOID-REFUND).
If SWIPE ADMIN CARD appears, swipe your POS Admin card.
2. Key in the transaction amount and press the green key.
3. Follow the merchant prompts table on page 37.
Note: To refund or void a partially approved purchase, use the TOTAL PAID amount on the Partial Approval
receipt. See page 54.
Pre-Authorization [102]
Authorization if the final Purchase amount is unknown (e.g. hotel or car rental).
1. If PRE-AUTH is the default, key in a Pre-Auth amount. (If PRE-AUTH is not the default: Press the Admin
key, select TRANSACTIONS, select PRE-AUTH, and then key in a Pre-Auth amount.)
2. Press the green key.
3. Follow the merchant prompts table on page 37.
Note: When the final Purchase amount is known, you must perform an Advice for the final amount using
the same card number (see Advice options starting on page 36).
Cheque Authorization [105]
1. Press the Admin key, select TRANSACTIONS, and select CHEQUE AUTH.
Moneris® iCT250 Reference Guide 35You can also read