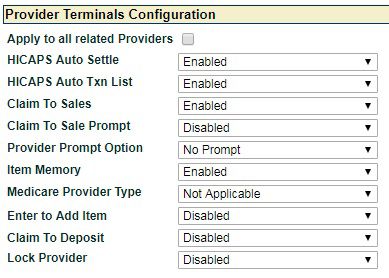
HICAPS TERMINAL USER GUIDE
←
→
Page content transcription
If your browser does not render page correctly, please read the page content below

HICAPS TERMINAL
USER GUIDE

CONTACT PHONE NUMBERS FOR HICAPS/EFTPOS
HICAPS Help Desk 1300 650 852
your merchant details
Merchant No.
For Authorisations:
• Credit Card (Credit) Account
This is an Australia-wide number 13 25 15
• Debit Card (Cheque) or (Savings) Account
This is an Australia-wide number 1300 369 852
• American Express 1300 363 614
• Diners Club 1800 331 112
Authorisation services are available 24 hours a day, 7 days a week.
lost or stolen cards
Please call the above authorisation line appropriate for the card type used (credit or debit).
Call 13 25 15 and select extension 500 when calling about lost or stolen credit cards.
terminal number
Attach your first sign on receipt here!
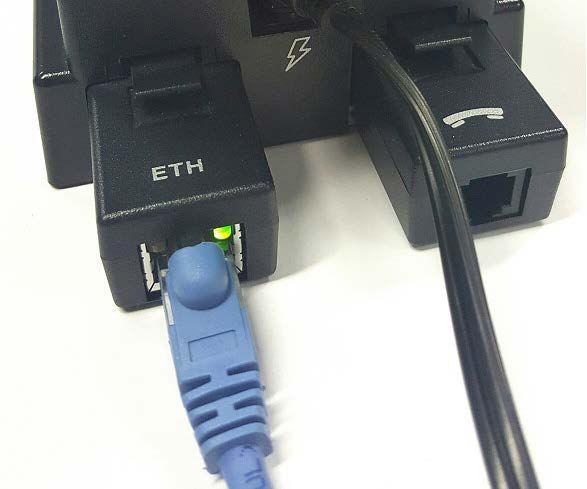
TABLE OF CONTENTS
1 HICAPS/EFTPOS 7
1.1 HICAPS help desk 7
1.2 glossary 7
1.3 diagram of HICAPS terminal 9
1.4 navigation 10
2 HICAPS 11
2.1 registering a New provider 11
2.1.1 complete provider set up 11
2.1.2 modify provider 2
2.1.3 deleting a provider 3
2.3 processing a HICAPS claim 14
2.3.1 processing a HICAPS claim transaction (HICAPS terminal) 14
2.3.2 processing a HICAPS claim transaction (practice management system) 17
2.4 cancelling a HICAPS claim 18
2.4.1 cancelling a HICAPS claim (HICAPS terminal) 18
2.4.2 cancelling a HICAPS claim (practice management system) 20
2.5 manual daily transaction summary (HICAPS totals) 21
2.6 ordering terminal rolls 22
2.7 performing terminal sign on/logon 22
2.8 customising a HICAPS receipt (optional) 23
3 EFTPOS 24
3.1 processing an EFTPOS transaction 24
3.1.1 processing an EFTPOS transaction following a successful claim transaction 24
3.1.2 processing an EFTPOS transaction 25
3.1.3 processing an EFTPOS transaction (practice management system) 27
3.2 refunding an EFTPOS transaction 27
3.2.1 refunding an EFTPOS transaction 27
3.2.2 refund an EFTPOS transaction (practice management system) 30
3.3 EFTPOS settlement 31
3.3.1 manual EFTPOS settlement 31
3.3.2 automatic terminal settlement 32
3.3.3 host forced settlement 35
3.3.4 merchant password 35
3.4 surcharge setup 37
3.5 UnionPay Cards 40
4 Terminal functions 41
4.1 functions 41
4.1.1 settle 41
4.1.2 trans 41
4.1.3 function 41
4.2 transaction menu 41
4.2.1 balance/quote 41
4.2.2 refund/cancel 42
4.2.3 pre-auth 42
4.2.4 completion 42
4.2.5 cash out 42
4.2.6 sale 43
4.3 terminal function options 43
4.3.1 reports [1] key (print EFTPOS and HICAPS reports) 43
4.3.2 configuration setup [2] key (refer help desk) 43
4.3.3 terminal restart [3] key 44
4.3.4 terminal lock [4] key 44
4.3.5 terminal logon [5] key 44
4.3.6 balance enquiry/quote [6] key 44
4.3.7 stationery order [7] key 44
4.3.8 reprint [8] key (reprint EFTPOS and HICAPS transactions) 44
4.3.9 terminal SW load [9] option 44
4.4 changing the terminal security password 44
4.5 fallback procedure 45
5 Terminal connections 46
5.1 terminal Connectivity – VX820 46
5.1.1 dial 46
5.1.2 ethernet (IP – Internet Protocol) 46
5.2 the terminal docking station – VX820 46
5.2.1 power 46
5.2.2 terminal pin pad 46
5.2.3 ethernet 47
5.2.4 telephone line 47
5.2.5 RS232 (PMS Integration) 47
5.3 terminal Connectivity – VX680 47
5.3.1 dial 47
5.3.2 3G mobile network 47
5.4 the terminal docking station – VX680 48
5.4.1 power 48
5.4.2 telephone line 48
5.4.3 Ethernet 48
6 thermal printer 49
6.1 VX820 49
6.2 VX680 49
7 HICAPS response codes 50
7.1 transaction level HICAPS response codes 50
7.2 item level HICAPS response codes 53
8 EFTPOS error messages and corrective actions 55
9 Merchant requirements to ensure EFTPOS 57
transactions are valid
10 Terminal functions 58
11 Medicare Australia Easyclaim 59
12 Termination of EFTPOS merchant service 60
1. HICAPS/EFTPOS
1.1 HICAPS help desk
HICAPS Help Desk phone number is 1300 650 852.
For HICAPS Help Desk hours of operation, please refer to www.hicaps.com.au
Provider information section.
HICAPS fax number is 1300 725 726.
1.2 glossary
benefit Value of rebate authorised by a Health Fund.
body part Two digit alpha/numeric identifying the part on the body
on which the service was performed.
cancel Reverses a transaction processed through the terminal.
card A membership card issued by the Health Fund or an EFTPOS
or credit card, issued by a bank.
claim After treatment is provided, details are sent electronically
via the terminal to the Health Fund.
claim declined When a Health Fund declines to pay the request a brief
response message will print with each declined item
and/or claim.
claim receipt Either the terminal or the associated Practice Management
System prints a receipt, which must be signed by the patient
to acknowledge services and approve the transfer of payment
to the provider.
claim to sale The terminal facility allowing you to start an EFTPOS transaction
using the Gap amount returned from the HICAPS Claim.
clinical code Two digit alpha/numeric identifying the body part/primary
condition/diagnostic intervention on which the service was
performed.
date (of service) The date the specific item of service was performed – format
ddmm.
fallback The terminal was unable to contact the bank to process an
EFTPOS transaction, but the transaction has been approved/
declined and will be sent to the bank with the next transaction.
gap payment The amount remaining after the Health Fund has approved
a benefit for the specified services.
hicaps Health Industry Claims And Payments Service. The company
responsible for the switching of transactions to health funds
from the terminal.
issue date The date the membership card was issued. Those cards with
issue dates have them printed on the bottom right-hand corner
of the card.
item cost The amount charged for the given item of service.
item number Numeric code identifying the type of service performed.
Refer to the HICAPS Quick Reference Guide or the relevant
schedule for a full list of item numbers.
member A customer of a Health Fund.
MMF The Multi-Merchant Facility. This is a feature of the HICAPS
terminal which optionally allows you to settle the EFTPOS
funds separately for each provider.
patient ID A member listed on the card which identifies a given patient
within a Health Fund membership.
Practice The PC-based system which allows a transaction to be sent
Management system directly to the HICAPS terminal.
provider Practitioners who provide Health Services to patients.
provider number Is eight characters that uniquely identify each individual
provider for a specific location. Provider numbers that HICAPS
use are issued by Medicare Australia or Medibank Private.
Provider numbers are location specific, so you must have
a provider number for each location you wish to practice at.
refund Refunds a previous EFTPOS or credit approved transaction.
reversal Reverses an approved transaction on the same day the
transaction was processed.
RRN Receipt reference number (unique 2 digit field).
swipe member card Pass the membership card through the card reader on the
right-hand side of the HICAPS terminal.
tooth number Two digit FDI numeric identifying the tooth on which the
service was performed.
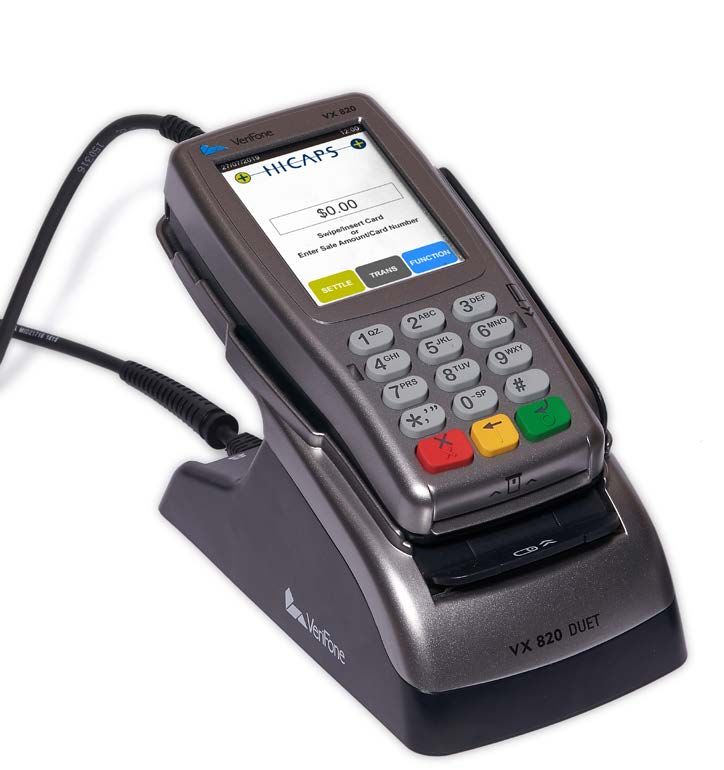
1.3 diagram of HICAPS terminal
VX820
1 2 1. Colour touchscreen
display
2. Magnetic stripe card
reader
3 3. Alphanumeric keypad
4. Smart card reader
5. High speed thermal
printer
4
5
6
8
VX680
7
9 6. High speed thermal
printer. (on rear of
terminal)
7. Mobile reception &
battery status
8. Battery charging
indicator
10
11 9. Colour touchscreen
display
10. Magnetic stripe card
12
reader
11. Alphanumeric keypad
12. Smart card reader
1.4 navigation
Your Verifone terminal has a touch screen, you can choose to navigate screens and menus
using the soft keys on the screen.
Alternately you can scroll up and down menus using the # and * keys on the terminal.
To confirm, cancel and clear selections you can press the coloured keys on the terminal.
i.e. if you wish to cancel out of a screen, the cancel button on the screen is red hence you
would press the red key on your terminal.
2. HICAPS
2.1 registering a new provider 2.1.1 complete provider setup
To add providers you will need to register On first use of the new provider/s the
their details by completing the online HICAPS terminal will prompt the following
form, available on the HICAPS website steps to complete the provider setup.
www.hicaps.com.au/forms/ step 1
Once the completed form and supporting Using the keypad, choose and enter a 4
documents have been submitted and digit Provider Password and press [OK].
approved by HICAPS the provider updates This password will be used to lock your
will be sent to the associated health funds provider and make modifications to your
and the new provider/s will automatically provider settings
appear on your HICAPS terminal within Note: Provider Password can not be made
5 business days. up of repetitive or consecutive numbers.
To begin transacting with the new Eg. 1234, 0000.
provider/s you will need to follow the
complete provider setup steps (2.1.1)
on your terminal
step 2 2.1.2 modify provider
The Payee Provider Number is used when If you wish to make modifications to a
processing Medicare claims. If the provider providers configuration settings you can
does not process Medicare claims press do so by accessing their provider profile
[OK] to skip this screen in HICAPS Accounts Online (www.hicaps.
This option, when completed, will pre- com.au).
populate the Payee Provider Number Simply login to HICAPS Accounts Online
when completing a Medicare claim. Using and navigate using the side menu
the keypad, enter in the Payee Provider (Providers > View / Modify Provider) to
Number (only if required) and press [OK]. the Provider page and select the changes
you wish to enable/disable. Once all
modifications have been made you can
select Modify Provider at the bottom of
the page to save the changes.
Note: This option should be used when the
servicing provider is not the practitioner
who is to be paid for the service.
All modifications to the provider settings
will be automatically updated on your
HICAPS terminal within 48 hours.
2.1.3 deleting a provider
You can remove a provider from your
HICAPS terminal that is no longer
practicing at your location by completing
the online form, available on the HICAPS
website www.hicaps.com.au/forms
Once the completed online form has
been submitted and approved by HICAPS
the provider updates will be registered
with the associated health funds and the
requested provider/s will automatically
be removed from your terminal within
5 business days.
2.3 processing a HICAPS claim A list of the participating health funds that
2.3.1 processing a HICAPS claim support mobile transactions is available on
transaction (HICAPS terminal) www.hicaps.com.au
step 1 step 2
To start a HICAPS Claim transaction, Use the arrows on the touch screen or
simply swipe the patient’s Health Fund key the number located next to the
card through the terminal. providers name to choose the Provider
that you would like to claim with and
Note: When claiming with the VX680
press [SELECT].
terminal model– Claims processing is
supported by all the participating health Note: This prompt will only be displayed
funds when the terminal is on the docking/ if more than one provider is loaded into
base station with a phone line or ethernet the terminal.
cable connected.
Some of the HICAPS participating health
funds will not be supporting mobile
terminal claiming (when the terminal
is off the docking station). For these
health funds the following message will
appear on the screen when the patient’s
membership card is swiped. To process
the transaction in this scenario you will
need to return the terminal to the docking
station and select [CONTINUE].
step 3 step 5
Using the keypad, enter the 2-digit Using the keypad, enter the Clinical Code,
Patient ID printed on the card relating to Tooth Number or Body Part in which the
the specific patient receiving treatment treatment supplied was performed and
and press [OK]. press [OK].
Note: This value will default to 01 if Note: This step will only appear if the
nothing is entered. provider being transacted with has a
prompt option enabled. This prompt
can be disabled in the provider setup
(Refer 2.1).
step 4
Using the keypad, enter the Item Number
associated with the treatment supplied
and press [OK]. step 6
Using the keypad, enter the Date (DD/
MM) in which the treatment supplied was
performed and press [OK].
To accept the current date just press [OK].
step 7 step 8b
Using the keypad, enter the Item Cost and To add an item to the claim, simply press
press [OK]. the [ADD] button on the touch screen and
Note: This field will default to the last cost repeat the steps above.
charged for the same item if item memory step 8c
is enabled for this provider. To enter a To remove an item from the claim, simply
different amount simply key in the new item press the [REMOVE] button on the touch
cost and select OK screen and then press [YES] to confirm the
deletion.
step 8a
The terminal will then display a Claim step 9
Summary of the item(s) entered. If the Claim Summary is correct, press
By pressing the [MODIFY] button on the the [SEND] button on the touch screen.
touch screen, you are able to modify any
of the items that have been entered by
repeating the steps above.
Note: To scroll through multiple items use
the up and down arrows displayed on the
screen.
example HICAPS claim receipt 2.3.2 processing a HICAPS claim
The claim receipt contains all of the transaction (practice
information relating to the claim. A second management system)
CUSTOMER COPY is printed without the To start a HICAPS Claim Transaction,
statutory declaration. The first copy is simply send the transaction to HICAPS
required to be signed by the Fund member by clicking on the HICAPS icon on your
and retained for your office records and Practice Management System screen.
may be required to be produced by the When the terminal receives the transaction
Health Fund. The second copy is for the details from your Practice Management
customer’s own records. System, the terminal will prompt for the
customer card to be swiped. The terminal
will recognise the card type that should
be swiped by the type of transaction that
is received from the Practice Management
System. The results from the transaction
will be returned directly to the Practice
Management System.
For further assistance on processing a
Practice Management System transaction
please contact your Practice Management
System provider.
Note: Integration with a Practice
Management System is not supported on
the VX680 mobile terminal model.
2.4 cancelling a HICAPS claim step 3
2.4.1 cancelling a HICAPS claim The terminal will then prompt you
(HICAPS terminal) for a card. Swipe the cardholder’s
Health Fund card.
There are two options for cancelling
HICAPS claim transactions, but for each
option a transaction can only be cancelled
on the same day that it was originally
processed.
option 1
Transaction was processed by the
same terminal.
step 1
Access the Transactions menu by pressing
[TRANS] on the touch screen.
step 4
The screen will then display the
transaction(s) processed on the terminal
by this cardholder for the current day. If
there is more than one transaction for
that cardholder all transactions can be
reviewed by using the up/down arrow
buttons on the touch screen.
Once you have located the claim you wish
to cancel, press [SELECT].
If the transaction was processed on a
step 2 different terminal press [CLEAR] and
Select 2. Refund/Cancel and press continue from Option 2, Step 4.
[SELECT].
step 5 step 3
Select [YES] to send the cancellation or The terminal will then prompt you
[NO] to return back to the home screen. for a card. Swipe the cardholder’s
Note: The terminal will produce two copies Health Fund card.
of the cancellation receipt. The first copy
must be signed by the Fund member and
retained for your records, the second copy is
for the member’s own records.
step 4
Use the arrows on the touch screen
to highlight the Provider used in the
original claim that you wish to cancel
option 2 and press [SELECT].
Transaction was processed by
Note: This prompt will only be displayed
a different terminal.
if more than one provider is loaded into
Note: The transaction must still have the terminal.
been processed in the same day.
step 1
Access the Transactions menu by pressing
[TRANS] on the touch screen.
step 2
Select 2. Refund/Cancel and press
[SELECT].
step 5 step 7
The terminal will then prompt you for Select [YES] to send the cancellation or
the 12-digit Receipt Reference Number [NO] to return back to the home screen.
of the original claim. Key the RRN and Note: The terminal will produce two
press [OK]. copies of the cancellation receipt. The first
Note: This can be found on the original copy must be signed by the Fund member
claim receipt. and retained for your records, the second
copy is for the member’s own records.
step 6
The terminal will then prompt you for 2.4.2 cancelling a HICAPS claim
the Benefit Amount approved by the (practice management system)
Health Fund on the original claim.
To cancel a HICAPS claim transaction,
Key the benefit amount and press [OK].
simply send the transaction to HICAPS
by selecting the appropriate option
from your Practice Management System
screen. When the terminal receives the
transaction details from your Practice
Management System the terminal will
prompt for the customer card to be
swiped. The results from the transaction
will be returned directly to the Practice
Management System.
For further assistance on processing
a cancel transaction using your Practice
Management System transaction please
contact your Practice Management
System provider.
Note: Integration with a Practice
Management System is not supported on
the VX680 mobile terminal model.
2.5 manual daily transaction step 3b
summary (HICAPS totals) If you select Today you will be provided
with an option for either a Summary
step 1 Listing or Detailed Listing.
Press [SETTLE] on the touch screen.
Use the arrows on the touch screen to
select your preferred totals listing and
press [SELECT].
step 2
Select option 2. HICAPS and press
[SELECT].
Note: If you select the previous day, only a
Note: You can also access this function summary report will be provided. In both
by pressing [FUNCTION] and enter [5] [1] cases the reports will be printed out by
then press [SELECT]. provider.
step 3a
Use the arrows on the touch screen to
select the appropriate day (Today or
Previous Day) that you are seeking
HICAPS totals for and press [SELECT].
2.6 ordering terminal rolls 2.7 performing terminal
sign on/logon
step 1
Press the [FUNCTION] key on the touch If you receive a transaction response code
screen. [L] (Logon Required) or when advised by
the Help Desk, the terminal is required
step 2 to logon to HICAPS. In most cases this
Enter [7] and press [SELECT]. is automatically done by the terminal,
however, there may be some times when
step 3
you are required to manually sign on to
Press [YES] to confirm that you wish to
the switch.
order stationery for your terminal.
The terminal will now print a receipt step 1
confirming your order with a STATIONERY Press the [FUNCTION] key on the touch
ORDER PLACED message. screen.
step 2
Enter [5] and press [SELECT].
step 3
Select 1. NAB and press [SELECT].
The terminal will now communicate with
HICAPS and print a receipt confirming your
sign on.
step 4
Press the [FUNCTION] key on the touch
screen.
step 5
Enter [5] and press [SELECT].
step 6
Select 1. NAB and press [SELECT].
This will send a sign on message to example sign on receipt
the host and it must be approved.
The stationery will take 5-8 business
days for the rolls to arrive.
2.8 customising a HICAPS example customised receipt
receipt (optional)
To customise your HICAPS receipt for
seasonal or other messages.
step 1
Press the [FUNCTION] key on the touch
screen.
step 2
Enter [2] [6] and press [SELECT].
step 3
Enter [1] to [4] depending on where you
want your message to be printed on the
receipt. You will then be prompted to
enter your message using the keypad.
The alpha entry for the receipt text allows
up to 24 characters.
3. EFTPOS
3.1 processing an EFTPOS step 3
transaction Confirm that the outstanding value is
3.1.1 processing an EFTPOS transaction correct and press [YES].
following a successful claim
transaction
step 1
The following screen will be displayed if
the Provider is set up to accept a deposit.
If the provider has accepted a deposit
prior to the claim going through, press
[YES]. If not press [NO].
Note: The following screen will only be
displayed if the provider has claim to
deposit enabled.
step 4
Tap, Insert or Swipe the customers credit
or debit card.
step 2
Using the keypad, enter the the deposit
amount and press [OK].
step 5 step 7
The cardholder is to select their account The transaction will be processed by
on the touch screen or by selecting the the bank and be approved or declined.
number on the keypad that is next to the Please ensure you check the screen and
account name on the screen. receipt to confirm the transaction was
e.g 1 – CHQ, 2 – SAV, 3 – CR. approved or declined.
step 6 3.1.2 processing an EFTPOS transaction
The cardholder is required to key enter
their PIN and press [OK]. step 1
To start an EFTPOS Sale transaction,
Note: In some cases the card will not simply swipe/insert the patient’s EFTPOS
require a PIN and therefore a signature will card through the terminal. This could be
be required to complete the transaction. Credit: Visa, MasterCard, Charge: Amex,
Diners or JCB, or Debit: Cheque or Savings
as per your EFTPOS agreement.
step 2
Using the keypad, enter the Sale Amount.
step 3 step 5
Select the Merchant in which you want The cardholder is required to key enter
to process the EFTPOS transaction for and their PIN and press [OK].
press [SELECT]. Note: In some cases the card will not
Note: This screen only appears if the require a PIN and therefore a signature will
terminal has more than one active be required to complete the transaction.
merchant.
step 6
step 4 The transaction will be processed by
The cardholder is to select their account the bank and be approved or declined.
on the touch screen or by selecting the Please ensure you check the screen and
number on the keypad that is next to the receipt to confirm the transaction was
account name on the screen. approved or declined.
e.g 1 - CHQ, 2 - SAV, 3 - CR.
example EFTPOS sale receipt For further assistance on processing a
The EFTPOS receipt contains all of the Practice Management System transaction
information relating to the EFTPOS please contact your Practice Management
transaction. A second CUSTOMER COPY System provider.
is printed. The first copy is to be retained Note: Integration with a Practice
for your office records. The second copy Management System is not supported on
is for the cardholder’s own records. the VX680 mobile terminal model.
3.2 refunding an EFTPOS
transaction
3.2.1 refunding an EFTPOS transaction
There are two options for refunding
an EFTPOS transaction.
option 1
Refunding an EFTPOS transaction
processed by the same terminal.
step 1
Access the Transactions menu by pressing
[TRANS] on the touch screen.
step 2
Select 2. Refund/Cancel and press
[SELECT].
3.1.3 processing an EFTPOS transaction
(practice management system)
To start an EFTPOS transaction, simply
send the transaction to HICAPS by clicking
on the HICAPS icon on your Practice
Management System screen.
The terminal will prompt for the
customer’s EFTPOS (Credit or Debit) card
to be swiped. It will then prompt for the
remaining input: Provider (for MMF),
Account, PIN, etc. The results from the
transaction will be returned directly to the
Practice Management System and a receipt
for your records will be produced for the
customer to sign, together with a copy for
the customer.
step 3 option 2
The terminal will then prompt you for a Refunding any EFTPOS Transaction.
card. Swipe/Insert the cardholder’s card.
step 1
Access the Transactions menu by pressing
[TRANS] on the touch screen.
step 2
Select 2. Refund/Cancel and press
[SELECT].
step 3
The screen will then display the
transaction(s) processed on the terminal
by this cardholder for the current day.
If there is more than one transaction for
that cardholder, all transactions can be
reviewed by using the up/down arrow step 3
buttons on the touch screen. The terminal will then prompt you for a
Once you have located the transaction card. Swipe/Insert the cardholder’s card.
you wish to refund, press [YES].
Note: If the transaction is not in the
terminal journal press [NO] and continue
from Option 2 Step 4.
step 4 step 6
Use the arrows on the touch screen to Key the amount you wish to refund and
highlight the Merchant you wish to press [OK].
transact with and press [SELECT].
Note: This option will only appear if there
is more than one merchant loaded in this
terminal.
step 7
The cardholder is to select their account
on the touch screen or by selecting the
number on the keypad that is next to the
step 5 account name on the screen.
The terminal will then prompt you for e.g 1 – CHQ, 2 – SAV, 3 – CR.
the refund password for the selected
merchant. Key the password and
press [OK].
Note: If the password is unknown or not
being accepted you will need to call the
HICAPS Help Desk 1300 650 852 to have
the password reset .
step 8 3.2.2 refund an EFTPOS transaction
The cardholder is required to key enter (practice management system)
their PIN and press [OK]. To refund an EFTPOS transaction, simply
Note: In some cases the card will not send the transaction to the HICAPS
require a PIN and therefore a signature will terminal by selecting the appropriate
be required to complete the transaction. option from your Practice Management
System screen.
When the terminal receives the
transaction details from your Practice
Management System the terminal will
prompt for the customer card to be swiped.
The results from the transaction will
be returned directly to the Practice
Management System.
For further assistance on processing
a cancel transaction using your Practice
Management System transaction please
contact your Practice Management
step 9 System provider.
The transaction will be processed by
the bank and be approved or declined. Note: Integration with a Practice
Please ensure you check the screen and Management System is not supported on
receipt to confirm the transaction was the VX680 mobile terminal model.
approved or declined.
3.3 EFTPOS settlement step 3
Use the arrows on the touch screen to
Settling EFTPOS simply advises HICAPS
highlight the Merchant you wish to settle
that you have finished EFTPOS processing
with and press [SELECT].
for that day. Anything processed after
performing the settlement will be included Note: This option will only appear if there
with the following day’s transactions. is more than one merchant loaded in this
terminal.
Note: For Pre Settlement and Last
Settlement functions press the [SETTLE]
button on the touch screen.
3.3.1 manual EFTPOS settlement
Note: You cannot manually settle the
terminal if Automatic Settlement is
programmed (as in 3.3.2 Automatic
Terminal Settlement).
step 1
To settle your EFTPOS facility manually,
press the [SETTLE] key on the touch
screen.
step 4
Once you have selected the
provider/merchant from the list,
you have 3 options.
step 2
Select NAB and press [SELECT].
settlement 3.3.2 automatic terminal settlement
To print your current EFTPOS settlement This option enables your terminal to
details and optionally a full transaction settle automatically at a pre-determined
listing, then process your totals to your time each day.
bank account.
To set up your terminal to settle
pre-settlement automatically:
To print a report summarising the totals
for EFTPOS transactions processed so far step 1
during the current settlement period. Press the [FUNCTION] key on the touch
screen.
last settlement
To print a report summarising the
totals for EFTPOS transactions previous
settlement period.
step 2
Using the keypad, enter [5] [6] and press
[SELECT].
step 3
Select 2. Auto Settle NAB and press
[SELECT].
Note: To view the current settlement setup
select 1. Settlement enable/disable.
step 4 step 6
Select option 1. All Merchants if you Press [ENABLE] to confirm that auto settle
would like to setup auto settlement for is to be enabled for the select merchant/s.
all active merchants on the terminal,
or 2. Select Merchant if you would like
to set up an individual merchant.
step 7
The terminal will ask if you wish to
print a complete transaction listing
step 5 when each auto-settle is performed.
Select option 1. Auto Settle and press Select [ENABLE] to print the listing,
[SELECT]. or [DISABLE] to produce only totals.
step 8 step 10
Using the keypad, enter the settlement The terminal is programmed to retry
time in which you would like the terminal an auto settlement upon failure to
to perform the settlement and press [OK]. complete. Using the keypad, set the
Note: The terminal time is in 24hr format. number of settlement retry attempts
(between 1 and 3), and press [OK].
To accept the default (3), just press [OK].
step 9
The terminal will ask you to confirm the
time entered. Press [YES] if the start auto
settlement time displayed is correct, or
[NO] to re-enter a different time.
3.3.3 host forced settlement step 3
The terminal automatically settles at 21:30 Select option 4. Merchant Options and
VIC/NSW time each day. The automatic press [SELECT].
settlement time can optionally be moved.
See Automatic Terminal Settlement 3.3.2.
If the terminal is not settled then it will
be automatically settled by the HICAPS
switch at the relevant time.
Note: If the HICAPS switch settles then no
receipt is printed. To obtain Totals please
use Last Settlement Enquiry, refer to 3.3.1.
3.3.4 merchant password
The terminal is able to have a known
password, a password that is set up
step 4
when your terminal is installed or
a scrolling password. Use the arrows on the touch screen
to highlight the Merchant you wish
If you know your password you can
to change the password for and press
change your password using the below
[SELECT].
steps. If you don’t know your password
you will need to contact the HICAPS Note: This option will only appear if there
Helpdesk on 1300 650 852 and they will is more than one merchant loaded in this
tell you how to change your password. terminal.
step 1
Press the [FUNCTION] key on the touch
screen.
step 2
Using the keypad, enter [5] [6] and
press [SELECT].
step 5 step 8
Select option 1. Merchant Password and Re-enter the new password and press
press [SELECT]. [OK].
step 6 Surcharge
Enter the existing 4-digit password and
press [OK]. Merchants have the ability to charge
customers an additional fee for paying
by debit or credit cards – surcharging.
The surcharge can be either a fixed fee
or a percentage fee based on the value
of the transaction.
A surcharge fixed fee amount that is
greater than $3 or a percentage amount
greater than 15% is prohibited by the
terminal.
If you do decide to charge customers a
fee for paying by a debit or credit card
you will need to make sure you do not
step 7 act in a misleading or deceptive way.
Enter a new 4-digit password and press You should ensure customers are aware
[OK]. of the following:
• Customer are aware of the extra charge.
•H
ow much it will be before the
transaction is entered into.
This can be done in many ways, including
in-store notices or prominent messages
on bills. Customers can choose whether
to pay the card fee or to use another form
of payment; eg. cash. The customer will
have the option on the terminal screen to
not accept the surcharge and cancel the
transaction.
3.4 surcharge setup step 5
Select option 2. Surcharge press [SELECT].
step 1
Press the [FUNCTION] key on the touch
screen.
step 2
Using the keypad, enter [5] [6] and press
[SELECT].
step 3
Select option 4. Merchant Options and
press [SELECT].
step 6
Press [ENABLE] to add the merchant to
the All Merchant surcharge value group,
or Press [DISABLE] to enter individual
surcharge values
step 4
Use the arrows on the touch screen to
highlight the Merchant you wish to
change the surcharge values for and press
[SELECT].
Note: This option will only appear if there
is more than one merchant loaded in this
terminal. Note: Select All Merchants in step 4 to
charge the individual surcharge values
for merchants that have the All Merchant
option enabled.
step 7 step 9
Press [YES] to make changes to Press [ENABLE] to enable the prompt
surcharge values. during a EFTPOS transition
Press [DISABLE] to remove the prompt
step 8
Press [ENABLE] to activate surcharging. step 10
Press [DISABLE] to deactivate surcharging. Scroll to the card type. For example
2. Visa CR then press [SELECT]
step 11 step 13
Press [YES] to ACCEPT these types Choose whether you want the surcharge
of cards on your terminal amount to be a fixed fee or a % of the
Press [NO] to cancel and return to the total then press [SELECT]
home screen
step 14
step 12 Enter a percentage amount (max 15%) or
Press [YES] to set up SURCHARGE for these a fixed fee amount (max $3.00).
types of cards on your terminal Press [OK]
Press [NO] to cancel and return to the
home screen
step 15 3.5 UnionPay Cards
Check the confirmation screen and press
UnionPay Cards
[YES] to confirm or [NO] to cancel UnionPay is a card scheme that originated
in mainland China and also operates
throughout parts of Asia. UnionPay
issues both debit and credit cards which
can be accepted at selected merchants
across Australia.
Processing UnionPay transactions
All UnionPay cards can be swiped/inserted
or tapped through the terminal card
reader to initiate the transaction.
Verification method
step 16 Debit card PIN & signature are mandatory
Repeat these steps for each card type, Credit card PIN & signature OR
account type and surcharge method signature only
you want applied. Authorisation
Press [CANCEL] to exit the menu. All UnionPay transactions are authorised
A report will print listing each card online by UnionPay.
type your terminal accepts and the
fixed amount or percentage fee that Fallback & manual transactions
applies where applicable. There are no floor limits (i.e. zero floor
limit) as UnionPay does not permit fallback
or manual transactions.
Functionality
The functionality that is available
on EFTPOS terminals for UnionPay
transactions are:
– Purchase
– Refund
– Pre-Authorisation
– Pre-Authorisation Completion
– Pre-Authorisation Cancellation
– Pre-Authorisation Completion
Cancellation
Cash-out, Tipping and Void functions
are not available with UnionPay cards.
4. TERMINAL FUNCTIONS
4.1 functions 4.2 transaction menu
4.1.1 settle The following menu lists the available
The SETTLE button is used to perform transactions for the HICAPS VX terminal.
and print a manual EFTPOS settlement
4.2.1 balance/quote
by merchant or daily HICAPS totals by
provider. The Balance Inquiry option can be used
to request an account balance, but only
For more information see the Settlement for NAB debit cardholders.
section (3.3)
The Quote option allows a provider
Note: A manual EFTPOS settlement can not to provide a quotation to a patient by
be performed if auto settle is enabled. checking with the patient’s Health Fund
4.1.2 trans what they are covered for. Entering
a quote transaction is the same as for
The TRANS button is used to initiate
a claim transaction.
a variety of transactional functions
including: Note: Refer to HICAPS website
www.hicaps.com.au for Health Funds
- Balance/Quote
participating in the quotations function.
- Refund/Cancel
- Pre-Auth
- Completion
- Cashout
- Sale/Claim
- Deposit
4.1.3 function
The FUNCTION button is used to access
the entire function menu.
4.2.2 refund/cancel 4.2.4 completion
The Refund/Cancel option is used The Completion option is used
to either reverse/refund an EFTPOS to process the value transaction relating
transaction or cancel a HICAPS Claim to a pre-authorisation already obtained.
transaction (refer to section 2.4.1). A completion must be performed
within four business days of obtaining
a pre-authorisation, and is only available
for CREDIT cards.
4.2.3 pre-auth
The Pre-auth option is available for
credit cards only.
4.2.5 cash out
A pre-authorisation is a non-value
transaction. In order to process the The Cash Out option allows you to provide
value portion of a pre-authorisation, cash to your customers. The terminal
refer to the completion option below. will also prompt for cash out or tips if
you have these options configured in the
terminal. If you wish to ignore the cash
out or tip option, press SELECT to bypass
those steps.
Cash out is available on cheque and savings
accounts only.
4.2.6 sale S/K – the card was Swiped or Keyed
The Sale option is explained in section 3.1 NO – the transaction was either Approved
or processed offline
x – the transaction has been sent to the
acquiring bank, if the [X] is absent
the transaction has been processed
in [fallback] and will be passed to
the host with the next transaction.
shift totals
As well as allowing the running shift
total to be reset, you can produce
a summary report of EFTPOS transactions
processed since the last shift total reset
was performed.
4.3 terminal function options
To access functions menu, simply press the reprint
[FUNCTION] key followed by the function This is used to reprint the receipt for an
you want to use, e.g. REPORTS [1]. EFTPOS or HICAPS transaction processed
in the current batch. By using Last for the
4.3.1 reports [1] key (print EFTPOS previous transaction or Invoice for any
and HICAPS reports) other receipt in the batch using the invoice
The Reports function (1) allows you to number (last six digits of the RRN).
print a number of different standard
reports from the terminal. provider
This is used to print a summary of the
Transaction Listing provider’s set up.
Produces an audit trail of transactions
processed through the terminal. surcharge
The details for each transaction include: This is used to print out the current
card surcharge values for all merchant
Transaction Type: Claim, Cancel, Sale etc. or individually.
Transaction Date and Time
AMIS
(format dd/mm/yy hh:mm).
This is used to check what values have
Transaction amount: in the case of been set for the Automated Settlement
a claim, the total amount requested. by merchant.
Card Type: HICAPS, VISA etc.
4.3.2 configuration setup [2] key
Authorisation Number. (refer help desk)
Invoice Number: used to reprint This option should only be used
an EFTPOS transaction receipt. on advice from the help Desk.
Card Number: for HICAPS the full card
number used for the transaction is
required. For eftpos, truncated card
number is required.
Transaction Code:
4.3.3 terminal restart [3] key 4.4 changing the terminal
The Terminal Restart function (3) is used security password
to re-start the terminal. The terminal security password is used
4.3.4 terminal lock [4] key to process both EFTPOS Refunds and to
also unlock the terminal for use.
The Lock function (4) is used to lock and
unlock your HICAPS terminal to provide To change the password:
added security. When active the Lock
step 1
option prevents all use of the terminal
Press the [FUNCTION] key.
until the security password is keyed in.
Once the terminal is locked it will be step 2
unusable until your 4-digit terminal Enter [9] [0] and press the [SELECT] key.
security password is keyed followed by
[SELECT].
4.3.5 terminal logon [5] key
The Terminal Logon Function (5) is used
to logon to the NAB/ HICAPS host or
Medicare host.
4.3.6 balance enquiry/quote [6] key
The Balance Enquiry/Quote function (6)
allows a provider to provide a quotation
to a patient by checking with the patients
Health Fund what they are covered
step 3
for. Entering a quote transaction is the
Enter your existing 4-digit password
same as for a claim transaction a claim
and press the [OK] key.
transaction.
step 4
4.3.7 stationery order [7] key
Enter a new 4-digit password and
The Stationery Order function (7) is used press the [OK] key.
to order terminal paper rolls as detailed in
section 2.6.
4.3.8 reprint [8] key (reprint EFTPOS
and HICAPS transactions)
The Reprint function (8) is used to either
reprint the receipt for the last transaction
or reprint any transaction by entering the
invoice number which is the last six digits
of the RRN number found on receipts.
4.3.9 terminal SW load [9] option
This option should only be used on
advice from the Help Desk.
step 5
Enter your new password again and
press the [OK] key.
step 2
Enter authorisation number* (refer below
for contact phone numbers) and press the
[OK] key.
4.5 fallback procedure
If authorisation is not received, press
We are committed to delivering a the [CANCEL] key and request another
continually high level of uninterrupted form of payment.
service to you. However there
Note: The transaction will be stored
may be times when system issues,
within the terminal and passed on when
telecommunications faults or faulty
communication is available.
terminals prevent us from doing so. In the
event of a system outage, your terminal If the amount of the transaction is below
may function in fallback mode. your floor limit, the transaction will be
approved on fallback. The receipt will
In the event of the terminal being unable
detail APPROVED 08 (fallback). Please
to communicate with the NAB/HICAPS
ask the customer to sign the receipt. The
host, it will default to a fallback situation.
transaction will be stored in the terminal
Amounts above your floor limit require an
and passed on when communication
authorisation number to be obtained and
is available. Please call the HICAPS Help
entered when requested into the terminal.
Desk if your terminal processes more
step 1 than 2 fallback transactions in a row.
If a transaction is unable to be processed For authorisation call:
due to a communication problem, the Credit Cards 13 25 15
following screen may be displayed at the American Express 1300 363 614
end of the transaction. Diners Club 1800 331 112
Authorisation services are available
24 hours a day, 7 days a week.
Call the above contact number to
*
obtain a valid authorisation number.
5. TERMINAL CONNECTIONS
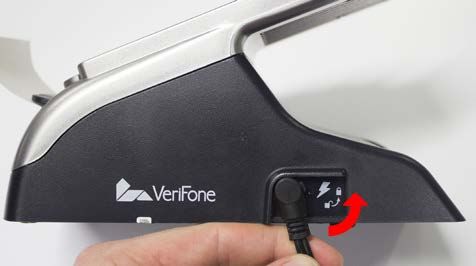
5.1 terminal Connectivity – VX820 5.2.1 power
The terminal can send transaction Every terminal comes with a power
messages via two separate comms pack which connects into the side of the
methods, Dial and Ethernet (IP –Internet docking station. This cable locks into
Protocol) the connection by inserting and turning
upright
5.1.1 dial
The terminal can send transaction/comms
messages via a dial method. This method
requires the connection of a standard
RJ11 phone line cable. This cable is to be
plugged into the telephone comms port
found at the back of the terminal docking
station (refer to 5.2.4)
5.1.2 ethernet (IP – Internet Protocol)
The terminal can send transaction/comms
5.2.2 terminal pin pad
messages via an ethernet method. This
method requires the connection of a LAN The terminal pin pad receives power from
cable. This cable is to be plugged into the plugging into the connection located at
Ethernet port labeled (ETH) found at the the back of the docking station
back of the terminal docking station (refer
to 5.2.3)
5.2 the terminal docking station
– VX820
The terminal dock is the base in which the
terminal receives power, communications
and PMS physical integration. The terminal
dock includes 5 active ports (power, terminal
pin pad, RS232, Ethernet, telephone line)
Note: The dock also includes a USB port,
although this is not currently active
5.2.3 ethernet
The terminal receives IP connectivity via an
active LAN cable being plugged into the
Ethernet port labeled ETH on the back of
the docking station
5.3 terminal Connectivity - VX680
The terminal can send transaction
messages via three separate comms
methods, Dial, Ethernet (IP –Internet
Protocol) and the 3G mobile network.
5.2.4 telephone line
The terminal receives telephone
connectivity via an active RJ11 phone line
cable being plugged into the phone port
on the back of the docking station
5.3.1 dial
The terminal can send transaction/comms
5.2.5 RS232 (PMS Integration) messages via a dial method. This method
The docking station includes an RS232 requires the connection of a standard
serial port. This port is used for connecting RJ11 phone line cable. This cable is to be
and integrating the terminal with a PC plugged into the telephone comms port
Practice Management System via an found at the back of the terminal docking
RS232 cable. station (refer to 5.4.2)
5.3.2 3G mobile network
The terminal can send transaction/comms
messages via the 3G mobile network. An
indication of the strength of the 3G mobile
network being received is displayed on the
terminals home screen (refer to 1.3)
5.4 the terminal docking station 5.4.2 telephone line
– VX680 The terminal receives telephone
The terminal dock is the base in which the connectivity via an active RJ11 phone line
terminal battery can be charged and also cable being plugged into the phone port
where it receives dial communications. on the back of the docking station
5.4.3 ethernet
The terminal receives IP connectivity via
5.4.1 power an active LAN cable being plugged into
Every terminal comes with a power pack the Ethernet port labeled ETH on the back
which connects into the back of the of the docking station
docking station. A green light at the front
of the docking station will be lit when
power is being received.
6. THERMAL PRINTER
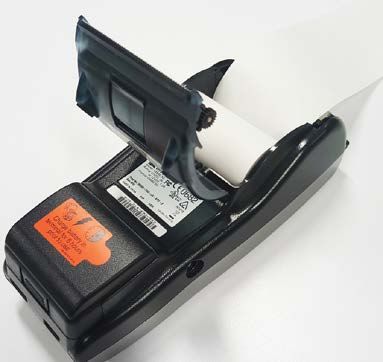
The HICAPS terminals have high speed, 6.2 VX680
whisper quiet thermal printers . They must Loading the VX680 Thermal Printer.
only be loaded with special thermal paper
The paper is loaded on the back
available from HICAPS, ordered either
of the VX680.
through the terminals, refer: 2.6 Ordering
Terminal Rolls or by contacting the HICAPS Flip the terminal over and lift the clip
Help Desk on 1300 650 852. found at the top of the terminal.
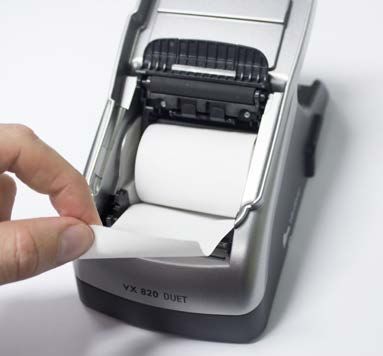
6.1 VX820
Loading the VX820 Thermal Printer.
The front of the VX 820 dock also
includes the Paper Roll Dispenser and
thermal Printer.
The paper guard will swing open.
Remove whatever is left of the old roll.
Place the new roll into the paper chamber
– ensuring that the paper is feeding out
from the bottom of the roll and then close
the paper guard over the paper.
There is a clip at the base with a paper
roll icon on it.
Lift the clip and the paper guard will
swing open.
Remove whatever is left of the old roll.
Place the new roll into the paper chamber
– ensuring that the paper is feeding out
from the bottom of the roll.
Close the paper guard.
7. HICAPS RESPONSE CODES
7.1 transaction level HICAPS response codes
code Description Receipt print Out
00 Approved or completed Approved
successfully
01 Provider not approved by fund Prov Not Approv
02 Membership under investigation Mship Under Invest
03 Invalid provider number Invalid Prov Nbr
04 Retain card Retain Card
05 Transaction Timeout System Inoperative
(Terminal reports as 91)
06 Transaction Timeout
(Subsequently identified)
09 Transaction submitted Submitted
for processing
10 Transaction submitted for Rebate To MBR Pendg
processing (SAF)
12 Declined Declined
14 Invalid card number Invalid Card Nbr
(no such number)
15 Items not accepted by this Fund Itms Not Accptd
19 No items entered No Items Entered
21 No action taken Call Help Desk
32 System generated Reversal
40 Membership not covered Mship Not Covered
42 Membership ceased/ Mship Ended at DOS
suspended at date of service
51 Membership unfinancial Mship Unfinancial
54 Expired card Expired Card
56 Invalid membership number Invalid Mship Nbr
57 No ancillary cover No Ancillary Cover
58 Transaction not permitted Txn Not Permitted
to terminal
60 Provider not registered with fund Provider Not Registd
61 Benefit limit exceeded Benefit Limit Exced
68 System generated Reversal
80 Payment should be made by Refer Employer
the Claimant's Employer
81 Unable to Match Cancel to Unmatched Cancel
Previous Claim
82 Claim being Cancelled has Unsupported Cancel
already be Settled
83 Too many patients for this Too Many Patients
transaction
91 Health Fund Down Fund Down
94 Duplicate transmission Duplicate Txn
97 Advises that reconciliation Reconc Totals Reset
totals have been reset
QL Quote Limit Reached Quote Limit Reached
QN Quote Not Available Quote Not Available
P0-PZ Refer to Health Fund Refer Health Fun
H1 Time Out waiting for ACK from terminal
H2 Maximum number of ACK Time Outs reached
H3 Timed Out waiting for response message
from terminal
H4 LRC Error in response message
H5 Unable to send, terminal not connected
H6 Terminal busy
HX ActiveX Internal Error
BZ Communication Error
CE Communication Error
ED Destination Error
EN Network Request Error
HM Hardware Error
HW Hardware Error
LC Unexpected loss of carrier
NA Transaction Type not available
ND Reversal Time Out
NM No sync with Modem network Failure Contact
Help Desk
NS Declined – Settlement required
Pf Power fail Power lost before completion of transaction
QL Quote Limit Reached Quote Limit Reached
QN Quote Not Available Quote Not Available
TO Time Out Error
TC Cancelled by user or input time out
VN Void not allowed
LR Terminal Logon Required
JF Journal Full
IM Invalid MAC
DI Duplicate Invoice
TA Transaction Not Allowed
NP Provider number not found
LP Locked Provider
IL Number of items exceeded limit
TP The transaction password is protected
II Invalid max item setup
FL An [empty] Claim initiated from Practice
Management System. (i.e. only provider
in the EA field)
FC Field content error – (a) Non numeric field
such as patient ID, Body part number, service
date and amount contain non-numeric data
(i.e. anything other than accept ‘0’ to ‘9’)
(b) Alpha numeric field such as item number
contains symbols. (i.e. anything other than
‘A’ to ‘Z’. ‘a’ to ‘z’, ‘0’ to ‘9’ and space)
Note 1: Response code for the unmatched reversal, void, cancellation) transactions.
Note 2: Response code in the range P0 – P9 and PA – PZ indicate that a transaction
has been declined by the Health Fund for a specific reason. These transactions must
be followed up directly with the fund.
7.2 item level hicaps response codes
code Description Receipt Print Out
00 Approved Approved
01 Nil benefit payable on this item Item No Benefit
02 Nil benefit - restricted item Restricted Item
03 Reduced benefit - restricted item Restricted Item
04 Nil benefit - benefit previously paid Previously Paid
05 Nil benefit - limit reached Limit Reached
06 Reduced benefit - limit reached Limit Reached
07 Nil benefit - qualifying period applies Waiting Period
08 Nil benefit - pre-requisite service required PreReq Ser Reqd
09 Nil benefit - pre existing ailment Pre Existing
10 Item number invalid Item Nbr Invalid
11 Item number ceased Item Nbr Ceased
12 Item not valid for provider Item Not Valid
13 Item not approved …not payable by HICAPS Item Not Apprvd
14 Service exceeds number of times permitted Max Nbr Ser Exc
15 Cost must be entered Cost Missing
16 Date of service must be before today DOS Not Valid
17 Date of service too old DOS too Old
18 Clinical Code required Clincl Code Rqd
19 Patient not covered Pat Not Covered
20 Dependent status ceased Depd Status End
21 Invalid patient code Invald Pat Code
22 Membership not covered Mship Not Cover
23 Membership ceased/suspended at DOS Mship Ended DOS
24 Membership unfinancial Mship Unfin DOS
25 No ancillary cover No Ancill Cover
26 Not covered for this service Item Not Coverd
27 Duplicate service already processed Duplicate Serv
28 Nil benefit – Excess on services applied Excess on Serv
29 Reduced benefit – Excess on services applied Excess on Serv
30 Nil benefit – Quote required prior to service Quote Required
31 Reduced benefit – Quote required prior to Quote Required
service
32 Nil benefit – Claim exceeds quotation Exceeds Quote
33 Reduced benefit – Claim exceeds quotation Exceeds Quote
34 Nil benefit – Age restriction applies Age Restriction
35 Reduced benefit – Age restriction applies Age Restriction
36 Nil benefit – Gender restriction applies Gender Restrict
37 Reduced benefit – Gender restriction applies Gender Restrict
38 Nil benefit – Amount charged is invalid Invalid Charge
39 Notional Charge Notional Charge
40 Converted Item Converted Item
41 Refer to Health Fund Refer to Fund
42 System Problem System Problem
43 Transaction Declined – Refer Tran Resp Code Refer Tran Resp
44 Medical Certificate Required Medical Crt Req
50 Provider not approved by Fund (at DOS) Prov Not Approv
51 Provider not approved by Fund for this Prov Not Approv
service at DOS
52 Tooth ID Number Required Tooth Id Reqd
53 Service Date Before Injury Date DOS before Injury
54 Transaction Submitted for Processing Submitted
55 ICD 10 Required ICD 10 Required
56 Charge Exceeds Agreed Minimum Chg Over Agreed
P0-PZ Refer to Health Fund Refer to Fund
Note 1: Item codes in the range P0 – P9 and PA – PZ indicate that an item has been
declined by the Health Fund for a specific reason. These items must be followed up
directly with the Fund.
8. EFTPOS ERROR MESSAGES AND CORRECTIVE ACTIONS
code short Description Details
00 Approved Transaction approved or completed
successfully
04 Pick up card Declined. The Card Issuer has requested
the card be retained by the merchant
and returned to the acquirer with the
merchant vouchers
05 Declined The transaction has been declined
07 Pick up card Pick up card– The Card Issuer has requested
the card be retained by the merchant and
returned to the acquirer with the merchant
vouchers – special condition
13 Invalid Amount The amount of the transaction is invalid for
the type of transaction or merchant
14 Invalid Card Either the Card Issuer does not recognise the
card or the card number is not allowed to be
processed by the terminal
15 No such issuer The card issuer is not known by the terminal
or switch
21 No action taken The card issuer did not process the
requested transaction
31 Issuer Not Supported The acquirer does not have an acquiring
arrangement with the issuer of this card
32 Partially Completed The transaction was not fully completed and
has been reversed
33 Expired Card The terminal has advised that the card
used for the transaction is expired or has
been replaced
38 PIN Retried Exceeded The allowable number of pin retries has been
exceeded for the card
39 No Credit Account The Credit account was selected for
the transaction, but one is not attached
to the card
43 Pick up card Pick up card – The Card Issuer has requested
the card be retained by the merchant and
returned to the acquirer with the merchant
vouchers – stolen card
52 No Cheque Account The Cheque account was selected for
the transaction, but one is not attached
to the card
53 No Savings Account The Savings account was selected for
the transaction, but one is not attached
to the card
54 Expired Card The Card Issuer has advised that the card
used for the transaction is expired or has
been replaced
55 Incorrect PIN The PIN entered by the cardholder is not
valid for the card used
58 Not Permitted This type of transaction is not permitted
to be performed at this terminal
61 Exceeds Limit The transaction amount exceeds the daily
or weekly withdrawal limit
65 Exceeds Frequency The number of transactions exceeds the
number allowed by the Card Issuer
75 PIN Retried Exceeded The allowable number of pin retries has
been exceeded for the card
76 Approved The transaction was approved but the
terminal will perform an automatic sign
on for security reasons
91 System Inoperative The Switch or Card Issuer is currently
not available
96 System Malfunction The Switch has experienced a serious
malfunction or the message is unable
to be processed due to invalid details
in one or more fields
97 Totals Reset Settlement has been processed and the
terminal totals have been reset
98 MAC Error The Switch has identified a possible
security error or the message is unable
to be processed due to invalid details
in one or more fields
N1 Upgrade Available Transaction approved – a new version
of terminal
N2 PIN PAD Error Transaction declined – the PINPAD connected
to the terminal is invalid and cannot be used
on the terminal
N3 Upgrade Required Transaction declined – the current version
of terminal
Pf Power fail Power lost before completion of transaction
Note: If the screen display is blank, power reset the terminal and check connections.
If problem persists, call the Help Desk.
If any other error messages are displayed, please call the Help Desk.
9. MERCHANT REQUIREMENTS TO ENSURE
EFTPOS TRANSACTIONS ARE VALID
1. For all manual transactions:
(a) Always try the transactions through the PIN pad first.
(b) Check the card is being used after its ‘valid from’ date and before its ‘valid to’ date.
(c) Ensure the card is not recorded on any warning bulletin.
(d) Ensure that the card imprint is legible and complete.
(e) Obtain authorisation for above floor limit transactions.
2. For any signature based transaction verify the cardholder’s signature matches the
signature on their card. If the signature does not match, or you are suspicious of the
sale, contact the appropriate centre listed on the next page.
3. Ensure the accuracy of any card information keyed into the PIN pad.
4. Retain your electronic transaction receipts and manual transaction vouchers for
a period of not less than 12 months.
If any of these conditions are not met, it is possible that the transaction may be invalid
and the merchant account debited for the value of the disputed transaction.
You can also read