User Guide for Windows - 2002- 2013 ContentWatch Inc. All rights reserved. 6949 S. High Tech Drive, Midvale, UT 84047
←
→
Page content transcription
If your browser does not render page correctly, please read the page content below

User
Guide
for
Windows
©
2002-‐2013
ContentWatch
Inc.
All
rights
reserved.
6949
S.
High
Tech
Drive,
Midvale,
UT
84047
Legal Notices ContentWatch, Inc. makes no representations or warranties with respect to the contents or use of this documentation, and specifically disclaims any express or implied warranties of merchantability or fitness for any particular purpose. Further, ContentWatch, Inc. reserves the right to revise this publication and to make changes to its content, at any time, without obligation to notify any person or entity of such revisions or changes. Further, ContentWatch, Inc. makes no representations or warranties with respect to any software, and specifically disclaims any express or implied warranties of merchantability or fitness for any particular purpose. Further, ContentWatch, Inc. reserves the right to make changes to any and all parts of ContentWatch software, at any time, without any obligation to notify any person or entity of such changes. You may not use, export, or re-‐export this product in violation of any applicable laws or regulations including, without limitation, U.S. export regulations or the laws of the country in which you reside. Copyright © 2002-‐2013 ContentWatch, Inc. All rights reserved. No part of this publication may be reproduced, photocopied, stored on a retrieval system, or transmitted without the express written consent of the publisher. U.S. Patent No. 745,591. Patents Pending. Net Nanny User Guide for Windows July 2013 ContentWatch Trademarks ContentProtect is a trademark of ContentWatch, Inc. in the United States and other countries. ContentProtect Professional is a trademark of ContentWatch, Inc. in the United States and other countries. ContentWatch is a trademark of ContentWatch, Inc. in the United States and other countries. Net Nanny is a trademark of ContentWatch, Inc. in the United States and other countries. Third-‐Party Materials All third-‐party trademarks are the property of their respective owners. ContentWatch Inc. 6949 S. High Tech Drive Midvale, Utah 84047 USA Copyright 2013 ContentWatch Inc. Net Nanny User Guide 2

Table
of
Contents
Welcome
to
Net
Nanny
..........................................................................................................
4
System
Requirements
and
Key
Features
.................................................................................
5
System
Requirements
......................................................................................................................
5
Key
Features
....................................................................................................................................
5
Installing
Net
Nanny
...............................................................................................................
6
Pre-‐installation
................................................................................................................................
6
Operating
System
Compatibility
..........................................................................................................
6
How
can
I
tell
which
version
of
Windows
I
have?
...............................................................................
6
First
time
installation
of
Net
Nanny
..................................................................................................
8
Removing
Net
Nanny
............................................................................................................
17
How
to
Access
the
Remote
Admin
Console
...........................................................................
21
Browser
Access
..............................................................................................................................
21
Windows
Desktop
System
Tray
Access
...........................................................................................
22
Using
the
Net
Nanny
Admin
Console
....................................................................................
23
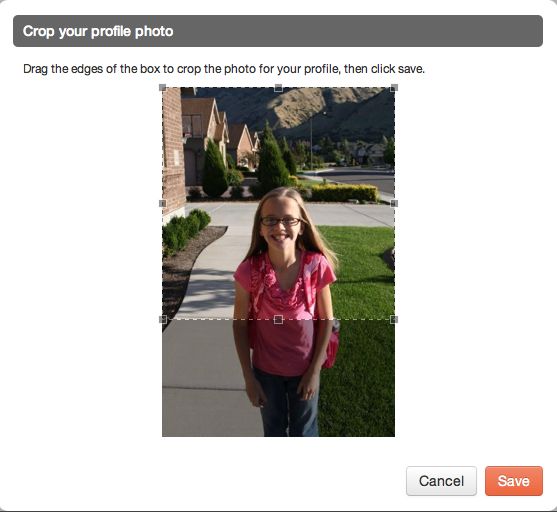
Dashboard
.....................................................................................................................................
24
Net
Nanny
icon
..............................................................................................................................
24
Add
User
............................................................................................................................................
27
Content
Categories
and
Profiles
....................................................................................................................
30
Definition
of
Block,
Warn,
Allow,
and
Profanity
Mask
..................................................................................
30
Content
Categories
............................................................................................................................
32
Definition
of
Block,
Warn,
Allow,
and
Profanity
Masking
.............................................................................
34
Allow/Block
........................................................................................................................................
37
Scheduling
.........................................................................................................................................
40
User
Settings
......................................................................................................................................
44
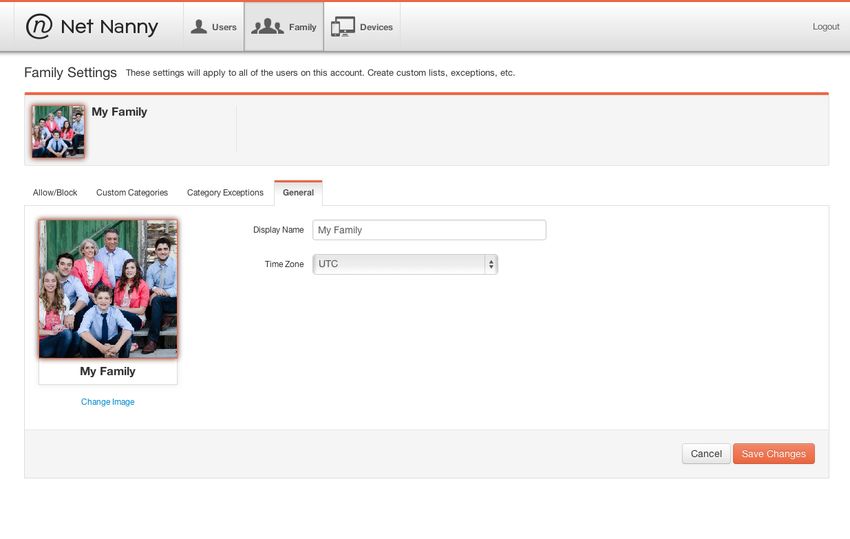
Family
Tab
......................................................................................................................................
53
Allow/Block
........................................................................................................................................
54
Custom
Categories
.............................................................................................................................
56
Category
Exceptions
..........................................................................................................................
62
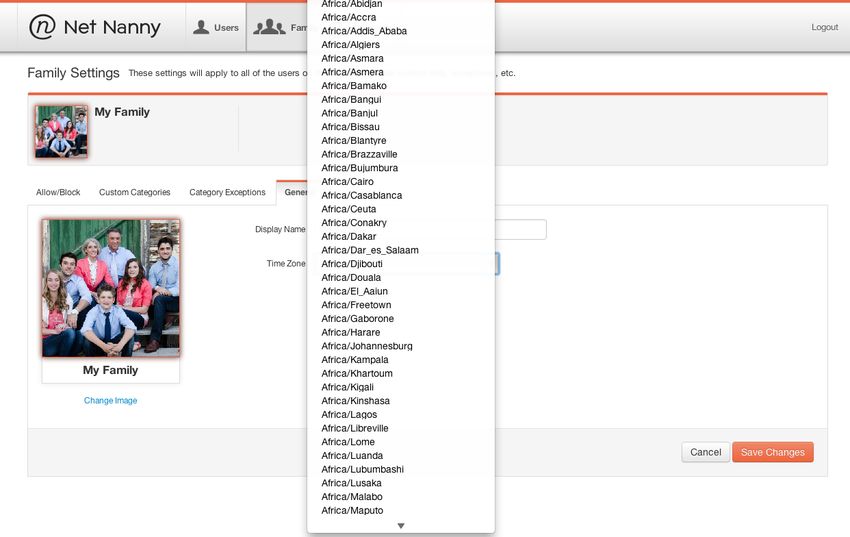
General
..............................................................................................................................................
63
Devices
Tab
....................................................................................................................................
65
Current
License
...................................................................................................................................
65
Edit
or
Remove
Device
License
...........................................................................................................
66
Edit
Name
of
Computer
......................................................................................................................
66
Add
Licenses
.......................................................................................................................................
67
Net
Nanny
Info
.....................................................................................................................
69
Web
Content
Filtering
Categories
...................................................................................................
69
Definition
of
Content
Categories
....................................................................................................
71
Glossary
................................................................................................................................
72
Third
Party
Software
License
Information
.............................................................................
73
Copyright
2013
ContentWatch
Inc.
Net
Nanny
User
Guide
3
Welcome
to
Net
Nanny
Welcome
to
Net
Nanny™,
the
most
comprehensive
Internet
filtering
software
available
today.
Net
Nanny
comes
preset
to
protect
you
from
objectionable
and
inappropriate
content.
However,
because
not
all
users
are
alike,
Net
Nanny
also
allows
you
to
modify
the
filter
settings
so
you
can
customize
Net
Nanny
to
suit
your
individual
usage
needs.
The
following
resources
are
available
to
help
you
use
Net
Nanny
for
Windows:
This
Net
Nanny
User
Guide
for
Windows
(PDF
format)
is
available
from
the
Net
Nanny
Admin
Console.
It
provides:
• Step-‐by-‐step
instructions
• Net
Nanny
category
list
with
descriptions
• Glossary
Customer
Service
is
available
Monday
through
Friday,
8
a.m.
to
5
p.m.
Mountain
Time,
by
calling
1-‐800-‐485-‐4008.
(If
outside
the
United
States,
please
call
+1-‐801-‐508-‐3600.)
Email-‐based
Customer
Service
is
available
any
time
by
sending
questions
to
support@contentwatch.com.
Emails
will
be
answered
within
one
business
day
or
less.
Documentation
Conventions
A
trademark
symbol
(either
™
or
TM)
denotes
a
ContentWatch
trademark.
An
asterisk
(*)
denotes
a
third-‐party
trademark.
Copyright
2013
ContentWatch
Inc.
Net
Nanny
User
Guide
4
System
Requirements
and
Key
Features
This
section
describes
the
device
prerequisites
that
must
be
met
for
Net
Nanny™
to
be
installed.
It
also
describes
some
of
the
key
features.
System
Requirements
Microsoft*
Windows
7*
or
8*
(32-‐bit
and
64-‐bit)
and
compatible
computer
Key
Features
• User-‐friendly
interface
• Web-‐based
Administrator
portal
for
Net
Nanny
for
Windows
and
Android
• Enforced
Google
Safe
Search
• Filtering
of
encrypted
(SSL)
web
sites
(July
2013)
• Filtering
of
secure
proxy
sites
(July
2013)
• Profanity
Masking
• Web-‐based
summary
and
detailed
reports
• Customizable
whitelist
and
blacklist
for
users
and
families
• Easy
user
creation
with
customizable
profiles
• Email
notifications
• Instant
override
and
override
request
options
Copyright
2013
ContentWatch
Inc.
Net
Nanny
User
Guide
5
Installing
Net
Nanny
Pre-‐installation
Operating
System
Compatibility
This
version
of
Net
Nanny
for
Windows
works
with
computers
running
Windows
7*
or
8*
(32-‐bit
or
64-‐bit).
How
can
I
tell
which
version
of
Windows
I
have?
1. First,
open
the
System
Properties
window.
The
quickest
way
to
do
that
is
to
click
on
the
Libraries
icon
in
the
Windows
task
bar
(lower
left
corner
of
the
desktop
screen
shown
circled
below).
Copyright
2013
ContentWatch
Inc.
Net
Nanny
User
Guide
6
2. Then
right-‐click
on
Computer
which
is
shown
in
the
left-‐navigation
pane
of
the
Libraries
window
and
Select
Properties.
(both
shown
circled
below)
3. In
the
resulting
window
that
opens,
you’ll
see
Windows
Edition
information
near
the
top
center
portion
of
the
screen.
(circled
below)
Copyright
2013
ContentWatch
Inc.
Net
Nanny
User
Guide
7
First
time
installation
of
Net
Nanny
Important:
To
install
Net
Nanny™
on
the
Windows
7*
or
8*
computer
you
wish
to
protect,
make
sure
that
computer
is
connected
to
an
Internet
connection
(Wi-‐Fi
or
Ethernet).
1. Install
Net
Nanny:
Go
to
http://www.netnanny.com/downloads/windows
Next,
click
on
32-‐bit
Download
here
link
or
the
64-‐bit
Download
here
link.
Note:
Windows
8
users
will
ALWAYS
download
the
64-‐bit
version.
(both
shown
circled
below)
The
most
recent
version
of
Windows
7*
included
64-‐bit
support.
If
you
are
uncertain
about
the
version
of
Windows
7*,
refer
to
the
previous
section
in
this
User
Guide
to
determine
which
version
you
have.
Copyright
2013
ContentWatch
Inc.
Net
Nanny
User
Guide
8

2. After
clicking
the
Download
here
link
above…
a. Microsoft
Internet
Explorer*
will
ask
you
to
Save
or
Run
the
download.
Select
Run.
Once
the
download
is
complete,
you
will
be
asked
to
Run
or
Cancel.
Select
Run.
The
screen
shot
below
will
then
appear.
b. Mozilla
Firefox*
and
Google
Chrome*
will
save
the
program
in
the
Downloads
folder.
To
access
it,
click
on
the
arrow
in
the
upper
right
corner
of
the
screen
and
click
on
Show
All
Downloads.
Double-‐click
on
the
file
“Net
Nanny
for
Windows…”
The
screen
shown
below
will
appear.
Copyright
2013
ContentWatch
Inc.
Net
Nanny
User
Guide
9
                3. Now
  the
  Net
  Nanny
  Setup
  Wizard
  appears;
  close
  all
  other
  applications
  before

                      continuing
  with
  the
  installation.
  Then
  click
  Next
  to
  continue
  (shown
  circled).


                4. Carefully
  review
  the
  License
  Agreement,
  select
  I
  accept
  the
  agreement,
  then
  click

                   Next
  to
  continue.
  (both
  are
  shown
  circled)


Copyright
  2013
  ContentWatch
  Inc.

                                      Net
  Nanny
  User
  Guide
     10
              5. Accept
  the
  default
  destination
  folder
  for
  the
  Net
  Nanny
  installation
  (or
  click
  Browse

                 to
  select
  an
  alternate
  installation
  folder),
  then
  click
  Next.
  (circled
  below)


              5.
  Now
  click
  on
  Install.
  (circled
  below)


Copyright
  2013
  ContentWatch
  Inc.

                                 Net
  Nanny
  User
  Guide
     11
6. When
the
Windows*
User
Account
Control
pop-‐up
appears,
it
shows
the
following
question:
Do
you
want
to
allow
the
following
program
to
install
software
on
this
computer?
Please
click
Yes.
7. Briefly,
you
will
see
a
pop-‐up
indicating
that
Net
Nanny
is
being
installed
and
then
the
following
pop-‐up
will
appear:
Completing
the
Net
Nanny
Setup
Wizard.
Click
Finish.
(circled
below)
Copyright
2013
ContentWatch
Inc.
Net
Nanny
User
Guide
12
8. Now,
  the
  Net
  Nanny
  Registration
  screen
  appears.
  To
  complete
  this
  step,
  you
  must

                      Register
  the
  software.
  Because
  you
  have
  a
  current
  Net
  Nanny
  Account,
  you
  can
  use

                      those
  credentials
  to
  Sign
  In
  now.

  (circled
  below)


                       At
  the
  bottom
  of
  the
  screen,
  you’ll
  see
  a
  blue
  link:
  Don’t
  have
  an
  account?
  Create

                       one.

  This
  step
  is
  not
  necessary
  since
  you
  have
  already
  purchased
  Net
  Nanny.


                   9. After
  selecting
  Sign
  In,
  a
  new
  screen
  appears:
  (Net
  Nanny
  Registration)
  Add
  Users.

                      At
  this
  point,
  you
  can
  add
  a
  user.
  You
  should
  select
  Add
  User
  to
  apply
  a
  web
  content

                      filtering
  profile
  to
  each
  person
  (user)
  you
  wish
  to
  protect.


Copyright
  2013
  ContentWatch
  Inc.

                                          Net
  Nanny
  User
  Guide
     13
            10. To
  create
  a
  user,
  enter
  a
  Display
  Name
  (the
  person’s
  name).

  In
  the
  future,
  when

                that
  person
  is
  using
  the
  computer
  and
  attempts
  to
  open
  a
  browser
  to
  go
  to
  the
  Web

                or
  any
  other
  app
  that
  accesses
  the
  Internet,
  s/he
  will
  be
  asked
  to
  login.
  If
  you
  choose

                not
  to
  include
  a
  password
  when
  creating
  the
  user,
  s/he
  will
  be
  promoted
  with
  the

                Login
  screen,
  but
  can
  simply
  select
  “Login”
  to
  start
  web
  surfing
  without
  a
  password.


                In
  either
  case,
  Net
  Nanny
  will
  protect
  the
  browser
  session.


Copyright
  2013
  ContentWatch
  Inc.

                                          Net
  Nanny
  User
  Guide
     14
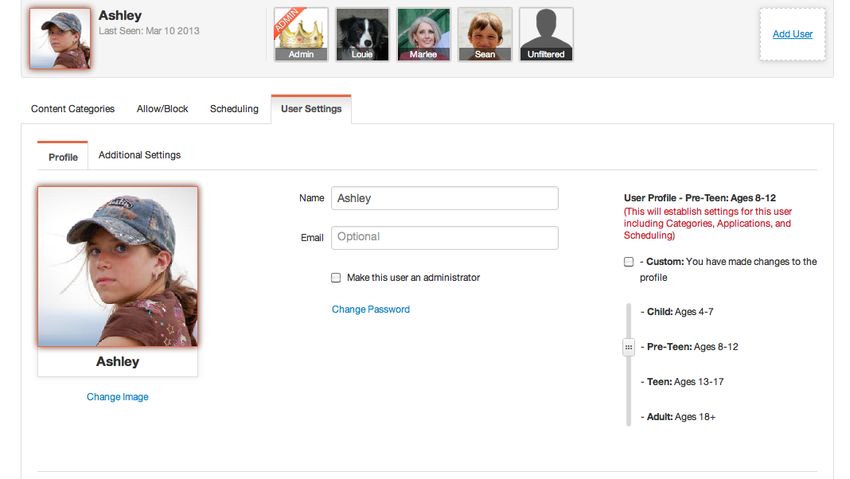
11. After
creating
a
new
user
and
assigning
a
password
(or
not),
you
should
choose
a
pre-‐defined
profile
for
that
user.
(see
the
large
cicled
portion
of
the
screen
below)
Note:
a
User
Profile
is
a
set
of
predetermined
web
page
categories
to
be
filtered
and
is
based
on
a
user’s
age.
For
example,
the
User
Profile
“Child:
Ages
4-‐7”
has
been
created
for
children
and
includes
the
highest
level
of
web
site
blocking
for
inappropriate
sites.
Net
Nanny
will
block
all
web
page
categories
included.
Those
web
page
categories
are:
abortion,
alcohol,
anime,
dating,
death/gore,
drugs,
gambling,
lingerie/swimsuits,
mature,
nudity,
pornography,
profanity,
provocative,
proxy,
sexual
health,
suicide,
tobacco,
and
weapons.
Although
you
are
required
to
select
a
pre-‐defined
profile
during
setup,
you
can
completely
customize
each
user
profile
after
installation
is
complete,
if
you
wish.
After
choosing
a
pre-‐defined
profile
for
the
user,
then
click
the
Add
User
button
in
the
lower
right-‐hand
corner
of
the
screen
(shown
circled
below).
For
more
information
on
this
topic,
see
the
section
entitled
Add
User
in
this
User
Guide.
(See
the
Table
of
Contents
for
the
page.)
Copyright
2013
ContentWatch
Inc.
Net
Nanny
User
Guide
15
12.
Now
the
Add
Users
screen
appears
showing
the
User
added.
Then
click
Done.
(circled
below)
Note:
If
you
have
more
than
one
computer
and
if
you
have
multiple
licenses
of
Net
Nanny,
you
can
repeat
this
installation
process
on
each
computer
and
re-‐use
your
existing
Net
Nanny
user
profiles,
if
you
wish.
If
you
have
additional
computers
or
devices
to
protect,
you
can
purchase
additional
licenses
of
Net
Nanny
and
then
repeat
this
installation
process
on
each
computer
or
device.
Net
Nanny
supports
Windows
and
Android
devices
in
the
same
Admin
console
today.
Support
for
managing
Mac
computers
in
the
same
Admin
console
will
be
added
in
the
near
future.
Copyright
2013
ContentWatch
Inc.
Net
Nanny
User
Guide
16
Removing
Net
Nanny
To
remove
Net
Nanny
for
Windows
from
Windows
Vista
or
XP:
see
the
Net
Nanny
6.5
User
Guide.
To
remove
Net
Nanny
from
Windows
7*
or
8*,
please
do
the
following:
1. Open
the
Windows
Libraries
icon
in
the
Windows
task
bar
(shown
circled
in
the
lower
left
corner
of
the
desktop
screen).
2. Click
on
Computer,
shown
in
the
lower
left-‐navigation
pane
of
the
Computer
window.
Copyright
2013
ContentWatch
Inc.
Net
Nanny
User
Guide
17
                   3. Click
  on
  the
  Uninstall
  or
  change
  a
  program
  link
  shown
  in
  the
  top
  menu
  bar.
  (circled)


                   4. Select
  Net
  Nanny
  from
  the
  list
  of
  installed
  programs.
  (circled
  below)


Copyright
  2013
  ContentWatch
  Inc.

                                        Net
  Nanny
  User
  Guide
     18
5. Click
on
Uninstall.
(circled
below)
6. When
the
pop-‐up
menu
Programs
and
Features
appears
asking
if
you
are
sure
you
want
to
uninstall
Net
Nanny,
click
Yes.
(circled
below)
Copyright
2013
ContentWatch
Inc.
Net
Nanny
User
Guide
19
                     7. At
  this
  point,
  the
  Net
  Nanny
  Login
  menu
  appears
  requesting
  the
  Net
  Nanny
  Admin

                        Password,
  which
  gives
  permission
  to
  uninstall.
  Add
  the
  Admin
  password
  and
  click

                        Login.
  (both
  shown
  circled)


                     8. At
  this
  point,
  the
  User
  Account
  Control
  menu
  appears
  requesting
  permission
  to

                        remove
  the
  software
  from
  this
  computer.

  Click
  Yes
  to
  continue
  the
  uninstallation

                        process.
  (circled
  below)


                     9. At
  this
  point,
  the
  uninstall
  process
  is
  complete.


Copyright
  2013
  ContentWatch
  Inc.

                                   Net
  Nanny
  User
  Guide
     20
How
to
Access
the
Remote
Admin
Console
The
Net
Nanny
remote
Admin
Console
is
a
web-‐based
software
tool
that
allows
the
Administrator
of
Net
Nanny
to
manage
users,
including
filtering
categories,
user
profiles,
and
other
settings.
You
can
also
check
usage
and
see
a
dashboard
with
reports.
Note:
The
Net
Nanny
Administrator
User
is
created
by
default
in
every
Net
Nanny
account.
During
installation,
you
can
add
additional
Users
to
your
account.
With
the
web-‐based
Admin
console,
Net
Nanny
for
Windows
can
be
managed
anywhere
and
anytime.
Changes
to
the
settings
are
implemented
in
less
than
a
minute
on
all
Net
Nanny-‐
protected
computers
and
protected
mobile
devices
regardless
of
their
physical
location.
Internet
access
and
a
browser
supporting
JavaScript*
are
required.
There
are
two
ways
to
access
the
remote
Admin
console:
1-‐
Web
Browser
or
2-‐
Windows
Desktop
System
Tray
(from
a
computer
where
Net
Nanny
is
installed).
Browser
Access
1. To
access
the
Net
Nanny
remote
Admin
console
from
a
web-‐enabled
browser,
open
an
Internet
browser
and
navigate
to
http://admin.netnanny.com.
2. At
this
point,
a
Login
menu
appears.
Please
enter
your
Net
Nanny
Admin
email
and
password
and
click
Login.
The
admin
email
and
password
would
have
been
created
during
the
installation
or
purchase
of
the
software.
Copyright
2013
ContentWatch
Inc.
Net
Nanny
User
Guide
21
Windows
Desktop
System
Tray
Access
1. The
second
method
for
accessing
the
remote
Admin
Console
is
done
from
the
Windows
Desktop
System
Tray
on
a
computer
where
Net
Nanny
is
installed.
This
icon
is
located
in
the
lower
right
corner
of
the
Windows
desktop
taskbar.
Click
on
the
Net
Nanny
icon
(shown
below)
and
a
pop-‐up
menu
appears.
Hover
the
mouse
over
the
Net
Nanny
icon
(shown
circled
below).
A
small
menu
will
appear.
Select
Remote
Admin
Console.
At
this
point,
a
Login
screen
appears.
Please
enter
your
Net
Nanny
Admin
email
and
password
and
press
Login.
The
Admin
email
and
password
were
created
during
installation
of
Net
Nanny
or
during
the
purchase
process.
Copyright
2013
ContentWatch
Inc.
Net
Nanny
User
Guide
22
Using
the
Net
Nanny
Admin
Console
To
use
the
Net
Nanny
Administration
(“Admin”)
console,
you
must
have
access
to
an
Internet-‐
enabled
browser.
The
Admin
Console
is
a
web-‐based
tool
that
grants
administrative
access
to
Net
Nanny
on
the
Windows
computer
where
you
installed
Net
Nanny.
Login
to
the
Admin
Console
as
indicated
above;
you
will
immediately
see
the
Net
Nanny
Dashboard,
described
and
shown
below.
Across
the
top
of
the
remote
Admin
Console
Dashboard,
you
will
see
the
following:
1-‐ Net
Nanny
icon
2-‐ Users
tab
3-‐ Family
tab
4-‐ Devices
tab
5-‐ Logout
Each
of
these
options
will
be
described
below.
Copyright
2013
ContentWatch
Inc.
Net
Nanny
User
Guide
23
Dashboard
1. On
the
Dashboard
page,
you
see
the
following
(circles
added
for
emphasis):
a. Alerts:
View
links
to
Alerts
for
your
license
and
subscription
status.
(top
left)
b. This
Week’s
Activity:
View
the
total
number
of
web
pages
blocked
and
warned
for
the
week.
(top
right)
c. Top
Blocked
Domains:
View
the
Top
Blocked
Domains,
which
is
a
list
of
the
web
sites
by
category
most
often
blocked
during
the
past
week.
(left
side)
d. Web
Events:
View
Web
Events,
which
is
a
list
of
the
web
site
categories
blocked
during
the
past
week.
(right
side,
middle)
Net
Nanny
icon
Located
on
the
top
left
side
of
the
Tool
Bar,
the
Net
Nanny
icon,
when
clicked,
will
take
you
back
to
the
Dashboard,
regardless
of
the
menu
or
sub-‐menu
you
are
visiting
in
the
remote
Admin
console.
The
Dashboard
is
described
in
the
previous
section
of
this
User
Guide.
Copyright
2013
ContentWatch
Inc.
Net
Nanny
User
Guide
24
Users
  Tab


                  When
  in
  the
  Users
  tab
  in
  your
  account,
  you
  will
  see
  the
  following
  tabs
  or
  links:


                       • Add
  User
  (far
  right)

                       • Content
  Categories
  (left
  side)

                       • Allow/Block
  (left
  side)

                       • Scheduling
  (left
  side)

                       • Users
  Settings
  (left
  side)


              1. User
  Avatars:
  When
  in
  the
  Users
  tab,
  you
  will
  see
  a
  list
  of
  Net
  Nanny
  User
  avatars

                 toward
  the
  top
  of
  the
  screen.

  An
  “avatar”
  is
  an
  icon
  or
  image
  that
  represents
  a

                 person
  or
  user.


Copyright
  2013
  ContentWatch
  Inc.

                                            Net
  Nanny
  User
  Guide
     25
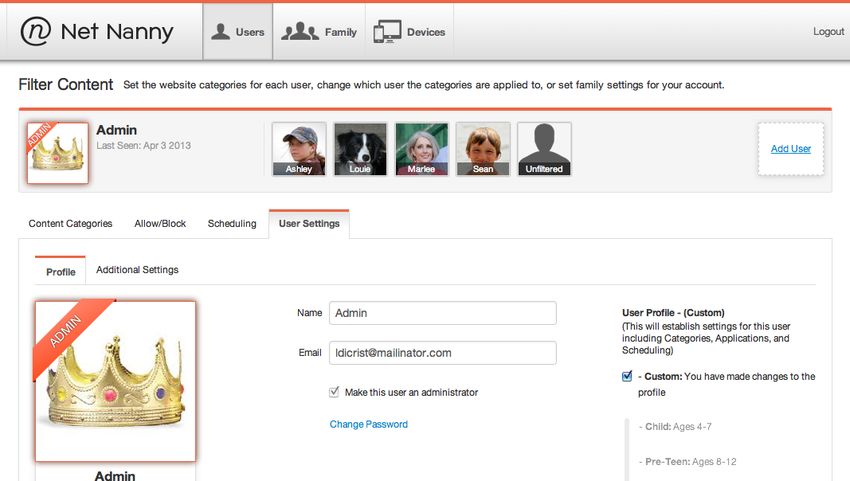
              2. If
  you
  have
  never
  added
  a
  User
  to
  your
  account,
  you
  will
  see
  only
  see
  the
  Admin

                 User
  (shown
  circled
  below).
  The
  Admin
  User
  will
  appear
  on
  the
  left
  side
  of
  the
  list
  of

                 Users
  (the
  “crown”
  avatar
  shown
  below
  is
  not
  the
  default
  but
  is
  an
  example).

                 Depending
  on
  your
  setup,
  the
  Admin
  account
  may
  not
  be
  named
  “Admin.”
  The

                 Admin
  user
  can
  be
  identified
  by
  the
  orange
  banner
  on
  the
  top
  left
  side
  of
  the
  avatar

                 (reads
  “Admin.”)


              3. If
  you
  have
  added
  other
  Users,
  you
  will
  see
  a
  list
  of
  those
  Users’
  avatars
  here
  (as

                 shown
  above).
  If
  you
  select
  a
  User
  by
  clicking
  on
  that
  User’s
  avatar,
  that
  User’s

                 avatar
  will
  appear
  on
  the
  left
  side
  of
  the
  list.
  When
  you
  logout
  and
  return
  to
  the

                 Admin
  console,
  the
  User
  avatar
  list
  will
  refresh
  and
  will
  appear
  in
  alphabetical
  order.


              4. Admin
  User:
  The
  Admin
  User
  is
  responsible
  for
  managing
  all
  Users
  and
  their

                 profiles
  for
  this
  account
  (family).

  The
  Admin
  User
  typically
  holds
  the
  login
  password

                 to
  the
  Net
  Nanny
  Admin
  console.

  Note:
  Net
  Nanny
  will
  allow
  you
  to
  create
  as
  many

                 users
  as
  you
  wish.
  Each
  user
  may
  have
  unique
  settings
  and
  restrictions.
  To
  learn

                 about
  creating
  users,
  see
  the
  next
  section
  of
  this
  User
  Guide.


Copyright
  2013
  ContentWatch
  Inc.

                                          Net
  Nanny
  User
  Guide
     26
You can also read