Tenant Setup - 2021 General Electric Company
←
→
Page content transcription
If your browser does not render page correctly, please read the page content below

Tenant Setup

               © 2021 General Electric Company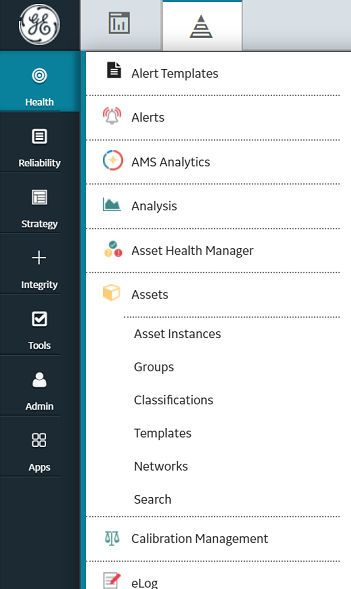
Contents

     Chapter 1: Tenant Overview                                                    1
         About Tenancy                                                              2

     Chapter 2: Tenant Preferences                                                 4
         Configure Tenant Display Preferences                                       5
         Configure the Module Navigation Menu Using Navigation Profiles             7
         Configure SmartSignal Chart and Marker Preferences                         9
         Enable Numeric Data for Condition Based Filters                           10

     Chapter 3: Manage Routes                                                    12
         About Routes                                                              13
         Create or Modify Routes                                                   13
         Delete Routes                                                             14

     Chapter 4: Manage Help Application Links                                    15
         Create a Link to a Custom Help Application                                16

     Chapter 5: Alert Configuration                                              17
         About Alert Configuration                                                 18

     Chapter 6: Cases Configuration                                              21
         About Case Configuration                                                  22

     Chapter 7: Tenant Automation Rules                                          26
         About Automation Rules                                                    27

     Chapter 8: Release Notes                                                    34
         Second Quarter of 2021                                                    35

ii                                                                        Tenant Setup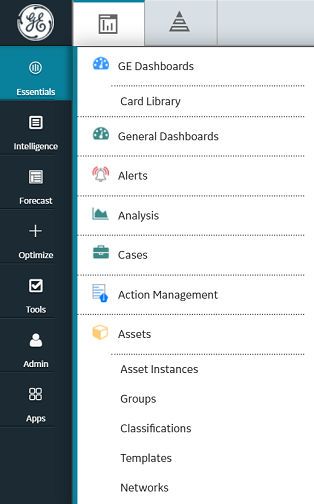
First Quarter of 2020    35
Third Quarter of 2019    36
First Quarter of 2019    36
Fourth Quarter of 2018   37
Second Quarter of 2018   37

                         iii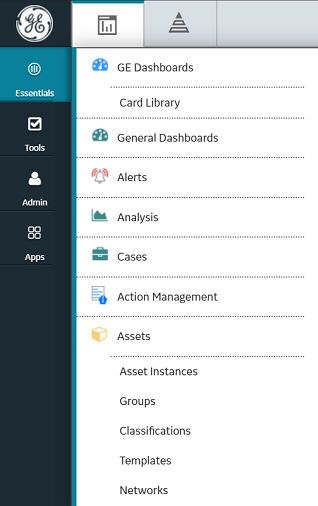
Copyright GE Digital
     © 2021 General Electric Company.

     GE, the GE Monogram, and Predix are either registered trademarks or trademarks of All other trademarks
     are the property of their respective owners.
     This document may contain Confidential/Proprietary information of and/or its suppliers or vendors.
     Distribution or reproduction is prohibited without permission.
     THIS DOCUMENT AND ITS CONTENTS ARE PROVIDED "AS IS," WITH NO REPRESENTATION OR
     WARRANTIES OF ANY KIND, WHETHER EXPRESS OR IMPLIED, INCLUDING BUT NOT LIMITED TO
     WARRANTIES OF DESIGN, MERCHANTABILITY, OR FITNESS FOR A PARTICULAR PURPOSE. ALL OTHER
     LIABILITY ARISING FROM RELIANCE UPON ANY INFORMATION CONTAINED HEREIN IS EXPRESSLY
     DISCLAIMED.
     Access to and use of the software described in this document is conditioned on acceptance of the End
     User License Agreement and compliance with its terms.

iv                                                                                 © 2021 General Electric Company
Chapter
1
Tenant Overview
Topics:
• About Tenancy
© 2021 General Electric Company 1About Tenancy
A tenant is a group of users with common access to and privileges within their instance of GE Digital APM.
A common set of underlying web services provides functionality (such as asset monitoring and user
management) to each tenant, yet secures access to customer-specific data. Users in one tenant
organization cannot access other tenants.
GE Digital APM can support multiple tenants. Each customer enterprise can be defined as an independent
tenant with access to its GE Digital APM instance.
The system administrator adds customers as new tenants and administers all tenants. When adding a
new tenant, the system administrator assigns a primary administrator for that tenant. After logging on,
the primary tenant administrator completes the initial setup tasks, such as ingesting assets and time
series data, creating users, and assigning user privileges.
Set or Change the Ingestor Password
Before You Begin
You must have an GE Digital APM tenant available. You must also have tenant administrator credentials to
perform the initial tenant setup.
About This Task
During tenant setup, you must provide the ingestor password used by asset and alert ingestion services
to ingest assets, alerts, and time series data into your current tenant. This password is unique to each
tenant, as the asset model and instances are exclusive to that tenant. Provide a complex password that
complies with your enterprise policies for password safekeeping.
When setting or changing a password, use the following guidelines:
• The password is case-sensitive and should be at least eight characters long.
• You must use a combination of alphanumeric characters.
• You can use special characters.
• You cannot use consecutive characters such as 123 or abc.
• You cannot repeat characters more than two times consecutively; for example, looop or 777.
The following are examples of invalid passwords:
Aaaron777
b!rthday20009
@bc1xyz
rapper123
After setup, you can also change the ingestor password at any time.
Procedure
1. Sign in to your GE Digital APM tenant with your administrator credentials.
2. In the module navigation menu, go to Setup.
3. Depending on whether you are setting up a new password or changing the password, one of the
following applies:
• If you are setting up the password for the first time, you will be presented with a password setup
page.
2 © 2021 General Electric Company• If you are changing an existing password, click Change Ingestor Password.
4. Enter a new password, and then re-enter the password to confirm.
5. Select Submit to save your changes.
Next Steps
Once the password is set, you can ingest data into GE Digital APM.
Tenant Structure Creation
Before users can access the application (specific tenant organization), the tenant or user administrator
must set up the tenant structure.
The tenant administrator needs to complete the following tasks to support a tenant architecture in GE
Digital APM:
• Create a tenant. Upon creating the tenant, GE Digital APM automatically creates the ingestor user
account. Then, you can log in as the tenant administrator and create a password for the ingestor user.
Note: The ingestor user account enables the ingestor user to upload assets to GE Digital APM. This
account is created during the tenant setup.
• If you are using Predix APM, go to Admin > Configuration Manager > Sites.
• If you are using Predix APM, ingest assets via Unified Loaders > Asset Ingestion Loader.
• If you are using Legacy Predix APM, login as the ingestor user and ingest the asset model, tag
classifications, and asset data (including asset instances, connections, and tag associations).
• Add other users and administrators.
• Create alert templates.
• Ingest alerts for ingested assets.
• Add user groups and link them to the appropriate permission sets.
• (SSO only) Import users from your identity management system into your tenant.
• Add assets to users and user groups.
• Complete deployment steps for modules and features.
© 2021 General Electric Company 3Chapter
2
Tenant Preferences
Topics:
• Configure Tenant Display
Preferences
• Configure the Module
Navigation Menu Using
Navigation Profiles
• Configure SmartSignal Chart
and Marker Preferences
• Enable Numeric Data for
Condition Based Filters
4 © 2021 General Electric CompanyConfigure Tenant Display Preferences
You can configure the display preferences for all the users of the tenant.
Before You Begin
You must have tenant admin permissions to access the Tenant Preferences page.
Procedure
1. In the module navigation menu, go to Tenant Preferences.
The Tenant Preferences page appears.
2. Select the Display tab.
3. As needed, enter the values in the following fields.
Field Names Description
Asset Display Name Displays the name of the asset based on the following
options:
• GE: Displays the asset name. By default, this option is
selected.
• Customer: Displays the alias name of the asset that you
provided. This name appears on the Asset page. Select
the ( ) button to switch between GE and Customer
name.
Culture Setting Identifies the preferred culture of the user. This setting
determines the date and number formats that are displayed
when the user signs in to GE Digital APM.
Language Determines the display language. By default, US English is
selected. You can select the preferred language from the
following options:
• Chinese (Simplified)
• Dutch (Netherlands)
• French (France)
• German (Germany)
• Italian (Italy)
• Japanese
• Polish
• Portuguese (Brazil)
• Russian
• Spanish (Spain)
• US English
© 2021 General Electric Company 5Field Names Description
System of Measure Determines the system of measure. You can select your
preferred system of measure in the drop-down list box.
Note: The values in the drop-down list box appear based on
the values that you configure in the Systems of Measure
Configuration section. None and Metric are the system-
provided system of measures, and by default, None is
selected.
TimeZone Determines the time zone of your location. You can select
your preferred time zone from the drop-down list box.
If you select Site Local as your preferred time zone, all the
date or time values will be converted to the time zone of your
asset.
Note:
• The selected time zone affects only this application.
• Any selected time zone that observes Daylight Savings
Time automatically observes the local time.
4. Select Save.
A message appears, indicating that the changes will take effect after you log out and then log in to the
application.
5. Select OK.
Next Steps
Log out of the application and then log in for the changes to take effect.
Note: The display preferences that are configured in the Tenant Preferences page appear as default
preferences for all users of the tenant, except for the users who have set their own display preferences in
the My preferences User Preferences page.
Configure the Systems of Measures
You can add new systems of measures for a tenant.
Before You Begin
You must have tenant admin permissions to access the Tenant Preferences page.
Procedure
1. In the module navigation menu, go to Tenant Preferences.
The Tenant Preferences page appears.
2. Select the Systems of Measure Configuration tab.
3. In the Systems of Measure section, select .
The button appears in the page.
4. Select , and then enter the name for the new system of measure.
5. Select Save.
Results
The new system of measure is added to the list and it also appears in the Units of Measure Conversions
page and Display section of the Tenant Preferences and My preferences User Preferences page.
6 © 2021 General Electric CompanyConfigure the Module Navigation Menu Using Navigation
Profiles
A navigation profile contains information about the set of menu items that should appear in the module
navigation menu.
About This Task
You can select a navigation profile if you want to switch to the user interface of a specific product for all
the users of a tenant. For example, if you want to change the UI to display the menu that is available in
APM, you can select the APM navigation profile. The following navigation profiles are available for
selection:
• APM
• Predix Essentials
• Predix Essentials & APM
• Predix Essentials & OPM
• Predix Essentials, APM & OPM
The following images display the different sets of menu items that appear based on the navigation profiles
that you select:
• Module navigation menu that appears when you select the APM navigation profile.
• Module navigation menu that appears when you select the Predix Essentials navigation profile.
© 2021 General Electric Company 7• Module navigation menu that appears when you select the Predix Essentials & OPM navigation profile.
Before You Begin
• Ensure that you have the tenant admin permissions to access the Tenant Preferences page.
Procedure
1. In the module navigation menu, go to Tenant Preferences.
The Tenant Preferences page appears.
2. Select the Module Navigation tab.
8 © 2021 General Electric CompanyThe Module Navigation section appears.
3. In the Select a Navigation Profile drop-down list box, select the products that you want to appear in
the module navigation menu.
Note: If you select a navigation profile other than the default navigation profile, only the module
navigation menu configured for that profile appears. You cannot access custom applications using the
menu.
or
Select Reset Module Navigation Settings to Default.
Note: This setting shows menu items that are based on your permissions.
A message appears, stating that your changes are saved. This configuration is applied to all the users
of the tenant.
Note: You can access only the menu items for which you have permission to access.
Next Steps
Sign out of the application, and then sign in to access the module navigation menu that you have
configured.
Configure SmartSignal Chart and Marker Preferences
You can configure the SmartSignal chart and marker preferences for all the SmartSignal users of the
tenant.
Before You Begin
You must have tenant admin permissions to access the Tenant Preferences page.
Procedure
1. In the module navigation menu, go to Tenant Preferences.
2. Select the SmartSignal Chart and Marker Settings tab.
3. As needed, select to enable or disable settings for the following options.
© 2021 General Electric Company 9Option Description
SmartSignal Chart and Marker Settings Customizes the SmartSignal markers and applies the changes
to all templates in their possessions.
You can select marker, color, or position from the drop-down
list. You can also select the stacking order number. The order
numbers are one through five. One being the top-most
position in the stack, and five being the bottom-most in the
stack. More than one type of marker can be placed in a lane.
For more information on each of the options, see the
Reference section in the SmartSignal documentation. You can
select from the following options:
• Diagnostic Rule
• Adaptation Successful
• Adaptation Inhibit
• NaN
• Outlier
• VSG
• Single Point Excursion
• Tag Level Rules Default
4. Select Save.
A message appears, indicating that the changes will take effect after you log out and then log in to the
application.
5. Select User Preferences.
6. As needed, select to enable or disable settings for the following options.
Option Description
• Diagnostic Rule For more information on each of the options, see the
• Adaptation Successful Reference section in the SmartSignal documentation.
• Adaptation Inhibit
• NaN
• Outlier
• VSG
• Single Point Excursion
• Tag Level Rules Default
• Actual
• Estimate
• Residual
• Smooth Actual
• Smooth Residual
7. Select OK.
8. Optionally, select Restore Defaults to revert the entire table to its original state.
Next Steps
Log out of the application and then log in for the changes to take effect.
Note: The display preferences that are configured in the Tenant Preferences page appear as default
preferences for all users of the tenant, except for the users who have set their own display preferences in
the My preferences User Preferences page.
Enable Numeric Data for Condition Based Filters
You can use the Enable numeric data for CBF option to consider only the numeric tags when using the
conditional filtering functionality. This option does not consider the incorrectly configured (string) tags.
10 © 2021 General Electric CompanyWhen the Enable numeric data for CBF option is selected, while using the conditional filters
functionality, you can see the slider for a tag or tag expression for you to select the minimum and
maximum values. When the Enable numeric data for CBF option is not selected, while using the
conditional filters functionality, the data for the string tags is displayed in a drop-down list box instead of
a slider.
Before You Begin
You must have tenant admin permissions to access the Tenant Preferences page.
Procedure
1. In the module navigation menu, go to Tenant Preferences.
2. Select the SmartSignal Marker Configuration tab.
3. Under the Plotting Preferences section, select Enable numeric data for CBF.
4. Select Apply.
Next Steps
Log out of the application and then log in for the changes to take effect.
© 2021 General Electric Company 11Chapter
3
Manage Routes
Topics:
• About Routes
• Create or Modify Routes
• Delete Routes
12 © 2021 General Electric CompanyAbout Routes
Routes are configurable URLs that determine a destination web page from a hyperlink or interface control.
For example, when an alert is generated, a link is provided for you to access the alert in APM. The URL
path that you provide when you create the route is the destination page of that link.
You can also create a new route for a custom Help application.
Create or Modify Routes
As a user with tenant admin permissions, you can create or modify routes for navigating to alert links and
assets within the product, or for adding a custom Help application link.
Procedure
1. In the left navigation menu, select Tenant Preferences.
The Tenant Preferences page appears.
2. Select Route Manager.
3. To create a route, select .
4. To modify a route, hover over the row that contains the route that you want to modify, and then select
.
5. Select a field name to specify required values for the route.
In this field Select or Enter
Name A unique route name.
The route name appears in the Route Selection page of the
intended module.
Module The module as it appears in the left navigation menu.
The combination of the Module and the Path creates
the fully qualified URL at runtime.
Path The relative URL path.
Type The route type. Valid values are alertLink, assetFacePlate, or
helpLink.
Description A description of the route.
Note: The Required fields are listed in bold font.
6. Select Apply to save the route changes or Reset to discard the changes.
Next Steps
Log out of the tenant and log back in to verify your changes.
Related Tasks
Create a Link to a Custom Help Application on page 16
© 2021 General Electric Company 13Delete Routes
As a user with tenant admin permissions, you can delete routes that are no longer needed.
About This Task
Procedure
1. In the left navigation menu, select Tenant Preferences.
The Tenant Preferences page appears.
2. Select Route Manager.
3. Hover over the row that contains the route that you want to delete, and then select .
4. Select Apply to save the route changes or Reset to discard the changes.
5. The route is removed from the list of routes.
Next Steps
Log out of the tenant and log back in to verify your changes.
14 © 2021 General Electric CompanyChapter
4
Manage Help Application Links
Topics:
• Create a Link to a Custom Help
Application
© 2021 General Electric Company 15Create a Link to a Custom Help Application
Note: This feature is available only in Legacy Predix APM.
About This Task
As a user with tenant admin permissions, you can create a link to a custom help application using the
Route Manager.
Procedure
1. In the left navigation menu, select Tenant Preferences.
The Tenant Preferences page appears.
2. Select Route Manager.
3. Select to create a route.
4. Specify required values for the route.
In this field Select or Enter
Name Name of the application for which custom Help is written.
Module Select Custom Help.
Path The relative URL path for the Help application
Type Select helpLink.
Description A description of the custom Help application.
Note: The Required fields are listed in bold font.
5. Select Apply to save the changes.
16 © 2021 General Electric CompanyChapter
5
Alert Configuration
Topics:
• About Alert Configuration
© 2021 General Electric Company 17About Alert Configuration
The Alert Configuration tab on the Tenant Preferences page allows you to configure various elements
for an alert.
Using the Alert Configuration tab, you can configure various elements, such as the Disposition, Type, and
Source for an alert.
The following table provides the list of default values available for various elements available in the Alert
Configuration tab.
Section Name Description
Disposition Lists the available dispositions for an alert. The following values
appear by default:
• None
• Valid
• False
• False System
• Sensor Issue
• Reset State Dat
• Outage
You can add new values or perform other actions as described
in the subsequent sections.
Type Lists the types of alerts. The following values appear by default:
• Combustion
• Vibration
• Mechanical
You can add new values or perform other actions as described
in the subsequent sections.
Source Lists the available types of sources for an alert. The following
values appear by default:
• Manual
• Predix
• SS Tag Rule
You can add new values or perform other actions as described
in the subsequent sections.
Configure an Element for an Alert
In Tenant Preferences, you can configure various elements, such as the disposition, type, and source for an
alert.
Before You Begin
You must be logged in to GE Digital APM as a tenant administrator to access Tenant Preferences.
About This Task
This procedure describes the steps to configure a disposition. You can use this procedure to configure the
types and sources as well.
18 © 2021 General Electric CompanyProcedure
1. On the Tenant Preferences page, select the Alert Configuration tab.
The Alert Configuration page appears, displaying the Disposition, Type, and Source sections.
2. In the Disposition section, select Edit icon ( ).
The button appears.
3. Select , and then enter the name for the new disposition.
The Save button is enabled.
4. When you are done, select Save.
The new disposition is added in the Disposition section.
Results
The list of configured dispositions will also appear on the Alert Detail page.
Change the Sequence of Elements for an Alert
You can change the order of input values that appear in the Disposition, Type, and Source sections.
Before You Begin
You must be logged in to GE Digital APM as a tenant administrator to access Tenant Preferences.
About This Task
This procedure describes how to change the order of input values in the Disposition section. You can also
use this procedure to change the sequence of input values in the Type and Source sections.
Procedure
1. On the Tenant Preferences page, select the Alert Configuration tab.
The Alert Configuration page appears, displaying the Disposition, Type, and Source sections.
2. In the Disposition section, select the Edit icon ( ).
The Move icon ( ) appears for each disposition listed.
3. Select and hold the Move icon, and then drag and drop a disposition to a new location in the list of
dispositions.
The Save button is enabled.
4. When you are done, select Save.
The sequence of dispositions is changed.
Results
The revised list of configured dispositions appears on the Alert Details page.
Deprecate an Element for an Alert
You can deprecate an element, such as disposition, type, or source, which removes it from the list of
available dispositions, types, or sources for an alert.
Before You Begin
You must be logged in to GE Digital APM as a tenant administrator to access Tenant Preferences.
© 2021 General Electric Company 19About This Task
This procedure describes how to deprecate a disposition for an alert. You can use this procedure to
deprecate a type or source as well.
Procedure
1. On the Tenant Preferences page, select the Alert Configuration tab.
The Alert Configuration page appears, displaying the Disposition, Type, and Source sections.
2. In the Disposition section, select the Edit icon ( ).
3. Pause or hover over the disposition that you want to deprecate.
The Delete icon ( ) appears.
4. Select Delete.
The Deprecate window appears.
5. Select Confirm.
6. When you are done, select Save.
The selected disposition is removed from the Disposition section and appears in the Deprecated
section. You can select to add the deprecated value back to the list of available dispositions.
20 © 2021 General Electric CompanyChapter
6
Cases Configuration
Topics:
• About Case Configuration
© 2021 General Electric Company 21About Case Configuration
On the Tenant Preferences page, the Case Configuration tab allows you to configure various properties
for a case.
Using the Case Configuration tab, you can configure various properties for the category, urgency, closure
code, and status for a case.
The following table provides the list of default values available for various properties in the Case
Configuration tab.
Section Name Description
Category Lists the available categories for a case. The following values
appear by default:
• Combustion
• Equipment
• Instrumentation
• Mechanical
• Operational
• Performance
• Process
• Vibration
You can add new values or perform other actions as described
in the subsequent sections.
This section will always contain one category.
Closure Code Lists the types of closure codes for a case. The following values
appear by default:
• None
• Forced Outage
• No Action
• Operational Change
• Scheduled Maintenance
• Sensor Repair
• Unplanned Maintenance
You can add new values or perform other actions as described
in the subsequent sections.
22 © 2021 General Electric CompanySection Name Description
Status Lists the types of status for a case. The following values appear
by default:
• Closed
• Awaiting
• Open
You can add new values or perform other actions as described
in the subsequent sections.
You cannot deprecate the values Open and Closed.
Urgency Lists the available urgencies for a case. The following values
appear by default:
• EHS
• Emergency
• High
• Low
• Next Opportunity
• Next Planned
You can add new values or perform other actions as described
in the subsequent sections.
This section will always contain one urgency.
Configure a Property for a Case
On the Tenant Preferences page, you can configure the property for a category, urgency, closure code,
and status for a case.
Before You Begin
You must be logged in to GE Digital APM as a tenant administrator to access the Tenant Preferences
page.
About This Task
This procedure describes the steps required to configure a category in the Category section. You can also
use this procedure to configure urgencies, closure codes, and status.
Procedure
1. In the left pane, select Tenant Preferences.
2. On the Tenant Preferences page, select the Case Configuration tab.
The Case Configuration page appears, displaying the Category, Urgency, Closure Code, and Status
sections.
3. In the Category section, select the Edit icon( ).
The button appears.
4. Select , and then enter the name for the new category.
The Save button is enabled.
5. Select Save.
The new category is added in the Category section.
© 2021 General Electric Company 23Results
The list of configured categories will also appear in the case details section of the Cases and Case
Templates page.
Next Steps
In the Category and Urgency sections, when you modify a property, you will need to refresh your cache
to view the updated list of categories or urgencies.
Change the Sequence of Properties for a Case
On the Tenant Preferences page, you can change the order of input values that appear in the Category,
Urgency, Closure Code, and Status sections for a case.
Before You Begin
You must be logged in to GE Digital APM as a tenant administrator to access the Tenant Preferences
page.
About This Task
This procedure describes how to change the order of input values in the Category section. You can also
use this procedure to change the sequence of urgencies, closure codes, and status.
Procedure
1. In the left pane, select Tenant Preferences.
The Tenant Preferences page appears.
2. On the Tenant Preferences page, select the Cases Configuration tab.
The Case Configuration page appears, displaying the Category, Urgency, Closure Code, and Status
sections.
3. In the Category section, select the Edit icon ( ).
The Move icon ( )appears for each listed category.
4. Select and hold the Move icon, and then drag the category to a new location in the list of categories.
The Save button is enabled.
5. Select Save.
The sequence of categories is changed.
Note: In the Category and Urgency sections, when you change the order of input values, you will
need to refresh your cache to view the updated list of categories or urgencies.
Results
The revised list of configured categories will also appear in the case details section of the Cases and Case
Templates page.
Deprecate a Property for a Case
You can deprecate a property that appears in the Category, Urgency, Closure Code, and Status
sections for a case.
Before You Begin
You must be logged in to GE Digital APM as a tenant administrator to access Tenant Preferences.
24 © 2021 General Electric CompanyAbout This Task
This procedure describes how to deprecate a category for a case. You can use this procedure to deprecate
urgencies, closure codes, and status as well.
Procedure
1. In the left pane, select Tenant Preferences.
The Tenant Preferences page appears.
2. On the Tenant Preferences page, select the Case Configuration tab.
The Case Configuration page appears, displaying the Category, Urgency, Closure Code, and Status
sections.
3. In the Category section, select the Edit icon ( ).
4. Pause on or hover over the category that you want to deprecate.
The Delete icon ( ) appears.
5. Select Delete.
6. The Deprecate window appears.
7. Select Confirm.
The Save button is enabled.
8. Select Save.
The selected category is deprecated and is unavailable in the Category section. You can select the
Edit icon ( ), and then select the Undo Deprecation icon ( ) to add the deprecated category
back to the list of available categories.
Note: In the Categoryand Urgency sections, when you deprecate a property, you will need to refresh
your cache to view the updated list of categories or urgencies.
Results
The revised list of configured categories will also appear in the case details section of the Cases and Case
Templates page.
© 2021 General Electric Company 25Chapter
7
Tenant Automation Rules
Topics:
• About Automation Rules
26 © 2021 General Electric CompanyAbout Automation Rules
Automation Rules is a tab in the Tenant Preferences page.
Users must have tenant admin permissions to access the Tenant Preferences page, which provides access
to the Automation Rules tab. A tenant admin can create rules at the tenant level that determine the
criteria that will trigger a specific action for Alerts or Cases. In creating a rule, the tenant admin selects a
trigger for the action, the asset involved, any additional criteria, and the action that the rule invokes.
Automation Rules for Alerts
A tenant admin can create automation rules to trigger one of the following actions on Alerts:
• Create a latched alert rule to group alerts.
• Create a rule for automatic processing of alerts when the Alert Disposition is updated. You can
configure the rule to trigger one of the following actions:
◦ Mark the status of the Alert as Processed.
◦ Set the Visibility of the Alert to Limited or General.
Create a Latched Alert Rule
You can create an Alert rule for latching, or grouping, alerts that frequently recur.
Before You Begin
You must have tenant admin permissions to see the Tenant Preferences page and the Automation Rules
tab. The tenant admin can view, create, and delete automation rules.
Procedure
1. In the left navigation menu, select Tenant Preferences.
The Tenant Preferences page appears.
2. Select Admin > Tenant Preferences.
The Tenant Preferences page appears.
3. In the Automation Rules tab, select the Plus icon (+) to the right of the Alert Rules row, and specify
the following information in the subsequent dialog boxes.
© 2021 General Electric Company 27Command or Action Description
Select a trigger Select an event that will cause this rule to trigger.
a. Select Alert Created in the list.
b. Select Next.
Enter Asset a. Enter the Asset Source Key for the asset you want to
create the rule for, and then select outside the box to
validate the selected asset.
b. Or, check the Use All Resources box. When Use All
Resources is selected, the rule will apply to all assets
across all sites in all enterprises. When the user checks
the box, the text field above it is disabled (grayed out).
c. Once the green check mark appears to the right of the
asset box, the Next button is enabled. Select Next.
Note: If the asset is not validated, the message Asset
Not Found appears instead of the check mark.
28 © 2021 General Electric CompanyCommand or Action Description
Select Criteria Select the Add Filter criteria for triggering the latching, and
then select one or more of the following options from the list.
a. Severity – Select one of the following from the list, and
then enter a number in the text field:
• Is equal to
• Is not equal to
• Is greater than
• Is greater than or equal to
• Is less than
• Is less than or equal to
b. Source – Select one of the following from the first list:
• Is equal to
• Is not equal to
and then select one of the following from the second list:
• None (default value)
• Predix
• Orchestration Manager
• Manual
• SmartSignal
• SS Tag Rule
c. Alert Type – Select one of the following from the first list:
• Is equal to
• Is not equal to
and then select one of the following from the second list:
• None (default value)
• Combustion
• Vibration
• Mechanical
• Generic
d. Alert Name – Enter a name in the text field.
Important: The alert name must not contain the
following characters:
• Quotation mark (")
• Apostrophe (')
• Semicolon (;)
• Slash (/)
• Open parenthesis ( ( )
• Close parenthesis ( ) )
Note: To remove any of the criteria, select the X at the
end of the row.
e. Select Next.
Select an Action Select the action to be taken when the rule is triggered.
a. Select Latch Alert from the list.
b. Select Finish.
Results
The message Your changes have been saved successfully appears in the upper right side
of the page, and the new rule appears in the Alert Rules section of the Automation Rules tab.
© 2021 General Electric Company 29Create a Rule for Automatic Processing of Alerts
You can create automation rules for alerts that specify an automatic action that is taken when all
conditions are met.
Before You Begin
You must have tenant admin permissions to access the Automation Rules section. The tenant admin
can view, create, and delete automation rules.
About This Task
You will need to select a trigger for the subsequent action, an asset ID, the criteria (or source of the alert),
and the action invoked by the trigger.
Procedure
1. In the module navigation menu, select Tenant Preferences.
The Tenant Preferences page appears.
2. Select Admin > Tenant Preferences.
The Tenant Preferences page appears.
3. In the Automation Rules section, select next to the Alert Rules row, and specify the following
information in the subsequent windows.
Command or Action Description
Trigger Select the Alert Disposition Updated
option in the list.
Asset a. Enter the Asset Source Key for the asset for which you
want to create the rule, and then select outside the box
to validate the selected asset.
-or-
Select the Use All Resources check box. When the Use
All Resources check box is selected, the rule will apply to
all assets across all sites in all enterprises. When the user
selects the check box, the box above it is disabled (grayed
out).
A green check mark appears next to the asset box and
the Next button is enabled.
b. Select Next.
Note: If the asset is not validated, the message Asset
Not Found appears instead of the check mark.
30 © 2021 General Electric CompanyCommand or Action Description
Criteria Select filter criteria to restrict when the rule will trigger.
Disposition is the default, and only, option.
Select Next.
Action Select one of the following options:
• Select Mark Alert as Processed to configure the rule to
automatically set the status of the Alert to Processed
based on the filter criteria.
• Select the Set Alert Visibility option to specify the
action that will be taken when the rule is triggered.
a. Set the Alert Visibility by selecting either General or
Limited. Limited is selected by default.
b. When done, select Finish.
Note: General visibility alerts are visible to any user with
permissions to view alerts and the relevant asset. Limited
visibility alerts require an additional permission.
Results
Once the rule is created, a message appears, specifying that the rule is saved and the new rule appears in
the Alert Rules section of the Automation Rules section.
Note: If you create a rule that duplicates an existing rule, you are not prompted regarding the duplicate
entry, but only the initial rule is displayed in the Automation Rules section.
Create an Automation Rule for Cases
You can create automation rules for cases that specify an automatic action that is taken when all
conditions are met.
Before You Begin
You must have tenant admin permissions to access the Automation Rules tab in the Tenant Preferences
page. The tenant admin can view, create, and delete automation rules. A user or user group to which the
case rule is assigned must have permissions to access Cases as well as the asset for which the rule was
created.
About This Task
You will need to select a trigger for the subsequent action, an asset ID, the criteria (or source of the case),
and the action invoked by the trigger.
Procedure
1. In the left navigation menu, select Tenant Preferences.
The Tenant Preferences page appears.
2. Select Admin > Tenant Preferences.
The Tenant Preferences page appears.
3. In the Automation Rules tab, select the Plus icon (+) to the right of the Case Rules row, and specify the
following information in the subsequent dialog boxes.
© 2021 General Electric Company 31Command or Action Description
Trigger Select Case Created in the list.
Asset Select an asset ID from the list, and then select outside the
box to validate the selected asset.
A green check mark appears to the right of the asset box and
the Next button is enabled. Select Next.
If the asset is not validated, the message Asset Not
Found appears instead of the check mark.
Criteria Select Orchestration Manager as the criteria and then
select Next.
Action Select Auto Assign Case as the action and then select Next.
4. After selecting an action, in the box, enter the name of the user or user group to which the case will be
assigned.
5. Select Finish.
Validation of the user or user group to which the case was assigned is done to ensure the users have
access to the selected asset.
Results
Once the rule is created, a message appears, specifying that the rule is saved and the new rule appears in
the Case Rules section of the Automation Rules tab.
Note: If you create a rule that duplicates an existing rule, you are not prompted regarding the duplicate
entry, but only the initial rule is displayed in the Automation Rules tab.
Delete an Automation Rule
As a tenant admin, you can delete an automation rule that has been set for either alerts or for cases.
Before You Begin
You must have tenant admin permissions to see the Tenant Preferences page and the Automation Rules
tab. The tenant admin can view, create, and delete automation rules.
Procedure
1. In the left navigation menu, select Tenant Preferences.
The Tenant Preferences page appears.
2. Select Admin > Tenant Preferences.
The Tenant Preferences page appears.
3. In Tenant Preferences, select the Automation Rules tab.
4. In either the Alert Rules or Case Rules section, find the rule you want to delete.
5. Select the rule, and then select the Delete icon ( ).
The Delete Rule dialog box appears.
6. Confirm the deletion of the rule.
The message Rule Deleted successfully appears.
Results
The rule is removed and you can verify that for any newly created alerts that satisfy the deleted alert rule
the alert disposition is unchanged, while any newly created cases that satisfy the deleted case rule are
32 © 2021 General Electric Companyunassigned or unclaimed. If you add the deleted rule again, you can verify that either the alert disposition
has changed or cases are unassigned, per the rule.
© 2021 General Electric Company 33Chapter
8
Release Notes
Topics:
• Second Quarter of 2021
• First Quarter of 2020
• Third Quarter of 2019
• First Quarter of 2019
• Fourth Quarter of 2018
• Second Quarter of 2018
34 © 2021 General Electric CompanySecond Quarter of 2021
Release Date: June 25, 2021
This topic provides a list of product changes released for this module on this date.
Table 1: Enhancements and New Features
The following enhancements and new features have been added.
Description Tracking ID
GE Digital APM tenant administrators can now disable the string data handling for Condition US491028
Based Filters (CBF) at the tenant level so that only numeric tags are considered when using the
conditional filtering functionality. To facilitate this enhancement, a new Enable numeric data for
CBF check box has been added to the SmartSignal Marker Configuration section of the
Tenant Preferences page.
When Enable numeric data for CBF is selected, while using the conditional filters functionality,
you can see the slider for a tag or tag expression to select the minimum and maximum values.
When Enable numeric data for CBF is not selected, while using the conditional filters
functionality, the data for the string tags is displayed in a drop-down list box instead of a slider.
First Quarter of 2020
Release Date: March 27, 2020
This topic provides a list of product changes released for this module on this date.
Table 2: Enhancements and New Features
The following enhancements and new features have been added.
Description Tracking ID
You can now configure the preferred culture of a user that determines the date and number US386929
formats displayed in GE Digital APM for the user. To facilitate this enhancement, a new drop-
down list box, Culture Setting, has been added to the Display section of the Tenant
Preferences page.
© 2021 General Electric Company 35Third Quarter of 2019
Tenant Preferences
This topic provides a list of product changes released for this module on the dates listed below.
Release Date: September 27, 2019
Table 3: Enhancements and New Features
The following enhancements and new features have been added.
Description Tracking ID
You can now access Route Manager from the Tenant Preferences page. F46374
First Quarter of 2019
Tenant Preferences
This topic provides a list of product changes released for this module on the dates listed below.
Release Date: March 29, 2019
Table 4: Enhancements and New Features
The following enhancements and new features have been added.
Description Tracking ID
You can now select which applications appear in the module navigation menu by selecting a US304693
module navigation profile. A new page, Module Navigation Menu, was added to Tenant
Preferences to facilitate this change. The following navigation profiles are available:
• APM
• Predix Essentials
• Predix Essentials & APM
• Predix Essentials & OPM
• Predix Essentials, APM, & OPM
Table 5: Obsolete Features
As of this release, the following items are no longer available.
Description Tracking ID
When a navigation profile is selected, the applications that are not accessible to a user no longer US315324
appear in the module navigation menu.
36 © 2021 General Electric CompanyFourth Quarter of 2018
Tenant Preferences
This topic provides a list of product changes released for this module on the dates listed below.
Release Date: December 14, 2018
Table 6: Enhancements and New Features
Description Tracking ID
You can now select which applications appear in the module navigation menu by selecting a US304693
module navigation profile. A new page, Module Navigation Menu, was added to Tenant
Preferences to facilitate this change. The following navigation profiles are available:
• APM
• Predix Essentials
• Predix Essentials & APM
• Predix Essentials & OPM
• Predix Essentials, APM, & OPM
Second Quarter of 2018
Tenant Preferences
This topic provides a list of product changes released for this module on the dates listed below.
Release Date: June 29, 2018
Table 7: Enhancements and New Features
Note Tracking ID
GE Digital APM now supports the following six new languages: US259336
• Chinese (Simplified)
• Dutch (Netherlands)
• Italian (Italy)
• Japanese
• Portuguese (Brazil)
• Spanish (Spain)
© 2021 General Electric Company 37You can also read