ACH User Guide - Central Bank
←
→
Page content transcription
If your browser does not render page correctly, please read the page content below
ACH User Guide

Commercial Online Banking Video Tutorials are located on our website at the following
web address: https://www.centralbank.com/commercial-online-banking-video-tutorials.
You may also access the Video Tutorials by accessing www.centralbank.com/Customer
Service/Commercial Online Banking Video Tutorials.

03-12-2021
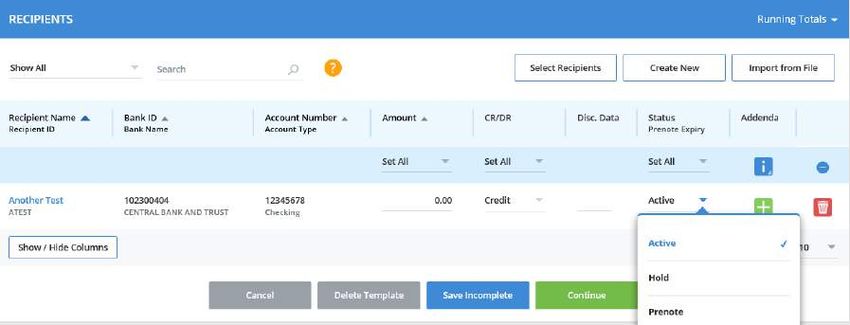
Table of Contents

About ACH ........................................................................................................................ 3
ACH User Setup ................................................................................................................ 3
Approval Access ................................................................................................................ 4
Payment Limits .................................................................................................................. 4
Access Schedule ............................................................................................................... 6
User Entitlements .............................................................................................................. 6
Methods of Creating an ACH Transaction.......................................................................... 7
Creating a Template .......................................................................................................... 7
Creating a Payment from a Template ...............................................................................11
Editing a Template ............................................................................................................14
ACH Quick Entry ..............................................................................................................15
Prenotes ...........................................................................................................................16
Export ...............................................................................................................................17
Approve Payments ...........................................................................................................17
ACH File Import and ACH File Upload ..............................................................................18
   ACH File Import ............................................................................................................................. 19
   Creating an Import Profile .............................................................................................................. 19
   ACH File Upload ............................................................................................................................ 20
   Manage File Uploads ..................................................................................................................... 21
General Information ..........................................................................................................21
Central Bank Holiday Schedules.......................................................................................21
ACH File Cut-Off...............................................................................................................22
Mobile Token ....................................................................................................................23
Additional Information .......................................................................................................24
Addenda Information – ACH SEC CODE WEB & TEL: .....................................................25
About ACH
Commercial Online Banking enables ACH origination, approval and release, as
determined by your company’s entitlements. This module may be accessed either
through the Commercial Online Banking website or the CentralMOBILE Business
mobile application (app). The security code from a mobile or physical token is
required to release ACH transactions.

Access Central Bank’s website at www.centralbank.com, Business, Cash
Management Services to review the most current version of the Terms and
Conditions to the Master Treasury Agreement where all services are further
outlined.

ACH User Setup
For users to create, modify, or release ACH transactions, the proper access to
ACH must be granted. Follow the directions below to grant ACH permissions.

     1. Click Administration on the horizontal toolbar.
     2. Click Users, located under Manage.

     3. Click the down arrow     next to the User Name.
     4. Select Edit User.
     5. Click Next to move to Step 3, Modify Privileges.

                                    Page 3 of 26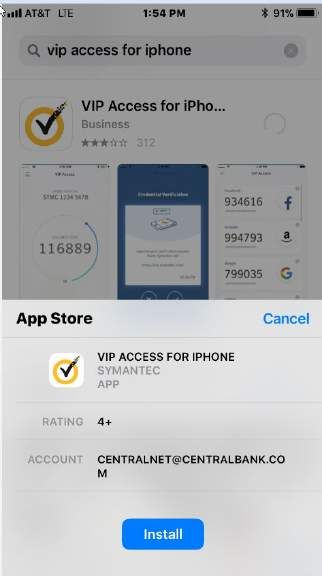
Approval Access
To enable Approvals, click Custom. Click Set Approvals, US ACH. Once
granted, the specific features for which approvals are enabled must be defined.
Select the approval privileges for the user, and then click Submit.

Payment Limits
Payment limits define a user’s customized limits for transactions and approvals.

1. Under Payment Limits, select Custom to specify limits for a user,
   otherwise leave the selection as Unlimited to default to the company
   limits.

2. If Custom is selected, click Limit Settings, click either Standard or
   Extended. Enter the approved limits for each applicable ACH type.
   Specify limitations related to transaction amount, approval amount,
   or daily cumulative (definitions provided below).

                                     Page 4 of 26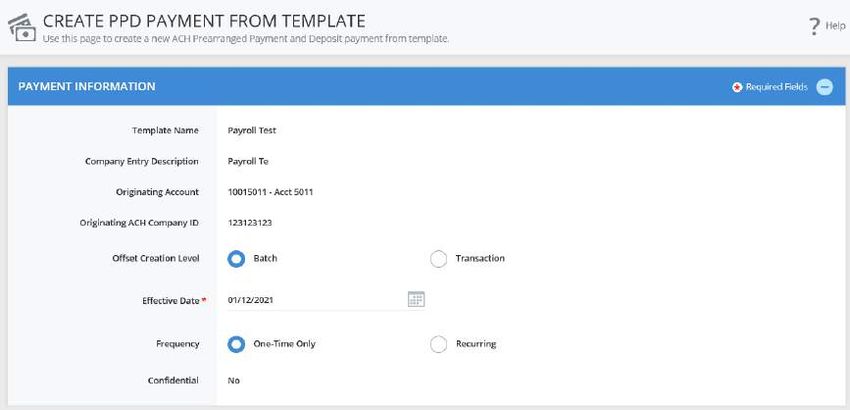
Transaction
  The maximum amount for a transaction for the corresponding
  payment type.
  Approval
  Maximum amount user can approve for processing. If the transaction
  is over the amount the user cannot approve the transaction.
  Daily Cumulative
  Maximum amount user can submit for processing in a single day
  Extended Transaction Non-Repetitive
  The maximum amount for a transaction for the corresponding
  payment type.
  Transaction Repetitive
  The maximum amount for a transaction for the corresponding payment
  type
  Approval Non-Repetitive
  Maximum amount user can approve for processing for non-repetitive
  transactions.
  Approval Repetitive
  Maximum amount user can approve for processing for repetitive
  transactions
  Daily Cumulative
  Maximum amount user can submit for processing in a single day

3. Click Submit.

                                  Page 5 of 26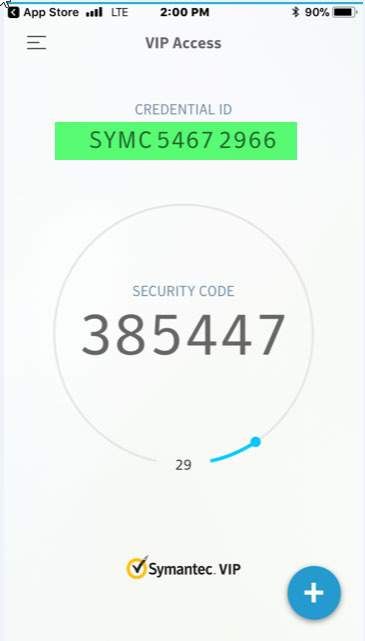
Access Schedule
If access to the system by a user needs to be modified, this can be accomplished
through the Access Schedule. Select either Unlimited or Custom. Custom
enables the restricting the days and hours the user can access the system.

Custom:
1. Choose Set Access located under Access Schedule. Enter the
   times/dates the user should have access.
2. Click Save.

User Entitlements
  None       User does not have entitlements to any account or functions.
  Custom     User have customized entitlements
  Full       User has full access to all associated accounts and functions

To grant User Entitlements, click Custom. To grant full access to all accounts
for a user, select Full.

Custom:
  1. Select Custom, then click Save.
  2. A green box will appear, select Custom.

   3. Click on Set Account Access to customize any account access
      for a user.
   4. Select Set Functional Access to grant permissions for the user.
      Once the access has been granted, click Save.

                                     Page 6 of 26
5. Click Set Data Service Access if the Company level has ACH
     access. If the company does not have ACH access, this option will
     not be available.

Methods of Creating an ACH Transaction
    I.    Create ACH Templates
    II.   ACH Quick Entry

 I. ACH Templates enables you to store ACH information for
 payments that you created on a regular basis (payroll, taxes, vendor,
 etc.) within Commercial Online Banking. This option provides you an
 efficient and effective means of managing your electronic payments
 and/or concentrations.

 II. ACH Quick Entry provides quick access to existing ACH
 templates for ACH transaction origination.

Creating a Template
  1. From the Payments menu, under Manage,
     select Template Center.
  2. Select Create a Template. Select the
     format for the ACH payments within the
     template.

                                   Page 7 of 26
Based on your specific company requirements, available payment
formats may include:
CCD
Cash Concentration and Disbursement – Typically used to transfer
funds between commercial business accounts. This format includes
up to 80 characters of addenda information to accompany the
payment.
Child Support
Used in payment of Child Support payments
CTX
Corporate Trade Exchange – Typically used to transfer funds between
commercial business accounts. This format includes unlimited addenda
information to accompany the payment. An example would be
expanded remittance information, containing details and invoice
numbers.
PPD
Prearranged Payment and Deposit Entry – Typically used for payment
to consumer accounts or to collect from consumer accounts. Examples
would be payment of direct deposit or the collection of dues from
individuals.
Tax
Used in the payment of Federal Taxes
NOTE: Additional formats may be available. Please contact your Cash
Management Officer if you have questions.
3. Enter the Template Information:
Page 8 of 26• Template Activation is the date the template is to become
active, defaulted to the current day. Future dates are accepted
if you wish to start using the template on a set date, but you
cannot set a date in the past.
• Template Name (i.e. Payroll). The Template Name may be up
to 35 alphanumeric characters with spaces. Choose a
meaningful name to make the template easy to identify.
• Originating Account identifies the account number used.
• Originating ACH Company ID should prefill based on the
selection made for Originating Account.
• Company Entry Description is a brief description of the
payment, in 10 or fewer characters. This field cannot be
modified when making a payment from the template. This
information will show in the Payment Center under Transaction
Name/Reference Column.
The next several fields are optional, but may be utilized:
Company Discretionary Data
Used to convey additional information about payments
created from the template. Up to 20 characters. This field
cannot be modified when making a payment from the
template
Template Limit
The maximum amount of a payment to be created from the
template.
Workflow
To designate a template as confidential. The template may
only be viewed by the template creator.
4. Enter the Recipients information. A recipient is one or more
individuals that you want to pay or collect from. You can select
from existing recipients already saved in Commercial Center, add
new, or import a NACHA file.
Page 9 of 265. When creating a new Recipient, click Create New and enter the
following:
Recipient Name
Name of the company or individual that you are paying or collecting
funds from
Recipient ID
An ID that will identify the recipient
Account Type
Select an option: Savings or checking
Account Number
Recipient’s account number
Bank Information
Recipient bank’s routing number. You can either select a bank from the
Preferred/Standard Bank lists or select the Enter Bank Information
option and enter the Bank ID or name. To search for Central
Bank,enter Central Bank * (two spaces before the asterick). Verify
Central Bank’s routing number of 042100146 is displayed.
6. Options. You may also choose to:
Save to Master List Recipient List
Add to the list of recipients. May be used in other payments. Select
appropriate payment type where the recipient can be used.
Add Contact
Store other contact information Information for the recipient (for
example, address details, email)
Add as Secondary Account Information
PPD recipients can be defined with a secondary account so that a
portion of every payment amount is allocated to that account while the
rest is going to the primary account. The allocation amount may be a
pre-set dollar amount or as a percentage of the recipient payment
amount.
Page 10 of 266. Once the information has been entered, click Continue.
7. A Preview Recipient box will appear. Once the information has
been verified, select Submit to save the information entered, or
Submit and Create to enter another Recipient.
Creating a Payment from a Template
1. To access an existing template, select Payments.
2. Select Create ACH Payments, From Template or select
Manage, Template Center.
3. Click the blue Template name to access the template.
4. Scroll to the Recipients list. All recipients in the listing are
displayed. You may modify the recipients in your listing by the
following:
Select Recipients
Choose the specific recipients to be included. Place a check mark in
the box by their name and click Done.
Create New
Create and add a new recipient.
Import from File
Import a listing of recipients from an existing file. The first time you
import recipients, an Import Profile must be created and saved to use
Page 11 of 26during the import process. See Import on Page 17.
5. Under Amount, enter the amount of the transaction for each
recipient.
6. Under CR/DR, verify that the correct action is designated, either
crediting or debiting the receiving account.
7. The dropdown next to Status enables you to designate the
recipient’s transaction as Active, Hold or Prenote.
8. Addenda enables the addition of related information to
accompany the transaction. The number characters available for
addenda information is determined by the ACH payment type
selected when creating the template.
Depending on your company setup, addenda options may be:
FRF – Freeform
Input up to 80 characters of freeform addenda
NTE – Note/Special Instruction
Defined as Change, Invoice Instruction, Line Item, Other Instructions,
Payment or Mutually Defined plus a Description
REF – Reference Number
Includes Reference Number Qualifer, Reference Number Id and
Description
RMR – Remittance Advice
Fields related to invoice: Invoice Amount Paid, Original Invoice
Amount, Discount Amount, Adjustment Amount, Adjustment Reason
Code
TRN – Trace
Current Transaction Trace Number, Referenced Transaction Trace
Number, Reassociation Trace Number
9. Click Continue.
10. A Preview Template page will display. Verify the information,
and select Submit Template.
Page 12 of 2611. A message will appear at the bottom of the screen that will
indicate if the template has been successfully submitted.
12. Click on Template Center.
13. Enter a check mark next to the transaction, and select Create
Payment.
14. Next, the Create Payment from Template screen will display.
Review the information, and make the necessary changes.
The Offset Creation Level should always be Batch.
Transaction is never the correct choice.
Change the Effective Date if the prefilled information is
incorrect (defaults to next business day).
Frequency If this is a recurring payment, select
Recurring, and enter the information accordingly.
Recurring payment options:
• Processed on a schedule of daily, weekly, monthly, or yearly options
• A specified number of times
Page 13 of 26• Until further notice – payment will continue until it is manually
deleted
• Until a specified date
15. Verify the Recipient Information once more.
16. Select Continue to preview the payment.
17. Click Submit Payment.
18. After clicking Submit, a confirmation will be appear at the bottom
of the screen.
19. If Workflow – Approve on Submit is not chosen, click on
Payment Center to approve the transaction.
20. Put a checkmark next to the transaction. Click the blue View
Recipients to review recipients and details of payments to be
approved. Click Cancel to continue the approval process.
21. Click Approve. (If this selection is grayed out, you do not have
permissions to approve a transaction).
22. The security code from a Mobile Token is required to release
a wire. Enter the six-digit security code from your security
token.
23. If an additional approver is required, the approver will need to
access the payment, approve and submit.
24. A confirmation will appear at the bottom of the screen when
approved and submitted.
Editing a Template
Numerous edits may be made to a template. The most common are changes
in amount of pay, or updates to bank information.
1. Click on Payments.
2. Click on Manage, Template Center.
3. Click on the blue Template name.
4. Enter the updated information for either Template Information
or for Recipients. Examples of Recipient edits would be: A new
dollar amount under Amount, or click the Recipient Name to
edit bank information.
5. Once the edits are complete, click Continue.
6. Click Submit Template.
Page 14 of 26ACH Quick Entry
Use ACH Quick Entry to re-create a payment for the same account, same end
recipient, and same amount with a new payment date.
For ACH Quick Entry, you can only select a new payment date. You cannot
edit the template, including the Company Account, Template Type, Recipient
or Payment Amount.
1. Click on Payments.
2. Click ACH Quick Entry under Create ACH Payments.
3. Select one or more templates you would like to re-create, enter
an effective date for each template. Review the Recipients for
accuracy and select Continue.
4. Click Submit Payment.
5. If Workflow – Approve on Submit is not chosen during the template
creation, click on Payment Center to approve the transaction.
6. Put a checkmark next to the transaction. Click the blue View
Recipients to review recipients and details of payments to be
approved. Click Cancel to continue the approval process.
7. Click Approve. (If this selection is grayed out, you do not have
permissions to approve a transaction).
8. The security code from a Mobile Token is required to release
a wire. Enter the six-digit security code from your security
token.
Page 15 of 269. If an additional approver is required, the approver will need
to access the payment, approve and submit.
10. A confirmation will appear at the bottom of the screen when
approved and submitted.
Prenotes
To validate bank account information, a prenote is recommended. This is a zero
dollar test to ensure the recipient’s bank account information entered is valid before
issuing a payment.
1. Access the Recipient information by clicking on Payments,
Manage, Template Center
2. Click on the blue Template name.
3. For the specific recipient, Under Status, choose Prenote.
4. If there are additional recipients listed in the template that do not
require Prenote, under Status, choose Hold.
5. Click Continue.
6. Click Submit Template.
7. A confirmation will appear.
8. If Workflow – Approve on Submit is not chosen during the template
creation, click on Payment Center to approve the transaction.
9. Put a checkmark next to the transaction, and click Approve. (If this
selection is grayed out, you do not have permissions to approve a
transaction).
Page 16 of 2610. The security code from a Mobile Token is required to release a
wire. Enter the six-digit security code from your security token.
11. If an additional approver is required, the approver will need to access
the payment, approve and submit.
12. A confirmation will appear at the bottom of the screen when
approved and submitted.
Export
1. Click Payments, Manage, then Payment Center.
2. Place a check mark next to the payment.
3. Choose Export.
4. You may export the following:
• All Recipients
• Active & Prenoted Recipients
• Active Recipients
Approve Payments
1. Click Payment, then Payment Center.
2. Place a check mark next to the transaction.
3. Click the blue View Recipients to review recipients and details of
payments to be approved. Click Cancel to continue the approval
process.
4. Click Approve.
5. Enter the passcode from the security or mobile token.
6. A confirmation will appear.
A second path to Approvals is located in the top header bar. Click the number
displayed beside of Approvals.
Page 17 of 26ACH File Import and ACH File Upload
ACH File Import and ACH File Upload enable direct import of NACHA files saved
from your accounting software into the system. See outlined below the differences
between the two methods. During the implementation process, your Cash
Management Officer will assist in determining the method most compatible with
your company’s procedures.
Description of Action ACH File ACH File
Import Upload
Enables import of information into Commercial
Yes Yes
Online Banking
Required Import Format - NACHA-formatted file Yes Yes
Import into existing Template stored in the
Yes No
Template Center
Import into existing Import Profile Yes Yes
Ability to update file information after import. i.e.:
Yes Yes
payment amounts, recipients
Enable a second system user to approve creation or
Yes Yes
changes to Import Profiles.
Enables a second system user to approve creation
Yes NA
of or changes to Templates
Enables a second system user to approve file for
Yes Yes
release
Ability to custom file map transaction information
Yes Yes
from non-NACHA format to a NACHA file
Reporting for submitted and processed
transactions is stored in Manage> Payments> Yes No
Payment Center
Reporting for submitted and processed
transactions is stored in Reports>Payment
No Yes
Reports>Standard>ACH Detail and/or ACH
Summary
Page 18 of 26ACH File Import –Recipients
1. Create a NACHA file within your accounting software.
2. Log into Commercial Online Banking Business.
3. You must have an ACH Template created for the imported file to load
into. To create an import template, see directions on Page 8, Creating a
Template
4. You must also have a Profile defined for the import. See directions below
to Create an Import Profile.
5. Click Payments, Manage, Template Center
To import recipients, click the blue template name (i.e. Payroll).
6. Under Recipients, choose Import from File.
7. In the Profile list, choose the associated profile for the transactions.
8. Click Next.
9. Choose Browse, to search your computer files to select the NACHA file
created
10. Click Next.
11. Review the Recipient Information to ensure all amounts are correct.
12. Select Import File.
a. You can also select Save all imported recipients to the
master list, so that information will be stored within the
Payment Center.
13. Click Continue.
14. Click Submit Template.
15. Next, click Payments Payment Center.
16. Enter a check mark beside the payment created.
17. Click Approve. If you do not have approval authority, this will be grayed
out.
18. Enter the passcode from your Security or Mobile Token.
19. A confirmation will appear confirming the transaction was created
successfully.
Creating an Import Profile – Recipients
1. Click Payments, Payment Tools, Import Profiles
2. Click Create Profile
3. Enter Profile Name
4. Select a File Format. If your accounting system can create a NACHA-
formatted file, choose ACH NACHA. If your account system cannot
create a NACHA-formatted file, choose ACH User-Defined. Please
contact Corporate Services, at 859-253-8743, for assistance in creating
your User-Defined profile.
5. Click Next.
Page 19 of 266. You may import either: Non-Repetitive Payments, Templates or
Recipients. Click Recipients to import into a Template listing Recipients.
7. Offset Creation Level – Always Batch.
8. Profile Access – Choose either Private or Public, to be viewed by others
within your organization.
9. Options
• Check for duplicate files and reject duplicates
• Check record count
• Check hash totals
10. Click Next.
11. Click Submit Profile.
NOTE: You may also import listings of Non-Repetitive Payments or Templates.
A Profile would be created for each of these specific file types.
ACH File Upload
1. Create a NACHA file within your accounting software.
2. Log into Commercial Online Banking Business.
3. To upload the ACH file into the Profile, click on File Services, then
Manage File Uploads.
4. Click Upload File.
5. Click the arrow next to Upload Type and choose ACH (Standard).
(NOTE: ACH (Standard) is used for a NACHA file. If your file is not a
NACHA file, contact Corporate Services at 859-253-8743.)
6. Click Next to continue to Step 2.
7. Click Browse to locate the NACHA file on your computer. If you would
like for the system to check for duplicate files and reject the duplicates,
check the box next to Duplicate File Check.
8. Click Upload to load the file.
9. Next, click Payments Payment Center.
10. Enter a check mark beside the payment created.
11. Click Approve. If you do not have approval authority, this will be grayed
out.
12. Enter the passcode from your Security or Mobile Token.
13. A confirmation will appear confirming the transaction was created
successfully
Page 20 of 26Manage File Uploads
1. Click on File Services, Standard File Uploads, Manage File Uploads
to review the file.
2. From the Manage File Uploads page you may complete the following
tasks:
• View content details of the ACH upload file by clicking on the
blue hyperlink file name.
• Approve uploads, but only if the users is defined as an Upload
Approver and is not the user who created the upload
• Transmit upload files to the bank
• Clicking Refresh Data to retrieve the most recent information
• Deleting uploads that have not yet been transmitted
3. Use the Search fields to search by File Name or Date Range. Click
Search to locate the file.
4. You may check the box next to a file that has not been submitted to edit
a file, view files that are already submitted, approve, transmit or delete.
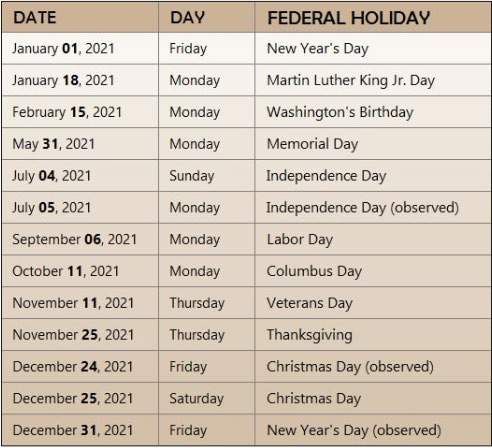
General Information
Central Bank Holiday Schedules
NOTE: For holidays falling on Saturday, Federal Reserve Banks and Branches
will be open the preceding Friday. For holidays falling on Sunday, all Federal
Reserve Banks and Branches will be closed the following Monday.
Page 21 of 26NOTE: ACH transactions should not have an effective date for any of the above
Federal Reserve Holidays.
ACH File Cut-Off
ACH File Cut-off is 5:00 PM ET. Files with the Effective Date of the next
business day must be released before 5:00 PM ET on the current business
day.
Same Day ACH - ACH File Cut-off for Same Day ACH is 12:00 p.m. and the
amount of the payment must be less than $50,000. If you need to originate a
Same Day ACH, contact Central Bank’s Corporate Services Department at
859-253-8743 prior to doing so. If you fail to contact us prior to originating the
payment, your transactions may be processed on a next-day basis.
Page 22 of 26Mobile Token
Install the Mobile Token on your phone to obtain the security code to access
Commercial Online Banking and the associated Mobile App.
To install your Mobile Token, follow the directions listed below.
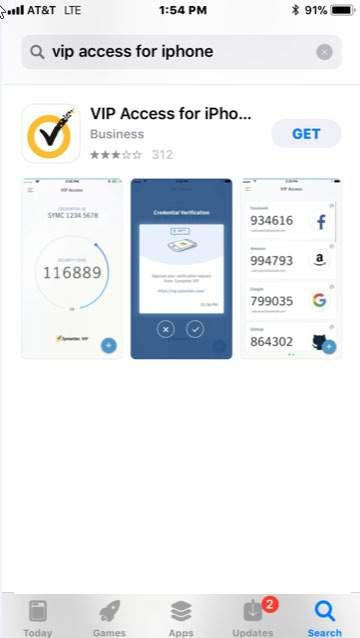
1. From the App Store or Google Play, search and download the VIP Access
App in the app store.
2. Once downloaded, log in to Commercial Banking Online, and select Activate
Token located under Other Settings and Preference in the Welcome menu.
3. Three pieces of information are required:
i. Activation Code: central2021
ii. Token Number: Credential ID listed on the mobile app
iii. Passcode: Six-digit number generated by the app
Page 23 of 26Additional Information
If you have any problems processing your ACH transactions, please call
Commercial Online Banking Client Services at 859-253-6338 or Central
Bank’s Corporate Services Department at 859-253-8743. Office Hours are
Monday-Friday 8am-5pm.
Page 24 of 26Addenda Information – ACH SEC CODE WEB & TEL:
SECURITY PROCEDURES APPLICABLE TO SEC CODE: WEB ENTRIES
NOTE: Please contact Central Bank Corporate Services at 859-253-8743 for
additional information related to originating a WEB or TEL transaction.
Initiating a Web Entry:
SEC Code WEB should be used under the following circumstances:
1. WEB is appropriate for a non-consumer Originator to use when
initiating debit entries that have been authorized by a consumer
Receiver via the Internet or a Wireless Network.
Example: A consumer’s authorization for a debit entry is obtained over the Internet accessed
from a device that uses a wired or Wireless Network.
2. WEB is appropriate if the consumer Receiver’s instructions for
initiation of the debit entry are communicated to the Originator via a
Wireless Network, even if the authorization has been given in some
other manner.
Example: An authorization was obtained from the Receiver in person but the Receiver sends
a text message to communicate when to initiate the debit entry.
3. WEB is appropriate to use when initiating credit entries transmitted
between consumers or between accounts belonging to the same
person, regardless of the manner in which the payment is initiative.
Example: A consumer’s payment instruction to send funds to another consumer is obtained
from a consumer over the Internet accessed from a device that uses a wired or Wireless
Network, or via in-person instruction at a bank branch.
SEC Code Web should not be used under these circumstances:
1. WEB is not appropriate if the consumer’s authorization for the debit
entry is oral.
Example: Authorization is given during a telephone conversation via a device over a Wireless
Network.
2. WEB is not appropriate if the Receiver’s instructions for initiation of
the debit entry are communicated to the Originator over the internet
via a wired network but the authorization has been given in some
other manner.
Page 25 of 26Example: A written authorization was obtained from the Receiver through the mail to debit
his account for a bill payment service, but he goes to the biller’s website on his desktop to
verify the amount of the bill ACH month. This transaction would constitute a PPD entry rather
than a WEB entry.
3. WEB is not appropriate to initiate entries to non-consumer (business)
accounts, even when the non-consumer Receiver (business)
provided authorization for the transaction via the Internet.
4. WEB is not appropriate if the POS code would otherwise apply,
because the WEB format does not contain the necessary fields for
communication of terminal identification information.
Example: A Receiver uses a near field communication mobile payment service to initiate a
debit to his or her bank account to pay for goods at the point-of-sale. In accordance with the
Formal Rules Interpretation regarding the Proper Use of SEC Codes, the merchant
(Originator) should use the POS SEC code so that information regarding the merchant
identity and terminal location can be properly communicated to the RDFI.
5. WEB is not appropriate to initiate credit entries from a consumer to a
non-consumer (business) account. The CIE SEC Code should be
used for a bill payment from a consumer to a business.
Initiating a TEL Entry:
SEC Code TEL should be used under the following circumstances:
1. There is an existing relationship between Company and
Receiver; or
2. There is not an existing relationship between Company and
Receiver, but Receiver initiated the telephone call to
Company.
Company and Receiver are considered to have an existing relationship when
either:
1. There is a written agreement in place between Company and
Receiver for the provision of goods or services (e.g., Receiver
has an insurance policy with Company); or
2. Receiver has purchased goods or services from Company
within the past two years.
A TEL Entry may not be used by a Company when there is no existing
relationship between Company and Receiver, and Company has initiated the
telephone call.
Page 26 of 26You can also read