2018 Director Transition Workshop - Technology Systems Overview Presented by PMI Chicagoland Technology Team - PMI Chicagoland Chapter
←
→
Page content transcription
If your browser does not render page correctly, please read the page content below

Technology Systems Overview

2018 Director Transition Workshop

Presented by PMI Chicagoland Technology Team
Venkata Sanaka | Kamen Williams | Arjun Valluri | Adenor Aragao, Praj Dani, Rob
Roque, Jeff Schutte
•   January 20, 2018
                                                                                  1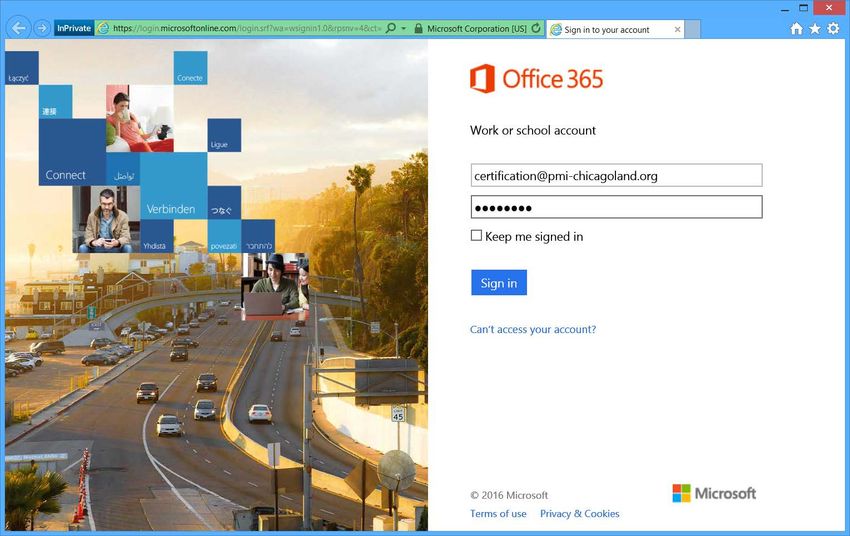
Agenda

• Solutions/Tools Available in the Chapter Overview
• Accessing Chapter Email
• Document Management Solution Overview
• Skype for Business
• Additional Features

                                                      2
Solutions/Tools available in the Chapter

•   Office 365 (Microsoft O365)
     – Email (Outlook Web App - OWA, Outlook desktop)
     – SharePoint (Document management portal.)
     – Office Online (online office productivity suite – Word, Excel,
         PowerPoint, etc.)
     – Skype for Business (IM, audio, video conferencing)
     – OneNote
     – Delve (Information discovery)
     – Sway (Digital scrap book)
•   Chapter Website (Star Chapter)
•   Member Relationship Management System (MRMS)
•   Survey Monkey (survey)
•   Constant Contact (email blasts)
•   Volunteer Relationship Management System (VRMS)

                                                                        3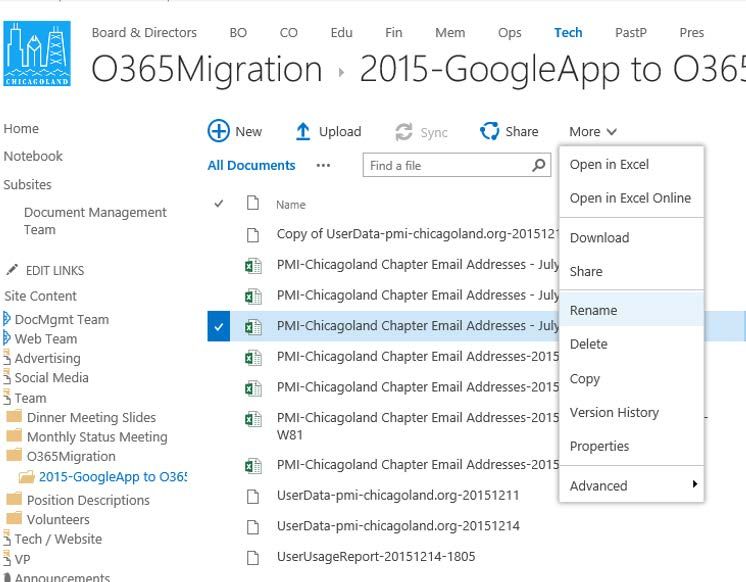
Accessing PMI Chicagoland SharePoint

       Microsoft 365                       Logging On
       • PMI Chicagoland SharePoint        • Enter
         is served through the Microsoft     https://login.microsoftonline.
         Cloud.                              com/ into your preferred
       • All Microsoft Cloud Products        browser
         are accessed at the following
                                           • Type in your “PMI
         link:
                                             Chicagoland email address”
         https://login.microsoftonline.
         com/                              • Enter your PMIChicagoland
                                             email password when
       or
                                             prompted
              https://portal.office.com

Presentation Title
                                                                         4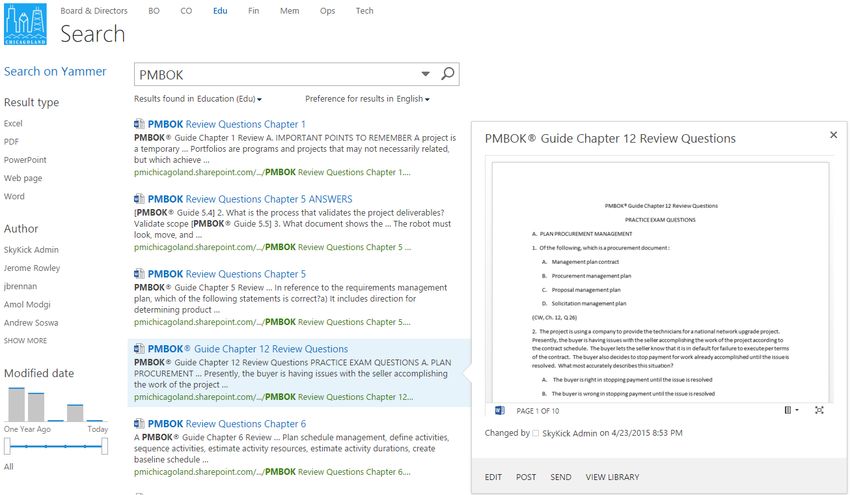
Staying Logged In Option

• Pop widow will ask to stay logged in
• Select “Yes” or “No”
   – Either option is fine

                                         5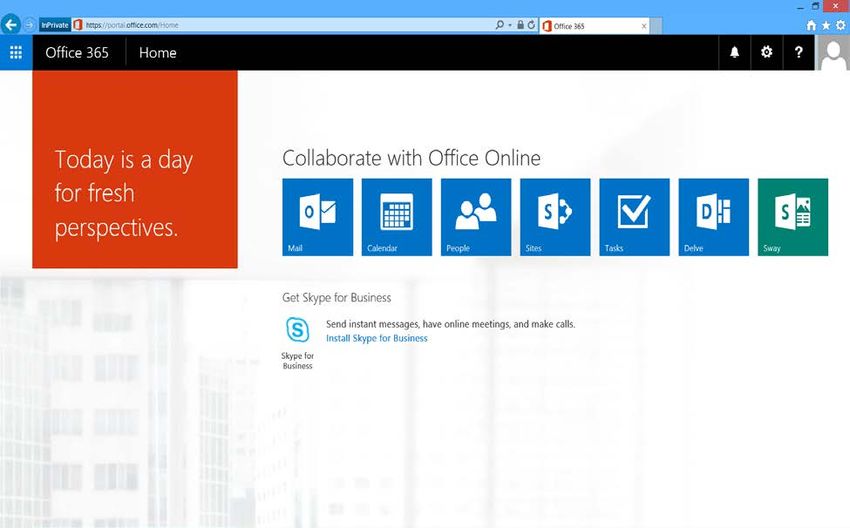
Getting Started – Main Screen

Click the App Launcher
in any screen at any time
to get all available apps

                                    6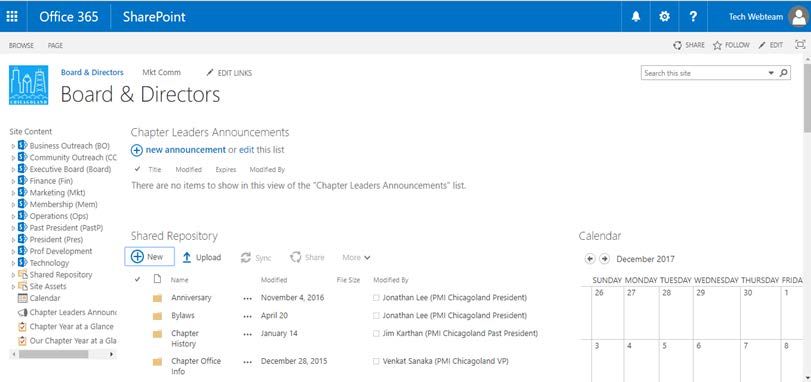
Getting Started – Available Apps

                       Mail     Chapter Outlook Emails
                     Calendar   Chapter Outlook Calendar
                     People     Chapter Outlook Contacts
                      Tasks     Chapter Outlook Tasks
                      Sites     Chapter SharePoint Team Site
                      Sway      Digital scrapbook (future)
                      Delve     Auto Information Discovery (future)

                                                                      7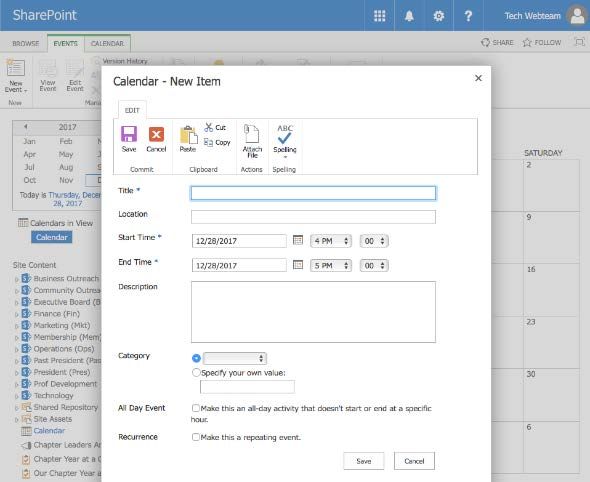
Email Account

• Each board member and director has an email
   account = @pmichicagoland.org.
• Refer to the contact list for your email address
• Four ways to get your email
    – Web access (OWA)
    – Forwarding
    – Outlook or equivalent
    – Mobile/Smart device

                                                     8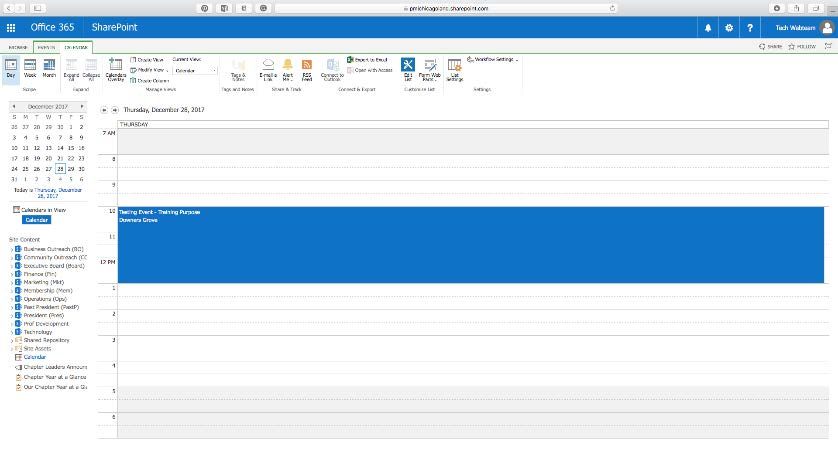
Outlook Web Access (OWA)
• Access Email via web browser

                                 9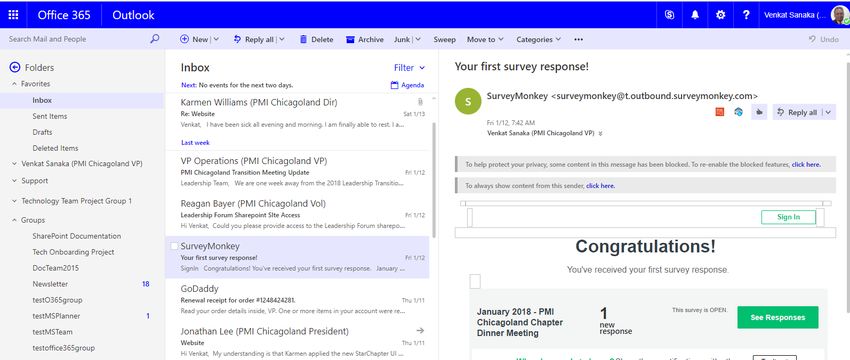
Automatic replies setting in Email Account
• Options -> Mail -> Automatic replies.

                                               10
Setting Email Signature in OWA
• Options -> Mail -> Layout -> Email Signature
11Setting Email Forwarding
• Options -> Mail -> Accounts -> Forwarding
12Setting up Outlook client on other devices
• Set up email in Outlook 2013 or 2016 for Office 365
– https://support.office.com/en-us/article/Add-an-email-account-to-
Outlook-6e27792a-9267-4aa4-8bb6-c84ef146101b?ui=en-US&rs=en-
US&ad=US
• Set up email in Outlook for Mac
– https://support.office.com/en-us/article/Add-an-email-account-to-
Outlook-6e27792a-9267-4aa4-8bb6-
c84ef146101b#PickTab=Outlook_for_Mac
• Add an email account to Outlook for Mobile Devices
– https://support.office.com/en-us/article/Add-an-email-account-to-
Outlook-6e27792a-9267-4aa4-8bb6-
c84ef146101b#PickTab=Mobile_email
• Office 365 install and setup – Help
– https://support.office.com/en-us/article/Office-365-install-and-setup--
Help-afb38ee0-1679-4548-9e68-7730cb36991d
13Document Management
Overview
SharePoint Online
14PMI Chicagoland SharePoint
Is used for… This training covers…
• Team Collaboration • Accessing PMI Chicagoland
• Communications SharePoint
• Project Task Tracking • Draft vs Shared Documents
• Document Management • Creating New Documents,
Uploading Documents, Editing,
Finding, Moving, Renaming
• Creating/Managing Tasks,
Announcements, Calendar
Events
15Accessing PMI Chicagoland SharePoint and
Basics
• Learning Objectives:
– Participants will learn how to log on and log off the PMI Chicagoland
SharePoint site
– Participants will learn how to navigate the basic features of the PMI
Chicagoland SharePoint site
• Pre-Requisites:
– As a Board Member or Director, you will receive a PMI Chicagoland email
address. This is your primary username to access PMI Chicagoland
SharePoint.
• All documents will be continue to be stored in the cloud
• Allows team editing of common documents
• Each department (BO, CO, etc.) will have their own SharePoint Team site
• Within each team site, all VPs & Directors will have their own unique library area
• PMIC Office 365 subscription is limited to only online versions of Word, Excel,
PowerPoint
16Getting Started – https://login.microsoftonline.com/
To Access the Chicagoland Chapter SharePoint Site at https://login.microsoftonline.com/
1. Enter User Name = Your PMI Chicagoland email address
2. Enter Password
3. Click Sign in
17Select SharePoint Site
• Select “Board and Directors SharePoint Site”
Presentation Title
18You Made It!
• Select the location you want to enter
Presentation Title
19Document Management on PMI Chicagoland
SharePoint
Presentation Title
20Example: Navigating to file folders in sites
Technology VP’s
Document Library
Document Library Navigation
(Repository)
• You can click on each of the
Technology Team’s document library name and
Document Library navigate to the folder/file
(Repository)
OR
• You can use the left side
Directors’ navigation bar to drilldown into
Document Library
(Repository) document library folders to find
the file (folder tree structure)
21Standard Document Library “Folders”
for Individual User Account
• “Drafts” Folder
– Accessible ONLY by the Owner of the Folder
Drafts – Create, Read, Update, Delete (Contribute) permission for
Owner
– Ex: storage of chapter related passwords, chapter
financial/sensitive data, draft documents not ready for
consumption, award nominations for your peers, etc.
• “Shared” Folder
– Accessible by other Board Members and Directors
Shared – Create, Read, Update, Delete (Contribute) permission for
Board and Directors
– Ex: Documents ready for consumption, monthly status
meeting notes, presentations, project plans/charter, etc.
Note: Contribute permission allows following capabilities:
– View, Add, Update, and Delete capabilities
22Document Management Best Practices
• Create folders for the current year and the 4-5 preceding years. Another
folder called Archive can be created for anything older
• Do keep folder and file names short, just long enough to describe what the
document is within the folder it resides. There is a 250 character limit for
names that starts from the top folder and includes the complete path along
with the file name
• Do keep names specific
• Do create, edit and refine documents in the Drafts folder before publishing
• Keep in mind that anything in the Shared folders can be viewed and edited
by others (Contribute permission: View, Add, Update, and Delete)
• Do use PMIC templates whenever possible
23How to create shared folder
1. Click on New to create shared
folder
New pop window will open
2.Select New Folder and enter
details in Create folder
3. Write Name for the Folder
4. Click on Invite People
Write details of invitees shown
in next slide
Presentation Title
24How to create shared folder
1.Write folder name
2.Write names or email address of the invitee
3.Provide edit/view rights
4.Can add personal
message for invitees
5.Click on Create
New Folder will be shared with selected
invitees
Presentation Title
Presentation Title
25Recommended Folder and Documentation
Naming Conventions
• Think in hierarchies as an aid in developing logical locations for the folders and files
• Parent Folder: Give shortest possible but meaningful folder name
Child Folder: 1st child folder name should be in year [YYYY] (For example: 2016)
Grandchild Folder: Give shortest possible but meaningful name
Great Grandchild Folder: Give shortest possible but meaningful name
…
File name: [YYYYMMDD] + [short but descriptive file name] + [version]
Example: Parent Folder Name 1st Child Folder Grandchild Great Grandchild … File Name
Training Docs 2016 O365 Email … 20160130-AddingEmailAccountToClientDevices.docx
26Folder and Documentation Naming and
Storing Best Practices
• Limit folder creation
– When you are creating folders, think minimal. Most files and
documents can fit somewhere in your hierarchy if you have
done a good job of initially mapping it out
– Only create new folders if you find yourself repeatedly coming
back to save similar files in the same place, only to find that it
does not exist yet
• Store Documents in SharePoint
– Do not put files on the Desktop
27Creating New Documents
1. Navigate to the folder where you
want the document
2. Select New
3. Select type of document you want
to create (Word, Excel, etc.)
28Editing Documents – Two Ways
1. Navigate to the folder where
document exists and select
2. Select FILES
3. Choose Edit Document
OR you and also simply click on the link to open the document and then edit it.
29Uploading Documents to SharePoint
Click on Upload to upload a file
Presentation Title
30Upload Documents to SharePoint cont’d
New pop window will open when you click on Upload
1.Select file
2.Specify folder
where you want
to upload file
3 .Write details about Version
4.Click ok
Presentation Title
31Downloading Documents
For downloading documents highlight .
1. Navigate to area where you want to download file
2. Right click
3. Select Download
32Search: Finding Documents
Step 1 Step 2
1. Navigate to top level folder where
you think the document resides
2. Type in the search box:
a. All or part of the file name
b. Any part of the file content
c. Wildcards (*) can be used
Results can be filtered
if necessary, by type,
by author, by date
33Search: Finding Document cont’d
• SharePoint is a very powerful search engine
• Displays results, can preview, obtain meta details, etc.
Can Preview documents
Presentation Title
34Renaming Documents
2. Select More
1. Navigate to the
folder where
document exists
and select
3. Choose Rename
35Moving Documents
Moving documents can be done in a number of ways
• Using Internet Explorer as the browser, Windows Explorer may be used to transfer files
between locations
1. Select
LIBRARY
Select Open with Explorer
36PMI Chicagoland SharePoint Calendar
Presentation Title
37Calendar Feature
• In this training you will learn how to use the Calendar feature
• You will learn:
1. How to create, modify and delete events
2. How to change the scope to show daily, weekly or monthly
overview
3. How to modify from a Calendar view to a List of Events
view
4. How to set up Alerts to send you an e-mail every time
someone creates or modifies an event
38PMI Chicagoland Home Page
When you login, this is the fist page you will see (currently):
This training is about
this section of the
webpage
Presentation Title
39PMI Chicagoland Home Page
Notice that there are two ways for you to select the Calendar feature:
Click on either one of these links
Presentation Title
40Calendar Home Page
Key elements of the Calendar view:
Events and Calendar Menus
Month Click here to go back to the Home page
Selector
Presentation Title
41Calendar Home Page
Events Menu
To create a If an event You can also In case there is a If you would like to
new event, already delete the event document (flyer, be informed if
click here exist and presentation, pdf, someone made a
you want to etc.) related to this change to this
view the event, you can event, you can set
details or attach the file up an Alert
modify the
event’s
information,
click here
Presentation Title
42Calendar Home Page
Creating New Event
This pop up will
open for you to enter
the event details
Notice that you can attach a file here,
create and define the category of the
event
Don’t forget
to save
Presentation Title
43Calendar Home Page
Calendar Menu
Select the Expand the You can overlay You can modify You can easily If you would like You can export
scope of details or two or more the view to show share the link for to be informed if the list of events
your view: collapse calendars to the events in a the calendar. Keep someone made to an Excel
them verify how the Calendar format in mind that the a change to this spreadsheet
Daily, events overlap or a List format person needs to calendar, you
Weekly or or conflict have access and can set up an
Monthly permission to view Alert
the calendar
Presentation Title
44Calendar Home Page
Calendar Scope Views: Daily View
Notice that it shows
only one date and
the hours
Presentation Title
45Calendar Home Page
Calendar Scope Views: Weekly View
Notice the
week days
You can drag and
drop the events to
another time or
date
Presentation Title
46Calendar Home Page
Calendar Views: Events List View
Notice All Events
as a list. This list
can be exported
to an Excel
spreadsheet
Presentation Title
47Calendar Home Page
Other General Tips
Some options are grayed out either Avoid clicking on
because the web services are not the settings if you
turn on for the environment, or you are not an expert
don’t have permission to use them or have advance
skills with
SharePoint .
Presentation Title
48Calendar - Alerts
Setting Up Alerts
Alert is a nice feature that you should turn on in case you
would like to track the changes to lists, items or
documents in SharePoint. Every time someone adds,
modifies or delete and information, you can ask
SharePoint to send you an e-mail telling you what has
changed, when and who did it.
When creating an Alert, you will define what type of
modification (i.e. any modification, or additions, deletes
and changes only) you would like to be informed and the
frequency (immediate, daily updates or weekly updates)
of the emails.
Presentation Title
49Calendar - Alerts
Creating an Alert Best practices recommend that a daily
summary with all changes is adequate
to keep you informed about what
happened during the day. You will
receive one email with a link to each
item that has changed. Click on the item
link in the email if you would like to see
the changes for that item
You can add more people (e-mail) to receive the
same alert. However, due to restriction with
licenses, not everyone can use its personal e-mail.
This feature is not turned on currently
Select this wisely based on the frequency of the
changes. If the item is very important and urgent,
then select ”immediate.” If the item changes
eventually during the week, then set up for ”daily.” If
the item rarely changes during the week, then set up
for ”weekly.” Also, select the time the e-mail will be
sent.
Choose wisely, you don’t want to inundate your
inbox with dozen of e-mails daily.
Presentation Title
50Skype for Business
• Installation
• Communicate Your Way
• Add people and video to a conversation
• Schedule a follow-up Skype for Business meeting
• Desktop sharing
• IM a contact
• Find a contact from Outlook
Presentation Title
51Getting Started – portal.office.com
To Access the Chicagoland Chapter SharePoint Site at: portal.office.com
1. Enter User Name = Your PMI Chicagoland email address
2. Enter Password
3. Click Sign in
52Access to Skype for Business client
Click “Install software”
53Access to Skype for Business client
Click “Install” and
follow instructions
54Teleconference Bridge Integrated with Skype
• Skype for Business is integrated with
Teleconference bridge
– Join via Skype (VOIP)
– Join via tele-conference bridge
number (Phone)
• Moderator Passcode
– Unique Moderator Passcode will
be handed out to each owners of
the O365 account
55Join Skype Meeting
• Click on “Join Skype Meeting” link
• Or Dial phone number and enter “Conference ID”
56Attendees without “O365” account
• Attendees (such as volunteers) that does not have O365 account
and does not have Skype for Business client installed
– simply enter their name and click on “Join the Meeting” button.
57Attendees without “O365” account
- Attendee for the first time
• First time attendees of O365 Skype for Business (without Skype
for Business client) will need to install a plug-in one time.
– Plug-in will be prompted as shown below to be installed
58Available Training
• O365 Training
– Skype for Business
https://support.office.com/en-us/article/Video-Communicate-your-way-c50059a4-9114-
4c81-8581-bd4fd6e97fc6?ui=en-US&rs=en-US&ad=US
– SharePoint Online
https://support.office.com/en-us/article/SharePoint-Online-video-training-cb8ef501-
84db-4427-ac77-ec2009fb8e23?ui=en-US&rs=en-US&ad=US
– Office Delve
https://support.office.com/en-us/article/What-is-Office-Delve-1315665a-c6af-4409-
a28d-49f8916878ca?ui=en-US&rs=en-US&ad=US
– You Tube:
Office Delve: https://www.youtube.com/watch?v=cCbyer0Xupg
Sway: https://www.youtube.com/watch?v=Jw-g6IuBVJE
Presentation Title
59Support
• General Support is available by sending email to:
– Support@pmi-Chicagoland.org
60OneNote
• OneNote is a computer program for free-form information gathering
and multi-user collaboration.
• Useful for capturing meeting minutes in real time with team
members
• Each SharePoint site has OneNote
61OneNote
• Access OneNote via Web or Desktop version
• Desktop version provides richer experience
62Managing a Team Announcement
Members can edit a Team Announcement with the following:
1. Select new
announcement or edit 2. Fill out form and
expiration
63Managing a Team Calendar
Members can edit a Team Calendar with the following:
2. Select EVENTS
3. Select New Event, Edit Event or Delete Event
1. Select day or
event
64Syncing Team Calendar with Outlook
Members can sync a Team Calendar with Outlook using the following:
3. Select Calendar in
1. Navigate to SharePoint site ribbon, then Connect to
calendar Outlook
2. Highlight calendar
65Team Tasks
Managing Team tasks assigned to individual members with Start
Dates and Due Dates
Step 1 Select New Task or Edit Step 2 Fill Out Form
Show task as completed by
checking box
For Milestones make Start
date and Due date same
date (like MS Project)
66Step 1: Create A New Task List
Task lists are “Apps” in
SharePoint. To create a new
Task List App, click the cog on
the menu strip and select “Add
an App”
67Step 2a: Create a New Task List
68Step 2b: Create a New Task List
Hint:
We recommend that
you give the task list a
unique name
69Step 2c: Create a New Task List
Your new “App” list
will appear in your
“Contents” list
Presentation Title 70Step 3a: Create Tasks In Your Task List
To access your new
Task List, navigate
back to your Home
Page and double-click
the new Task List
Presentation Title 71Step 3b: Create Tasks In Your Task List
Hint:
After opening the new task list, we
recommend that you select the “edit”
this list. It will enable you to view all
tasks within this task list at the same
time.
Presentation Title 72Step 4a: Create The Tasks
Enter the tasks in each row. New rows
will appear when you press “Enter”
Hint:
1. We recommend that you put the
major tasks (i.e., tasks with no
subtasks lists first)
2. We recommend that you create
tasks in the following order:
a) Create tasks
b) Add Due Dates
c) Add Assignments
Presentation Title 73Step 4b: Create The Tasks
Subtasks are created by hovering your
mouse over the three “dots” and then
click on create sub-task
To change the order of the tasks, grab
the box to the left of the check box and
drag to the correct order.
Presentation Title 74Step 5a: Add Due Dates To Your Tasks
To add due dates, click on the
“Due Date” box next to the
task. Select the due date from
the calendar.
Presentation Title 75Step 5b: Add Due Dates To Your Tasks
Continue adding dates until all
of the tasks (which require
one) have due dates
Presentation Title 76Step 6: Add Assignments
Assigning tasks allow you to
view responsibilities and to
use tools such as workflow
(will be shown in future
courses).
To assign a task to an
individual, click in the
“Assigned To” box next to the
task and enter a name.
NOTE: To be assigned a task,
the individual must have
access to the site and have a
registered email address
Presentation Title 77Step 7: Save List
To save your changes, select
“Stop” editing this list.
Presentation Title 78Step 8: Your New List is Created
When completed, your new
project task list will look
similar to this. SharePoint will
add a timeline with at least one
data point. In the next step, we
will show you how to add tasks
to the timeline.
Presentation Title 79Step 9: Add Tasks To A Timeline
Tasks must be added
to the timeline to
show on the timeline
graph. Click on the
the three dots next to
the task to open the
dialog box to select
“Add to Timeline”
Note: The same
process is used to
remove an item from
the timeline.
Presentation Title 80Step 10: You’re Done!
Check the boxes next
to the task to indicate
that a task is
complete.
Presentation Title 81Managing the Team Timeline
• Team Tasks can be added
to a timeline view after it
has been created.
2. Select elipsis
– “ADD TO TIMELINE”
1. Select TASK
3. Select ADD TO TIMELINE
82Thank You Presentation Title 83
You can also read