HOMECARE CLINICIAN TRAINING MANUAL - Axxess
←
→
Page content transcription
If your browser does not render page correctly, please read the page content below
1

HOMECARE CLINICIAN
 TRAINING MANUAL

                     January 2019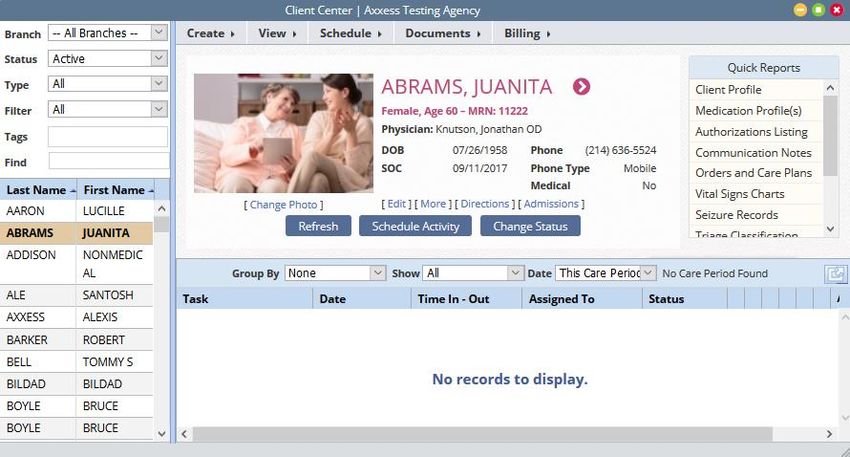
2

Table of Contents
LOGGING IN ........................................................................................................ 4
CLINICIAN PLANNER .......................................................................................... 5
DASHBOARD ....................................................................................................... 7
   My Scheduled Tasks ......................................................................................... 8
EDIT PROFILE ................................................................................................... 11
RESET SIGNATURE .......................................................................................... 11
CLIENT CENTER ............................................................................................... 12
TASK DETAILS................................................................................................... 13
QUICK REPORTS .............................................................................................. 14
   Client Profile .................................................................................................... 15
   Medication Profile ............................................................................................ 15
   Allergy Profile .................................................................................................. 18
   Immunization Profile ........................................................................................ 19
   Communication Notes ..................................................................................... 20
   Orders And Care Plans.................................................................................... 21
   Vital Sign Charts .............................................................................................. 22
   Seizure Records .............................................................................................. 22
   eMAR............................................................................................................... 23
   I&O Logs.......................................................................................................... 24
   Vent Flow Sheet .............................................................................................. 25
   Hospitalization Log .......................................................................................... 25
   Triage Classification ........................................................................................ 26
   Deleted Tasks/Documents............................................................................... 26
CLIENT CHART TABS ....................................................................................... 26
CREATE ............................................................................................................. 26
   Order ............................................................................................................... 27
   Communication Note ....................................................................................... 28
   Authorization .................................................................................................... 29
   View ................................................................................................................. 30

                                                                                                                               January 2019
3

  Schedule Activity ............................................................................................. 31
  Upload Document ............................................................................................ 31
  View Documents .............................................................................................. 31
SCHEDULE CENTER ......................................................................................... 32
SCHEDULING A TASK (PERMISSIONS BASED) ............................................. 33
DELETING A TASK (PERMISSIONS BASED) ................................................... 35
OASIS C-2 START OF CARE............................................................................. 36
HELP CENTER ................................................................................................... 38

                                                                                                                       January 2019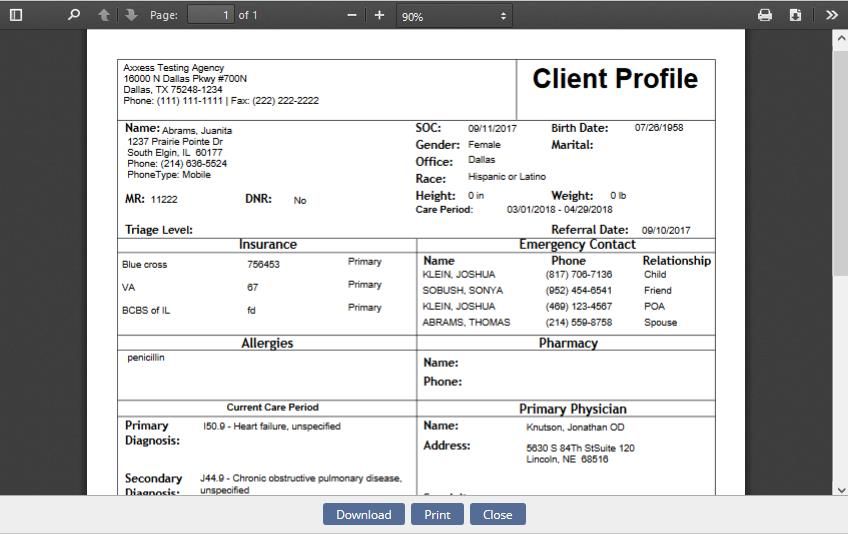
4
Common Icons & Buttons
Print Expand Section
Refresh Restore
Missed Visit Form Delete
Edit Scheduled Date/Time OASIS Warning
Reassign OASIS Error
LOGGING IN
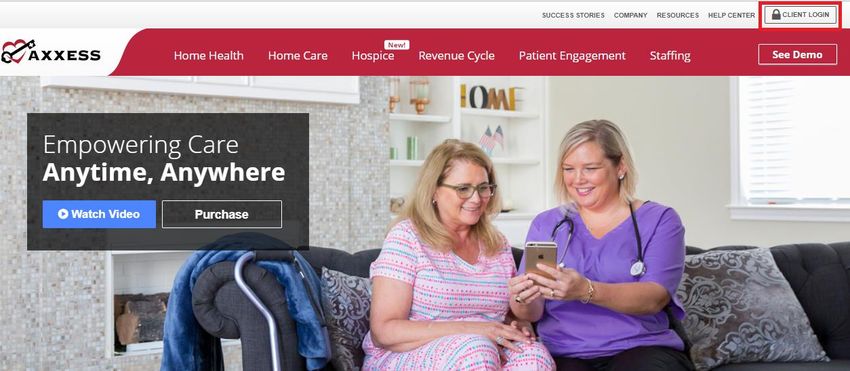
Go to www.axxess.com, and select on “Client Login”, located in the upper, right-
hand corner.
Enter the username and password then select “Secure Login.”
January 2019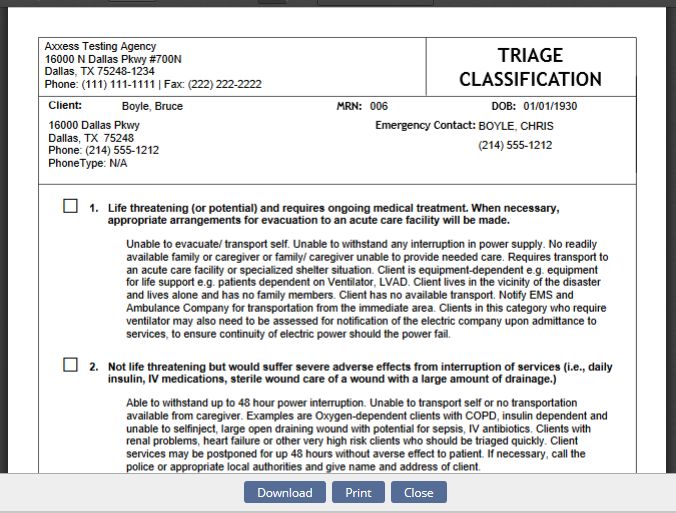
5

The Username is the email address assigned to the users account when it was
created. The Password was created by the user, from a link that was sent to this
email address. This password will also be the user’s electronic signature.

If the user forgets their password, select Forgot your Password, and a link will
be sent to this email address. The user will be able to reset their password,
however the electronic signature will remain the same (Resetting Signature will
be covered later). After the correct username and password have been entered,
the following message will display:

Select “OK” and the user will see the Clinician Planner.

CLINICIAN PLANNER

                                                                                   January 2019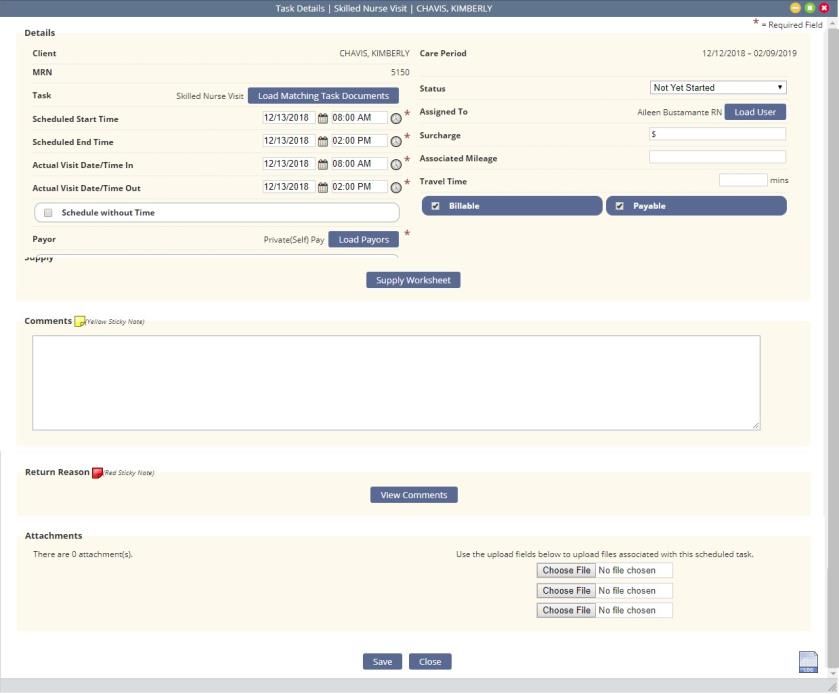
6

   •   Date/Time/Weather – Today’s date, time and 5-day weather forecast for
       the user’s specific area.
   •   Today’s Visit Schedule – Calendar that shows the user’s visit schedule
       (red dots on the dates the user has visits).
          o Selecting the day, will bring up the tasks schedule. Selecting the
               Task will show the status of the visit. Then select the client name to
               go directly to the client’s Chart.
   •   Today’s Visits Map – View directions for the users’ daily visits or plan out
       their route.
Green – Current Location
Red – Visit Location
Blue – Selected Visit

Select the marker to view the details of the visit.

Select “Get Directions” and this will take the user to Google Maps, giving step by
step list of directions and the visual map.

   •   Unread Messages – A list of unread messages from the Internal
       Messaging Center. Selecting a message will take the user directly to the
       messaging center.
   •   Past-Due Visits – A list of visits from the last 21 days that have not been
       completed and signed.
          o Selecting the red “Open” tab on the left-hand side of the visit will
              show the note and allow users to view the chart. The visits list from
              oldest to newest and can be sorted to reverse the order from
              newest to oldest.
   •   Alerts – A list of all visits/tasks that have been returned to the user from
       the QA Center.
          o Hover over the red sticky note to view comments from QA.

                                                                                        January 2019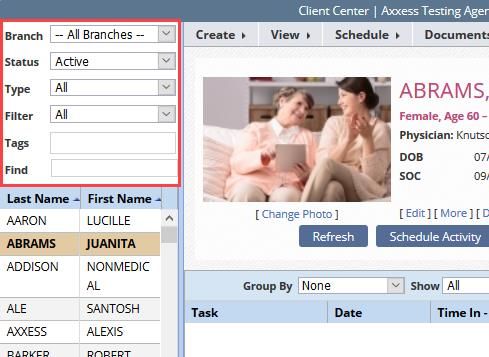
7

          o Select the orange “Open” tab to chart on the note/visit.
          o Inside the note, a message will be displayed that the document has
            been returned by QA. Select “View Comments” to read the
            message and send back any response.

On the left-hand side of screen, is a list of agencies that the user works with, as
well as multiple products their agencies subscribe to.

DASHBOARD
Opens upon log in. Below are the six tiles for all clinicians:

                                                                                      January 2019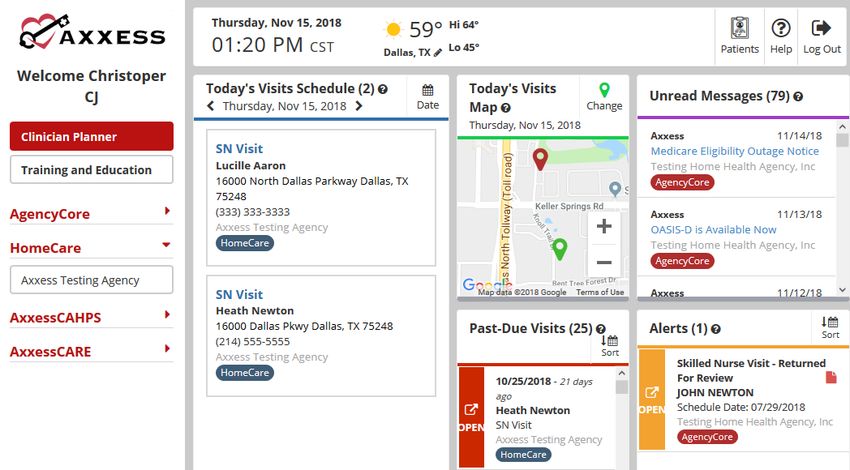
8

   1. Welcome Panel – Items for subscribers to Axxess products. These will
      include items such as important announcements and training videos.
   2. Date and Time – Date and Time for the user’s specific area.
   3. Messages – HIPAA-compliant messaging center, allowing all agency
      users to communicate in a secure manner. When the user receives
      messages, notifications will be sent to the user’s email assigned to their
      account.
   4. News/Updates – Links to Axxess generated blog posts, educational
      articles, regulatory updates and other important information.
   5. My Scheduled Tasks – Electronic “To-Do” list. Users can quickly access a
      client chart and/or tasks for the first five clients on their to-do list.
   6. Client Birthdays - This is a quick reminder of the clients who will celebrate
      birthdays in the upcoming week/month.

My Scheduled Tasks
Select the “More” hyperlink in the bottom right-hand corner of the tile to view the
entire list of scheduled tasks.

                                                                                      January 2019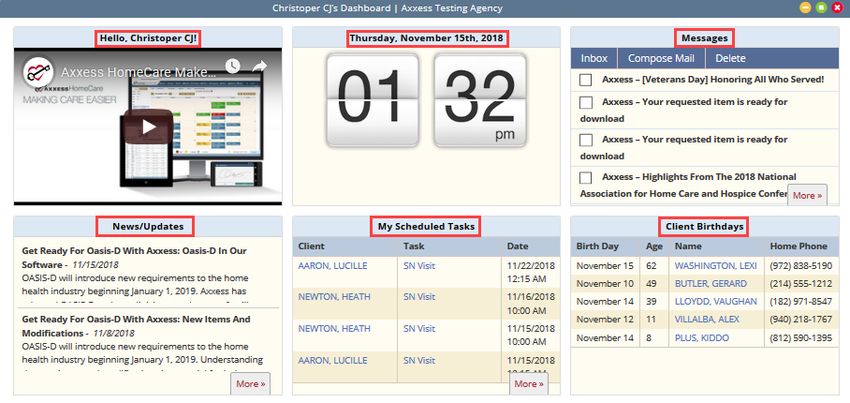
9

   •   View the calendar by Month, Week or Day.
   •   Export the data into a spreadsheet by selecting the “Excel Export” button.
   •   Print the calendar by selecting the   icon.
   •   Refresh the page by selecting the    icon.
Tasks will show in three different colors:

Hovering over a task will give the following options:

   •   Edit Document – Jumps straight into documentation for the client.
   •   Print
   •   Missed Visit Form      - see below.
   •   Edit Scheduled Date/Time        - Update the date and time of the task.
   •   Reassign      - Assign the task to another user.
   •   Delete     - Remove the task entirely.
See the tasks in a list by selecting the “List Tasks” button at the top right or the
List Tasks tab on the bottom right. Selecting the blue arrow button below the
Action column will give users the same functionality as hovering in the calendar
view.

                                                                                       January 2019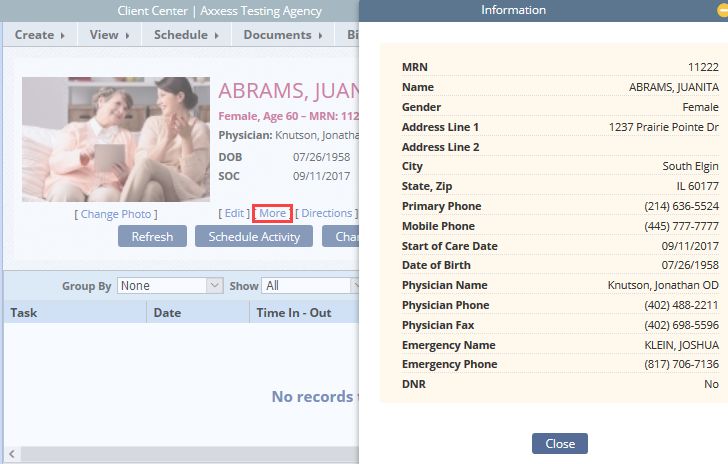
10

Sticky Notes:

    Red – Return Reason from either QA Center or another clinician.
    Yellow – A note pertaining specifically to this visit, that communicates to
other users.

      Blue – A note that has information for every visit in a care period (ex. A gate
code or where to park). This information will appear in a sticky note on every
visit in that care period.

Missed Visit Form - Select the Missed Visit Form icon and a window will pop up,
asking whether an Order [was] Generated, Physician Office Notified, Reason,
Comments, and the user’s Signature and Date. Then select the “Submit” button
Once submitted, the visit will turn red.

Hovering over the missed visit will allow you to Restore      if mistakenly missed.

                                                                                        January 2019
11
EDIT PROFILE
Home/My Account/Edit Profile
If the user knows their current password and/or signature they can come to this
screen and update with new information. If they do not remember their current
signature, they will have to reset their signature.
RESET SIGNATURE
Home/My Account/Reset Signature
When users select “Reset Signature,” a link will be sent to the email address
listed in the message, allowing them to create a new signature.
January 201912
CLIENT CENTER
Clients/Client Center
Filter by:
• Branch - Choose the branch (if more than one branch in agency).
• Status - Status of the client (Active, Discharged, Pending, Non-Admit,
Hospitalized).
• Type - Medical or Non-Medical.
• Filter - Payer Source.
• Tags - Free text to type in search term.
• Find - Free text to type part of a client’s name.
January 201913
Client’s snapshot at the top of the screen gives a quick view of the client’s
demographics. Select “More” to view the client’s Address, Phone Number,
Physician Contact info and Emergency contact.
A list of tasks in the current care period will display at the bottom of the screen.
Filter the “Group By” and “Show” dropdown menus to change viewing
parameters.
Select the task/note and start charting, if they are not complete. Selecting the
blue triangle (under the Action column) will allow viewing of the Details
(permissions based):
TASK DETAILS
January 201914
• Scheduled Start & End Time - The date the task was scheduled on the
calendar.
• Actual Visit Date/Time In & Out - The date/time the task was completed.
This is pulling from the task completed by the clinician.
• Assigned To - The clinician that is currently assigned to this task.
• Payer - The payment source for the task, can be changed by selecting
“Load Payers.”
• Comments (Yellow Sticky Note) - Any notes that pertain to this specific
visit and are needed to communicate with other agency users.
QUICK REPORTS
NOTE: The following Quick Reports are permissions based.
January 201915
Client Profile
PDF print out of the client information taken at admission.
Medication Profile
January 201916
Add Medication:
• Long Standing - Has client been taking medication for extended period.
• Start Date - Enter or select calendar icon to choose date.
• D/C Through Date - Enter or select calendar icon to choose date.
• Medication & Dosage - Begin typing the description of the medication,
then select “Search for Medication.” A drop-down box will appear with all
the medications that are listed in the software. Medications not listed can
be added. However, only medications selected from the drop-down box
will be checked for drug interactions.
• Classification - If a medication from database is entered this area will give
suggested classifications.
• Frequency - Can be written out fully or with medical shorthand.
• Route - Free text.
• Type - Whether New, Changed or Unchanged.
• Amount - ex. 1 tab, 1 puff, 1 pump.
• Physician - Start typing name of physician and dropdown box will appear
with related physicians.
• Pharmacy - Start typing name of pharmacy and dropdown box will appear
with related pharmacies.
January 201917
Decide whether the new medication should “Create Order.” If there are more
medications to enter, select the “Add Another Medication” if not, select the
“Close” button. Once a medication is added, it will appear on the active
Medications. Edit/Delete/Discontinue this medication by hovering over the
triangle on the right-hand side of the medication.
Check for Drug Interactions:
• Select the “Drug Interaction” red button at the top of the screen.
• Select the box next to the medication, on the left-hand side.
• Select “Check Interactions.” A PDF will generate called Drug-Drug
Interactions.
January 201918
Once any updates are made to the Medication Profile, it will need to be signed.
Select “Sign Medication Profile” in the upper left. A window pops up with the
Medication Profile, allowing users to enter their signature and date.
To view any prior signed Medication Profiles, select “Signed Medication Profiles”
and a window will pop up with a list of previously signed profiles. Select the
printer icon to view and/or print the signed Medication Profile or select the “Edit”
or “Delete” hyperlinks to make updates.
Allergy Profile
January 201919
This pulls a list of all added allergies for the client. To add an allergy, select “Add
Allergy.”
Type in the name of the Allergy and the Type of allergy. Select “Save & Exit” and
the allergy will be added to the report. If there are additional allergies, select the
“Save & Add Another” button.
Immunization Profile
There is a list of Inactive Immunizations in the bottom part of the window. To
restore, select the “Reactivate” hyperlink. To add an Immunization, select the
button in the top left, “Add Immunization.” Choose the Type, Administration Date,
and Administered By. Once completed, select the “Save & Close” button. Select
“Save & Add Another” if more than one is being entered.
January 201920
Communication Notes
This report will give a list of all the Communication Notes created for this client.
The report will also show who created the note, the date and also provide a PDF
to view, print and/or download.
Select the printer icon and a PDF document will generate with the ability to “Print”
and/or “Download”:
January 201921
Orders and Care Plans
This report will list out all the Orders and Care Plans for this client. This list is a
quick way to view these orders when trying to locate a specific one. The list
provides the basic details of the orders with the ability to view, print and/or export
the document:
Verify that this is the correct date range. Select the printer icon and a PDF
document will appear with the ability to “Print” and/or “Download”:
January 201922
Vital Sign Charts
This report pulls a chart of all the prior vital signs documented on visits and a
graphic view of their trends. There is also a Vital Signs Log that shows a
summary list of all the vitals taken:
Seizure Records
This report shows all documented seizures by the client. New records can only
be added inside of a visit.
January 201923
eMAR
This report shows records of medications that were taken or refused/not taken.
The report can be viewed by day, week or month. Medications taken are
displayed in green and medications refused/not taken are in red.
Edit the medication log by hovering over the scheduled medication time and
selecting the edit icon or if it should not be there select the trash icon to delete.
To document a medication being taken that was not scheduled, select an empty
square on the calendar. A new window will open. Enter the Log Time, whether it
was taken, the User, User Initial and any comments. Select “Save & Close” when
complete.
January 201924
I&O Logs
This report documents the input and output for clients. The report can be viewed
by day, week or month. Output is displayed in green and input items are in red.
The I&O log can also be filtered with these colors or select “All” to show both.
Edit the I&O log by hovering over the input/out and selecting the edit icon or if it
should not be there, select the trash icon to delete. To document input/output,
select an empty square on the calendar. A new window will open. Enter the Log
Date and Time. The type will be chosen dependent on where the user selected.
This can be changed with the Type dropdown. Enter the amount and add any
comments. Select “Save & Close” when complete.
January 201925
Vent Flow Sheet
This report will show a list of all tasks that included Ventilator documentation.
Hospitalization Log
This report will show a list of any time the client was hospitalized.
Hospitalizations cannot be entered from here. They must be entered from Client
Center/Change Status and they will move from the active census to a status of
Hospitalized.
January 201926
Authorizations Listing
This report shows all current authorizations listed for the client. Authorizations
are typically added by the Biller/Scheduler (Office Staff).
Triage Classification
This quick report will pull up a PDF version of the client’s Emergency
Preparedness Plan/Triage Classification based on what was answered during the
assessment. Select the “Print” button at the bottom to get a copy of the form.
Deleted Tasks/Documents
See Deleting a Task below
CLIENT CHART TABS
Create
January 201927
Order
Client Center/Create/Order
The New Order window below will appear:
• Client Name - Will autofill in the designated field.
• Select the Care Period this order goes with.
• Order is for next Care Period - Check this box if the order will go to the
next Care Period.
• Date - The date will default to today’s date but can be changed if
necessary.
• Physician - Locate client’s physician that will be signing order by starting
to type name.
• Summary/Title - Give this order a title.
• Order Description - Enter text given for order. Option available to “Load
Template.”
January 201928
• Read Back - Indicate if Order has been read back by selecting check box.
• Enter Signature and Date. Select “Save” if continuing to write or select
“Create Order” when completed.
Communication Note
Client Center/Create/Communication Note
The New Communication Note window below opens:
• Client’s Name - Auto Filled.
• Care Period - Select the drop-down to select the care period assigned.
• Date - Default to today’s date but can be changed.
January 201929
• Physician - Start typing in the physician’s name and a drop-down box
appears. If the physician is not currently in Axxess, select “New
Physician” to enter the name.
• Subject Line/Free Text - This is the area where the title and
Communication Note is written. Either free text or select one of the
agency’s templates.
• Send note as Message - Check this box to send the note as a message to
other users in the agency.
• Signature - Sign with the user’s Signature.
• Date - Verify the correct date is filled in.
• Select “Save” if still working on or select “Complete” when done.
Authorization
Client Center/Create/Authorization
The New Authorization window below opens:
January 201930
• Client’s Name - Auto Filled.
• Start & End Date - Enter the date range of the authorization.
• Authorized Tasks - Indicate which tasks will be covered by the
authorization by checking specific boxes or select “Check All” to select all
boxes/tasks.
• Payment Source - Select payment source from the drop-down menu.
• Status - Indicate whether the authorization is Active, Pending, Closed or
Denied.
• Units - Enter how many units were authorized for this client.
• Unit Type - Choose between Per Hour, Per Visit or Per 15 min block.
• Frequency of Units - How often are the units used.
• Total Units - Enter or select “Calculate Total” for the number to be
generated.
• Enter any Comments or attach any documents related to authorization.
Select “Save” when complete.
View
January 201931
Select the View tab to see any of the Quick Reports that are listed in the top right
of the Client Center.
Schedule Activity
Client Center/Schedule/Schedule Activity
Select “Schedule Activity” to be taken to the Schedule Center already filtered for
the client. See Schedule Center below.
Upload Document
Client Center/Documents/Upload Document
To add any documents/attachments to the client’s chart, select “Upload
Document.” A new window will open for a new document. “Browse” for a file
saved on the computer, give the document a name that will appear in the client’s
chart, and select the Upload Type. Then select “Upload.”
View Documents
Client Center/Documents/View Documents
January 201932
Documents that have been uploaded will display. Select the “Edit” or “Delete”
hyperlink to make updates. A new document can be uploaded from here by
selecting the “Add Document” button in the top right.
SCHEDULE CENTER
Client Center/Schedule Activity or Schedule/Schedule Center
January 201933
The left column provides the ability to view client and employee
calendars/schedules. The default search is by client. Selecting Employee
updates the criteria and results to employee. The Schedule Center has a list of
menus located at the top of the screen that will assist with preparing and
managing the client’s schedule.
The calendar defaults to a month view of the current month. View by calendar or
select the “List Tasks” button in the top right or the List Tasks tab in the bottom
right to see tasks stacked in a grid. Select the Hide List tab to get back to the
calendar view.
Tasks are shown in color that corresponds to the status of the task. The following
is the color legend:
SCHEDULING A TASK (PERMISSIONS BASED)
Schedule Center/New/Client Task or select any free space on desired time of
task.
January 201934
Choose a shift length and whether to Override Shift Length or Schedule without
Time by selecting the check boxes. Enter the From and To date and time.
Choose the Payment Source, Task, Recurrence and the Caregiver/Employee
completing the task. There is an optional Comments box with a 1,000 character
limit. Select “Save and Close” for adding a single task and select “Save & Add
Another” if there is more than one.
After adding a task, hover over the task in the Schedule Center for more options.
There are options to Document, Print, Missed Visit Form, Edit Scheduled
Date/Time, Reassign or Delete.
January 201935
Task Details: In the List Tasks view on the right-hand side of the screen (under
the Action column) will be a Menu drop-down option Details for all tasks
(permissions based).
The window will open, displaying the details of the task. Make edits to the task,
add comments, add attachments or view the Activity Log. Select “Save” to keep
any updates.
DELETING A TASK (PERMISSIONS BASED)
Hover over a task and select the trash icon or (from the Task List view) go to the
Menu drop-down and select “Delete” to remove a task. The confirmation below
will appear:
January 201936
Select “Yes” and the task will be deleted, but still stored in the “Deleted
Tasks/Documents” in the Clients Chart. Select the “Restore” hyperlink to
reactivate.
OASIS-D START OF CARE
When charting information in the Start of Care (SOC) visit, some information has
already pulled in from the client’s profile. Make sure all required questions get
filled in the rest of the visit. This will be indicated by red asterisks.
January 201937
• Green Boxes – Information in the Green boxes are the M questions that
will be exported to CMS. At the end of the OASIS, select “Check for
Errors” and the system will make sure all OASIS questions are answered
and not conflicting.
• Grey Boxes - These questions will pull to the Plan of Care (sent to
physician for signature).
• Cream Boxes – Physical Assessment questions.
When all information is complete, select the “Check for Errors” button. A window
will open showing any warnings or errors.
Warnings will have a yellow triangle icon. This message is the software
letting users know of things they may want to look at before submitting the
OASIS and is not a hard stop. A fatal error will be a red stop icon. This
message is the system letting users know this question either needed to be
answered or answered differently. Users cannot finish this OASIS with red error
messages. Confirm the HIPPS Code, OASIS Claim Matching Key, and HHRG
scores all have a code. These codes are going to affect billing, so they should
not be blank.
January 201938
Before finishing the OASIS, users can run the “OASIS Scrubber” by selecting the
red button in the bottom left. Axxess has an integration in place with SHP for
OASIS Audits. This will look for any inconsistencies or flags that the agency may
want to address. These audits are not necessarily wrong, the scrubber is looking
for inconsistencies.
After all audits have been addressed, make sure the Time In and Time Out is
filled out. Then enter the signature, date, and select “Complete.” Once the OASIS
is finished, it will be sent to the QA Center for approval.
HELP CENTER
A great resource that is available 24/7 is our Help Center. It is a place to get
answers to frequently asked questions or watch videos of all Axxess products. It
can be accessed by going to:
Help/Support & Training/Help Center
Or also available at https://www.axxess.com/help/
January 201939 January 2019
You can also read