SEP Evaluation Expert Quick Guide - SEP Evaluation 27 March 2020 - European Commission
←
→
Page content transcription
If your browser does not render page correctly, please read the page content below
SEP Evaluation Expert
                                               Quick Guide

                                                       SEP Evaluation

                                                      27 March 2020

Copyright Notice
© European Union, 1995-2020
Reproduction of this document and its content, in part or in whole, is authorized, provided the source is acknowledged, save where otherwise
stated.
Where prior permission must be obtained for the reproduction or use of textual and multimedia information (sound, images, software, etc.),
such permission shall cancel the above-mentioned general permission and shall clearly indicate any restrictions on use.
Preface
Purpose and Scope
The purpose of this guide is to offer a usable and quick reference to the European Commission's
Evaluation tool functionalities and to assist Proposal Evaluators (Experts) with their online
evaluation process in the scope of specific Calls for Proposals ('Calls').
Intended Audience
Proposal Evaluators (Experts) registered in EMI/EMPP and having tasks assigned in the European
Commission's Evaluation tool (SEP).
Links and Resources
Detailed how-to procedures and instructional video presentations on the usage of the SEP Evaluation
tool are available on the following location under 'Expert Evaluation of Proposals':
https://webgate.ec.europa.eu/funding/display/ECResearchGMS/Experts
Information on EU Login is available here:
https://webgate.ec.europa.eu/funding/display/ECResearchGMS/Logging+in+to+the+Evaluation+Tool+thr
ough+EU+Login
Contact
For technical issues regarding SEP applications, please contact the IT Helpdesk team:
By email DIGIT-EFP7-SEP-SUPPORT@ec.europa.eu
By phone: +32 2 29 92222
Opening hours: 8:00 - 18:00 (Monday to Friday)
2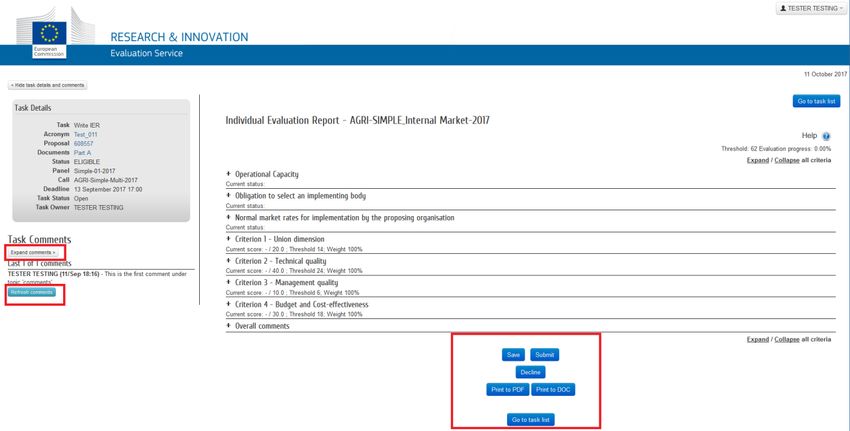
Table of Contents

Logging to the Evaluation Tool ................................................................................................... 4
  The EU login page ........................................................................................................................... 4
User Interface and functionalities .............................................................................................. 5

  The Dashboard page ....................................................................................................................... 5

      Managing tasks from the Dashboard............................................................................................ 8
  The Proposals page ....................................................................................................................... 10

  The Documents page..................................................................................................................... 11

  The Active Tasks and All tasks pages ........................................................................................... 14

      Navigate to task forms - The Proposal and Acronym links ................................................... 14

      Navigation buttons - The three button names and their functionalities........................... 14
  The Proposal Summary page ......................................................................................................... 15

  The Task page .............................................................................................................................. 16

      The online Evaluation Report form.............................................................................................. 16

      The Task Details ............................................................................................................................. 19

      The Task Comments ........................................................................................................................ 19
  Summary of Tasks and Actions ..................................................................................................... 21
Remote meetings ........................................................................................................................ 22

  Connecting to WebEx ................................................................................................................... 22

      Setting up your browser ................................................................................................................ 22

      Launching the meeting from the dashboard ............................................................................. 23

      Connecting from your Mobile phone............................................................................................ 27
  Using via WebEx (remote consensus meetings) ............................................................................. 28

      Audio and Video ............................................................................................................................... 29

                                                                                                                                                      3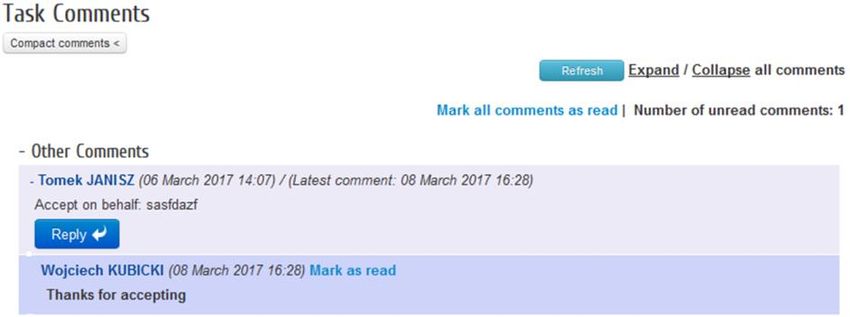
Logging to the Evaluation Tool
The EU login page
When you attempt to login to the Evaluation Tool, your identity is checked by the EU login system
(The European Commission's Authentication Service), which is widely used to securely authenticate
users in most of the European Commission’s electronic systems. The Evaluation Tool uses the same
EU Login account that you have used to register as an Expert in the Funding & Tenders Portal.
To login click on the link in the Evaluation Invitation email from the EU. You will be prompted
to authenticate through EU Login. Enter your email, click Next and then enter your
password:
Click the arrow beside the Password field and select the authentication method you require
from the drop-down menu. In this example, we use "Password". EU Login supports a variety
of verification methods. Using a password is the simplest one. Other verification methods
involve using additional devices that can provide more security.
Enter your password in the Password field.
Click Sign in. The Evaluation Tool screen will appear.
For more information about logging in to the evaluation IT tool and password requirements, see
https://webgate.ec.europa.eu/funding/display/ECResearchGMS/How+to+authenticate+with+EU+Logi
n.
4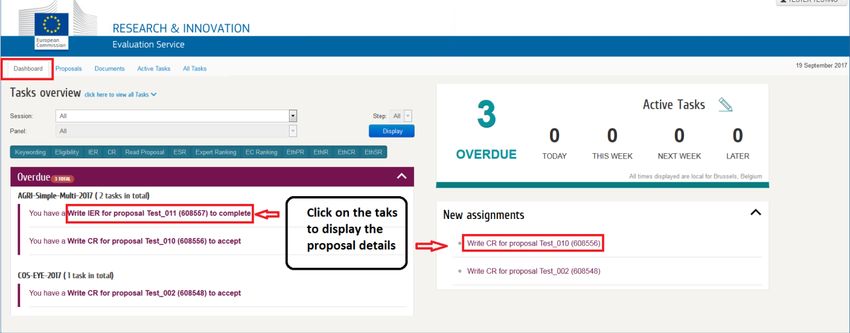
User Interface and functionalities

The Dashboard page

To make it easier for you to manage your assigned tasks, the Dashboard shows all of them in an
organized manner.

The left side shows the number of active tasks on the top, and those tasks you did not accept at the
bottom. To accept the tasks click on the tasks to access the proposal details.

The right side of the screen displayed all assigned tasks by due date and by session. Clicking on the
task will also take you to the proposal details screen.

Use the drop-down menus on the top to display only tasks associated to a specific session or panel.
Confirm your selection by clicking on the Display button:

                                                                                                   5
You can also display only specific task types. Click on the task type you wish to hide.

To clear the filter, click again on the hidden task type of click on Display.

The new assignments which need to be accepted are displayed on the right side, as well as an
overview of amount of tasks by due date.

You can see new comments in accepted tasks, if applicable. They display below New assignments:

The expert dashboard also includes a Remote Consensus Meetings area that displays both the
currently open/ongoing meetings and the Upcoming ones. The status of an Upcoming meeting

                                                                                                 6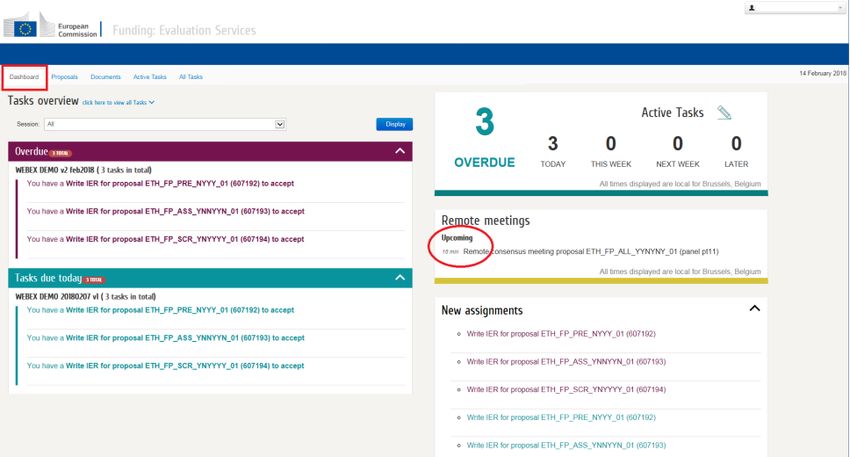
changes to currently open/ongoing ten minutes before the scheduled meeting time. The Join button
also will be displayed 10 minutes before the meeting starts.

Clicking on the Join button will launch the meeting using WebEx. Check the section about connecting
to WebEx at the end of this manual.

Some meetings are sent with different proposed time slots, and depending on which slots are mostly
selected by most of the evaluators, a final meeting will be scheduled. When this is the case, you will
see the meeting on your dashboard; click on the Edit your availability button to see the different
options:

Select the time slots that fit you better, you can also leave messages.

                                                                                                    7
If it is not possible to attend during any of the slots, simply click on the Update button (comments
are optional) without selecting any of the slots.

Later, the Rapporteur will propose a final meeting based on the selections of the evaluators, and you
will be notified via email of this new meeting, as well as it will appear on your Dashboard.

Another feature accessible from the Dashboard is also access to the briefing documents of a
session. To do so, select the session and the panel and click on Display (1).

Then, click on the Supporting Documents icon at the bottom (2). The amount of available documents
is indicated in the icon itself (3).

Managing tasks from the Dashboard
You can access the Proposals Details screen from the Dashboard in order to take an action on your
assigned task.

To accept a proposal, click on the task name to open the Proposal Details screen:

                                                                                                   8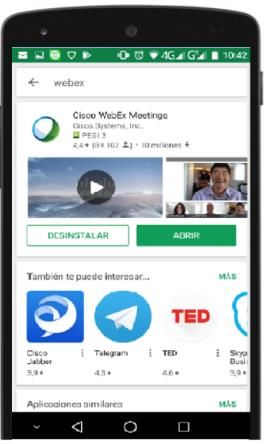
When displaying the task details, you can accept the task, work on it and reject it, among other
possibilities.

                                                                                              9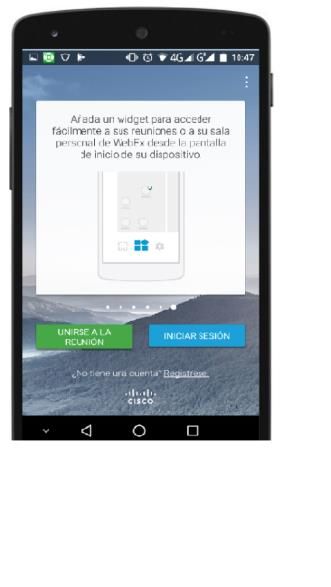
The Proposals page
In the Proposals page you can view the proposals that have at least one task allocated to you. You
can filter by Call, panel, Proposal or Acronym and sort by clicking on the column's arrows.
The page provides a visual representation of the task's status:
Icon squares with Task Acronyms: W = Write; R = Review; A = Approve; F = Finalize.
Icon squares Task box Colours: Blue = you own the task; Grey = someone else owns the task.
Square completely filled in = task submitted.
Square partially filled in = task in progress.
Square completely white = task not yet started.
If you click on the icon squares, the system will open the corresponding task page. Hovering over the
squares opens a pop-up window with summary information and buttons for actions you can perform.
10The Documents page
In the Documents page, you can select proposals for which you are part of the expert pool and
download the documents of those proposals. If there are different panels, after selecting the
evaluation session, a new filter field displays to select the panel.
Click on the available documents button next to a specific proposal to display the documents for
that proposal. You can click the link(s) under attachments in the pop-up window to download a
concrete document. A download window opens in a new tab.
If you wish to download more than one document for a proposal, or the documents for different
proposals, select the proposals and click on the button, instead.
11The available documents are automatically selected; click the document type to be selected, i.e. click
the Part B, for instance, to download only the Part B documents. To select different types, hold the
Ctrl key while you click on the document types. The number of documents and the total size of the
zip file are indicating on the top.
The documents will be downloaded in a zip file, click on the drop-down list to select how the content
will be organized within the zip file.
12You can select one of these options:
• Flat list: the zip file contains a folder per evaluation session and all the corresponding
files alphabetically ordered within.
• By Panel: the zip file contains a folder per evaluation session and a folder per panel
inside the evaluation folder, and the corresponding documents within.
• By Type of Document: the zip file contains a folder per evaluation session and a folder
per document type, i.e. type A, type B, with the corresponding documents within.
• By Panel and then by Type of Document: This option presents a folder per evaluation
session in the zip file, and then by panel, containing a folder per type of document and
the corresponding files within.
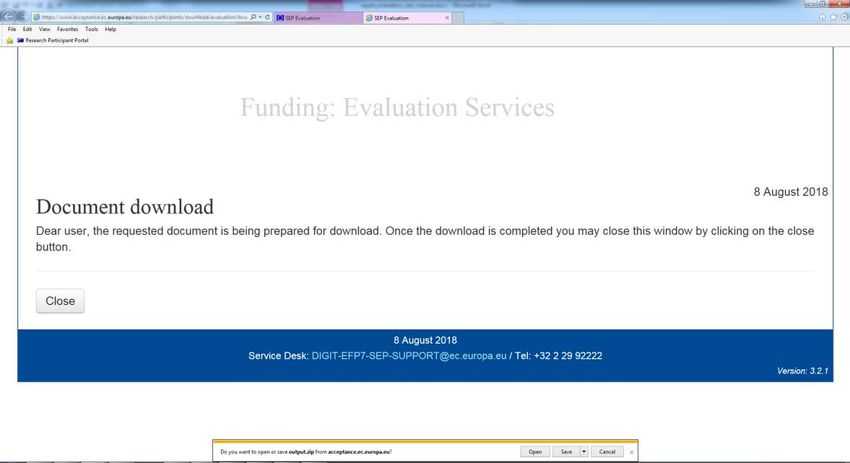
After selecting the options for the zip structure, click on . A new window will open. When
completed, click on the hyperlink "file 1", this will open a new tab, which is just a confirmation of
download. Check the downloaded file via your browser download functionality.
13The Active Tasks and All tasks pages
The Active Tasks page is the default page that you arrive at when logging in to the evaluation tool.
It displays tasks with status Assigned or Open that you are the owner of.
The All Tasks page displays all your tasks in the session, whether they are Assigned, Open, Finished
or Cancelled. When you access the All Tasks page after you log in, the task list will be empty - you
must filter to select a call, along with any other filters, and then click on Search.
When a task status is assigned, you must first click on either the Proposals ID or Acronym to go to
the Proposal Summary page and accept the task.
Navigate to task forms - The Proposal and Acronym links
These links take you to the Proposal
Summary page
Navigation buttons - The three button names and their functionalities
: A task is assigned to another task owner, but you can view it, and, if you are a Call or
Panel Coordinator, you can work on it on behalf of the owner.
: You own this task and must work on it. It takes you to the Task Form page.
: (also in the task form page for a task that is Assigned, Open or Finished) A pop-up
provides Conflict of Interest or Other reasons to select from
Selecting either option provides a list of additional choices and comments.
14The Proposal Summary page
You will get to the Proposal Summary page where you can see the proposal abstract and consortium,
download Part A, and agree to work on the task or decline.
When you click OK agreeing to work on the task, you are taken to the task page. Once a task has
been accepted, the Active tasks page will display an button next to the Decline button, which
gives you direct access to the task page.
15The Task page
The Task page comprises the online Evaluation Report form and the Task Details and Comments
section. The system automatically saves the page every two minutes. Submitting a task saves and
submits it at the same time.
The online Evaluation Report form
The form is specific to each task (Individual Evaluation Report – IER; Consensus Report – CR;
Evaluation Summary Report – ESR and includes the criteria and scoring from the respective work
program templates), you can click on or on to view or hide the criteria.
With the action buttons at the bottom of the IER page, the task owner can Save, Submit, Decline,
or Print the Report to PDF or DOC.
With the action buttons at the bottom of the CR page, the task owner can Save, Submit, Decline, or
Print the Report to PDF or DOC, Merge IERs, View Changes and Initialize the task.
16 Click to view all the IER scores and comments by expert.
Click to start the CR task. A new popup will open where you can select which
Reports to merge (all available ones or selected expert's ones) and how to merge them (use
"Append" if you have already entered comments and want to now merge an expert's report).
Click to view the changes between current task and previous task criteria
comments in a new popup window.
The label indicates the criteria comments that have changes from the previous task.
17Clicking on the blue label, which will read , or , displays the changes.
Clicking on Current reverts to the current version.
IMPORTANT: After you submit the report, the Evaluation Report form will become read-only. You
will still be able to read your assessment or to print it, but you will not be able to modify it.
18IMPORTANT: If you submitted your evaluation report by mistake, or if you want to re-open it,
please contact your Call Coordinator, who is the only person authorised to re-open and administer
your task.
The Task Details
The Proposal Summary page and all the task form pages include a Task Details section from where
you can download the proposal documentation.
The Task Comments
To facilitate remote consensus communications, the Proposal Summary page and all the task form
pages include a section for asynchronous Task comments.
Users are able to start a new conversation by criterion, read and reply to existing comments, mark
comments as read, or click on Refresh to update the list. The total number of unread comments is
clearly indicated and each unread comment is in bold letters.
19When entering a Task comment at the Consensus phase, email notifications can be sent to other
users.
Also at the Consensus phase, users can vote on a Task comment indicating their approval or
disapproval.
Different colours differentiate between the different users.
20Summary of Tasks and Actions
From the Proposals page:
From the Active Tasks and All Tasks pages:
21Remote meetings
Connecting to WebEx
Setting up your browser
To make sure that your browser is correctly configured, you can check for the required WebEx
configuration before the meeting takes place. To do so, launch the meeting centre via
https://eesc.webex.com or use the link provided in the invitation email you will receive when the
meeting is created in SEP:
Select Classic View on the right.
Then select Set Up / Meeting Center and click on the Set Up button.
22If you are not able to finish the set up correctly, contact your local IT Service Desk.
Launching the meeting from the dashboard
The dashboard displays the future remote meetings on right side.
Those meetings are accessible only 10 minutes by default before the start time, but this parameter
can be modified when setting up the meeting. A Join button will display close to the meeting name.
23Note: The host is the person who sets up the meeting. If the CallCo is setting up the
meeting, it could be the case that he/she is not present in the remote session. Therefore,
you could see this message when joining in.
Just click on OK. The person joining will be set as presenter, see below how to make
someone else the presenter when all are connected.
If you did not install the software or did not configure your browser before, you will be prompted to
do it when clicking on the Join button to launch the meeting.
When launching WebEx from within the SEP application, the software Cisco WebEx will be executed
on your pc. Therefore, the kind of access you have in your pc will determine if the software can be
executed or not.
You also have the possibility to use the browser, instead of the desktop application.
Using the browser is a good option if you are experiencing issues with the software, you will lose a
couple of functionalities, which are not essential, and you only need the meeting ID. Go to:
https://ecgrants.webex.com/webappng/sites/ecgrants/dashboard/home
24In the first screen, enter the meeting ID and click Enter.
Then enter your name and click on Join Meeting, the meeting will be open in the browser.
If you do not know the ID, you can ask another participant to copy the link of the meeting and send
it to you, you will get the second screen above when clicking on the link:
Regardless of the browser in use, you will be requested to install or allow the Cisco WebEx add-on:
25Edge
Firefox
Chrome
If you lack admin rights on your machine, executing the add-in can fail. Try first to execute it as "a
temporary application". Please note; if you are able to execute the plugin, it will have to be done only
26once. If you run it as a temporary application, it will need to be run every time you launch a meeting.
If you are not able to execute the plug-in, even as temporary application, please check in the
following section how to connect via your mobile phone. This can be the quickest solution when the
meeting is imminently starting.
Connecting from your Mobile phone
It is also possible to connect via your mobile phone. First, make sure that you get Cisco WebEx
installed in your device from the Play Store (Android) or Apple Store (iPhone).
After the installation, you have two possibilities to join a meeting:
Either open the WebEx app, click on the join meeting button (green button) and enter the
meeting ID; then, click the join button (it is placed on the upper right corner)
Or connect to SEP via a browser within your mobile device; then launch the meeting by
clicking the Join button from the Dashboard, as usual. The meeting will open using the APP in
the device.
27Please, disregard the log in option; unless you have gotten an account by your own means, scheduling
the meeting from SEP did not generated any Cisco accounts.
Using via WebEx (remote consensus meetings)
When launching your meeting from the dashboard on your PC, the main screen shows the following
icons and buttons:
1. Audio/video connection options. You use these buttons to connect to the conference via
audio and video. By default, when entering the meeting you will be prompted to set the
values for audio and video.
2. The panel and sharing icons. Panels within WebEx are functionalities, they are call panels
because they can get separated in different floating windows as will we see below. They are,
from left to right:
1. Sharing. This functionality allows to share your screen or a specific programme
running on your pc with others. Normally, the presenter shares the screen.
2. Recording. This panel launches an application to record the meeting.
3. Participants. Under this panel you can check the users which are connected to the
web conference, if they are connected using the PC as audio system or they are
calling in from a telephone, and who the presenter is.
4. Chat. You are able to send messages to all attendees via the Chat panel.
3. Other actions such as copying meeting url and managing audio settings.
4. Leave meeting. This button closes WebEx
5. The initials of the presenter.
286. Your status, only visible if you are using the software and not a browser. Additional icons
display to indicate your means of connection, also visible by the others. displays when
connecting to audio using your computer and when call it from the phone. This option is
available only if you connect using WebEx, not if you are connecting via a browser.
7. Meeting info. Here, you find all the details of the current meeting.
Audio and Video
When you enter the meeting, you are prompted to select which channel you will use to connect your
audio.
From the possible options, you should select either I will call in or Call using Computer, please do
NOT use any other options.
29In the same window, you can set the video settings.
If you are using the computer to call in, you will able to set up additional options according to your
computer configuration (i.e. headset, etc.). By clicking in More options, you are able to test both the
audio and the mike.
Once the video and voice settings are set and you called in, the initial icon will split into two, click on
the mike icon to mute/unmute yourself or on the camera icon to manage your video.
For an explanation on additional functionalities such as recording the meeting or sharing the
screen/files, please consult the page in IT How To.
30You can also read