Neo finance UTS Internet Expenses User Guide - University of Technology Sydney
←
→
Page content transcription
If your browser does not render page correctly, please read the page content below
neo finance
UTS Internet Expenses User Guide
Updated August 2010
INTRODUCTION

This workbook is designed to provide you with an introduction to Neo (Oracle) Internet
Expenses (UTS Internet Expenses).

This workbook will guide you through applying for a UTS Credit Card and how to acquit credit
card and out of pocket expenses.

All users MUST complete training to gain access to UTS Internet Expenses. To do so, staff must
complete the online registration form on the FSU website.

Correspondence relating to UTS Internet Expenses should be directed to the iExpenses team at:
iexpenses@uts.edu.au

If there is a system issue or you cannot log into Neo, you will need to contact Service Desk
(ext2222).

                                                                                      Page 2 of 27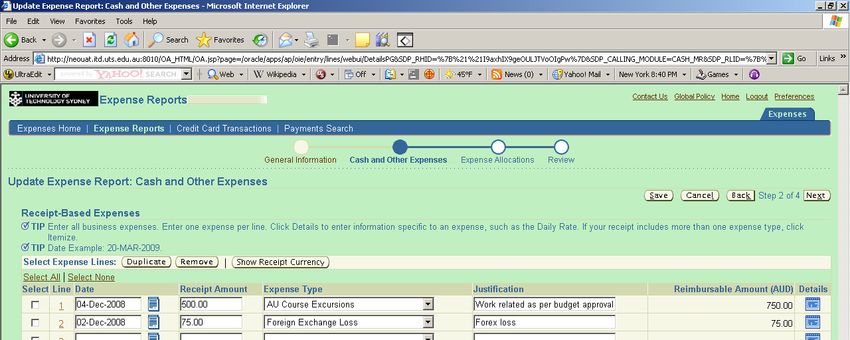
UTS CREDIT CARD APPLICATION

   1. To apply for a UTS credit card please go to FSU website and download application form
      which is located at http://www.fsu.uts.edu.au/forms/uts-credit-card-application-form.pdf

   2. Managers approving credit cards for staff MUST have the appropriate delegation to do
      so. As all UTS credit cards will be issued with a $2,000 limit, manager’s who approve this
      must have the delegation to approve at least $2,000. If a higher limit (over $2,000.00)
      is required, justification must be made in writing with approval by the Dean or Director
      and submitted to FSU.

   3. Staff applying for a UTS Credit Card must satisfy 100 POINT IDENTIFICATION CHECK
      (Financial Transactions Report ACT 1988). Please refer to the Credit card 100 point ID
      checklist located at http://www.fsu.uts.edu.au/forms/index.html#iexpenses. This 100
      point check must be satisfied in person by the cardholder before your application can be
      processed. Originals of all ID must be presented and a copy retained by FSU to comply
      with its legal obligations.

   4. It is compulsory that all staff applying for a UTS Credit Card hold a UTS staff card and
      use this as 1 form of identification when applying. This accounts for 40 of the 100 points
      required by LAW and is referred to as the “Public Employee Identification Card”.

   5. Every Credit Card Applicant and their Manager MUST download and sign the UTS Credit
      Card agreement. This form is located at http://www.fsu.uts.edu.au/iexpenses/uts-credit-
      card-agreement.pdf. The cardholder will be required to collect the card in person from
      FSU and sign this agreement to acknowledge receipt of the card.

   6. It is important that all staff with credit cards read and understand the UTS Vice-
      Chancellor’s Credit Card Directive. This is located at
      http://www.fsu.uts.edu.au/iexpenses/uts-vicechancellors-credit-card-directive.pdf

REIMBURSEMENT OF OUT OF POCKET EXPENSES

Staff who purchase goods or services using their own cash or other resources are reimbursed
through UTS Internet Expenses. Staff should only use personal funds to purchase goods and
services for UTS for low value goods and services, and where there are no other means
available. An example would be when the UTS credit card fails to work, or if the staff member is
located in an area where credit card facilities are not available and an advance was not
organised prior to travelling. These situations should be ‘one off’ in nature and will be monitored
by FSU.

                                                                                        Page 3 of 27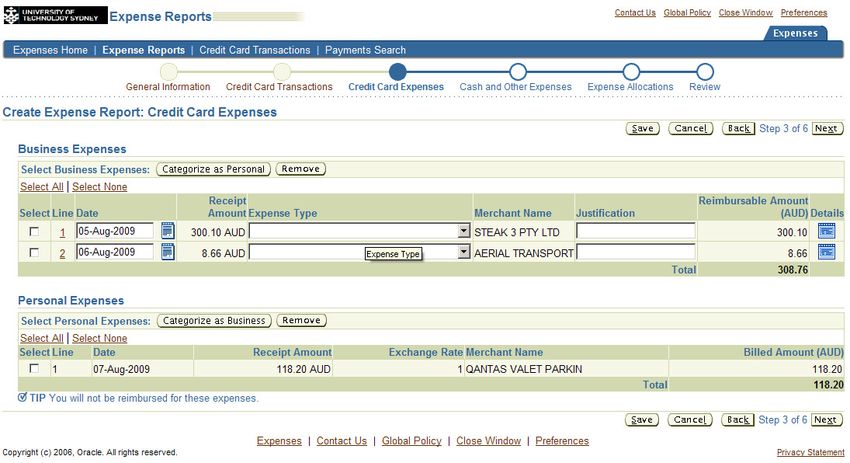
LOGGING INTO NEO

Go to the neo homepage http://www.neo.uts.edu.au and click on the box to login to neo, as
illustrated below:

Enter your username, which should be your staff ID, and password.

       Tip: It may be useful to save this page into your favourites

                                                                               Page 4 of 27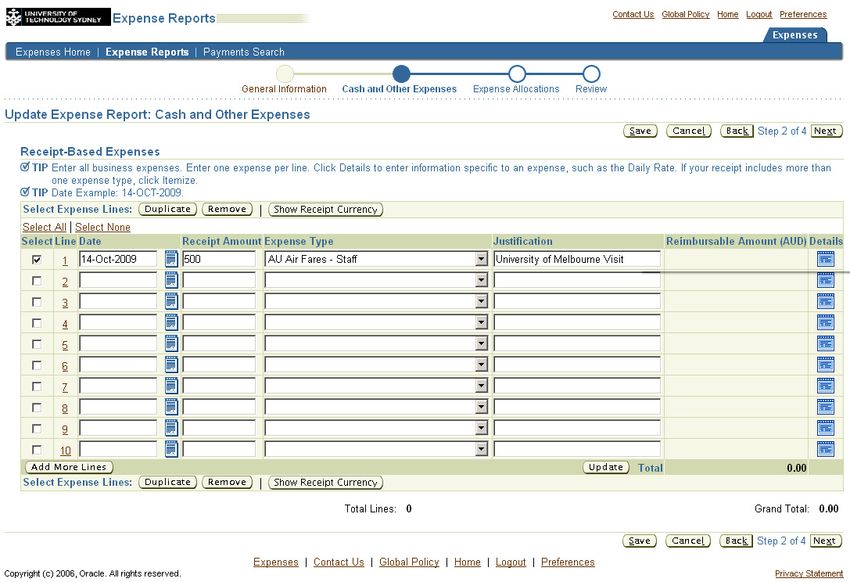
FIRST TIME USERS

What is a ‘Responsibility’?

A responsibility is a level of authority in Oracle Applications assigned to you by the business.
This responsibility will allow you to access particular functions, forms and data appropriate to
your role within the University of Technology, Sydney.

To select your responsibility simply click on UTS Internet Expenses.

What are Preferences?

Preferences are settings which you can set once and they will remain pre-populated in future
expense reports.

Select the ‘Internet Expenses’ responsibility from the main menu and then select ‘Preferences’
from the top right hand corner.

                                                                                        Page 5 of 27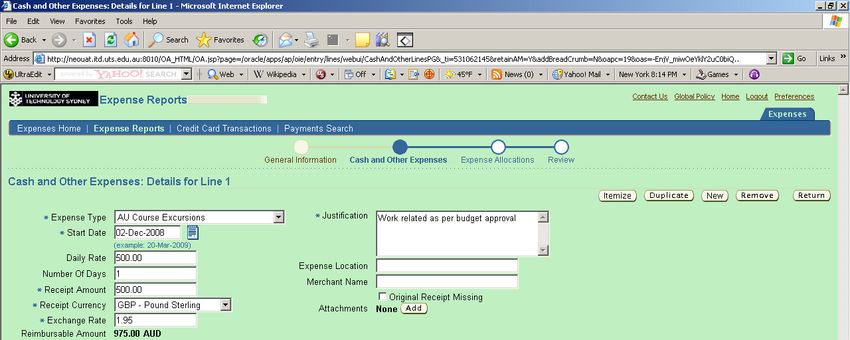
‘General Preferences’ need to be set as follows for first time users;

 Section Name                 Field Name                       Input Values These values
                                                               MUST be as per below
 Languages                    Current Session Language         American English
 Languages                    Default Application Language     American English
 Accessibility                Accessibility Features           NONE
 Regional                     Territory                        United States
 Regional                     Date Format                      dd-MMM-yyyy (18-Feb-2009)
 Regional                     TimeZone                         Leave Blank
 Regional                     Number Format                    10,000.00
 Regional                     Currency                         Leave Blank
 Regional                     Client Character Encoding        Western European (Windows)
 Change Password              Known As                         Accept Default
 Change Password              Old Password                     Only to be completed if you
                                                               want to update your password
 Change Password              New Password                     Only to be completed if you
                                                               want to update your password
 Change Password              Repeat Password                  Only to be completed if you
                                                               want to update your password
 Start Page                   Responsibility Page              You can leave blank. Or Select
                                                               a responsibility that next time
                                                               you log on to Neo will
                                                               automatically launch
 Notifications                Email Style

                                                                                    Page 6 of 27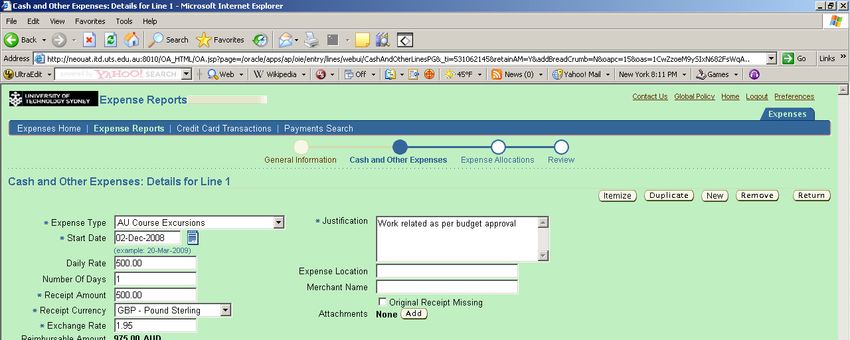
‘Expense ’Preferences’ also need to be set up for first time users as follows;

 Section Name                 Input Values                    Additional Info
 Defaults Source              Click on “Expense Preferences”  When this box is ticked, the
                                                              values entered will populate
                                                              on all Expense Reports you
                                                              create in the future.
 Expense template           This is defaulted to          All Accept default
                            Expenses.
 Purpose                    An example –“ Monthly Credit       This information will   populate
                            card Charges or “petty cash        on the Purpose          of the
                            Reimbursement”                     Expense Report Field
 Approver                   Select the approver that you       This information will   populate
                            are sending the Expense            on the Purpose          of the
                            Report to for approval             Expense Report Field
 Data Entry Preferences – Box is already ticked                Accept default
 Enable account Allocations
 Data Entry Preferences – Box is already ticked                Accept default
 enforce Required fields on
 Details Page

Once complete, click on ‘save’ and then ‘apply’ and you will be brought back to the Expenses
Home Page.

                                                                                       Page 7 of 27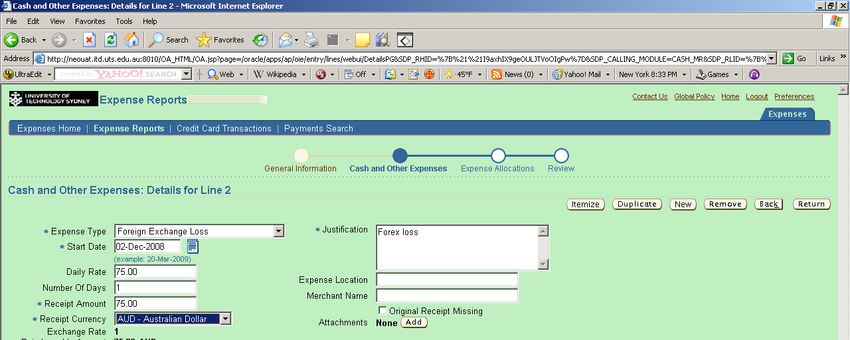
‘My Allocations’ is an optional setup for users that have multiple organisational and activity
combinations that are repetitive.

Select ‘My Allocations’ under ‘Preferences’ and type in the name you want to assign the
Organisational and Activity combination.

There is no limit to the amount of allocations you can set up, but be sure to ‘Save’ them before
exiting.

                                                                                      Page 8 of 27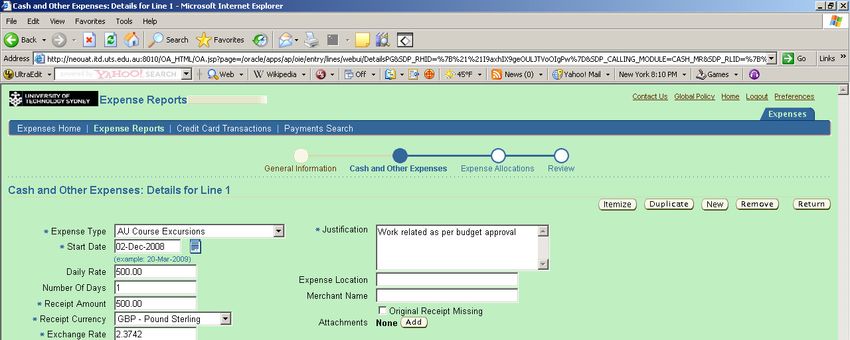
CREATING EXPENSE REPORTS - CREDIT CARD EXPENSES

Log into Neo and Select UTS Internet Expenses:

Once the Expense Home Page launches, click on ‘Create Expense Report’

                                                                        Page 9 of 27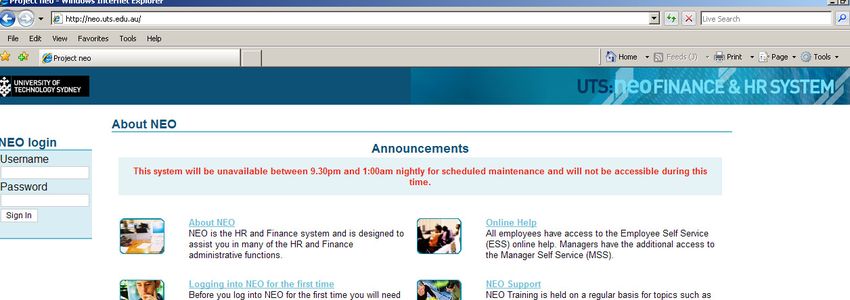
Step 1 – General Information

Confirm that the Organisation Unit and Approver are correct. If you have set your “Internet
Expense Preferences” then the fields will be populated as you stated. If you have not set your
Preferences or you wish to change them for this expense report, you will need to complete the
form as follows;

 Field Name                    Data Entry
 Name                          This will default to your name. If you have been setup to acquit
                               expenses on behalf of another employee. Their name should be
                               in the list of values (LOV).
 Organisation Unit             This defaults from information on your HR record. If the
                               information is not correct, please work with your finance
                               manager to get your record corrected. If you do change this,
                               please ensure your approver has financial delegation to approve
                               over the new org unit.
 Re-imbursement Currency       “Australian Dollar” This field is not updateable. UTS policy is
                               that you convert FX payments to Australian dollars before
                               submitting your Expense Report. Your Finance Manager can
                               assist.
 Purpose                       Enter the purpose of the Expense Report here.
 Approver                      Enter the approver for this Expense Report.

When complete click ‘Next’

Tip: Use the torch symbol and the % wildcard if you are unsure of the exact details

                                                                                      Page 10 of 27
Step 2 – Credit Card Transactions
If you do not have a credit card (or do not wish to acquit credit card transactions) and want to
go straight to processing staff reimbursements through Out of Pocket expenses, use the ‘Next’
button to skip to ‘Cash and Other Expenses’. (Go to Step 4, pg 13 of these Procedures).
Tick the ‘select’ box to add specific transactions to an expense report. If you want to add all
expenses to the 1 expense report and acquit them all at the same time, use the ‘Select All’
button.
Tip: All Credit Card transactions will be imported by FSU on a daily basis. This means that all
credit card transactions will be available the day after the merchant processes the
charge.
Page 11 of 27Step 3 – Credit Card Expenses
You will now have to classify each expense as follows;
Field Name Data Entry
Select (tick box) Place a tick in this box if you need to update a line or
change information on a line
Line This cannot be updated – it is the line number of the
transaction
Date This date is populated from the merchant, being the date
of the transaction.
Calendar You can click on this and a calendar will display
Receipt Amount The amount is populated from the credit card program
and can not be changed.
Expense Type From the List of Values (LOV) Select the expense type for
the line.
Justification Enter a justification here. Your manager will be able to
view this.
Reimbursable Amount (AUD) Can not be changed
Details Click on Details to add extra details or Itemize a line.
Tip: If your receipt includes more than one expense type, click ‘details’ and use the Itemize
functionality.
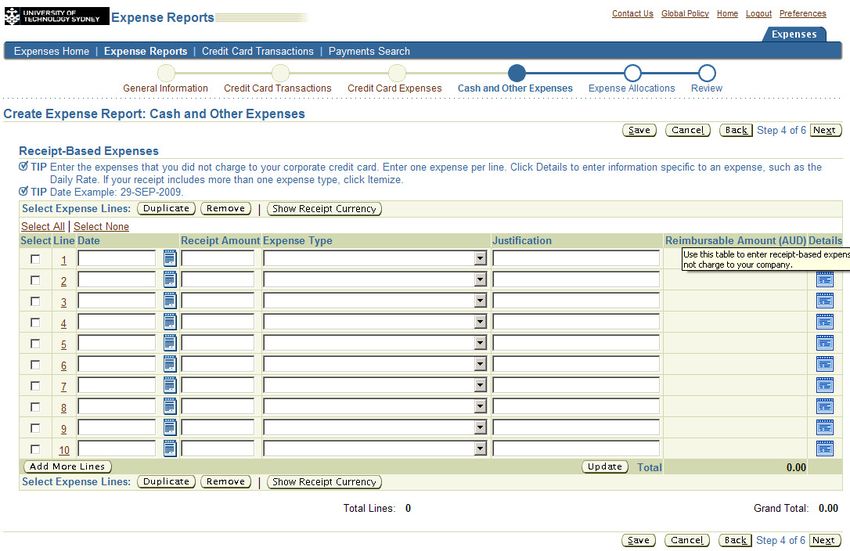
Page 12 of 27Step 4 – Cash and Other Expenses
Enter all business expenses using one line per receipt. Complete the form as follows;
Field Name Data Entry
Select (tick box) Place a tick in this box if you need to update a line or
change information on a line
Line This cannot be updated – it is the line number of the
transaction
Date Enter the receipt date (Must be in format DD-MMM-YYYY –
Please see setting up preferences above)
Calendar You can click on this and a calendar will display
Receipt Amount Enter amount of receipt
Expense Type From the List of Values (LOV) Select the expense type for
the line.
Justification Enter a justification here. Your manager will be able to
view this.
Reimbursable Amount (AUD) Accept Default
Details Click on Details to add extra details or Itemize a line.
Tip: If your receipt includes more than one expense type, click ‘details’ and use the Itemize
functionality.
Page 13 of 27Step 5 – Expense Allocations
The ‘Expense Allocations’ step allows users to change the org unit or activity. The natural
account is driven from the expense type in the previous screen, so if this needs to be changed
you will need to go back to the previous screen.
You can change the Organisation unit and activity for each expense line manually, or if you
have previously set up “Expense Allocations” under preferences (see page 8), use the ‘My
Allocations’ drop down on this screen to select the correct combination.
Page 14 of 27Step 6 – Review
The ‘Review’ stage allows users to check that the expense report contains all the correct
information and is where users attach their receipts or supporting documentation online.
FSU encourages users to provide all documentation electronically as it speeds up the processing
time and provides a transparent audit trail for user and FSU alike. The ‘Add’ button next to the
‘Attachments’ field is where soft copies of receipts can be linked to the Expense Report.
Once complete, hit the submit button. If you have scanned ALL your receipts, you do not need
to do anything else as the expense report and electronic copy of receipts have gone to your
manager. If you have hard copies, you will need to print the Expense Report (select ‘Printable
Page’ after you select the ‘Submit’ button), and physically attach the receipts to the expense
report. This will need to be given to your manager and once approved, forwarded to FSU.
Tip: All expenses over $75 must be accompanied by a tax invoice. If an invoice can not be
provided, a substitute receipt form will need to be completed. This is located at
http://www.fsu.uts.edu.au/iexpenses/substitute-receipt.pdf. Expenses under $75 also
need to be substantiated, either by a tax invoice or some other form of documentation.
If you have multiple receipts, photocopy all receipts onto 1 piece of paper (or as many
as required depending on number and size) and scan them to your email. Save the file
in a dedicated directory and then attach this file using the ‘Add Attachment’ functionality
in Oracle.
Note: Receipts from the credit card terminal will not suffice as valid documentation.
Page 15 of 27Handy Hints
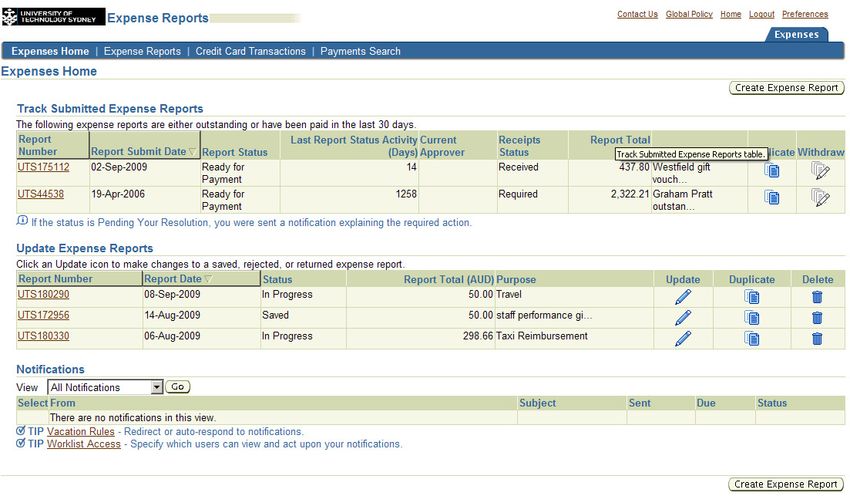
Managing your expense reports from the iExpenses home page
The home page allows you to create a new expense report or alternatively do the following;
1. Track submitted expense reports.
2. Update expense reports
3. Review Notifications
‘Track submitted Expense Reports’ shows reports that are either outstanding or have been
paid in the last 30 days. It is important to monitor expense reports here and pay particular
attention to their status.
‘Update Expense Reports’ shows expense reports that are saved, rejected or returned,
The ‘Notifications’ option displays messages for you. They are categorised as ‘All’, ‘FYI’, ‘From
Me’, ‘Open’ and ‘To Do’. Notifications is the place where users can find out what is required
from them, and often provides the answers to many questions or reasons for outstanding
issues.
Tip: You can not withdraw an expense report once FSU has processed it following manager
approval.
Rejected expense reports will need to be corrected and go through the approval process
from the start
Page 16 of 27The following is a summary of some status types that expense reports can be;
Report Status Current Approver Action
In Progress Individual Expense report needs to be finalised.
Ready for Payment Accounts Payable The Expense Report has been
processed by AP.
Pending Payables Approval Accounts Payable Awaiting approval by AP.
Pending Your Resolution Individual Expense Report needs to be
withdrawn and resubmitted for
payment
Pending Managers Approval Manager Awaiting for manager to approve or
reject
Pending Individual's Approval Individual When another employee acquits
expenses on your behalf, you will
need to approve the transaction.
Page 17 of 27Foreign currency out of pocket expense
Foreign currency exchange rates are automatically uploaded into Oracle iExpenses on a daily
basis. When processing an ‘Out of Pocket’ expense in foreign currency, carry out the normal
‘out of pocket’ expense steps. Click on the ‘details’ icon and insert the expense amount in
foreign currency as per your receipt. Select the currency from the drop-down box. The
Australian dollar equivalent will be automatically calculated. Please note that you will need to
select the same date in Oracle as on your receipt:
If the rate is not available you will receive the below error message. In this case you will need
to contact accounts payable to ask them what rate you should use.
Page 18 of 27If the exchange rate in Oracle is higher than the rate you received at the time of the
transaction, simply overwrite the exchange rate downwards and the reimbursed amount will re-
calculate.
If the exchange rate in Oracle is lower (resulting in the conversion of the foreign currency
expense as per your receipt being higher than the reimbursable amount in $AUD) you need to
add a second line to the transaction for the difference.
Page 19 of 27In the second line, select “Foreign exchange loss” in the expense type, and select $AUD. The
amount you need to claim is the $AUD amount equivalent to the difference between your
receipt (in $AUD) and the ‘Reimbursable Amount’ Oracle advised you in the previous screen.
Tip: Ensure the currency is changed to $AUD
After hitting the return button the summary screen should represent the $AUD owed to
you.
Page 20 of 27Meal Entertainment
Meal Entertainment is the provision of food or drink to employees and their associates that has
the character of entertainment. Business lunches & drinks, dinners, cocktail parties and staff
social functions (if paid by UTS) could be subject to FBT. Functions that have alcohol are also
subject to FBT.
Meal Entertainment is not the provision of a light meal (finger food etc) for example a working
lunch (sandwiches and orange juice) on UTS premises, or a morning or afternoon tea.
Meal entertainment can be tricky so don’t stress! Before completing the entry in iExpenses, you
MUST complete a form for each meal entertainment expense.
Go to the FSU website and hit ‘Forms and Links’
Then go to ‘Taxation’
Page 21 of 27Then go to ‘Meal Entertainment Form’
Complete the form and attach it to your expense report. Failure to do so may result in
additional expenses being incurred by your area.
The form is currently being updated to provide easier integration into iExpenses. In the short
term, all that you need to do is follow the following steps;
Was there any UTS Staff while the expense was occurred?
• If yes, select ‘Meal Entertainment Staff’ (most cases)
• If no, select ‘Meal Entertainment Customer’
Please note that this is only an interim measure BUT you must attach the
form!
Page 22 of 27Itemising Expenses
You would use this function if a receipt or an expense line was made up of 2 different expense
types.
Complete the expense report as normal, whether it is a credit card expense or an out of pocket
expense, including the total expense amount (this would be pre-populated for credit card
expenses).
Select one of the expense types that the total amount relates to and then select ‘Details’
Then select ‘Itemise’
Page 23 of 27You will notice from this screen that there is only one row showing the expense details that
were entered in the previous screens, with the summary at the bottom of the page showing
‘Itemisation 1-1’. To itemise, you will need to add additional rows.
Then select ‘Add another row’
The following screen will appear. Note that there is now an additional expense line and the
bottom of the screen summary shows ‘Itemisation 1-2’.
Complete the details of the second expense type, including the ‘Expense Type’, ‘Receipt
Amount’ and ‘Justification’.
Be sure that the first expense type is adjusted by the amount of the second expense type if the
total amount of the expense was input initially.
Page 24 of 27Tip: You can toggle between itemised expense lines by clicking the buttons next to the
expense.
Page 25 of 27Exporting credit card details to Excel
Select the ‘Credit Card Transactions’ link from the iExpenses main screen;
Click on the export button and follow the on-screen instructions to save the data;
Page 26 of 27Personal expenses on UTS credit cards
The UTS Credit Card directive specifically states that the UTS credit card is not to be used for
personal expenses. In the event that a staff member does have a personal expense on their
credit card, follow the below procedures.
Proceed as normal through the credit card procedure creating an expense report. Select the
expense line that is personal and click ‘Categorize as Personal’ button.
The personal expense will not be moved to a different category as seen below and you will not
be required to advise any further details
The personal expense amount will need to be repaid to UTS as a matter of urgency. Please
send a cheque to Accounts Receivable, clearly stating the expense report number on the back
of the cheque (UTS XXXXX). Outstanding ‘Out of Pocket’ expense reimbursements will be offset
by personal expense amounts owed to UTS.
Frequent use of the UTS credit card for personal expenses is against policy and will cause your
credit card to be cancelled.
Page 27 of 27You can also read


