SONICOSX 7 DIAGNOSTICS - ADMINISTRATION GUIDE FOR THE NSSP SERIES - SONICWALL
←
→
Page content transcription
If your browser does not render page correctly, please read the page content below
SonicOSX 7

Diagnostics
Administration Guide
for the NSsp Series

Contents

Tech Support Report                                                                                   3
Completing a Tech Support Request                                                                     3
Generating a Tech Support Report                                                                      3

Check Network Settings                                                                                6

DNS Name Lookup                                                                                       8
Resolving a System DNS Server                                                                         8
Resolving a Customized DNS Server                                                                     9

Network Path                                                                                          10

Ping                                                                                                  11

Trace Route                                                                                           12

Real-Time Blacklist                                                                                   13

Reverse Name Lookup                                                                                   14

Connection TopX                                                                                       15

Geo and Botnet                                                                                        16

URL Rating Request                                                                                    17

PMTU Discovery                                                                                        18

Switch Diagnostics                                                                                    19

Policy Lookup                                                                                         20

SonicWall Support                                                                                     21
About This Document                                                                                   22

                                    SonicOSX 7 Diagnostics Administration Guide for the NSsp Series        2
                                                                                          Contents
1
Tech Support Report
The Tech Support Report generates a detailed report of the SonicWall security appliance configuration and
status and saves it to the local hard disk using the DOWNLOAD REPORT button. This file can then be
emailed to SonicWallTechnical Support to help assist with a problem.
NOTE: You must register your SonicWall security appliance on MySonicWall to receive technical
support.
Topics:
l Completing a Tech Support Request
l Generating a Tech Support Report
Completing a Tech Support Request
Before emailing the Tech Support Report to the SonicWall Technical Support team, complete a Tech
Support Request Form at https://www.mysonicwall.com. After the form is submitted, a unique case number
is returned. Include this case number in all correspondence, as it allows SonicWall Technical Support to
provide you with better service.
Generating a Tech Support Report
SonicOSX 7 Diagnostics Administration Guide for the NSsp Series 3
Tech Support ReportTo generate a Tech Support Report (TSR):
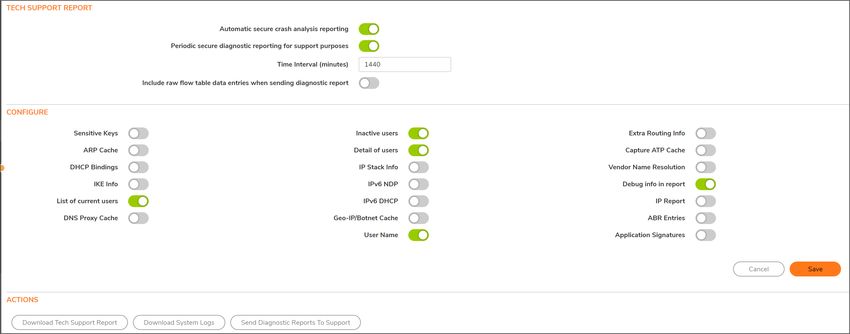
1. In the Tech Support Report section, turn on any of the following report options:
l Sensitive Keys ‐Saves shared secrets, encryption, and authentication keys to the report.
l ARP Cache ‐Saves a table relating IP addresses to the corresponding MAC or physical
addresses.
l DHCP Bindings ‐Saves entries from the firewall DHCP server.
l IKE Info ‐Saves current information about active IKE configurations.
l Wireless Diagnostics ‐Lists log data if the SonicPoint or internal wireless radio experiences
a failure and reboots.
l List of current users ‐Lists all currently logged in active local and remote users.
l DNS Proxy Cache ‐This option is not selected by default.
l Inactive users ‐Lists the users with inactive sessions. Selected by default.
l Detail of users ‐Lists additional details of user sessions, including timers, privileges,
management mode if managing, group memberships, CFS policies, VPN client networks, and
other information. The Current users report checkbox must be enabled first to obtain this
detailed report.
l IP Stack Info ‐This option is not selected by default.
l IPv6 NDP ‐This option is not selected by default.
l IPv6 DHCP ‐This option is not selected by default.
l IP/Botnet Cache ‐Saves the currently cached Geo‐
Geo‐ IP and Botnet information.
l User Name - Shows user name in the report.
l Extra Routing Info - Shows extra routing information in the report.
l Capture ATP Cache ‐Saves the currently cached Capture information.
l Vendor Name Resolution ‐This option is not selected by default.
l Debug Info in report ‐Specifies whether the downloaded TSR is to contain debug
information.
l IP Report - This option is not selected by default.
l ABR Entries - This option is not selected by default.
l Application Signatures - Shows application signature information in the report.
2. Click Download Tech Support Report to save the file to your system.
3. Click OK to save the file.
4. Attach the report to your Tech Support Request email.
5. To send the TSR, system preferences, and trace log to SonicWall Engineering (not to SonicWall
Technical Support), click Send Diagnostic Reports to Support.The Status indicator at the bottom
of the page displays Please wait! while the report is sent, and then displays Diagnostic reports
sent successfully. You would normally do this after talking to Technical Support.
6. To send diagnostic files to SonicWallTech Support for crash analysis, select the Automatic secure
crash analysis reporting toggle switch.
7. To periodically send the TSR, system preferences, and trace log to MySonicWall for SonicWall
Engineering:
a. Select the Periodic secure diagnostic reporting for support purposes switch.
b. Enter the interval in minutes between the periodic reports in the Time Interval (minutes)
field. The default is 1440 minutes (24 hours).
SonicOSX 7 Diagnostics Administration Guide for the NSsp Series 4
Tech Support Report8. To include flow table data in the TSR, toggle the switch for Include raw flow table data entries
when sending diagnostic report.
SonicOSX 7 Diagnostics Administration Guide for the NSsp Series 5
Tech Support Report2
Check Network Settings
Check Network Settings is a diagnostic feature that automatically checks the network connectivity and
service availability of several pre‐
defined functional areas of SonicOS, returns the results, and attempts to
describe the causes if any exceptions are detected.
This tool helps you locate the problem area when users encounter a network problem. The feature lists both
IPv4 and IPv6 network settings in different tabs.
Specifically, Check Network Settings automatically tests the following functions:
l Default Gateway settings
l DNS settings
l MySonicWall server connectivity
l License Manager server connectivity
l Content Filter server connectivity
The return data consists of two parts:
l Test Results – Provides a summary of the test outcome
l Notes – Provides details to help determine the cause if any problems exist
The Check Network Settings feature is dependent on the Network Monitor feature available under
Network | Network Monitor view. Whenever the Check Network Settings tool is being executed (except
during the Content Filter test), a corresponding Network Monitor Policy appears on the Network | Network
Monitor page, with a special diagnostic tool policy name in the form:
diagTestPolicyAuto__0
SonicOSX 7 Diagnostics Administration Guide for the NSsp Series 6
Check Network SettingsTo use the Check Network Settings tool, first select it in the Diagnostic Tools drop‐ down list and then click
the Test button in the row for the item that you want to test. The results are displayed in the same row. A
green check mark signifies a successful test, and a red X indicates that there is a problem.
To test multiple items at the same time, check the box for each desired item and then click TEST ALL
SELECTED.
SonicOSX 7 Diagnostics Administration Guide for the NSsp Series 7
Check Network Settings3
DNS Name Lookup
The DNS lookup tool returns the IPv4 and IPv6 IP address of a URL. If you enter an IPv4 and/or IPv6 IP
address, the tool returns the domain name for that address. If you enter a domain name, the tool returns the
DNS server used and the resolved address.
With the DNS Server radio buttons, you can select either a System or Customized DNS server. The
options change, depending on which you choose.
The IPv4/IPv6 DNS Server fields display the IP addresses of the DNS Servers configured on the firewall. If
there is no IP address (0.0.0.0 for IPv4 or :: for IPv6) in the fields, you must configure them on the Network
> DNS page.
Under Find location of this URL, enter the URL and select, IPv4, IPv6, or All and click GO.
Resolving a System DNS Server
To resolve a system DNS Server:
1. Select System for the DNS Server.
2. In the Find location of this URL field, enter either the domain name or the IP address.
SonicOSX 7 Diagnostics Administration Guide for the NSsp Series 8
DNS Name Lookup3. Select the type of IP address from the drop‐
down menu:
l IPv4 (default)
l IPv6
l All (both IPv4 and IPv6)
4. Click GO. The firewall returns the matching pair of addresses and domain names.
IMPORTANT: IMPORTANT: When specifying a domain name, do not add http or https to the name.
Resolving a Customized DNS Server
To resolve a Customized DNS Server:
1. Select Customized under DNS Server.
2. If the DNS Server IP address is not populated, enter it in the IPv4 or IPv6 field.
3. In the Find Location of this URL field, enter either the domain name or the IP address.
4. Select the type of IP address from the drop‐
down menu:
l IPv4 (default)
l IPv6
l All (both IPv4 and IPv6)
5. Click GO.
SonicOSX 7 Diagnostics Administration Guide for the NSsp Series 9
DNS Name Lookup4
Network Path
Enter an IP address to determine the network path of it. The Network Path feature finds if the IP is located
on a specific network interface, if it reached a router gateway IP address, and if it reached through an
Ethernet address.
To find network path of an IP address:
1. Under Diagnostics, click Network Path.
2. Enter the IP address of the network.
3. Click GO.
SonicOSX 7 Diagnostics Administration Guide for the NSsp Series 10
Network Path5
Ping
The Ping test sends a packet off a machine on the Internet and returns it to the sender. This test shows if the
firewall is able to contact the remote host. If users on the LAN are having problems accessing services on
the Internet, try pinging the DNS server, or another machine at the ISP location. If the test is unsuccessful,
try pinging devices outside of the ISP. If you can ping devices outside of the ISP, then the problem lies with
the ISP connection.
To ping an IP address:
1. Select Ping under Diagnostics.
2. Enter the IP address or host name of the target device.
3. In the Interface drop‐
down menu, select which WAN interface you want to test the ping from.
Selecting ANY allows the appliance to choose among all interfaces—including those not listed in the
drop‐ down menu.
4. Toggle Prefer IPv6 Networking switch if you prefer pinging to an IPv6 address.
5. Click GO.
SonicOSX 7 Diagnostics Administration Guide for the NSsp Series 11
Ping6
Trace Route
Trace Route is a diagnostic utility that assists in diagnosing and troubleshooting router connections on the
Internet. By using Internet UDP packets similar to Ping packets, Trace Route can test interconnectivity with
routers and other hosts that are spread along the network path until the connection fails or until the remote
host responds.
Trace Route tool includes a IPv6 networking option. When testing interconnectivity with routers and other
hosts, SonicOS uses the first IP address that is returned and shows the actual Trace Route address. If both
IPv4 and IPv6 addresses are returned, by default, the firewall checks the IPv4 address. If the Prefer IPv6
Networking option is enabled, the check only IPv6 address.
To troubleshoot with Trace Route:
1. Select Trace Route from Diagnostics menu.
2. Type the IP address or domain name of the destination host in the TraceRoute this host or IP
address field.
3. In the Interface drop‐ down menu, select which WAN‐ specific interface you want to test the trace
route from. Selecting ANY, the default, allows the firewall to choose among all interfaces—including
those not listed in the drop‐
down menu.
4. To TraceRoute for IPv6, select the Prefer IPv6 Networking checkbox.
5. Click GO. Depending on the route, this may take a few minutes. A popup table displays with each
hop to the destination host. By following the route, you can diagnose where the connection fails
between the firewall and its destination.
SonicOSX 7 Diagnostics Administration Guide for the NSsp Series 12
Trace Route7
Real-Time Blacklist
The Real‐
Time Blacklist feature allows you to blacklist SMTP IP addresses, RBL services, and DNS servers.
To blacklist an IP address, RBL domain, or a DNS server:
1. Click Real-Time Blacklist under Diagnostics.
2. Enter an IP address in the IP address field, a FQDN for the RBL in the RBL Domain field, or DNS
server information in the DNS Server field.
3. Click GO.
SonicOSX 7 Diagnostics Administration Guide for the NSsp Series 13
Real-Time Blacklist8
Reverse Name Lookup
The Reverse Name Lookup feature returns the DNS server name for a given IP address. The Log Resolution
DNS server 1, 2, and 3 shows the DNS servers configured for the firewall. You can manually configure the
DNS servers from Network > DNS.
To look up an IP address:
1. Click Reverse Name Lookup under Diagnostics.
2. Enter the IP address in the Reverse Lookup the IP Address field.
3. Cick GO.
SonicOSX 7 Diagnostics Administration Guide for the NSsp Series 14
Reverse Name Lookup9
Connection TopX
The Connection TopX feature lists the top 10 connections by the source and destination IP addresses.
Before you can use this tool, you must enable source IP address connection limiting and /or destination IP
address connection limiting for your appliance. If these are not enabled, the page displays a message to tell
you where you can enable them.
SonicOSX 7 Diagnostics Administration Guide for the NSsp Series 15
Connection TopX10
Geo and Botnet
The Geo and Botnet Lookup feature allows you to block connections to or from a geographic location based
on IP address and to or from Botnet command and control servers.
To troubleshoot with GEO Location and BOTNET Server Lookup:
1. Select Geo and Botnet under Diagnostics menu.
2. Type the IP address or domain name of the destination host in the Lookup IP field.
3. Click GO. The result displays underneath the Lookup IP field.
SonicOSX 7 Diagnostics Administration Guide for the NSsp Series 16
Geo and Botnet11
URL Rating Request
Content Filtering Service feature classifies websites under 64 categories based on the content. You can find
information about a website by looking up the URL in the CFS URL Rating Request feature.
To look up a URL:
1. Under Diagnostics, click CFS URL Rating Request.
2. Enter the URL in the Lookup Rating for URL field.
3. Click Submit.
SonicOSX 7 Diagnostics Administration Guide for the NSsp Series 17
URL Rating Request12
PMTU Discovery
PMTU Discovery is a diagnostic tool that uses a standardized technique for determining the maximum
transmission unit (MTU) size on the network path between two Internet Protocol (IP) hosts, usually with the
goal of avoiding IP fragmentation. PMTU Discovery works with both IPv4 and IPv6 protocols.
To troubleshoot with PMTU Discovery::
1. Under Diagnostics, select PMTU Discovery.
2. Type the IP address or domain name of the destination host in the Path MTU Discovery to this
host or IP address field.
3. In the Interface drop‐ down menu, select which WAN‐ specific interface you want to test the trace
route from. Selecting ANY, the default, allows the firewall to choose among all interfaces—including
those not listed in the drop‐
down menu.
4. Click GO.
Depending on the route, this may take a few minutes. A pop-up table displays with each hop to the
destination host. By following the route, you can diagnose where the connection fails between the
firewall and the destination.
SonicOSX 7 Diagnostics Administration Guide for the NSsp Series 18
PMTU Discovery13
Switch Diagnostics
The Switch Diagnostics page displays the port status and port counters of respective interfaces of a
switch.
To access Switch Diagnostics::
1. Navigate to Device > Diagnostics > Switch Diagnostics.
2. Select the interface from the Interface drop‐
down menu.
SonicOSX 7 Diagnostics Administration Guide for the NSsp Series 19
Switch Diagnostics14
Policy Lookup
The Policy Lookup page allows you to search for policies based on specific criteria.
The available types of policies you can search for include:
l Security Rules
l NAT Rules
l Routing Rules
l Decryption Rules
l DoS Rules
You can also click All search for and view policies from all of the categories.
To search for policies:
l Navigate to Device > Diagnostics > Policy Lookup.
l Click the tab for the policy category you want to search or click All to search all of the categories.
l Select Show all matched rules to view the results from all of the categories on the page you
selected.
l In the Policy Lookup section, select the criteria for the policies you want listed.
l Click Lookup Policy to search for policies that match the criteria you specified.
The policies that match your criteria are displayed in the Result section at the bottom of the page.
Click Reset to clear all of your selection and begin a new query.
SonicOSX 7 Diagnostics Administration Guide for the NSsp Series 20
Policy Lookup15
SonicWall Support
Technical support is available to customers who have purchased SonicWall products with a valid
maintenance contract.
The Support Portal provides self-help tools you can use to solve problems quickly and independently, 24
hours a day, 365 days a year. To access the Support Portal, go to https://www.sonicwall.com/support.
The Support Portal enables you to:
l View knowledge base articles and technical documentation
l View and participate in the Community forum discussions at
https://community.sonicwall.com/technology-and-support.
l View video tutorials
l Access https://mysonicwall.com
l Learn about SonicWall professional services
l Review SonicWall Support services and warranty information
l Register for training and certification
l Request technical support or customer service
To contact SonicWall Support, visit https://www.sonicwall.com/support/contact-support.
SonicOSX 7 Diagnostics Administration Guide for the NSsp Series 21
SonicWall SupportAbout This Document
NOTE: A NOTE icon indicates supporting information.
IMPORTANT: An IMPORTANT icon indicates supporting information.
TIP: A TIP icon indicates helpful information.
CAUTION: A CAUTION icon indicates potential damage to hardware or loss of data if
instructions are not followed.
WARNING: A WARNING icon indicates a potential for property damage, personal injury, or
death.
SonicOSX Diagnostics Administration Guide for the NSsp Series
Updated - March 2021
Software Version - 7
232-005332-30 Rev A
Copyright © 2021 SonicWall Inc. All rights reserved.
The information in this document is provided in connection with SonicWall and/or its affiliates’ products. No license, express or
implied, by estoppel or otherwise, to any intellectual property right is granted by this document or in connection with the sale of
products. EXCEPT AS SET FORTH IN THE TERMS AND CONDITIONS AS SPECIFIED IN THE LICENSE AGREEMENT FOR
THIS PRODUCT, SONICWALL AND/OR ITS AFFILIATES ASSUME NO LIABILITY WHATSOEVER AND DISCLAIMS ANY
EXPRESS, IMPLIED OR STATUTORY WARRANTY RELATING TO ITS PRODUCTS INCLUDING, BUT NOT LIMITED TO,
THE IMPLIED WARRANTY OF MERCHANTABILITY, FITNESS FOR A PARTICULAR PURPOSE, OR NON-INFRINGEMENT.
IN NO EVENT SHALL SONICWALL AND/OR ITS AFFILIATES BE LIABLE FOR ANY DIRECT, INDIRECT, CONSEQUENTIAL,
PUNITIVE, SPECIAL OR INCIDENTAL DAMAGES (INCLUDING, WITHOUT LIMITATION, DAMAGES FOR LOSS OF
PROFITS, BUSINESS INTERRUPTION OR LOSS OF INFORMATION) ARISING OUT OF THE USE OR INABILITY TO USE
THIS DOCUMENT, EVEN IF SONICWALL AND/OR ITS AFFILIATES HAVE BEEN ADVISED OF THE POSSIBILITY OF SUCH
DAMAGES. SonicWall and/or its affiliates make no representations or warranties with respect to the accuracy or completeness of
the contents of this document and reserves the right to make changes to specifications and product descriptions at any time without
notice. and/or its affiliates do not make any commitment to update the information contained in this document.
For more information, visit https://www.sonicwall.com/legal.
End User Product Agreement
To view the SonicWall End User Product Agreement, go to: https://www.sonicwall.com/legal/end-user-product-agreements/.
Open Source Code
SonicWall Inc. is able to provide a machine-readable copy of open source code with restrictive licenses such as GPL, LGPL, AGPL
when applicable per license requirements. To obtain a complete machine-readable copy, send your written requests, along with
certified check or money order in the amount of USD 25.00 payable to “SonicWall Inc.”, to:
General Public License Source Code Request
Attn: Jennifer Anderson
1033 McCarthy Blvd
Milpitas, CA 95035
SonicOSX 7 Diagnostics Administration Guide for the NSsp Series 22
SonicWall SupportYou can also read