Virtual Scanner Appliance - User Guide April 18, 2019 - Qualys, Inc.
←
→
Page content transcription
If your browser does not render page correctly, please read the page content below
Virtual Scanner Appliance
User Guide

April 18, 2019

          Verity Confidential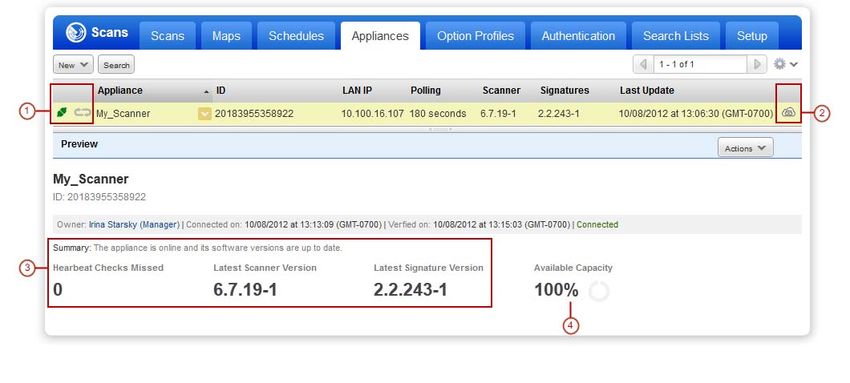
Copyright 2012-2019 by Qualys, Inc. All Rights Reserved.
Qualys and the Qualys logo are registered trademarks of Qualys, Inc. All other trademarks
are the property of their respective owners.

Qualys, Inc.
919 E Hillsdale Blvd
4th Floor
Foster City, CA 94404
1 (650) 801 6100
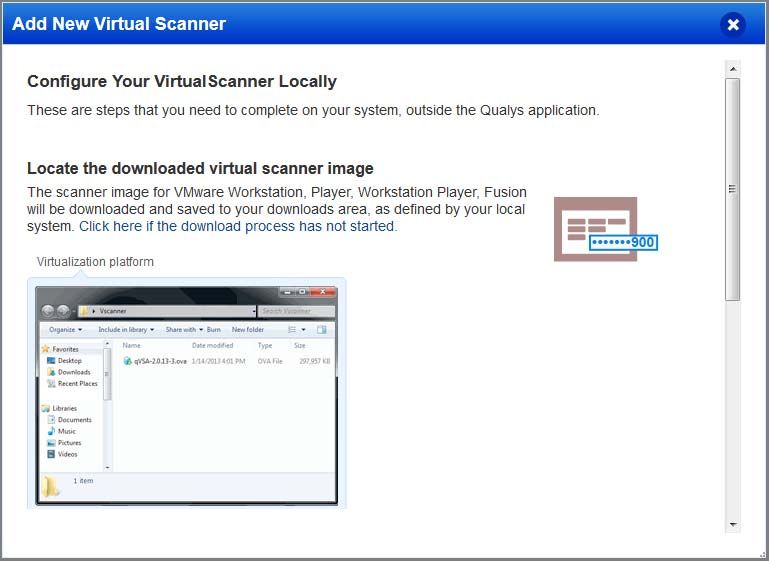
Table of Contents
About this guide............................................................................................... 3
About Qualys ........................................................................................................................... 3
Qualys Support ........................................................................................................................ 3

Get Started ........................................................................................................ 4
It’s easy to add a virtual scanner........................................................................................... 4
Add Your Virtual Scanner ...................................................................................................... 5
We recommend one more thing .......................................................................................... 10

Configuration settings ................................................................................... 11
Troubleshooting ............................................................................................. 16
Why do I see an Activation Code? .......................................................................................              16
Communications Failure message ......................................................................................                 16
Appliance Configuration Error .............................................................................................           17
Trouble connecting or seeing the wrong IP returned for your scanner? ........................                                         18

                                                                       3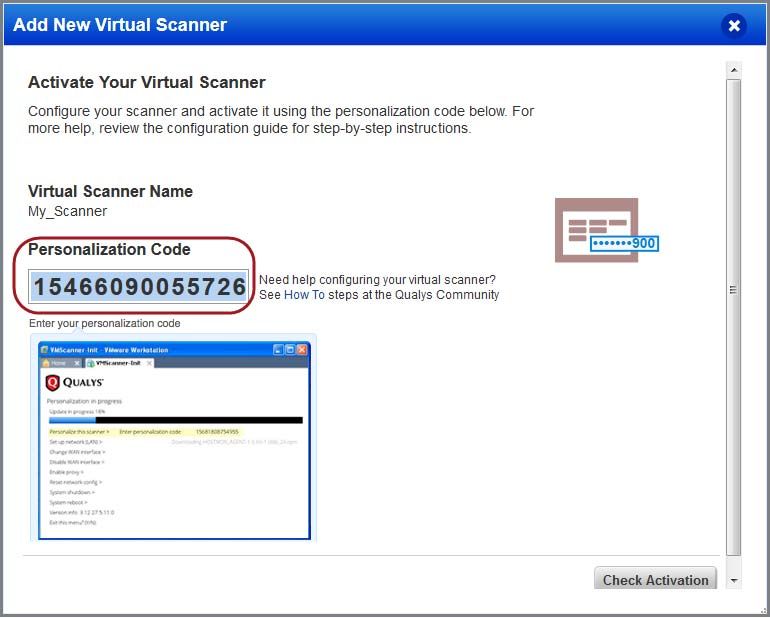
About this guide
                                                                              About Qualys

About this guide
Qualys Virtual Scanner Appliance supports the same global scanning capabilities as our
physical scanner appliance. The virtual scanner appliance is a stateless, disposable
resource which acts as an extension of the Qualys Cloud Platform and is not a separately
managed entity. This user guide describes how to get started with using a virtual scanner
with your virtualization or cloud platform.

About Qualys
Qualys, Inc. (NASDAQ: QLYS) is a pioneer and leading provider of cloud-based security and
compliance solutions. The Qualys Cloud Platform and its integrated apps help businesses
simplify security operations and lower the cost of compliance by delivering critical
security intelligence on demand and automating the full spectrum of auditing,
compliance and protection for IT systems and web applications.
Founded in 1999, Qualys has established strategic partnerships with leading managed
service providers and consulting organizations including Accenture, BT, Cognizant
Technology Solutions, Deutsche Telekom, Fujitsu, HCL, HP Enterprise, IBM, Infosys, NTT,
Optiv, SecureWorks, Tata Communications, Verizon and Wipro. The company is also a
founding member of the Cloud Security Alliance (CSA). For more information, please visit
www.qualys.com

Qualys Support
Qualys is committed to providing you with the most thorough support. Through online
documentation, telephone help, and direct email support, Qualys ensures that your
questions will be answered in the fastest time possible. We support you 7 days a week,
24 hours a day. Access support information at www.qualys.com/support/

                                            3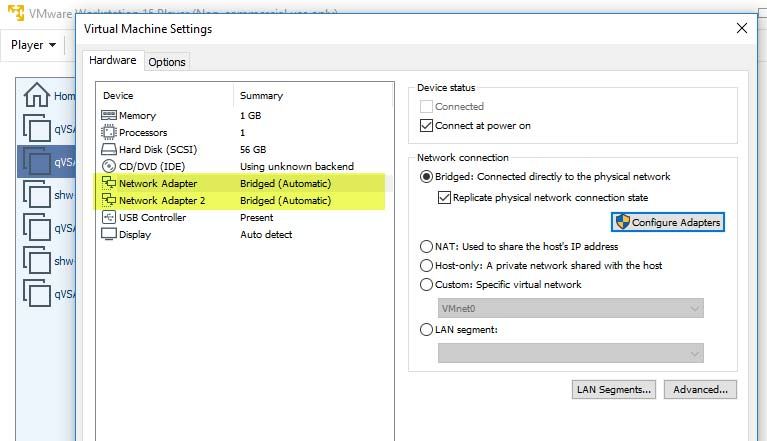
Get Started
                                                                  It’s easy to add a virtual scanner

Get Started

It’s easy to add a virtual scanner
You can add a virtual scanner to your account in just a couple minutes. Then you’ll be
ready to scan devices and web applications on your internal network.

Supported virtualization platforms
                                Qualys Virtual Scanner Appliance is packaged and qualified
                                for deployment on a variety of virtualization and cloud
                                platforms.

                                Desktop/Laptop
                                VMware Workstation, Player, Workstation Player, Fusion

                                Client/Server
                                VMware vSphere: vCenter Server, ESXi
                                Citrix XenServer
                                Microsoft Windows Server (Microsoft Hyper-V)

                                Cloud
                                Amazon EC2-Classic
                                Amazon EC2-VPC
                                Microsoft Azure Cloud Platform (ARM)
                                Google Cloud Platform
                                OpenStack
                                OCI and OCI-Classic

Want help with choosing the right platform?
No problem, just check our Community where you can find all the details about our
supported virtualization platforms, configurations and available distributions.

   From our Community
   Virtual Scanner Appliance - Platform Qualification Matrix
   Reference - Virtual Scanner Appliance

                                             4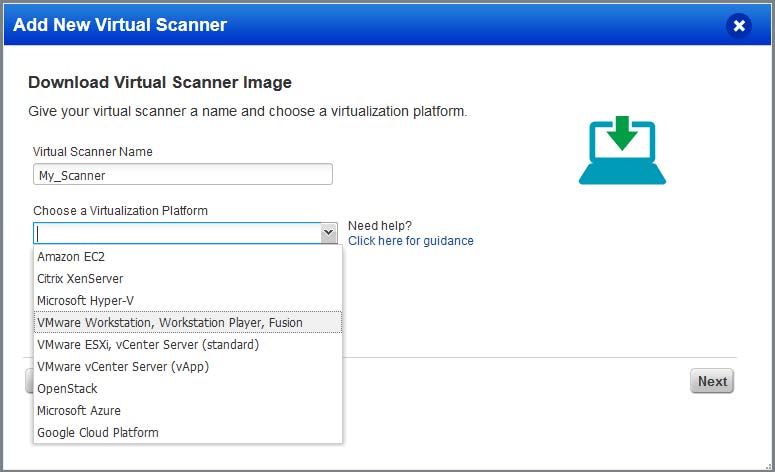
Get Started
                                                                       Add Your Virtual Scanner

About managing instances
Instance Snapshots/Cloning Not Allowed
Using a snapshot or clone of a virtual scanner instance to create a new instance is strictly
prohibited. The new instance will not function as a scanner. All configuration settings and
platform registration information will be lost. This could also lead to scans failing and
errors for the original scanner.

Moving/Exporting Instance Not Allowed
Moving or exporting a registered scanner instance from a virtualization platform (HyperV,
VMware, XenServer) in any file format to a cloud platform (AWS, Azure, GCE, OpenStack)
is strictly prohibited. This will break scanner functionality and the scanner will
permanently lose all of its settings.

What do I need?
The Virtual Scanner option must be turned on for your account. Contact Qualys Support
or your Technical Account Manager if you would like us to turn on this option for you.
You must be a Manager or a sub-user with the “Manage virtual scanner appliances”
permission. This permission may be granted to Unit Managers. Your subscription may be
configured to allow this permission to be granted to Scanners.

Add Your Virtual Scanner
Step 1 - Start the Wizard
Go to Scans > Appliances and select New > Virtual Scanner Appliance.

Click Start Wizard, and we’ll walk you through the steps.

                                             5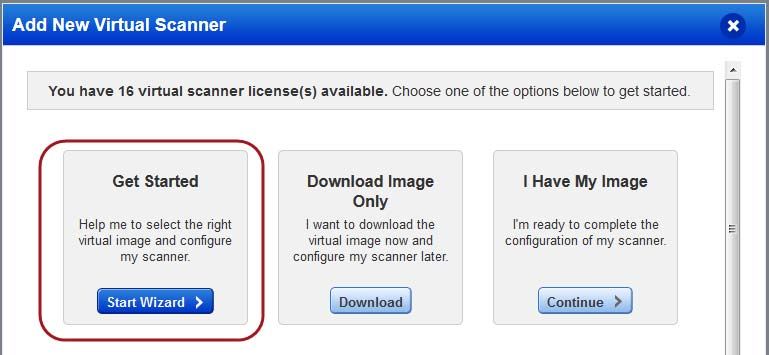
Get Started
                                                                      Add Your Virtual Scanner

Step 2 - Choose your virtualization platform
Give your scanner a name and tell us the virtualization platform you’d like to use.

If you’re a sub-user then you’ll need to pick an asset group that has been assigned to your
business unit by a Manager user. Not seeing any asset groups? Please ask a Manager to
assign an asset group (other than the All group) to your business unit.

                                             6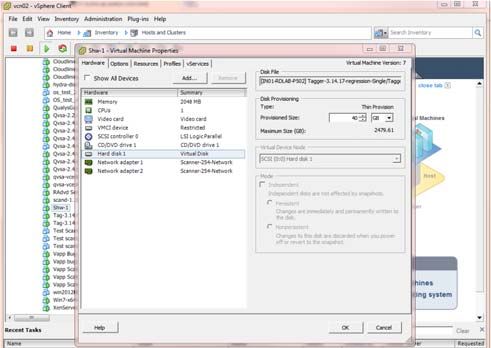
Get Started
                                                                       Add Your Virtual Scanner

Step 3 - Download the Image
This step applies to virtualization platforms with a scanner appliance image download
(i.e. for VMware, Citrix XenServer, etc). Using a cloud platform? Skip to the next step.
Locate the Virtual Scanner image on your local system.

Interested in QCOW2 format for importing into KVM? Download the OVA image file and
convert it using the qemu-img tool. Learn more

Step 4 - Get your Personalization Code
You’ll want to copy the code to a safe place (you’ll need it later).

                                               7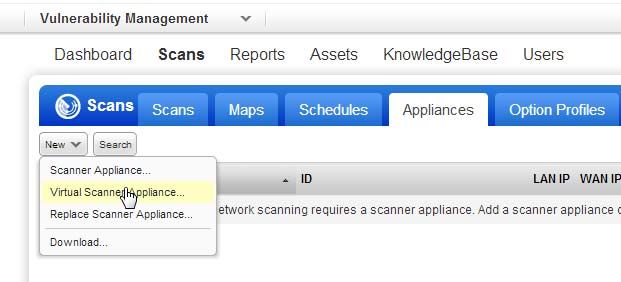
Get Started
                                                                         Add Your Virtual Scanner

Step 5 - Complete Configuration Steps for your Platform
Follow the “How to” link on the screen (next to your personalization code) to get
step-by-step instructions for your virtualization platform. The steps will differ slightly for
each platform.

Step 6 - Personalize Your Scanner
Local system or server
These steps apply when you have downloaded a scanner appliance image (i.e. for VMware,
Citrix XenServer, etc). You’ll use our Virtual Scanner Console running on your
virtualization software to complete these steps.
Good to know We’ll automatically configure your virtual scanner with DHCP. Do you
want to use a static IP instead? If yes select “Set up network (LAN)” first. Learn more

                                              Press the Right arrow to select
                                              “Personalize this scanner” and then type
                                              in your personalization code.

                                              Don’t have your personalization code? Go
                                              to Qualys and get it from the Scans >
                                              Appliances list.

                                              Once you enter the code the activation
                                              process starts and you’ll see the progress.
                                              This may take a few minutes to complete.

                                              Your virtual scanner must connect to our
                                              Cloud Security Platform in order to
                                              complete the activation and download
                                              the latest software versions.

                                              8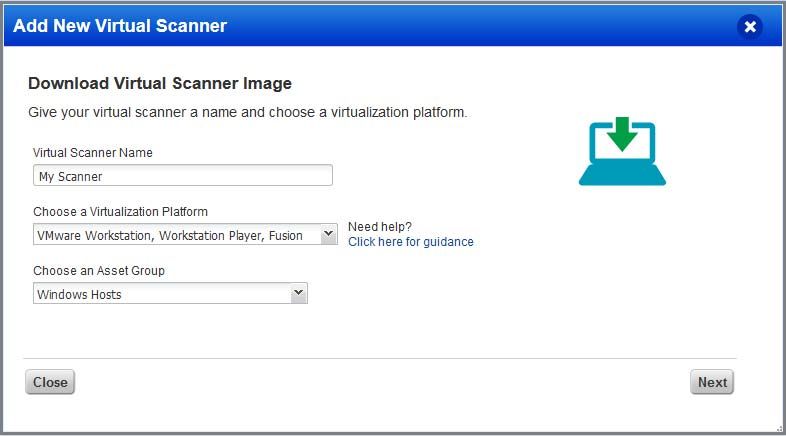
Get Started
                                                                      Add Your Virtual Scanner

                                            Upon success you’ll see this scanner’s
                                            name and IP address. That’s it! You’ve
                                            added your virtual scanner to your
                                            account.

                                            Having trouble with completing the
                                            activation? Click here

Get detailed instructions and best practices from our Community.

   Learn more
   Scanner Appliance FAQs
   Configure a virtual scanner using VMware (various products)
   Configure a virtual scanner using Microsoft Hyper-V
   Configure a virtual scanner using VMware vSphere (vCenter)
   Configure a virtual scanner using a laptop connected to the Internet
   (MiFi)

Cloud Platform
This includes Amazon EC2, Microsoft Azure, Google Cloud Platform, OpenStack, OCI and
OCI-Classic. You’ll enter your personalization code on the cloud platform, as part of the
scanner appliance instance configuration. Get detailed instructions and best practices
from our Community.

   Learn more
   Configure a virtual scanner using Amazon EC2
   Choosing the Correct Scanner AMI (Amazon Machine Image)
   Scanning in Microsoft Azure
   Virtual Appliance in Google Compute Cloud (GCE)
   Scanning in OpenStack
   Deploy virtual scanner in Oracle Cloud Infrastructure (OCI)

                                            9
Get Started
We recommend one more thing
We recommend one more thing
Check your virtual scanner status. Go to Scans > Appliances, and select your scanner and
you’ll see the preview pane.
Tip - It can take a few minutes for the Qualys user interface to get updated after you add a
new appliance. Please refresh your browser periodically to ensure that you are seeing the
most up to date details.
1- tells you your virtual scanner is ready. Now you can start internal scans! (Next to
this, you’ll see the busy icon is greyed out until you launch a scan using this scanner).
2 - This shows you it’s a virtual appliance.
3 - Latest software versions - these are installed as part of the activation.
4 - The available capacity will be 100% until you launch a scan. You can come back and
check this at any time.
10Configuration settings
Configuration settings
You might need to customize your configuration, so that your scanner can phone home to
our Cloud Security Platform - this is required for successful activation.
Network settings
There are multiple network settings that you can choose for your virtual scanner, like
static IP address, proxy server, and VLAN tag (for 802.1q trunked port). Just enter the
network settings using the Virtual Scanner Console.
Having trouble personalizing your scanner? You may need to configure network settings
first.
How to use a static IP address
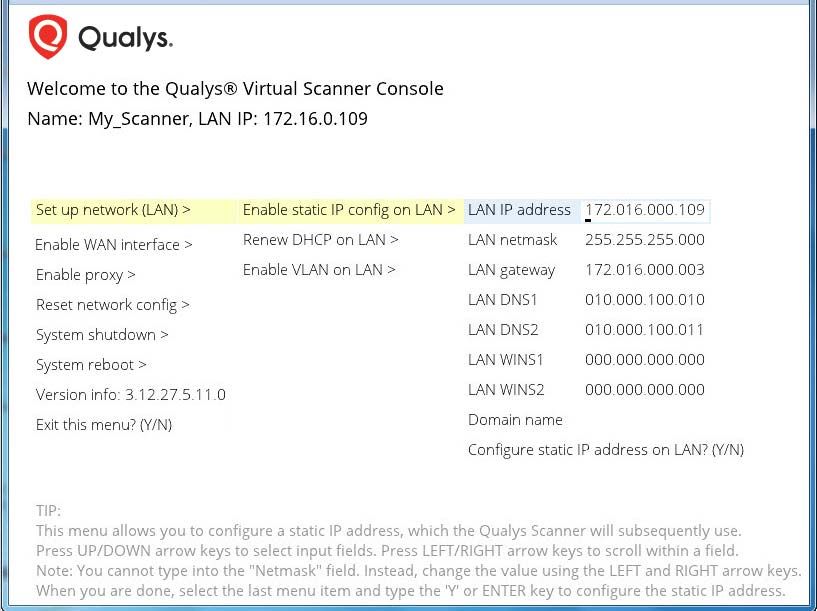
You can choose to configure your appliance with a static IP address instead of DHCP.
- using the Virtual Scanner Console go to the main menu
- select “Set up network (LAN)”
- press the Right arrow to highlight “Enable static IP config on LAN”
- press the Right arrow
- enter settings
How do I enter settings? Press the Up and Down arrows to select input fields. Press the
Right and Left arrows to scroll within a fields. When you are done, select the last item, for
example “Configure static IP address on LAN?” and type Y to confirm (or type N to cancel).
Want to configure a static IP using Amazon EC2? Click here
11Configuration settings
Enable VLAN on LAN (Native/Default VLANs)
Native VLAN interface is configured with DHCP settings by default. If you want static
VLAN settings, make sure you’ve already enabled and saved the static IP config on LAN
before continuing.
Select the “Enable VLAN on LAN” option in the Virtual Scanner Console if you have
connected the LAN interface to a 802.1q trunked port and need your virtual scanner to use
VLAN tags on the LAN default network. You’ll enter the VLAN tag number (1-4094) you
want to use.
Configure VLANs and static routes (in Qualys UI)
Configuring VLANs and static routes is supported for all virtual scanner distributions,
except cloud platforms like Amazon EC2/VPC, Microsoft Azure and Google Cloud Platform.
Log in to Qualys and go to the appliances list (Scans > Appliances) and edit the appliance
settings. Up to 4094 VLANs and static routes can be added to each virtual scanner
appliance, as long as you are using the latest distribution. You’ll have the latest virtual
scanner if you’ve deployed it using scanner image qVSA-2.0.13-1 or later. (If you have an
older version, you can add up to 99 VLANs and static routes.)
Don’t see these settings? The VLAN trunking feature must be turned on for your account.
Please contact Support or your Technical Account Representative if you’d like us to turn it
on for you.
Proxy configuration
The Scanner includes Proxy support with or without authentication - Basic or NTLM. The
Proxy server must be assigned a static IP address and must allow transparent SSL
tunneling. Proxy-level termination (as implemented in SSL bridging, for example) is not
supported. The Scanner does not support Proxy servers in networking environments
where the Proxy server IP address is dynamically assigned. SOCKS proxies are not
supported.
What are the steps? Access the Virtual Scanner Console. Navigate to “Enable proxy”, press
the Right arrow and enter proxy settings. You can enter either the IPv4 address or the
FQDN for the proxy server. Not seeing the FQDN option? Be sure you have the latest
scanner software version.
12Configuration settings
Split Network configuration
By default the Scanner LAN interface services all traffic to the Qualys Cloud Platform,
including management traffic (software updates, health check, scan data upload) and
scanning traffic.
You have the option to configure a split network configuration for your Scanner by
configuring the WAN interface using the Virtual Scanner Console. This enables support for
networks that do not have direct Internet access. Split network configuration also keeps
scanned data and internal targets secure by isolating internal LAN traffic from Internet
traffic by using the WAN interface.
Once configured, management traffic will be routed through the WAN interface and
scanning traffic will be routed through the LAN interface. No internal traffic will be routed
or bridged to the WAN interface, and no management traffic will be routed or bridged to
the LAN interface.
Please review these tips and best practices before you configure split network
configuration.
• Check to be sure that network connection to both the LAN and WAN interfaces on
the Virtual Scanner have been set up properly.
• The Virtual Scanner must be configured with DHCP or a static IP address on the
LAN interface first.
• Do not configure the LAN and WAN interfaces on the same subnet. This type of
configuration is not supported.
13Configuration settings
What are the steps? Access the Virtual Scanner Console. Navigate to “Enable WAN
interface”, press the Right arrow and provide the required settings. All software updates
and health checks are routed through the WAN interface and scanning traffic is routed
through the LAN interface.
14Configuration settings
Resize the Disk
You can increase the disk size for your scanner appliance instance at any time, as often as
needed. Stop the instance, find the Hard Disk/Storage option in your Virtual Machine
settings and increase the size of the disk (reducing the size is not supported). Save your
settings and start up your scanner. Your scanner instance should come up with the new
disk size.
Here’s an example from the VMware ESXi/vCenter platform.
Convert image to another format
Scanner image disks are available in VMDK and VHD formats. You can convert these into
any format supported by the qemu-img tool, for example convert VMDK or VHD to
QCOW2 or RAW. The following command provides a list of supported formats:
qemu-img -h
The steps below describe how to convert an OVA file (with VMDK disk format) to QCOW2
and import it into the KVM hypervisor as a Linux/RedHat Enterprise virtual machine.
1) On a Linux system install the qemu-img tool.
2) Download the Standard image in OVA format from Qualys (e.g. qVSA.i386-2.2.27-1.ova).
3) Extract the .vmdk disk image file from OVA as follows:
#] tar xvf qVSA.i386-2.2.27-1.ova
This will extract a qVSA.i386-2.2.27-1-disk1.vmdk file in the same location.
4) Convert the .vmdk disk image to .qcow2 format as follows:
#] qemu-img convert -f vmdk -O qcow2 qVSA.i386-2.2.27-1-disk1.vmdk
qVSA.i386-2.2.27-1-disk1.qcow2
5) Import qVSA.i386-2.2.27-1-disk1.qcow2 into KVM as a Linux/RedHat Enterprise virtual
machine.
15Troubleshooting
Why do I see an Activation Code?
Troubleshooting
Why do I see an Activation Code?
The Scanner Console displays ACTIVATION CODE in some cases:
- You powered on the Scanner before entering the Activation Code using the Qualys portal
UI.
- You entered the wrong Activation Code using the Qualys portal UI, i.e. the Scanner has
another activation code.
- You entered the Activation Code following the activation steps but used the wrong
Qualys Cloud Platform, e.g. the Scanner is licensed for US Platform 1 instead of US
Platform 2.
Communications Failure message
The COMMUNICATION FAILURE message appears if there is a network breakdown
between the scanner and the Qualys Cloud Platform.
The communication failure may be due to one of these reasons: the local network goes
down, Internet connectivity is lost for some reason, or any of the network devices between
the scanner and the Qualys Cloud Platform goes down.
Note the sequence of events following a network breakdown:
- If there are no scans running on the Scanner: The next time the scanner sends a polling
request to the Qualys Cloud Platform, the polling request fails, and then the
COMMUNICATION FAILURE message appears.
- If there are scans running on the Scanner: The COMMUNICATION FAILURE message
appears after the running scans time out. In this case it is recommended you cancel any
running scans and restart them to ensure that results are accurate.
Once the network breakdown is resolved, you'll see the scanner friendly name and IP
address and you scan start new scans.
16Troubleshooting
Appliance Configuration Error
The COMMUNICATION FAILURE message remains until the next time the Scanner makes
a successful polling request to the Qualys Cloud Platform. There may be a lag time after
the network is restored and before the scanner is back online, depending on when the
next polling request is scheduled. Additional time is necessary for communications to be
processed by a Proxy server if the scanner has a Proxy configuration.
Appliance Configuration Error
An appliance configuration error indicates the Scanner attempted to connect to the
Qualys Cloud Platform and failed.
Important! The Scanner is not functional until the error is resolved.
Error listing
General
No response to HTTP request from Qualys Cloud Platform
Invalid proxy IP
Invalid proxy configuration
libcurl error=7 [Failed to connect to host]
(For complete list of libcurl error codes, refer to curl(1) manual page)
Unexpected QG HTTP/404
(where QG represents Qualys Cloud Platform)
Unexpected proxy HTTP/407 (Proxy Authentication Failure)
LAN related
LAN interface is down
No CARRIER on LAN interface
LAN has no IPv4 address
LAN has no DNS servers
LAN DNS servers can't resolve Qualys Cloud Platform URL
LAN has no default IPv4 gateway
Invalid LAN IP configuration
17Troubleshooting
Trouble connecting or seeing the wrong IP returned for your scanner?
LAN DNS servers can't resolve proxy URL
WAN related
WAN interface is down
No CARRIER on WAN interface
WAN has no IPv4 address
WAN has no DNS servers
WAN DNS servers can't resolve Qualys Cloud Platform URL
WAN has no default IPv4 gateway
Invalid WAN IP configuration
WAN DNS servers can't resolve proxy URL
Trouble connecting or seeing the wrong IP returned for your
scanner?
You may need to change the network adapter selected for the virtual scanner.
Your virtualization software should automatically create an instance of the appliance
with the correct network adapters in place. These interfaces will be Network Adapter and
Network Adapter 2. Both interfaces default to type Bridged (Automatic). This means the
network adapter will be automatically selected for you.
18Troubleshooting
Trouble connecting or seeing the wrong IP returned for your scanner?
If your virtual machine is installed on a host with multiple network adapters, then it’s
possible the wrong adapter is being chosen by the automatic setting. You may need to
change the automatically selected network adapter to one the virtual machine should be
using based on the network you want it to be in.
First determine which network adapter installed on the host is the right one for your
virtual machine. On Windows you can do this by dumping IP logs with full details to see
the network adapter name for the IP belonging to the host.
Then go to your Virtual Machine Settings to select the network adapter(s) for the host that
you want to automatically bridge. Here’s an example from VMware Player. Click the
Configure Adapters button to see the network adapters available for automatic bridging.
19You can also read