DEVELOPING MYNET USING VISUAL STUDIO AND WINDOWS AZURE - A"STEP"BY"STEP"GUIDE"
←
→
Page content transcription
If your browser does not render page correctly, please read the page content below
Developing MyNet
using Visual Studio and Windows Azure

A"step"by"step"guide"
Content&

Prerequisites ........................................................................................................................ 3!
Introduction ......................................................................................................................... 4!
  MyNet Application ....................................................................................................................... 4!
Creating a Windows Azure Database ................................................................................ 6!
Creating the Database Scheme ....................................................................................... 12!
Developing and Testing a Web Service .......................................................................... 18!
Deploying a Web Service into Windows Azure .............................................................. 29!
  Testing the Windows Azure Service Locally.............................................................................32!
  Windows Azure Service Deployment .......................................................................................36!
Developing a Web User Interface based on a Windows Azure Service........................ 39!

                                                                                                                                           2
Prerequisites
  1. Activation of the Windows Azure Code
     http://www.WindowsAzurePass.com/azureu

  2. Visual Studio 2012 Professional Edition

  3. Windows Azure SDK
     http://www.windowsazure.com/en-us/develop/downloads/

  4. Microsoft Web Platform Installer
     http://www.microsoft.com/web/downloads/platform.aspx

                                                            3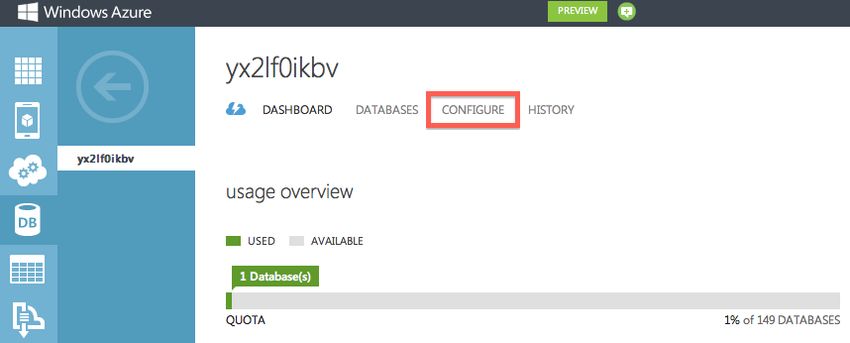
Introduction
The objective of this guide is to give you an overview of the required steps for developing
a cloud-based application using Visual Studio and Windows Azure. For this purpose the
guide describes the implementation of a basic (but functional) version of the application
MyNet in button-up fashion. Just follow the steps.

During the course you will be asked to extend the functionality of MyNet multiple times.
Consider this guide as a memento of how to accomplish a particular task.

MyNet&Application&
As shown in figure 1 MyNet is a cloud application that integrates the social networks’
information of a particular user in one place.

                                             Figure 1 MyNet application

The main components of the application are following:

   1. Data Management – in charge of data storage according to a data model (e.g., the
      relational model).
   2. Business Logic – offering set of operations for accessing and modifying the
      database through a program (e.g., functions for importing and inserting data from
      Facebook and Twitter into the DB). These operations are exported by web services.
   3. Presentation – for data visualization and operation invocation based on a HTML
      client. This layer is also responsible for managing users (e.g., login, registering).

                                                                                              4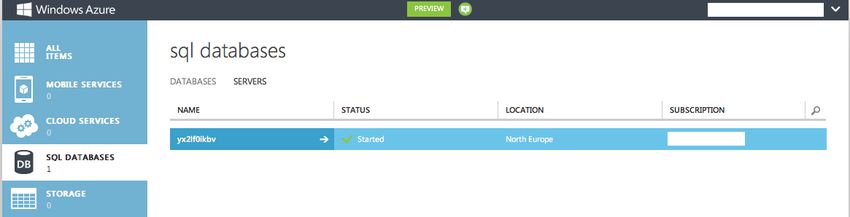
As a user you will interact with the presentation component through the Web UI using a
web browser. Nevertheless note that it is possible to interact directly with the Web
Services offered by MyNet.

                                                                                         5
Creating a Windows Azure Database
Creating a database in Windows Azure requires first the creation of a database server.
Both steps can be accomplished by using the Windows Azure Management Portal.

In the web browser:

   1. Go to http://windows.azure.com and sign in into the portal
   2. Click +NEW at the bottom of the portal

   3. Click Data Services > SQL Database > Custom Create

   4. In the creation form enter MyNetDB in the field Name. This will be the name of the
      new database.
   5. Leave the default values for the Edition, Limit Database Size, and Collation fields.
   6. Select New SQL Database Server in the Server field and verify that your form
      looks like the one shown below.

                                    Database Settings

                                                                                         6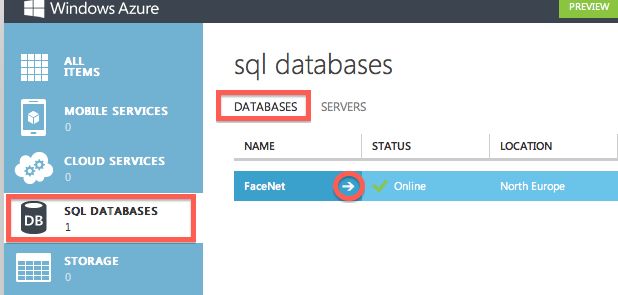
Remark

   •     SQL Database provides two database editions: the Web Edition that grows up to a
         size of 5 GB and the Business Edition that grows up to a size of 50 GB.
   •     For each SQL database created on Windows Azure, there are actually three
         replicas of that database. This is done to ensure high availability. Also, failover is
         transparent and part of the service.
   •     The Service Level Agreement provides 99.9% uptime for SQL Database.

  7. Click the arrow to go on to the next page where you will specify the settings of your
      database server.
  8. Enter an authentication login name and provide a strong password.
  9. Choose your nearest geographical location as Region.
  10. Leave selected the Allow Windows Azure Services to access the server option and
      verify that your form looks like the one shown below.

                                  Database Server Settings

Remark

   •     Region determines the geographical location of the server. Choose a location that
         is closest to you. Keeping your Windows Azure application and database in the
         same region saves you on egress bandwidth cost and data latency.
   •     Notice that you did not specify a server name. SQL Database auto-generates the
         server name to ensure there are no duplicate DNS entries. The server name is a ten-
         character alphanumeric string. You cannot change the name of your SQL
         Database server.

                                                                                              7
• The Allow Windows Azure Services to access the server option is important since it
allows the administration of the database using the Preview Management Portal.
11. Click the checkmark at the bottom of the page and wait for the creation of both
the database server and the database instance.
SQL Database Servers
12. Click SQL Databases > Servers > the arrow next to the name of your database
server for opening the Dashboard of your database server.
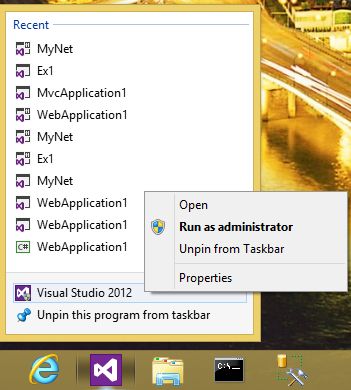
813. In the Dashboard click Configure for configuring the database server firewall.
14. Add your current IP address to the list of allowed IPs addresses and click Save at
the bottom of the page.
Remark
• If you are connecting from a network, this is the IP address that your router or
proxy server is listening on. SQL Database detects the IP address used by the
current connection so that you can create a firewall rule to accept connection
requests from this device.
9You now have a database instance and a database server accepting inbound connections
from your IP address. Now you will retrieve the necessary information for connecting to
the database.
15. In the Management Portal, click SQL Databases > Databases > the arrow next to
the MyNetDB database.
16. Click Show Connection Strings.
1017. Copy the string in the ADO.NET section. You will use it in your code for connecting
to the database.
Remark
• For security reasons the connection string does not include your password. You
will need to type it into the string before using it.
• The Fully Qualified Name is a URL includes the server address and the port.
Congratulations! Now you are ready to go.
11Creating the Database Scheme
The first step in the development of MyNet is the definition of the database scheme. This
section will show you how to connect to your database server for creating a database table.
Start by preparing Visual Studio (VS).
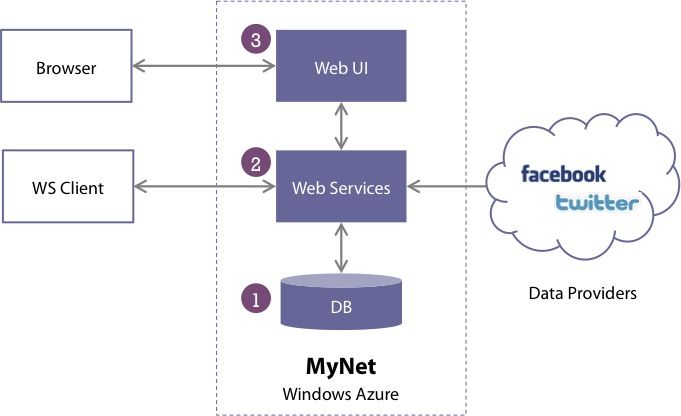
1. Run VS12 as administrator
2. Click File > New > Project
123. Click Web > .NET Framework 4 > ASP.NET Empty Web Application
4. Name the solution MyNet and the project MyNet.WebServices
5. Click OK
Remark
For the time of writing Windows Azure only supports .NET Framework 4, so be sure
that you select the right framework.
Next, in the menu of Visual Studio:
6. Click SQL > Transact-SQL Editor > New Query
137. Enter your database server information, your username and your password
8. Click Options
9. Choose Browse Server in the Connect to database list of the Connection Properties
tab
1410. Click Yes and wait a few moments
11. Select MyNetDB and click OK
12. Finally click Connect
At this point you have established a connection to your database server and all the queries
you execute in the SQL Editor will be directed to the database MyNetDB. As an example,
enter the following lines in the editor and execute them by clicking in the VS menu SQL >
Transact-SQL Editor > Execute.
CREATE SCHEMA mynet
GO
CREATE TABLE mynet.Contact (
ID INT IDENTITY (1, 1) NOT NULL,
Lastname NVARCHAR(MAX) NOT NULL,
Firstname NVARCHAR(MAX) NOT NULL,
Society VARCHAR (20) NULL,
CONSTRAINT pkContact PRIMARY KEY CLUSTERED (ID DESC)
);
GO
15As shown in the following figure, after the execution of the query your database will
contain the table mynet.Contact.
You will conclude this section by saving the previous query in a file.
In the Solution Explorer:
13. Click right button MyNet.WebServices > Add > New Folder
14. Name it DataModel
16Back in the Transact-SQL Editor:
15. Press CTRL + S for saving the query
16. Name it MyNetDB.sql and save it inside the DataModel folder.
17. Right click MyNet.WebServices project > Add > Existing item for integrating the
file into VS for future use
17Developing and Testing a Web Service
As described in the Introduction of this document, the business logic of the application
MyNet is exposed as a set of web services. For instance, the web service MyNetDbService
offers CRUD operations (Create, Read, Update, Delete) for manipulating the database
MyNetDB. This section will show you how to develop a web service in VS by implementing
a simplified version of the service MyNetDbService. The service will offer the operations
shown in the class diagram of Figure 2.
Figure 2 MyNetDbService Operations
Note that the operations offered by the service receive and return objects of type Contact.
You will start by creating the class Contact. Then you will create the service
MyNetDbService.
In the Solution Explorer:
18. Right click DataModel folder > Add > Class
1819. Name it Contact.cs
20. Click Add
This will create the file Contact.cs. The file already contains the following code:
!!!!namespace!MyNet.WebServices.DataModel!{!
!!!!!!!!public!class!Contact!{!}!
!!!!}!
Remark
Note that VS automatically constructs the namespace based on the project name
and the path to the file.
Complete the class with the following code:
!!!!public!class!Contact!{!
!!!!!!!!public!int!Id;!
!!!!!!!!public!String!Firstname;!
!!!!!!!!public!String!Lastname;!
!!!!}
19Once the type Contact defined, you can continue with the definition of the service
MyNetDbService.
In the Solution Explorer:
21. Click right button MyNet.WebServices > Add > New Item
22. Click Web > WCF Service
23. Name it MyNetDbService.svc
24. Click Add
20The previous steps will create the following files:
• IMyNetDbService.cs containing an interface defining the operations that will be
exported by the service.
• MyNetDbService.svc containing the class implementing the operations defined in
the service interface.
Open the file IMyNetDbService.cs and change the auto-generated code with the
following code:
namespace!MyNet.WebServices!{!
!
!!!!using!MyNet.WebServices.DataModel;!
!
!!!![ServiceContract]!
!!!!public!interface!IMyNetDbService!{!
!
!!!!!!!![OperationContract]!
!!!!!!!!void!addContact(!Contact!contact!);!
!
!!!!!!!![OperationContract]!
!!!!!!!!List!getContacts(!);!
!!!!}!
}!
!
The new code specifies the methods addContact and getContacts as the operations
exported by the service.
Note the use of the namespace MyNet.WebServices.DataModel. Recall that it denotes the
address of the class Contact that the compiler will use for locating it. Note also that the
interface and the methods are respectively decorated with the attributes
[ServiceContract]!and [OperationContract]. At compilation time these attributes and the
information in Web.config are used by the middleware (WCF) and the web server (IIS) for
preparing all the plumbing that will host your service instances.
Remark
Do not forget to declare the interface and the interface methods with the attributes
[ServiceContract]!and [OperationContract]. Without them the service will not
work.
Once the interface has been specified, continue implementing the service operations. For
this, open MyNetDbService.svc and complete the auto-generated code with the
following code:
using!System.Data.SqlClient;
namespace!MyNet.WebServices!{!
!
!!!!using!MyNet.WebServices.DataModel;!
!
!!!!public!class!MyNetDbService!:!IMyNetDbService!{!
!
!!!!!!!!static!String!databaseServer!=!"ENTER_YOUR_AZURE_DBVSERVER_SETTINGS_HERE";!
21!!!!!!!!static!String!databaseName!=!"!ENTER_YOUR_AZURE_DBVSERVER_SETTINGS_HERE";!
!!!!!!!!static!String!username!=!"!ENTER_YOUR_AZURE_DBVSERVER_SETTINGS_HERE";!
!!!!!!!!static!String!password!=!"!ENTER_YOUR_AZURE_DBVSERVER_SETTINGS_HERE";!
!
!!!!!!!!static!String!MyNetDbConnectionString;!
!
!!!!!!!!public!MyNetDbService(!)!{!
!
!!!!!!!!!!!!//!Create!DB!Connection!String!
!!!!!!!!!!!!var!connectionString!=!new!SqlConnectionStringBuilder!{!
!!!!!!!!!!!!!!!!DataSource!=!databaseServer,!
!!!!!!!!!!!!!!!!InitialCatalog!=!databaseName,!
!!!!!!!!!!!!!!!!Encrypt!=!true,!
!!!!!!!!!!!!!!!!TrustServerCertificate!=!false,!
!!!!!!!!!!!!!!!!UserID!=!username,!
!!!!!!!!!!!!!!!!Password!=!password!
!!!!!!!!!!!!};!
!
!!!!!!!!!!!!MyNetDbConnectionString!=!connectionString.ToString();!
!
!!!!!!!!}!//!Constructor!
!
!
!!!!!!!!///!Add!Contact!
!!!!!!!!public!void!addContact(!Contact!contact!)!{!
!
!!!!!!!!!!!!//!Connect!to!MyNetDB!
!!!!!!!!!!!!using!(!var!dbConnection!=!new!SqlConnection(!MyNetDbConnectionString!)!)!{!
!
!!!!!!!!!!!!!!!!dbConnection.Open();!
!
!!!!!!!!!!!!!!!!//!Execute!SQL!statements!
!!!!!!!!!!!!!!!!using!(!SqlCommand!sqlCommand!=!dbConnection.CreateCommand()!)!{!
!
!!!!!!!!!!!!!!!!!!!!//!Firstname!and!Lastname!may!contain!apostrophes!'!
!!!!!!!!!!!!!!!!!!!!//!They!are!replaced!with!double!apostrophes!''!before!insertion!in!DB!
!!!!!!!!!!!!!!!!!!!!var!firstname!=!contact.Firstname.Replace(!"'",!"''"!);!
!!!!!!!!!!!!!!!!!!!!var!lastname!=!contact.Lastname.Replace(!"'",!"''"!);!
!
!!!!!!!!!!!!!!!!!!!!var!sqlStatementTemplate!=!!
!!!!!!!!!!!!!!!!!!!!!!!!"INSERT!INTO!mynet.Contact!(!Firstname,!Lastname!)!VALUES!(!N'{0}',!N'{1}')";!
!!!!!!!!!!!!!!!!!!!!var!sqlStatement!=!String.Format(!sqlStatementTemplate,!firstname,!lastname!);!
!
!!!!!!!!!!!!!!!!!!!!//!Insert!Contact!in!DB!
!!!!!!!!!!!!!!!!!!!!sqlCommand.CommandText!=!sqlStatement;!
!!!!!!!!!!!!!!!!!!!!sqlCommand.ExecuteNonQuery();!
!
!!!!!!!!!!!!!!!!}!//!SqlCommand!!!!!!!!!!!!!!!!!
!
!!!!!!!!!!!!!!!!dbConnection.Close();!
!
!!!!!!!!!!!!}!//!dbConnection!
!
!!!!!!!!}!//!Method!
!
!!!!!!!!!
!!!!!!!!///!Get!All!Contacts!
!!!!!!!!public!List!getContacts(!)!{!
!
!!!!!!!!!!!!List!contacts!=!null;!
!
!!!!!!!!!!!!//!Connect!to!MyNetDB!
!!!!!!!!!!!!using!(!var!dbConnection!=!new!SqlConnection(!MyNetDbConnectionString!)!)!{!
!
!!!!!!!!!!!!!!!!dbConnection.Open();!
!
!!!!!!!!!!!!!!!!//!Execute!SQL!statements!
!!!!!!!!!!!!!!!!using!(!SqlCommand!sqlCommand!=!dbConnection.CreateCommand()!)!{!
!
!!!!!!!!!!!!!!!!!!!!//!Query:!Select!ALL!Contacts!
!!!!!!!!!!!!!!!!!!!!sqlCommand.CommandText!=!"SELECT!*!FROM!mynet.Contact";!
!!!!!!!!!!!!!!!!!!!!SqlDataReader!reader!=!sqlCommand.ExecuteReader();!
!
22!!!!!!!!!!!!!!!!!!!!//!Create!Contact!object!for!every!contact!in!MyNetDB!
!!!!!!!!!!!!!!!!!!!!contacts!=!new!List();!
!
!!!!!!!!!!!!!!!!!!!!while!(!reader.Read()!)!{!
!
!!!!!!!!!!!!!!!!!!!!!var!contact!=!new!Contact!{!
!!!!!!!!!!!!!!!!!!!!!!!!!!!!Id!=!(int)!reader["Id"],!
!!!!!!!!!!!!!!!!!!!!!!!!!!!!Firstname!=!(String)!reader["Firstname"],!
!!!!!!!!!!!!!!!!!!!!!!!!!!Lastname!=!(String)!reader["Lastname"]!
!!!!!!!!!!!!!!!!!!!!!!!};!
!
!!!!!!!!!!!!!!!!contacts.Add(!contact!);!
!
!!!!!!!!!!!!}!//!While!
!
!!!!!!!!!!!!!!!!}!//!SqlCommand!!!!!!!!!!!!!!!!!
!
!!!!!!!!!!!!!!!!dbConnection.Close();!
!
!!!!!!!!!!!!}!//!dbConnection!
!
!!!!!!!!!!!!return!contacts;!
!
!!!!!!!!}!//!Method!
!
!!!!}!//!Class!
}!!
!
The line!public!class!MyNetDbService!:!IMyNetDbService!specifies that the class
implements a service exporting the operations defined in the IMyNetDbService!interface.
These operations will use the information related to your database server for establishing a
connection with your DB in order to add contacts and retrieve the existing ones.
The rest of the code should be self-explanatory.
Remark
Do not forget to change the values of the variables containing your Windows
Azure database settings.
As stated before, the file Web.config contains information about your services in the form
of xml. You can always edit this file by hand however, for the sake of clarity, you will use
the WCF Configuration Tool for defining your service graphically.
23Press F6 to compile the project. Then in the Service Explorer:
25. Click right button Web.config > Edit WCF Configuration
p
26. Click Services > Create a New Service
27. Click Browse > bin Folder > MyNet.WebServices.dll >
MyNet.WebServices.MyNetDbService
28. Click Open > Next
29. Click HTTP > Next
30. Click Basic Web Service Interoperability > Next
31. Delete the content of Address
32. Click Next > Yes
33. Click Finish
34. Close the editor and Save the changes
24This will insert the following xml lines in the Web.config file:
!!!!!
!!!!!!!!!
!!!!!!!!!!!!!
!!!!!!!!!!!!!!!!!
!!!!!!!!!!!!!
!!!!!!!!!
!!!!!!!!!
!!!!!!!!!!!!!
!!!!!!!!!!!!!!!!!
!!!!!!!!!!!!!!!!!!!!!
!!!!!!!!!!!!!!!!!!!!!
!!!!!!!!!!!!!!!!!
!!!!!!!!!!!!!
!!!!!!!!!
!!!!!!!!!
!!!!
The more relevant information is inside the !element. The element specifies that
• The service is implemented by the class MyNetDbService
• The operations exposed by the service are those defined in the interface
IMyNetDbService.
• The URL used for locating the service is relative to the URL where you will deploy
the project
25At this point your service is ready to be tested. For this purpose you will use the WCF Test
Client developer tool that is a generic web service client available in VS. In order to use it you
need to configure your project first for launching automatically the WCF Test Client.
In the Solution Explorer:
35. Click right button MyNet.WebServices > Properties
36. Click Web > Specific Page
37. Type in MyNetDbService.svc
38. Save (CTRL + S) and close the tool
26With this last configuration done you can test your service by right clicking
MyNet.WebServices > Debug > Start new instance in the Solution Explorer.
Then follow the instructions presented in the WCT Test Client for testing the operations
exported by your service.
27Remark
When testing your web server locally the URL of the service has the following
structure
http://localhost:/.svc
28Deploying a Web Service into Windows Azure
In the previous section you developed the web service MyNetDbService. In this section
you will learn how to deploy the service (or any web service) into Windows Azure. You will
start by defining a Windows Azure Project that will contain the information used by
Windows Azure for creating and configuring the Virtual Machines (VM) that will host your
services.
In the Solution Explorer:
1. Right click MyNet Solution > Add > New Project
2. Click Cloud > Windows Azure Cloud Service
3. Name it MyNet.WindowsAzure
294. Click OK
5. Leave the list of Windows Azure Cloud Service Solutions empty and click OK
The previous steps will create a new Windows Azure Project that contains no references to a
web service. In the next step you will associate the web service MyNetDbService to your
Windows Azure project through the concept of Roles.
In the Solution Explorer:
6. Right click Roles inside the MyNet.WindowsAzure project
307. Click Add > Web Role Project in solution
8. Select MyNet.WebServices and click OK
This will produce a new role called MyNet.WebServices in your Windows Azure project.
As stated before roles contain information about the VMs hosting your service. Open the
role MyNet.WebServices and see the default configuration for your service. For instance,
note that the default configuration specifies that only one VM will be created.
Remark
For this exercise 1 instance of a VM is ok. However you can increment the number of
VMs (up to three with your subscription) in order have multiple instances of your
service. Some advantages of doing these are: fault tolerance, load balancing, SLA
etc.
Also note that, under the Endpoint section, the default Public Port assigned to your
service is 80. As you may recall this port is usually reserved to web applications like MyNet
Web UI so you have to change the default value.
Back in the open MyNet.WebServices role file:
9. Click Endpoints
10. Change Public Port to 8080
3111. Save (CTRL + S) and close the file
Testing&the&Windows&Azure&Service&Locally&
At this point your service should be ready to be tested locally. For this purpose you will use
the Windows Azure Emulator.
Remark
The Windows Azure Emulator is one of the multiple tools belonging to the
Windows Azure Tools that you installed as prerequisites.
In the Solution Explorer:
12. Right click MyNet.WindowsAzure > Debug > Start new instance
32This will launch the Windows Azure Emulator (visible in the Windows Taskbar) and will
open your default web browser pointing to the address where your service is hosted.
By default cloud projects do not launch the WCF Test Client so you will need to launch it
manually.
33In the Windows Application Menu:
13. Search for Developer Command Tools for VS 2012 using the search tool and
launch it
14. In the command tool enter wcftestclient
This will open the WCF Test Client. To using it and test your service you need to specify the
address to your service.
34In the WCF Test Client:
15. Click File > Add Service
16. Enter the address to your service e.g. http://localhost:/MyNetDbService.svc
Remark
The WCF Test Client is a handful tool for testing local and remote web services. Try
to remember these steps. You will use them during the next section.
35Windows&Azure&Service&Deployment&
The easiest way to deploy a web service into Windows Azure is using the VS tools.
In the Service Explorer:
17. Right click MyNet.WindowsAzure > Publish
18. Click Sign In To Download Credentials and follow the instructions in the browser
The previous steps will generate a file containing your Windows Azure Credentials. Save
the file in your computer since for using it in the next step.
Back in Visual Studio:
19. Import file containing your credentials to populate the subscriptions list
20. Choose a subscription and click Next
3621. In Common Settings, in Cloud Service, select Create New
22. Name it MyNetProject< ProjectID > and set your geographical location
Remark
The < ProjectID > inside the name will be assigned to you by the professor.
23. In Advanced Settings, in Storage Account, select Create New
24. Name it MyNetStorage< ProjectID > and set your geographical location
3725. Click Next
26. Click the diskette icon to save the configuration in a profile
27. Click Publish and wait a couple of minutes
Once the deployment is finished, look for the URL of your Windows Azure Service in VS.
Then use the WCT Test Client for testing your service running in the cloud (cf. the steps
presented in the previous subsection).
Remark
Note that the URL assigned to a cloud application is composed of the name of the
windows azure service (i.e. the name you specified in the Publishing wizard) and
the domain cloudapp.net. For instance,
http://mynetproject.clouddapp.net.
38Developing a Web User Interface based on a Windows Azure
Service
As you may recall from the introduction, the users of the application MyNet interact with
the web services offered by MyNet by using a Web User Interface (Web UI). For instance,
using the buttons in the Web UI a user can get all the contacts in the database. In this
section you will learn how to develop a simple Web UI in Windows Azure for the
application MyNet.
In the Solution Explorer:
1. Click right button MyNet Solution> New Project
2. Click Web > .NET Framework 4 > ASP.NET Web Forms Application
3. Name it MyNet.WebUI
4. Click OK
This will create a new web application project ready to be used. If you right click
MyNet.WebUI > View in Browser you will see the web application home page in your
default web browser.
39The content of the home page resides in the file MyNet.WebUI > Default.aspx. You will
change the content of this file in order to call the operations of the cloud service
MyNetDbService.
You will start by generating a client for your service.
In the Solution Explorer:
1. Right click MyNet.WebUI > Add Service Reference
2. Specify the Address of your service. For instance,
http://mynetprojectt####.cloudapp.net:8080/MyNetDbService.svc
3. Click GO and wait for a few seconds
404. Set Namespace to MyNetDbService
5. Click Advanced
6. In Data Type > Collection Type select System.Collection.Generic.List and click OK
7. Click OK
41The previous steps caused a lot of work to be done by VS. First, VS contacted your cloud
service for retrieving its metadata. Examples of the information contained in the metadata
are i) the name of the operations exported by the service, ii) the types of operation
parameters iii) the communication protocol used by the service. Then VS used this
metadata to automatically generate the code that will communicate with your cloud
service (i.e. the service reference). You can see the generated classes by double clicking
the reference to MyNetDbService inside the folder Service References of the project
MyNet.WebUI. Then, simple inspect the content of the namespace
MyNet.WebUI.MyNetDbService.
Once the service reference is generated, you can proceed with the development of the
web page that will contain your Web UI. For this you have to open the Default.aspx file
and replace its content with the following lines.
!
!
!
!
!!!!List!of!Contacts!!
!!!!!
!!!!!
!!!!!!!!!
!!!!!!!!!!!!!
!!!!!!!!!!!!!
!!!!!!!!!!!!!
!!!!!!!!!
!!!!!
!
!!!!!
!!!!!
!
!!!!Add!New!Contact!
42!
!!!!Firstname!!!
!!!!Lastname!!!
!!!!!
!!!
The more relevant elements in these lines are , and
.!The first one will generate a table containing the Contacts of the database
MyNetDB. The table will contain 3 columns, each column bound to an attribute of the
Contact type i.e., Id, Firstname and Lastname. The second one will create an object that will
be used for filling the table. In this case the object is an instance of
MyNetDbServiceClient and the operation to be called is getContacts() that, as you may
recall, produces a list of Contact instances. The last one will generate a button used for
adding new contacts to the database.
The previous code defines the structure of the interface but does not define its behaviour.
For defining the behaviour open the file Default.aspx.cs that resides inside Default.aspx.
Now replace the auto-generated code with the following code.
!
!!!!public!partial!class!_Default!:!Page!{!
!
!!!!!!!!protected!void!Page_Load!(!object!sender,!EventArgs!e!)!{!}!//!Method!
!
!!!!!!!!protected!void!AddContactButton_Click!(!object!sender,!EventArgs!e!)!{!
!
!!!!!!!!!!!!//!Service!client!
!!!!!!!!!!!!var!myNetDbService!=!new!MyNetDbService.MyNetDbServiceClient();!
!
!!!!!!!!!!!!//!Create!Contact!object!based!on!info!in!Text!fields!
!!!!!!!!!!!!var!contact!=!new!MyNetDbService.Contact!{!
!!!!!!!!!!!!!!!!Firstname!=!FirstnameTextBox.Text,!
!!!!!!!!!!!!!!!!Lastname!=!LastnameTextBox.Text!!
!!!!!!!!!!!!};!
!
!!!!!!!!!!!!//!Send!the!New!Contact!to!the!service!for!insertion!in!DB!
!!!!!!!!!!!!myNetDbService.addContact!(!contact!);!
!
!!!!!!!!!!!!//!Update!the!interface!
!!!!!!!!!!!!ContactsGridView.DataBind!();!
!!!!!!!!!!!!FirstnameTextBox.Text!=!"";!
!!!!!!!!!!!!LastnameTextBox.Text!=!"";!
!
!!!!!!!!}!//!Method!
!
!!!!}!//!Class!
43The code contains the behaviour of the button when clicked. Basically it creates a Contact
object with the information in the textboxs of the page and it send the contact object to
the service.
At this point you should be able to test your Web UI locally. For this right click
MyNet.WebUI > Debug > Start new instance.
After local testing, you can continue with the deployment of the Web UI on Windows
Azure. Follow the instructions of the previous section for adding a new role to the project
MyNet.WindowsAzure. The role has to be associated with the project MyNet.WebUI. Just
be sure that the port assigned to the new role is 80 before publishing into Windows Azure.
Finally use your web browser to interact with your Web UI deployed in Windows Azure.
The URL that you will have to use is similar to
http://mynetproject.cloudapp.net.
44You can also read