Click Studios Passwordstate Installation Instructions
←
→
Page content transcription
If your browser does not render page correctly, please read the page content below
Click Studios
                                            Passwordstate
                                Installation Instructions

This document and the information controlled therein is the property of Click Studios. It must not be reproduced in whole/part, or
                           otherwise disclosed, without prior consent in writing from Click Studios.
Click Studios Passwordstate Installation Instructions
Table of Contents
1 SYSTEM REQUIREMENTS - GENERAL .......................................................................................... 3
2 INTERNET INFORMATION SERVICES (IIS) REQUIREMENTS ........................................................ 4
3 PASSWORD RESETS AND REMOTE SESSION LAUNCHER REQUIREMENTS ................................ 5
4 WHAT INFORMATION IS REQUIRED FOR THE INITIAL SETUP .................................................... 6
5 SQL SERVER EXPRESS, AND SQL PORT NUMBER CONSIDERATIONS ......................................... 7
6 CREATING AN APPROPRIATE DNS RECORD................................................................................ 8
7 INSTALLING PASSWORDSTATE ................................................................................................... 9
8 CONFIGURING PASSWORDSTATE FOR FIRST TIME USE........................................................... 12
9 PASSWORDSTATE BACKUPS ..................................................................................................... 18
10 ENCRYPTING THE DATABASE CONNECTION STRING IN THE WEB.CONFIG FILE ..................... 19
11 ENCRYPTING THE APPSETTINGS SECTION WITHIN THE WEB.CONFIG FILE............................. 20
12 SSL CERTIFICATE CONSIDERATIONS.......................................................................................... 21
13 SINGLE SIGN-ON WITH ACTIVE DIRECTORY ACCOUNTS .......................................................... 23
14 CONFIGURE PASSWORDSTATE TO USE A MANAGED SERVICE ACCOUNT (MSA) TO CONNECT
TO THE DATABASE ............................................................................................................................. 25
15 X-FORWARDED-FOR SUPPORT ................................................................................................. 30
16 TROUBLESHOOTING CONNECTIVITY ISSUES ............................................................................ 31
17 MCAFEE AND CONSTANT LOGOUT ISSUES ............................................................................... 32
Page 2 of 32Click Studios Passwordstate Installation Instructions
1 System Requirements - General
Passwordstate has the following system requirements:
Web Server
Your web server which will host the Passwordstate web site can be any of the following Operating System
versions, with required components:
• Microsoft Windows Server 2008 R2 & IIS 7.5
• Microsoft Windows Server 2012 & IIS 8.0
• Microsoft Windows Server 2012 R2 & IIS 8.5
• Microsoft Windows Server 2016 & IIS 10.0
• Microsoft Windows Server 2019 & IIS 10.0
• Windows 7 & IIS 7.5
• Windows 8 & IIS 8.0
• Windows 10 & IIS 10.0
• Microsoft SQL Server 2012 Native Client
• .NET Framework 4.5
• PowerShell 4.0 or above
• Open JDK 12 or above (if using Browser based Remote Session Launcher)
Note: It is not recommended or supported to install Passwordstate on a Domain Controller.
Database Server
You will need to have one of the following supported SQL Server versions installed prior to installing
Passwordstate, so Passwordstate can connect to SQL Server and create a database. SQL Server can be
installed either on the same web server as Passwordstate, or on any other Windows Server in your
environment.
• Microsoft SQL Server 2012
• Microsoft SQL Server 2012 Express
• Microsoft SQL Server 2014
• Microsoft SQL Server 2014 Express
• Microsoft SQL Server 2016
• Microsoft SQL Server 2016 Express
• Microsoft SQL Server 2017
• Microsoft SQL Server 2017 Express
Note: If you would like to use the High Availability module of Passwordstate, your distribution and
publication databases must reside on SQL Server Standard or above – SQL Express can only act as a
subscriber to SQL Server replication.
Important: SQL Server must be configured for mixed-mode authentication, so the Passwordstate web site
can connect to SQL Server using an SQL Account. Active Directory Accounts cannot be used to
authenticate against the database.
If you are unsure of how to install SQL Server, the Passwordstate.zip file contains some instructions for
installing SQL Server 2016 Express edition.
Email Server
If you would like to receive emails generated from Passwordstate, you must also have an email server
which is capable of sending anonymous SMTP emails, or emails from an authenticated mailbox
Page 3 of 32Click Studios Passwordstate Installation Instructions
2 Internet Information Services (IIS) Requirements
When installing Internet Information Services, the following component/roles are required as a minimum.
If these IIS roles are not installed, Passwordstate will install them for you.
Common HTTP Features
• Static Content
• Default Document
• HTTP Errors
Application Development
• ASP.NET (or ASP.NET 4.5 on Server 2012 and Windows 8)
• .NET Extensibility (or .NET Extensibility 4.5 on Server 2012 and Windows 8)
• ISAPI Extensions
• ISAPI Filters
Security
• Windows Authentication
• Request Filtering
Performance
• Static Content Compression
Note: Authentication to the Passwordstate web site can be integrated with your Active Directory
domain, or you can use the Forms-Based Authentication which doesn’t rely on Active Directory at all.
During the initial install of Passwordstate, you will be asked which authentication option you would like to
use.
Page 4 of 32Click Studios Passwordstate Installation Instructions
3 Password Resets and Remote Session Launcher Requirements
Password Discovery, Reset and Validation Requirements
In Passwordstate, through the use of PowerShell scripts, you’re able to reset passwords on many different
remote systems and hosts.
Please refer to the document ‘Password Discovery Reset & Validation Requirements.pdf’ for the various
system requirements required to use this functionality.
Passwordstate Remote Session Launcher Requirements
The Passwordstate Remote Session Launcher allows you to perform RDP, SSH, Telnet, VNC or TeamViewer
remote session connections directly from the Passwordstate web site, without having to manually enter
any authentication credentials.
To use this feature, please refer to the document ‘Remote Session Launcher Installation Instructions.pdf’
for System Requirements and installation instructions.
Page 5 of 32Click Studios Passwordstate Installation Instructions
4 What Information is required for the Initial Setup
Prior to installing Passwordstate and running through the initial Setup Wizard, you will require the
following information:
Let Passwordstate Create its Own Database
• An SQL Account (not an Active Directory account) with sufficient permissions to create the
database – at a minimum the ‘dbcreator’ and ‘securityadmin’ SQL Server roles are required (The
‘sa’ account has these privileges, although some DBA’s do not like to use this account due to its
elevated privileges).
During the initial setup, the following will occur:
a. The Passwordstate database will be created and populated with some base data
b. A SQL Account called ‘passwordstate_user’ will be created, and will be given db_owner
rights to the Passwordstate database only
Create Your Own Database, and Let Passwordstate Connect to it
• You will need to have created the empty database, and an SQL Account for Passwordstate to
connect to this empty database. The SQL Account requires db_owner rights to the Passwordstate
database only
Additional Setup Information
• Your Registration Key details for Passwordstate
• Host Name and Port Number of an email server capable of sending anonymous SMTP mail, or
from an authenticated mailbox
• SMTP Address from which Passwordstate will send the emails from
• Proxy Server Details – Passwordstate can periodically check for the updates, and if your
organization requires all internet access to go through a proxy server, you will need to specify the
proxy host name and port number during the installation (this feature can also be disabled once
you’re using Passwordstate if required).
Page 6 of 32Click Studios Passwordstate Installation Instructions
5 SQL Server Express, and SQL Port Number Considerations
If you intend to use SQL Server Express to host your Passwordstate database, please consider the following
before installing Passwordstate:
1. If you're using SQL Server Express on a different server to where you installed Passwordstate, you may
need to check if the TCP/IP Protocol is enabled (use SQL Server Configuration Manager -> SQL Server
Network Configuration), and also the Windows Service 'SQL Server Browser' is set to 'Automatic'
Startup Type and has been started. You will need to restart SQL Server Express after changing these
settings
2. By default, SQL Server Express installs with an ‘instance’ name of SQLExpress. When you’re configuring
Passwordstate for first time use, specifically the ‘Database Settings’ page, please ensure you have
specified the name of the instance correctly i.e. fill out both the Database Server Name and Instance
Name fields
3. If you intend to also install the High Availability instance of Passwordstate, SQL Server Express can only
be used as the Subscriber for data replication, not the Publisher or Distribution database.
If you are running SQL Server on a non-standard port number, you will need to append the port number to
the end of the Database Server Name during ‘9. Configuring Passwordstate for First Time Use’ in the
following way: ServerHostName,PortNumber i.e. sqlserver1,8484
Page 7 of 32Click Studios Passwordstate Installation Instructions
6 Creating an Appropriate DNS Record
During the installation of Passwordstate, you have the option of using a URL which has the host name of
the web server in it, or you can specify your own custom URL e.g. https://passwordstate
If you want to use your own custom URL, you will need to create a CNAME DNS entry as per the following
instructions (please do not use host files for name resolution, as they do not work with Windows
Authentication in IIS):
1. On your server hosting DNS, start ‘DNS Manager’
2. Right click on the appropriate domain, and select ‘New Alias (CNAME)’
3. As per the following screenshot, specify the name of your web server host name in the ‘Fully qualified
domain name (FQDN) for target host’ text box, then click on the ‘OK’ button
Page 8 of 32Click Studios Passwordstate Installation Instructions
7 Installing Passwordstate
To install Passwordstate, run ‘Passwordstate.exe’ and follow these instructions:
1. At the ‘Passwordstate Installation Wizard’ screen, click on the ‘Next’ button
2. At the ‘License Agreement’ screen, tick the option ‘I accept the terms in the License Agreement’,
then click on the ‘Next’ button
3. At the ‘Destination Folder’ screen, you can either accept the default path or change to a different
Page 9 of 32Click Studios Passwordstate Installation Instructions
location, then click on the ‘Next’ button
4. At the ‘Specify Web Site URL and Port Number’ screen, specify the URL you would like to use, then
click on the ‘Next’ button
Page 10 of 32Click Studios Passwordstate Installation Instructions
5. At the ‘Completing the InstallAware Wizard for Passwordstate’ screen, click on the ‘Next’ button
6. Once installed, click on the ‘Finish’ button
7. If you have a Firewall enabled on your web server, you may need to open up the port number you
specified during the install (default is 9119), so that users are able to access the web site
Page 11 of 32Click Studios Passwordstate Installation Instructions
8 Configuring Passwordstate for First Time Use
Introduction - Now that Passwordstate is installed, you can direct your browser to the URL you specified during the initial install, and follow the initial Setup
Wizard – this wizard will guide you through a series of questions for configuring Passwordstate for use.
Page 12 of 32Click Studios Passwordstate Installation Instructions
Database Settings – Create New Database - On this screen you will need to specify database settings for creating the Passwordstate database. Please use the
onscreen instructions if you have any issues connecting to the database.
Please Note: Creating the database, and populating the tables with data, could take up to a minute to complete.
Page 13 of 32Click Studios Passwordstate Installation Instructions
Database Settings – Connect to Blank Database – If you prefer to create the blank Passwordstate database yourself prior to tables being created and populated
with data, you can do so by clicking on the ‘Connect to Blank Database’ tab first.
Please Note: You must first create a blank database to connect to, and an appropriate SQL Account which has db_owner rights to this database. If connecting to a
Microsoft Azure or Amazon AWS database, please refer to their documentation for how to create the database and SQL Account.
Page 14 of 32Click Studios Passwordstate Installation Instructions
System Settings – On this screen you specify various system wide settings for Passwordstate usage. Please take note of fields with a red * as these are required
fields.
Page 15 of 32Click Studios Passwordstate Installation Instructions
Create Admin Account – On this screen you specify details for the first user account to be created in Passwordstate. This account will be granted Security
Administrator privileges, and assign all Security Administrator roles.
Page 16 of 32Click Studios Passwordstate Installation Instructions
Setup Complete – The installation is now complete and you can begin using Passwordstate. Prior to granting access, or informing users of the new version, you
may wish to review some of the system wide settings found under the ‘Administration’ area of Passwordstate.
Export Encryption Keys – It is very important you export your encryption keys for safe storage outside of Passwordstate. If you were to lose your web.config file in
a disaster, Click Studios would not be able to help you rebuild your Passwordstate environment. The split encryptions keys are stored in the web.config file, and
within the database.
Page 17 of 32Click Studios
9 Passwordstate Backups
To allow backups to work through the Passwordstate web interface, you will need to specify an account
(domain or Windows account), which has the following permissions:
• Permissions to write to the Backup path you’ve specified
• Permissions to stop and start the Passwordstate Windows Service on the web server
• Permissions to write to the Passwordstate folder.
In addition to this, you must configure the SQL Server service to use a domain or Windows account which
has permissions to also write to the Backup Path. To do this, you need to open the ‘SQL Server
Configuration Manager’ utility on your database server, click on ‘SQL Server Services’, and then specify and
account as per the next screenshot:
1. Now you can navigate to the page Administration -> Backups & Upgrades
2. Click on the ‘Backup & Upgrade Settings’ button
3. Using the Windows/Domain account mentioned above, configure the options on the screen and click
on the ‘Test Permissions’ button. If the Test Permissions is successful, you can return to the previous
screen and run a manual backup by clicking on the ‘Backup Now’ button.
Note: Further information can be found in the Security Administrator’s Manual, with instructions for
configuring backups without Administrative privileges.
Page 18 of 32Click Studios
10 Encrypting the Database Connection String in the Web.config file
Whilst it’s not entirely necessary to encrypt the database connection strings within the web.config file, it is
recommended so the SQL Account credentials used to access the Passwordstate database is encrypted and
unreadable from anyone who can read the file system on your web server.
To encrypt the database connections string, please follow these instructions:
Encrypt Connection String
• Open a command prompt and type CD C:\Windows\Microsoft.NET\Framework64\v4.0.30319
• Type the following:
o aspnet_regiis.exe -pef "connectionStrings" "c:\inetpub\passwordstate" (change the path if
you’ve installed Passwordstate to a different location)
• Then restart the Passwordstate Windows Service
Decrypt Connection String
• Open a command prompt and type CD C:\Windows\Microsoft.NET\Framework64\v4.0.30319
• Type the following:
o aspnet_regiis.exe -pdf "connectionStrings" "c:\inetpub\passwordstate" (change the path if
you’ve installed Passwordstate to a different location)
• Then restart the Passwordstate Windows Service
Note 1: If you intend to rename your server host name, or move your Passwordstate install to a different
server, you should decrypt these settings first.
Note 2: If you do not wish to use an SQL Account to connect to your database server, please refer to the
section below in this document titled ‘Configure Passwordstate to use a Managed Service Account (MSA) to
connect to the database’.
Page 19 of 32Click Studios
11 Encrypting the appSettings Section within the Web.config file
It is also not entirely necessary to encrypt the appSettings section within the web.config file, but as this
section of the file stores half of your split encryption keys, it is recommended for added security.
To encrypt the appSettings section, please follow these instructions:
Encrypt appSettings Section
• Open a command prompt and type CD C:\Windows\Microsoft.NET\Framework64\v4.0.30319
• Type the following:
o aspnet_regiis.exe -pef "appSettings" "c:\inetpub\passwordstate" (change the path if you’ve
installed Passwordstate to a different location)
• Then restart the Passwordstate Windows Service
Decrypt appSettings Section
• Open a command prompt and type CD C:\Windows\Microsoft.NET\Framework64\v4.0.30319
• Type the following:
o aspnet_regiis.exe -pdf "appSettings" "c:\inetpub\passwordstate" (change the path if you’ve
installed Passwordstate to a different location)
• Then restart the Passwordstate Windows Service
Note 1: If you intend to rename your server host name, or move your Passwordstate install to a different
server, you should decrypt these settings first.
Note 2: For peace of mind, you should always have a backup of your encryption keys if you are going to
encrypt the appSettings section of your web.config file. You can export your encryptions keys to a
password protected zip file under Administration -> Encryption Keys once you have access to your website.
Page 20 of 32Click Studios
12 SSL Certificate Considerations
The installer for Passwordstate installs a self-signed SSL certificate on your web server, and binds it to the
Passwordstate web site.
If you have your own SSL certificate installed on the web server you’d prefer to use, you can modify the
bindings for the site in IIS, and select the appropriate certificate.
If you wish to continue using the self-signed SSL certificate, then you may want to instruct your users to
“Install” the certificate on their computer, so the various Internet browsers don’t complain about the
certificate not being issued by a trusted authority.
To install the certificate, you can follow these steps:
1. Using Internet Explorer, browser to the Passwordstate web site
2. When you see the following screen, click on the ‘Continue to this website’ link
3. Now click on the ‘Certificate error’ link at the top of your screen
4. The click on ‘View Certificates’, then on the ‘Install Certificate…’ button
5. Select the ‘Local Machine’ Store Location, then click on the ‘Next’ button
6. Select ‘Place all certificates in the following store’ option, click on the ‘Browse’ button, and select
‘Trusted Root Certification Authorities’ as per the next screenshot
Page 21 of 32Click Studios
7. Now click on the ‘OK’ button, then the ‘Next’ and ‘Finish’ buttons
8. After the certificate is installed, you can close and re-open your browser to the Passwordstate web
site, and it should no longer complain about an untrusted certificate
Page 22 of 32Click Studios
13 Single Sign-On with Active Directory Accounts
If you choose the ‘Active Directory Integrated’ version of Passwordstate, it is also possible to configure
Internet Information Services to allow single sign on for authentication.
To do this, simply disable ‘Anonymous Authentication’ for the site in IIS, like in the screenshot below.
Please note that when doing this, it may cause issues authentication from Mac and Linux desktops.
If after enabling single-sign on your browser prompts you for your domain credentials, then below is the
most common cause of this.
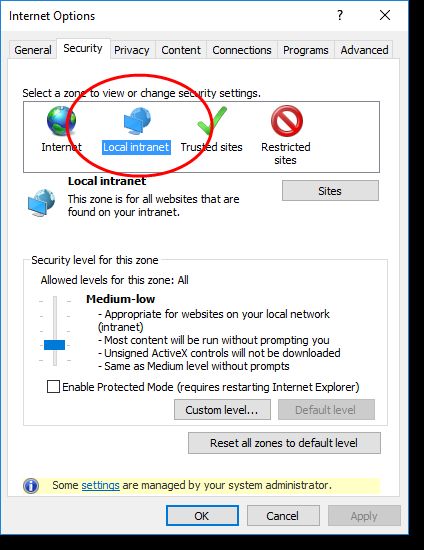
If using Internet Explorer or Chrome, check the Passwordstate web site is being detected in the 'Local
Intranet' security zone in Internet Explorer, and the option for 'User Authentication' is set to 'Automatic
logon only in Intranet zone'. You may need to add the URL of the site to a group policy which forces
Internet Explorer to detect the site is in the intranet zone. Alternatively, each user can add this manually
in Internet Explorer via the Internet Options -> Security Tab. Below is a screenshot of this setting.
Page 23 of 32Click Studios
• If using Firefox, it does this by design. To fix this, you can install a Firefox extension
called ˜Integrated Authentication for Firefox™. Now in your Firefox browser click Tools -
> Integrated Authentication Sites -> Enter in your passwordstate URL - ensure there is no backslash
on the end - eg https://passwordstate.halox.net
Page 24 of 32Click Studios
14 Configure Passwordstate to use a Managed Service Account (MSA) to
connect to the database
As of Build 7301, it is possible to configure Passwordstate to use a Managed Service Account to
communicate with the database server, instead of a SQL Login Account. Below are the following steps
required in order to configure support for this.
Note 1: If you are wanting to do Password Resets and Account Heartbeat validations across non-trusted
domains, then you cannot use a MSA account for database connectivity – the Application Pools in IIS
and the Passwordstate Windows Service executes the PowerShell scripts for these features, initiating
connections to the remote hosts. If there are no domain trusts in place, this will cause issues as the
MSA account makes the connection to the remote host.
Note 2: The Windows Integrated API cannot be used in a standard fashion when also using an MSA
account for database connectivity, due the way “impersonation” works with the Windows API. If you
are wanting to use the API in this scenario, then you need to give each user who will be executing an
API Script direct access to the Passwordstate database in SQL Server i.e. db_owner rights for the user’s
Active Directory Domain account. In general, your SQL Server also has to be installed on the same
server as your web server, due to a double-hop authentication limitation with interaction between IIS
and SQL Server.
Create a Managed Service Account (MSA)
• On your domain controller, open PowerShell console as an Admin, and execute the following
commands
o New-ADServiceAccount -Name -RestrictToSingleComputer -
AccountPassword (ConvertTo-SecureString -AsPlainText "" -Force) -Path
"cn=,dc=,dc=" (replace the variables in as appropriate)
o Add-ADComputerServiceAccount -Identity "" -ServiceAccount
" " (The Web Server Name is where the MSA Account will be used)
• On your Passwordstate Web Server, open PowerShell console as Admin, and execute the following
commands:
o Add-WindowsFeature RSAT-AD-PowerShell (this role may already be installed)
o Import-Module ActiveDirectory
o Install-ADServiceAccount -Identity
MSA Account and SQL Server
You now need to add a new Windows login within your SQL Server, and you can use the screenshots below
as a guide – in our example, the MSA account is called passmsa, and whenever referencing an MSA account
you must append the $ symbol to the end.
1. Create the MSA Login Account
Page 25 of 32Click Studios
2. Grant the MSA Account db_owner rights to the Passwordstate database
Page 26 of 32Click Studios
Configure Passwordstate IIS Application Pools
You need to open Internet Information Services Manager, and modify the “Identity” for all of the
Passwordstate Application Pools so it uses the MSA Account. When specifying the MSA Account to use, you
leave the password fields blank, as per the screenshot below.
Modify the Passwordstate web.config file
• Open the web.config file in the root of the Passwordstate folder (open as Admin with notepad or
equivalent)
• Change the line:
to read like:
• Save the file and exit notepad
Configure Passwordstate Windows Service
We now need to change the ‘Log On As’ property for the Passwordstate Windows Service to use the MSA
Account.
When doing so, you may need to select the ‘Service Accounts’ Object Type in order to find the account in
Active Directory, as per the screenshot below:
Page 27 of 32Click Studios
And also leave the password for the account blank, just like the Application Pools.
Now restart the Passwordstate Windows Service.
File System NTFS Permissions
There are certain features where images and logos need to be written and read from the file system,
requiring your MSA account to have access to do so. Please also apply Modify NTFS Permissions for the
MSA Account to the Passwordstate folder, and all nested files/folders.
Page 28 of 32Click Studios
Encrypted Web.config Settings and MSA Account
If you have encrypted either of the database connection string or AppSettings section in the web.config file,
and you are using an MSA account, you also need to apply permissions to the RSA Key Container for the
MSA Account, so the account can decrypt these settings. Below are instructions for how to do this:
• Open a command prompt as Admin and type CD
C:\Windows\Microsoft.NET\Framework64\v4.0.30319
• Type the following:
o aspnet_regiis.exe -pa "NetFrameworkConfigurationKey" "Domain\MSA-AccountName$"
(change the path if you’ve installed Passwordstate to a different location)
• The restart the Passwordstate Windows Service
Page 29 of 32Click Studios
15 X-Forwarded-For Support
When Passwordstate adds auditing data to the database, it records the IP Address of the client who initiated
an action which triggered the audit event.
As Passwordstate supports the “X-Forwarded-For (XFF) HTTP header field” for identifying the originating IP
address of a client, and if you use any form of Load Balancing or Proxy Server caching, you may need to
make configuration changes to your device/appliance. This will ensure the correct IP Address of the client is
reported, instead of the load balancer or proxy server.
You can find the configuration screen for this in Passwordstate at Administration -> System Settings ->
Proxy & Syslog Servers.
Page 30 of 32Click Studios
16 Troubleshooting Connectivity Issues
If when you first try and browse to the Passwordstate web site you get a blank page, or an error saying ‘The
page cannot be displayed because an internal server error has occurred.’, this may be caused by the order
in which you installed Internet Information Services and the .Net Framework 4.5 – if you install the .NET
Framework first, this error will occur.
Note: These instructions only apply to Microsoft Windows Server 2008 R2 and Windows 7
To resolve this, follow these instructions:
• Open a Command Prompt as an Administrator
• Type CD C:\Windows\Microsoft.NET\Framework\v4.0.30319 or
C:\Windows\Microsoft.NET\Framework64\v4.0.30319 depending on our operating system version
• Now type aspnet_regiis -i
• After ASP.NET has been re-registered, ensure the Passwordstate Application Pool in IIS is set to
'Integrated Managed Pipeline Mode', and then restart IIS (you need to open the Internet Information
Services (IIS) Manager tool to do this)
• Now open your browser and point it back to the Passwordstate web site
You may need to do this for both the 32bit and 64bit versions on the Framework directories above if you
still experience issues.
Page 31 of 32Click Studios
17 McAfee and Constant Logout Issues
McAfee’s Anti-Virus On-Demand scan can cause issues with logging users out of Passwordstate
prematurely, before the default IIS session time of 10 minutes.
The On-Demand scan process isn't blocking the accessing of any files, but when it scans either the
web.config file, or any files in the /bin folder, it can cause sessions in IIS to end.
We recommend excluding the Passwordstate folder from On-Demand scanning, as this has helped a lot of
customers.
If you are seeing the same symptoms, but are using a different Anti-Virus suite, please also exclude the
Passwordstate folder from real-time scanning to see if this helps.
Page 32 of 32You can also read