BLADE TABLE GUIDE BY SHORYUKENTOTHECHIN - PAGE 1 OF 30
←
→
Page content transcription
If your browser does not render page correctly, please read the page content below
Page 1 of 30

       Blade Table Guide
    By ShoryukenToTheChin

              6                  9

                       8

              5

                  7

1

     2

                  10
                                     12
                           11

     3    4

                                          14

                                13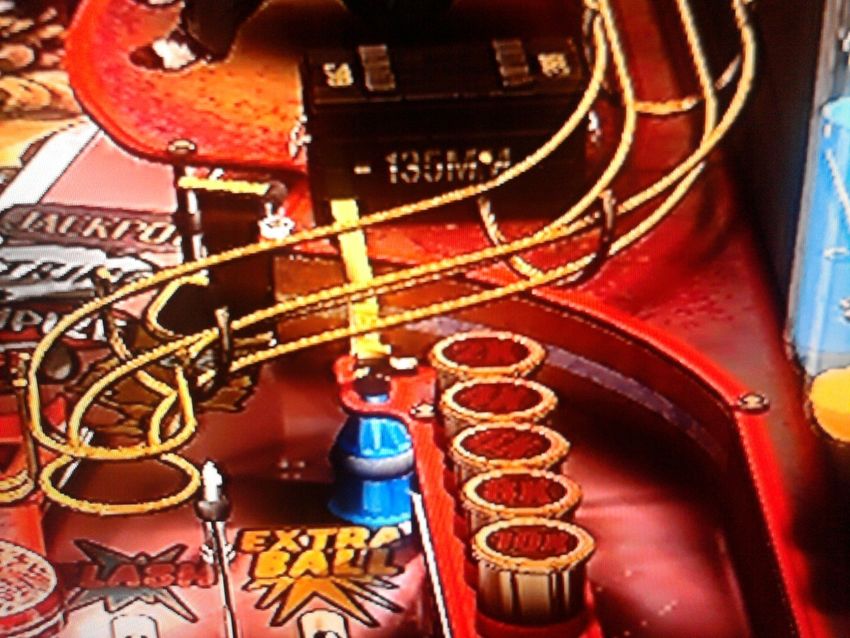
Page 2 of 30

Key to Table Overhead Image – Thanks to Cloda on the Zen Studios Forums for the Image

   1. Hidden Sink Hole
   2. Citadel Ramp
   3. Treasure Sink Holes
   4. Lair Sink Hole
   5. Multiplier Sink Holes/Targets
   6. Left Fire Orbit
   7. Shrine Sink Hole
   8. Mission Sink Hole
   9. Right Fire Orbit
   10. Left Orbit
   11. Alley Ramp
   12. Right Orbit
   13. Sewer Ramp
   14. Lock Sink Hole

In this guide when I mention a Ramp etc. I will put a number in brackets which will correspond to the above
Key, so that you know where on the table that particular feature is located.

                                      TABLE SPECIFICS

INTRODUCTION
This Table came as the first of the Marvel Pinball 4 Pack dubbed the Marvel Pinball: Core Pack; which
came with Tables such as Wolverine, Spiderman & Iron Man.

In my opinion is for me the most complex out of the Pack because it has a Day/Night Cycle which certain
features can only be accessed during specific Cycles. It’s one of the most inventive features Zen has
incorporated into a Table, thus it makes Blade very unique and a Fan favourite when it comes to Marvel
Pinball.

 Notice: This Guide is based off of the Zen Pinball 2 (PS3/Vita) version of the Table on default controls.
 Some of the controls will be different on the other versions (Pinball FX 2, Marvel Pinball, and Marvel
                 Pinball 3D, etc...), but everything else in the Guide remains the same.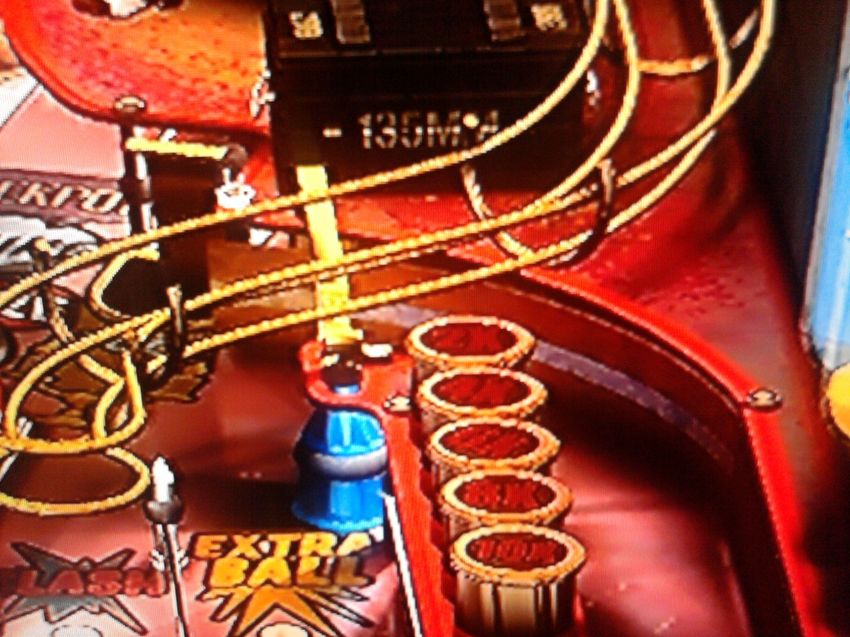
Page 3 of 30

Skill Shot -
A Skill Shot award is attained on this Table by landing the Ball into 1 of the 3 Treasure Sink Holes (3); you
need to have the Ball sink into the lit Treasure Sink Hole (3). This is done by pulling down the Plunger
(Analogue Stick on your Controller controls this) to adjust the right amount of power needed to launch the
Ball then releasing, so that the Ball has just enough momentum to go into the lit Treasure Sink Hole (3) –

                                             Top Treasure Sink Hole
                                                      (3)

                                             Middle Treasure Sink
                                                  Hole (3)

                                           Low Treasure Sink Hole
                                                    (3)

On the next page I will detail how to get the Ball to land into each of those Treasure Sink Holes (3)
successfully -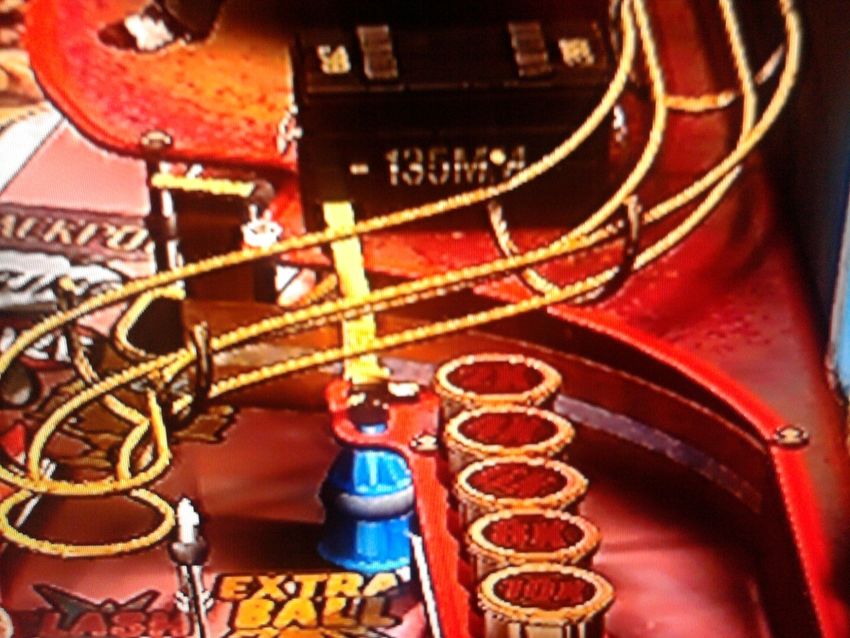
Page 4 of 30
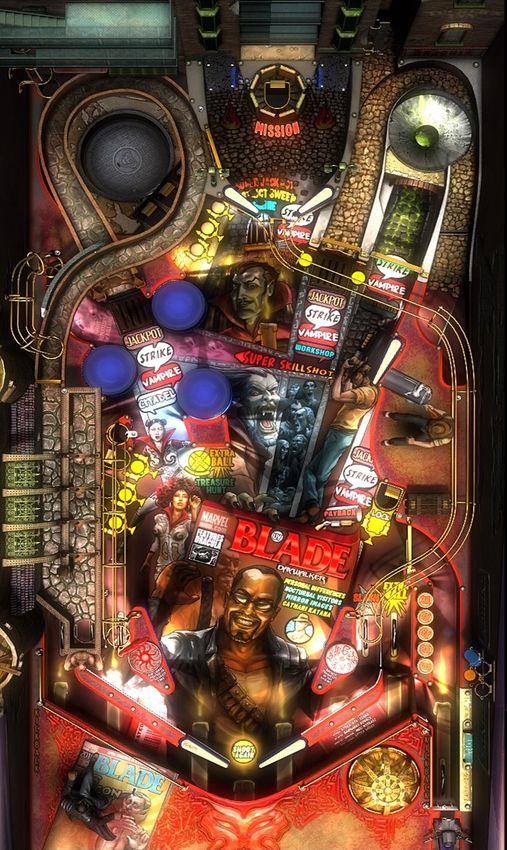
Plunger – Adjustment
Rev Gauge/Plunger – As you pull
back the Plunger (Analogue Stick
on your Controller controls this)
The Rev Gauge will increase.
Pull it down as shown in the Image
(about ¾ of the way) for all 3 Skill
Shot Treasure Sink Hole (3)
Targets.
Now the below Images will show when you should release the Plunger, note that the Diverter’s position is
paramount to getting the Ball in the correct lit Treasure Sink Hole (3) –
*Note – The Diverter will move Up & Down repeatedly without stopping*
Top Treasure Sink Hole (3) –
Launch Lane Diverter –
Release the Plunger when the
Diverter is all the way up, as
shown in the Image to the Left.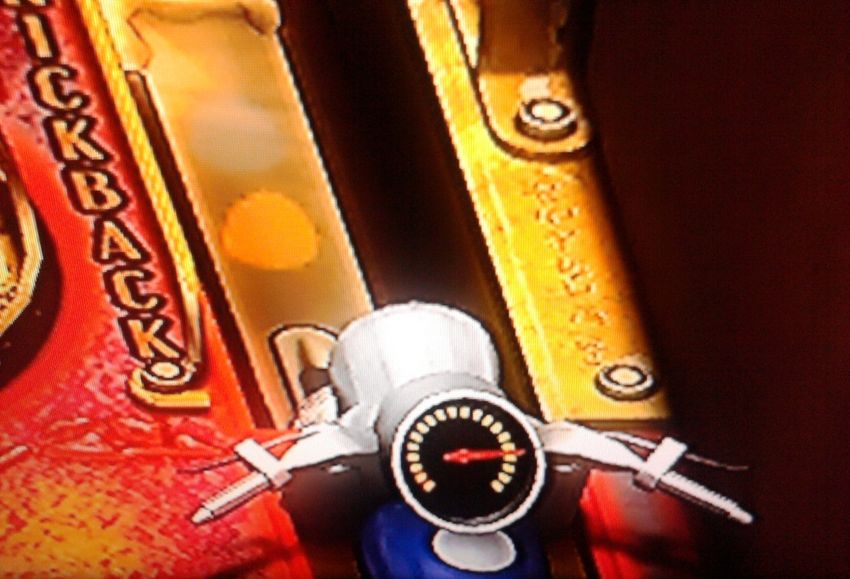
Page 5 of 30

Middle Treasure Sink Hole (3) –

                                                                             Launch Lane Diverter –
                                                                            Release the Plunger when the
                                                                            Diverter is about half way, as
                                                                           shown in the Image to the Left.

Low Treasure Sink Hole (3) –

                                                                             Launch Lane Diverter –
                                                                            Release the Plunger when the
                                                                           Diverter is all the way down, as
                                                                           shown in the Image to the Left.

Super Skill Shot -
If you manage to score a Skill Shot then you will have the opportunity to gain a Super Skill Shot; this is
done by hitting the Ball immediately up the Alley Ramp (11) then as the Ball rolls down to the Top Right
Flipper you must hit the Ball into the Hidden Sink Hole (1).

If you do that then you will score a Super Skill Shot award.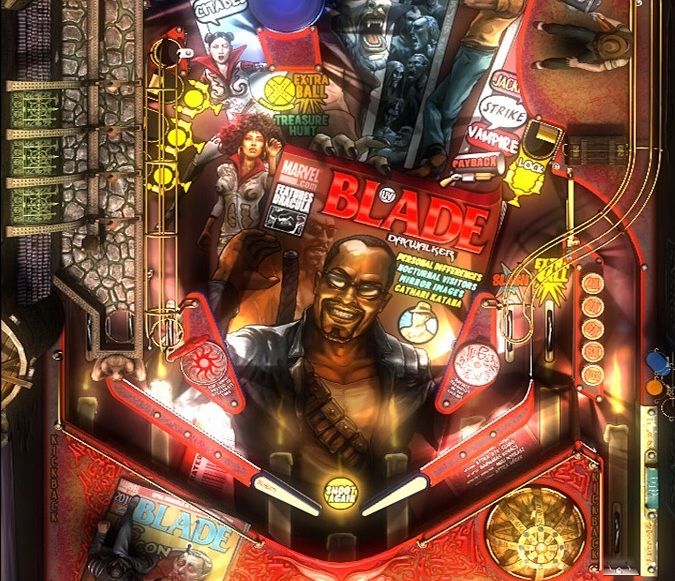
Page 6 of 30

Kick Back & Ball Save
Kickback – On this Table the Kickbacks are both activated at the same time which means Left & Right
Kickback will activate upon doing either of the below methods –

    •    Hitting the Left Orbit (10) several times.

    •    The Workshop (look later in the Guide at the section titled ‘Table Cycles – Day Cycle - Workshop’
         for information on how to access and purchase items) also has a Kickback item which you can
         acquire by buying said item Kevlar Armour.

                      *Note - This Table resets the Kickbacks earned if you lose a Ball*

Ball Save - On this Table the Ball Save is activated upon doing either of the below methods –

   •     Hitting the Ball into the Hidden Hole (1) a total of 4 times.

   •     The Workshop (look later in the Guide at the section titled ‘Table Cycles – Day Cycle - Workshop’
         for information on how to access and purchase items) also has a Ball Save item which you can
         acquire by buying said item Twin Blades.

        *Note – Ball Save remains active until you lose the Ball or the Ball Save time limit runs out!*

Extra Balls
The 4 Ways to achieve an Extra Ball – the Extra Ball is collected either at the Lair Sink Hole (4) or the
Left/Right Outlanes;

   •     Method 1: Obtaining all 8 Dark Hold Chapters during Night Cycle.; look later in the Guide at the
         section titled ‘Table Cycles - Night Cycle -DRACULA Letters – Side Missions – Darkhold
         Chapters’ for information on how to obtaining them for the Extra Ball.

   •     Method 2: Spelling out BLADE during Day Cycle; look later in the Guide at the section titled
         ‘Table Cycles – Day Cycle - BLADE Notification Lights’ for information on how to attain these
         letters for this Extra Ball.

   •     Method 3: Maxing out the multiplier (10x); look later in the Guide at the section titled ‘Raising the
         Multiplier’ for information on how to raise them for this Extra Ball.

   •     Method 4: Suck Factor; if you get a really low Score on your first 2 Balls, the Extra Ball will be lit
         on your 3rd Ball.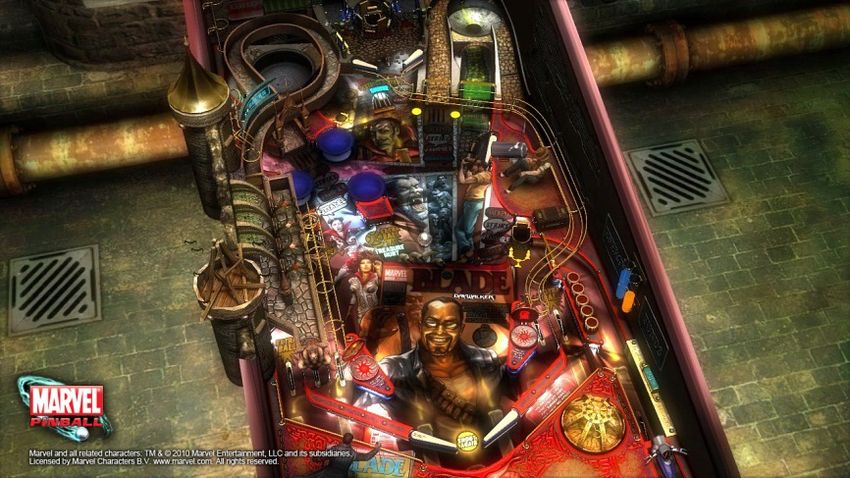
Page 7 of 30

Raising the Multiplier
Raising the Multiplier on this Table is done by hitting all 3 of the Multiplier Sink Hole/Targets (5);

Depending on the Cycle which you are on they will either be Targets or Sink Holes –

   •   Day Cycle; They will be Sink Holes - hit the Ball into 1 of the 3 Holes (this also rescues a person)
       with the Top Right Flipper. Once all 3 Sink Holes have been hit the Multiplier will advance to the
       next level.

   •   Night Cycle; They will be Targets - Hit the Alley Ramp (11) or Sewer Ramp (13) and then hit the
       Ball at the 3 Targets with the Top Right Flipper. Once all 3 Targets have been hit the Multiplier will
       advance to the next level.

You can also access the Workshop (look later in the Guide at the section titled ‘Table Cycles – Day Cycle -
Workshop’ for information on how to access and purchase items) and increase the Multiplier by buying
the Tearwood Dagger.

                        *Note – The Multiplier Level resets upon losing your Ball.*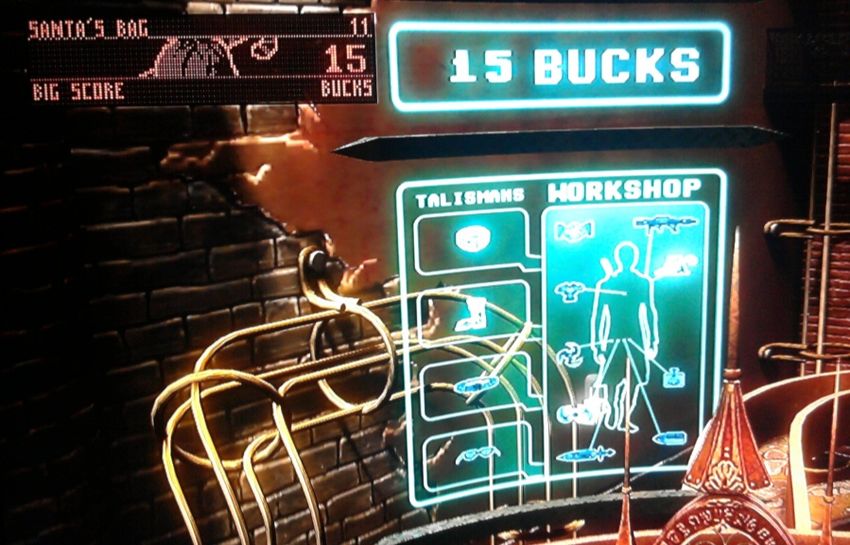
Page 8 of 30

                                          Table Cycles -
This Table contains 2 Cycles which are the Day Cycle & Night Cycle;

                                        Energy & Funding
The Day Cycle; occurs when Blades Energy (Which can be seen on the Dot Matrix) reaches 0 and if you are
in the Night Cycle it reverts to the Day Cycle –

  Energy Gauge

While in the Day Cycle your goal here is to regain your lost Energy so that you can be fully charged for the
Night Cycle; you gain back Energy by Hitting the Sink Holes etc. (especially the Shrine hole (7) - when no
Darkhold Chapter needs to be suppressed) builds up your energy.

The Night Cycle; is where you do Vampire Hunting (more information can be found ‘Table Cycles – Night
Cycle – Mini Missions’ section), tackle the Frost Main Missions & Wizard Mode (more information can be
found ‘Table Cycles – Night Cycle –Frost Main Missions or Wizard Mode’ sections), etc. The more Energy
you amassed in the Day Cycle will allow you to stay in the Night Cycle for a longer period of time.

You also gain Funds from completing various Tasks on the Table;

                                                                                       Funds Gauge

Gaining Funds is not limited to any Cycle, but the ability to spend those Funds is tied to the Day Cycle since
the Workshop is only accessible in the Day Cycle. Funds can be attained by Clearing a District (Night
Cycle) which awards $50 etc.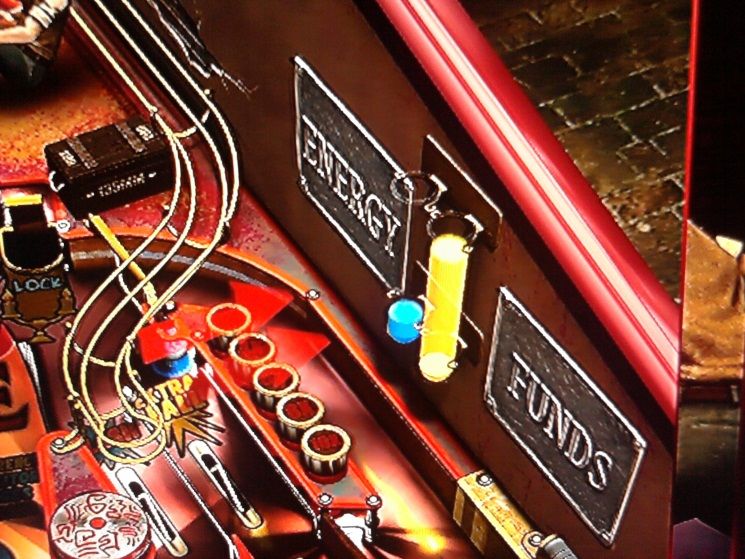
Page 9 of 30

  *Note - You can also speed up the process of alternating the 2 Table Cycles by holding the Ball with a
                            Flipper and holding down the ‘Launch’ Button*

  Chronometre –
 Controls the Table
      Cycles.

    •   Sun – Day
        Cycle

    •   Moon – Night
        Cycle

Below is how the Tables Playfield appears in each of the 2 Cycles –

The Day Cycle –

The Night Cycle –

Now some Table Mechanics/Modes can only be activated on a specific Table Cycle – Day Cycle, Night
Cycle & also Anytime (means Day or Night Cycle); I will now list when each of them can be activated –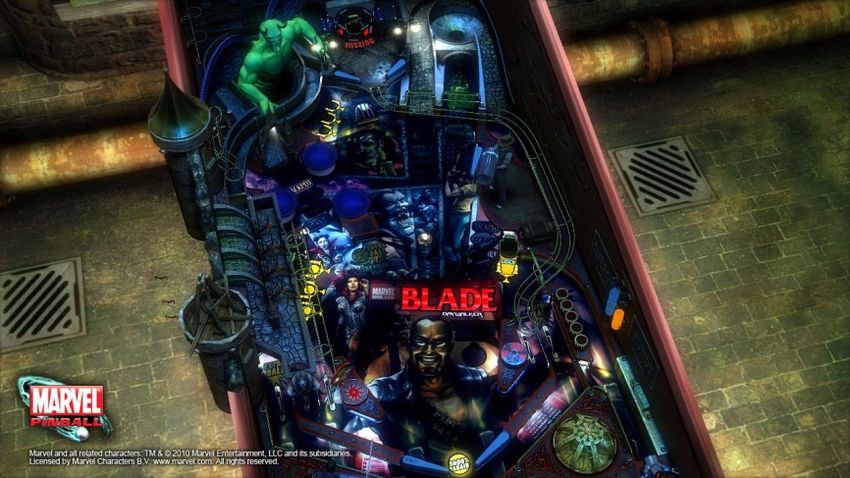
Page 10 of 30

                       Anytime! (Day or Night Cycle) –

Flame Ball Scoring Hurry Up Mode *Anytime - Day or Night Cycle*
The Flame Ball will double or triple with the Double Score Talisman (Explained later in the Guide under
‘Day Cycle – Talismans’ section) all point values for a short period of time.

    •    Day Cycle; Buy the Flame Thrower from the Workshop (look later in the Guide at the section titled
          ‘Table Cycles – Day Cycle - Workshop’ for information on how to access and purchase items).

                   *Tip - I recommend buying this before suppressing the Dark Hold Chapters.*

   •    Night Cycle; Hit the Orbits – Left Fire Orbit (6) or Right Fire Orbit (9) on the Mission Mini -
        Playfield 3 times to get the Flame Ball -

                                                    Fire Orbits

        After which the Ball will then become inflamed –

                                       Fire Ball

   *Tip - I recommend activating this just before you start the Wizard Mode (Dracula). That way all
Ramp/Orbit etc. shots for the 1st phase are worth 2 Million Points. But with the Double Scoring Talisman
  (Gate/Talisman 3 – Azu’s Belt) it will be worth 3 Million Points (Explained later in the Guide under
                            ‘Table Cycles - Day Cycle – Talismans’ section).*
Page 11 of 30
‘DRACULA’ Letters
Side Missions -
Activate Visions *Anytime - Day or Night Cycle*-
Every time you hit the Bumpers (located at the sides of the entrance to the Citadel Ramp (2)) several times
you will gain a letter of ‘VISIONS’ as you continue to hit the Bumpers you will acquire more of the letters.
When you finally spell out ‘VISIONS’ Dracula will appear at the Bumpers and begin smashing into them
for a while.
*Note - The Point value starts at 10,000 Points (per bumper hit) and the Point value increases after each
time you spell out "VISIONS". It maxes out at 100,000 Points but with the Double Scoring Talisman
(Gate/Talisman 3 – Azu’s Belt) it will max out at 200,000 and 300,000 with talisman (Look earlier in the
Guide under ‘Table Cycles – Day Cycle –Talismans’ section for more information) and Flame Ball (Look
just above this page for more information).*
Visions
After you complete this once you will be awarded with the letter ‘D’ of ‘DRACULA’.Page 12 of 30
Day Cycle Only! –
Talismans *Day Cycle Only!* -
There are 4 Talismans that can be obtained by hitting the Citadel Ramp (2) during Day Cycle. To do this
you must first hit the Right Orbit (12) to drop down the Gate that is blocking access to the Citadel Ramp (2).
Once this is done, the Gate will stay down for the rest of the game.
Hit the Ball up the Citadel Ramp (2) during the Day Cycle and you will be taken to the Citadel Mini –
Playfield.
Gate/Talisman 1 – Ogun’s Wristband
Gate/Talisman 2 – Musenda’s Boots
Gate/Talisman 3 – Azu’s Belt
Gate/Talisman 4 – Jamal’s Shades
You will see 4 Gates and 1 of them will be flashing. Getting the Ball though the flashing Gate will net you
one of the 4 Talismans. To do so you must press any of the Trigger Buttons on your Controller to activate
the Plungers which are located on the Left side of the Mini – Playfield, try to time it so that you activate the
Plunger as the Ball is in line with the Gate you want it to go through. You can switch the lit gate by hitting
the Right Orbit (12) again.
The 4 Talismans are as follows –
• Gate/Talisman 1 – Ogun’s Wristband; Adds 100 Points to all score values for the rest of the game.
• Gate/Talisman 2 – Musenda’s Boots; Gives you 4 Darkhold Chapters. This drops down 4 of the
spinning Darkhold Targets (look later in the Guide at the section titled ‘Table Cycles – Night Cycle –
Darkhold Chapters’ for more information).
• Gate/Talisman 3 – Azu’s Belt; Doubles all score values for the rest of the game.
• Gate/Talisman 4 – Jamal’s Shades; 50% off all Items in the Workshop (look later in the Guide at
the section titled ‘Table Cycles – Day Cycle - Workshop’ for information on how to access and
purchase items) for the rest of the game.Page 13 of 30
Workshop *Day Cycle Only!* -
The Workshop can only be accessed in the Day Cycle; it is accessed by hitting the 2 Targets on either side
of the Alley Ramp (11) –
Workshop Targets
Once you have done the above the Workshop will be available via the Alley Ramp (11) which will now
divert you to the Workshop once you hit the Ball up it.
Workshop Items –
• Friendly Handshake; costs $0 - awards
Points.
• Santa's Bag; costs $15 – awards Points.
• Silver Bullet; costs $25 - awards Points.
• Swirling Blade; costs $40 - Increases the
value of the spinner on the Right Orbit (12).
• Flame Thrower; costs $50 - Flaming Ball
Scoring Hurry Up Mode.
• Tearwood Dagger; costs $60 - Advance the
Multiplier to the next level.
• Garlic Essence; costs $75 – awards Points.
th
*Tip – Collecting the 4 Talisman
(Gate/Talisman 4 – Jamal’s Shades) will give you a • Kevlar Armour; costs $80 - Lights both
50% discount (Look earlier in the Guide under kickbacks.
‘Table Cycles – Day Cycle –Talismans’ section
for more information).* • Twin Blades; costs $90 - Activate Ball Save.Page 14 of 30 Treasure*Day Cycle Only!* You can collect Treasure by shoot the Lair Sink Hole (4) then hit the lit Sink Hole which will be either – • 1 of the Treasure Sink Holes (3) • 1 of the Multiplier Sink Hole/Targets (5) • Lock Sink Hole (14) You earn some Funds from doing this. Bound Captives *Day Cycle Only!* Rescue a Person; Hit the Alley Ramp (11) or Sewer Ramp (13), then hit 1 of the Multiplier Sink Hole/Targets (5). You earn some Funds from doing this.
Page 15 of 30

‘BLADE’ Notification Lights *Day Cycle Only!* -

 ‘B’ – Collect a Talisman; look
earlier in the Guide under ‘Table      ‘A’ – Rescue a Person; See
Cycles – Day Cycle – Talismans’       above this Page under ‘Bound
                                     Captives’ for more information.
              section).

                                                                         ‘E’ – Visit the Shrine; Hit the
                                                                             Shrine Sink Hole (7).

                                      ‘D’ – Buy an Item from the
 ‘L’ – Collect some Treasure;         Workshop; look earlier in the
   See above this Page under        Guide at the section titled ‘Table
‘Treasure’ for more information.    Cycles – Day Cycle - Workshop’
                                    for information on how to access
                                           and purchase items).
Page 16 of 30
Multiball Modes
There is only 1 Day Cycle Multiball Mode;
Daywalker Multiball *Day Cycle Only!* –
This Multiball Mode begins when you doing either of these 2 things in the Day Cycle –
• Perform a 5 way Combo; meaning you hit a Ramp/Orbit in quick secession of each other 5 times.
• Light the ‘BLADE’ Notification Lights; look earlier in the Guide under ‘Table Cycles – Day Cycle
– ‘BLADE’ Notification Lights’ section for information on how to do this.
During the Multiball hit the 3 of the 4 lit Ramps/Orbits and then hit the Citadel Ramp (2) to collect
the Jackpot award. Repeat this as many times as you can to amass the most Points that you possibly can.
The Multiball will continue as long as you have a minimum of 2 Balls in play, you will have to repeat the
above process again if you wish to re-enter this Multiball Mode again.Page 17 of 30
Night Cycle Only! –
Darkhold Chapters
To suppress the Darkhold Chapters you must do 2 things –
*Tip – Collecting the 2nd Talisman (Gate/Talisman 2 – Musenda’s Boots) will net you 4 of the Darkhold
Chapters (Look earlier in the Guide under ‘Table Cycles – Day Cycle Talismans’ section for more
information).*
1. Night Cycle; you must shoot the Ball up the Citadel Ramp (2) then once you are on the Mini –
Playfield you need to hit as many as the rotating Targets (8 Targets which each of them represents a
Darkhold Chapter) –
Darkhold Chapters
After you have cleared all 8 you will need to return to the Day Cycle of the Tables Playfield,
continue to Step 2….
2. Day Cycle; hit the Shrine Sink Hole (7) to suppress 1 Darkhold Chapter. Hit it 8 times to suppress all
of them.
*Tip - This is a high scoring opportunity, especially if you can complete the Wizard Mode (explained later
in the Guide under ‘Table Cycle – Night Cycle – Wizard Mode’ section). Each time you suppress a
Darkhold Chapter, the Point value increases (with the double scoring Talisman (Gate/Talisman 3 – Azu’s
Belt) it’s by 200,000 Points; look earlier in the Guide under ‘Table Cycle – Day Cycle – Talismans’ for
more information). If you complete the Wizard Mode, the Darkhold Chapters reset but not the score
values. This means the value keeps on climbing. After completing the Wizard Mode 7 times, the value was
over 10 Million Points for each suppression for me.*Page 18 of 30
Mini – Missions *Night Cycle Only!*
Payback –
Hit the Sewer Ramp (13) 3 times. The third time will start up Pay Back. In this
mode, you shoot the ball out of Hannibal's gun into the lit hole for some bonus
points.
Lone Vampires –
Hit the 2 Targets on either side of the Alley Ramp (11) entrance. Then hit the lit Vampire lane (Ramp/Orbit)
to slaughter the Vampire. The score value increases after each slaughter.
Haunted Alley –
Hit the Ally Ramp (11) 4 times; after the 4th time the ball will break the door down and go into the
Workshop Sink Hole and now you just need slaughter the Vampire. One the Ramps/Orbits will be lit. Just
hit that lit Orbit/Ramp to collect the bonus Points. The score value increase after each slaughter.
Slash -
Hit the Slingshots (Just above the Left & Right Flippers) 20 times and then hit 1 of the Inlanes to perform a
Slash Attack. The value of the Slash increases every time you preform one.Page 19 of 30 Multiball Modes There are 2 Night Cycle Multiball Modes; UV Multiball *Night Cycle Only!* - To start this Multiball Mode you must first hit all 3 Treasure Sink Holes (3) during the Night Cycle. This Multiball starts off as 2 Balls. The goal here is to plug up the Security Breaches. If you manage to plug up 5 of them will start up a 3 Ball Multiball. Now if you manage to plug up 100 Breaches you will receive a score bonus. The Multiball will continue as long as you have a minimum of 2 Balls in play, you will have to repeat the above process again if you wish to re-enter this Multiball Mode again. Hannibal Multiball *Night Cycle Only!* - To start this Multiball mode you must first hit the Lock Hole (14) 4 times during Night Cycle. The first hit activates the lock and the other 3 hits locks the 3 Balls. Once the Multiball begins; you hit one of the 3 Ramps to get the Jackpot award and hit the Shrine Sink Hole (7) to get the Super Jackpot award. The Super Jackpot increases with every Jackpot you obtain and the Jackpot increase every orbit shot you make. Once you collect the Jackpot/Super Jackpot, the score values reset. The Multiball will continue as long as you have a minimum of 2 Balls in play, you will have to repeat the above process again if you wish to re-enter this Multiball Mode again.
Page 20 of 30

                                      ‘DRACULA’ Letters
                                             Side Missions -
Clear a Lair *Night Cycle Only!* -

Hit the Lair Sink Hole (4) then hit any of the Ramps to light up the Lair Sink Hole (4). Once you have done
this revisit the Lair Sink Hole (4) and now you have to hit one of the Ramps/Orbits you are given a time
limit on this so don’t sleep on the job. After you successfully hit that the Dot Matrix will have dancers and it
will feel like you’re in a Rave (Party) –

The Lair Hurry Up Mode has now started; you then are given a time limit to hit the 5 Ramps/Orbits which
are lit/flashing. Every time one is hit successfully the time limit is refreshed and the remainder will start
moving counter-clockwise around the ramps and orbits about every 2 Seconds. Repeat the above until you
hit all 5.

Once the Lair is cleared, you are then awarded with the letter ‘R’ of ‘DRACULA’.
Page 21 of 30
District Sweep *Night Cycle Only!* -
To access this you must hit the Shrine Sink Hole (7) twice to allow access to the District Sweep Video
Mode; hit the Shrine Sink Hole (7) again to activate this mode -
Dot - Matrix; displaying the
District Sweep Video Mode.
The Dot – Matrix will display a Vampires Mug Shot (Face) then you will have a choice of 4 Faces to choose
from, the goal here is to select the Vampire out of the innocent Humans.
Cycle through the Faces using the Trigger Buttons on your Controller, and when you wish to select press the
‘Launch’ Button on your Controller.
It’s very easy to spot the Vampire so don’t worry because his Face is very different from the rest. There is a
time limit but it’s more than enough to complete this.
There are 4 Levels to this but you only need to complete the 1st level to get the letter ‘A’ of ‘DRACULA’.
Each level increases the number of Vampires you need to find by 1 (e.g. in level 4 you need to find 4
Vampires). After clearing all 4 Districts, you can get a 1 Million Point completion bonus if you hit the
Shrine Sink Hole (7) again.
To sum up the previous paragraph; after you successfully complete this once (1st Level), you are then
awarded with the letter ‘A’ of ‘DRACULA’.Page 22 of 30
Frost Main Missions*Note – These Missions can only be activated/completed
on the Night Cycle of the Table!*
There are 4 Frost Main Missions on this table; these are activated by hitting the Ball up the Citadel Ramp (2)
within the Night Cycle as the Ball will divert to the Mission Mini – Playfield, you will then have to hit the
Ball into the Mission Sink Hole (8) but you may need to hit some of the Darkhold Targets to gain access to
that Sink Hole –
Darkhold Chapters Targets
Mission Sink Hole (8)
After you hit the Mission Sink Hole (8) you then have a choice of those 4 Missions (Cycle through them
using the Flipper Controls & select using the Launch Button) also note after a set time the Mission will be
auto – selected for you.
Increasing the Mission Completion Value –
In the Night Cycle, just hit the spinner via the Right Orbit (12). This will increase the Mission completion
value. The value will max out at 5 Million Points, but with the Double Scoring Talisman - Gate/Talisman 3
– Azu’s Belt (Look earlier in the Guide under ‘Table Cycles – Day Cycle Talismans’ section for more
information) it will make it 10 Million Points.Page 23 of 30 Personal Differences Mission This is the easiest Missions in my opinion, as all you need to do is hit 3 Ramps or Orbits. Of course, when you hit one of those you need to hit another. You can’t just keep using the same Ramp/Orbit. You’re Energy slowly depletes during the Mission so you need to complete this before it is fully gone or Mission is failed. After 3 are hit the Mission is completed, you are then awarded with the letter ‘C’ of ‘DRACULA’.
Page 24 of 30

Nocturnal Visitors Mission

This Mission is a bit tricky as you need to hit the flashing Ramp/Orbit without hitting the solid lit
Ramps/Orbits. You need to hit 3 flashing Ramps/Orbits in all. You only get 3 tries to hit each flashing
Ramp/Orbit or your energy will be depleted and the mission will end.

After you complete this Mission, you are then awarded with the letter ‘U’ of ‘DRACULA’.
Page 25 of 30

Mirror Images Mission

Once this Mission begins you will be given a 2 Ball Multiball; This Mission requires the completion of 2
Phases –

   1. Hit any 3 Targets/Sink Holes such as Lair Sink Hole (4) & also any 3 Ramps/Orbits.
   2. Finally after completion of the above Phase, you will need to lock 1 of the 2 Balls into the Shrine
      Sink Hole (7).

The Mission only fails if you drain 1 of Balls, this Mission is not timed.

Once you complete the Mission, you are then awarded with the letter ‘L’ of ‘DRACULA’.
Page 26 of 30 Cathari Katana Mission This Mission requires you to – • Hit 2 Ramps - Alley Ramp (11) & Sewer Ramp (13) & 2 Orbits - Left Orbit (10) & Right Orbit (12) After you hit one of those Ramps/Orbits you are then required to hit the Citadel Ramp (2). Rinse and Repeat this for the other 2 Ramp/Orbit hits, the 4th Ramp/Orbit hit doesn’t require you to go up the Citadel Ramp (2). After you do that the Mission is completed, you are then awarded with the letter ‘A’ of ‘DRACULA’.
Page 27 of 30

             WIZARD MODE (FINAL MISSION)
Once you have collected the ‘DRACULA’ letters by completing all the Side Missions (Letters – ‘D’ ‘R’
‘A’) & Frost Main Missions (Letters – ‘C’ ‘U’ ‘L’ ‘A’) –

   •   ‘D’; Activate the Visions (look earlier in the Guide under ‘Table Cycles – Anytime –
       ‘DRACULA’ Letters – Activating Visions’ section)

   •   ‘R’; Clear a Lair (look earlier in the Guide under ‘Table Cycles – Night Cycle – ‘DRACULA’
       Letters – Side Missions – Clear a Lair’ section).

   •   ‘A’; Complete a District Sweep (look earlier in the Guide under ‘Table Cycles – Night Cycle –
       ‘DRACULA’ Letters – Side Missions – District Sweep’ section).

   •   ‘C’; Completion of Personal Differences Mission (look earlier in the Guide under ‘Table Cycles –
       Night Cycle – ‘DRACULA’ Letters – Frost Main Missions – Personal Differences Mission’ section).

   •   ‘U’; Completion of Nocturnal Visitors Mission (look earlier in the Guide under ‘Table Cycles –
       Night Cycle – ‘DRACULA’ Letters – Frost Main Missions – Nocturnal Visitors Mission’ section).

   •   ‘L’; Completion of Mirror Images Mission (look earlier in the Guide under ‘Table Cycles – Night
       Cycle – ‘DRACULA’ Letters – Frost Main Missions – Mirror Images Mission’ section).

   •   ‘A’; Completion of Cathari Katana Mission (look earlier in the Guide under ‘Table Cycles –
       Night Cycle – ‘DRACULA’ Letters – Frost Main Missions – Cathari Katana Mission’ section).

After which you are then given access to the Wizard Mode of the table.

 *Note - Don’t worry because unlike many Wizard Modes that Zen implement on their Tables, if you fail
 any part of the Phases listed below you can just reactivate the Wizard Mode by hitting the Mission Sink
         Hole (6). But it will not save where you were when you failed within the Wizard Mode.*
Page 28 of 30
DRACULA
This Wizard Mode has 4 Phases (the 4th is a Bonus Reward Multiball Mode) –
• Phase 1;
You will need to hit 15 things on the table; basically everything counts (Ramps/Orbits/Sink Holes
etc. except for the Hidden Sink Hole (1)) This is timed so hit them as fast as you can. If you don’t
finish this in time the Mission fails.
• Phase 2;
You are then tasked with hitting the Citadel Ramp (2) to gain 4 Talismans which will help you
defeat the Dracula. You achieve this by making the Ball divert to one of the 4 Gates between the
pillars on the Citadel Mini – Playfield, you will need to divert the Ball through each of those by
using a Flipper Button (Triggers on your Controller), try to time it so when the Ball is just about to
go in line with the flashing Gate you are aiming for. There is no time limit at this stage so relax, time
your Citadel Ramp (2) shots because the entrance Gate opens and closes randomly.Page 29 of 30
• Phase 3;
You are then given a 3 Ball Multiball and like Phase 1, all you need to do is make 10
Ramp/Orbit/Sink Hole shots. After the 10 shots, the Dot Matrix congratulates you for defeating
Dracula. Do note that if you are go down to only 1 Ball the Wizard Mode fails.
Phase 4 (It’s a Bonus Reward Multiball Mode);
This Phase is just a bonus 3 Ball Multiball Mode, where all of the Ramps/Orbits/Sink Holes remain lit and
the Point values are tripled from Phase 1. There is no objective here, just make as many Points as possible
(Minimum 2 or the Bonus Reward Mode ends); a Tip I would give is don’t look up at the Table just zoom
into the Flipper section and hit anything that moves.Page 30 of 30 Special Thanks to all the Zen Studios Forum Community! Members such as Cloda, shogun00, heathenSauce & YouTube Member - StOrMtRoOpErMx19 I couldn’t have completed the Guide without your help either directly or indirectly - you are all awesome!!! In closing I hope you enjoyed this Table, I certainly have and I hope by using this Guide it increases that Fun factor for you and everyone else who plays with you etc. Check out the other Tables available, they are all available to download on the Xbox Live Marketplace in Add-Ons section or download it straight from the PFX2 Platform itself. Zen Pinball 2 on PlayStation Network, Zen Pinball on the Apple AppStore, Zen Pinball 3D on Nintendo 3DS and Zen Pinball THD on Android Marketplace. Thanks for viewing my Guide, Mortals “Now go Stake Those Vampires!” Yours ShoryukenToTheChin
You can also read